
Make a Li-ion battery charging pack for your Xbox 360 controller.
A long time ago, Hack a Day did a breakdown on the rechargeable battery that you could buy for the Xbox 360 controller. There really wasn't a whole lot inside as a lot of your circuit for charging is actually in the charge cable. The only thing that was in the Xbox rechargeable battery is 2 Ni-Mh batteries rated at around 2100mAh, a thermal sensor, and a circuit board which has a little EEprom chip that simply informed the Xbox what kind of battery was installed into it.
In the spirit of the original hack posted by them. We will focus on working with replacing the battery cels in the Ni-Mh charger versus mutilating our Xbox controller. Now, for those reading this and want a super simple solution check out this blog about using just one battery and a diode. For those looking for that total conversion charger and all. Keep reading!
Proof of concept with a 18650 Li-Ion battery.
Although the original article dates way back to 2008 , a commentator from 2013 mentioned how he just crammed a 18560 Li-Po battery to the bottom of his battery, placed a Li-po/Li-ion charge circuit in the battery housing and called it a day. Which they do make single cel li-po chargers very cheaply as I pointed out in a previous blog. 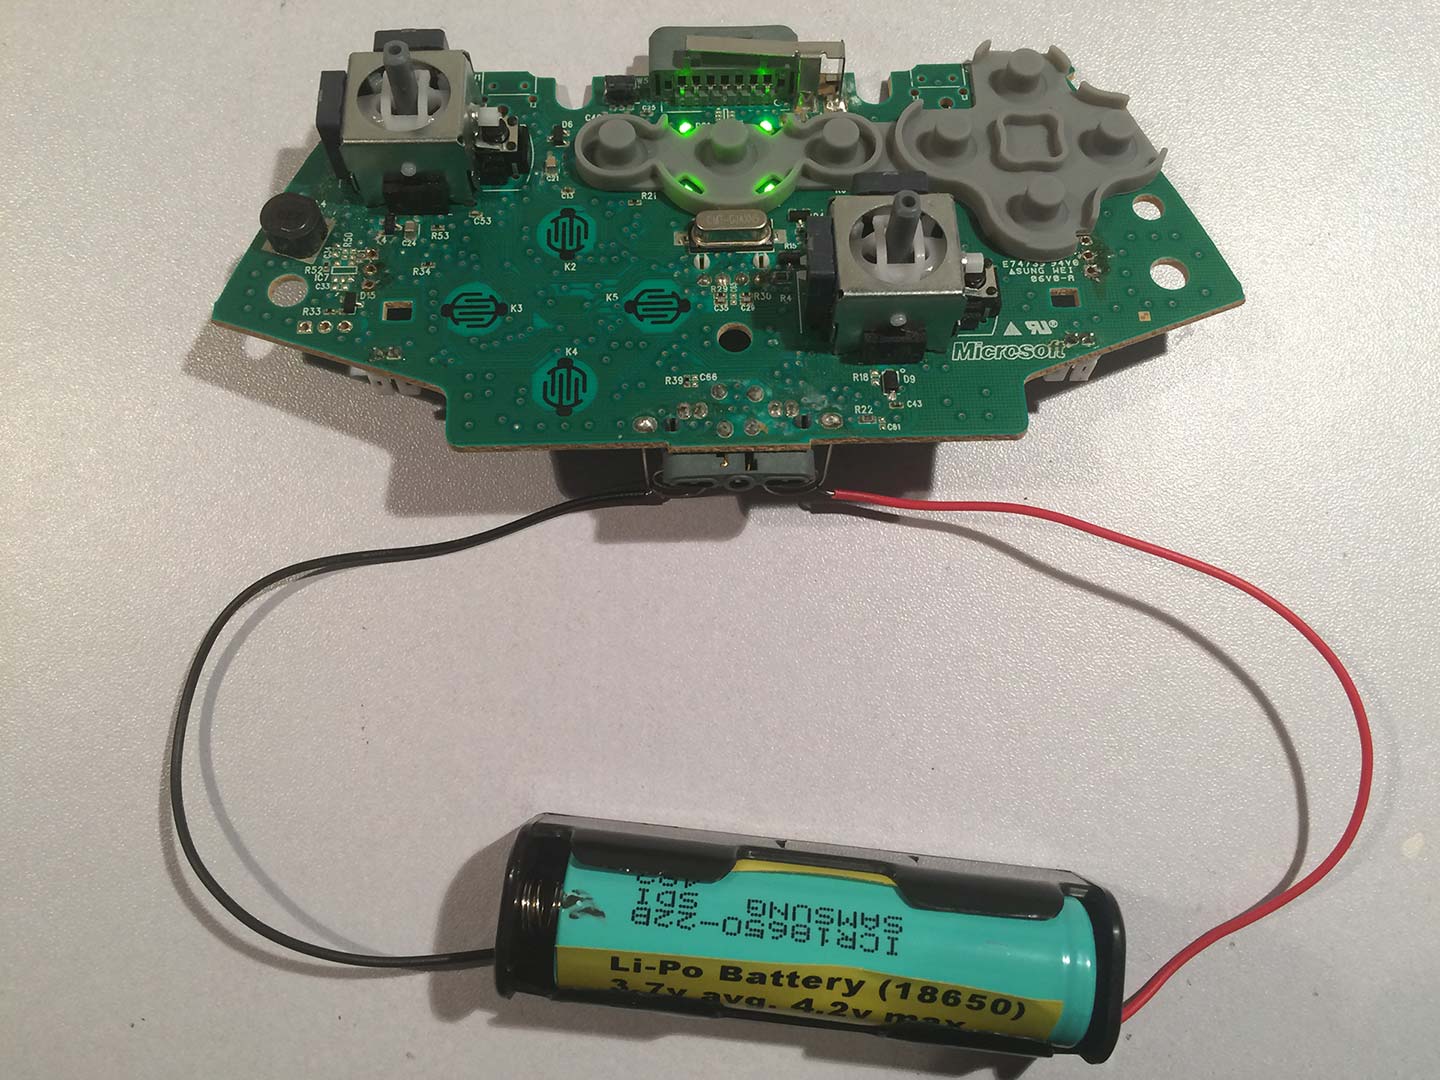 For the lulz we tried it out. There was an abundant source of lithium batteries from previous projects and was in the process of cataloging the storage of each battery. With a fully charged by battery using my IMax B6AC v2 charging station to 4.2volts and plugged it in. The controller came to life and did not blow itself apart. This is a good thing!
How is this possible?!?!?
The reason why this works is manufacturers typically has DC-DC regulator circuits inside of every battery controlled device. When you pick up alkaline batteries at the store. They're charged around 1.5 to 1.67 volts DC per cel. Totaling 3.0 to 3.4 volts DC. The regulator also serves a purpose of stabilizing power as the voltage drops until it hits 1.8 to 2.0 volts DC and shuts off your controller. Ni-Cad batteries such the stock rechargeable only go to 1.4volts per cel totaling 2.8volts DC. Since battery voltage is all over the place this is why in-line circuit regulators are handy things.
Differences in Xbox Controller circuitry.
It should be noted from another blog dealing with Xbox controllers that not all Xbox controllers provide the same power regulation circuit in them. The first generation Xbox controllers will not power on completely with a fully charged lithium 4.2v battery because the first gen launch controllers had a regulator going up to 4 volts and that is it. But anything past the initial launch date controllers had a better power regulator installed with the Xbox elite controllers having the very best regulation chip inside of them that can take a 4.2 lithium battery fully charged. If your controller has dim lights and refuses to power on, drain the lithium battery a little by leaving it plugged in and when it hits around 3.9volts DC it will kick. This problem for launch-date controllers and can be remedied by using a diode to draw the voltage downwards to an acceptable level as stated in this blog entry.
18650 battery is just too big!
The 18650 batteries are really awesome and they store a lot of power behind them (the one in use above was using had a storage level of 2200mAh and the battery tester states it has a proven storage of around 1960mAh). But a big problem with the 18650 is they are simply too big to fit into the Xbox controller and must find a unique way to glue it to the bottom of the controller. you can't even do the trick of replacing the rumble motors with batteries because the 18650's are simply too big. 18650 batteries however may still have a use in a controller if you were making something like a fighting stick or classic arcade stick that had a very large wooden base to it. Then with a under/over-voltage protection circuit installed as well, you could keep multiple 18650's inside and have enough power to keep it running for weeks at a time!
Stepping down the size with a 14500 series Li-Ion battery.
 You can change the Li-Ion type from the 18650 down to the 14500 series battery. The downside of the 14500 series Li-Ion battery is that they are not as abundant to get out of things such as old laptops. But they have roughly the same dimensions as a pair of alkaline AA batteries (we will get to the rough part in a moment). After doing a lot of looking around for a high-capacity 14500 battery. Trust-fire states that they have 900mAh of capacity is really too good to be true. The average on a 14500 cell is anywhere from 700mAh to 850mAh. So I tested out these batteries after fully charging them up. We were able to pick up a pack of 4 batteries for around $10(USD) with free shipping from a US seller out of California. The up-side of purchasing a 14500 battery like this is since it has its own circuit under/over voltage protection that means one less thing to be installed into the cramped spaces of the Xbox battery holder (you'll see when we get to that section)
Special notes about fake batteries.
Always try to go through a local dealer within your country as it would be easier to get your money back if the product is bad. If you go direct from China you are rolling the dice with getting a potentially bad product as there's no quality control when it comes to the vendors in China. You can check the blog article of SkyWolfEye 14550 batteries as just one example of a battery manufacturer outright lying about their specifications.
Optional step: Battery testing.
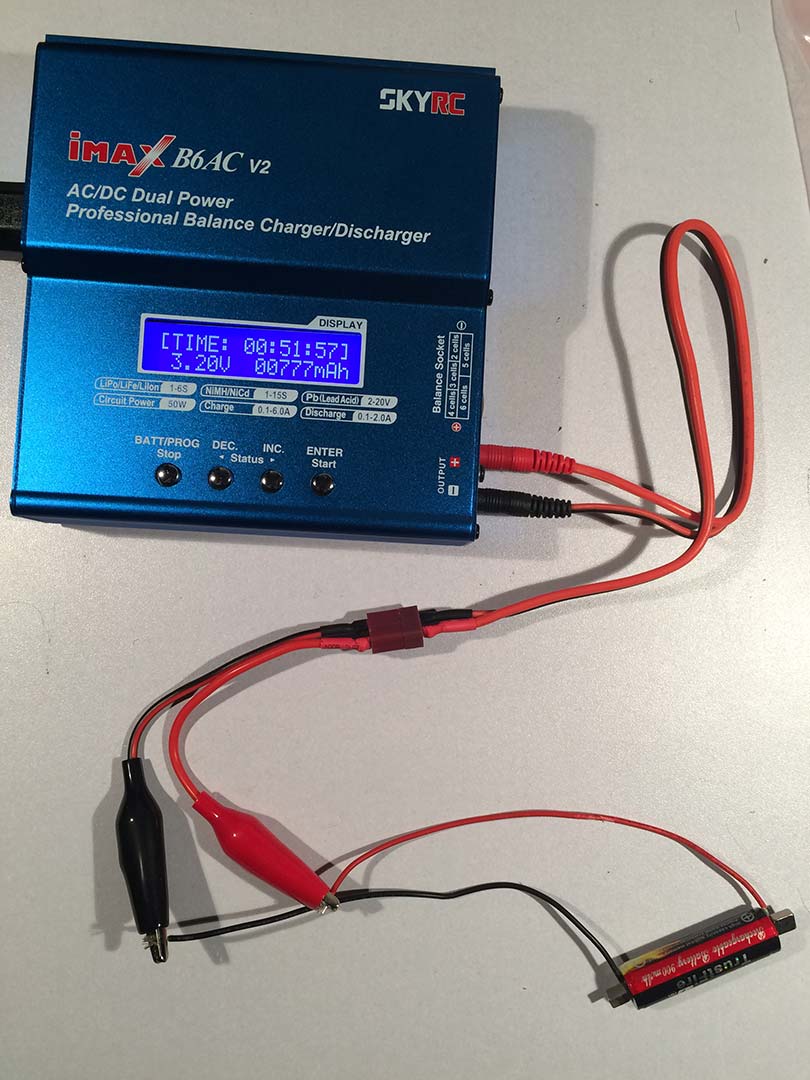
Testing the Li-Ion batteries using the IMAX B6AC charger.
Using the discharge at 1amp with a cutoff value of 3.2 which is the default on this machine. The total current one of the Trust-Fire series batteries is around the mid to upper 700mAh which isn't what is advertised on the battery itself. How did Trust-Fire come up with the number of 900mAh? My guess is their under-voltage protection circuit cuts off at 2.5v which is .5 volts lower then when you SHOULD cut off a lithium pack their test runs the lithium all the way down to a dangerously low voltage to the point where the power will begin to diminish if you do not charge it right away. Shame on Trust-Fire for setting the under-voltage cutoff so low. It should be around 2.9-3.0 to maintain the best life out of the Li-Ion battery.
They are good enough for the price paid at $10(USD) and I can't really complain a whole lot about their performance. Since we will be using two of these 14500 batteries in parallel instead of in series. That means we will get approximately 1400mAh at 3.7v during the Xbox 360 Controller operation. This may not be as good as the original Microsoft OEM at 2100mAh but it's still worth doing in my book.
About the charger.
Having a professional charger like a TRUE IMax B6AC v2 charging station costs around $59 which is why it may be a little overkill for the average user who wants to simply charge a lithium battery. We bought this because of the rampant amount of fake lithium batteries out there that promise awesome amperage. However, when put to the test those high amperage batteries fall flat on their face. Read here about a perfect example of this with SkyWolfEye 14550 batteries.
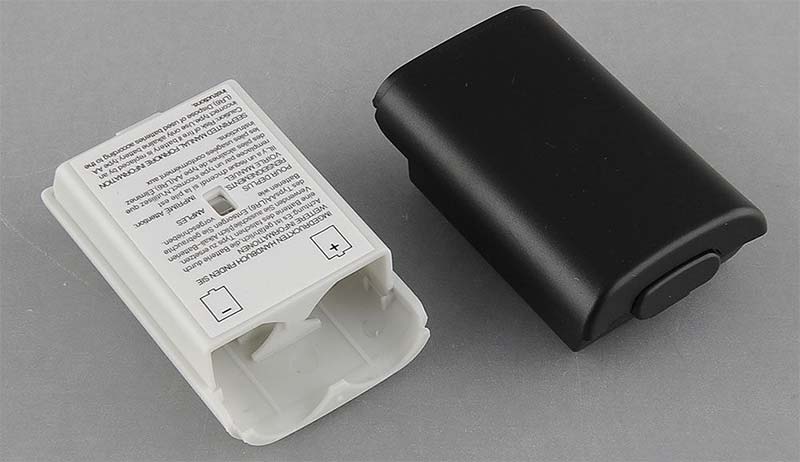
The breakdown of the old controller battery casing.
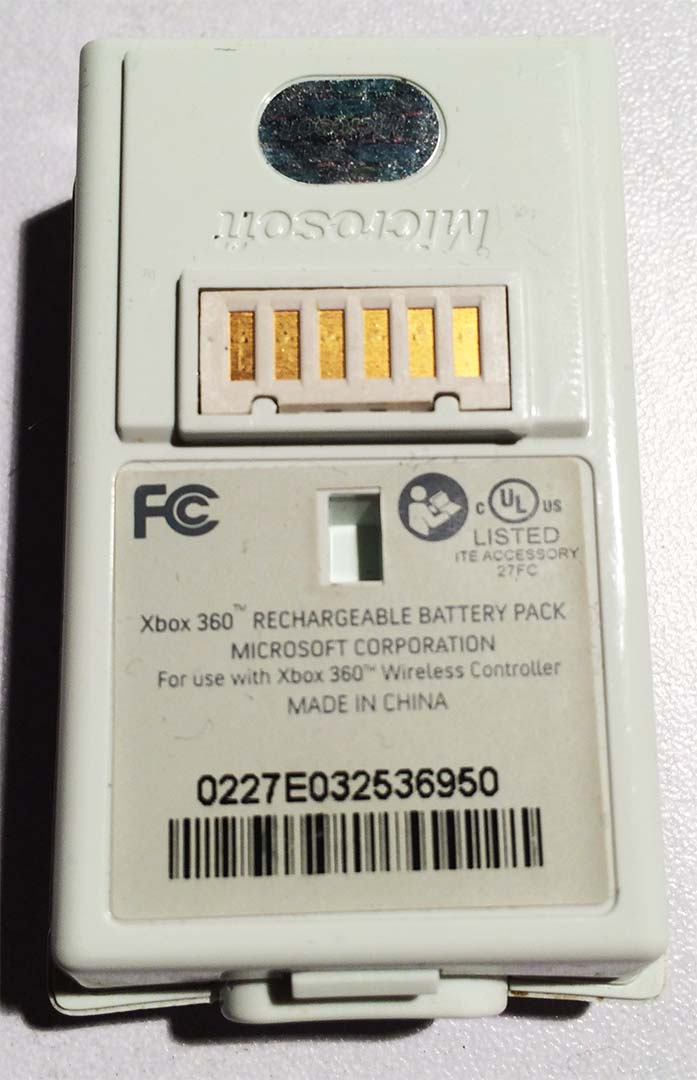 What is pictured above is the
 victim candidate for this project. It's an old rechargeable battery pack that I've had for almost 7 years. I can leave it in my controller all night and it will never charge past 0.917 volts. which it should be at around 2.4-2.5 volts as the batteries are in a 1P2S configuration ( 2 cells in series stacked to provide enough voltage to step up the necessary circuits in the Xbox)
Pry it open the rechargeable battery casing!
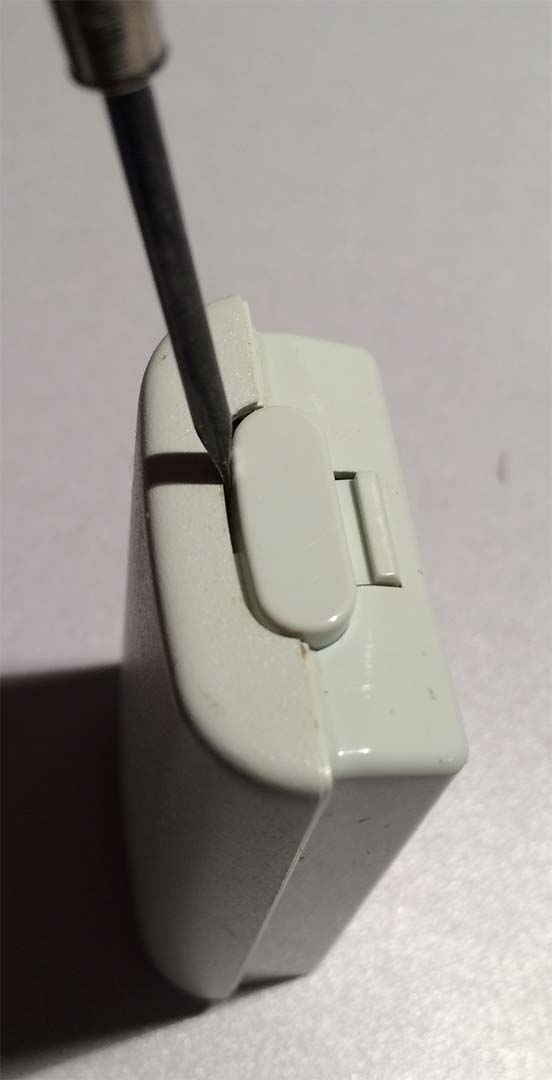
The inside of the casing is fused together with slightly melted plastics which happens at manufacturing. Fusing plastics this way gives it a really strong bond for handling and charging but the bond can be broken. This very first step I have seen a lot of stupid YouTube videos such as using a knife to pry it open (which is dangerous because if it slips you could be cutting a chunk out of your finger.) I've also seen people start at the sides of the controller which ends up really destroying the plastics. Using either a plastic cel-phone LCD separator or a small jeweler's flat head screwdriver start where the latch button is as shown above. Pry gently and it will pop the first few fused pieces around the button assembly. From there you can work your flathead screwdriver around the plastic seal until it splits open. I've had pretty good luck taking these apart however because of where you are prying you may damage the inside release button. So use some caution when you are doing this.
Inside of the rechargeable battery casing.
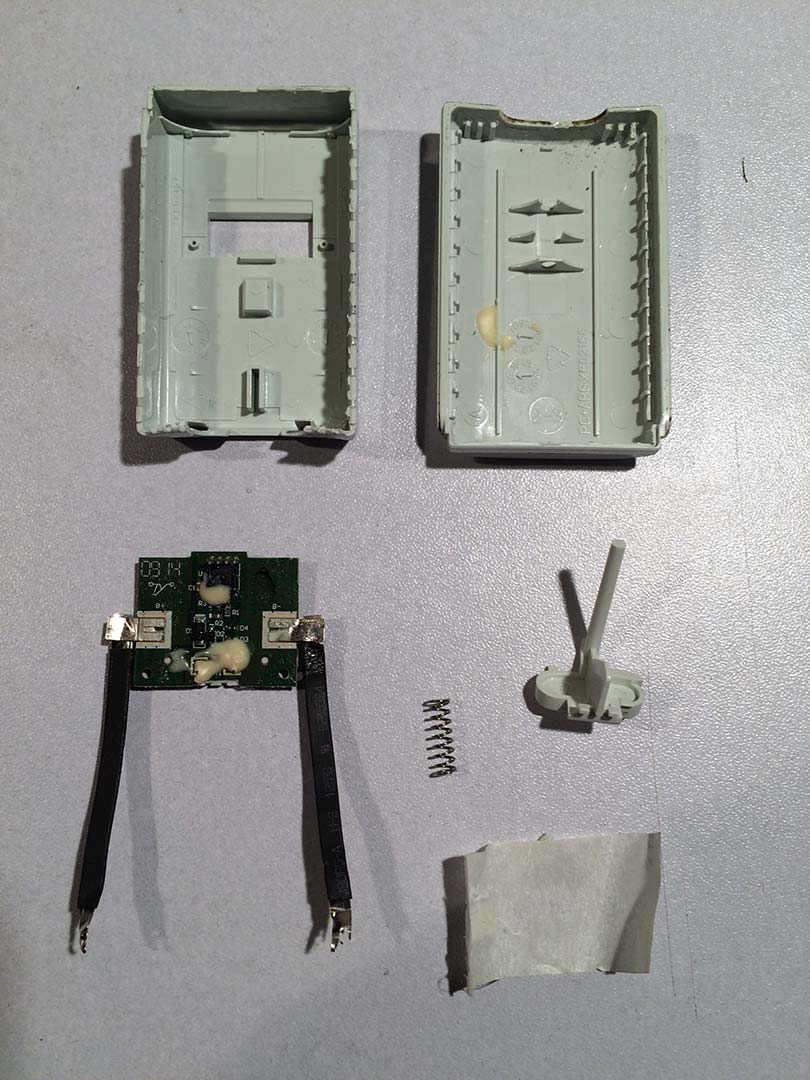 Not a whole lot inside of one of these units. Just the plastic release button with a spring. A "Charge Board" which I don't even think it's deserving of such a name as all it has on it is an AT24C04 amptel I2C EEPROM with some minor conditioner circuitry for the battery itself. The battery straps are thin pieces of metal that were tack-wielded onto the battery terminals inside. Apparently, the EEPROM tells the Xbox what kind of battery it is and how far it should charge it. So in my lipo project that part of the system will be practically useless.
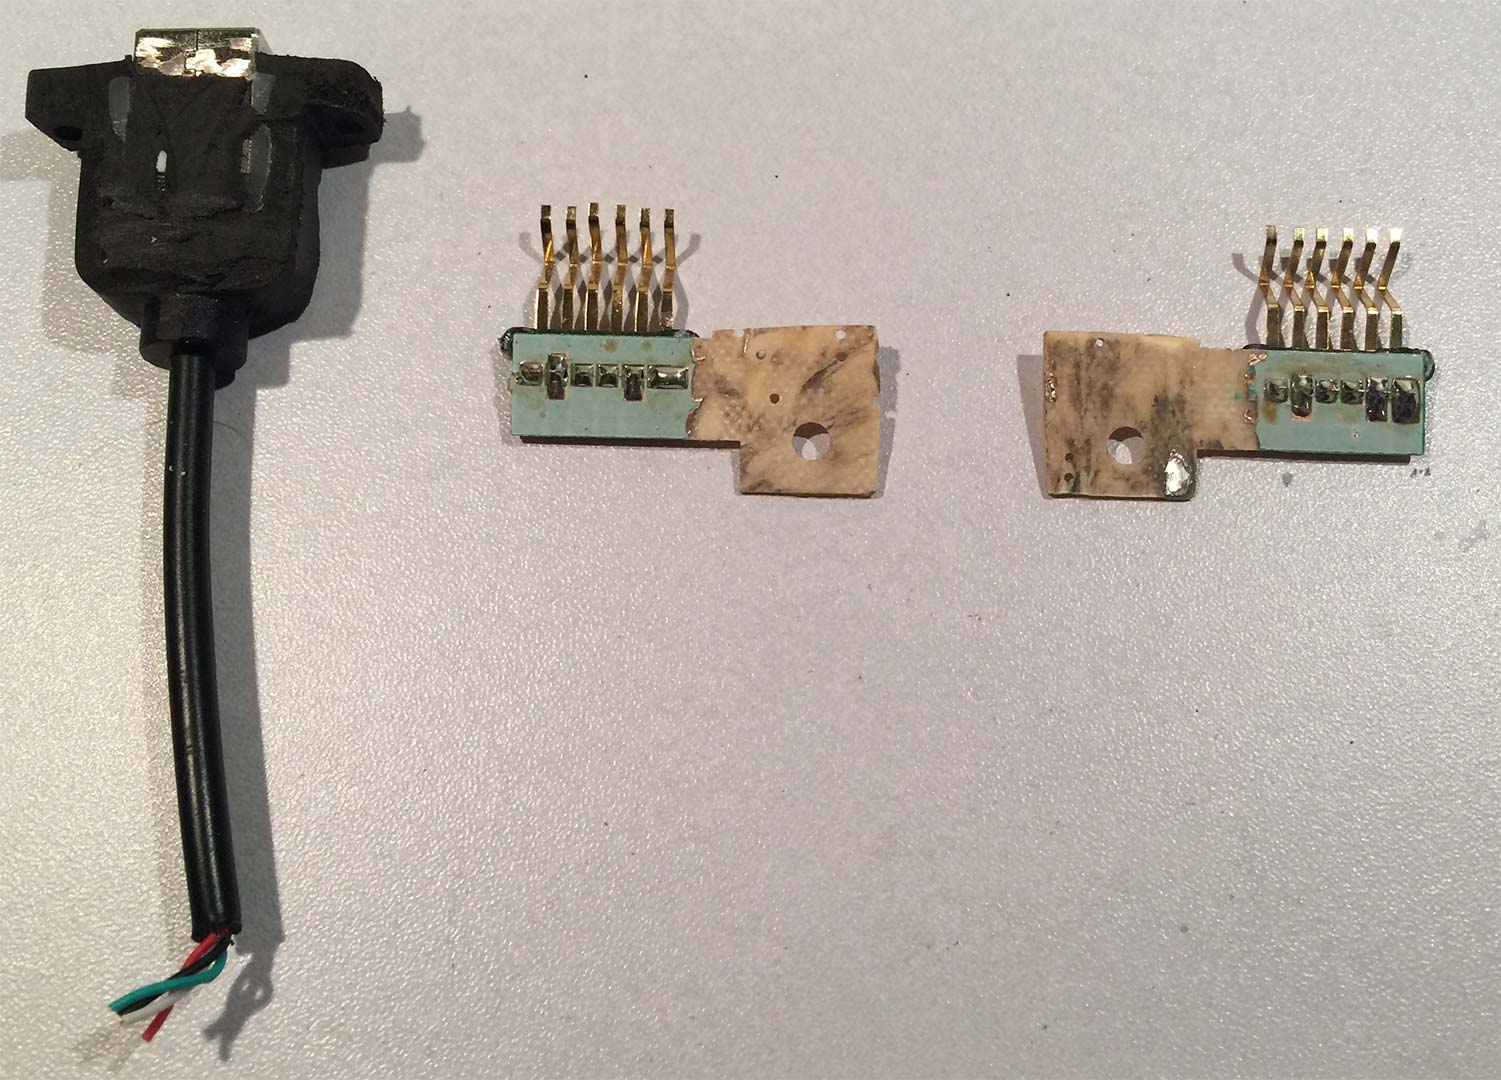
Closer look at the battery board in the Xbox rechargeable battery unit.
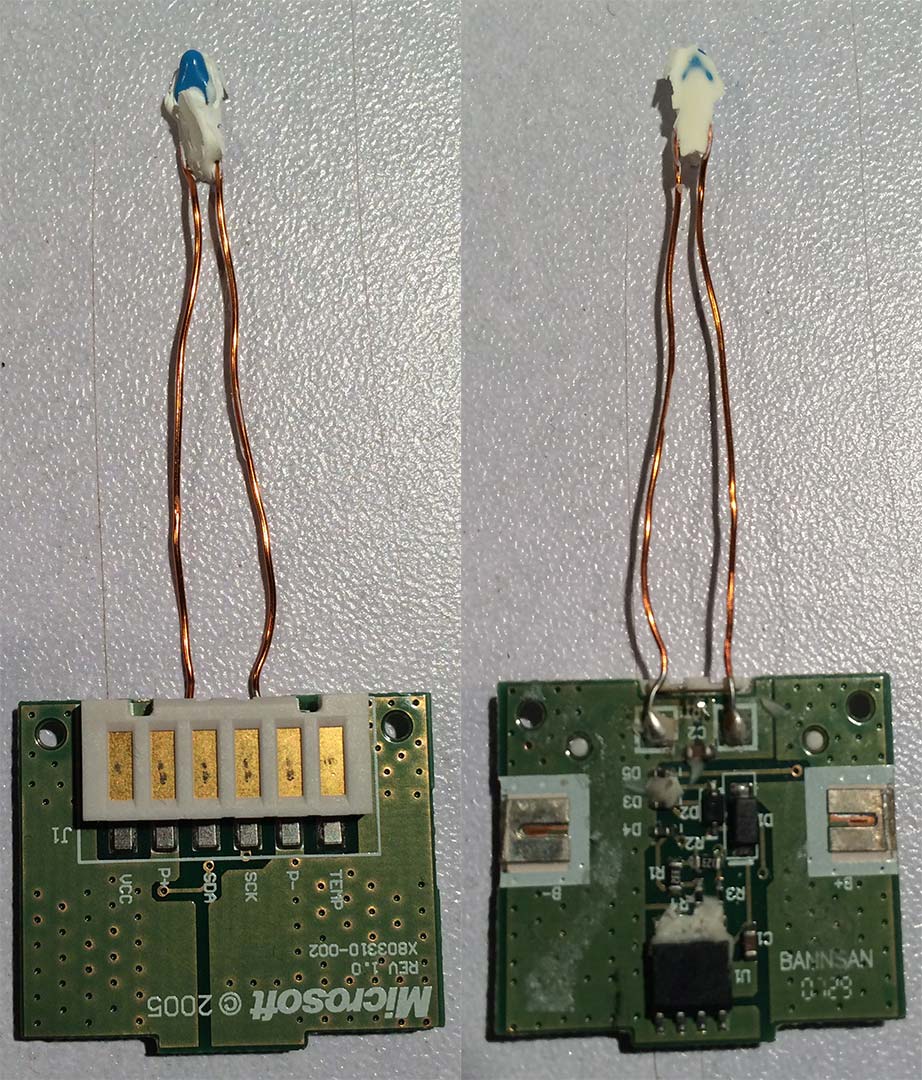
This is another board where the thermistor stayed in place as I pulled it out. the pins we're going to be interested in are -P and +P. All of the other pins for this project are irrelevant You'll also note the pads on the other side and how we left some of the metal behind. Part of it is we didn't want to break the board. This is also because it would make a good place as any to begin soldering the wires into place.
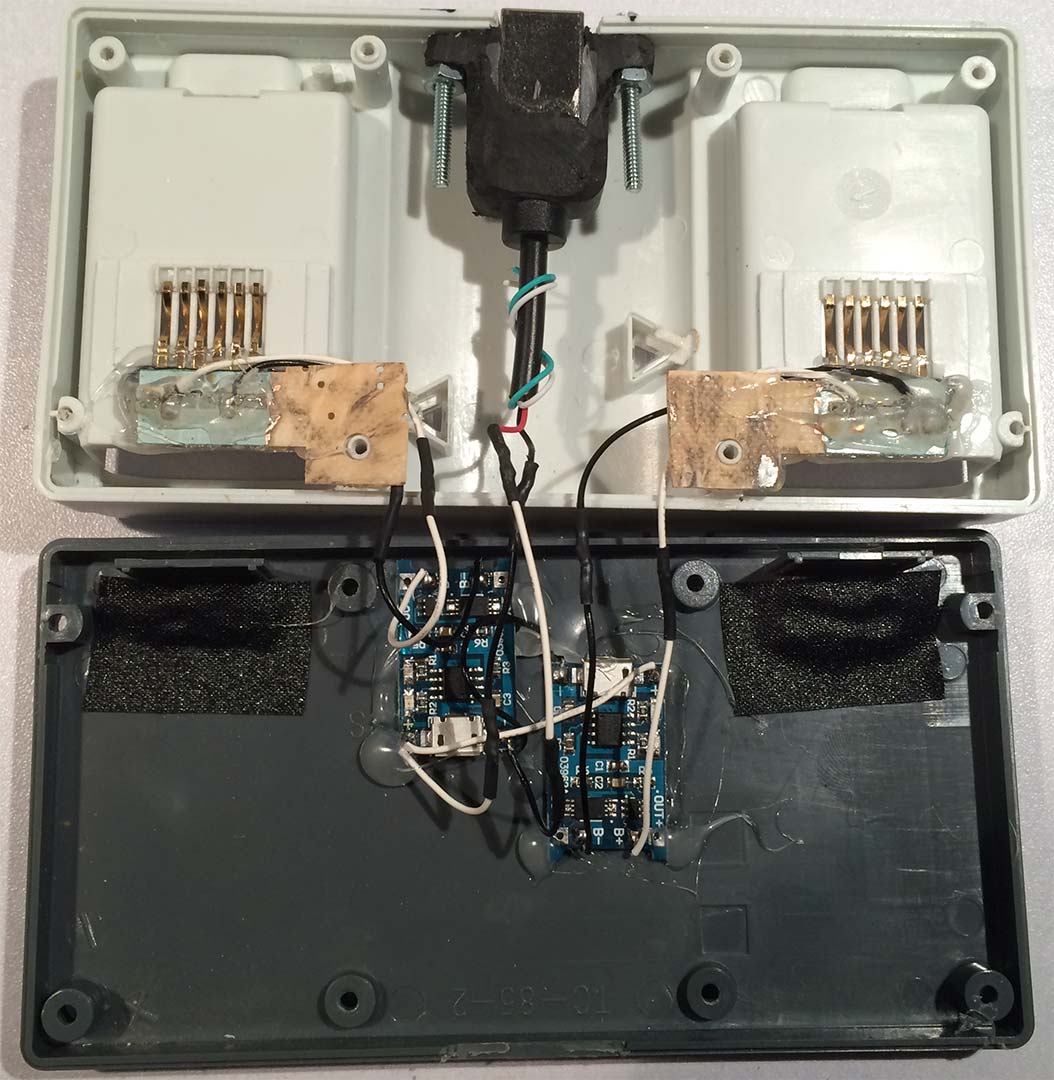
Assembly of the lipo battery into the Xbox recharge casing.
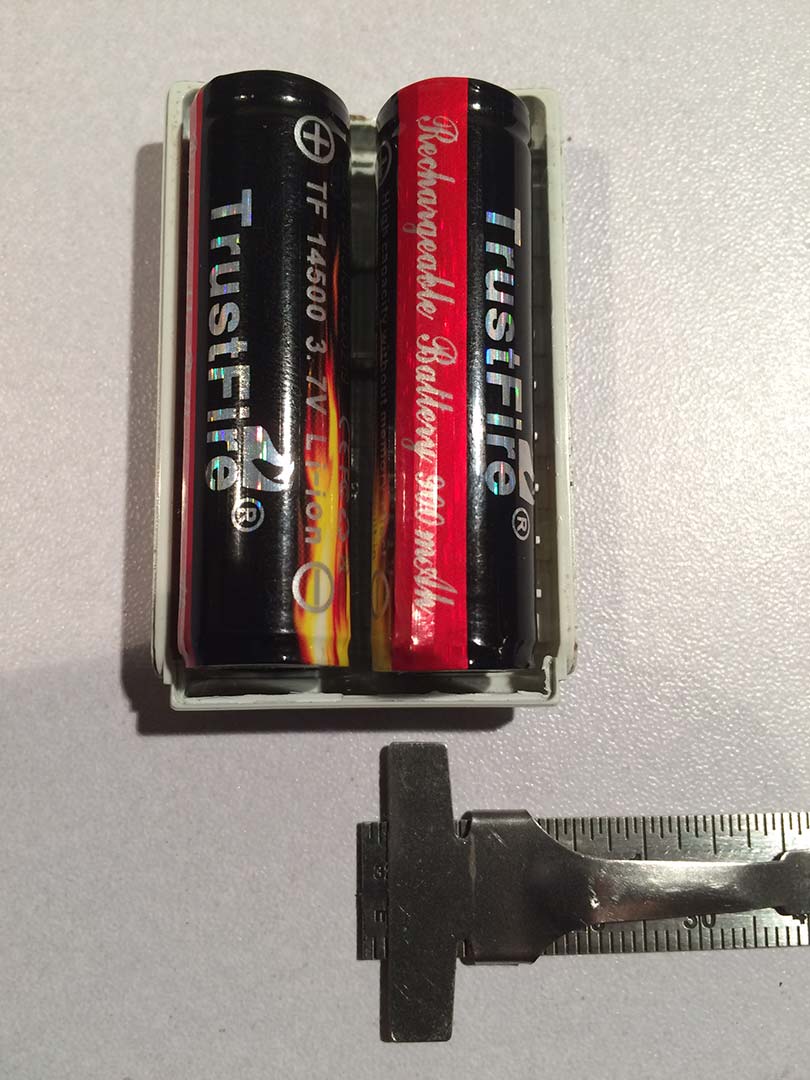 The first thing you will want to do is rest of the lithium batteries into the casing. notice how there's a 2mm cap in between? That's for the plastic push-button clip to go in between. Also, there's a notch at the bottom of the casing where it locks in with the Xbox controller. We can use this 2mm gap for wires however we must use a thin gauge wire to connect the batteries to the board otherwise we'll have problems closing the case back up when completed. Also, the circuit protection board is at the bottom of the Li-po batteries. It means you'll have even less room to work for soldering connections. It's best to place the positive side close to the latches as you will have more room to work.
De-solder all of the components from the board!
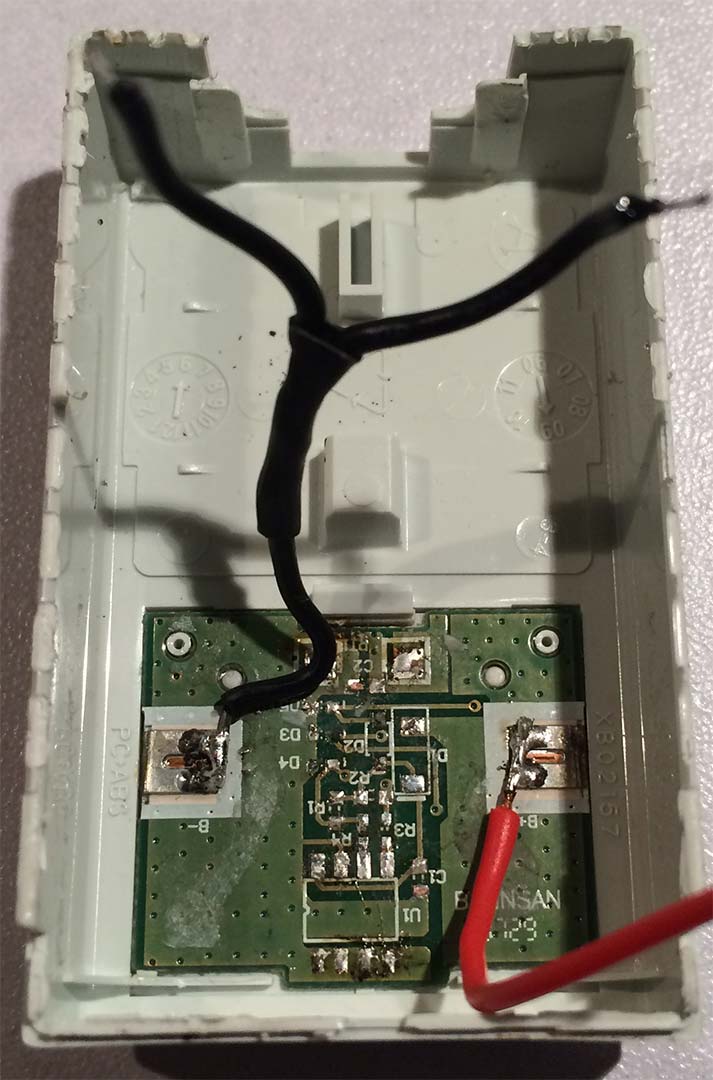 In an act of barbarism, we used my wire cutters to remove all of the circuits on the board as we feared that the lipo battery may produce too much power and cause a bridge inside of the battery holder. Afterward, we soldered on the wires that were needed. This was a little problematic to get all of the wires in place as you want them long enough to solder on, but short enough that you can fit everything back together.
Fit Test.
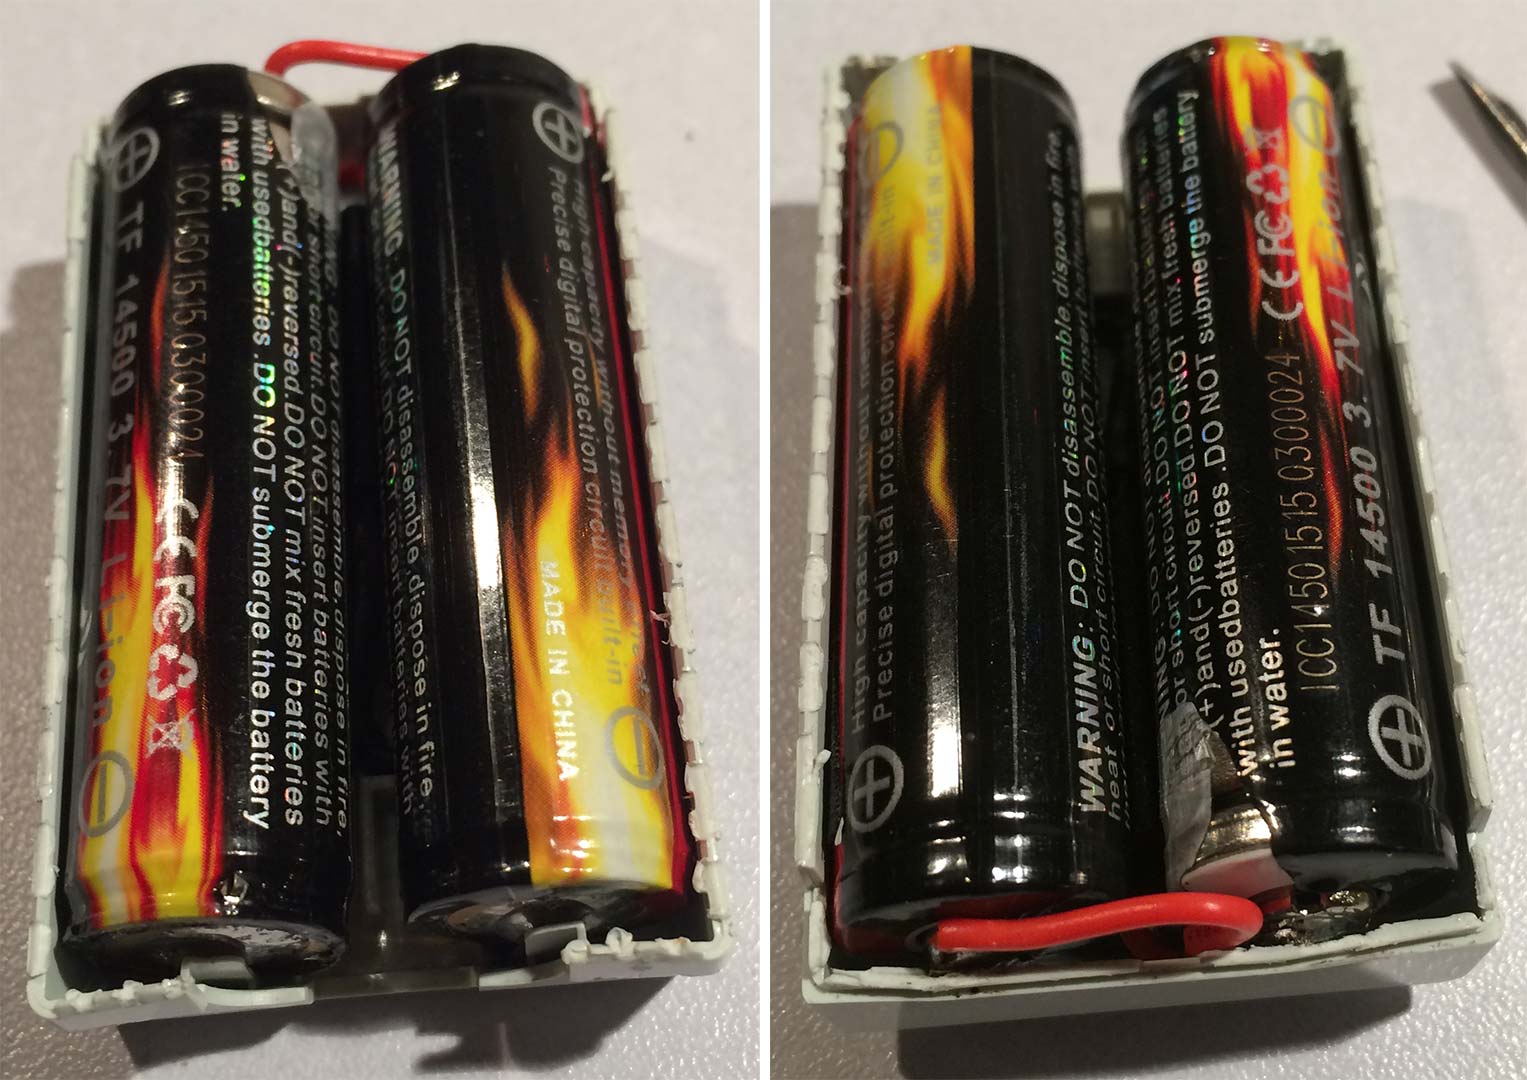 If you leave the positive end on the bottom and the negative on top. as well as doing wire bridging, the case will start to bulge out a little which is no good. We tried to use a thicker gauge wire which was a lot harder to control and solder into place without it breaking off all of the time. A 60W soldering iron set to the max is the only way to solder directly onto the battery terminals. using anything less like a 30 or 40-watt iron will not allow the solder to stick properly and will result in the wires popping off.
Sealing the battery casing.
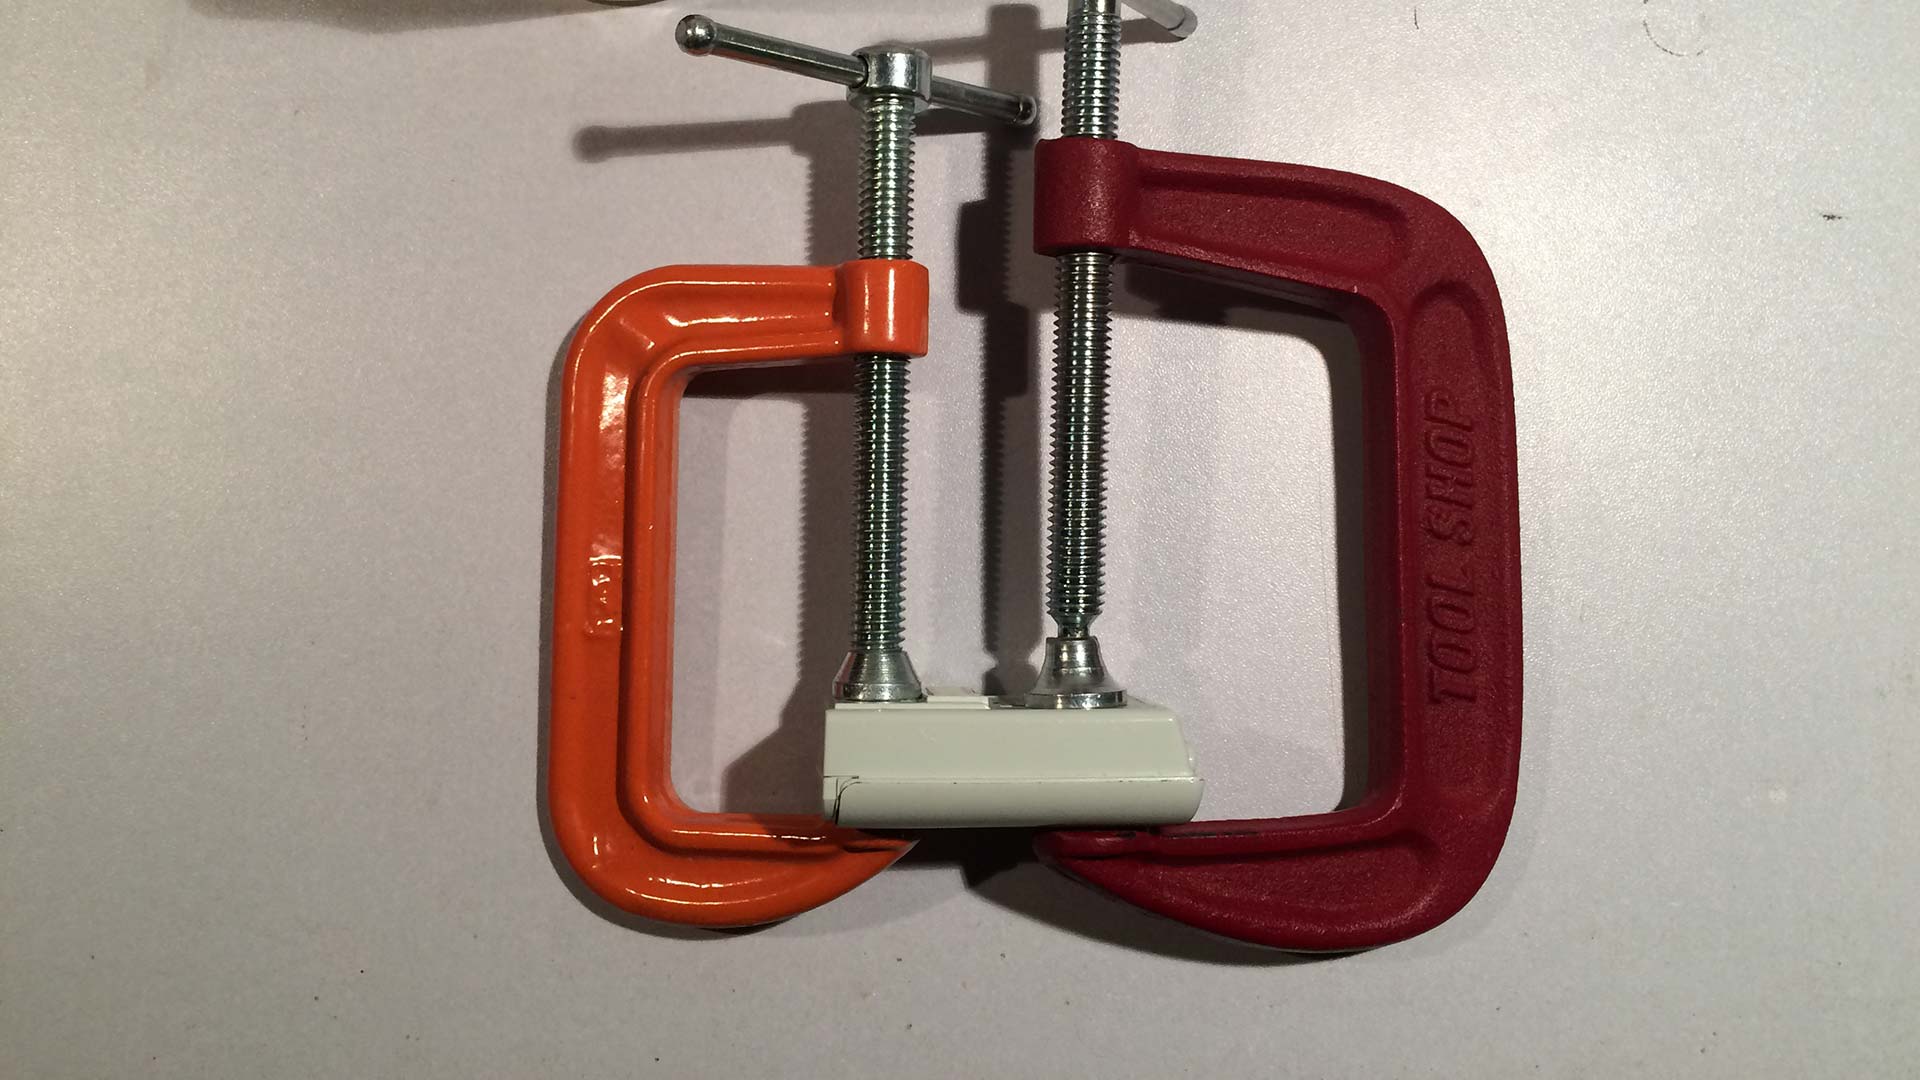 Once you can close the case with your hands. Then you want to use some form of high-strength glue that can bind to plastic very easily and glue along the insides of the case. Be sure and keep it away from the button as it's very important that button on your Xbox rechargeable pack can move freely so you do not get it stuck inside of your controller. When clamping down on the controller do not over-torque the casing as you may damage your lithium batteries inside. Use just enough processor where the seams of the controller line up again and wait 24 hours for the glue to cure. Always do final checks with a volt meter to ensure the polarity is not reversed on the pins! Once complete you can finally install it into your controller and start playing again. As for charging the batteries once you get them in there, you can either use a cheapo-lithium battery charger that I described in my previous blog and rubber band it together. Or if you want to get a little more fancy about it you can find old battery chargers online and at Gamestop for around 5 dollars. just pick one of those up, cut out the circuit, and replace it with your lithium charging circuit. We'll be getting to that in a minute.
Known issues with using a Li-po battery in an Xbox controller:
We've tested these Li-po batteries in about 12 Xbox controllers from different makes and years of production. It does seems that Microsoft or the chip company that regulates power to their controllers gradually improved their technology as time went on. In the launch date controllers, a fully charged lithium battery at 4.2 volts would almost make the controller flicker and that's it. If we drained a little power away from the lithium battery down to 3.7 volts which can be done very quickly by plugging it into another controller for about 30 minutes the launch controller was perfectly happy with it. For controllers released in 2008 the lithium battery works totally fine without draining but when the controller is off you could see the lights of the controller lit very dim on it. It doesn't hurt the controller but it's worth noticing that leaving the batteries in the controller may cause them to slowly drain. Finally, the Xbox Elite or Black controller seems to handle the lipo batteries flawlessly with no dim lights when the controller is off. So the regulator chip on the Xbox Elite controllers seems to work the best. and launch date controllers are problematic with this mod.
What about the NiMh batteries that you removed?
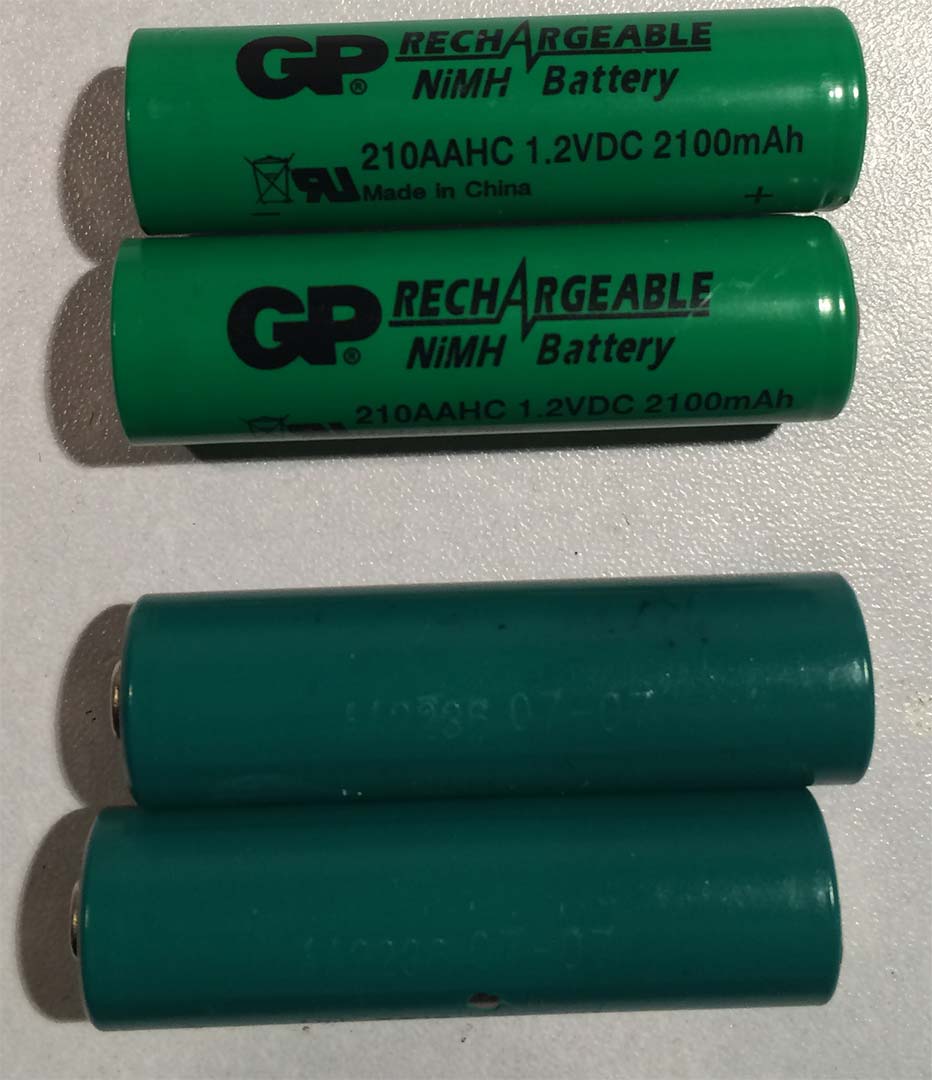 We checked the old NiMh batteries that have been in those cases for anywhere from 5 to 7 years with a volt meter. one of them was at 0.2volts, the other at 0.93 volts. which the one at 0.2 volts would've been the problematic one preventing the unit from charging with the Xbox cable.
Bringing Xbox 360 NiMh batteries back from the dead.
Since the professional battery charger used in this blog has a NiMh function as well hooking up these batteries to it was simple. The battery that was at 0.2 volts we let charge very slowly at 100mA until it was back up to around 0.9 volts. From there I charged it like the rest at 0.4mA. NiMH batteries are very slow to charge. However, we were able to bring them back to life with it.
 If we really wanted we could even purchase a battery holder for my Xbox Controllers for $1-2 bucks and call it a day saying "Screw it" to the charging cable.
After a few charge cycles as well as doing a re-peak test on these NiMH batteries we were able to get them up to 1820mAh. So they store about 80 percent of their life than what they used to store now. Which isn't bad given the age of these batteries!
Charging the new Xbox 360 Lithium pack.
Since we can't use the Xbox 360 plug and charge cable for obvious reasons. 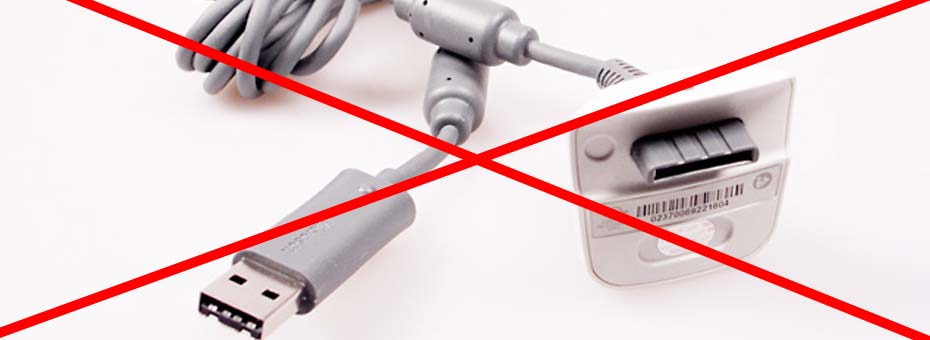
- The circuit that tells the controller that it's even a rechargeable battery no longer exists.
- It's a Lithium Ion battery and the charging requirements are totally different.
We're going to have to use other means to charge these new Li-PO/Li-ion batteries.
So you put the lithium into the Xbox housing which is great. But there's no room for a charging plug. How do you charge it? Dark Magic?
Almost!
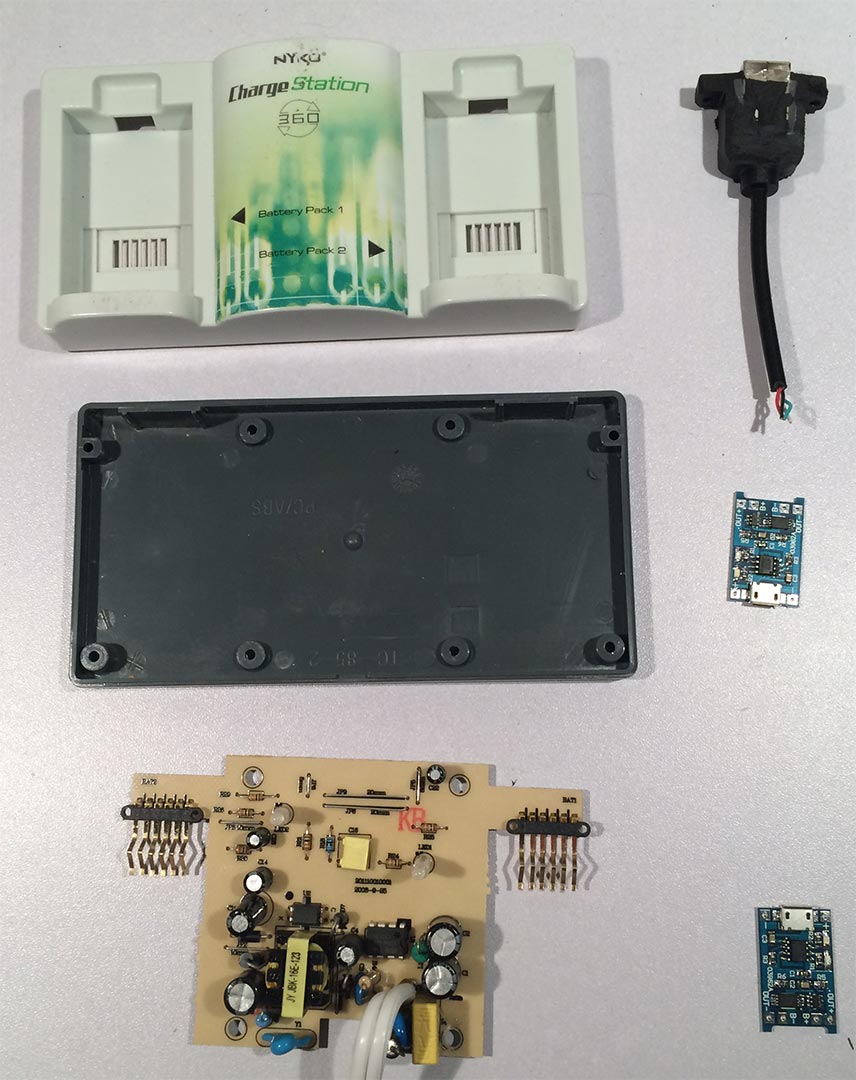
It's often better to take something apart and re-purpose it than it is to bend the wires and try to make a dock yourself. In this case, the Nyko ChargeStation 360 is a perfect candidate for hacking because it contains all of the pins we require to hack together a good Li-Ion charging station. We got the Nyko ChargeStation 360 for around $4.20 on Ebay because the quality of the charger was not great. The Xbox 360 is slowly dying off in popularity. Getting third-party hardware like this charger is going to get super cheap. You could even find one of these cheaper if you go to a local video game store as often they will be happy to just get something for this.
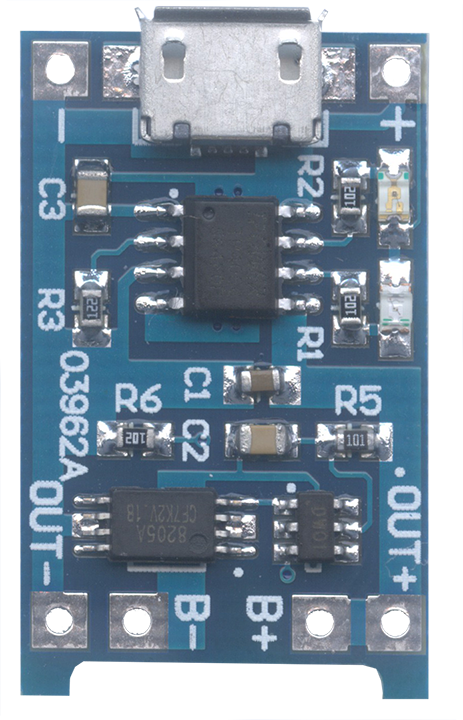
Just like our previous blog entry about charging lithium batteries, this will be using the TP4056 chip which is easily attained on eBay for around $1.24(USD) a pop.
Some destruction of the charging station.
When looking at the original board Nyko put in. It's an inefficient fire hazard and to top it off the circuit board was bent due to a lack of back support for the charging pins. So I'm not going to feel bad about destroying this PCB board to get what we need off of this.
 Using a cutting rotary power tool we simply cut out the connectors I want from the PCB as well as the posts since we will still use the posts as support for our connectors. Any traces and chips that were in the area were ground away. the solder points are large enough to attach wires too directly.
Also, We are using a female USB "B" panel mount connector and shaved a lot of plastics away from that as well. This is to have it sit as flush with the plastics as possible when we mount it inside of the case. We don't have a whole lot of room to work with on the inside of this.
Don't screw up like me!
Always do a continuity test on your USB cables. The colors inside may not match what you think!
Note: Finding out the very hard way that the Chinese who make these USB panel mount connectors do not even follow proper wire color guidelines. That the black lead was actually +5 VDC and red was ground. It seems like I'm bashing that country over and over again in my technical blogs and it's purely incidental. I have received a lot of good products from China it's just that the sheer mass of products means that you're bound to get some true "What the hell?!?" moments when you take apart devices.
Assembling your Li-Ion charging station.
 Now after finding out about the reverse polarity wiring on the USB. as well as messing up the placement of which charging circuit goes where. We finally got it all into position and it's ready to be closed up. Note the gaffer's tape on each side of the charger. That's to add additional support to the charging pins so that regardless of pressure the PCB will not bend out of place or snap off of the posts. I don't have to worry about the screws and nuts we installed for the USB connector as they are far enough away from the two charging circuits we have installed.
Note: In this configuration and assuming that both lithium batteries are depleted maximum amperage I require from a USB power supply will be 2.0 amps. In other words, an I-Pad charger or the USB charging station I made from DC-DC step-down chips will do nicely for this task.
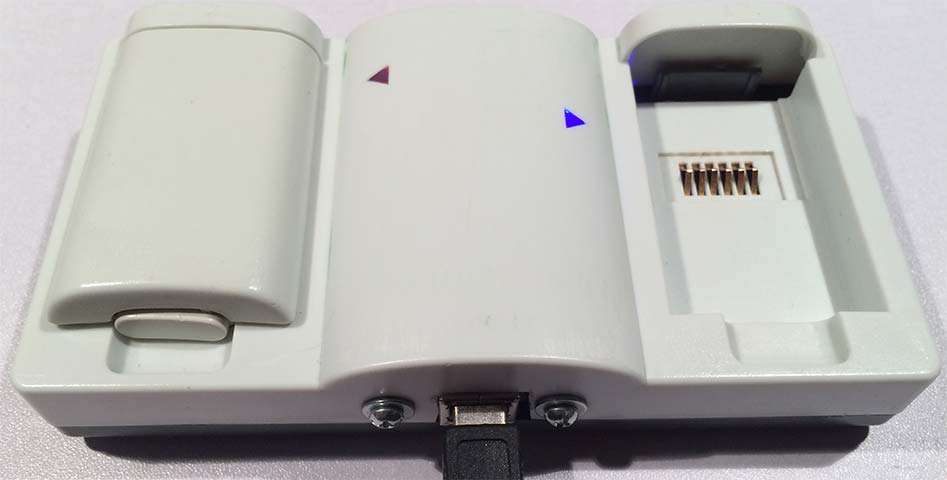
With quick assembly and the 8 screws reinstalled the assembly is complete. Also adding some feet to the bottom to keep the plastics from wearing away further underneath. With a very light sanding the labeling can be removed to make sure it doesn't say Nyko or fool anyone into thinking it's a regular Xbox Charger. It's ready for a sticker stating what this charger really is. It's very important to label things boys and girls. Or else you may have someone shove a NiMh battery into this charger and be in for a rude surprise. BOOM!
Upon power up the unit is blue and it flashes red 3 times a second searching for a lithium battery. When I install a battery it switches to red and begins charging it up. Upon charging it will switch to a solid blue with no flashing. Because of the positioning of the lithium circuits inside it lined up perfectly with the clear ABS arrows of the original charger.
Afterthoughts of Lithium Ion Xbox 360 Charger building.
 We charged up one of my lithium packs for my Xbox controller that according to my meter was at 3.1vdc. I noticed how insanely hot the charger got! To the point where the TP4056 chip was melting a little! When your lithium battery is almost empty the chip will begin to pull the maximum 1 amp through its circuit. This will result in a heavy exchange of heat even though the efficiency is good. It's not enough where it can be passively cooled unless you expose the board to the open air.
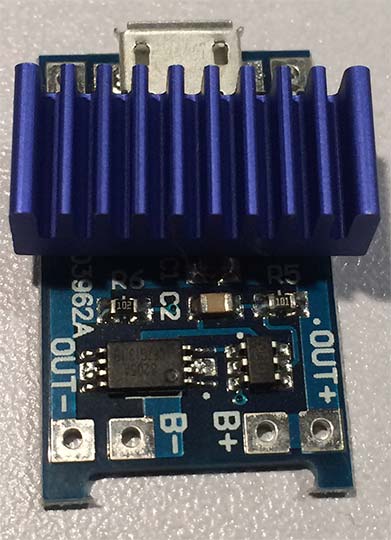
Adding heatsinks to the TP4056 chip.
I can't put a fan inside of this box due to its shape and size. So the only thing left is using a heat sink. I had a few heat sinks left over from my ram cooling mod days. So after carefully placing it on the chip, make sure that the LEDs do not get masked when doing this. I can now charge lithium batteries and at the very worst my charger gets WARM for the first hour before it slowly cuts back on the amperage until full.
Final Thoughts.
Well, if you're going for cost then I have bad news for you. You are better off picking up a pack of Sanyo/Panasonic Enelop 8x AA NiMh batteries for around $24-28. This technique which is described above only destroys the battery housing and not the controller itself. In terms of cost/time/material using lithium ions in this matter may be a little overkill Li-Ion has a few properties over NiMh in this application:
- Long lasting - They can hold a charge about as long as a lead acid battery. If you have friends that come over once a month to play some couch co-op action. You no longer have to panic as all of your NiMh cells are dead.
- Fast Charging - My NiMh cells can take anywhere from 5-8 hours to fully charge. The Li-Po's in the configuration we have using a 1amp charge. This means we're fully charged in about and hour and a half tops.
- Weight - Although not really important for the average gamer. It does make the controller a few grams lighter.
And I did it because of my previous projects I had all of the parts so why not? Overall, as long as you treat Li-Ion or Li-Po batteries with respect they will give you a very long gaming life. Hope this blog helps you on getting more life out of your controller.
END OF LINE+++
i can using two battery 14500 as parallel in xbox controler?
That's effectively what I was putting into the Xbox casing later on in this blog.
Yes, you can use 14500. But I should note the least destructive way of handling 14500 is in this blog article which talks of using a Diode to bring down the voltage for more sensitive controllers. Granted it means sacrificing an extra AA slot and only getting 800 MaH. But the positive side if you can use any lithium charger you want instead of building a custom one like in this article.
I just wanted to let you know you're doing this quite a bit more complicated than it needs to be. If you're willing to sacrifice some capacity for much greater ease, just use a single 14500 in a standard AA holder.
You can make a spacer for the other side that just passes current through with a wooden dowel and a screw put through it, or many other ways. A short metal bar would work good. Some 1/2" OD copper tube filled with solder. Or really any proper size tube filled with melted solder. Or a wooden dowel with a rod of 1/8" thick solder put through the middle.
Then you just charge the cell with a separate charger. I use an xtar vc4.
Oh you mean like this blog we posted a long time back about using 14500's and a diode to draw down the power to safer limits so that legacy Xbox controllers and even other controllers like the Ouya Controller can power up at 3.3vdc which is about what a fully charged Alkaline would throw? Yeah, I kinda covered that too! ;)
Thanks for checking out this blog though! We cover both the simple solutions and the insanely complicated solutions too! :D
P.S. My favorite charger is the iMax B6AC v2. Overkill perhaps. But effective.
- S
https://youtu.be/y8WNKZzfi5k
Battery mod long life battery
Hey man, great job rolling the charger and a kill-switch into the Xbox casing.:)
Since the controllers seem to be generally happy up to 3.7 volts or more, could I simply replace my alkaline batteries (which are wired in series to produce 3v) with 2 14500 (AA size) lithium batteries wired in parallel to produce 3.7v?
That's what I was going to try. I didn't realize it was so complicated.
This blog deals more with trying to get the same mAh rating that what one would almost expect out of their Alkaline batteries into their Xbox 360 controller. There's a simpler (and safer) tutorial on just using one 14500 and a schotky diode and it works in all xbox controllers as well as even a few other game controllers i tried. For charging you just get a lithium wall-charger and you're good to go.
https://www.s-config.com/li-ion-batteries-game-controllers/ - is the link for that.
Anyhow, hope that helps.
Thanks for sharing
What about the Play&charge cable? Is it compatible with this hack?
No it is not. Partially because of the removed circuitry that prevents the battery from being detected and partially because the charge method was for NiHm based batteries. It's why I had to build the charge station for it.