
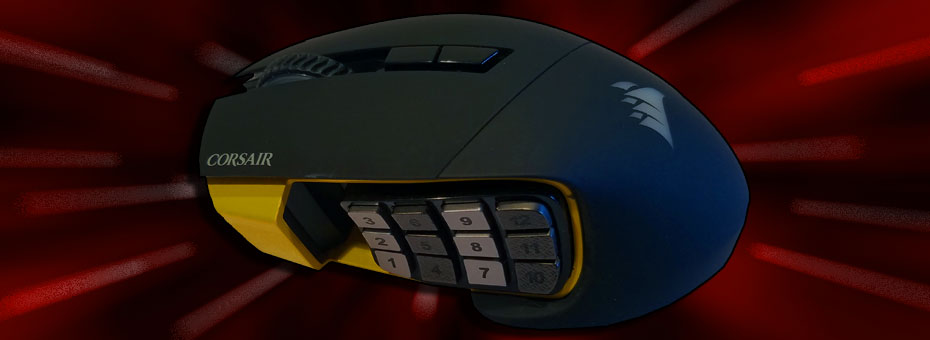
The Scimitar! Yet-Another Corsair mouse repair blog!
It's repair and disassembly of the Corsair Scimitar Gaming Mouse! We know we've been doing a lot of these types of blogs. For those who read the M65 repair and are back for more. Thanks! We do appreciate your readership! This guide is going to cover the problem along with a quick tear-down and rebuild of the mouse.
"Note: If you get a black screen but the audio is playing. Or you got a potato PC and it's studdering. We have fallback Links below."
Video tutorial fallback mirrors:
In case you have no-script enabled or for some reason cannot see the title video on this website. We have provided direct links for these videos. For more information about the standards we use on this site click here if you would like to know more.
AV1       - Link
MP4/.h264 - Link
OGV       - Link
The problem.
 The problem according to the box we received this unit in had the words:
No lights, no power - Anonymous
Short, sweet and to the point. Upon taking out the mouse and looking at it our reaction was the following:
Holy shit! - S
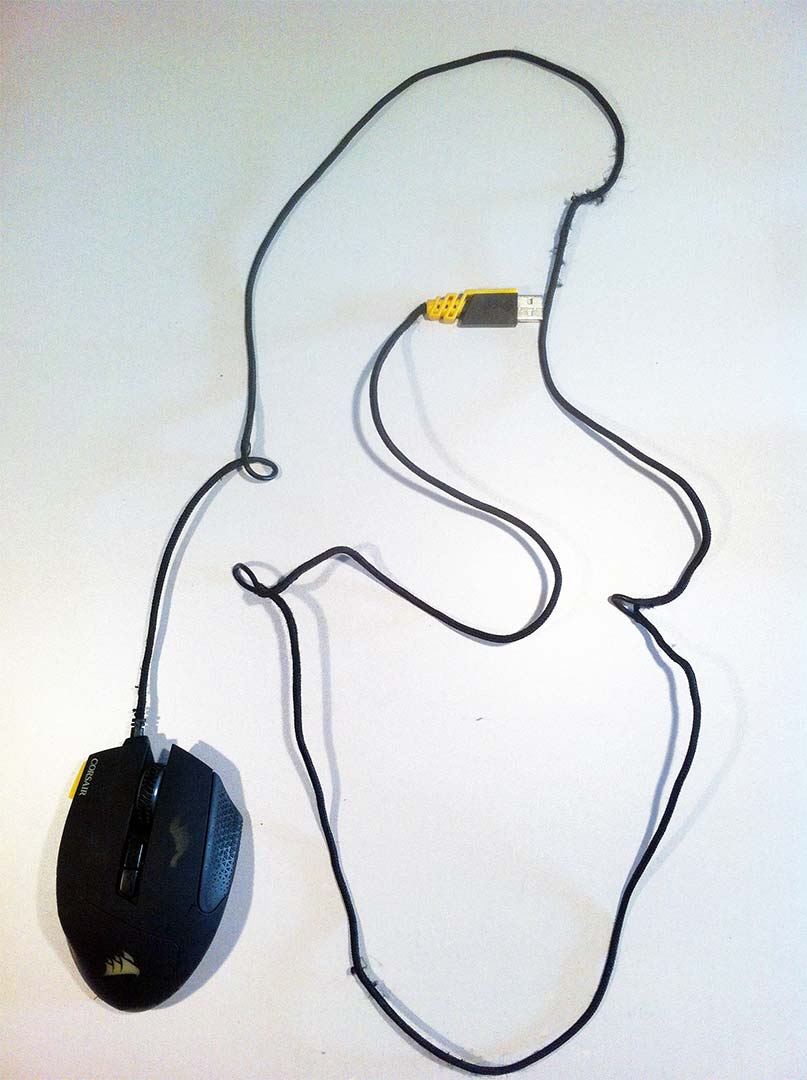
This is nothing like the Razer DeathAdder blog before where there's no cuts or anything in the braided cable causing failure. This cable has been chewed upon, tugged, pulled, rubbed up against sharp surfaces to the point where the plastics underneath are sticking out of the braid. This is what happens when someone is gaming so hard they forget how to take care of their hardware. This is a real shame.
Repair time!
We're going to bring this mouse back to life with a re-cabling job! Re-cabling a mouse like this will require almost a tear-down of everything inside which is perfect because you're going to be seeing how this thing is put together.
Required tools for disassembly and repair.
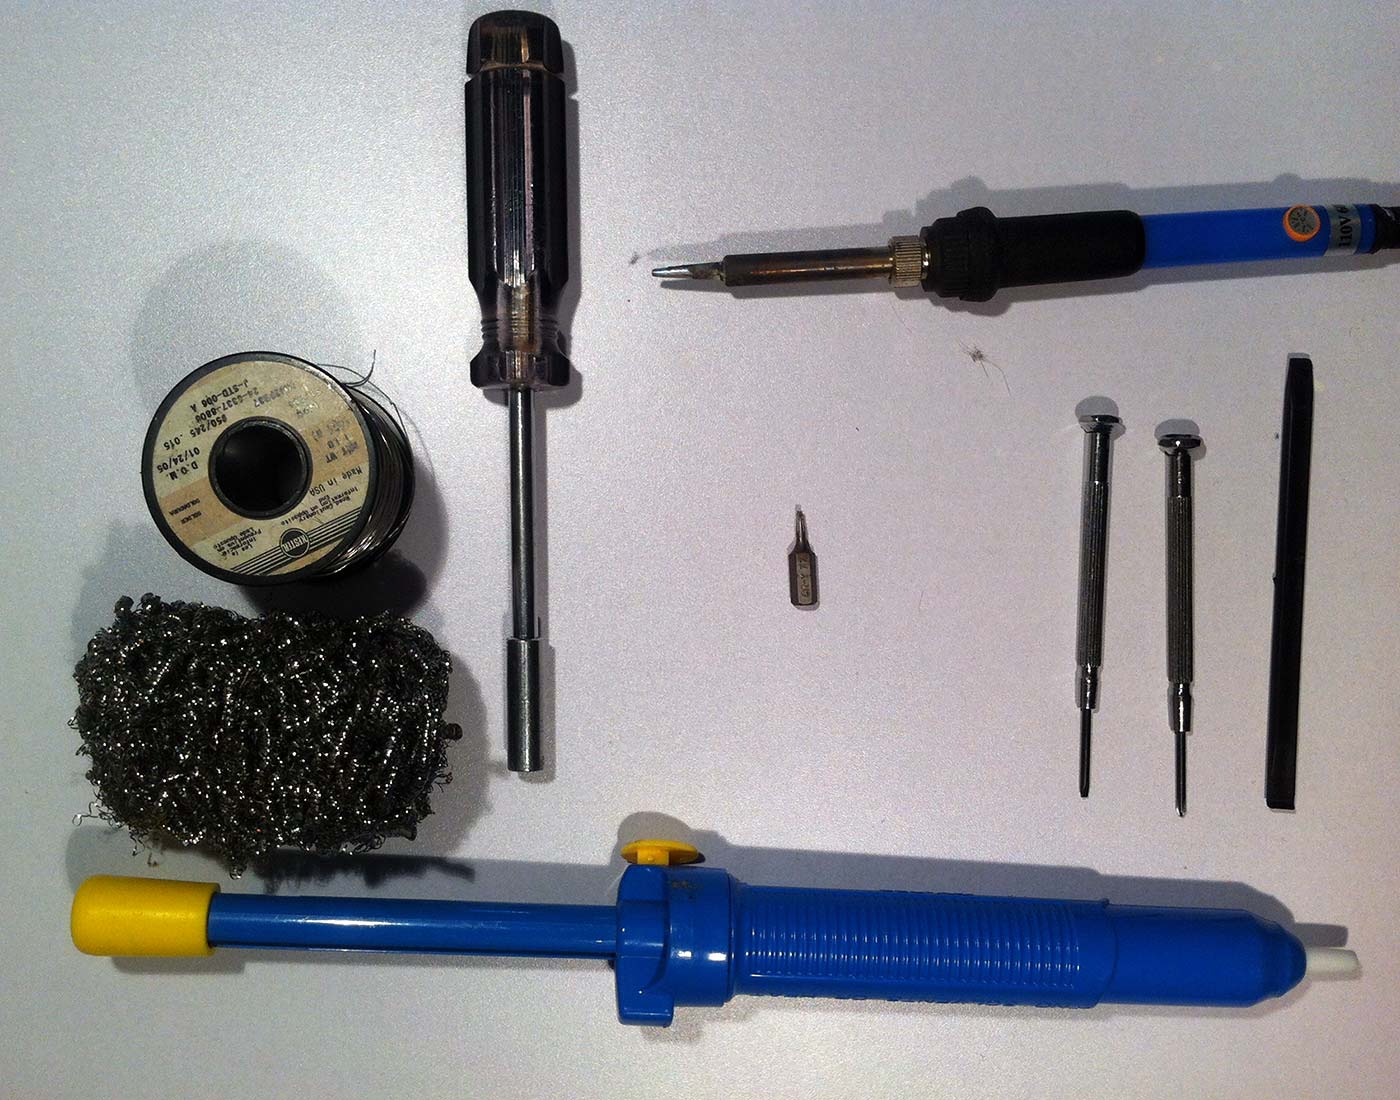 You will need the following tools:
-
-
- Small Jewelers Phillips screwdriver for removing all of the PCB screws.
- Small Jewelers Flat-Head Screwdriver for loosening cable clamps.
- (Optional) Plastic pry-bar. You Could use the screwdriver however metal tends to leave cosmetic damage around the lip of the mouse.
- Soldering Iron. Any standard 30-35 watt iron should be fine.
- Solder
- Cleaning pad to clean your solder.
- Solder sucker. You could use braid. But don't like it as it damages the traces on the board you are working on.
- Shrink Tubing Not pictured (Electrical tape if you're in a bad spot)
-
It's also nice to have a Multi-Meter for basic continuity testing and to make sure your USB connectors are going where they are supposed to be going.
Disassembly of the Corsair Scimitar
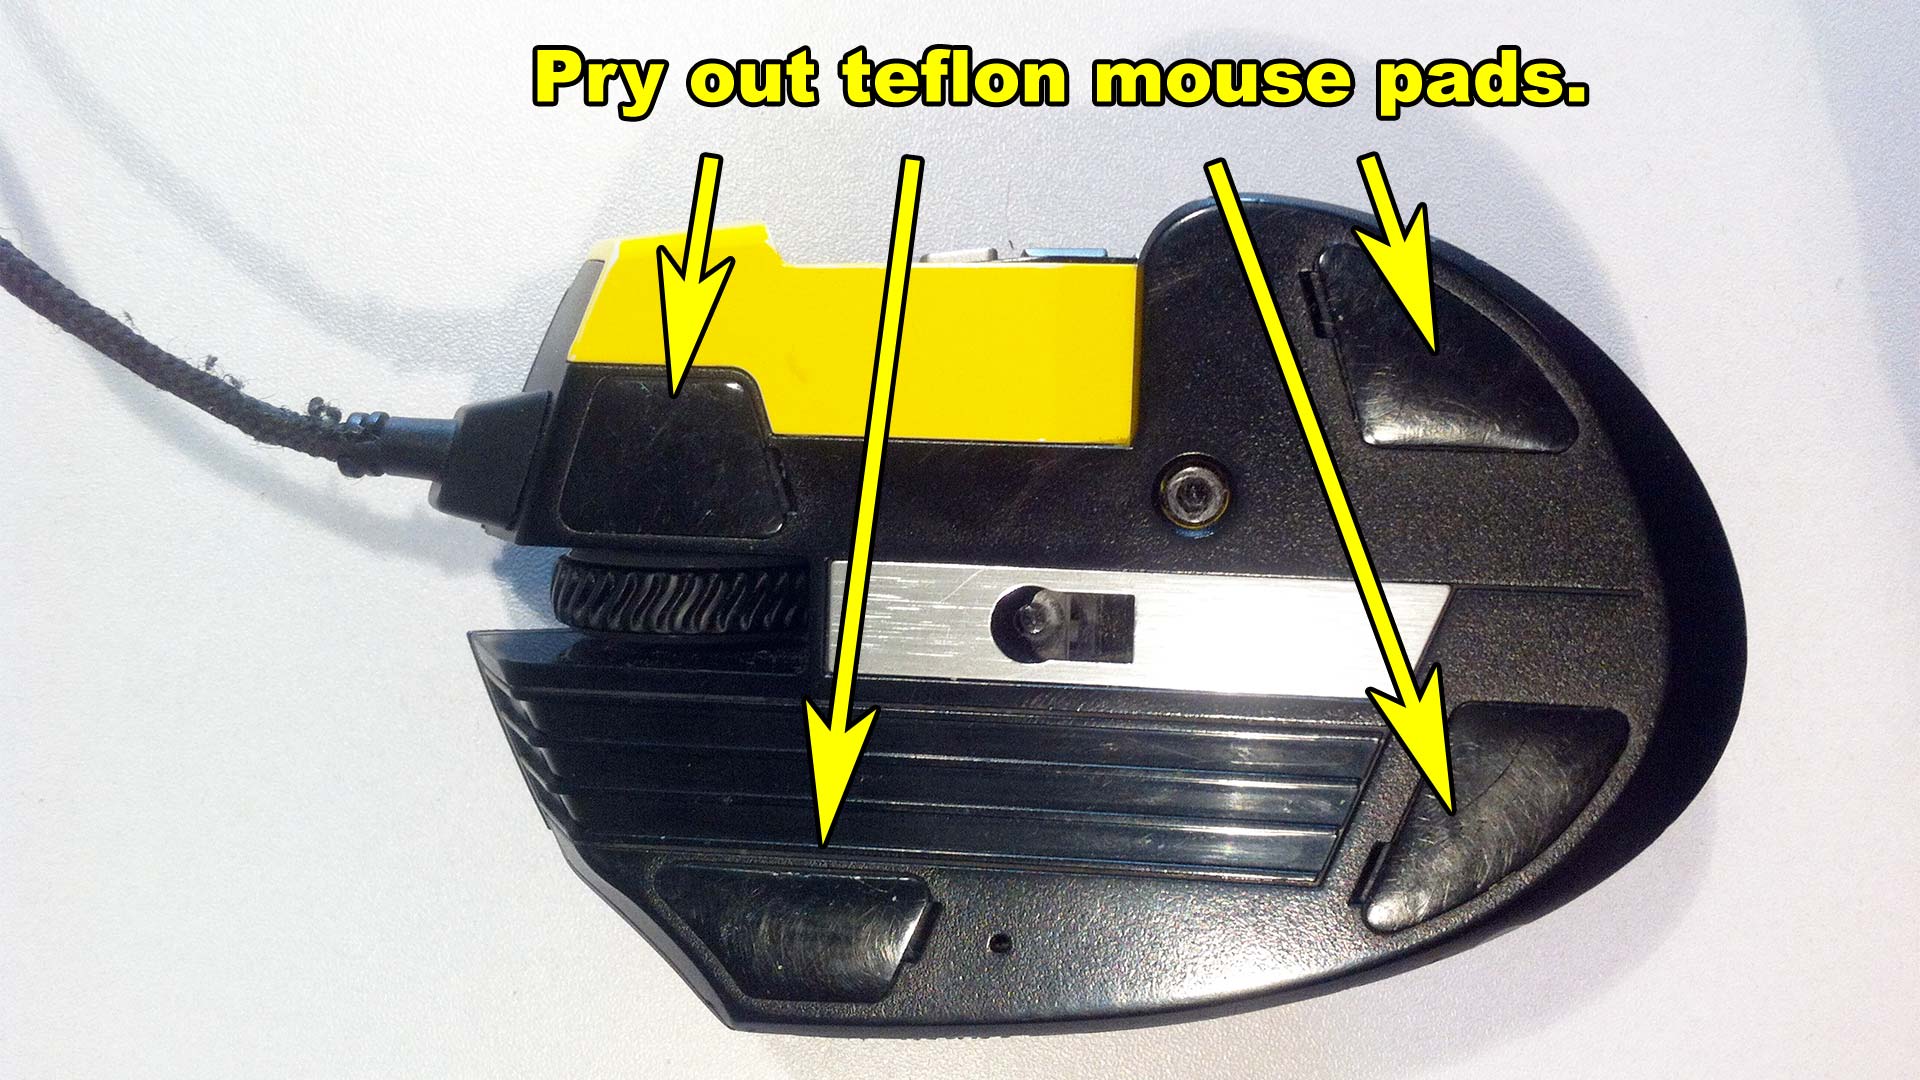 To gain access to the screws on the Corsair Scimitarwe will have to use a knife or a jeweler's flat-blade screwdriver to slowly pry the Teflon mouse pads from the bottom. Depending on the age and environment your mouse has been in. The double-sided sticky tape will come off as one piece or may require you to pry a little slower so it all comes off. If this is your first time opening this mouse it should come off and allow us to re-use the tape without having to apply any glue.
For those users who have missing mousepads, I have provided a DIY method of making PTFE pads in another blog here. Note: for those who have never owned one of these before. The hex screw in the center of the mouse simply adds stiffness to the number pad so it doesn't slide around during game-play. It will not allow us to get into the mouse so leave that screw alone. 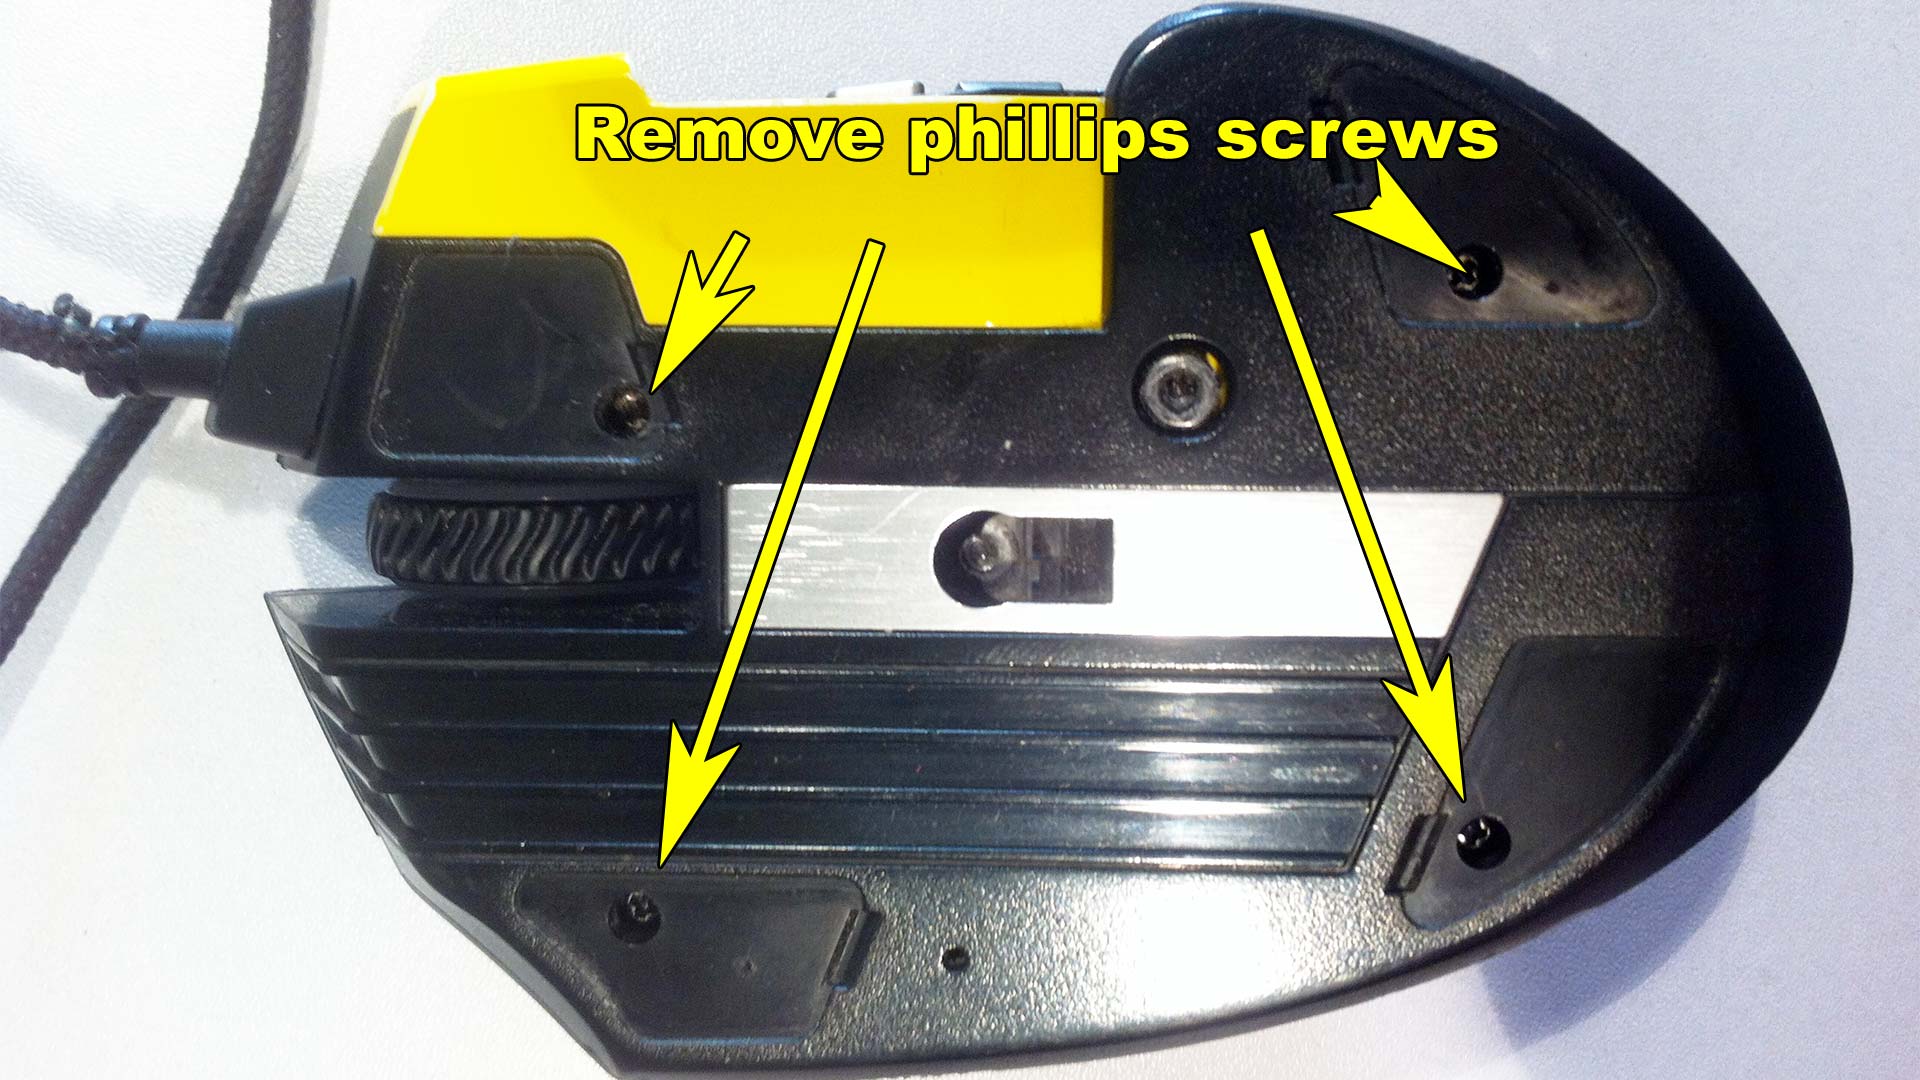 Using your jewelers Phillips screwdriver you can now remove the four screws to begin opening this mouse.
 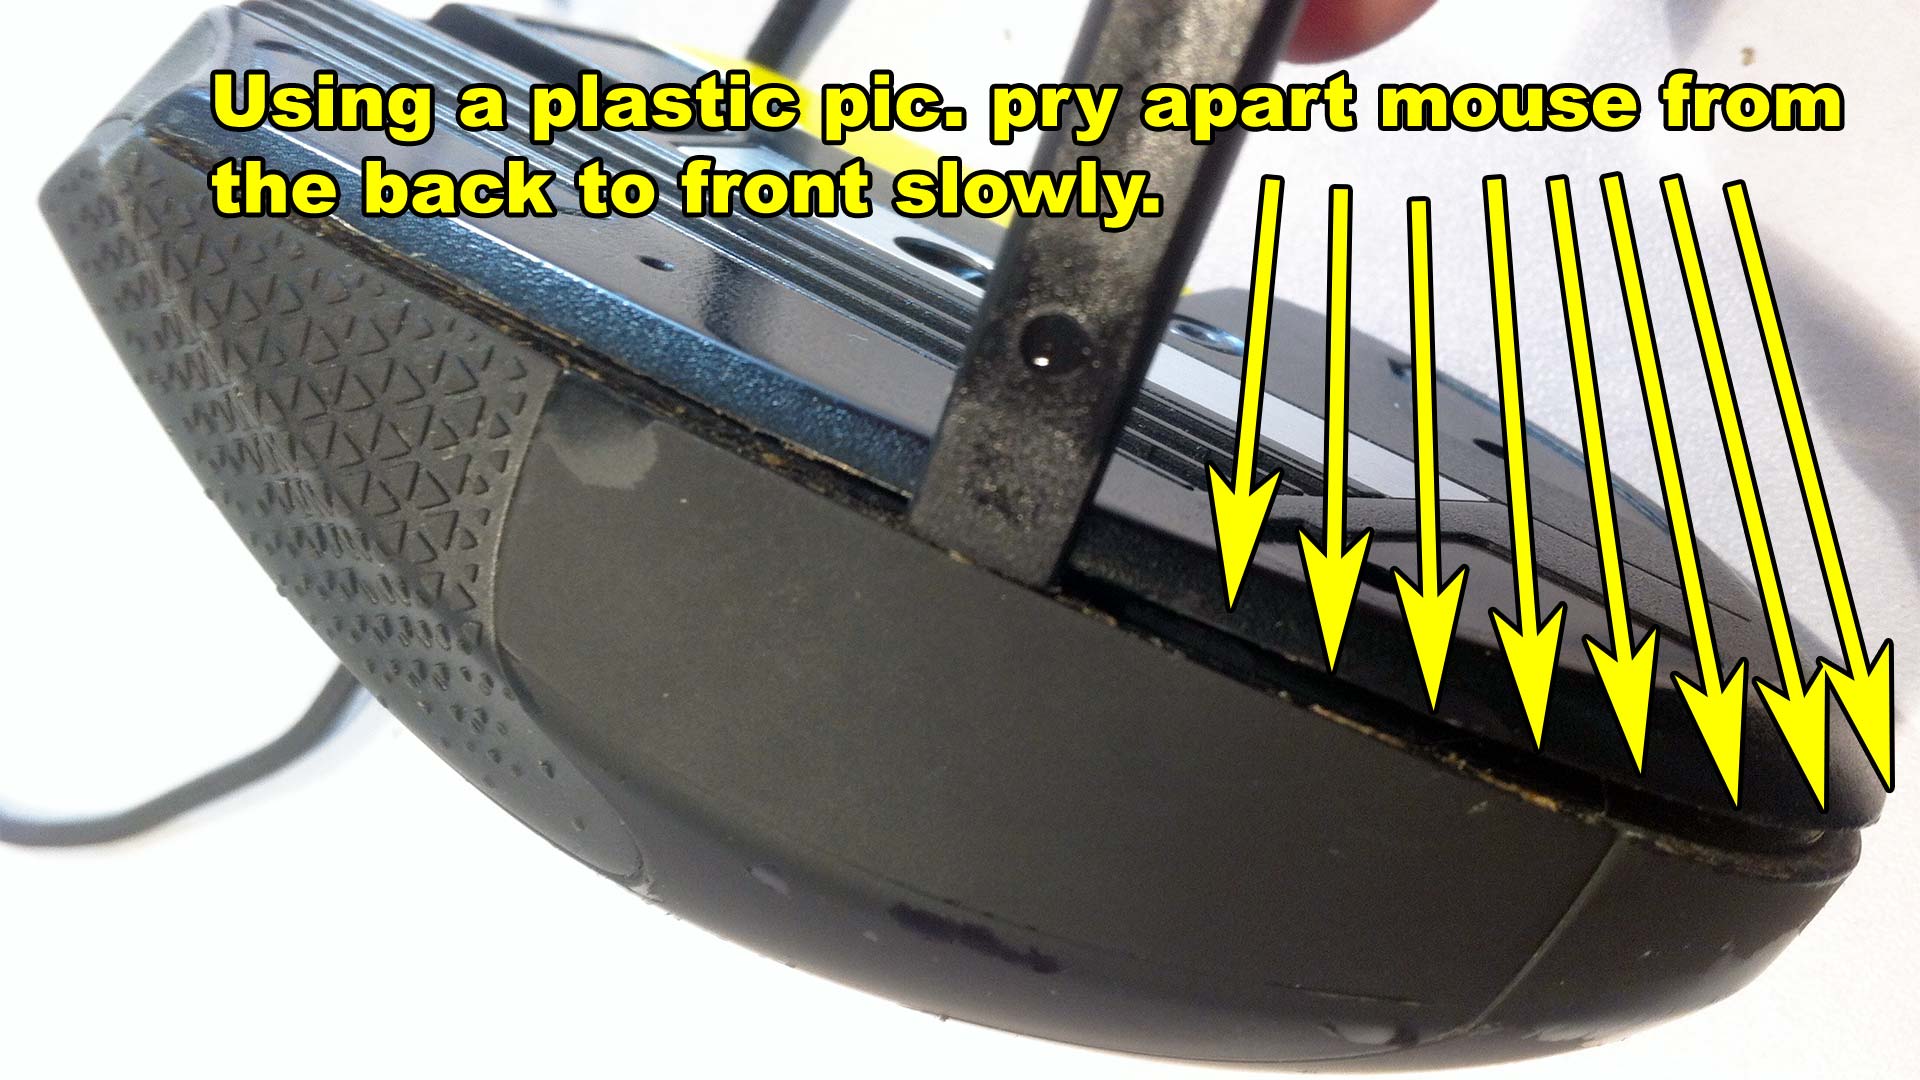 Using our trusty cel-phone plastic pry-pic we can begin popping the tabs that are holding everything in place by starting at the back of the mouse and working forward. Some people suggest that you start at the front and work your way back. We disagree as you'll be prying on your left/right button plastics which could very easily break. You can use a flat-blade jewelers screwdriver but the metal could scuff the hell out of the plastics. So be careful.
 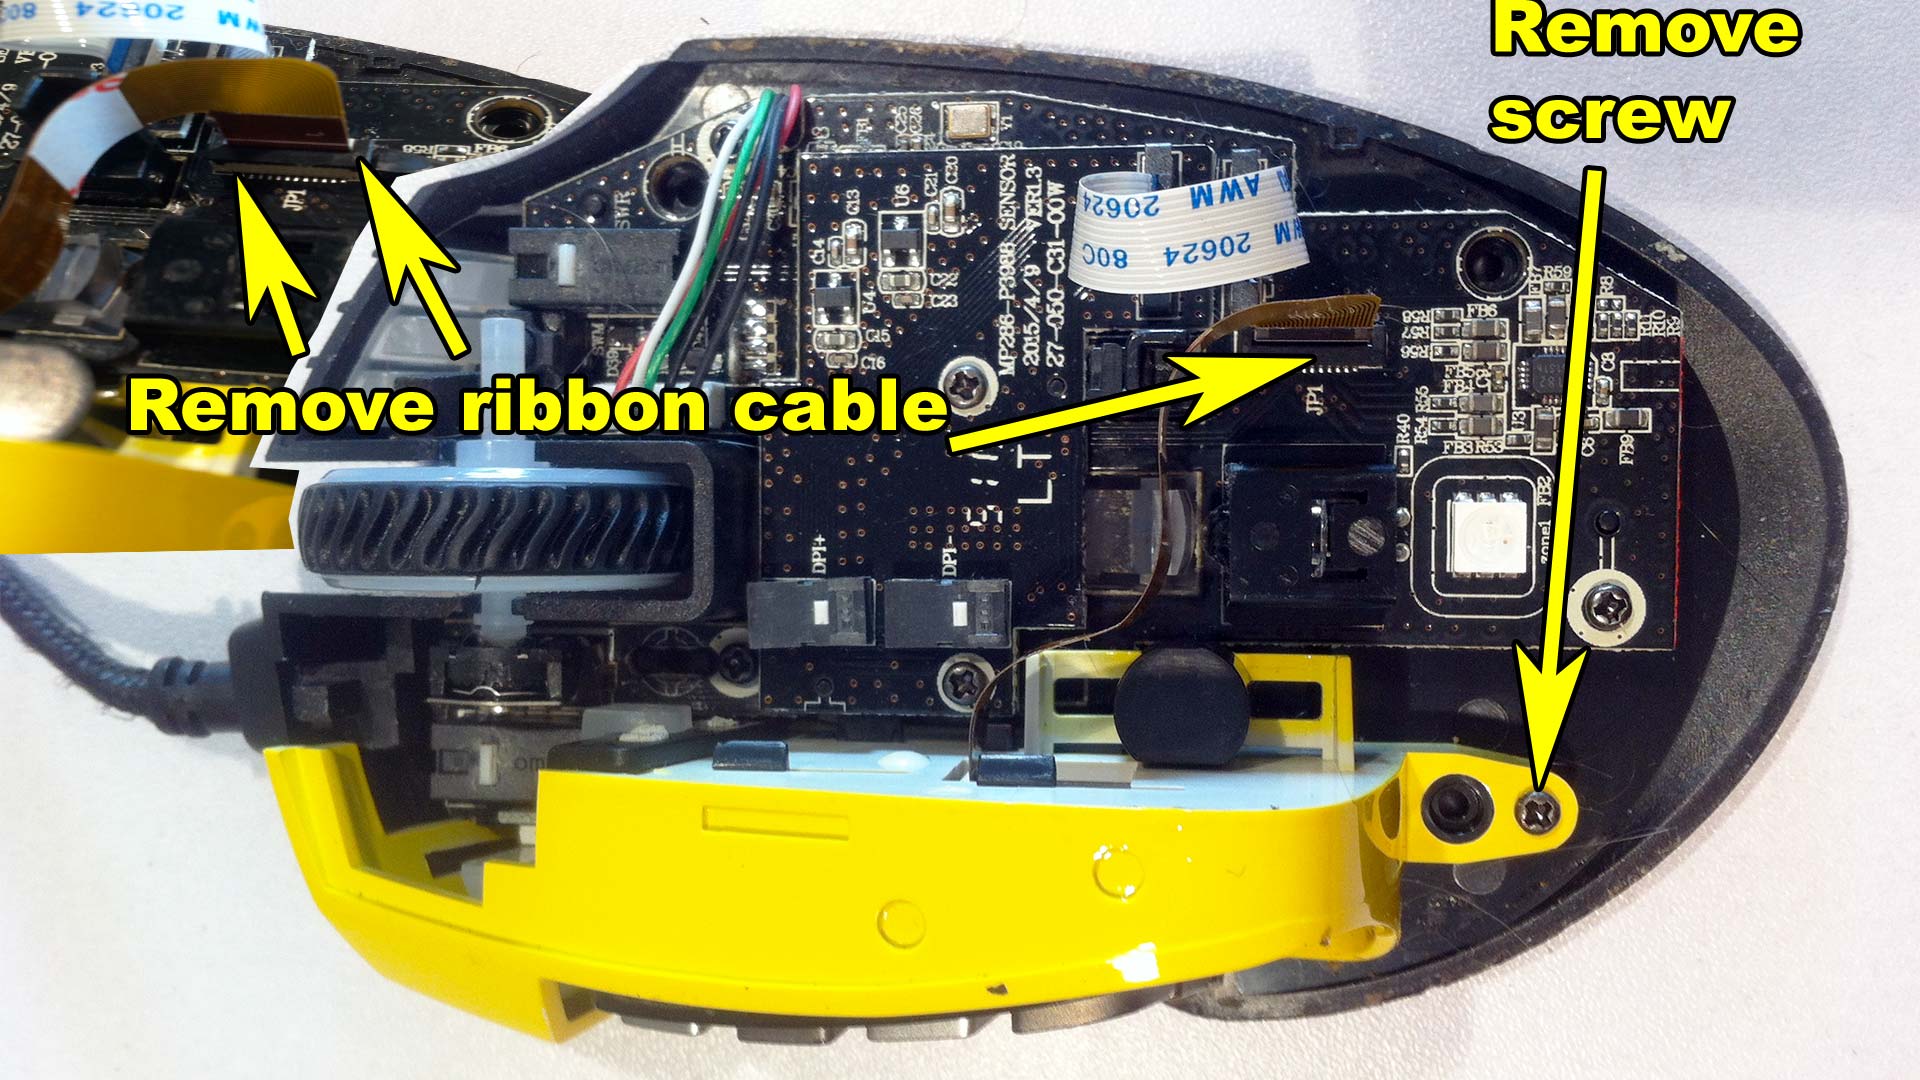 Once inside you get to see all of the glorious parts pictured above. The first thing that we want to do is remove that number pad that's on the side as parts of it are overlapping into the mainboard inside and the cable as well. Simply remove the single Phillips screw. Then with the flat-blade jewelers pull up the tabs on either side of the ribbon cable and gently tug on the cable to release. Note: do not use force on the ribbon cable! Breaking the ribbon cable connector will render your mouse useless! Once both the ribbon cable and screw are removed you can simply pull up to remove the number pad on the Corsair Scimitar mouse.
 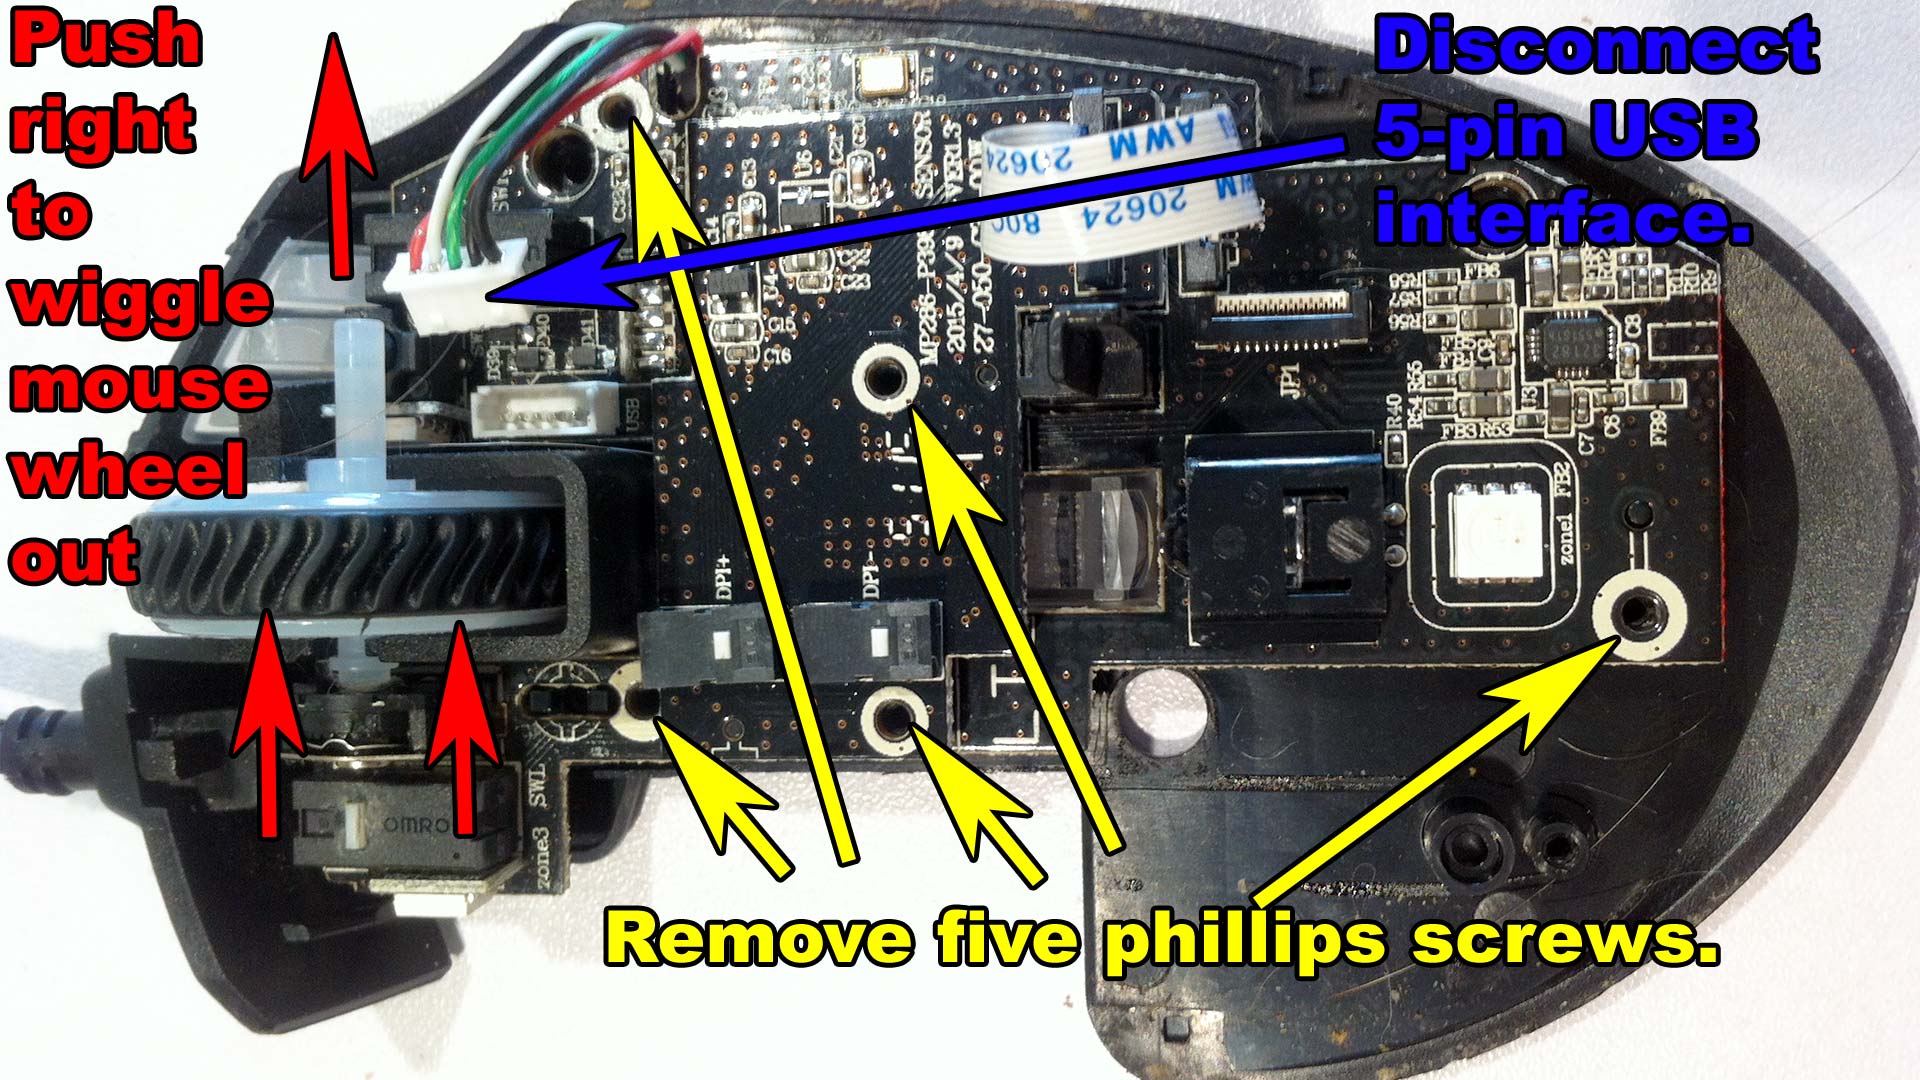 A lot of arrows going on but all of it is super-easy so we'll go through it here.
-
-
- In blue - disconnect the USB Cable. The USB cable is underneath the main board so there's nothing we can do with it right away.
- In yellow - Remove the 5 Phillips screws holding the motherboard down.
- In red - Remove the mouse wheel. This would be a great time to clean the plastic mouse wheel with soap and water as the grooves in the wheel attract dust and dirt bad!
-
That's about it. If you are dealing with sticky mouse buttons this would be the time to flip over the main board on this mouse to begin soldering and replacing said micro switches. The mainboard should pull straight up from its base. 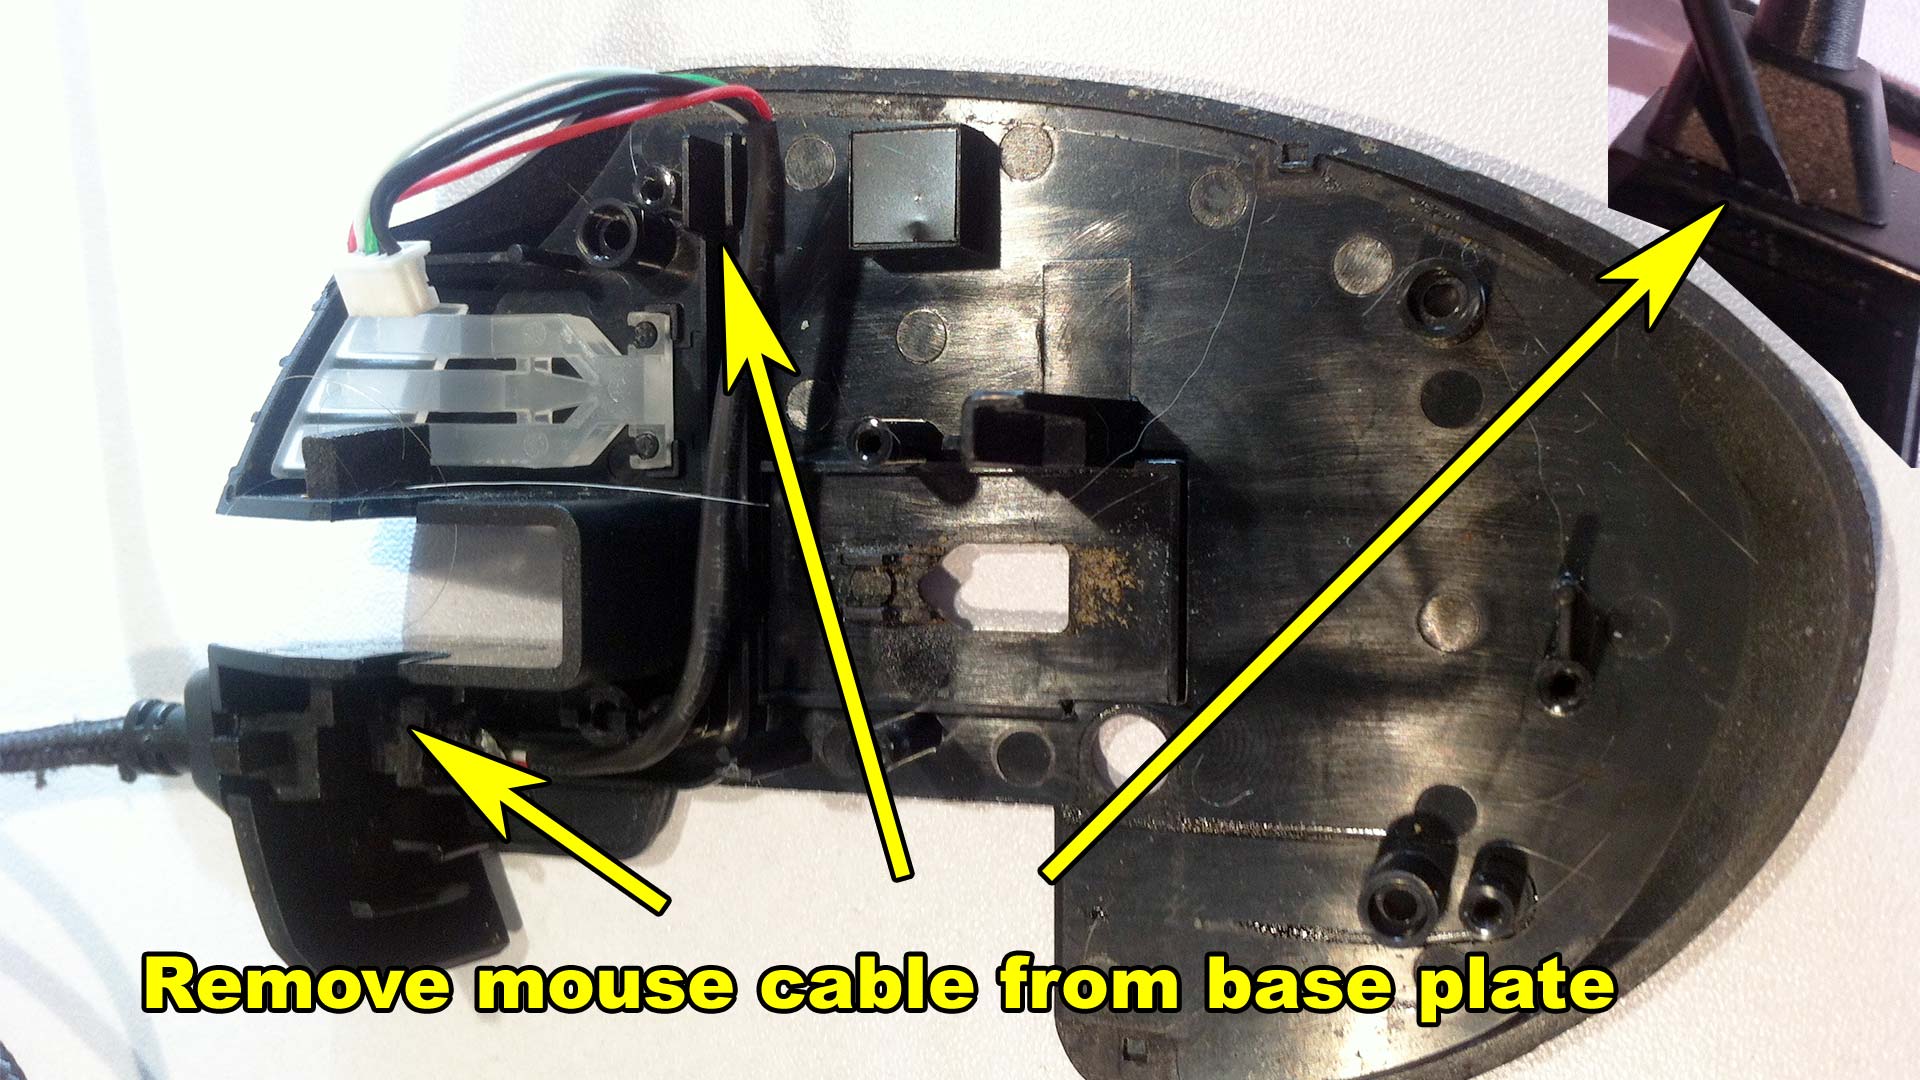 After this, we can finally remove the mouse cable from the base plate. To remove the custom boot-plug from the front of the mouse you may need to use a jeweler flat-head to wedge into the underside for the cable to pop out. Corsair was a group of assholes for making custom molding instead of going with a standard boot or even just straight-running it into the channel. We're going to change that as well. Once the cable is removed this would be a great time to clean out all of the dust and crap that was building up around the laser optics of this mouse.
 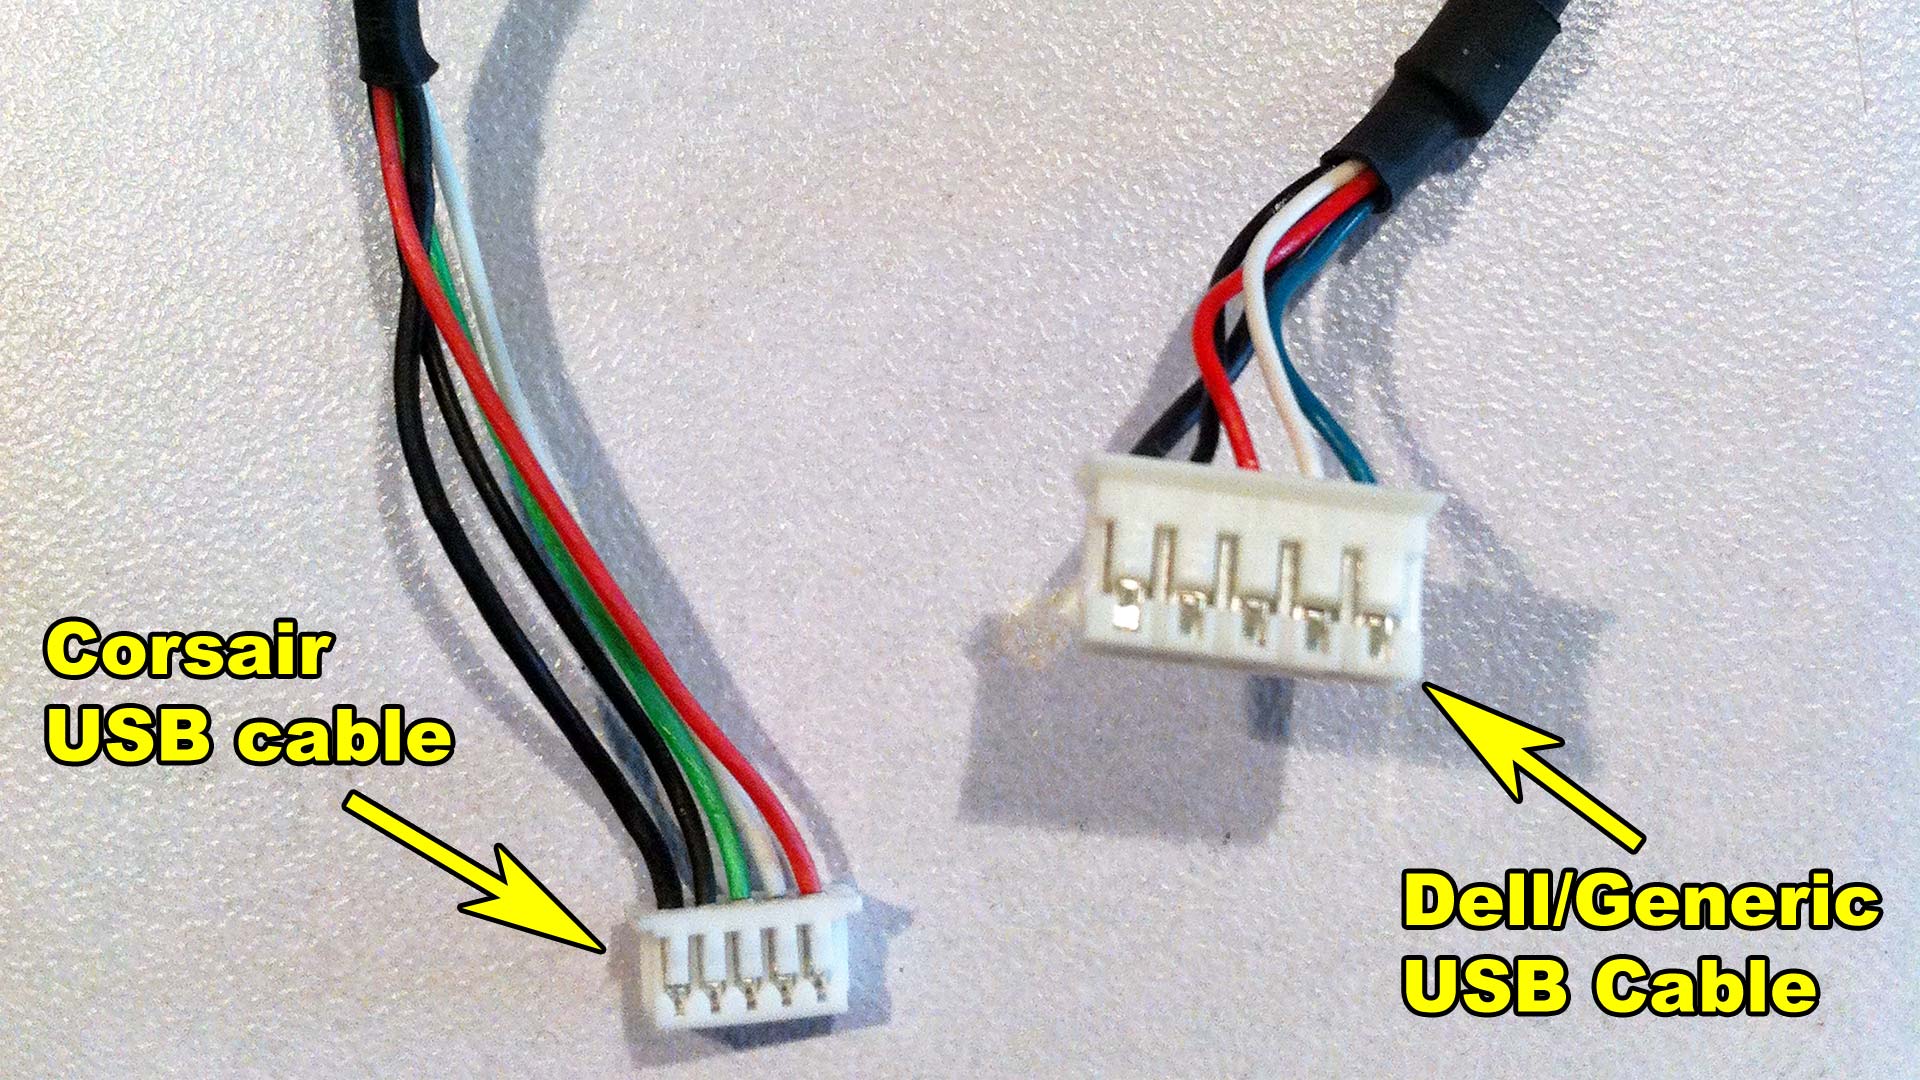 The asshole factor of corsair doesn't stop using a custom boot but also a smaller 5-pin JST connector versus conventional JST cable connectors found in most mice which prevents us from doing a simple re-pin job as we did with Razer mice. This means we'll have to cut the cables on both of them, solder, and shrink tube it together to make something usable. We're not concerned about re-using the wires of the corsair so close to the USB connector because those cables were inside the mouse and were not destroyed from the abuse the braided portion went through. Or so we hope!
 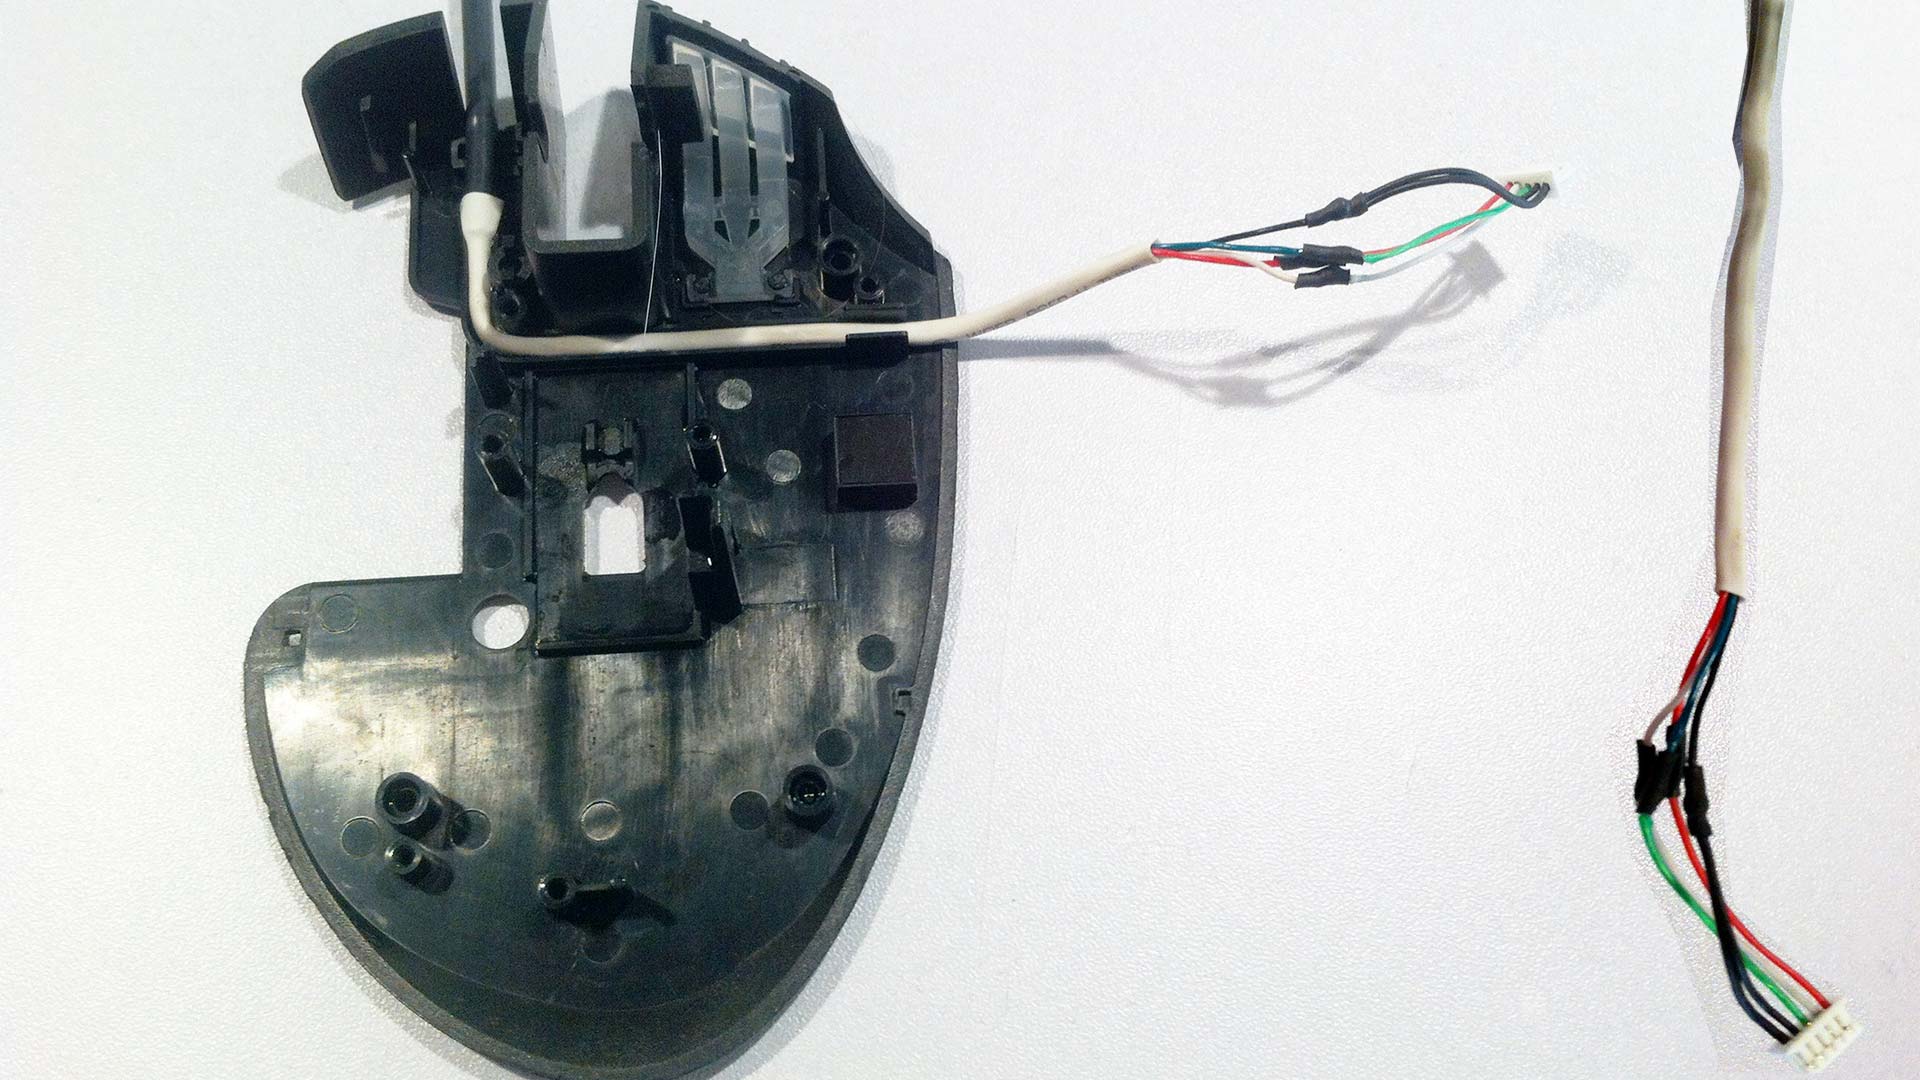 Upon prepping the cable from the generic USB mouse we got from a dell over to this Corsair Scimitar. We realized the channel was super-narrow because the insulation around the wires was almost non-existent in contrast to the generic Dell USB mouse that we're using. This means that we have to strip away an additional three inches of cable so it fits along the channel. After a lot of careful wire stripping and soldering. We not only shrink tubed up our connections; But also the three inches of insulation so the wires are rubbing raw against the channels of this mouse. Ideally, there should only be an inch of slack after you're done. We found it very difficult to close the mouse with two inches of slack that is shown above.
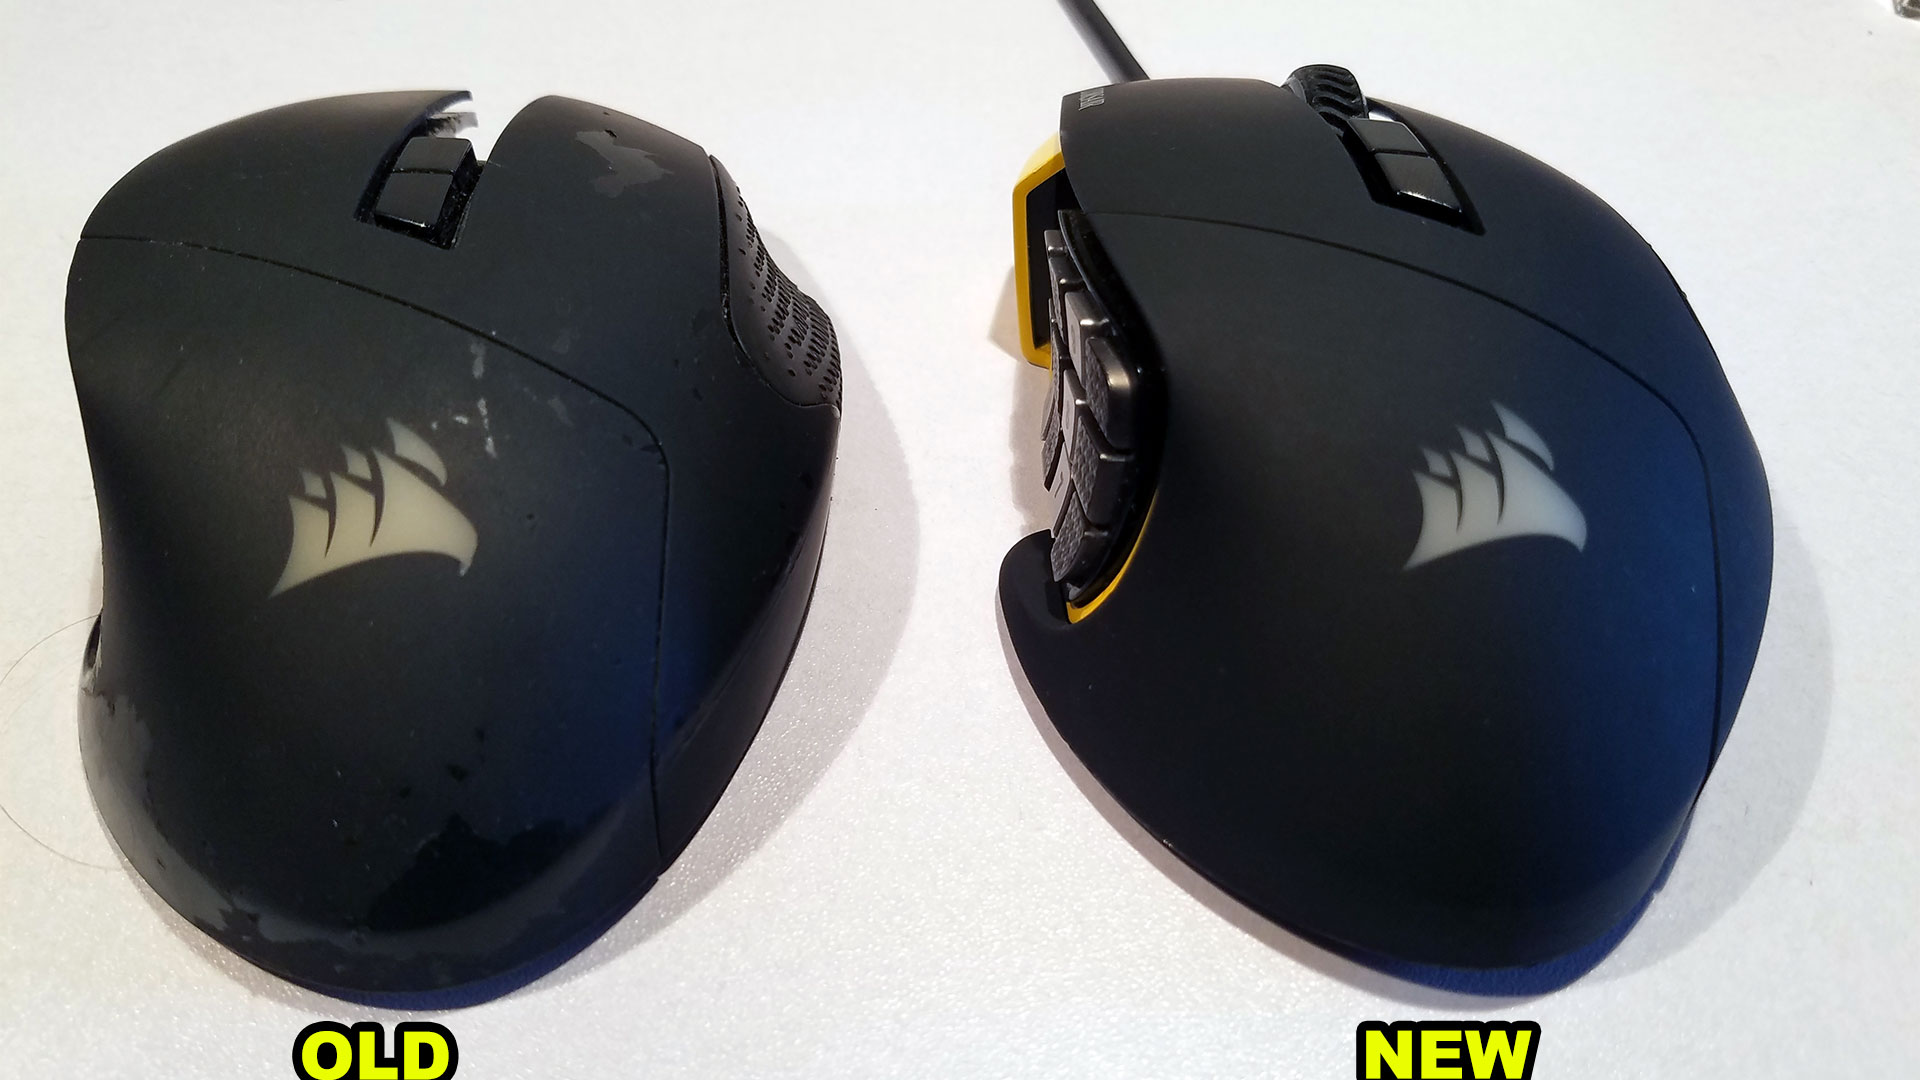
OMG, that outer casing!
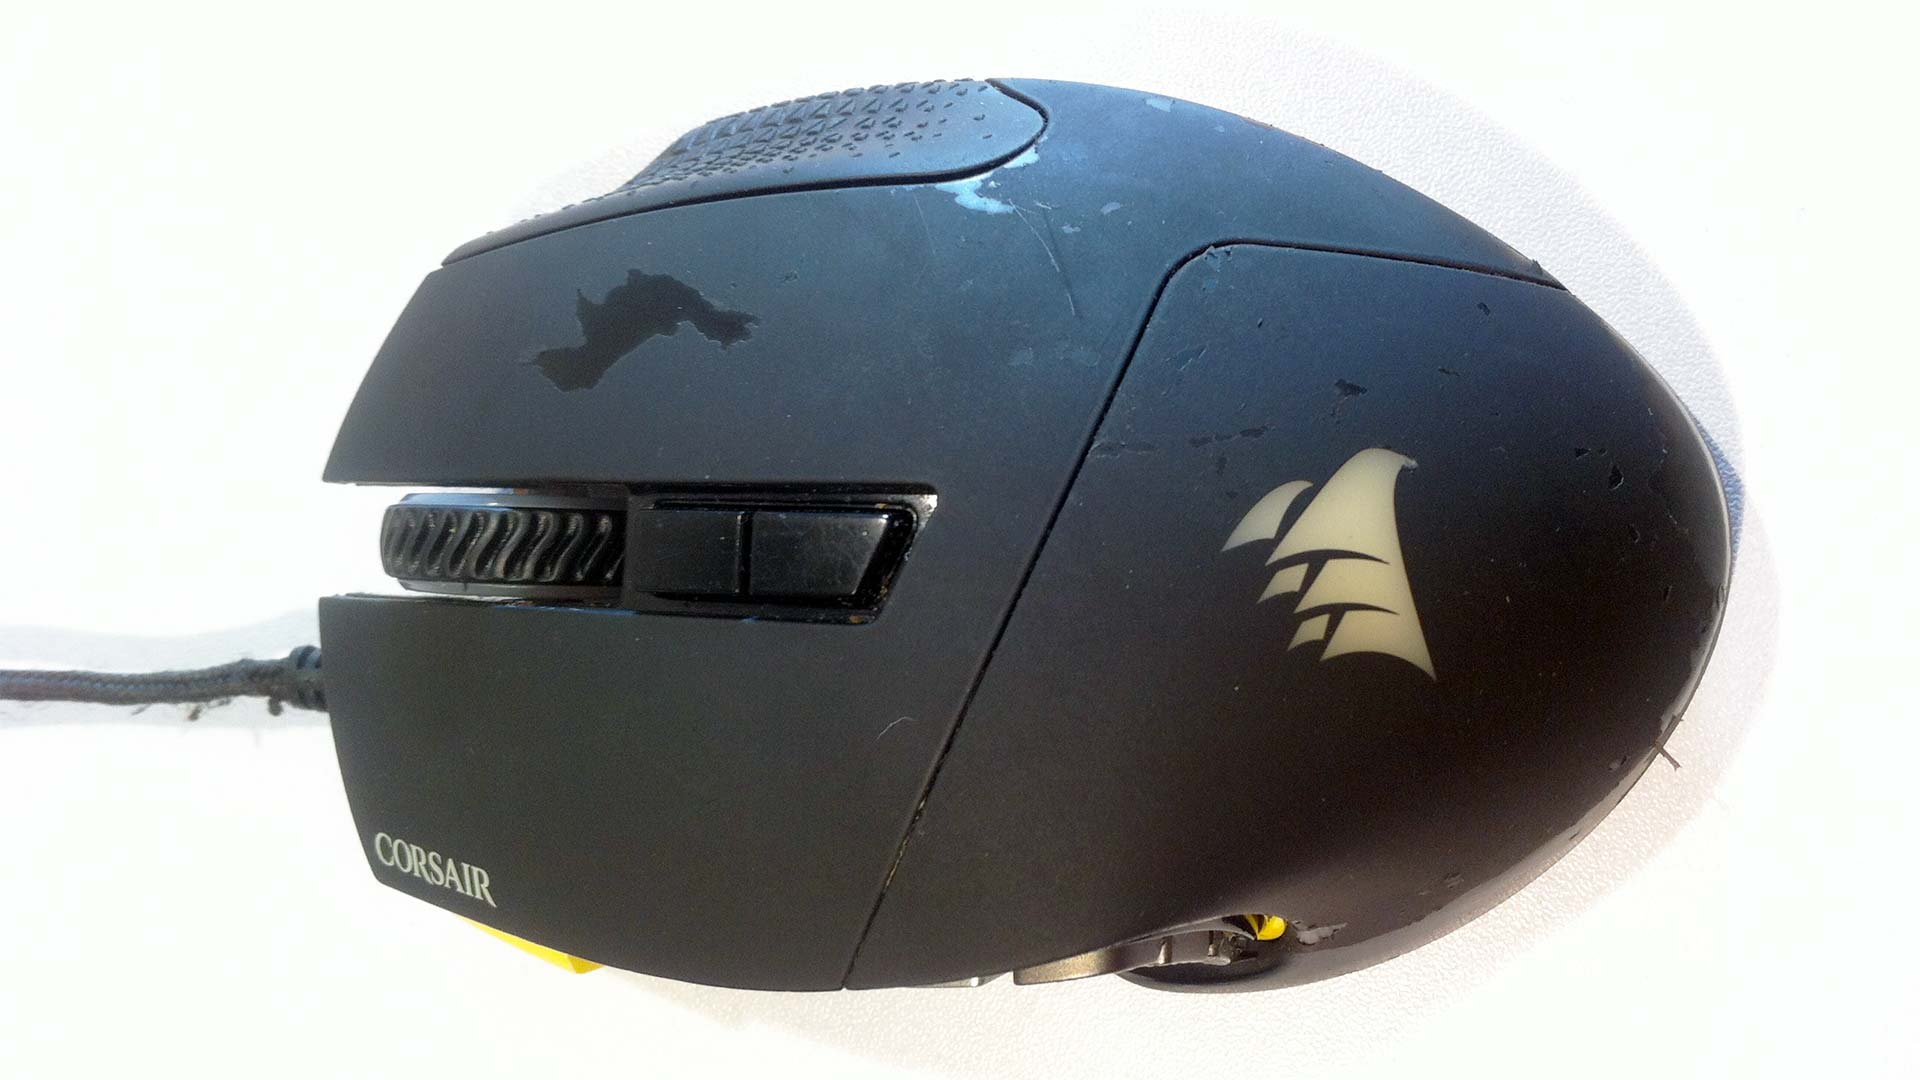 Corsair used to coat the plastic is starting to peel away and in general making that mouse look terrible. IBM also does this with their laptops by coating it in this rubber paint. But IBM's paint job was far better for their laptops. We shall hold corsair accountable for this flaw because this is a gaming mouse. This isn't a casual office mouse that gets touched once and a while to open up a word document. This type of mouse is for the gaming community. Gamers are not like Stacey from accounting. These people are constantly bouncing their mouse off of their desk, walls, forehead, penis, boobs, the kitchen stove, into the tray of hot-pockets, the toilet, the list simply goes on and on! It's going everywhere! We've been to enough gaming events to see ALL of these locations get hit by a mouse. Corsair needs to account for that.
Thanks, bootleg china for the aftermarket parts!
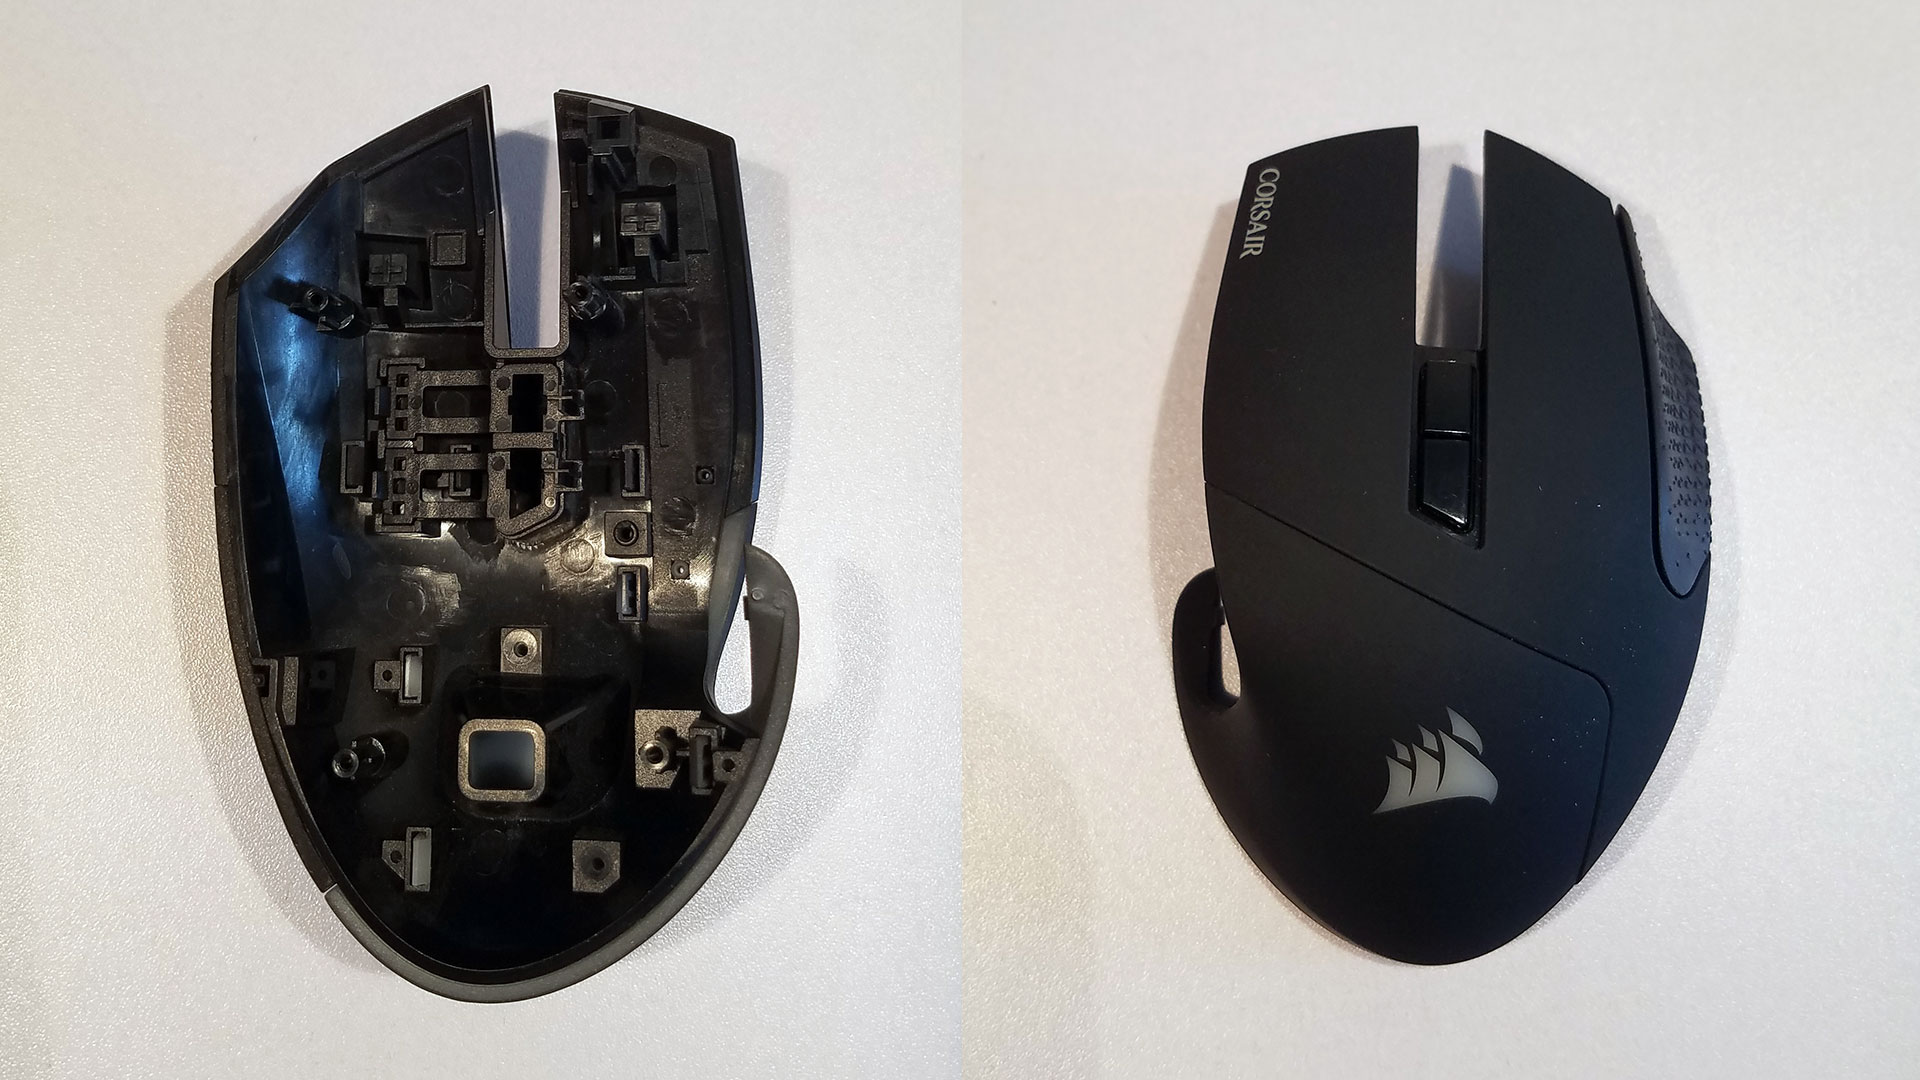 If there is one thing I do love the Chinese industrial complex is their blatant disregard for intellectual property. In this case, I was able to purchase a shell for my Corsair Scimitar mouse for $12(USD) with free shipping from a dealer off of Alibaba. As of 09/30/2020 we checked Alibaba again and found that any instance of corsair mice shells have been completely obliterated off of their site.. Oh sure! It took about 2 weeks for it to get here. But it arrived and is a perfect replacement part for my outer shell. Which begs the question.
Why doesn't corsair sell the aftermarket product themselves?
Greed? I guess?
 Corsair could even throw in some mouse pads which you have to peel away anyways to get the shell off and mark it up a few bucks. But the answer to this question is fairly simple. They could give two shits about the environment! No seriously! They would rather you dump the cable, the circuit boards, all of the electronics right into the landfill and shell out another $50-60(USD) for a mouse then repair the one you got which only has worn out plastics. Or tabs broken on the inside because you're inhuman fingers are giving the mouse buttons the 5-finger Kung Fu Punch of death. Of course, you could fault us for doing the same with all of the mice that are destroyed in these articles but at least I'm recycling parts to keep another mouse out of a landfill.
Greed is a double-edged sword. On one hand, you have a company that just wants to destroy your mouse every year so you buy another. On the other, you have companies around the world who will stomp on your product to make a fast buck. Neither side is right. But it just illustrates how inherently wrong the entire electronics industry operates.
The second problem - Outdated Firmware/BIOS.
"Note: If you get a black screen but the audio is playing. Or you got a potato PC and it's studdering. We have fallback Links below."
Video tutorial fallback mirrors:
In case you have no-script enabled or for some reason cannot see the title video on this website. We have provided direct links for these videos. For more information about the standards we use on this site click here if you would like to know more.
AV1       - Link
MP4/.h264 - Link
OGV       - Link
Now, this should be the point where I would show you the mouse is working and give my final thoughts about this particular mouse. But no, the fun doesn't end there. This particular mouse was broken and unused for more than a year. Unlike Razer which doesn't give a shit if you're running an old firmware and instead will just have their program nag you for an update. Corsair decided to take a total dick approach by not even using default color schemes. Instead, they are going to make your mouse flash this annoying purple at you until you do something about it in your Corsair Utility. This, in turn, forces the user to download their bloatware utility onto their PC. Not to mention prey the end-user is running a Windows-based environment to do the update properly on. 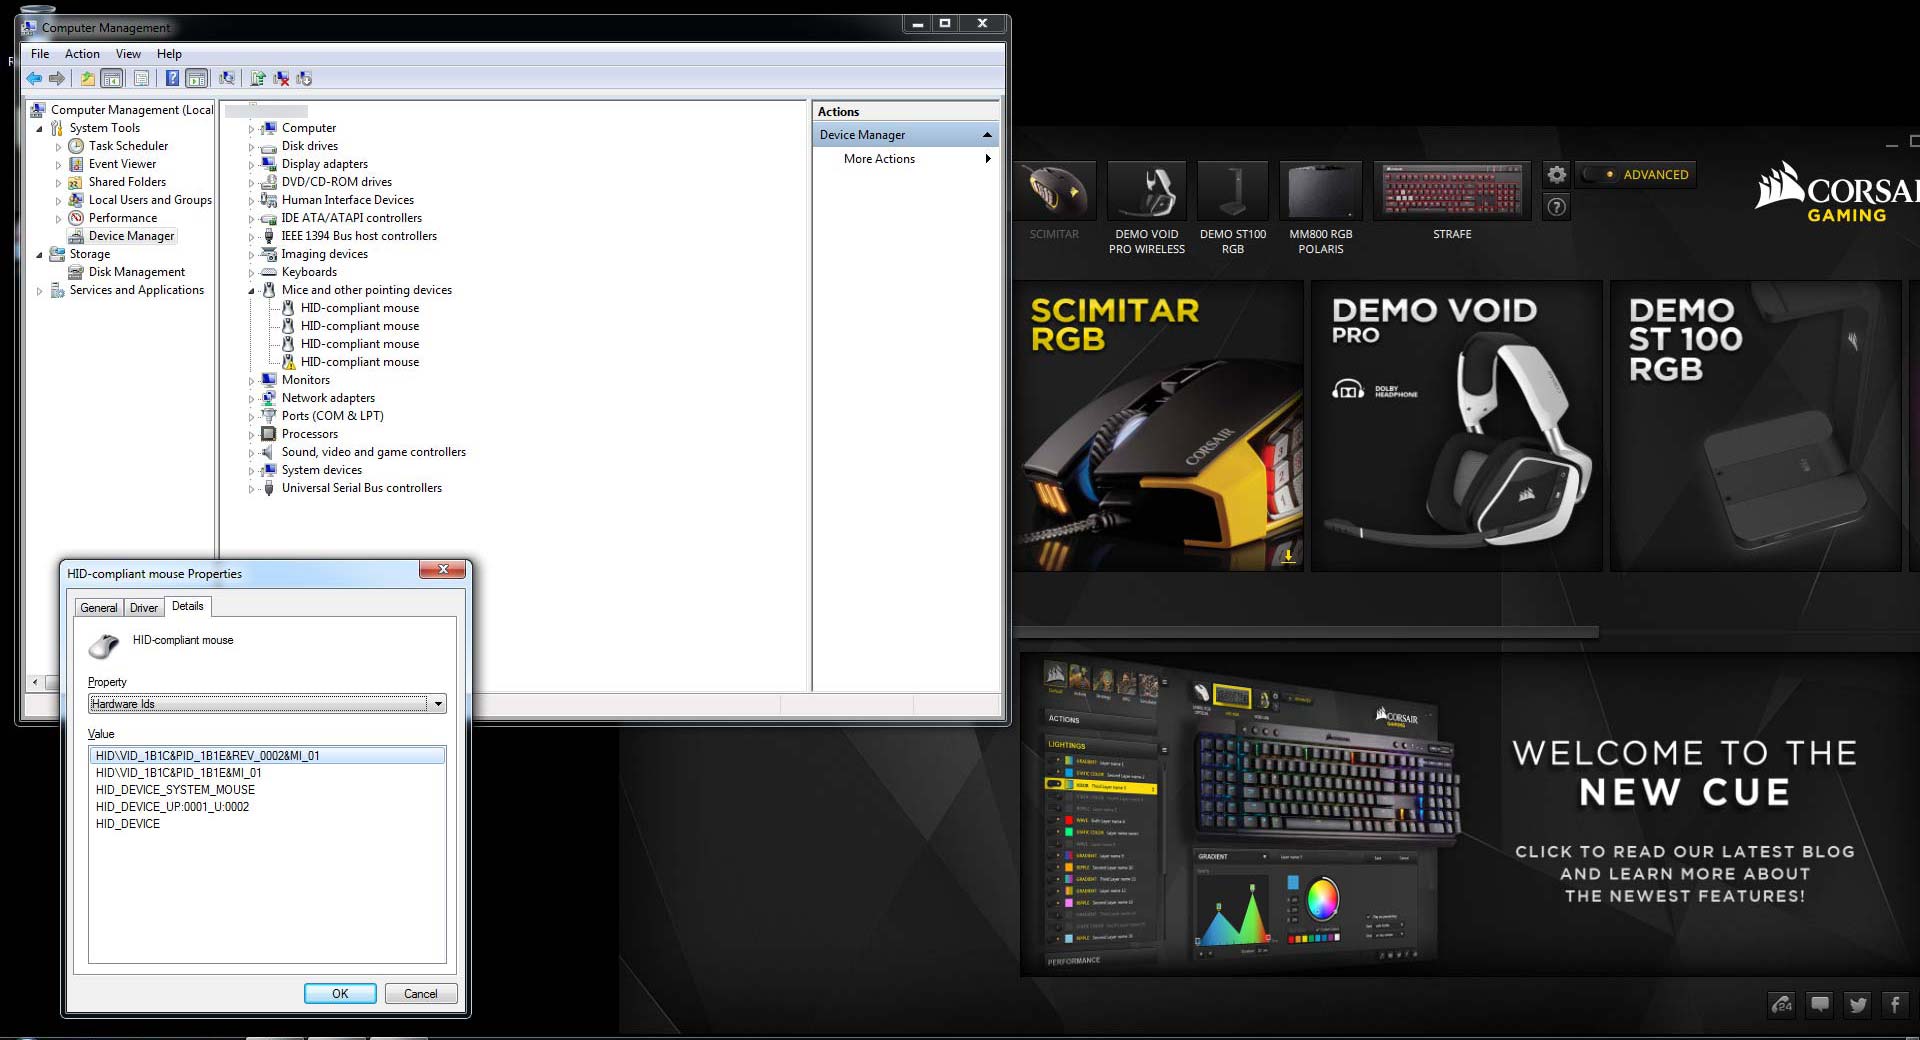 Now my repair DOES work. If it didn't then there would be no detection in Device manager as well as the Corsair Gaming Utility. HID\VID_1B1C&PID_1B1E is the ID underneath a windows 7 environment.
 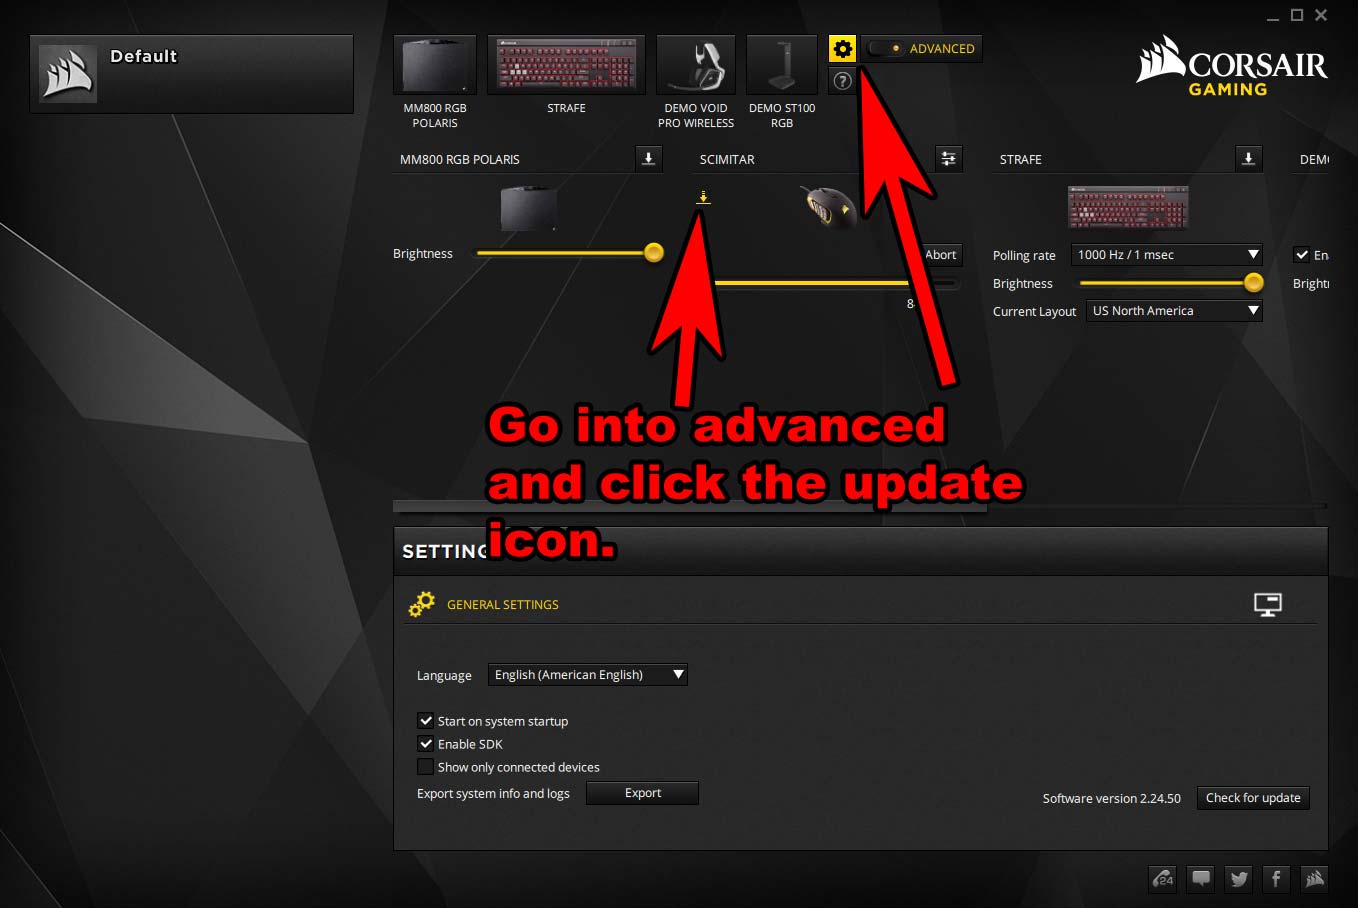 Updating the mouse is however easy. First, you might want to check for updates at the bottom to entire you have the latest Corsair Gaming Utility. Next, you'll want to click on the advanced button and there should be an update icon next to your Corsair Scimitar. Click on that icon and it should push new firmware down to your mouse.
 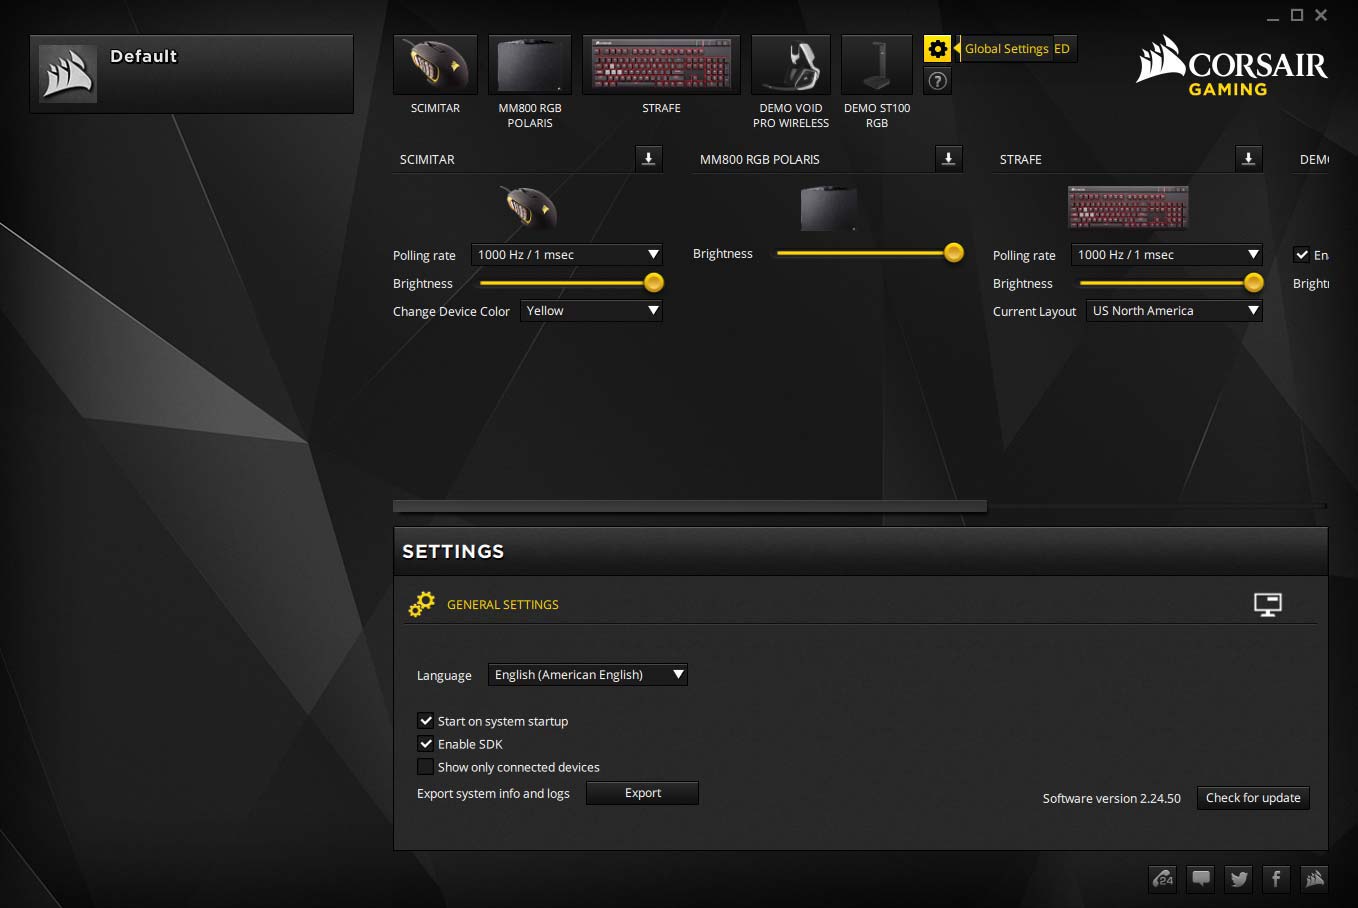 After the flash, your Corsair Scimitar mouse should return to default colors and ready for you to modify within the Corsair Gaming Utility.
"Note: If you get a black screen but the audio is playing. Or you got a potato PC and it's studdering. We have fallback Links below."
Video tutorial fallback mirrors:
In case you have no-script enabled or for some reason cannot see the title video on this website. We have provided direct links for these videos. For more information about the standards we use on this site click here if you would like to know more.
AV1       - Link
MP4/.h264 - Link
OGV       - Link
As you can see. The Corsair Scimitar is working fine after the bios update.
Update 12/2/2018 - Mouse button issues - Round 2!
I decided to use the Corsair Scimitar for work. It's so far been a good mouse and it feels nicer than the Microsoft mice that we have at work. Unfortunately; Similar to my M65 repair it seems that after about six months of use the buttons on this Corsair Scimitar or deteriorating rapidly. My opinion is starting to change about Omron switches. Either we should take Kung-Fu lessons because my fingers are capable of performing the 5-point death punches capable of destroying any micro-switch that my hand touches.
Or, the mouse buttons on these do not last long at all! The failure got bad when we were editing an Adobe Illustrator document and it was false-clicking on the wrong objects in the chain as well as de-selecting certain objects that were previously selected. This is not what you want to have happened at 11 pm in the middle of graphic arts and this certainly is not something you want to have happened in the middle of the gaming experience. 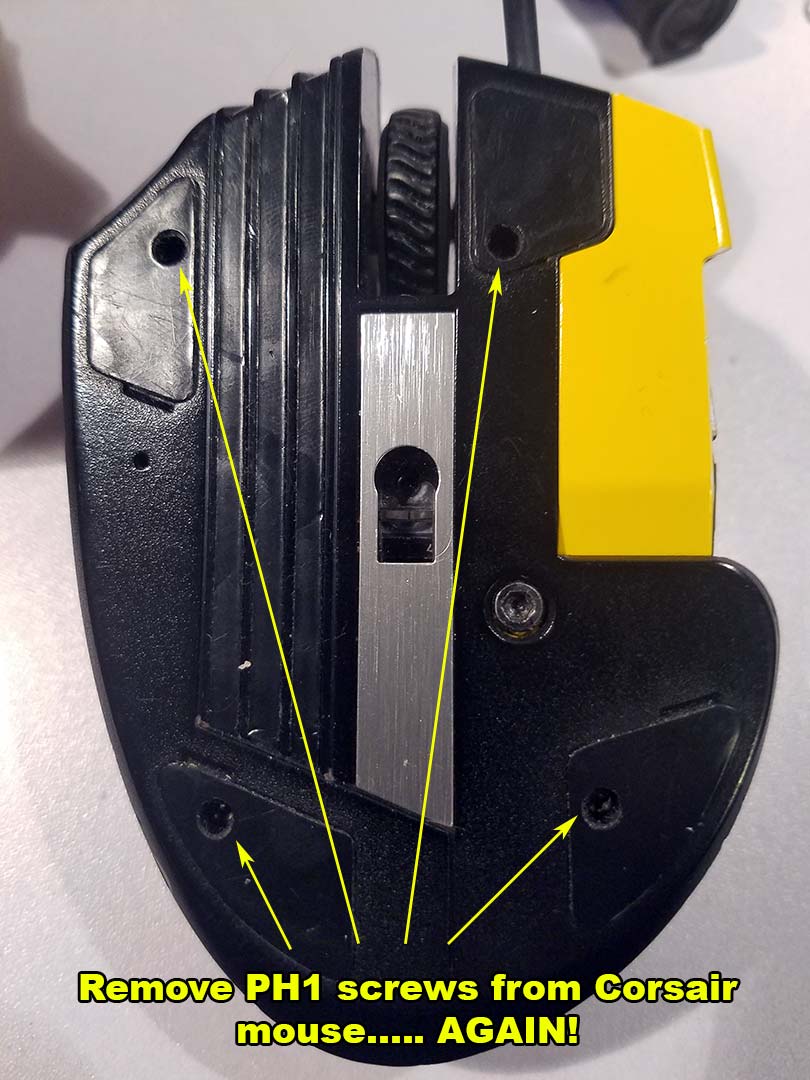 It's a good thing that we engineered our mousepads to have the screws accessible. If you didn't do this then you're probably going to have to bust out the Exacto blade and pry off the Teflon feet once again to gain access to the mouse.
 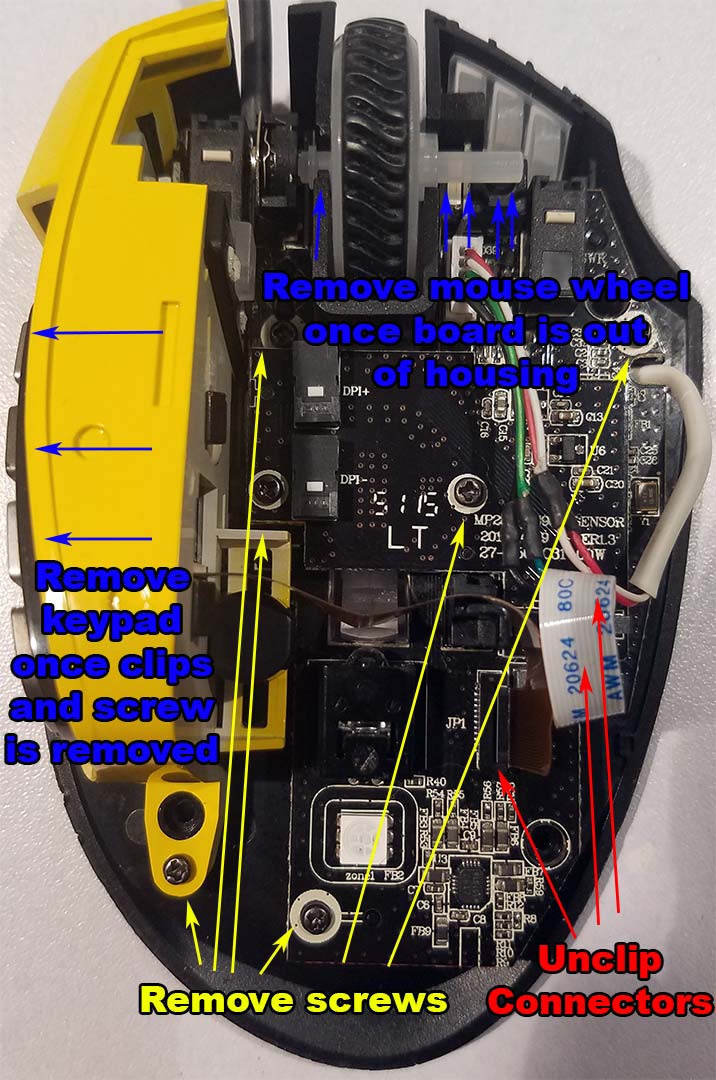 Similar to replacing the USB cable we're going to take out almost everything from the Corsair mouse with the added step of disconnecting the Sensor board cable as well as we will want to get that out of the way so we do not damage it during soldering. Once again a lot of arrows going on so we'll break it down:
- In red - Unclip the edge connectors going to both the keypad on the side of the mouse as well as the optical board. Two in total.
- In yellow - remove all of the screws. This should make almost everything in the mouse fall right out.
- In blue - you can slide the number pad off to the left and the mouse wheel you should be able to lift one side up and then wiggle the other out of its socket.
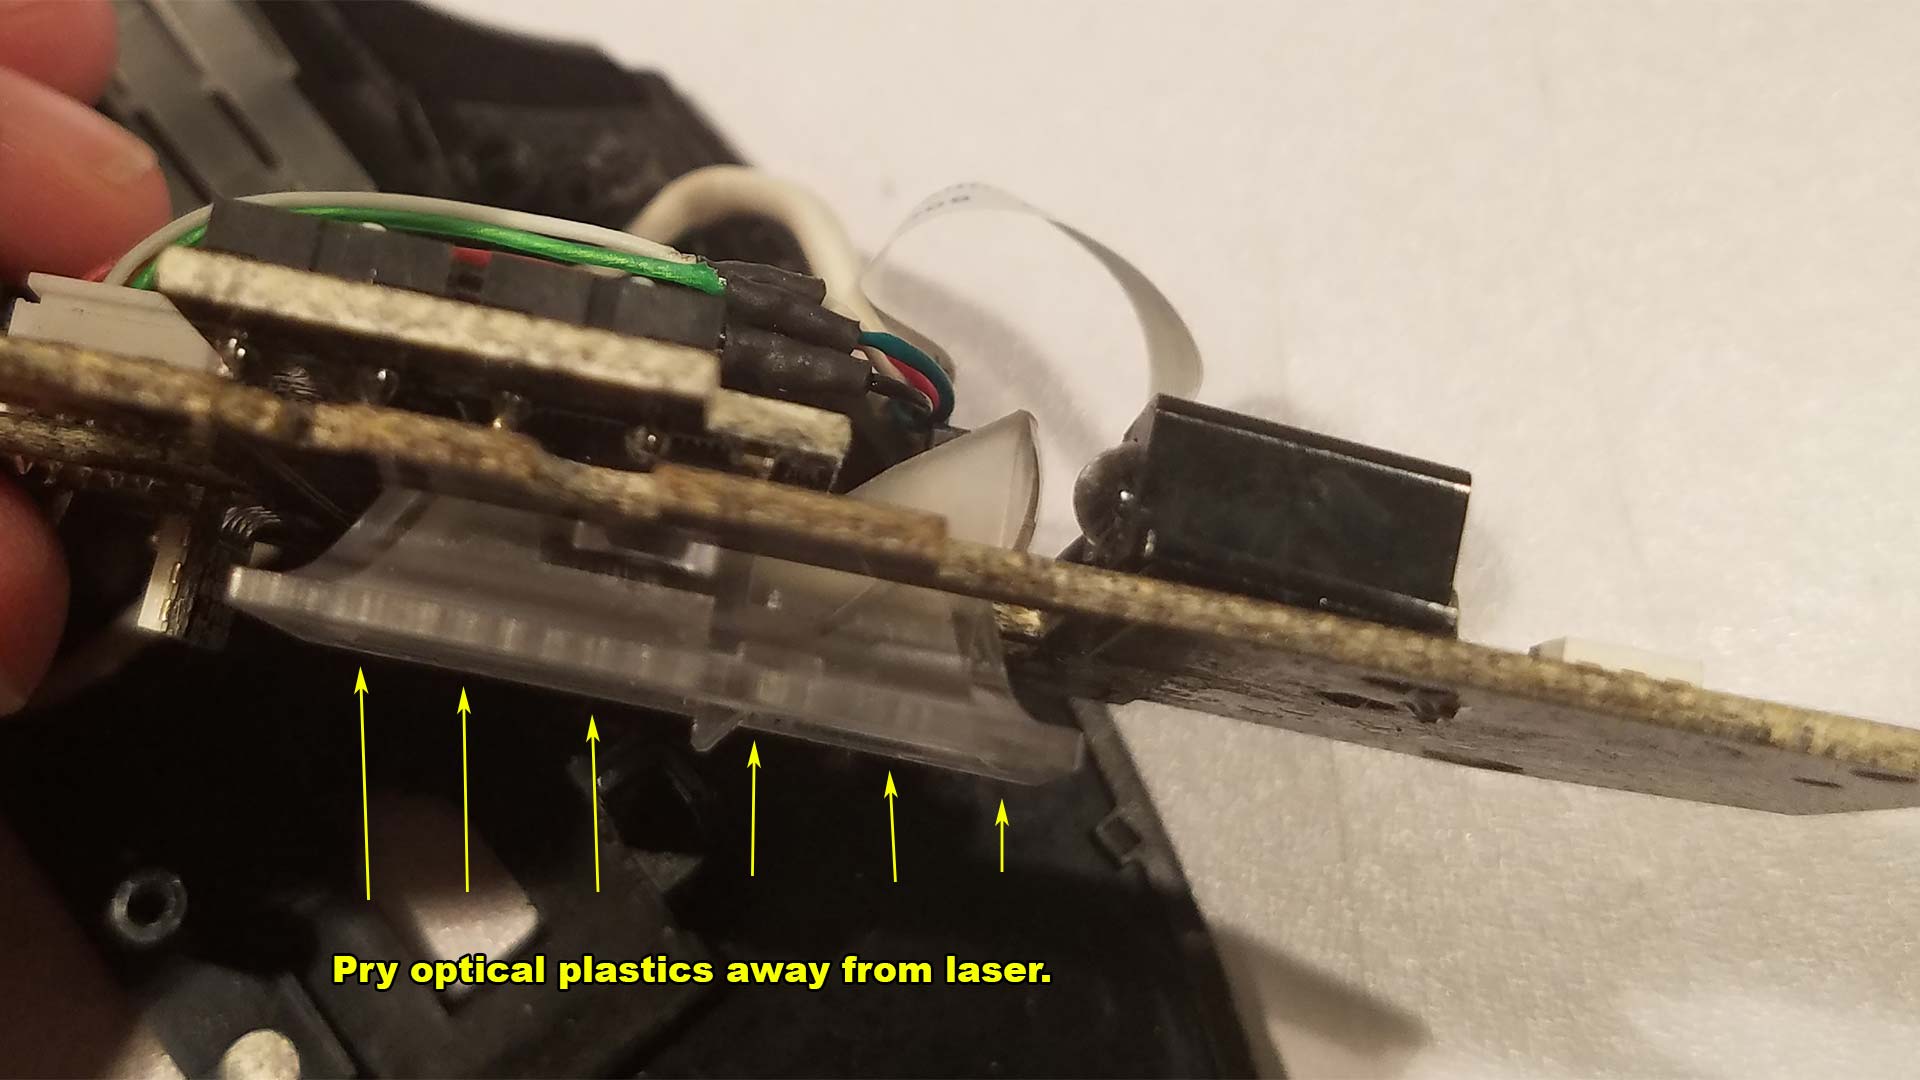 We will want to gently remove the plastics that are covering our optical assembly for the daughterboard to be able to be released from the mainboard. this will strip away the last piece for us to begin work on the repair. Cleaning this optical plastic could resolve some issues you may have with a jumpy mouse or not sensing certain mouse pads.
 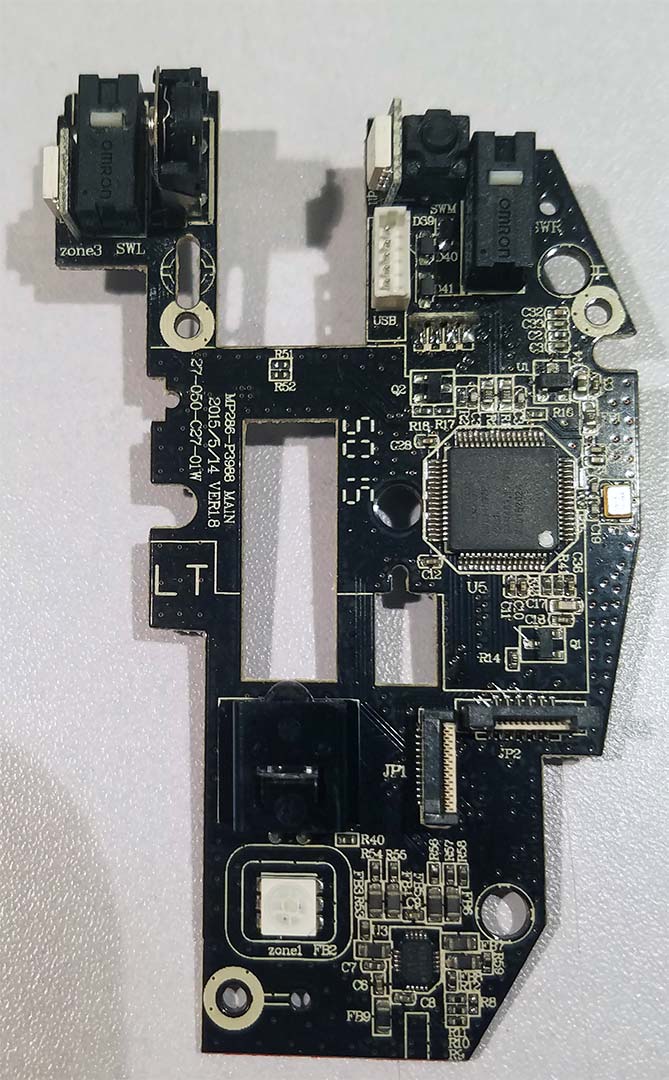 With everything stripped away you should see what is pictured above. Our Corsair Scimitar board with the two Omron switches just like the Corsair M65 repair.
If a part doesn't de-solder nicely. you shatter it!
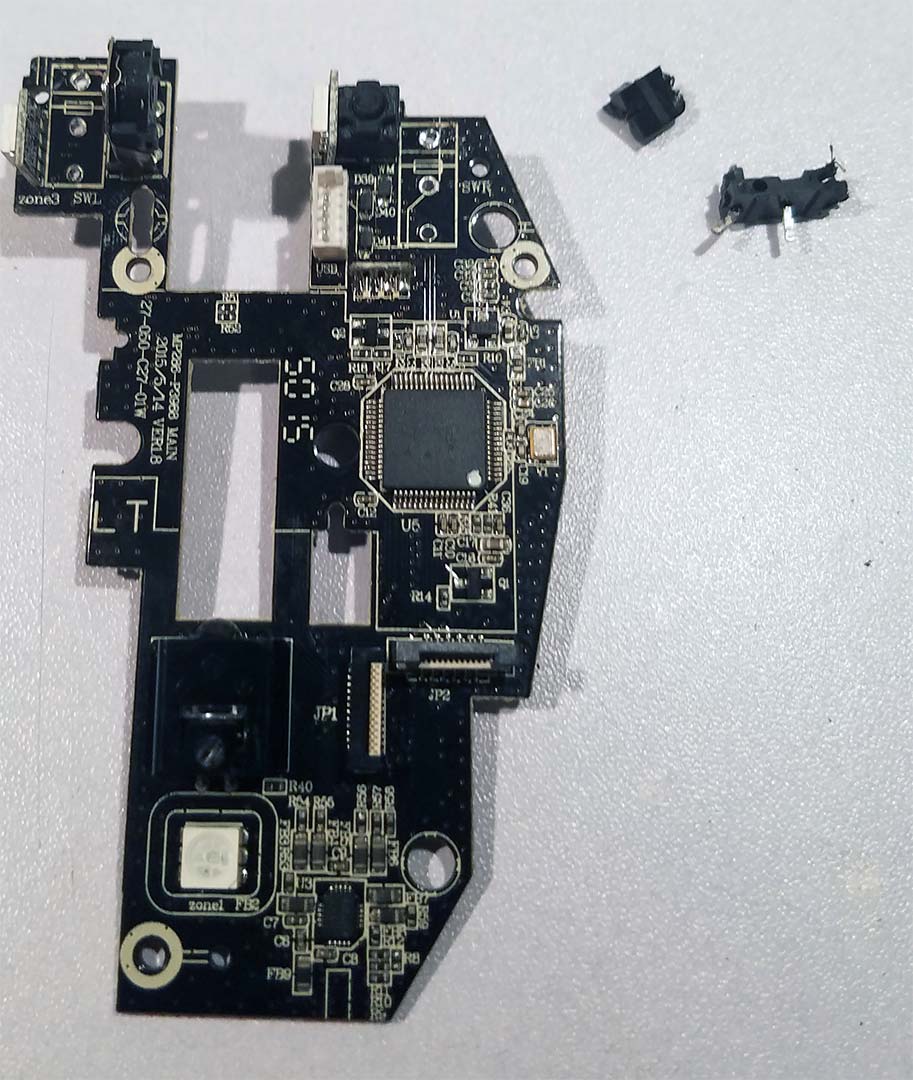 This would be the point where I would tell you to use some solder to break up the existing RoHS solder that is on the board and like the M65 they should come out easily. Unfortunately, the Corsair Scimitar has a lot more grounding going through the mainboard than our M65 repair. This resulted in certain pins getting stuck no matter how much new solder was added to the pin. We ultimately had to break out some wire clippers shallow enough to dig into the Omron switches and destroy the plastic housing until it's just bare pins. Then, using our soldering iron we were able to extract one pin at a time out. Then a final cleaning to get the remaining solder out of the holes.
 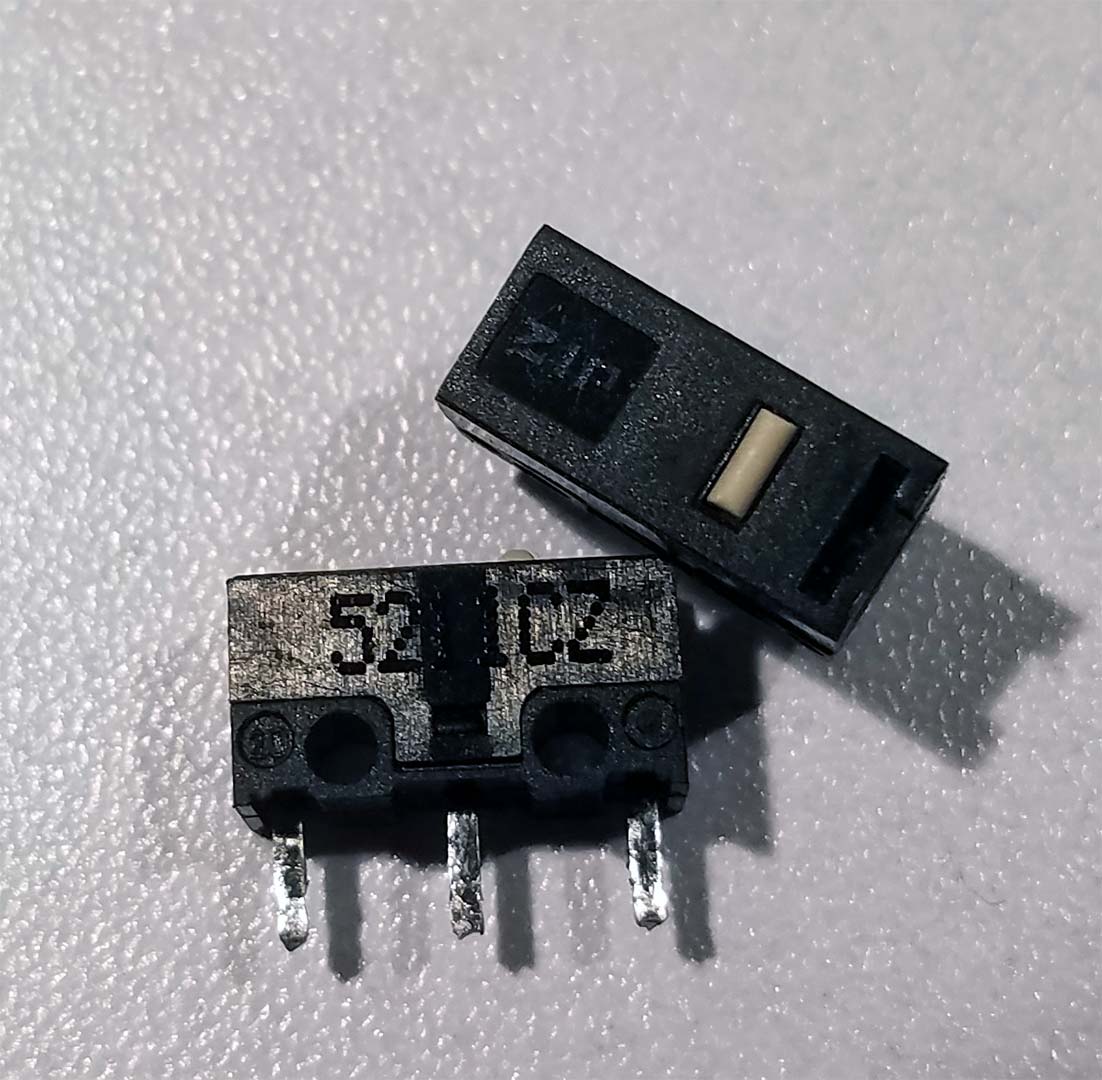 Like in our previous mouse repairs we decided to salvage switches out of all dell-mice. Because even though the switches are the third party the buttons in a lot of the dell mice we've had throughout the years seem to last forever. If you want to purchase instead of salvage we have some links to help you out there. The left and right switches are Omron D2FC-F-7N20M0. If you prefer new switches then here is a link on where to purchase.:
- Left/Right Mouse button on eBay.
- Middle Mouse Button from Digikey.
Alternatively, you could also go with cherry switches for your left and right buttons as we think they would be better quality than the Omron.
Buttons not fitting/pressing down after re-installation.
If there is one thing I have to stress during the step of re-installation is to make sure your micro-switches are as flat as humanly possible. A gap even as little as 0.5mm can cause the switches to be pressed down in the clam-shell casing rendering your mouse UN-usable. We also found out that the switches we salvaged had a slightly taller button to them. we passed a file on the rounded section of the button until it was within the tolerance of closing out the mouse lid. It was a bit of an ugly hack but it allowed me to once again breathe new life into my Corsair mouse.
Final Thoughts.
We suppose we could've made our build a little better by salvaging the boot. Rotary tooling or drilling out the wire inside to line our own. But that mouse cable isn't going to go anywhere. At least as long as I don't flail it around like a morning star such as what the last user probably did. We should be good to go. Even if I did go nuts on it there's enough of a valley to keep everything in place.
The old becomes new again.
 Corsair wants to believe that they are new and innovative by putting a number pad on a mouse. That it's some sort of new way to control your game. Which we're sorry to report that we're old enough to remember the early 80's of gaming where Intellivision and Coleco also thought that it was revolutionary to put number-pads onto devices where there shouldn't be. Or to be more precise than people know how to use a telephone so using a controller or mouse is the same thing. It's a very conservative stance that we thought died out long ago. But hey, thanks for the necromancy Corsair!
Not so much for gaming, but more for OBS
Be it as it may there may still will be a use for mice such as the Corsair Scimitar just not the way Corsair thinks. In the world of streaming such as "Open Broadcast Streamer" or OBS for short you sometimes assign macros for special video effects and transitions. As you can set up numbers 1 through 12 as F13-F24 which most keyboards wouldn't have. Another thing that could come in handy is games such as Fortnite where they want to use a convoluted control scheme to build as well as inventory management and fight to have a number pad maybe a little handier than having the Corsair M65 mouse where the 'sniper' button simply slows down the DPI rate.
Dear Corsair,
We do like the builds of these units. but certain aspects need to be better. Like actually having an NVRAM state on your gaming keyboards and mice so that it can remember the last color scheme it had without the assistance of the Corsair Gaming Utility. Also, fire your engineer that decided to go with a single coat of rubberized paint. That was terrible. To the engineers which cripple the mouses function unless they do mandatory updates. Fuck you as well!
The only thing that makes you less of a monster than Razer is at least you don't mandate e-mail sign-ups as a means of getting a few extra pennies in marketing lists.
That's all server has to say.
+++END OF LINE
My middle mouse button no longer works reliably (I can get it to work momentarily by clicking while holding it on its side, but it will become unresponsive the next day). The right mouse button is also beginning to fail. I want to replace all the switches, but I want to have the parts before opening the mouse. What should I look for the middle mouse button switch?
Thanks :)
This is a part that neither Omron nor Cherry made.
6mmx6mmx6mm switch with a 1mm actuation through-hole 2-pin. part TSF-1166Z . Trying to find a cross-over on Digikey/mouser but if you type in that model into google it will take you to Aliexpress.
Apparently what makes this part so special is that it's waterproof.
Informative guide! Having modded arcade sticks before I appreciate it! I have had a SINGLE button failure(?) after 2+ years or longer of consistent use, oddly enough the G10 button seems to be unresponsive despite being one of the least used of all. Having gone thru the iCue and attempted reprogramming seems not to work I am left wondering if it is a hardware problem. It still lights up w/o an issue and seems to press in and click just as any other and yet I cannot get it to function at all, any thoughts?
Today I'm using your guide to change the cable of my Scimitar. Mine kept connecting and disconnecting. Sometimes I could play for hours without any problem, sometimes it would disconnect after 30 seconds. It seemed to be a problem on the USB plug, but I couldn't find a way to fix it. So I've bought a Razer cable and did everything on your tutorial, except I did salvage the boot and the velcro strap. Worked like a charm! Thank you so much!
Awesome news to hear! Glad you were able to bring your mouse back from the dead!
Bonus on the cable boot salvage too!
has anyone had any luck on finding the alibaba vendor for corsair shells? i spoke to customer support for corsair and they are not being helpful... no surprise there
Hi I realise this guide is old now. However my corsair scimitar started connecting and disconnecting repeatedly - I think there is a loose wire somewhere so figure I'd replace the entire cable. What you don't say in your guide though is where you got your replacement cable from? Did you just use any USB cable and hack the corsair connector onto the end?
Thanks
Hello,
Thanks for visiting this blog article.
To answer your question. Yes, I just grabbed an old USB cable off of a dell mouse and spliced the wires within the housing of the corsair. The reason being is usually when you get wire damage (Which is my article the wire damage is severe) that almost all of the breaks of the wires happens outside of the mouse where the cables are flexing around all over the place.
Just letting you know. Despite the article being old. That mouse is still kicking and alive to this day.:)
Thanks for visiting!
Ended up here as I have newer Scimitar which I'm planning to mod, MMB feels far to stiff to me - and I'm betting it's due to a switch with way to high an actuation force.
You'd talked about Omron switches and their quality -and it looks like you're using ones marked as D2FC - the C indicates it comes from China. If you get switches marked as D2F, they're manufactured in Japan. The main difference seems to be the D2FCs have had every corner and cost cut so that Razer, Logitech, Corsair etc can have their mice die in a year or less - because that's the only kind of switch I find lately.
Omron still makes switches in Japan, but you'll likely want to get it from a known distributor rather than ebay, amazon or alibaba (where the chances of getting a D2FC with the part number re-branded as a D2F starts to go up). If one were still set on saving a few bucks, there are D2FC switches which state they are better quality - if the part number has 50M in it, it's rated for 50million cycles. If there is no ##M in the part number, it's rated 10 million cycles or less
Okay, that could very well explain a lot! That a lot like the Capacitor hells of the mid-2000's that once again bootleg chinese companies strike again with faulty switches and victims are three fold. The original switch company, the gaming company having the switches. and of course the consumer. I'll try to update my article to reflect that it may not be Omron(the original manufacturers) fault on this.
Thank you for commenting on my blog and visiting this site.
Hi, Where did you find this mouse shell? Please can you send me the website? t*@g*.com Thank you so much.
It was a vendor on Alibaba. Apparently there was a plastics injection company that was making stuff for Corsair and they must have decided to see who else was buying. Apparently we lucked out because looking again corsair outside of new mice have been completely obliterated off of Alibaba.
Hi there! Would you help me saying where did you buy your new scimitar case? Mine looks just like the old one you had. Thanks a lot.
I bought mine off of an alibaba vendor a while back that seemed to have a surplus of corsair shells. I checked today and can't really find anything left. So not entirely sure if i was lucky and got it before corsair shut them down or they just moved onto the next plastic mold.