
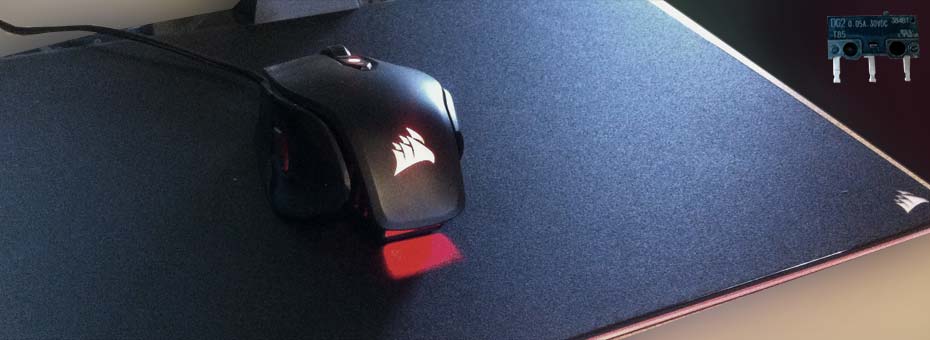
A Corsair M65 has now ended up on the repair bench. It is ours. Crap!
So the Corsair M65 mouse we use on one of our primary PCs is failing after only a year of operation. Honestly, we didn't expect it to fail so soon! Partially because whenever a person purchases gaming hardware for everyday office and blogging activities such as what we do. Under less stressful environments the mouse should last a long time! Perhaps it's also prior to this mouse we installed a Microsoft IntelliMouse for almost 15 years(blog article here). We thought that the corsair should last at LEAST that long. We should also note that during the entire year of operation with this mouse no known abuse has happened to this unit. No liquids or extreme physical abuse such as any long-term gaming. Read on for more!
"Note: If you get a black screen but the audio is playing. Or you got a potato PC and it's studdering. We have fallback Links below."

Video tutorial fallback mirrors:
In case you have no-script enabled or for some reason cannot see the title video on this website. We have provided direct links for these videos. For more information about the standards we use on this site click here if you would like to know more.
AV1       - Link
MP4/.h264 - Link
OGV       - Link
The problem - Left mouse clicking issues.
The video above shows very well what the Corsair M65 mouse is doing. Which is when you click and hold on the left mouse button it does not really 'hold'. The switch makes almost a cold/loose connection and fails to maintain contact at light pressure. This is a huge problem in applications like Adobe Photoshop where you are using a magic wand tool to click-drag around an image. Or worse still if you are using the polygon tool to select points of an image. The left click with its cold contacts can actually register as a very fast double-click. This tells adobe to complete the image selection which is frustrating as hell!
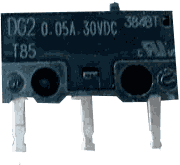
The problem part which is universal inside almost every mouse is the 20mm micro-switch which is pictured above. Usually, these switches do last forever and the only time a user has a problem is if they spilled something into their mouse causing the switches to come up. Or in our case where the switch isn't making complete contact with the lower metal giving a cold or easily broken connection which the end-user has to press very hard down upon just to keep it stable. When it comes to the center mouse button the design shifts away from the 20mm switch as you will see later in this article.
Difficulty factor.
I would state that the difficulty is this repair is moderate. You will remove very small cables similar to cellular phone repair. You must also have knowledge of how to use a soldering iron.
DISCLAIMERS:
Like almost every blog article that we write and to establish grounds of sanity and common sense. S-Config.com is not responsible for anything that you the individual personally do with the information presented here. We shall not be held accountable for any physical, mental, emotional, or financial damage that could occur when performing any of the repairs listed on this website. Always contact your manufacturer and check your warranty prior to doing any repairs yourself. If you are uncomfortable with performing the repairs described below then find someone within your local community who can help. S-Config.com does not offer any repair services nor has any intention of making it our business in doing so. Just a note for anyone from Corsair reading this. The mouse in this blog is over a year old and thus is out of warranty. Therefore it is no longer your problem anymore!
Addressing the WD40 in the room.
 I'm not going to name YouTube creators on this one. But there are videos where the fix for cold contacts and sticky mouse buttons is if you simply take it apart and spray it with WD40. We don't think those creators truly understand what they are telling their subscribers. As WD40 may work for a while. The problems will get worse over time. One of the ingredients of WD40 is mineral oil you have now left an oily surface to which dust and residue can attract and stick onto. Also, the interaction with oils on plastic isn't great. Just don't do it! Legitimately the only thing you should be using is canned air to clean dirt out of your mouse. If that's not enough then it's time to repair it correctly.
Required tools for disassembly and repair.
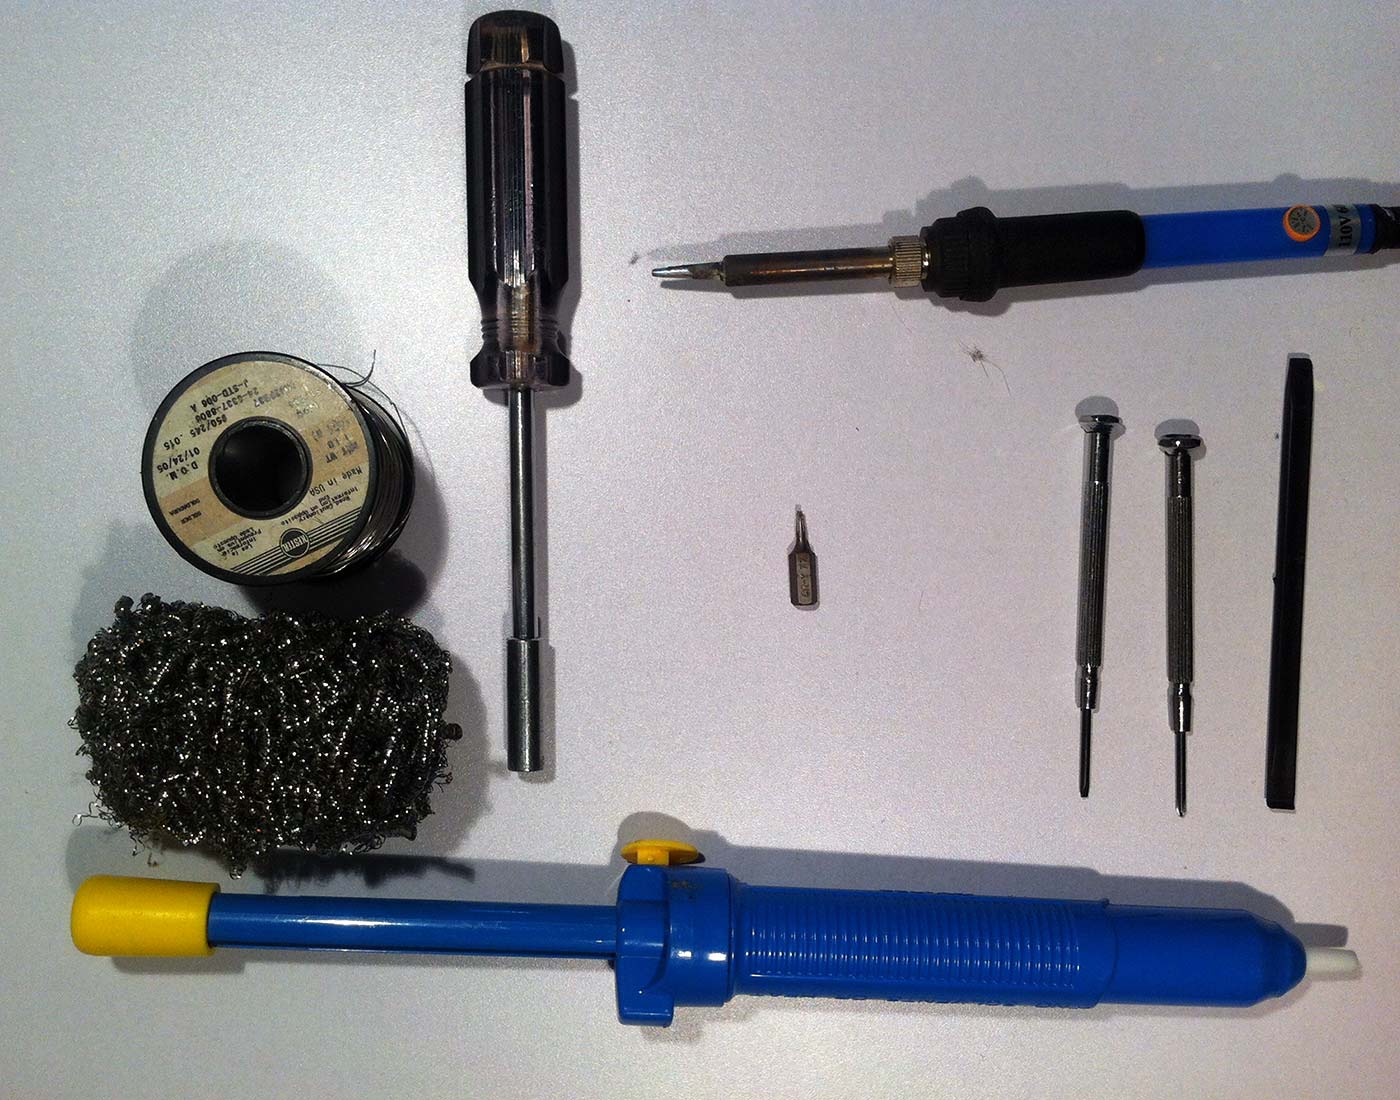 You will need the following tools:
- Screwdriver with a Torx-7 bit for the outside mouse casing.
- Small Jewelers Phillips screwdriver for removing all of the PCB screws.
- Small Jewelers Flat-Head Screwdriver for loosening cable clamps.
- (Optional) Plastic pry-bar. You Could use the screwdriver however metal tends to leave cosmetic damage around the lip of the mouse.
- Soldering Iron. Any standard 30-35 watt iron should be fine.
- Solder
- Cleaning pad to clean your solder.
- Solder sucker. You could use a braid. But don't like it as it damages the traces on the board you are working on.
Also, a good thing to have is a cheap voltmeter with a continuity tester to verify your switch's operational state prior to soldering them in.
Disassembly of the Corsair M65 Pro RGB mouse.
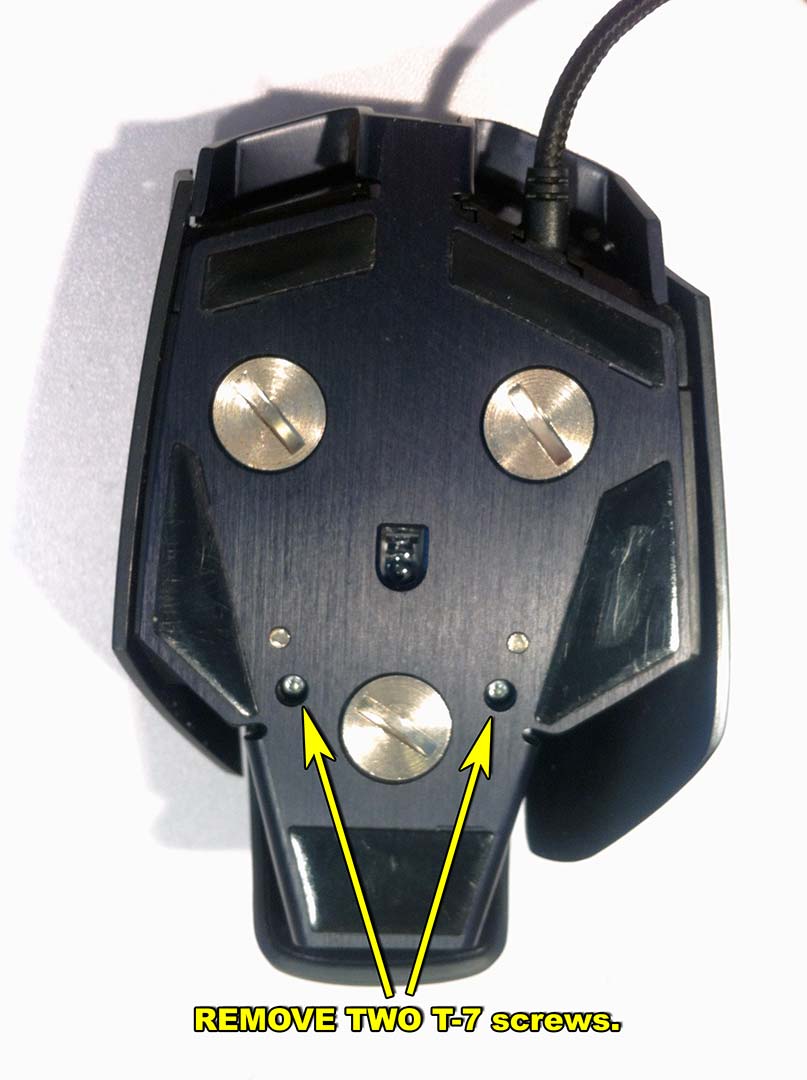 Flip over your mouse and with your Torx-7 bit remove the two screws. We should note that this is actually nice of Corsair. Most hide the screw holes underneath the PTFE pads. But we're also unsure why corsair used T-7. Why not Phillips like everything else? Oh well.
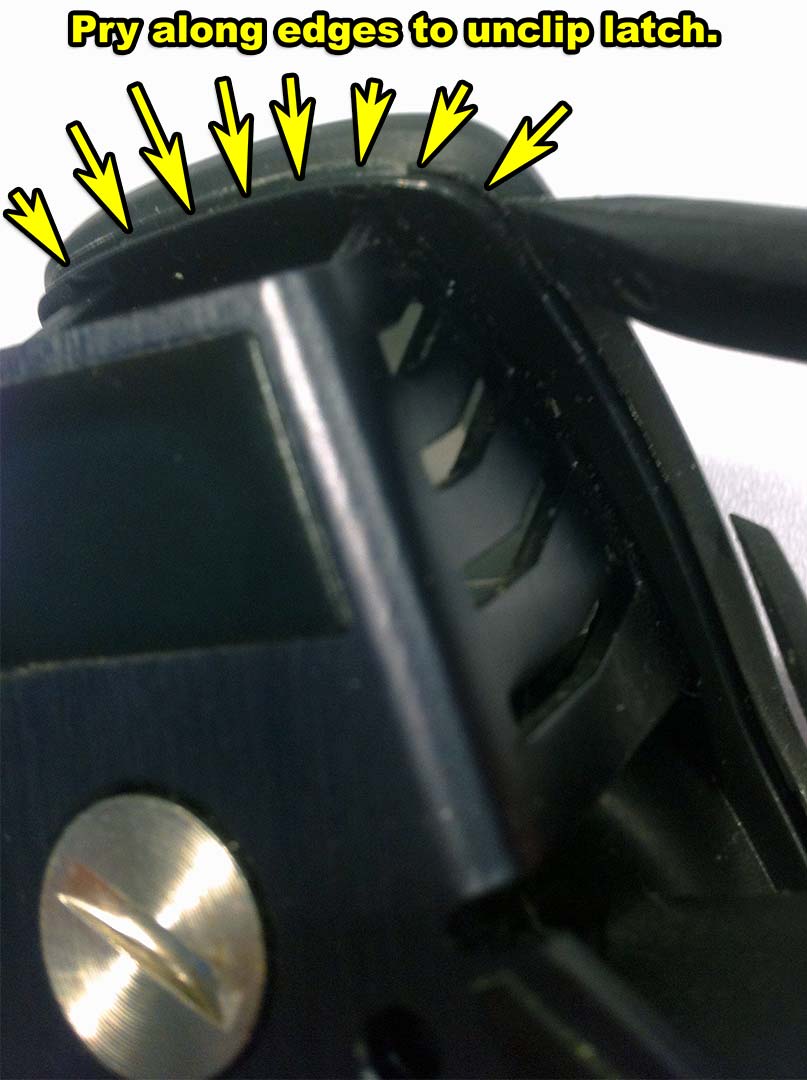 Using your plastic pry tool on the rear of the mouse you can separate the plastics on one side and move along to the other side to un-clip the latch. No not pry from the front of the mouse! that is now you break the plastics which your mouse buttons hinge upon! Once the latch is undone the mouse should begin to separate easily for you. Don't use force to separate the mouse as you could rip the cables from the top of the mouse to the bottom.
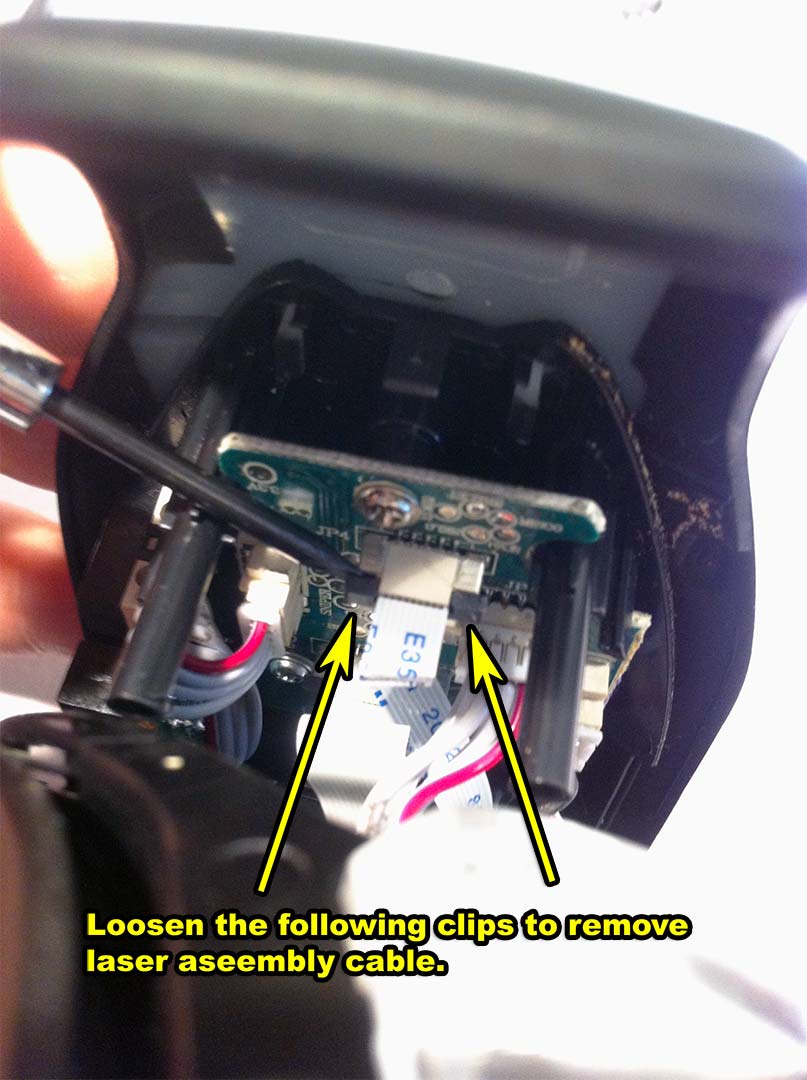 You will find out quickly upon opening it that this particular corsair mouse really doesn't have a 'Mainboard' as much as a bunch of sub-assemblies that perform their own functions. As a result you have two primary edge connectors. One for the laser, and one for the mouse buttons. We shall start with the laser edge connector as we are already facing the back of the mouse. Using your jeweler's screwdriver you should be able to loosen the clips by wedging your screwdriver into the latches and pry up very gently. This is not a time to be using force as too much prying will shatter the latch rendering the repair a total failure. Once both latches are pressed up and away from the board you should be able to tug on the cable lightly to unplug the first cable.
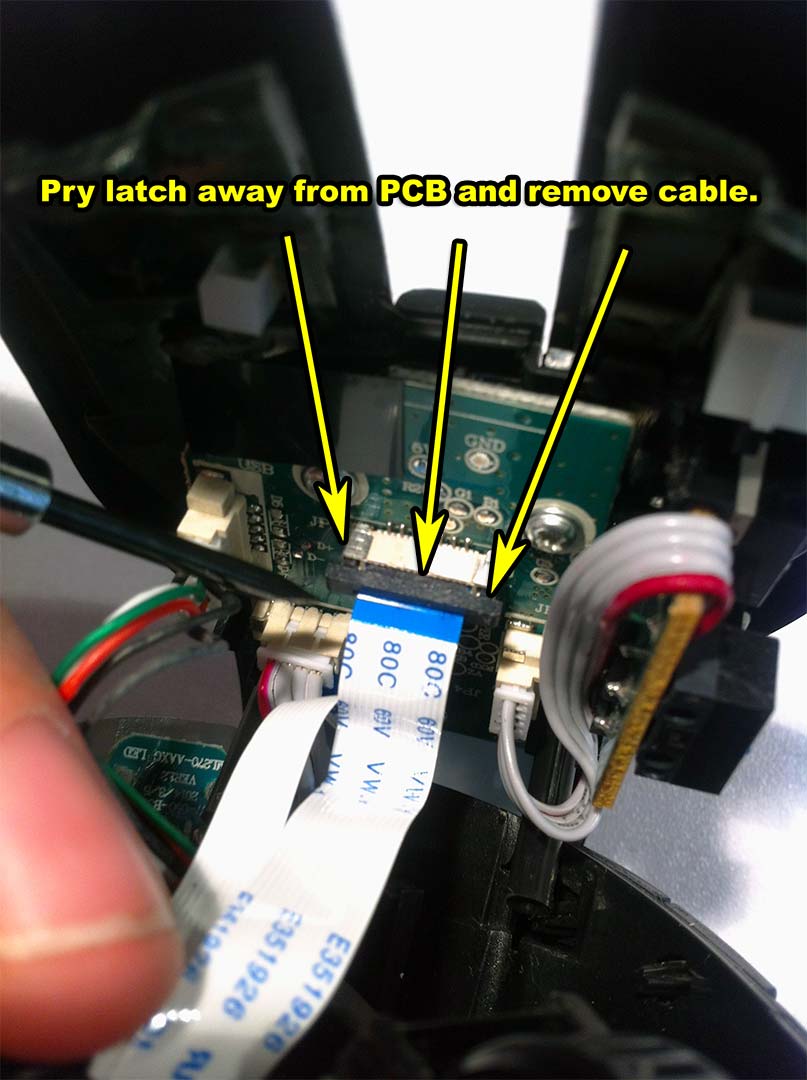 Flip the mouse 180 degrees to the front and repeat the steps similar to the laser assembly. This cable goes off to our mouse buttons and thus is thicker as it controls more lighting. It may require slightly more strength for the black latch to unhook. Once lifted you should be able to pull the cable out easily.
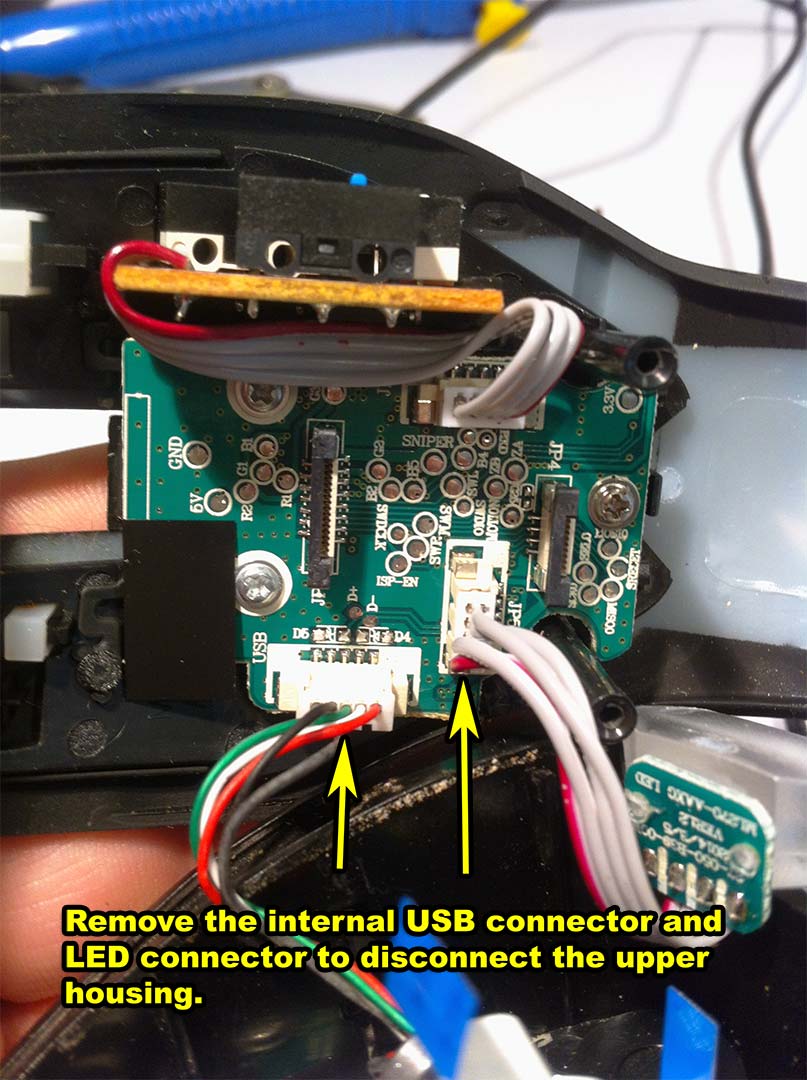 At this point you should be able to flip the cover of your Corsair M65 mouse about halfway off with only two cables still connecting it to the bottom. The USB interface cable and one of the RGB LED cables. Remove both of those and you can then clean/set your upper case aside.
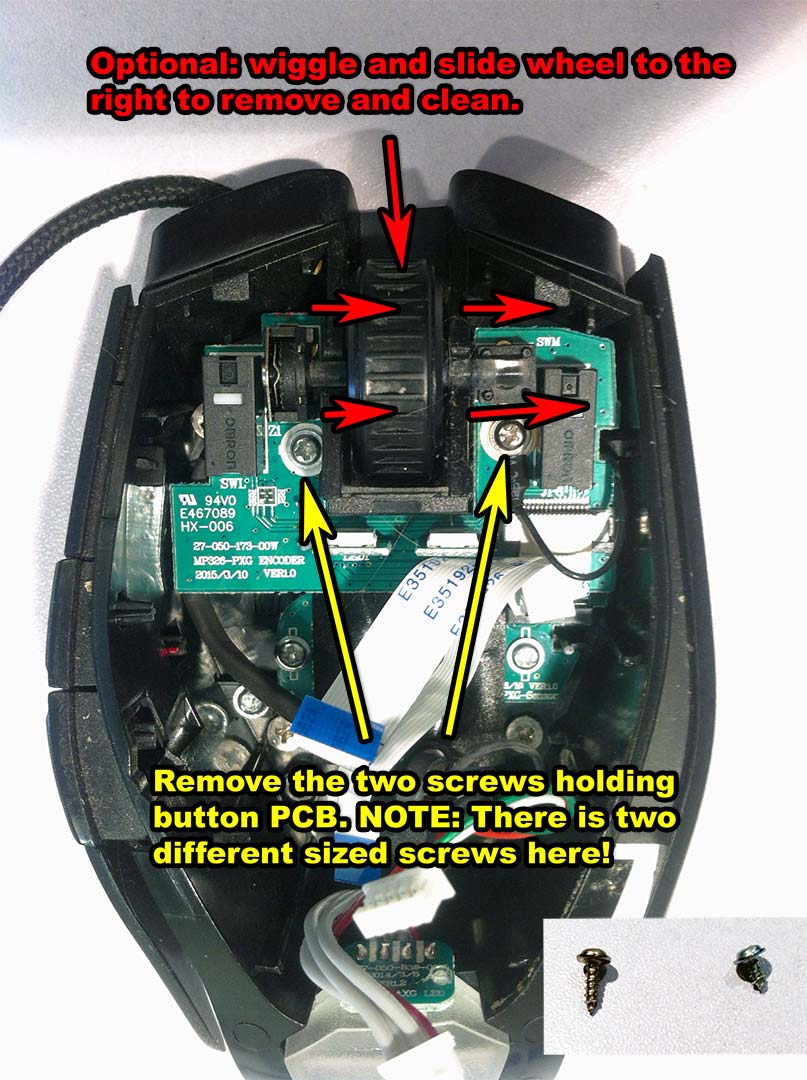 Looking inside you will see the part we want which is the mouse switch PCB board underneath it all. Simply remove the two screws. Take note of the different sizes used for re-assembly. Also, since our mouse wheel is nasty looking we click it to the right to remove the plastic wheel from the sensor and pull that out first so clean it. Then with all of the screws gone you should be able to pull straight up and the switch PCB will come out easily.
Repair of the Corsair M65 Pro RGB Mouse Board.
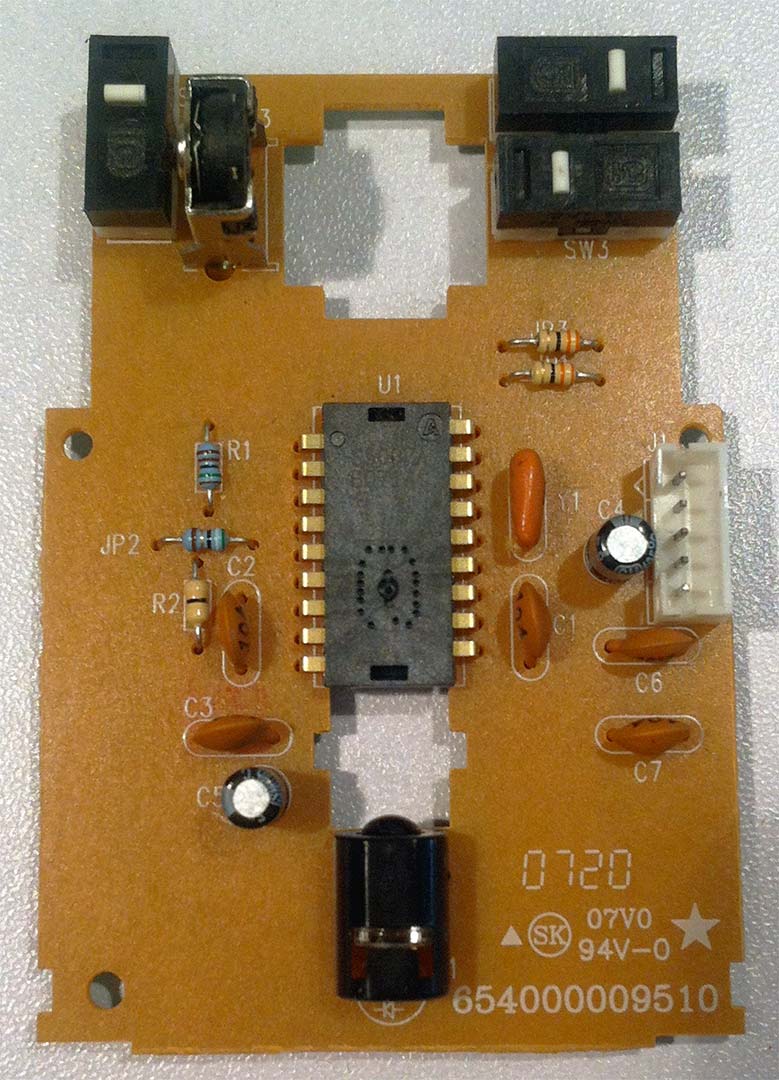
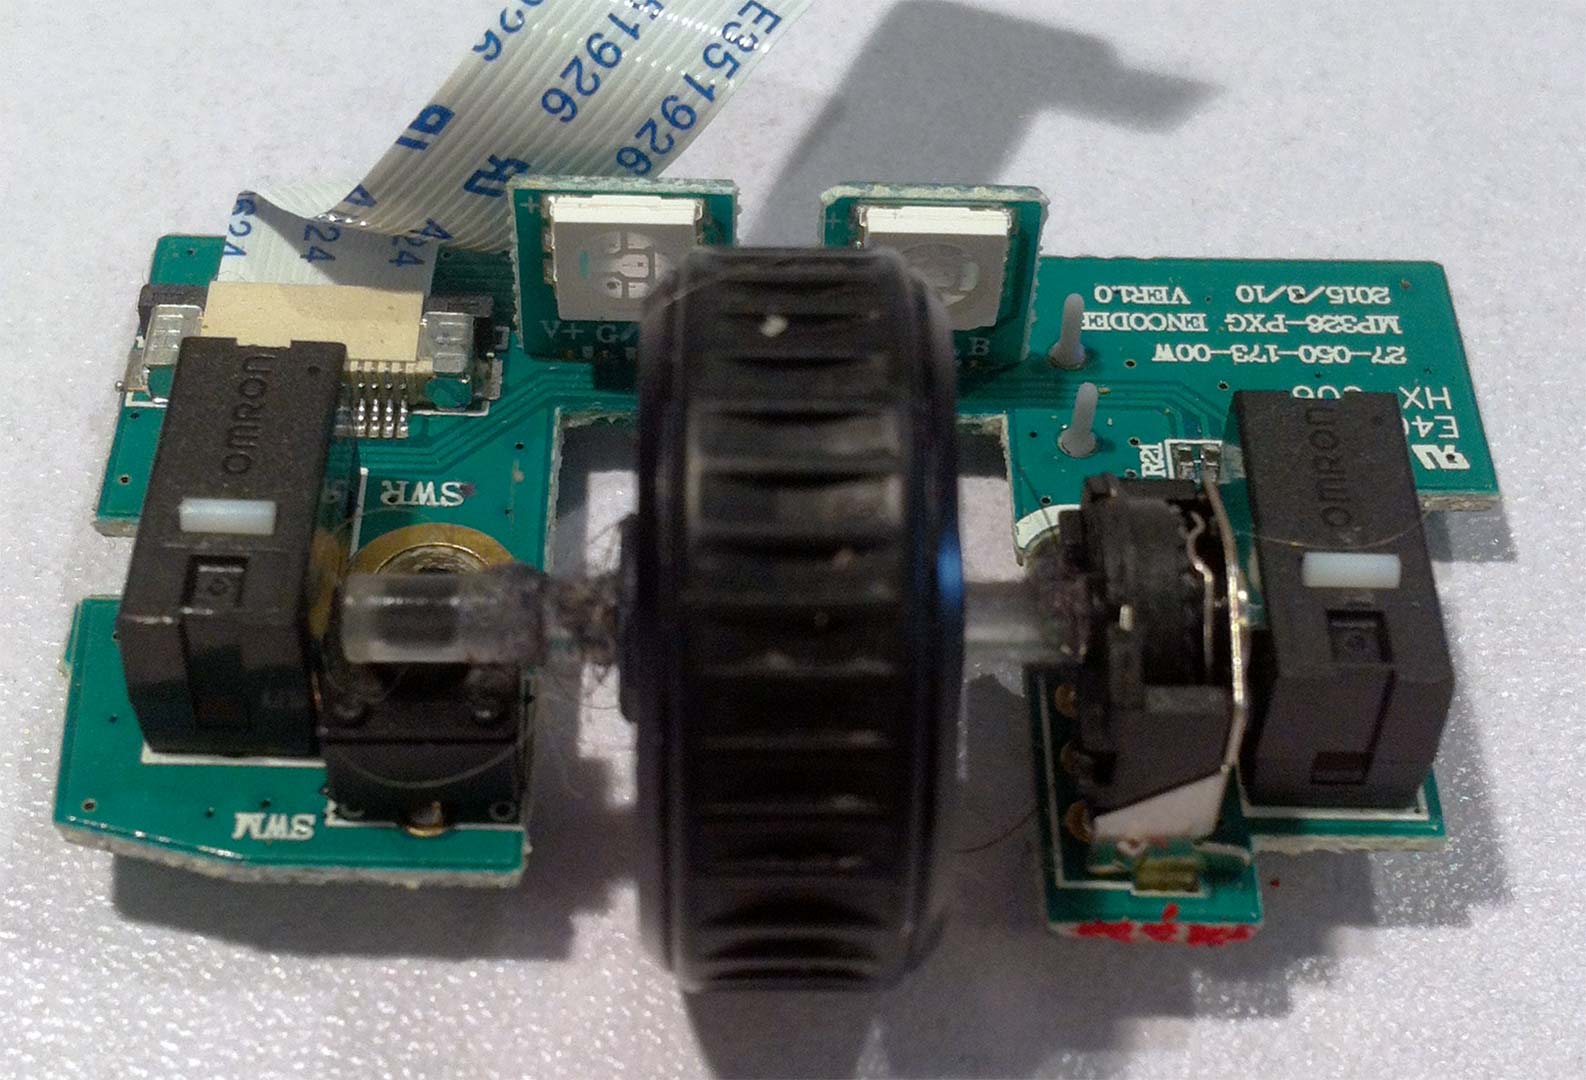 So here it is. The board that is causing our problems. The Left and right switches are Omron D2FC-F-7N20M0 with the middle mouse button being an Omron B3F-6020 or B3F-6022 depending on revision for those with a failing middle mouse button. Now if you prefer new switches then here is a link on where to purchase.:
Alternatively you could also go with cherry switches for your left and right buttons as we think they would be of better quality than the Omron.
We were having a hard time finding the appropriate cherry for the middle mouse button which is 6mm X 6mm X 5mm in dimensions with only two connector pins no ground pin. If anyone knows the Cherry model number for that leave it in the comments below.
Salvage mode.
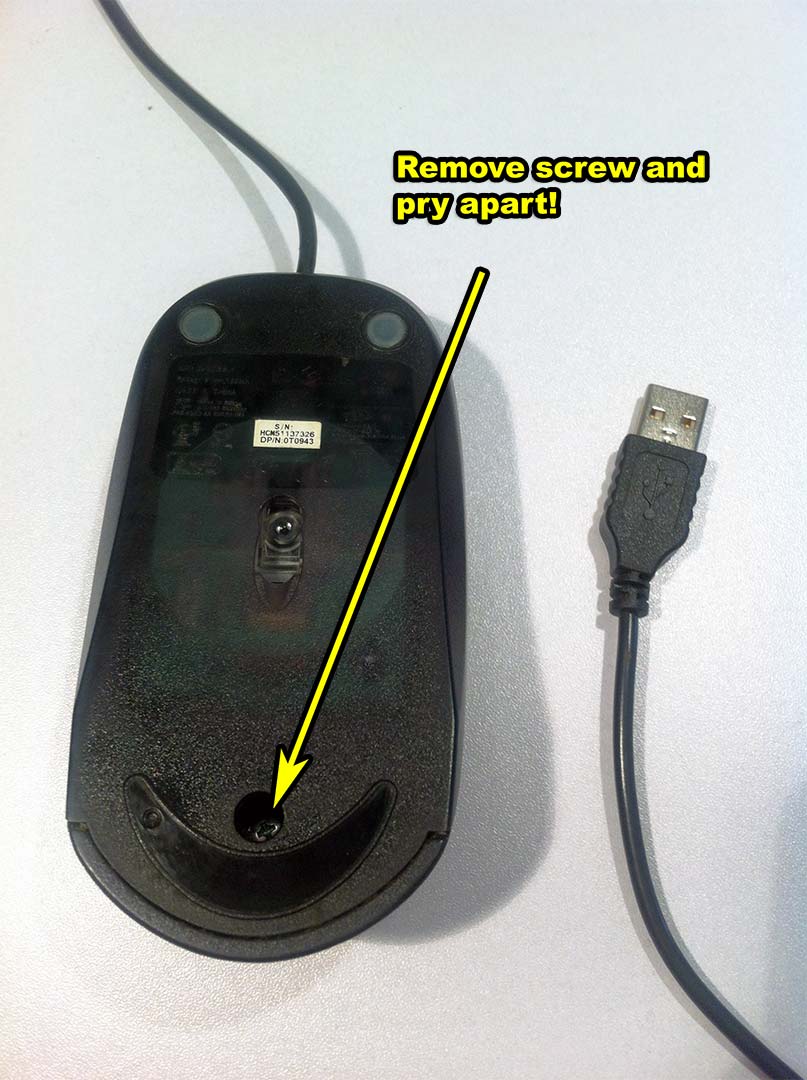 Similar to our Razer Deathadder Chroma mouse blog you can also extract these switches from another mouse such as this dell. The style of the switch can be found in almost any mouse including ball mice so if you know someone with a lot of used equipment or even a thrift store. Pick up the mouse and click on it just to make sure the switches sound good when you press them. We also like these dell mice because it's one screw and that's it. With a simple pry, we are inside!
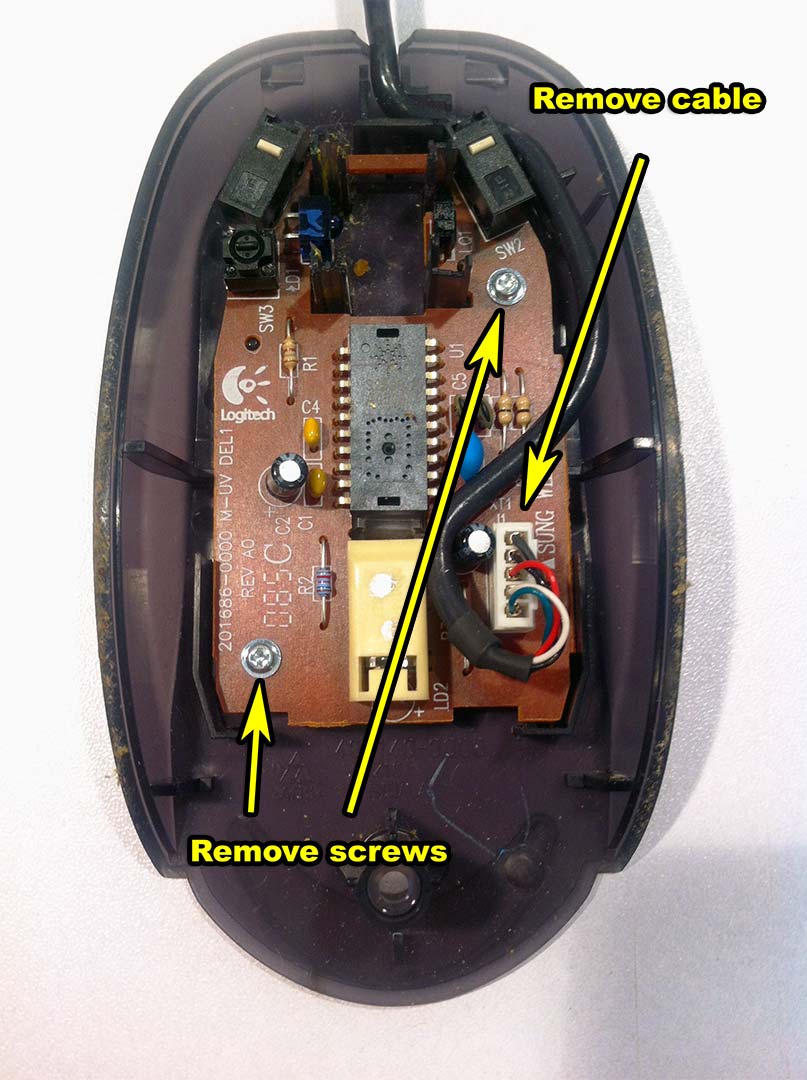 Once we're in and after we remove the cables and screws we now have some left-right mouse buttons that we can salvage! The company "ZIP" cannot be found but the switches at least feel good and we did plug this mouse in prior to make sure that there are no cold connections going on. One thing to note is if you are trying to repair your middle mouse button switch it might be harder to salvage. In the picture above the middle-button switch has the dimensions which are more appropriate to repair a Corsair Naga series mouse which needs a 6mm X 6mm X 7mm design.
 This is another board that we pulled out from a dell-mouse. Once again, the manufacturer changed but the interesting thing is how they used the same switch for the middle as they did for left and right. This isn't a bad design!
Why salvage instead of buy?
Outside of the fact that recycling is a good thing. salvaging allows you to practice your de-soldering skills on something you could care less about. These boards are very simple and thus will be easy to extract these parts which are exactly what you will be doing to the switchboard of your Corsair. If you're going to burn away traces or break switches. This would be the place to do it.
 For those wondering. We de-soldered both buttons because we do not want to have an inconsistent feel when we click on our buttons. We should note that it was slightly harder to remove the switches on this board versus salvaging switches off of the dell. The corsair PCB is multi-layered and the ground plane required more heat from the soldering iron. But after a bit of wiggling and checking, they both came off clean. Also kudos for silk-screening the switch placement Corsair! The middle mouse button switch was not replaced as we barely use it in our day-to-day blogging life.
 Installing the replacement buttons was easy and within 6 points to solder, the parts have been repaired. At this point, you can simply follow the instructions backward to re-assemble the mouse. Keep in mind that the edge connector for the buttons will actually click into the socket prior to locking down. The optical assembly edge connector will not click in at all.
"Note: If you get a black screen but the audio is playing. Or you got a potato PC and it's studdering. We have fallback Links below."
Video tutorial fallback mirrors:
In case you have no-script enabled or for some reason cannot see the title video on this website. We have provided direct links for these videos. For more information about the standards we use on this site click here if you would like to know more.
AV1       - Link
MP4/.h264 - Link
OGV       - Link
Final thoughts.
 With the switches replaced we're back online with no false or double-clicking in Photoshop. We can shift-select multiple files without accidentally opening 100+ images at once. We don't think the Omron switch company a terrible switch manufacturer since they are involved with things such as Razer and Logitech products. So perhaps the dying left-click switch is an isolated incident. But as we were tearing apart the Corsair mouse we had more questions than answers. Such as the following:
Why use Omron switches for the left and right click. But switch over to third party Chinese switches for the sniper, forward, and back buttons?
We're not leaders of industry however one of the ways factories keep costs low is by buying one particular brand of switches and circuits and use those units throughout the entire product. Corsair gaming products were known for using cherry switches in their mechanical keyboards. So why not remain consistent in quality for their mice? Why not keep it the same brand using five or even six switches making even the middle button amazing?
We're sure it comes down to someone in a cube farm at Corsair trying to squeeze those pennies as hard as they can. Savings that the average gamer does not see when they spend 50-60(USD) on a mouse. When that mouse is out of its warranty period and breaks prematurely like ours. That gamer is going to do exactly what that cube farm bean counter did and purchase a product that isn't name-brand such as Corsair. Because what the hell is the point if Corsair is unwilling to use high-end hardware?
Shit, just go get a Microsoft Intellemouse 1.1 for around 20-30(USD) from NewEgg if all Corsair wants to do is sell a mediocre product!
We loved our Corsair Keyboard with its cherry red switches. But this mouse is giving us some serious buyer's remorse. We hope you found this blog informative and thank you for taking a break from the social networks to check us out.
Update 08/30/2019: I've set all of my corsair hardware aside and purchased A Red Dragon M711-FPS mouse and K556 keyboard. Although too early to tell it's been working great for the past 6 months and the cost is 1/3rd of the level of Corsair. Red Dragon is a Chinese company and they are not ashamed of saying it.
With the key-caps wearing out about a year and a half of ownership, I'm pretty much tired of Corsair's shit at this level and am now willing on cutting my losses with this company altogether.
Until then, that's what server said.
+++END OF LINE
i have the buttons on the left sticking. i spilled a coffee but saved it from water damage. but now the buttons are sticky. How can i fix it? you might be my last hope! Thank you ahead of time
without completely removing the affected switch by desoldering it like we did when my buttons were sticking (BTW, still running with the same mouse after all of these years)
we found that unplugging it and using a liberal amount of alcohol be it 90 percent or denatured and just covering that button tends to help it. now you will probably have to actuate that switch as your soaking it in alcohol to make sure that whatever is sticking is not sticking anymore.
It may be tempting to use WD-40 on the button, but mineral oil could penetrate some plastics and worsen the problem. So stay away from penetrating oils like Tri-Flow unless you just don't care anymore.
We did this to a mechanical keyboard that had a whole bunch of sticky keys by dunking the entire assembly in hot water and pressing down on all of the keys with a sponge. then, using a bit of denatured alcohol on top before putting all of the keycaps on. We waited about a week to make sure there's no water in the keyboard before powering it back on and stickiness was gone that way.
Anyhow, best of luck getting that coffee out. If it was anything like our nvidia controllers it's not fun dealing with coffee in buttons.
Thank you for the guide. I've had my M65 Pro RGB for a few years now, but it starting having double click issues on both right-and-left buttons, but the right click is worse than the left click for some reason. Also, my mouse wheel isn't very reliable now, but I've read that cleaning the mouse wheel will make that temporarily go away.
I found this informative, but long (1 hour and 15 minutes) video that goes into detail on why the switches start failing sooner on newer "gaming" mice.
the newer mice are going way below the switch's minimum operating current which causes the switch to not perform at their rated livespan. Omron sells a low-current switch, which is made in Japan, that (in theory) will be more reliable. Then again, manufacturers could easily stick a resistor between the USB's 5v, and the switch in-order to achieve the minimum operating current for the switches that their using.
Thanks for the info!
Another reader informed me that just like the bootleg capacitor issues of the mid 2000's that Corsair might have fallen victim to Omron bootleg switches as well. Not entirely sure how much validity is behind that claim. However, when we fixed out buttons we didn't even use official Omrons, just some random ass switches out of an old dell mouse. We're happy to report to this very day there has been no double-click issues with the M65 since.
Thank you for this as it proved instrumentally helpful with fixing my own M65 Pro.
My left click would "stick" and if i was playing a shooting game i'd end up draining my magazine and probably kill a few teammates in the process, then my middle mouse button stopped registering properly, and now my right click decides to unregister while it's pressed, causing me to "scope out" in my shooting games, and its making clicking a context based menu impossible.
This is my first corsair product that isn't internal hardware and it will be my last. After seeing the different switches and after all three switches give me problems I'll stick to buying microsoft mice and keyboards as they work for decades without the issues you find with all the "gamer" products.
Wow...
I guess -ALL- of the buttons get destroyed in the hands of a gamer! Super glad it helped you out. I was a little blown away myself that my buttons failed after a few months and I was just doing office work (Illustrator).
Anyhow, after owning a Microsoft intellemouse explorer for almost 18 years. As long as you clean the mouse it's hella solid. And it should be considering logitech was behind the designs of a lot of Microsoft office products. I also have a blog about RedDragon products which so far has been holding up generations better then ALL of my corsair gear. So if you DO like glowey mechanical keyboards and mice and don't wanna spend a fortune. The option is there.
P.S. I am in no way sponsored or endorsed by RedDragon. I just think a $17 mouse that has the same laser assembly as a $60 corsair except it doesn't freak out on pure white surfaces is legit.
It's not the switch. It's the cantilevered contact pad not maintaining consistant conact with the switch. A far simpler and more effective fix is to shim the square plastic bumper on the bottom of the left engadgement area.
If the switch itself was unique and irreplaceable then engineering a shim or correcting the engineering failures of a limited item would be the only option. This article was published April of 2018. The button that approved your comment was clicked on this very mouse in December of 2019. No ghosting or double-clicking to this date as we're writing our response to you. Using the markers of time; Would you say over a year and a half after the repair would be considered effective?
We're not saying you're wrong. In fact we would love to see an article describing your procedure in detail. In the world of repair if a part is known to go bad you replace the part so you never have to worry about it again. Or, better yet, if it was properly engineered product the end-user wouldn't need to replace switches or add shims in the first place. :)
Anyhow, thanks for checking out this blog!
Cant you just open the switches to replace the worn internals instead of soldering new ones on?
In some cases like those Cherry switches they heat weld the casing together preventing the internals from shifting and causing premature falure. But the salvaged switched that I got had tabs on them to remove the tops. The original problem with mine is it producing false clicking. So do you bend the little piece of metal? Is it something a little serious like the internal housing wearing out? Or is it liquid damage? To which we suppose we could spend the time investigating exactly what went wrong. But given the cost of one of these switches it's easier just to replace then repair the existing one.
Thanks for checking out my blog.
Thank you very much for the guide. And yes, you were right.... the solder on the microswitch was incredibly difficult to remove. I had to use a flathead screwdriver to push down the microswitch in increments while keeping the pins heated.
Anyway, if not for this guide, I would never have made that attempt. Thanks.