
Mechanical keyboard repair fun with the Razer Blackwidow Chroma 2014 edition.
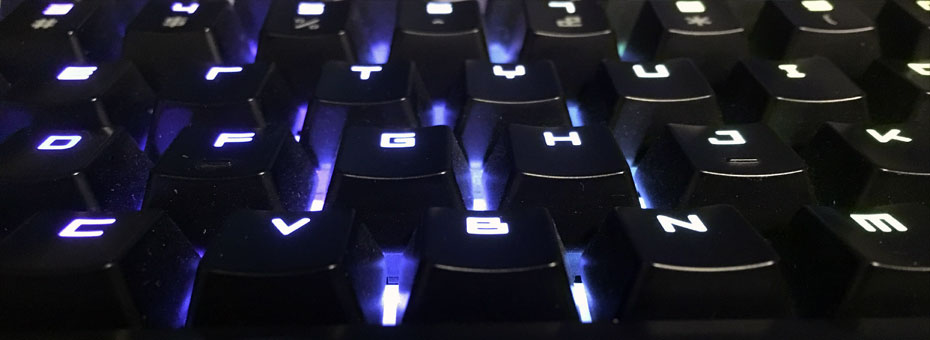
Well, the day finally happened when it is time to service a Razer Blackwidow Chroma 2014 edition keyboard. For those who don't know what this type of keyboard is Razer makes a mechanical keyboard with the probable slogan "by gamers for gamers." It sounds so pretentious that they had to defend that statement in Popular Mechanics. However! My article is not going to bash the Razer keyboard because in this case, it was not Razer's fault. During this article, you will see the tear-down, diagnostics, and repair of just one Razer Blackwidow Chroma 2014 keyboard. Program complete and enter when ready. Read on!
"Note: If you get a black screen but the audio is playing. Or you got a potato PC and it's studdering. We have fallback Links below."
Video tutorial fallback mirrors:
In case you have no-script enabled or for some reason cannot see the title video on this website. We have provided direct links for these videos. For more information about the standards we use on this site click here if you would like to know more.
AV1       - Link
WebM VP9  - Link
OGV       - Link
MP4/.h264 - Link
The problem.
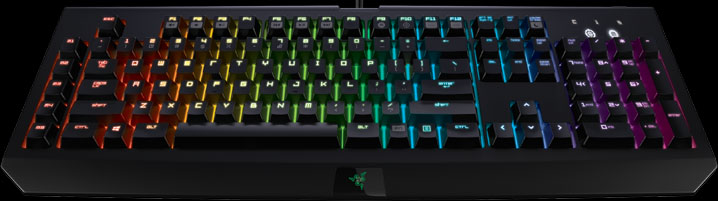 As you can probably see in the videos that we've attached above. We received a Razer BlackWidow Chroma 2014 edition keyboard from one of our friends which said that this was their kid's keyboard. Apparently, he plays lots of "accounting of the dead" and "Minecraft" which obviously requires a $150+ dollar keyboard in order to do it right. Who are we to judge right? :D All keys on this keyboard were fully operational except for the "0" key and the "." key on the numeric keypad. All of the RGB lights including the "0" and "." on the numeric pad were operational. When pressing the keys I can hear the click of Razer's mechanical switches. and the lights are all operational as you can see in the video above but when switching to reactive mode "0" and "." never fired. Well, only one thing to do, let's tear this apart.
Tool prerequisites.
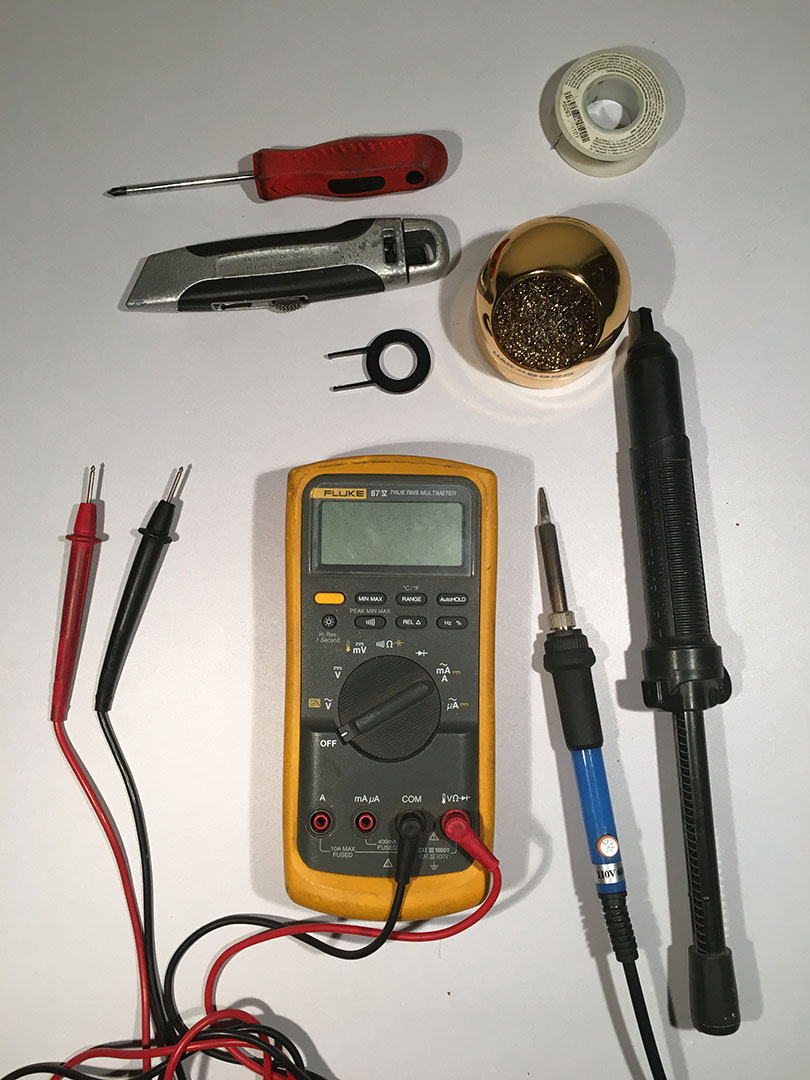 To open the keyboard you will need the following:
- Razor Blade
- PH2 Phillips head screwdriver
- plastic key extractor. (nice to have for extracting keycaps for cleaning and replacement. but not necessary)
For testing you will need the following:
- Multi-meter with a continuity tester which is useful for checking the mechanical switches and tracing leads.
For repair you will need:
- Soldering Iron (30-40 watts should be fine)
- Soldering Iron tips - Flathead for removing the mechanical keys. Curve or the pointed tip for working on finer components like SMD-mounted chips.
- Solder wire
- A means to clean your tip.
- Solder sucker (this is very important. Do not use a solder braid on your keyboard. You will only damage the traces. Braid is only used for clean-up after the component is removed.
Items not shown but handy to have:
- Tweezers for working on SMD components
- Magnifying glass because some SMD components are really flipping tiny.
- Solder Flux
Disassembly of the Razer Blackwidow 2014 keyboard.
 The serial number is blurred to protect the guilty.
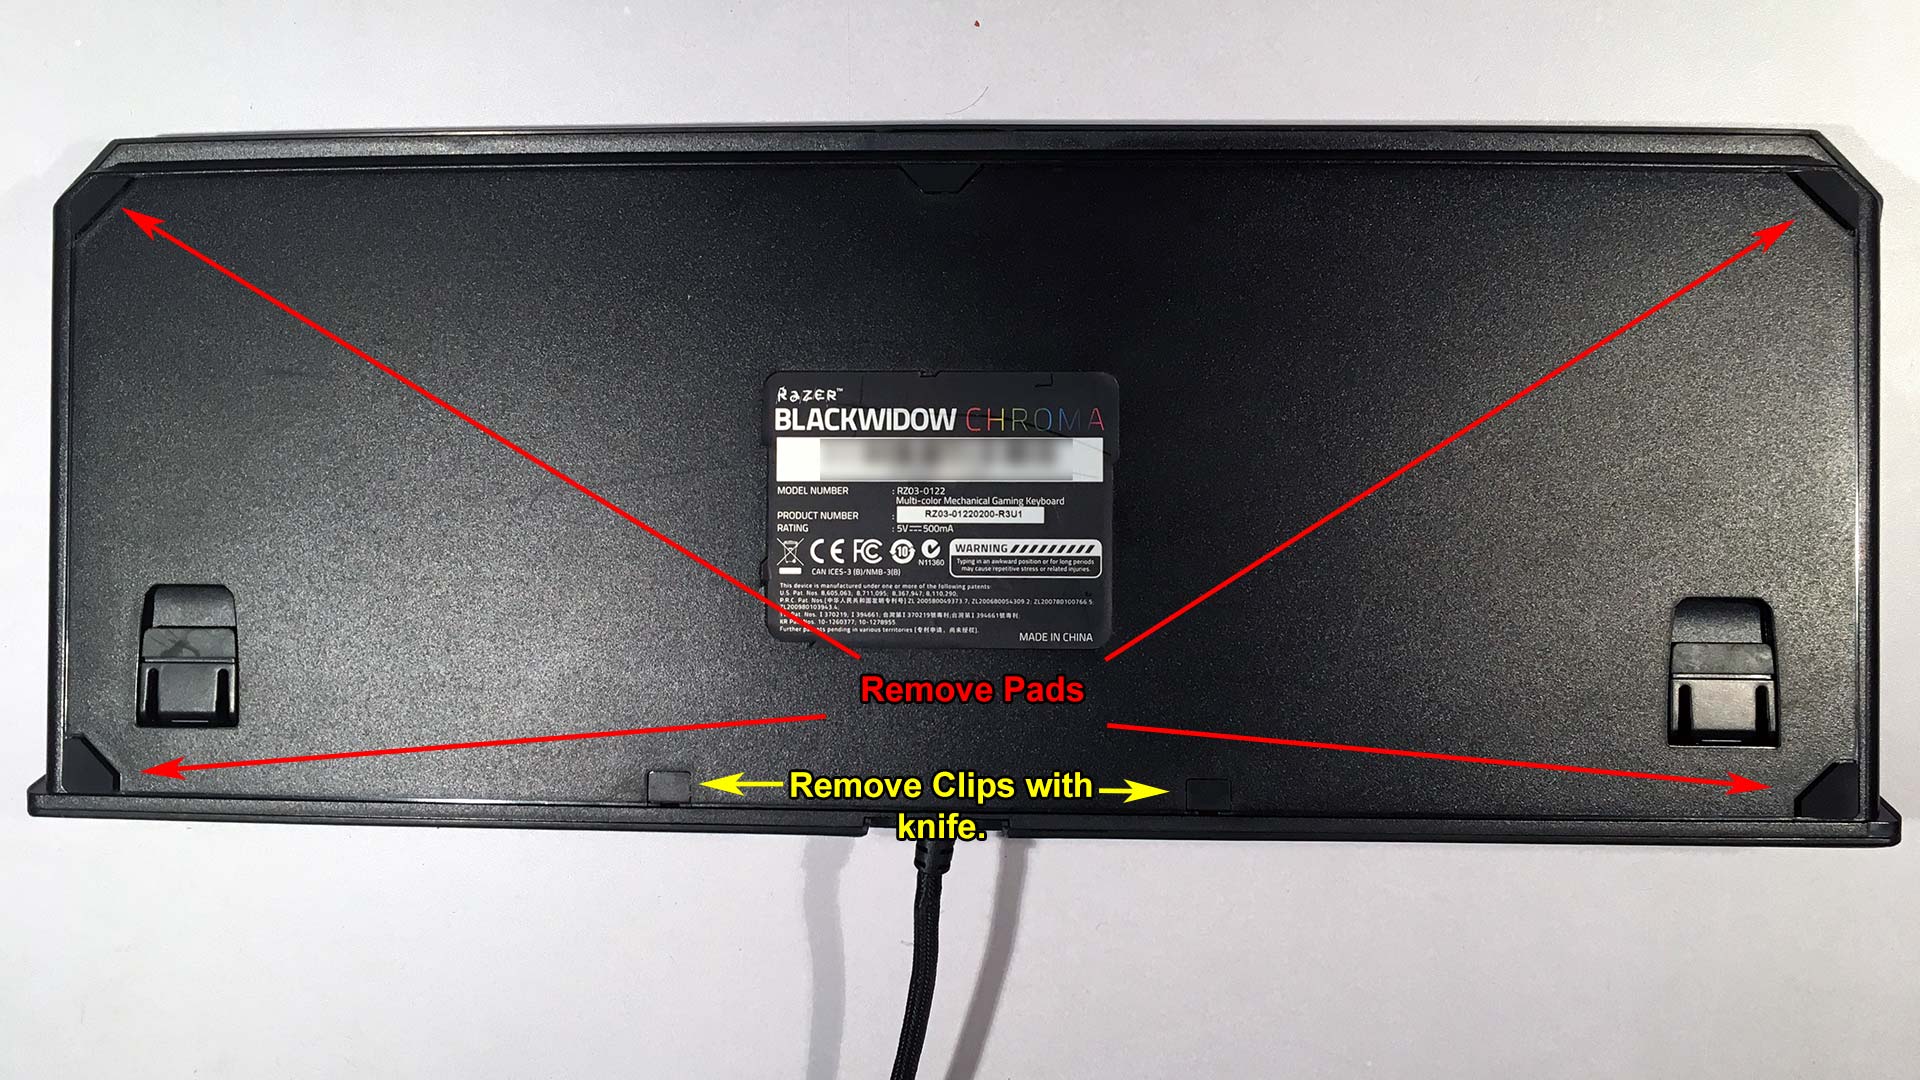
Start by flipping the keyboard and removing the four pads in the corners with your fingers. Start slowly so you can keep the adhesive material on the pad so you can re-use them once we are done assembling.
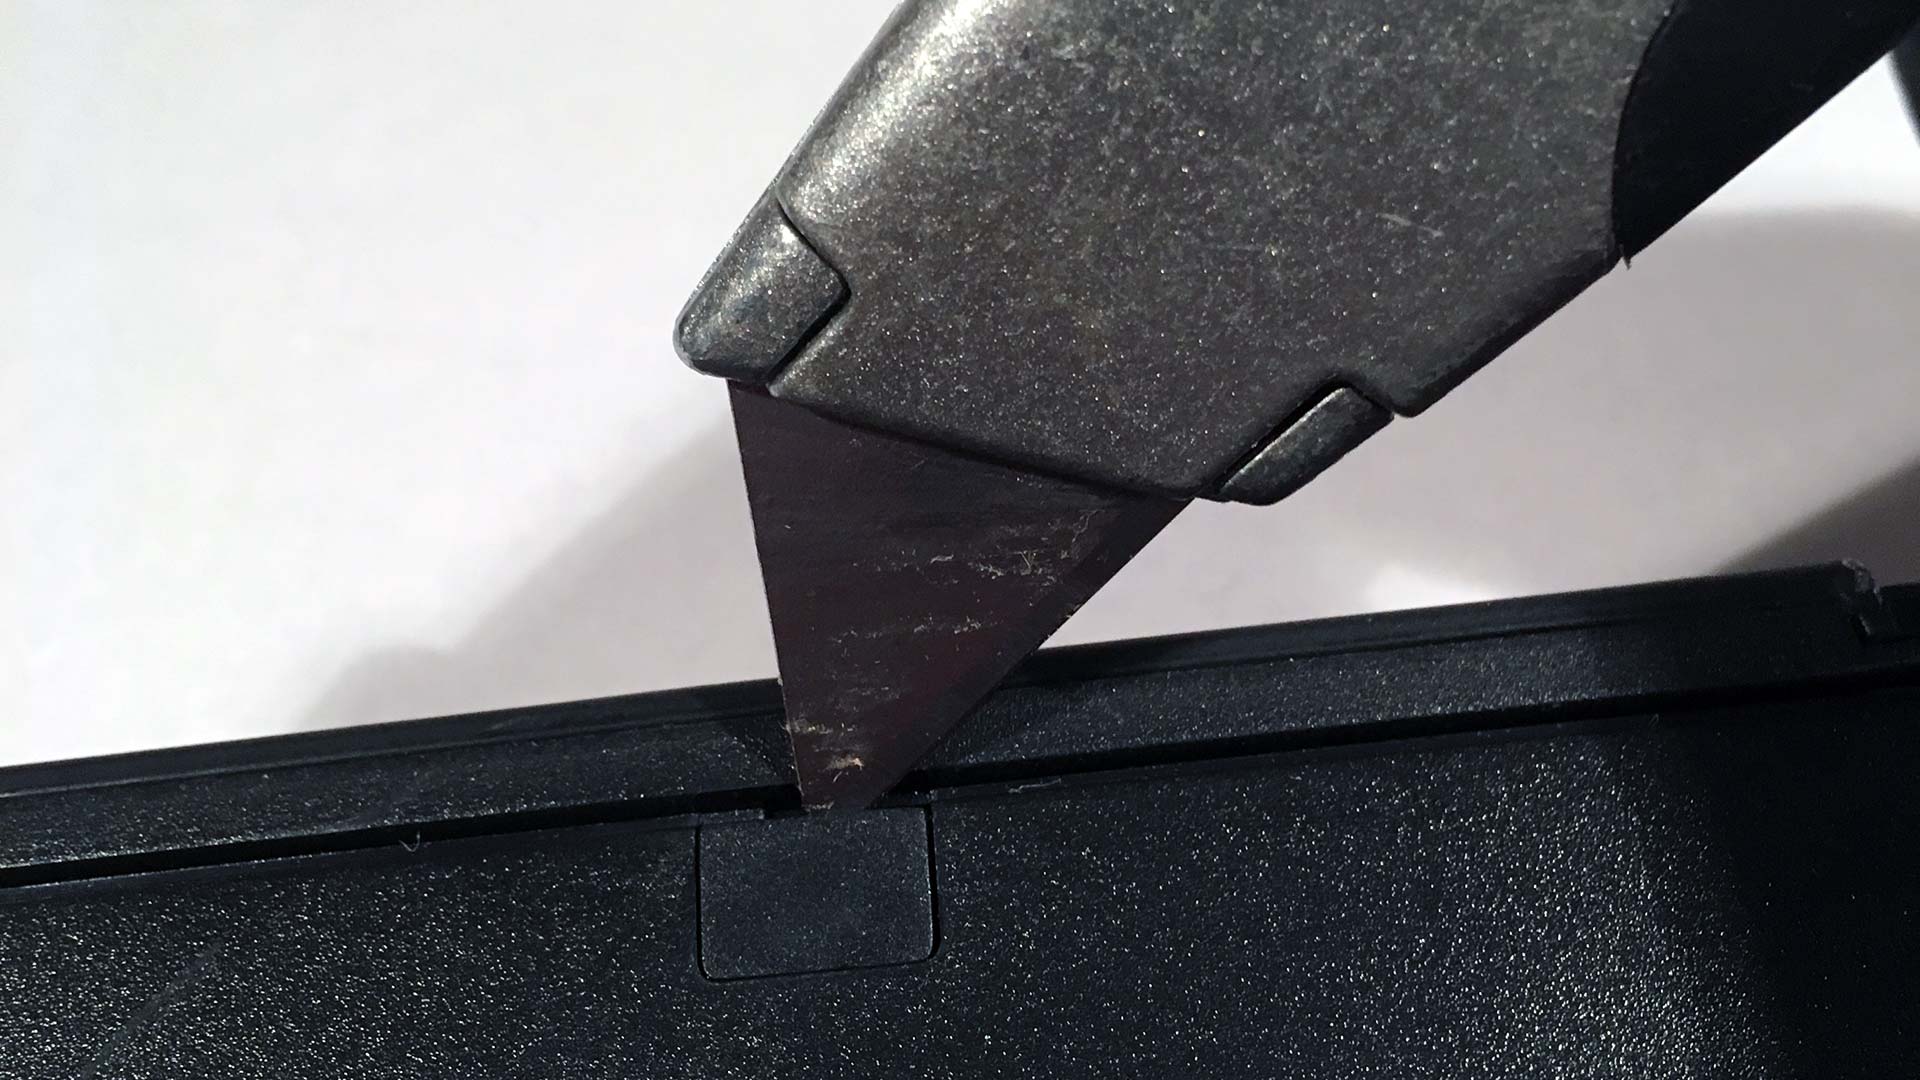 Using a box cutter or knife you can undo the two plastic clips that guard the upper two screws on this keyboard. Be gentle as you pry up on this as the latches can break easily.
 You can now remove the six plastic tapping screws on the bottom of the keyboard.
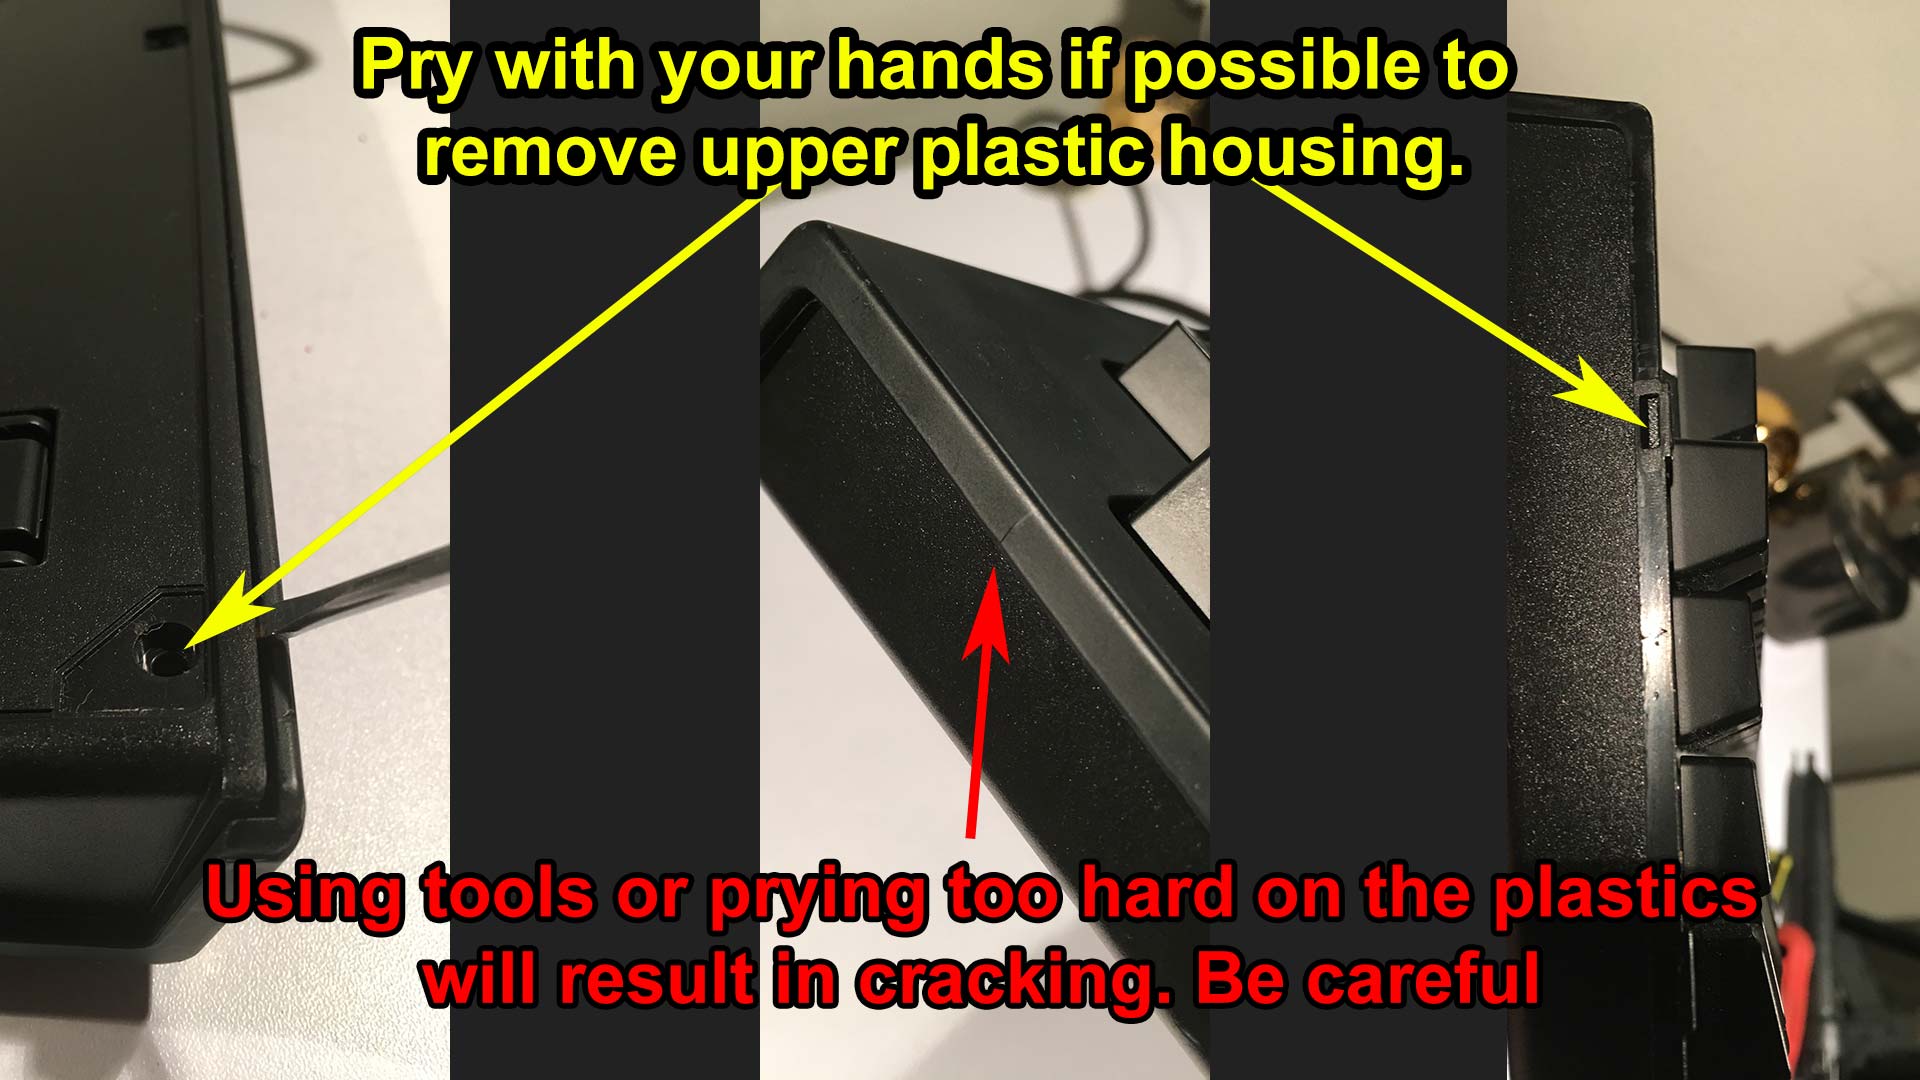 This is the most annoying part of the disassembly procedure because as you can see. I screwed up! Razer uses two interlocking plastic clips on each side of the keyboard. With enough time and effort, you can pry these clips apart using your fingers. If you pry too hard on one side or start to use tools, you'll get damage as you see above. This is actually poor engineering on Razer's behalf because even though I understand why the plastic clips exist which is to pass certain FCC testing. This makes these keyboards much harder to service and keep going for years to come. Thankfully this is a free repair and I don't think that kid is really going to care about a hairline fracture on the side of his board. As long as his keys are fully functional. Let's keep going.
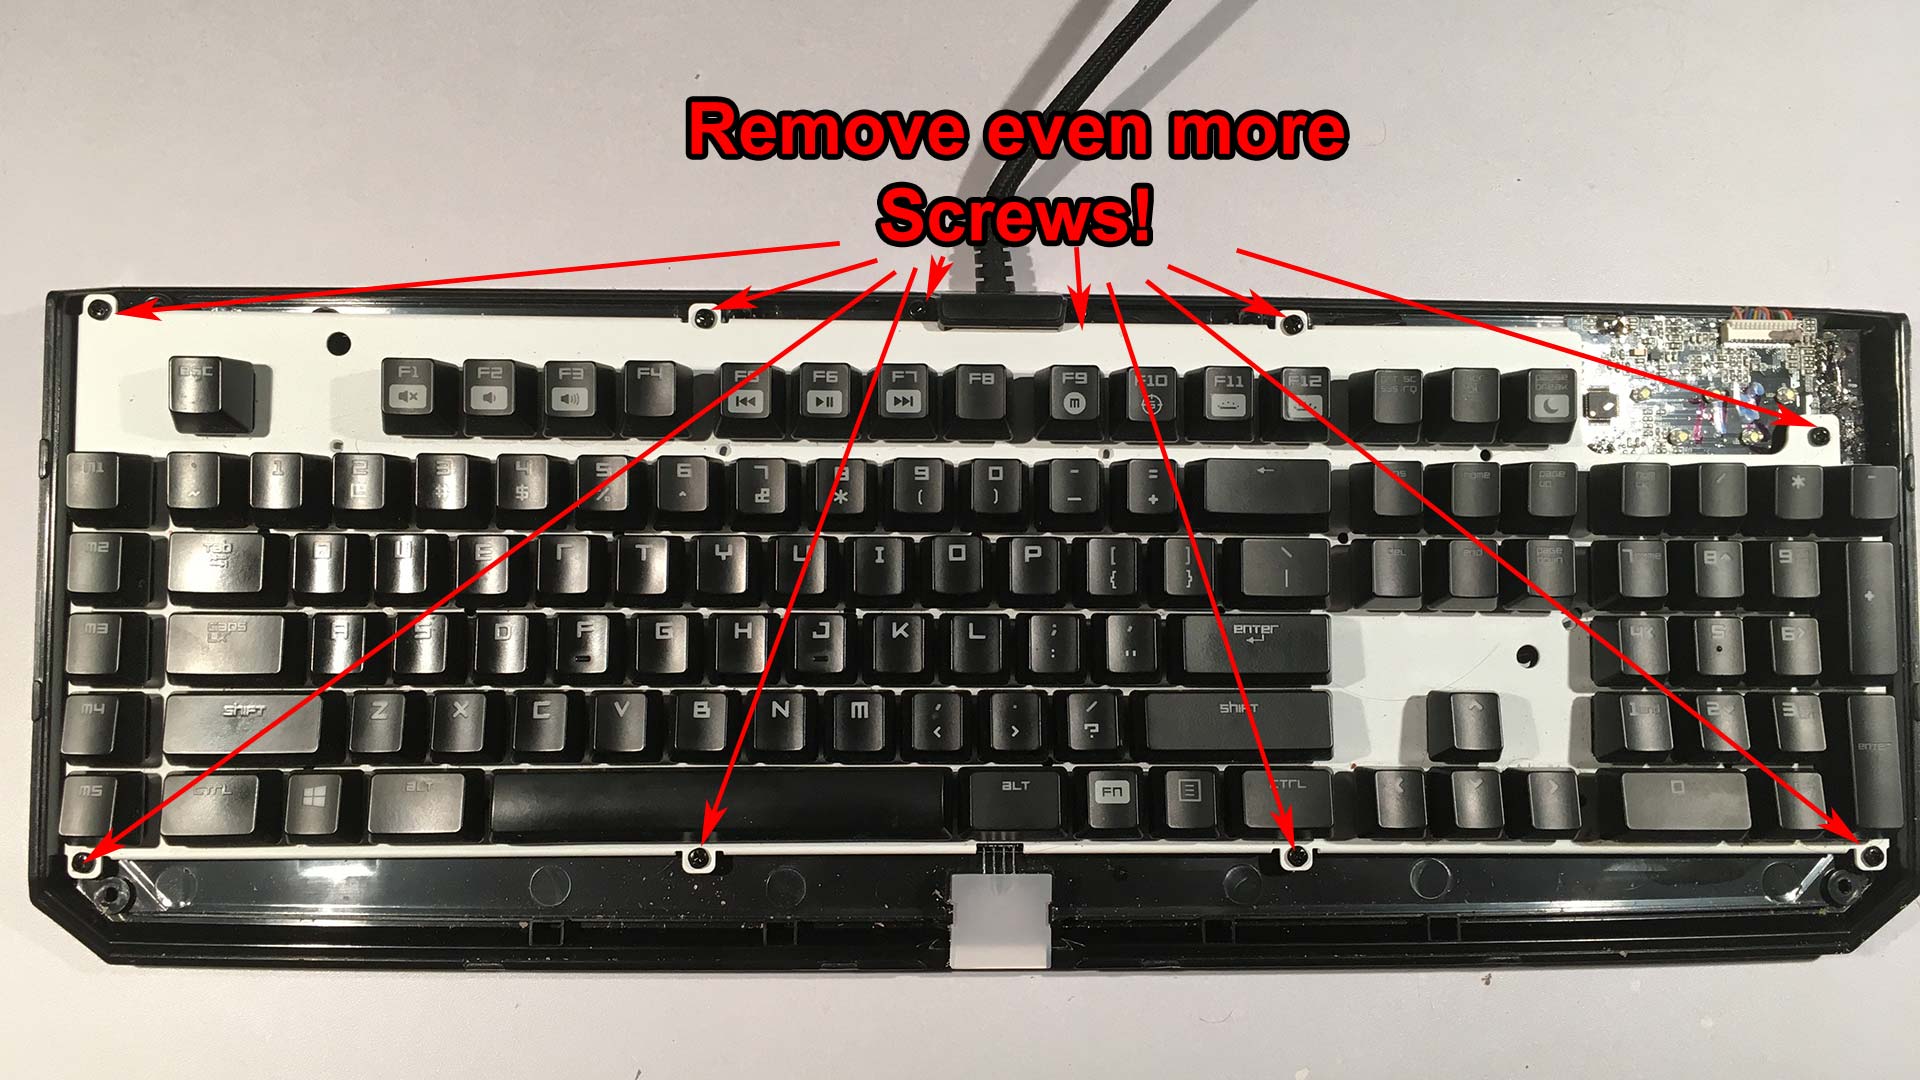 We got about another ten screws to remove. Eight around the keyboard assembly, and two that hold the cable clamp in place. As a note, all of the screws are still plastic tapping PH2 head screws which means you don't have to worry about mixing types and sizes of screws.
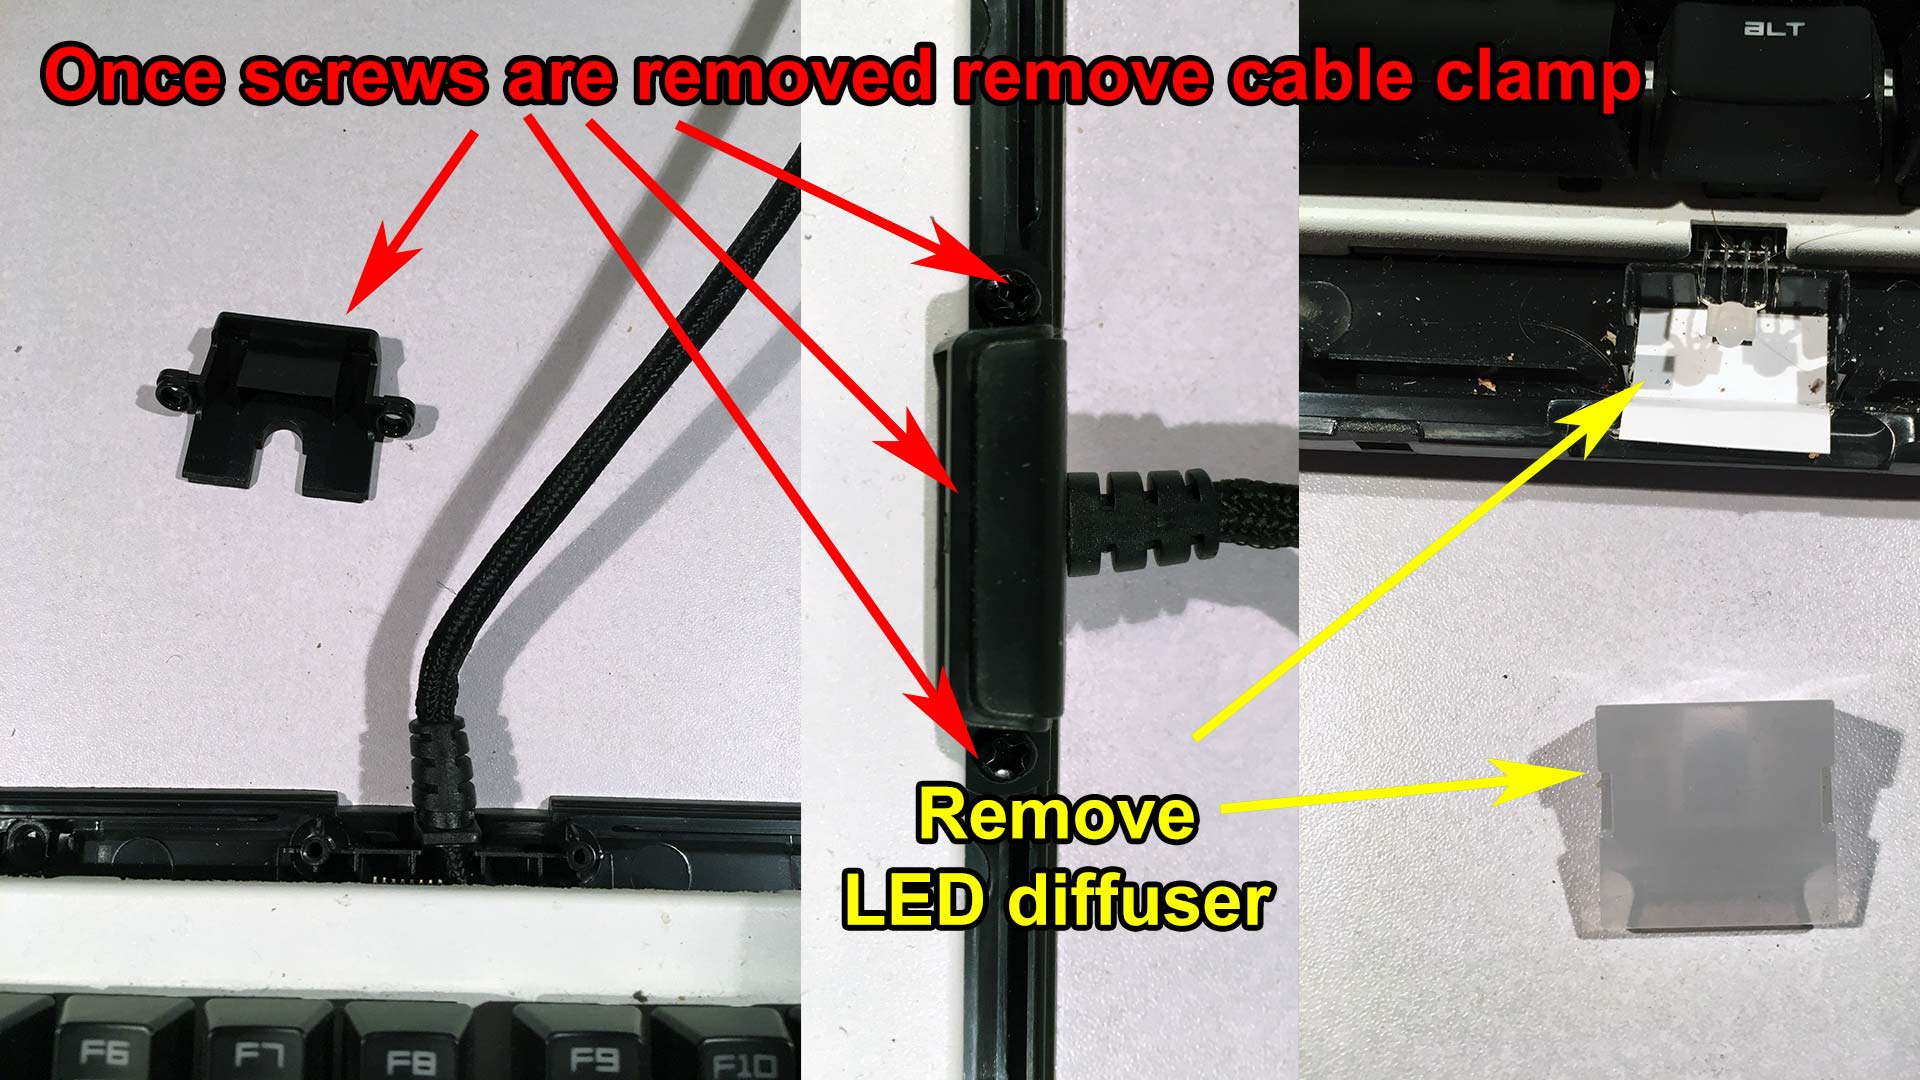 Before you can lift your keyboard out we will need to remove the plastic cable clamp that is holding both the keyboard and the cable into the base of the Razer keyboard. Also, we need to remove the diffuser that lights up the Razer logo in the front of the keyboard. Removing the diffuser is simple as it's held in by two plastic tabs and easily removed by hand.
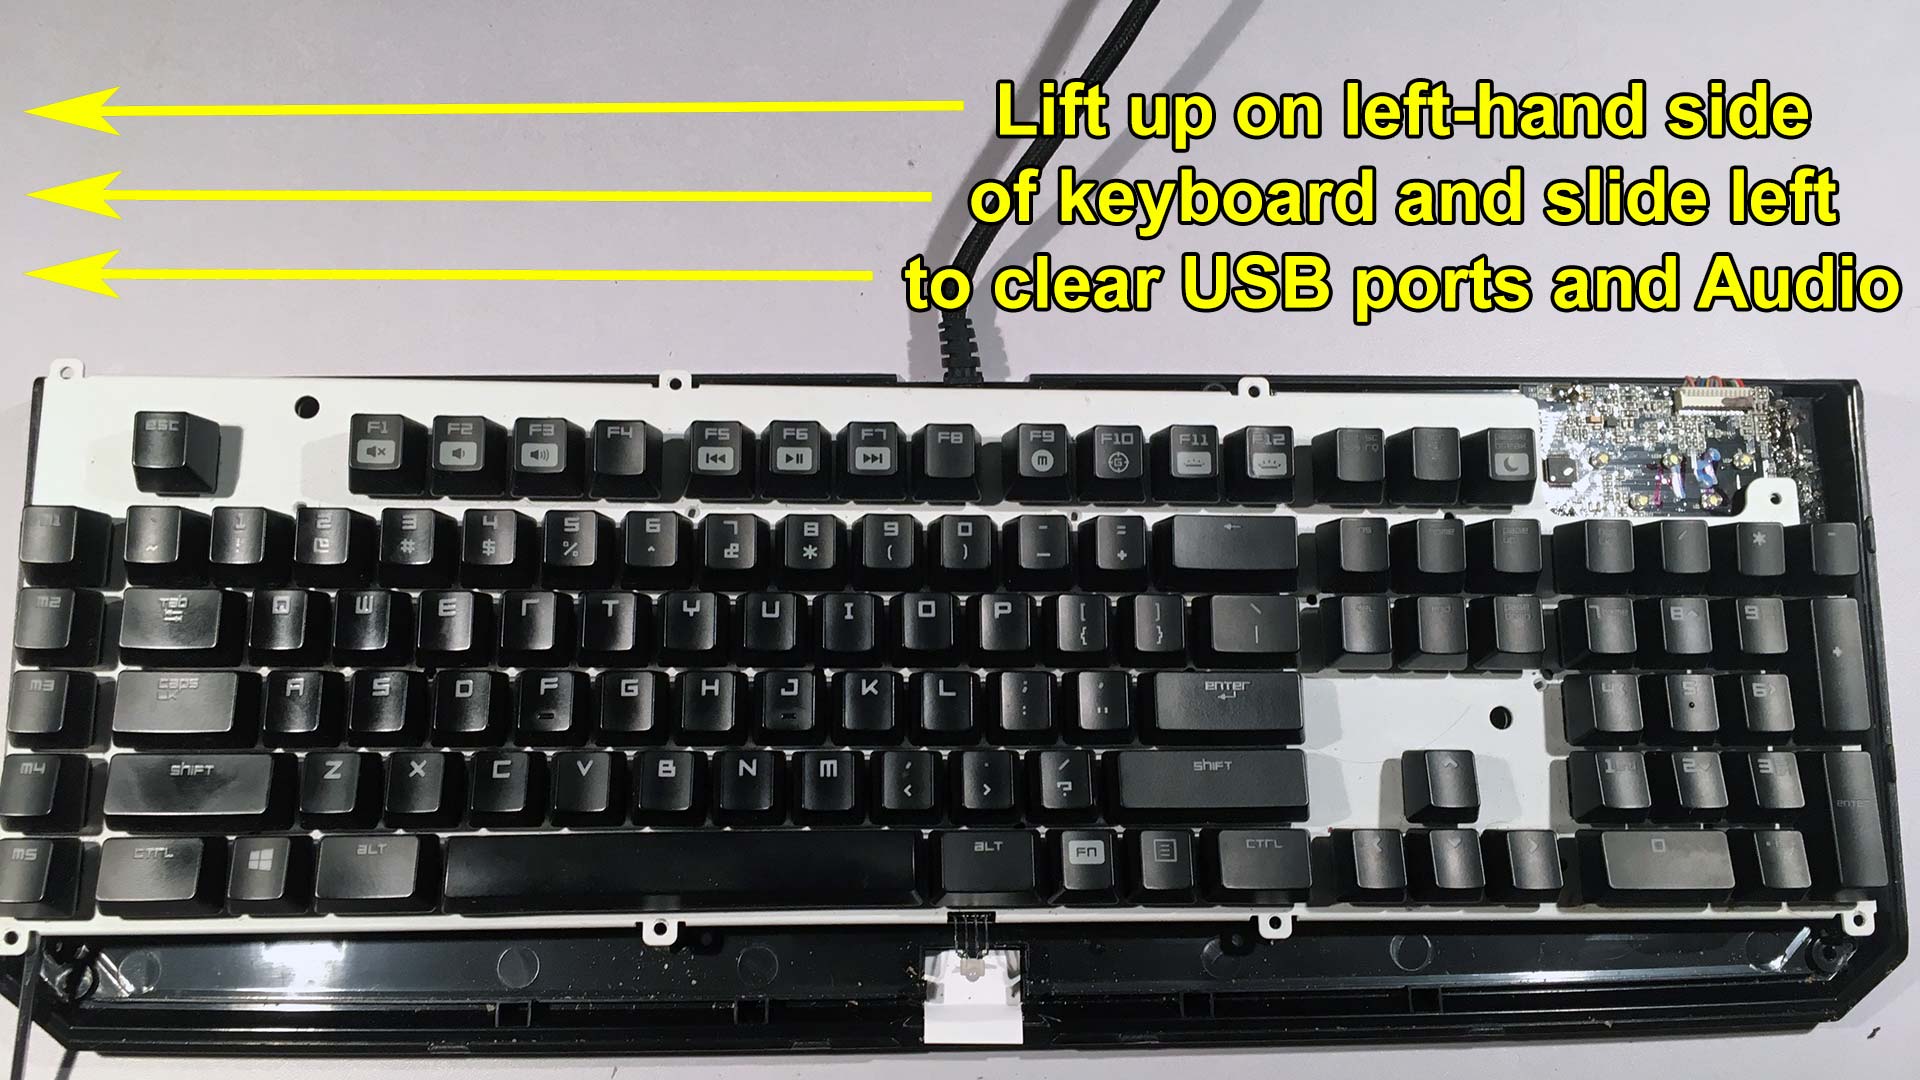 It should be noted that if you just wanted to clean your keyboard this is about the point you would stop. But we have to bad keys to check out so we're going to keep taking it apart. lift up on the left side of the keyboard and slide left in order to clean the USB port and the audio ports that are mounted on the right side of the keyboard.
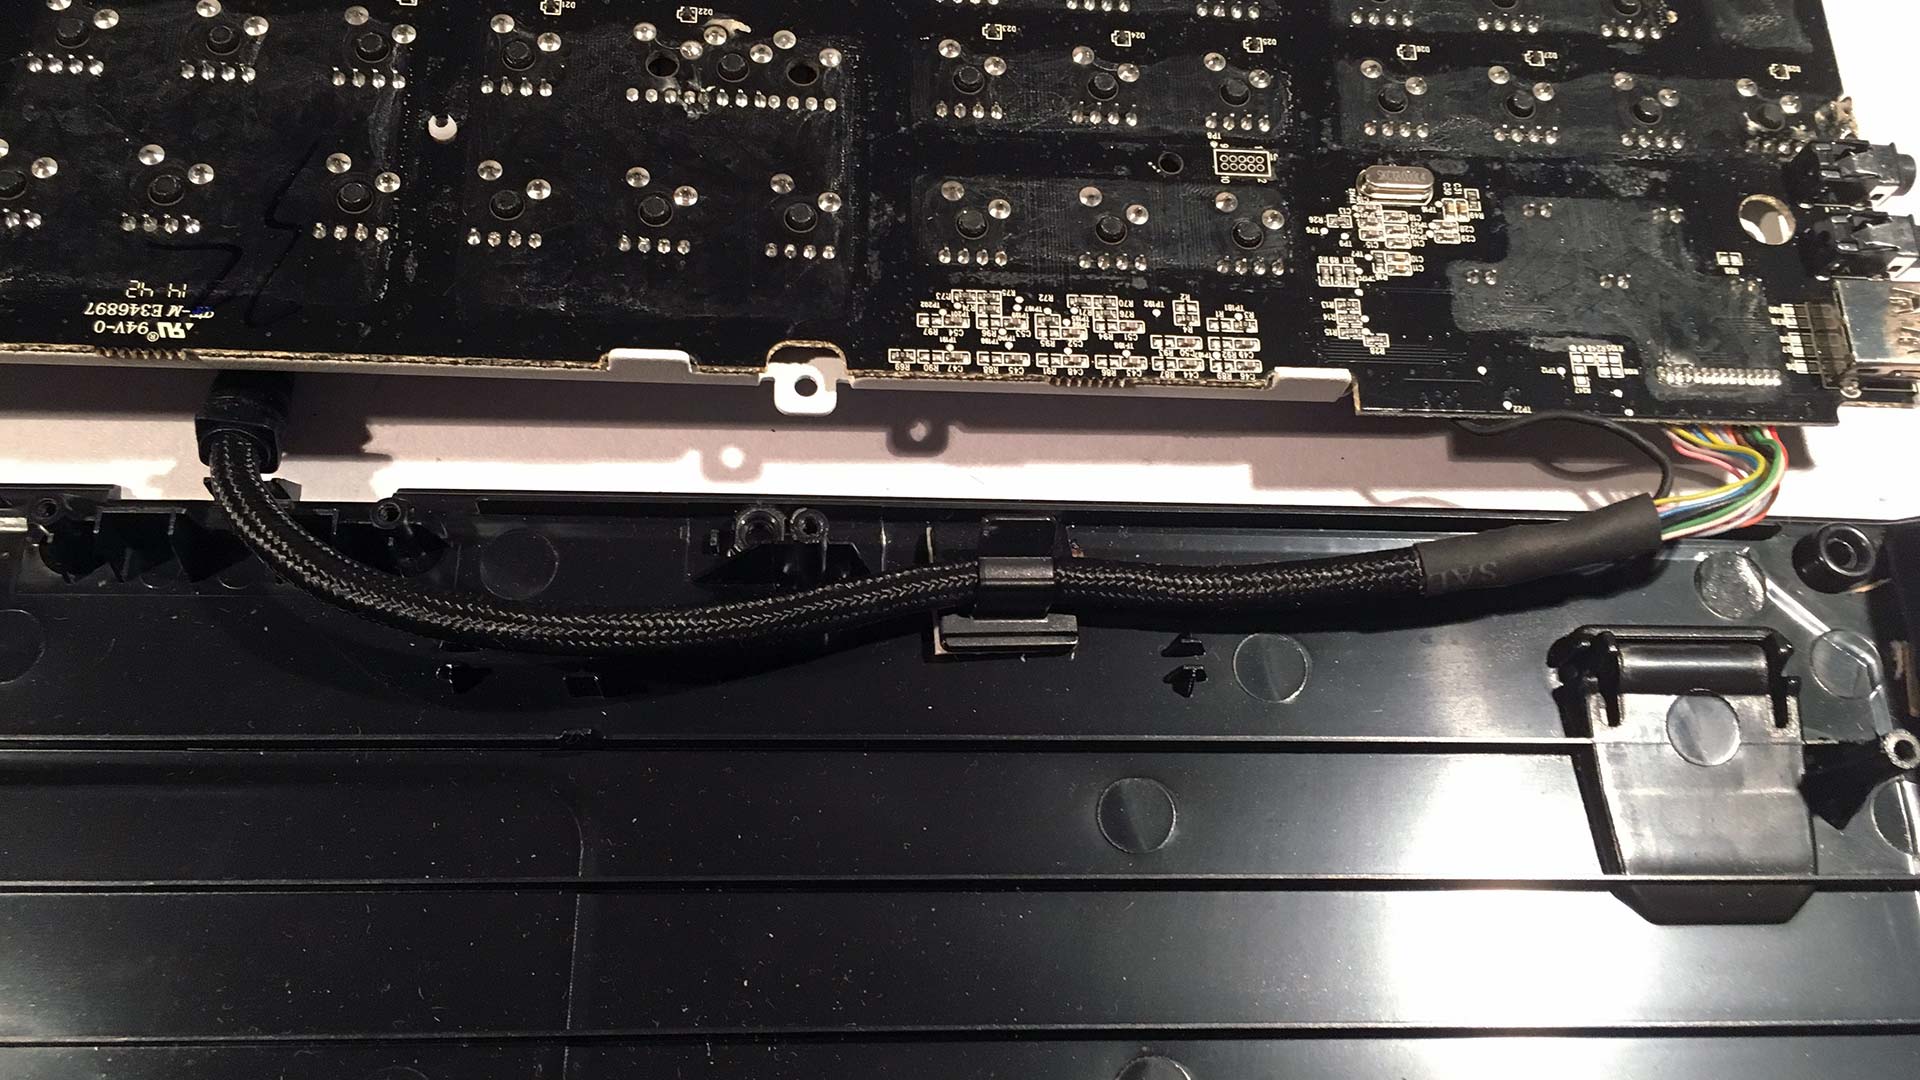 The last thing you want to do before your board is finally free from its lower casing is to flip the keyboard over and remove the cheap-ass cable management clamp that Razer put inside (Seriously guys? Double-sided tape?) And from here we can now inspect the board.
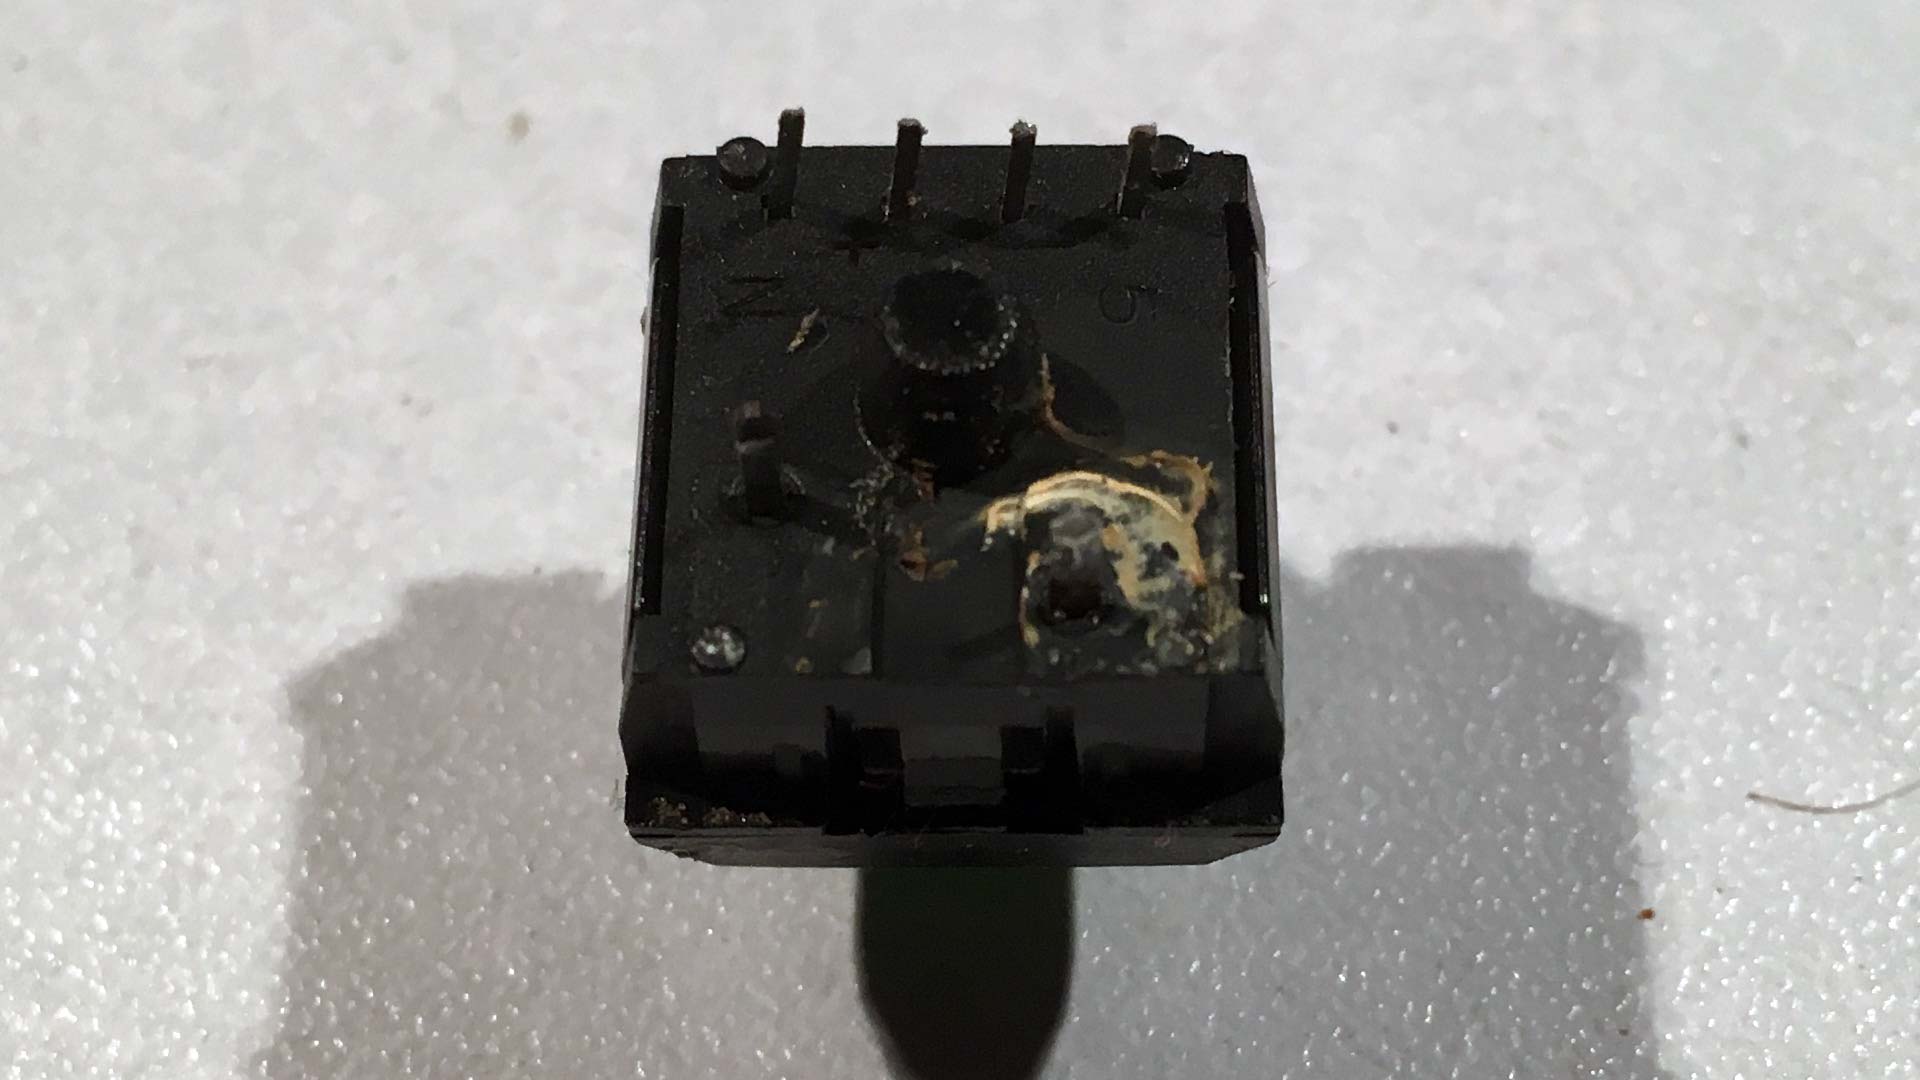
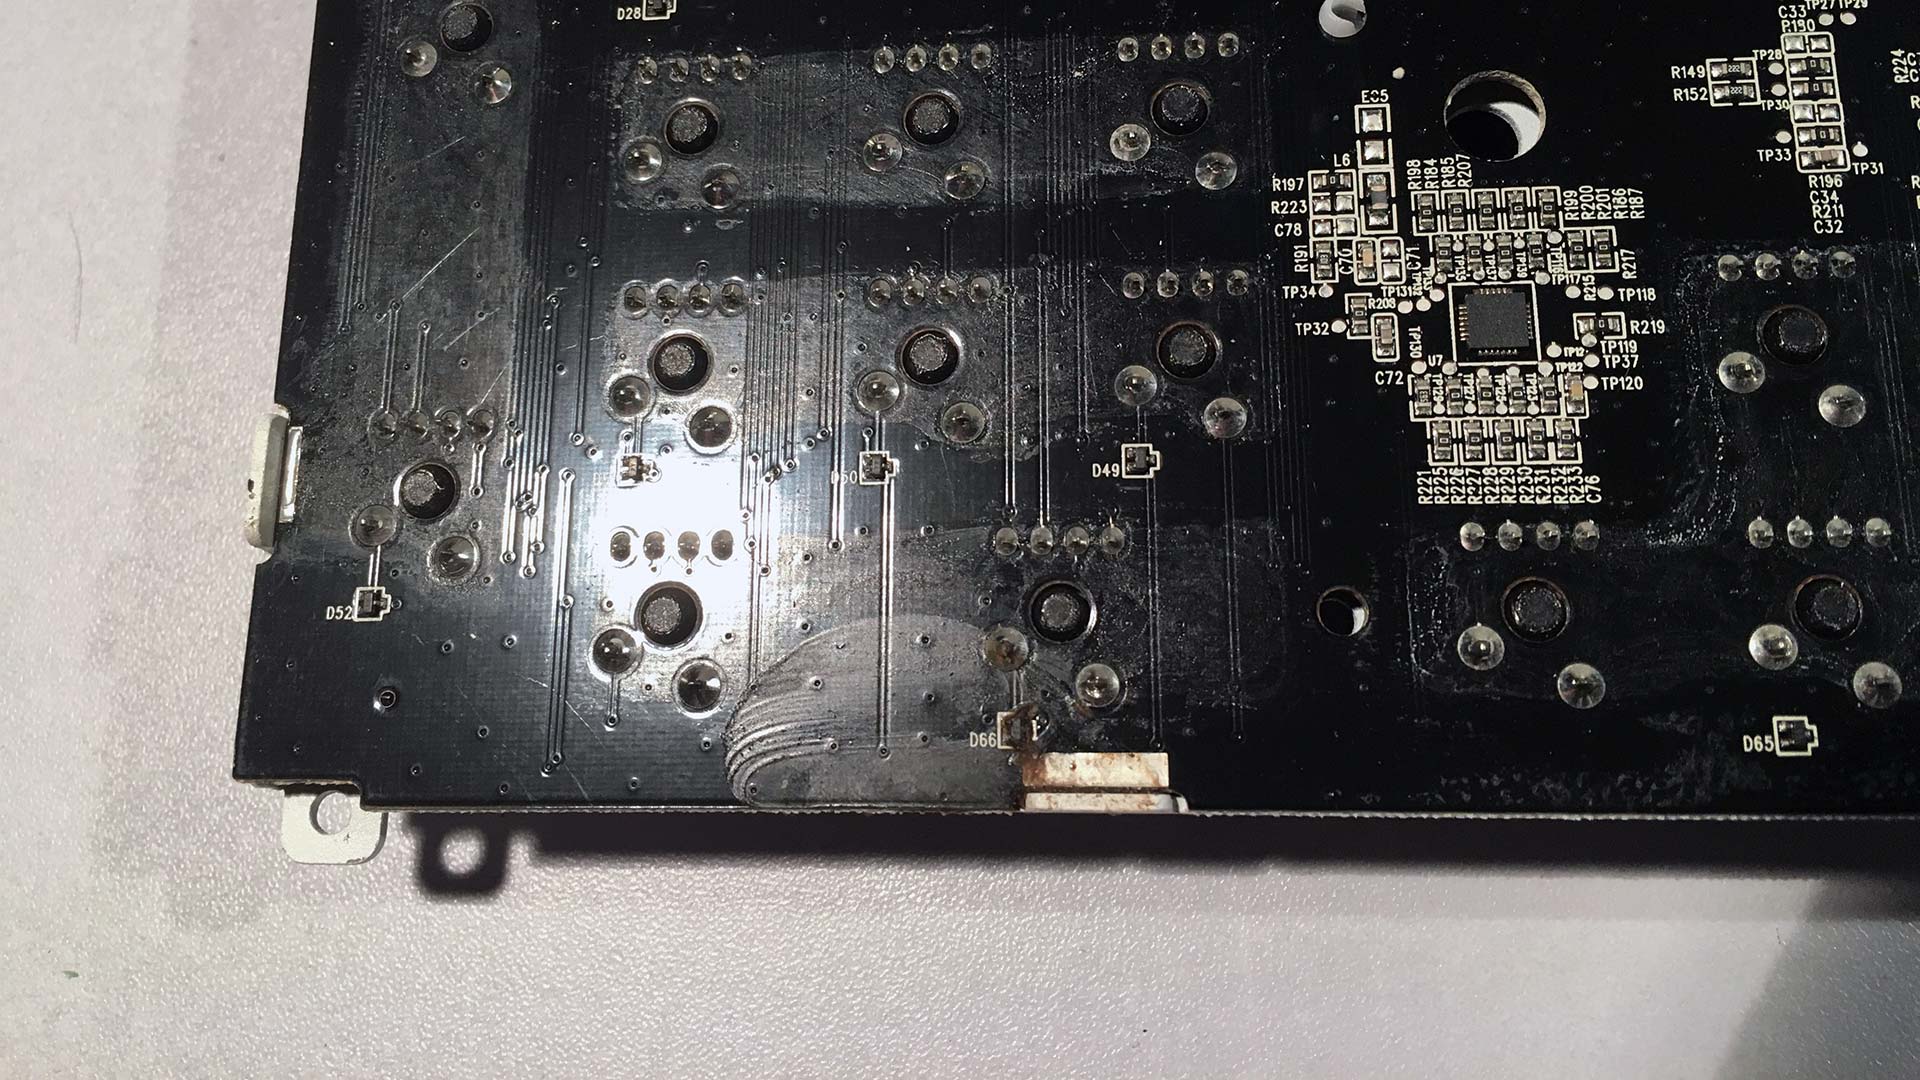 Now that we can see the board we immediately found out why the "0" and "." keys failed. Liquid damage. someone dropped some soda onto the board and it leaked around the protective plate on the top and got around to the back of the board. Rather than turn off the keyboard and let it dry most users probably just dry the top and keep going. There's corrosive damage all over D66 and even on one of the mechanical keys.
The mechanical keys.
 Tasty!
I decided to extract the mechanical key that had some corrosive damage. I didn't really need to since the two larger pins is the switch itself and the continuity test passed without a problem on it. But the liquid damage did seep upwards into the key so we decided to replace that key just to be on the safe side.
Tips for DE-soldering mechanical keys.
- Be sure to ADD additional solder to each of the joints. The reason why is the solder that is currently on your board is a ROHS blend of solder which effectively means it's lead-free. It uses harder metals that have to be melted at higher temperatures. If you have a nice soldering station such as a Weller of Hakko you don't have to do this step. But my mixing your solder in with the ROHS it makes it a lot easier to extract with just about every soldering iron out there.
- Use a solder sucker. Do not use braid. You will damage the traces on the board. Braid is only good for cleaning the pads after you extract the switch.
- Do not attempt to pry the keyboard switch out with a flathead screwdriver. The circuit board is a multi-layer board and prying will rip out the traces in between the board making it useless!
- To verify that you removed all of the solders from both the LED and Key-Switch you should be able to wiggle it back and forth with your finger and actually see the metal feet wiggle in the holes. If you are having problems with just one or two legs of the LED pins. use your solder to heat up just those two pins and gently pull with your fingers.
- Clean up the pads after you remove the key switch.
- Try not to hold your soldering iron on each pin for more than 3 seconds. You'll start to melt things. If you are having issues heating up your solder then try a higher-wattage iron.
- Use in a well-ventilated area. breathing in solder fumes is bad m'kay?
History time!
 When Razer first introduced its gaming keyboard it didn't go with cherry MX switches like everyone else in the market. Instead, they went with a Chinese company called "Kailh" to make their custom micro-switches. The quality of these switches was not good and typing on an older razer keyboard can feel inconsistent. The clicking and there was also a higher failure rate of the switches. Razer took a lot of heat from the gaming community about this and after 2014 they switched from the Chinese manufacturer "Kailh" over to "Greetech". Razer did this without really making any announcement about it (Which I hate, at least admit you screwed up!) So far, the Greetech switches are holding up just fine. In the latest edition of the Razer Blackwidow Chroma "X" edition. There is now the option to choose either Greetech orange switches or Cherry MX Blue switches. Razer going back to the standards of other mechanical keyboards using the Cherry MX standard. Instead of being the unique flower in the business. That's not a bad thing! Cherry MX switches have the highest of standards about them. Because of that, there are so many Chinese companies out there mimicking them since Cherry does have such high standards the cost on a per-switch level is also high. I kind of covered this on my gaming from the past to now blog for those who want to check that out. Back to the repair.
The Kailh switches apparently are just fine. Now what!
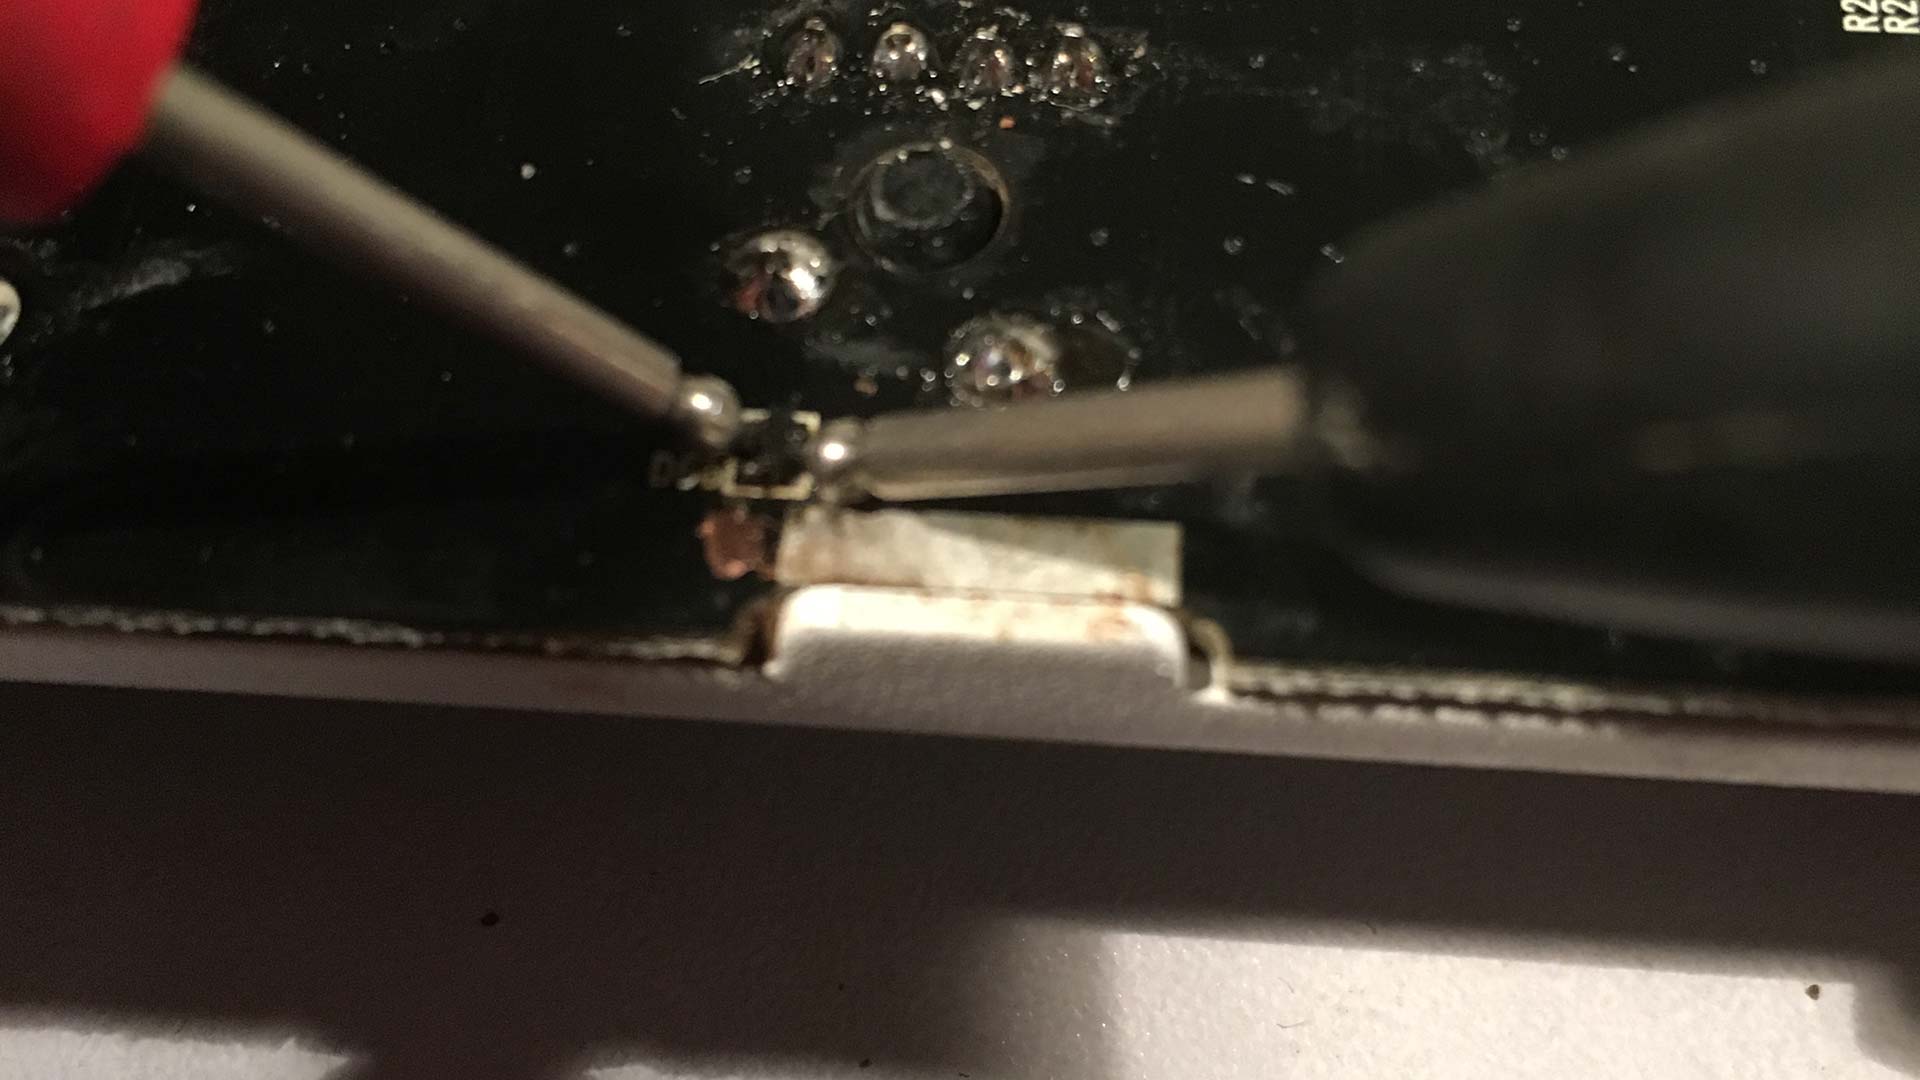 Okay, so we put back the mechanical switch and now we're going to clean up all of the liquid damage that happened with denatured alcohol. Now how did I find out that tiny chip no better then the tip of a pencil is actually a diode? Well, ignoring the silkscreen of the board which states "D66" which D usually means diode, Q means transistor, R means resistor, etc. I can also verify that it does indeed act as a diode by going to a neighboring chip such as D49 right above it and doing a continuity test. It passes by giving my resistance of around 540Ohms in one direction and 0 if we reversed our probes.
Identification.
If you take a magnifying glass and look at the neighboring chip all it says is "A4." Wow, not a whole lot of information to go on! Okay, typing in "A4 diode" into google actually got me exactly where I want to be. That this chip is what is known as a "Diode array" SMD chip with two leads heading off of it. Guess where the two leads go off to? If you guessed the "0" key and the "." key you win at least one internet!:) So for every two keys, there's one of these chips governing it. This is good to know in the event you just have a pair of keys that don't work instead of just one or two keys. As for exactly WHY is there a diode there? There could be many reasons for this. It could be for reverse polarity for the controller chip. Or it could also be as a safety so the controller chip does not send ghosting keystrokes in the event of a high electrostatic charged room. Either way that chip is gone!
Improvisation.
Now, I could order DigiKey part number 2156-BAV70W-ND manufacturer part number BAV70W and do it the right way by SMD soldering on a new one. But guess what? The kid wanted his keyboard back right away (same day)! I know, shame on me for not having parts. Real men carry parts for everything. I did actually have some BAV70 but those were 0.5m too large and the soldering job was not stable with a chip of that size.
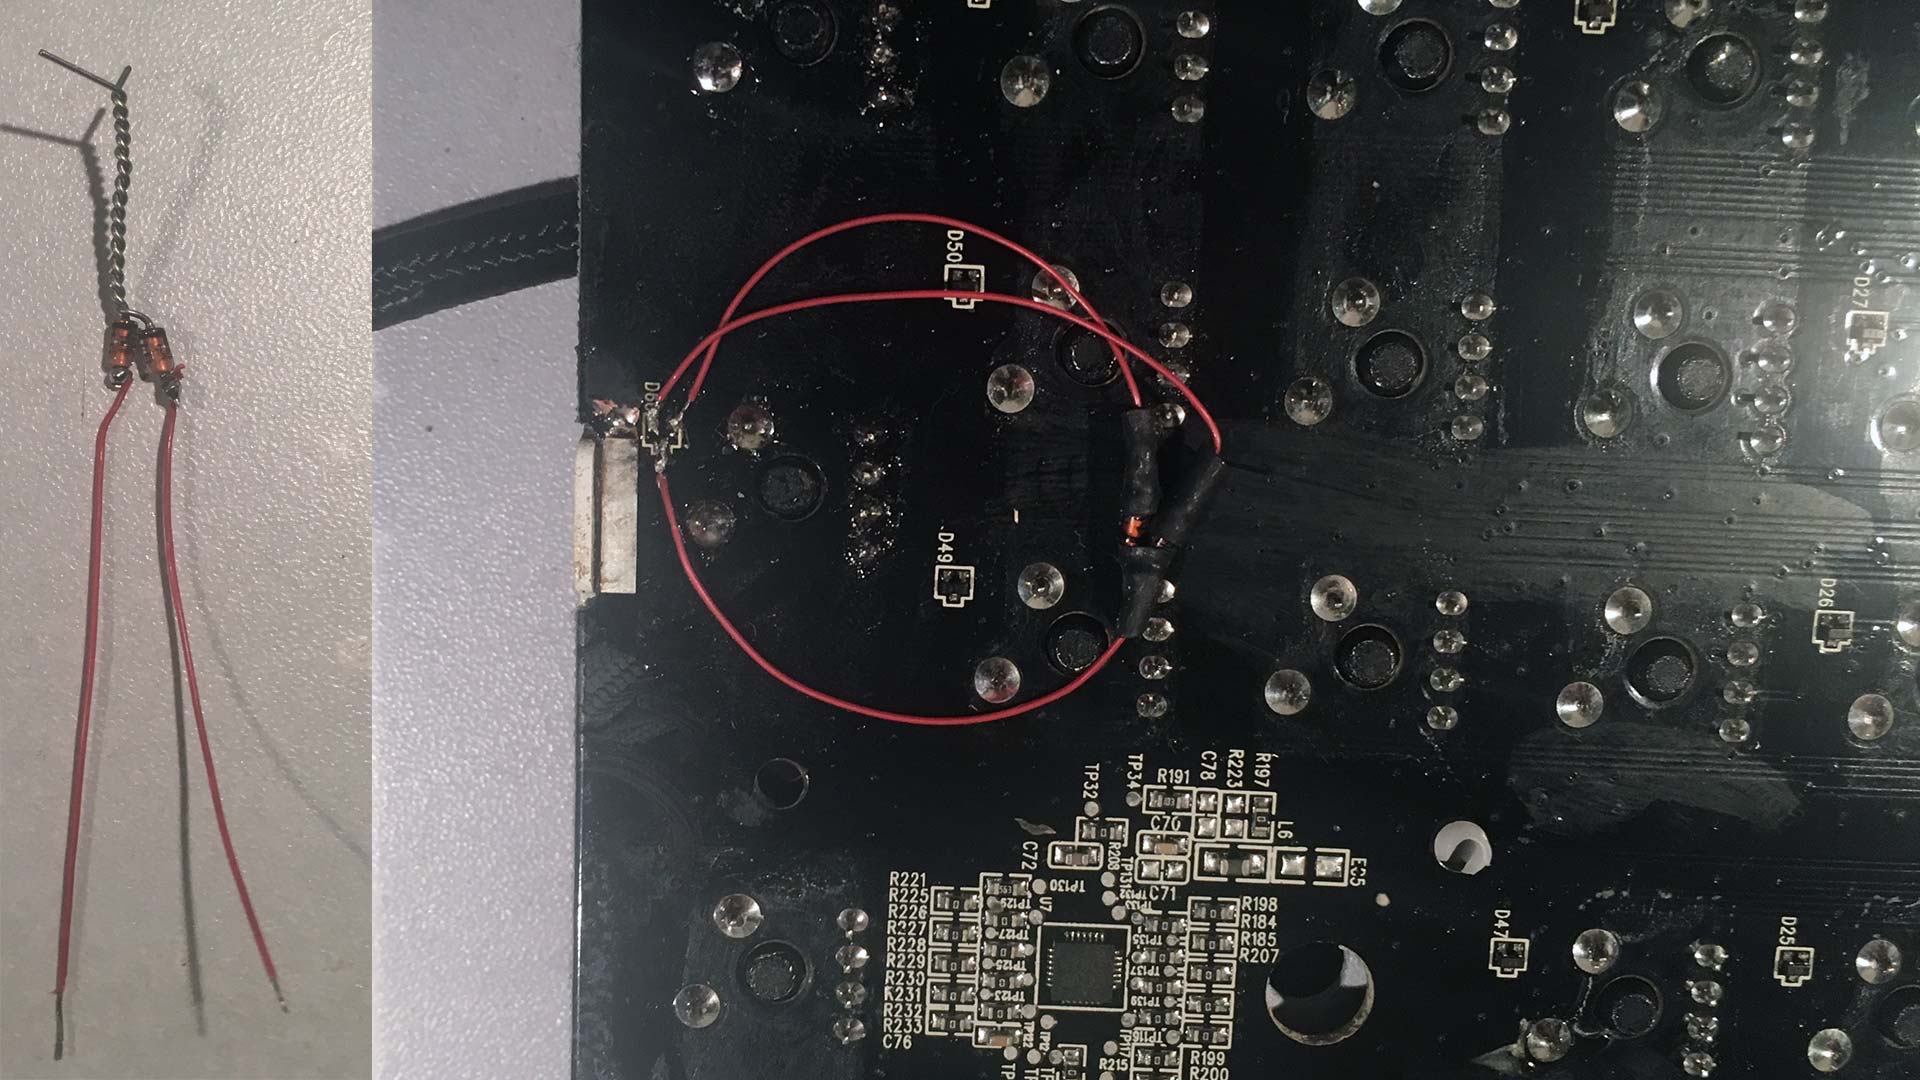 Alright! McGuyver time! If you look at the BAV70 it's just two diodes with the cathodes tied together and the package shrunk down to the size of a pencil tip! So I used 2x 1N4148 with a max current of 200mA and a reverse current timing of 4ns which is identical to what the chip is doing. These diodes and tracer wire you can get at any radio shack if this happens in the middle of a LAN gaming tournament and need an emergency fix! With some tracer wire magic, we were soldered in and ready to be buttoned back up. I didn't have to worry about the size of these diodes as even with the electrical tubing it's no taller than the mechanical switch stabilizer plastics poking through the board. On top of that the lower ABS frame of the keyboard has some room to spare. So no worries about crushing the wiring or the diodes.
Does it even work?!?
Video roll, please!
"Note: If you get a black screen but the audio is playing. Or you got a potato PC and it's studdering. We have fallback Links below."

Video tutorial fallback mirrors:
In case you have no-script enabled or for some reason cannot see the title video on this website. We have provided direct links for these videos. For more information about the standards we use on this site click here if you would like to know more.
AV1       - Link
WebM VP9  - Link
OGV       - Link
MP4/.h264 - Link
Video of after the repair is uploaded. So, you tell me.
Final thoughts.
I was rather disappointed with the overall repairability and quality of the Razer keyboards. I expected better out of a company that holds the slogan "By gamers for gamers" because they of all people should know Gamers are brutal people towards their hardware. Razer should at least anticipate that with better ways of cleaning the hardware. Also, a simple foam or rubber gasket lined along the bottom of the keyboard could've prevented the damage in the first place. It's a little apparent that Razer is all about marketing and realizing they have to update their hardware to actually back up their claims. But then again, perhaps I'm not a hard-core gamer so I simply cannot possibly understand the level of awesomeness that is Razer.  Overall the repair would've been a lot easier if I didn't deal with an impatient gamer who wanted it done for free because their mom "knows a guy." Ohh well, it's working and it's time to move on to other things now. If you have just one key failing. It's probably a bad Kaith or Greetech key. If your keys are failing in pairs. Now you know it's a diode array issue. Stick a key extractor into it. It's done!
That's all server has to say for now. Until next time.
END OF LINE+++
Thanks to your post, I discovered that the single-legged side of my diode had a cold solder joint and wasn't making proper contact. Your guide helped me identify and fix the issue — it was an incredibly valuable resource. I truly appreciate your work. Thank you so much!
-Berkay
Super glad it helped out and you get to keep your keyboard working longer!
Take care! And thank you very checking out my blog!
- S