
It has landed back on my bench once again.
It pains me whenever something we fixed lands back on our bench once again. Perhaps we should've seen the warning signs the first time around. Perhaps we did not test this controller thoroughly enough. Regardless of the error in our ways, the Nvidia controller is back on my bench and this time around it's finally un-fucked while learning some things around the way.
Care to listen to my multi-thousand-word diatribe? Buckle up and keep on reading!
"Note: If you get a black screen but the audio is playing. Or you got a potato PC and it's studdering. We have fallback Links below."
Video tutorial fallback mirrors:
In case you have no-script enabled or for some reason cannot see the title video on this website. We have provided direct links for these videos. For more information about the standards we use on this site click here if you would like to know more.
AV1       - Link
MP4/.h264 - Link
OGV       - Link
The problem? Drifting analogs sticks!
While we performing my first controller disassembly and cleaning of the person that decided to lie to us and in reality found out this individual dumped an entire cup of coffee onto the controller. The initial problem was the buttons were sticking so badly that the "A" button was simply held down for hours at a time. On top of that, the controller was utterly disgusting when we received it last. But now! It's drifting to the right. Now, this does not sound terrible at first until you realize exactly how much rely on your controller with your Android set-top device.
- You can't put the Nvidia shield to sleep. It will drift to the right and wake the fuck back up!
- While watching a movie in VLC or Kodi it will simply jump to the beginning of the movie at any given time. Depending on how the movie is encoded it could crash the shield this way too!
- Entering in any data via the onscreen keyboard is an act of sheer frustration. So much so that you'll probably want to eventually throw your controller into the wall and buy another.
But instead of adding to the landfill let's dive back in and take it apart once more.
The Nvidia forums:
Now, I will say that the Nvidia forums covered a topic like this. Unfortunately they never really dived in and determined what the problem is. Just there are two things you could do if your controller is drifting:
Un-pair your controller completely.
Then, hold the Nvidia home button like you’re going to pair your controller again and keep holding until it turns off completely.
Then, re-pair the controller. - My article and also the forums advise.
As you could see in the video when we paired it to my Microsoft Surface tablet. The controller automatically moves from the center to the most extreme position.
Calibration is not going to do shit.
If that fails then contact Nvidia to process warranty on your controller - Nvidia Forums.
That's great if this shield was purchased in 2019. But guess what? It was purchased sometime around 2016. Sooooooo. That's not really a solution either!
Wow, amazing this device is 4 years old yet it can still play all of the best codecs you can download videos to. Let us hope for Android TV version 10 support so I can at least play 1080p av1 codecs.
Disclaimer time:
It would be irresponsible for any website to not throw up some sort of disclaimer. So here goes; We here at S-Config.com are not responsible for any physical, mental, psychological, or financial damage that takes place by performing this repair. Nor will we accept any responsibility or damages from reading our terrible sentence structures as we continue to improve. If you want a full breakdown of questions and answers feel free to read the FAQ. Now, let us move on!
Disassembly:
 Click here for the previous blog dealing with dissassembly of the Nvidia Shield Controller.
Instead of sounding like a broken record, we're just going to refer you back to our original disassembly blog if this is your first time on this site and you are wanting to take it apart this controller hopefully BETTER than what we did. We still take the blame for cracking one of the posts on our controller even though NVidia could've used a better plastic shell.
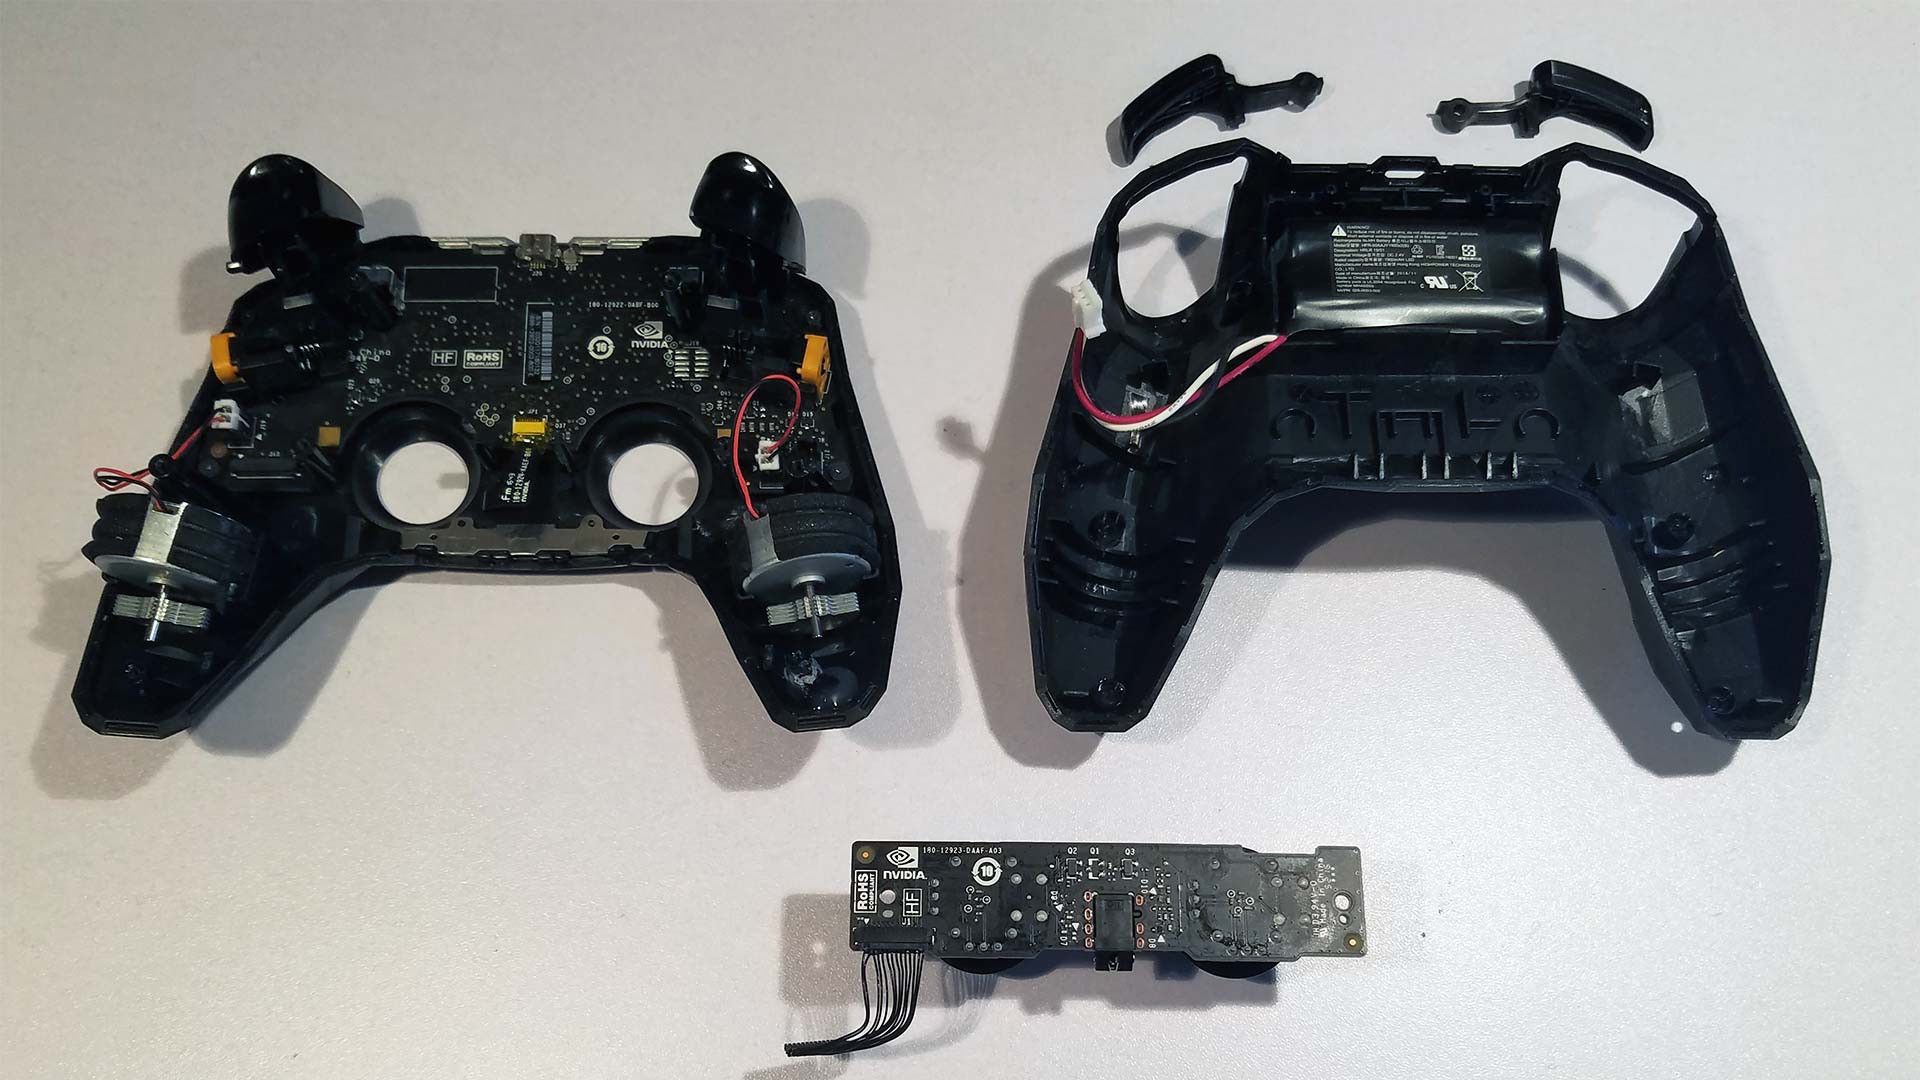
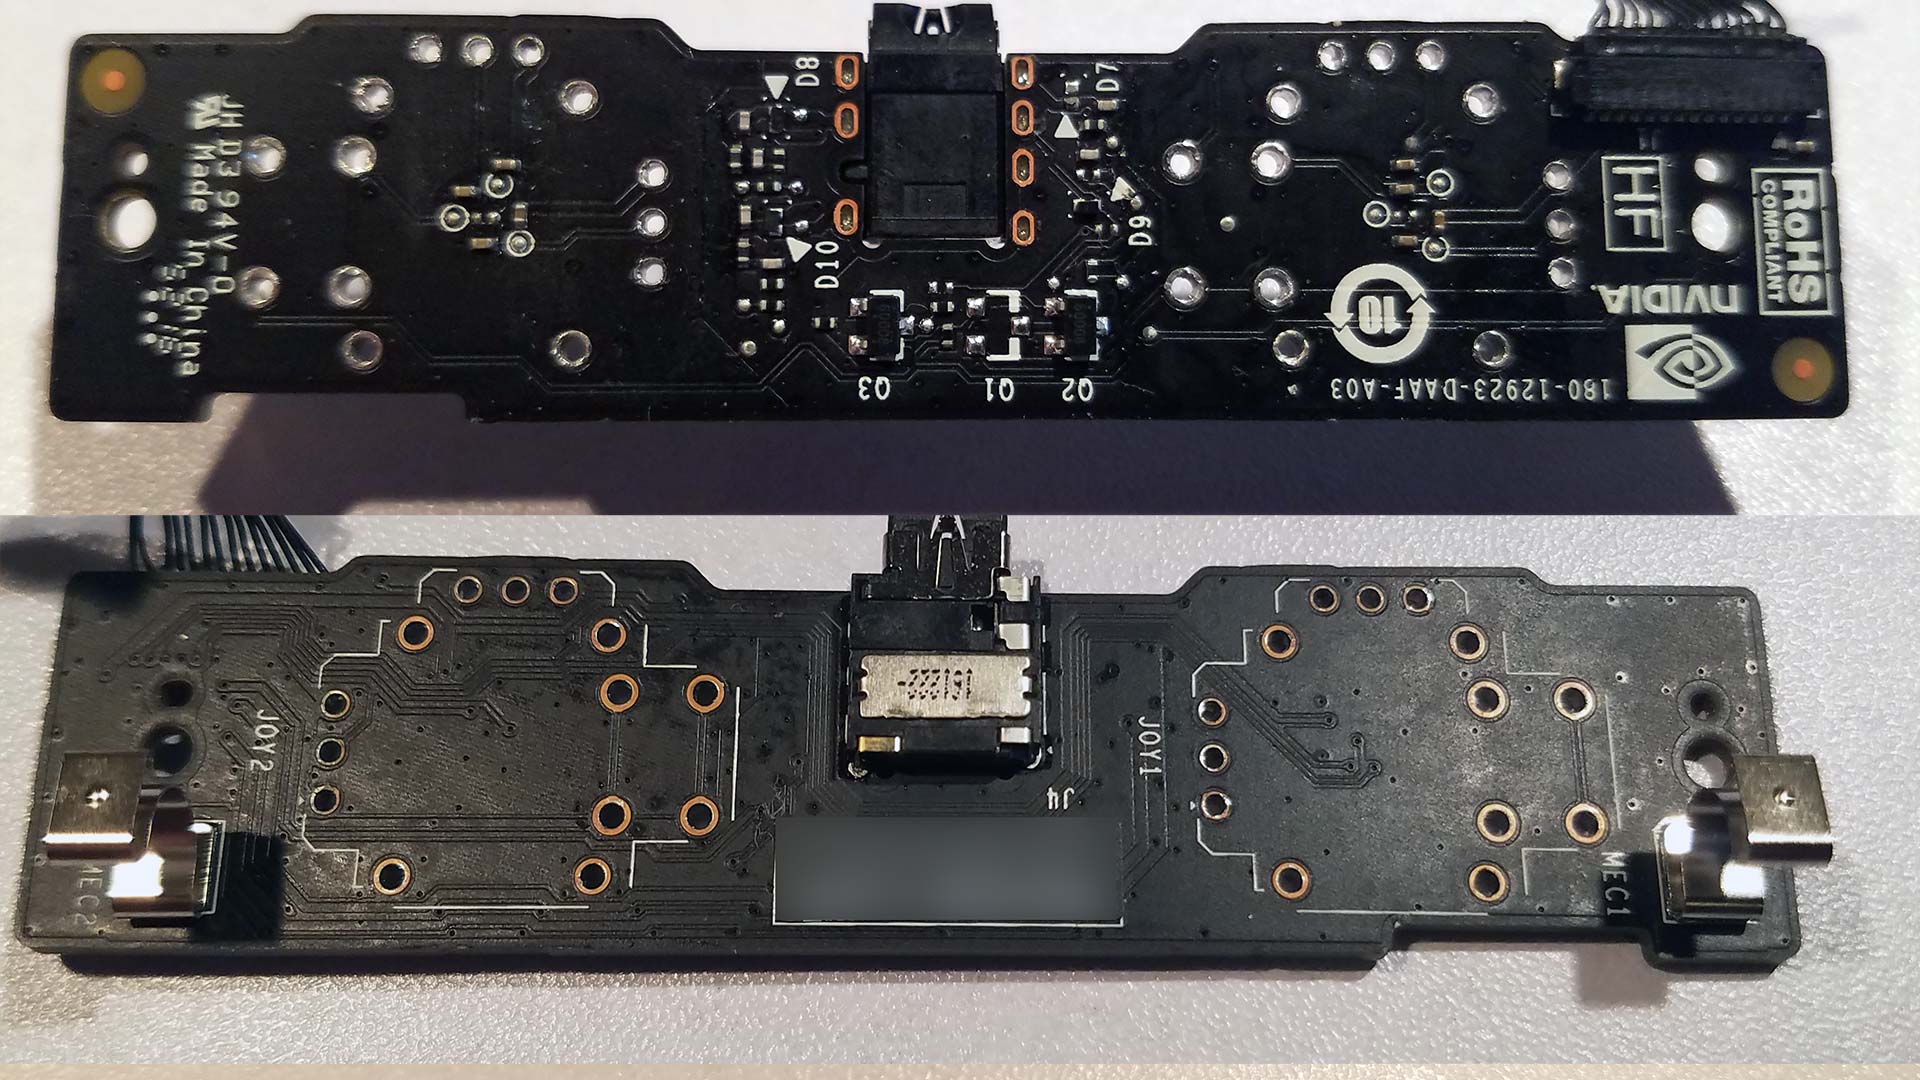
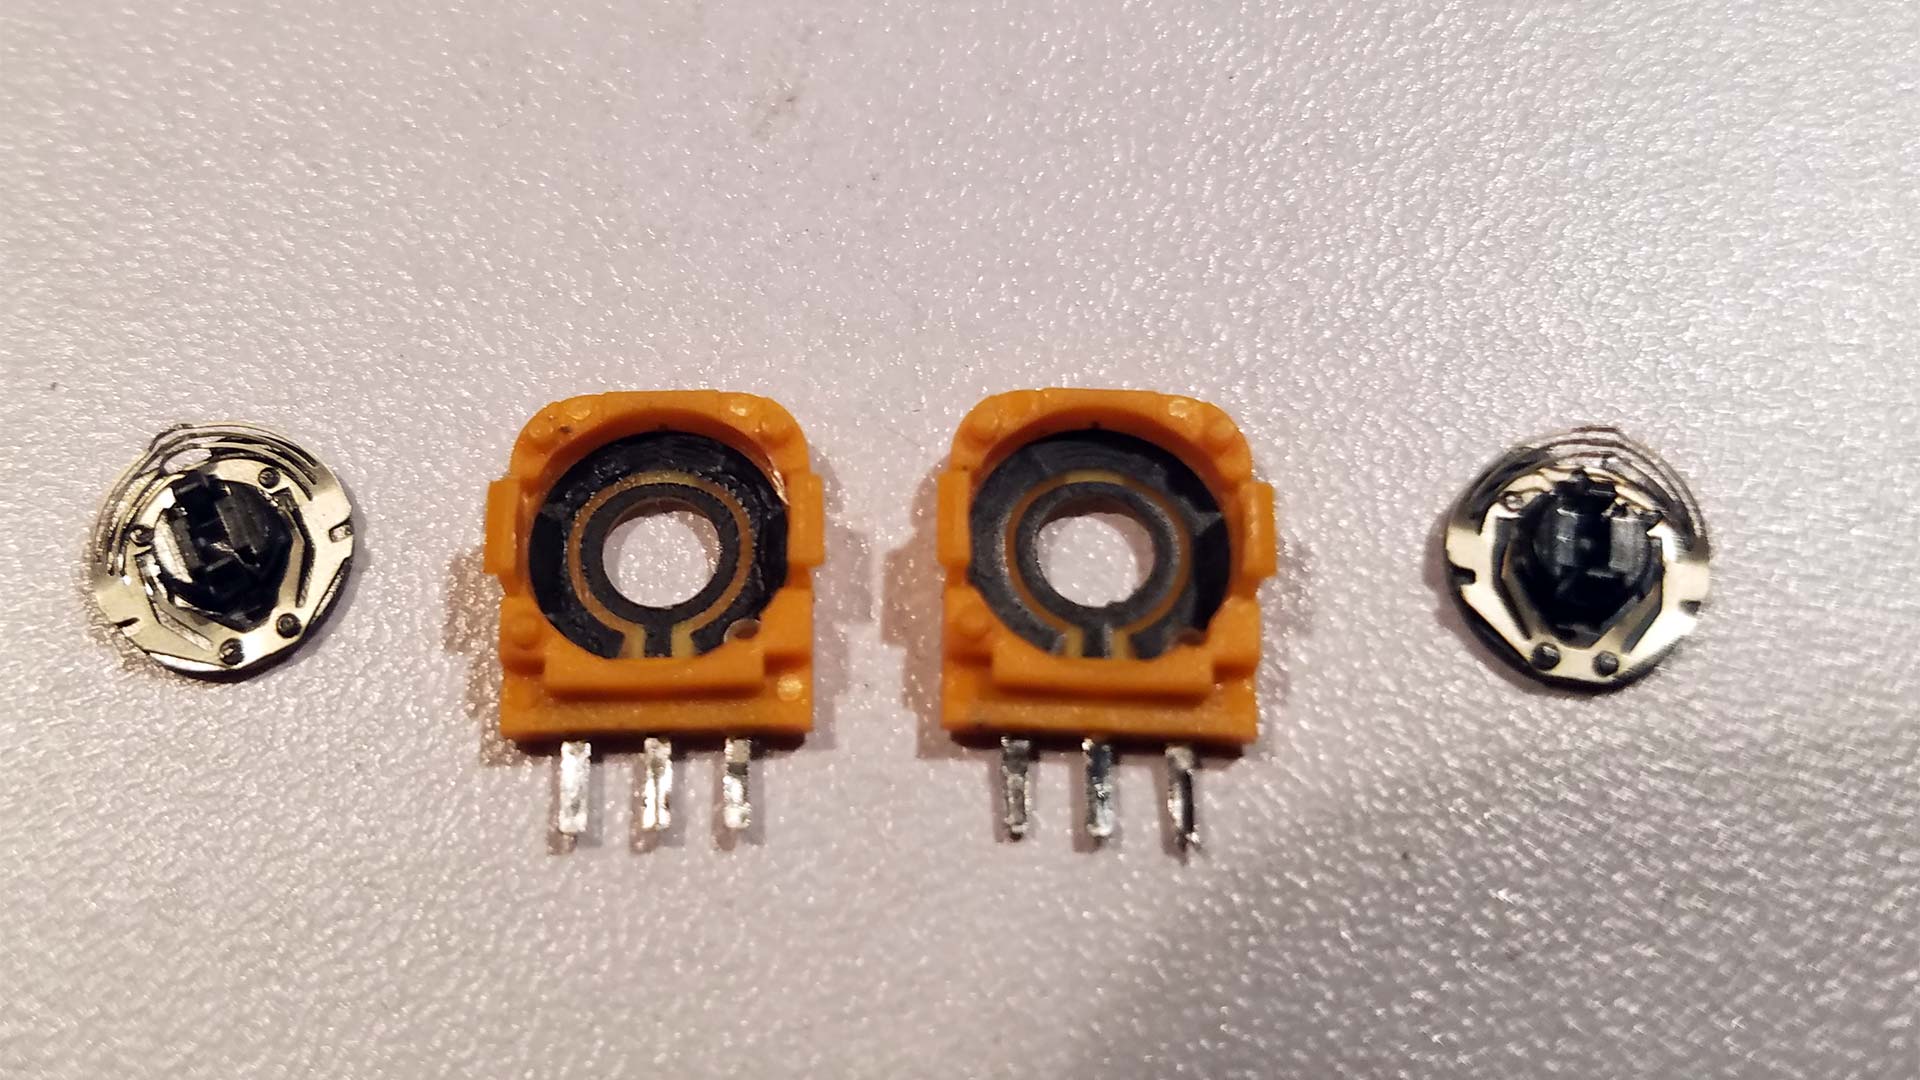
The part that we want to focus on in the board at the center bottom of this picture is the analog hat daughter card and headphone adapter. Since this game-pad uses excessive cell-phone style cabling akin to razor products. So, be as careful as possible when removing the wires. They are incredibly easy to break!
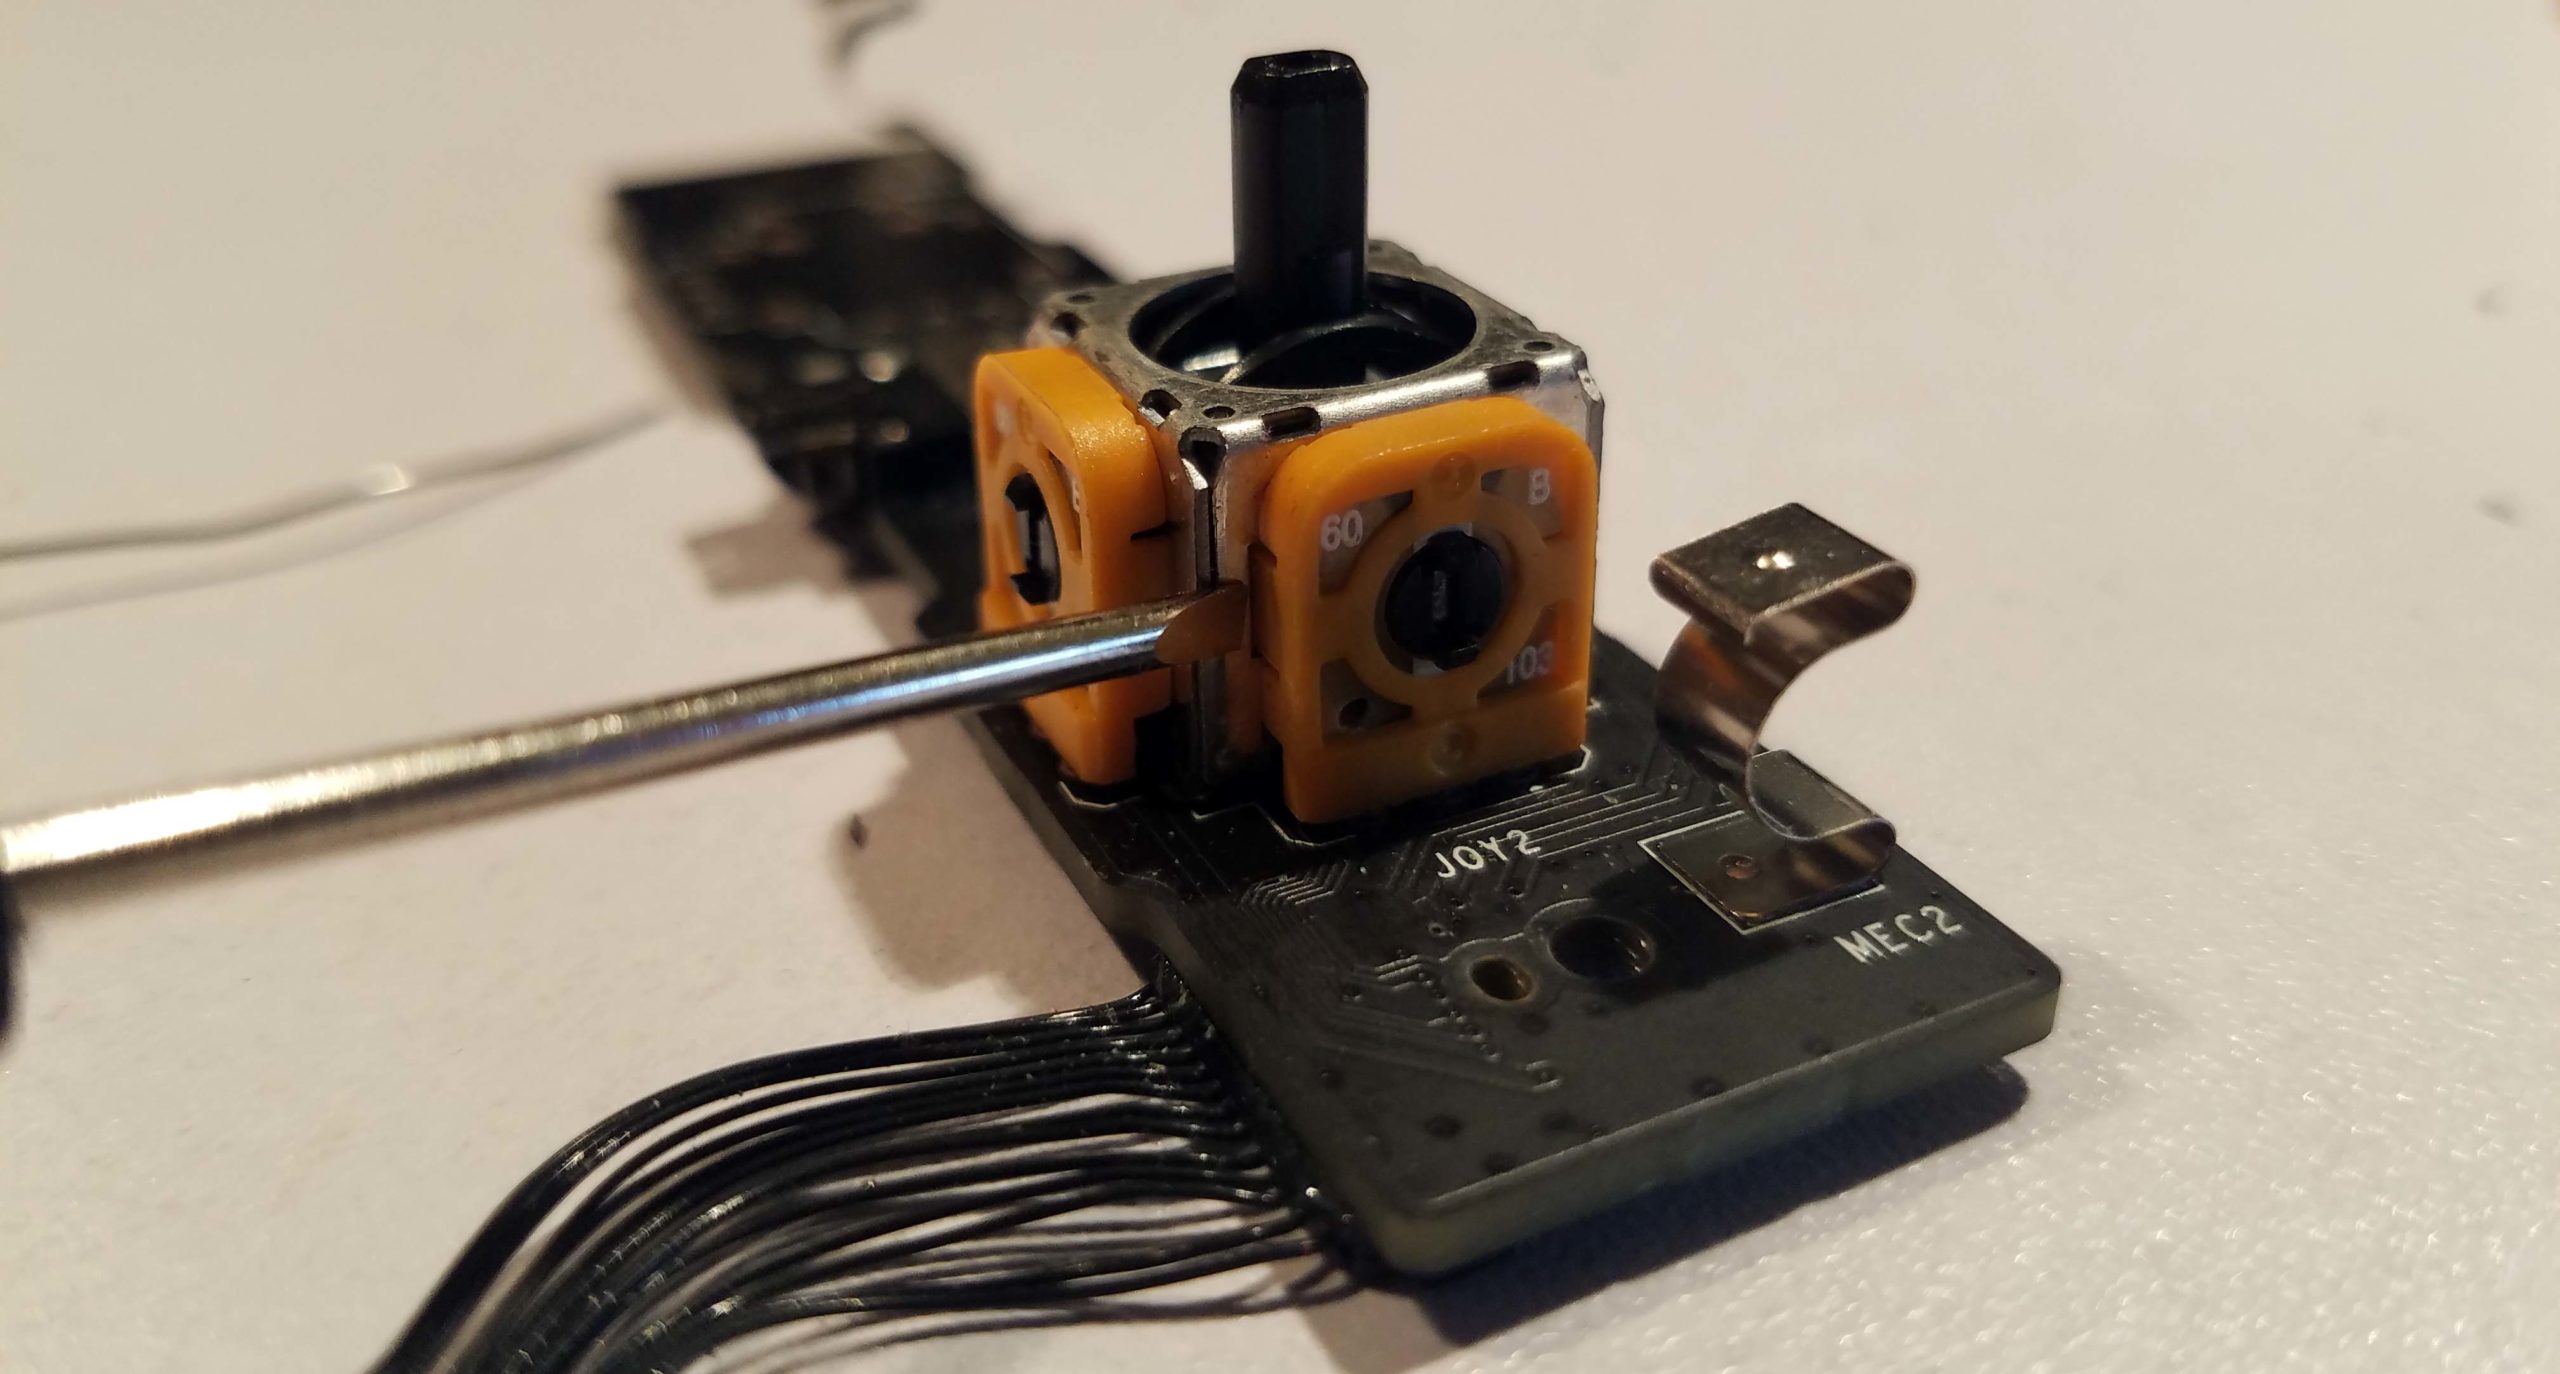 The analog hats Nvidia seems to use are strikingly similar to Tru Components part number: 98002C3
De-Soldering everything on this daughterboard is actually kind of a bitch especially with the ground-plane there. If you are gentle you could save time by simply taking a jeweler's flathead screwdriver and un-clipping the tabs that lock the potentiometers into the analog casing. Bend them out slightly away from the post and then simply de-solder three pins instead of everything. Because there is something I will say about Nvidia is at least they used an analog hat that had a lot of metal inside instead of some garbage knock-off hat.
We choose the harder path and with our trusty 600-degree solder station, we decided to remove the entire mechanism. This took a lot of wiggling back and forth to finally remove despite re-flowing the solder into each of the holes and sucking out all of the solders until there was nothing. Oh, and serial numbers blurred to protect the guilty.
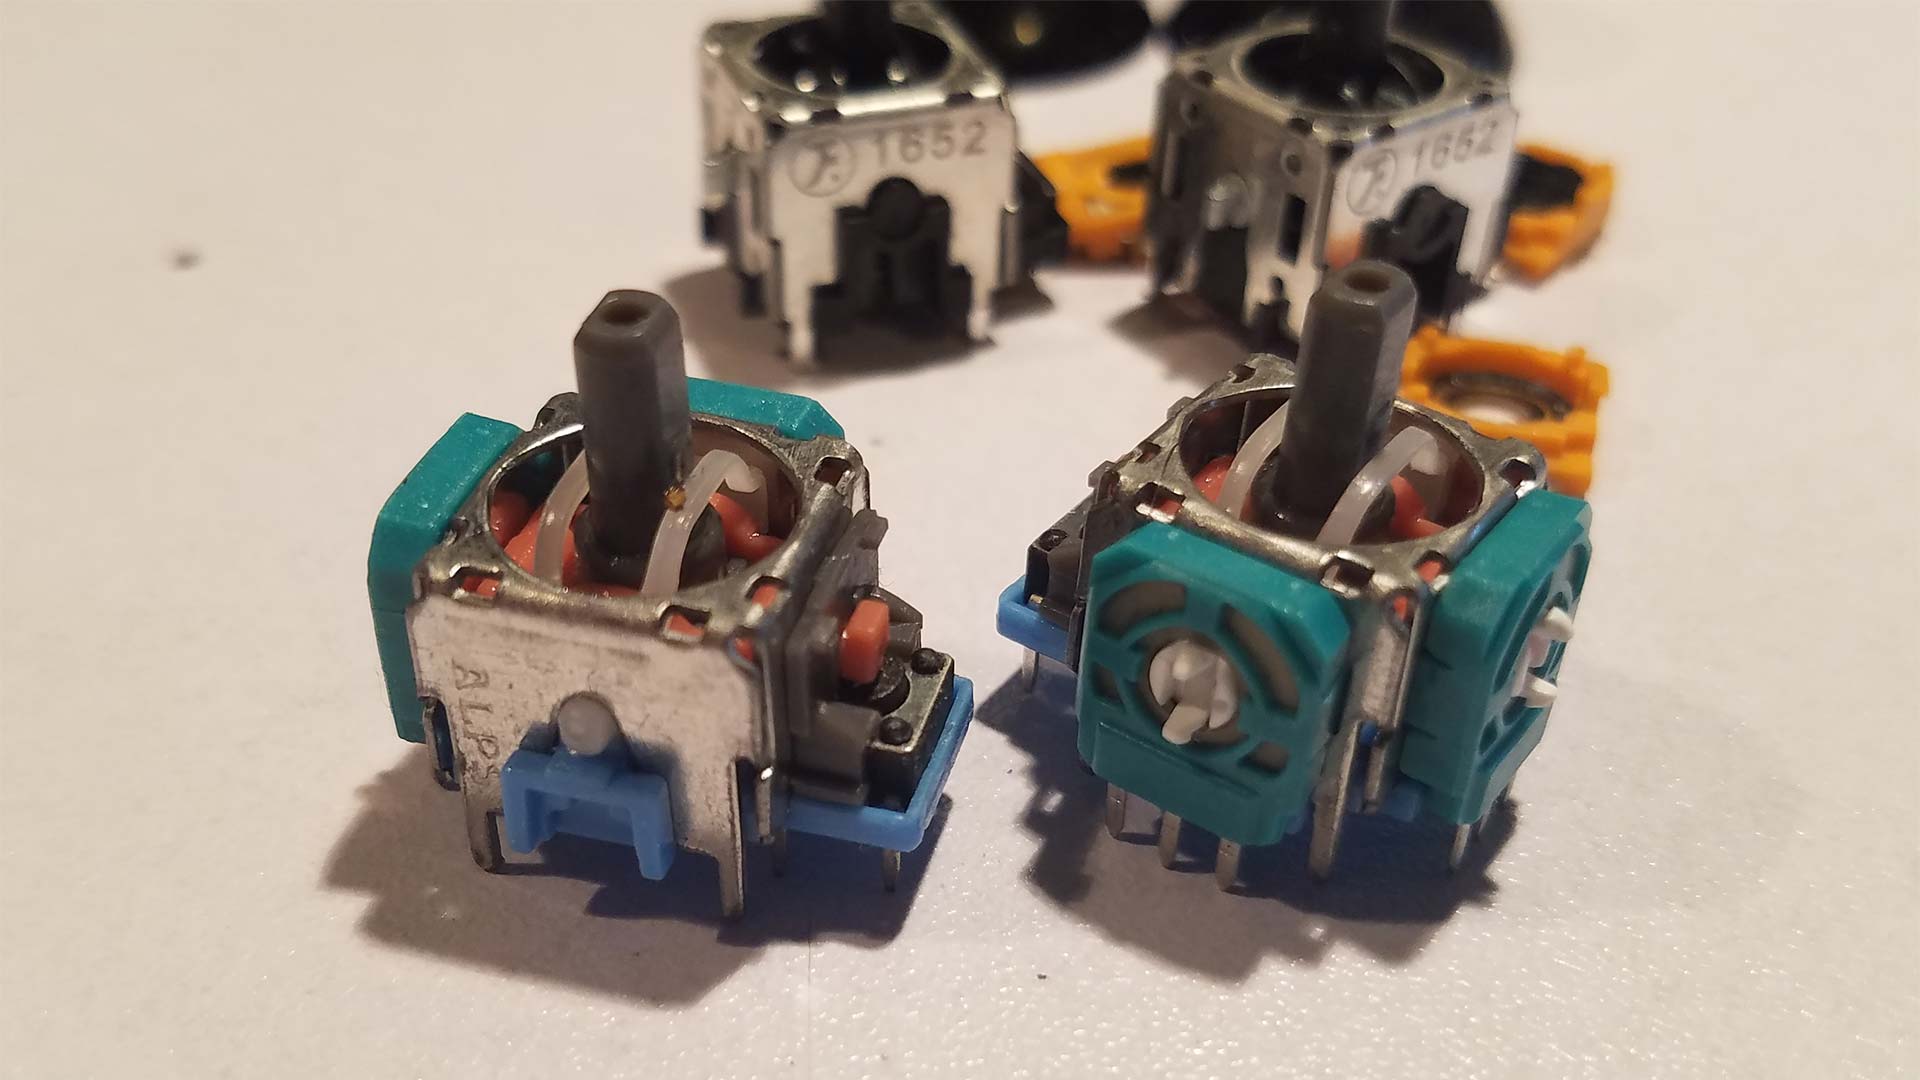 What I thought were legit Alps analog hats. Should've paid closer attention to the lack of numbering on the potentiometers themselves.
The hats did not come off clean but they at least came off without leaving any trace of damage on the board. Now at the time, we did not know what was about to happen next. But we went through an American vendor in the hopes of getting a trusted brand of analog hats. What we got was indeed Alps mechanics. The same brand was heavily used during the Xbox 360 era. But with no name potentiometers. Let's just say we'll pay a terrible price for that in a moment.
I must stress that when you re-install these hats to keep them as level and pressed down to the board as possible. If it rises up even by 1mm it can result in the enclosure not closing or dragging action on the hat as it brushes against the outer case.
This would be the point where we would show you a video that's fixed and it's awesome.
Garbage analog sticks.
"Note: If you get a black screen but the audio is playing. Or you got a potato PC and it's studdering. We have fallback Links below."
Video tutorial fallback mirrors:
In case you have no-script enabled or for some reason cannot see the title video on this website. We have provided direct links for these videos. For more information about the standards we use on this site click here if you would like to know more.
AV1       - Link
MP4/.h264 - Link
OGV       - Link
Wow, this is unexpected.
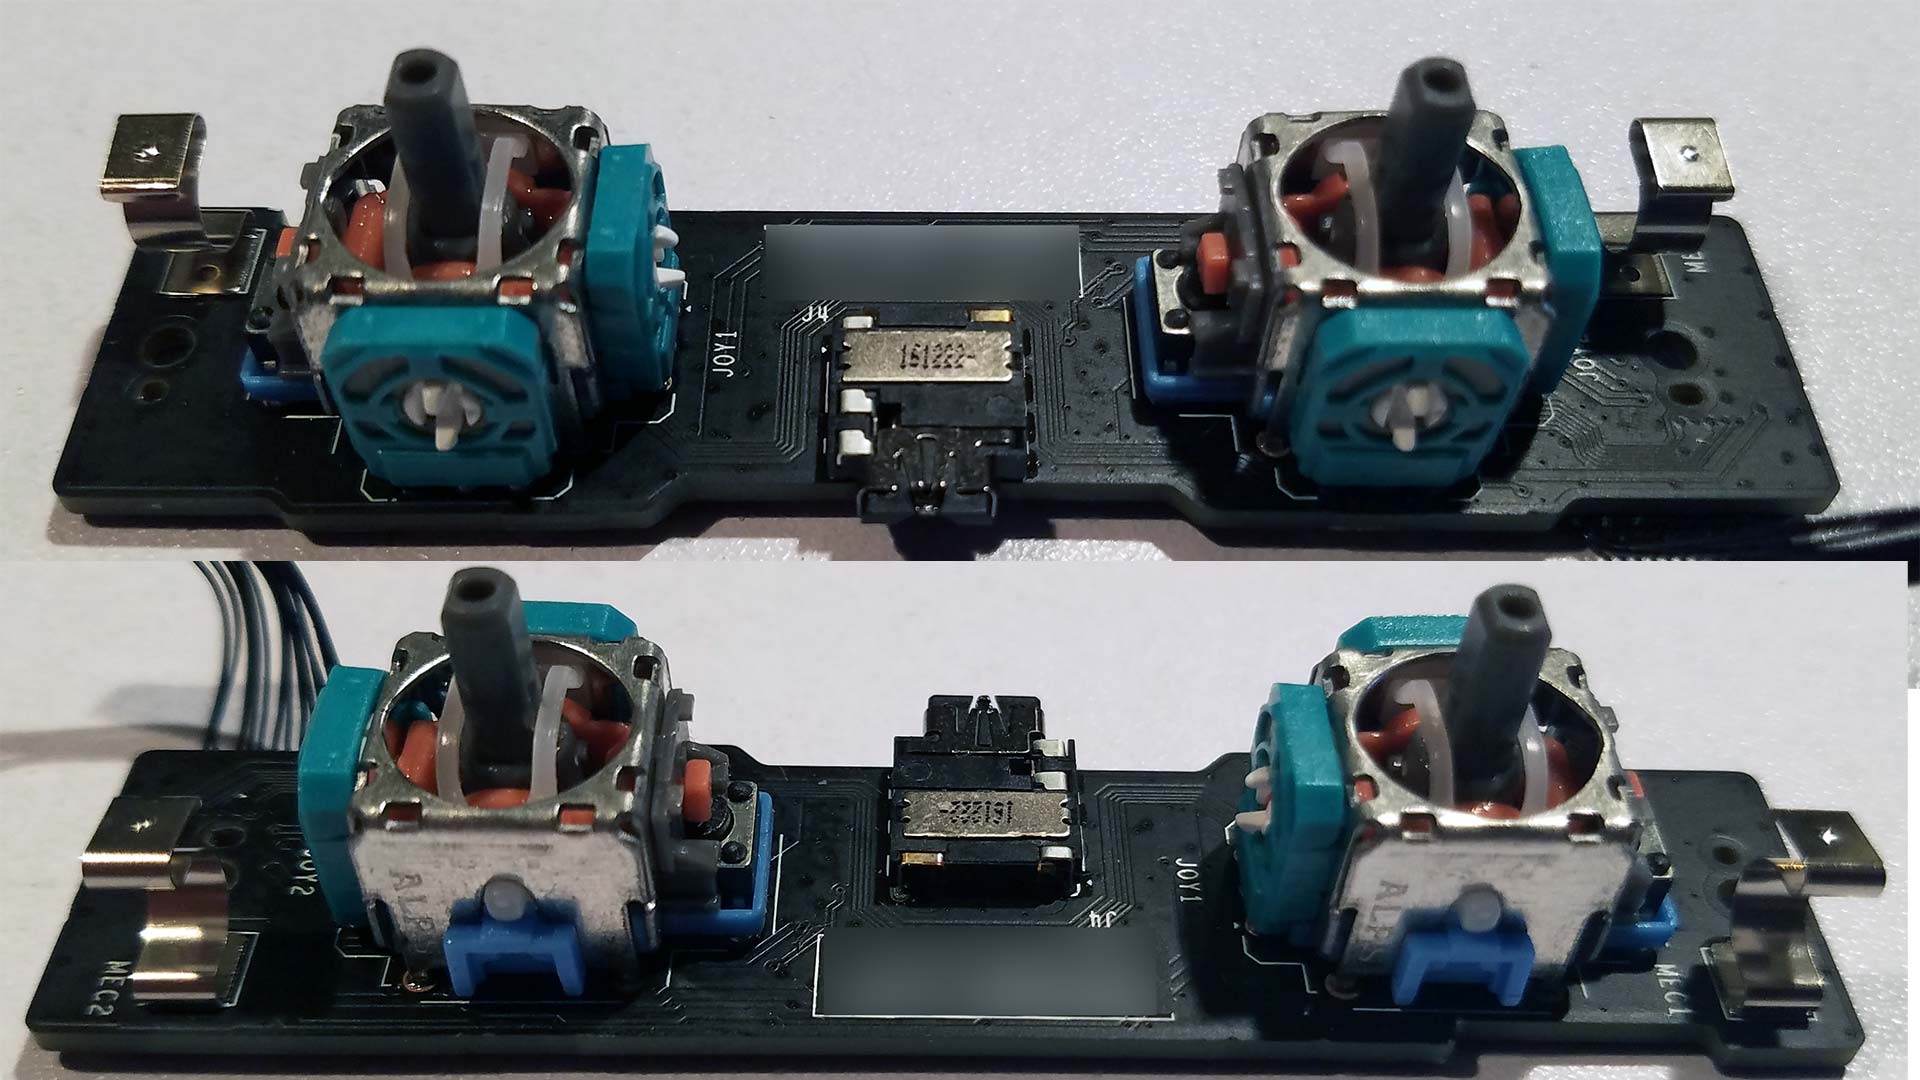
But as you could probably see in the video posted above. No, we are in fact not done. For starters when we move around the stick you'll see that we're having a really hard time keeping it in between absolute zero and extreme left-right-up-down. The Chinese call this 'super-sensitive but we call this a bootleg product that fails to perform like even an Xbox 360 joystick. There's even an added effect where when we move the joystick from left to right it almost bows upward instead of going left-right. This may be totally fine if you are using your controller for simple games like point and clicks and/or if you don't use your shield for gaming and instead just want Kodi to stop drifting to the right. In that case, the bootlegs did their job. But using this joystick in twin-stick shooter games is an absolute nightmare.
So, I was left with two options. Either order MORE analog hat sticks and hope the next batch from a different US vendor isn't more shitty china knock-offs or see what's going on with the original pots since they seem to almost fall apart as we removed them off of the PCB.
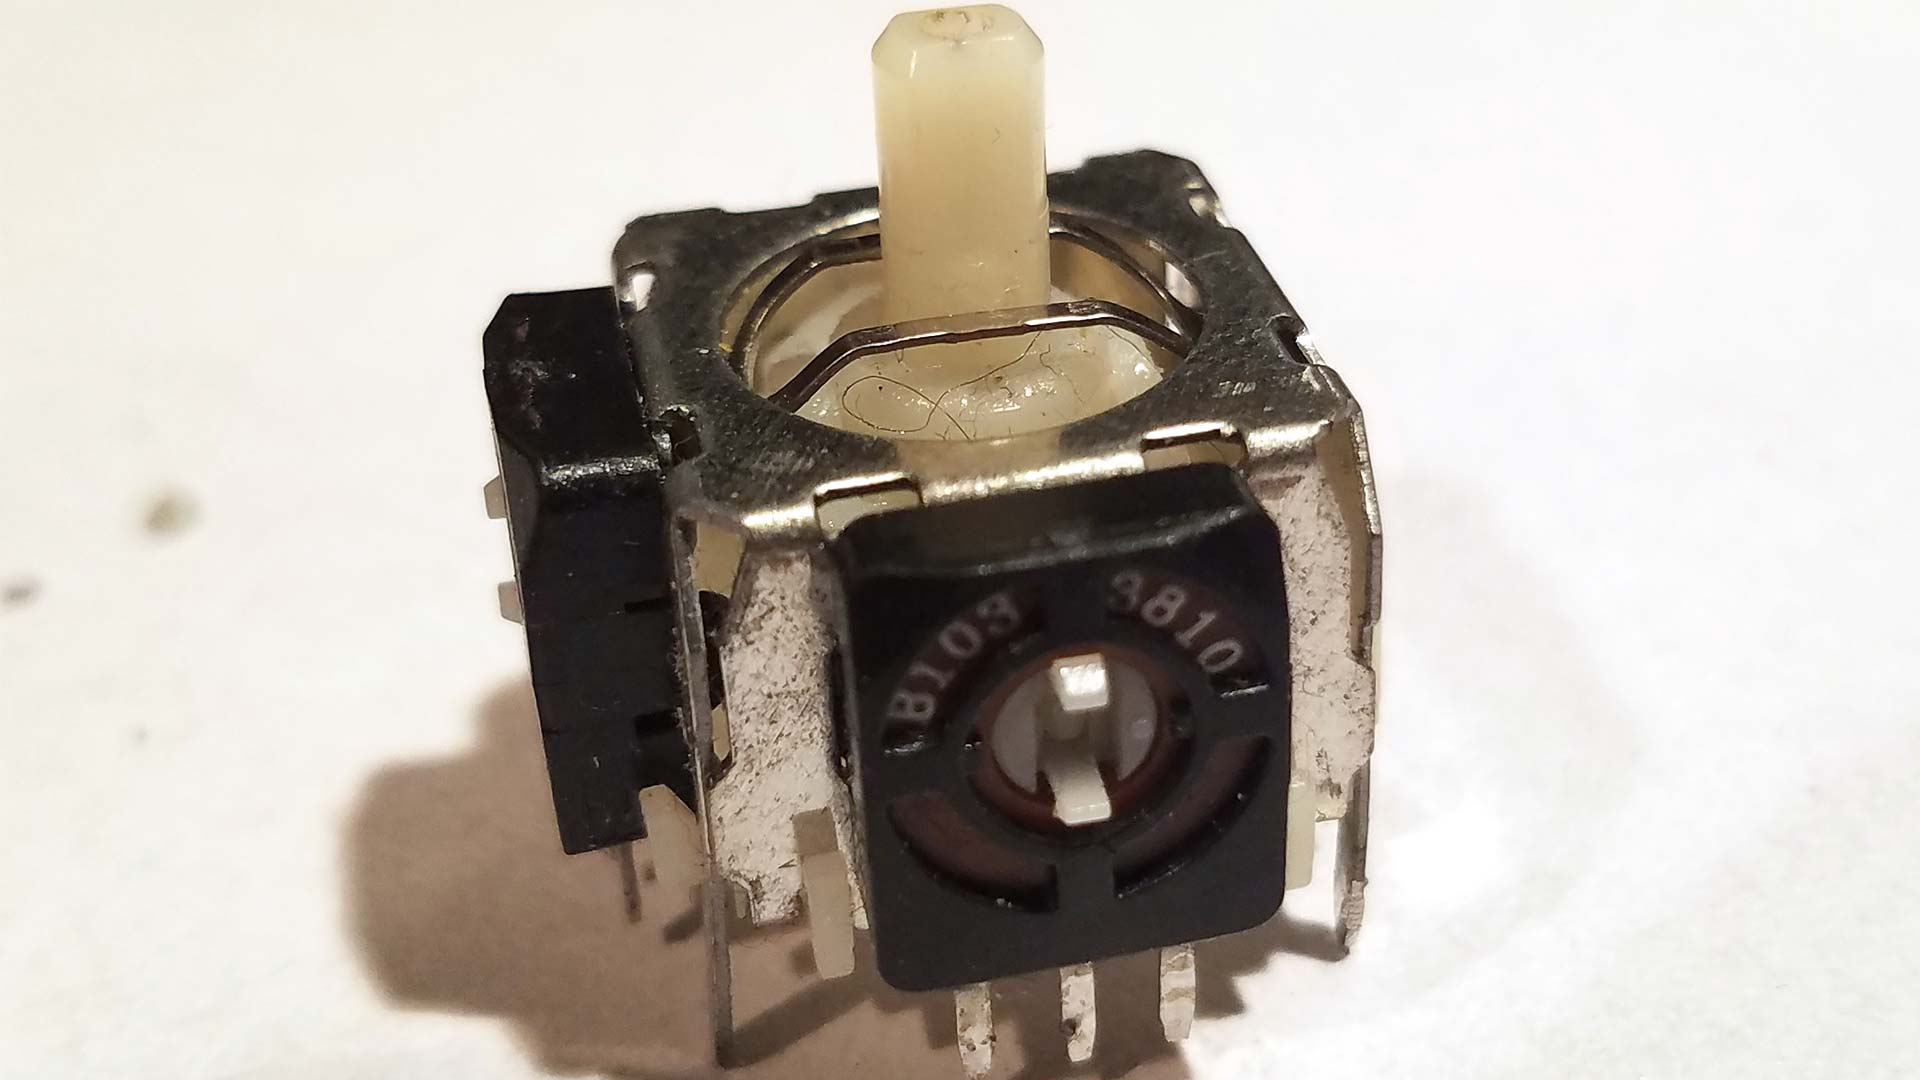
Getting inside of those existing potentiometers is actually really easy regardless of what joystick you are fixing. Once you've pressed the two clips on the side to remove the pots from the mechanical housing. Simply press the tabs in the center together in the center of the potentiometer and the metal spring will release inside allowing you to see inside.
Now how these things work is there's a piece of metal with three fork-like posts that slide back and forth on these carbon rails acting as a variable resistor. As the dial turns it moves up and down these rails provided new values of resistance that your microchip picks up and transfer to your game. Keep in mind that these are the original Nvidia Shield controller potentiometers. The ones up top don't look half bad. These came out of the right hat. the one that was not drifting. Still going to clean them!
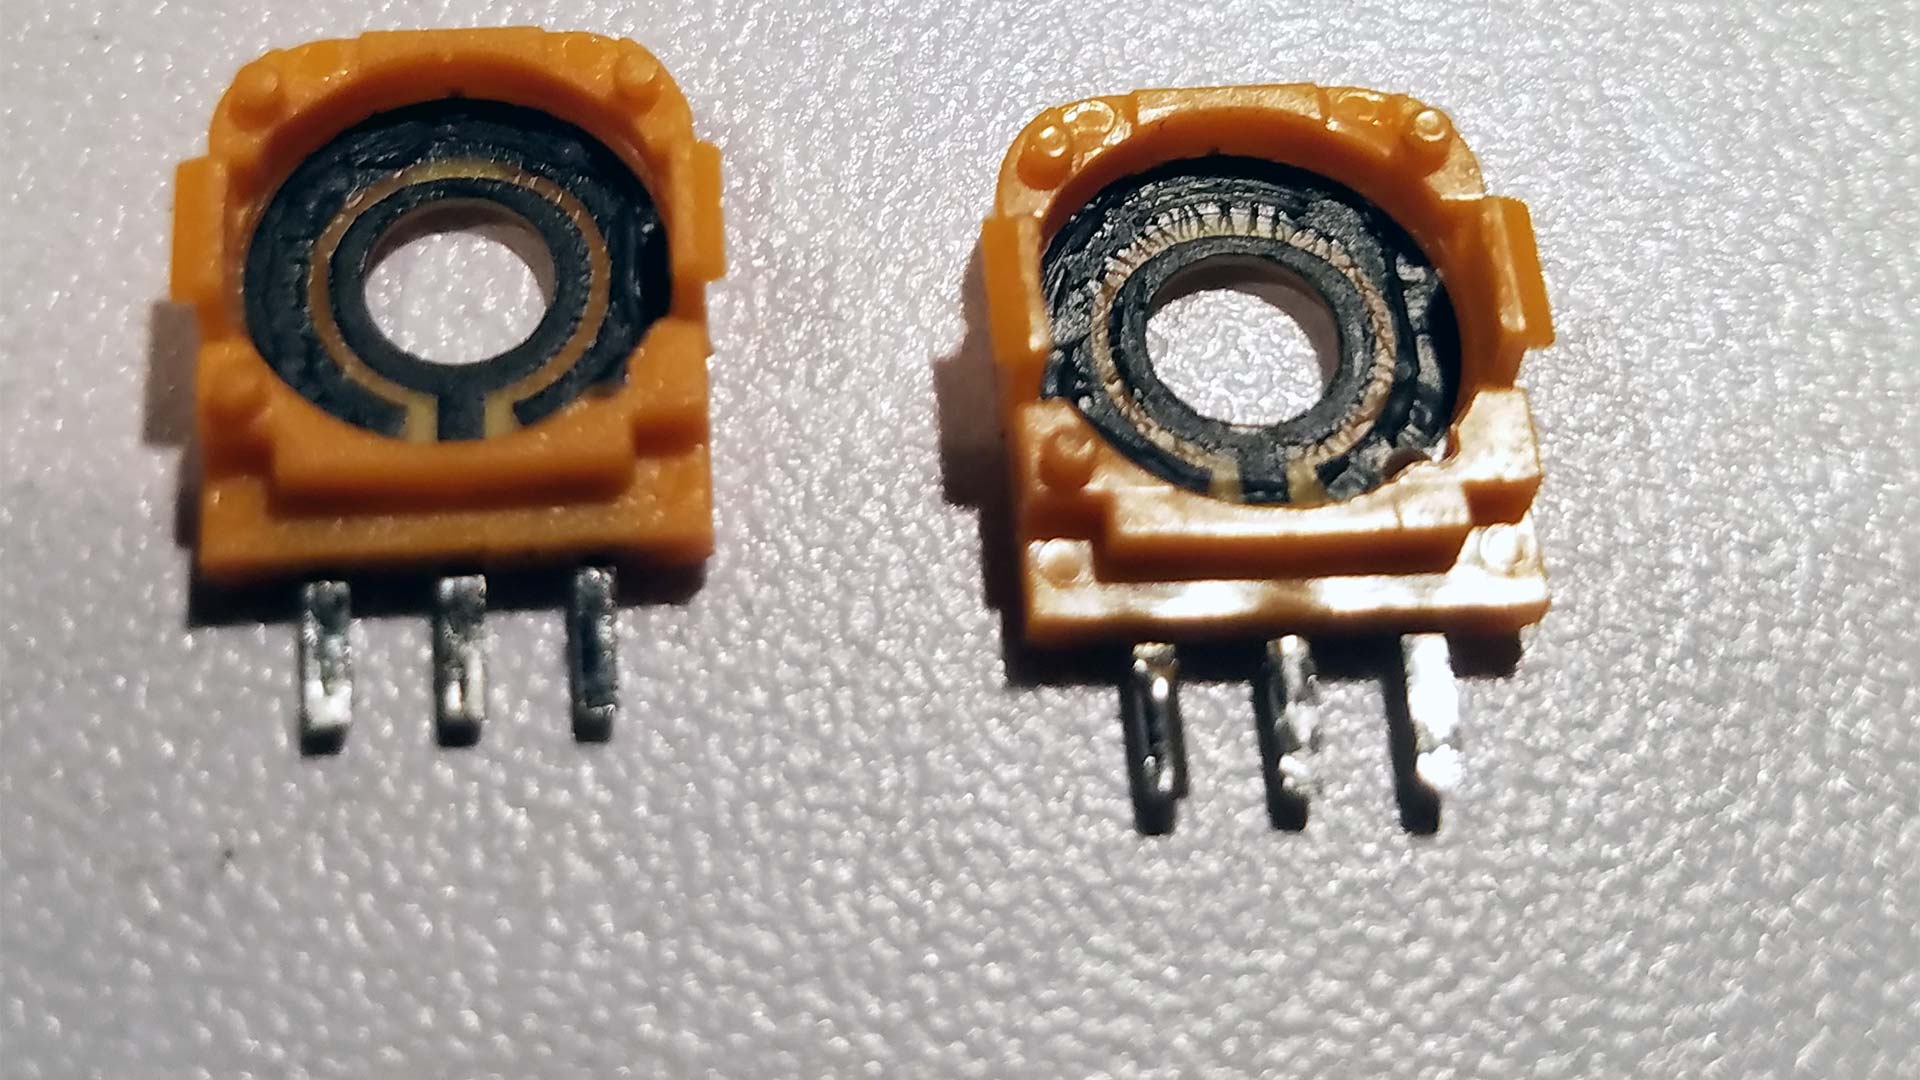
The left hat is another story completely. We're not entirely sure if it's the same kind of cleaner as the pot cleaner that you use on mixer boards. But the hair-line strands indicate the two are touching on another all by themselves.
Given the abuse of this controller in the past (spilled coffee) one could conclude that this grease is now conductive. Making our Nvidia joystick drift across the screen without the aid of the metal spring.
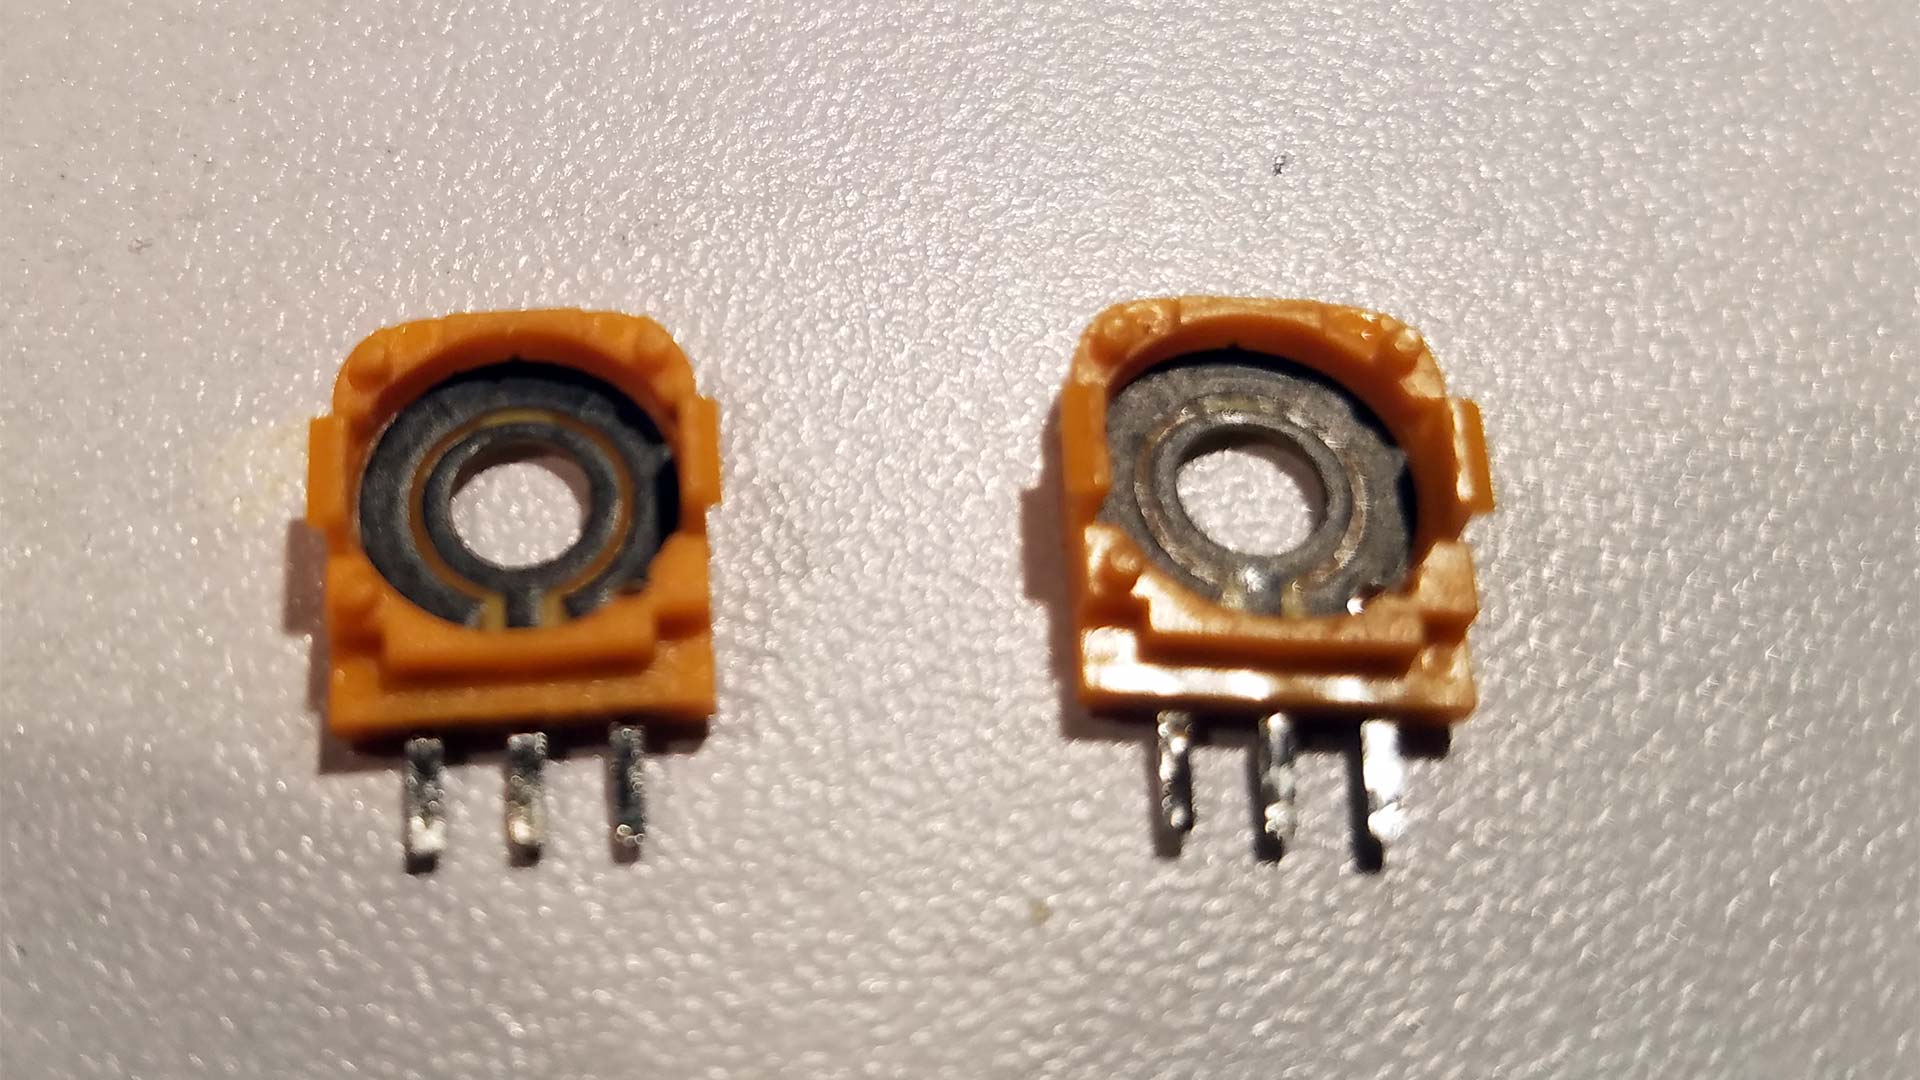
Apologies for the slightly out-of-focus shot. But with a bit of denatured alcohol and a q-tip. We are able to very easily clean all of that black crap out of the pots and make them look new and shiny with nothing touching the inner and outer rings. Will cleaning the grease out depreciate the life of the pots? Time will tell on this one! Given how the first set looks it seems like there should be no fluid or black stuff in there in the first place! Now, it's just a matter of assembling them and giving them a try!
"Note: If you get a black screen but the audio is playing. Or you got a potato PC and it's studdering. We have fallback Links below."
Video tutorial fallback mirrors:
In case you have no-script enabled or for some reason cannot see the title video on this website. We have provided direct links for these videos. For more information about the standards we use on this site click here if you would like to know more.
AV1       - Link
MP4/.h264 - Link
OGV       - Link
Final thoughts.
As repair technicians, we always tend to lean towards "Replacing" the part instead of just repairing it given the cost of these parts is in pennies. However, since I was backed into a corner on this with the person owning this controller expecting it back the same day. I'm happy to report that the drifting issue has all but gone away. I hear no noise off of the now bare contacts and they can now relax knowing that when they press the sleep button on their Nvidia Shield it will in fact go to sleep. Will the controller last for years to come? *shrug* You got me! But for now, it's better than dropping $50(USD) to Nvidia for another controller.
Anyhow, if you found it useful sweet. If any of you guys know a great arcade vendor that sells legit analog hats leave it in the comments below.
We thank you for checking out this blog and until next time. Server protect you.
+++END OF LINE
Hello S-Config,
Hope you are doing well.
I know this is an older article that was written on the website but very glad I came across it. Very instructional for somebody who has never taken apart a controller before. I have an Nvidia controller where the left thumbstick has been drifting recently. Thanks for the instructional page. I know I can buy a new 3rd party controller for my Geforce now but apparently I will lose the volume control and rumble if I do that so wanted to try and replace joystick.
It appears that the part number your referred to above for the joystick is not something I can purchase where I am from and also is out of stock. I am not sure what kind of joystick I should buy. There are sticks for Xbox 360, Xbox One, ps2,3 and 4. Would any of those joysticks be compatible? Or do I need to stick to a certain type? Any recommendations? A model or brand I should use?
Tia
It's sometimes referred to as an "EL FU 10K" or "B103" dependng on how you look at it. and although I didn't know this at the time of posting however these orange potentiometers are very common in PS4 controllers. I can still find a ton of them on amazon, alibaba, etc.
I tried to use an ALPS potentiometer for an xbox 360 but found out there is way too many bootlegs out there.
There's a fairly good chance your pots are fine .. Like mine and three others i've serviced.. Grease build up is real and conductive. a little alchohol and it's gone.
Anyhow, good luck refurbishing your controller.
I had this problem on both sticks of my Nvidia Shield controller. I desoldered just the potentiometers using a solder sucker, some desoldering braid and a bit of cursing and didn't find nearly as much "grease" inside them as in your photos. However, I gave the carbon tracks a wipe round with a dry Q-tip, resoldered and reassembled and lo-and-behold, no drift! Since I didn't spill coffee on my controller, I'm guessing that after enough use the grease picks up enough carbon dust from the tracks to make it conductive enough to mess with the potentiometer scale. Thanks for posting this and helping me out!
Glad to hear some feedback about this bizarre grease issue. We popped open some xbox and ps4 controllers and those had no grease what-so-ever. So, vendor isolated problem?
Anyhow. glad to hear it helped you. thanks for checking out this blog.
Thanks a lot for this. I've been looking for a solution several months ago. You just go beyond everyone recommend (like the contact cleaner, calibration, separate more than 6 feet the router from your Nvidia shield, etc).
Unfortunately, I'm a basic repair user, i've just got lost when you de-soldering, maybe because I never done that. But man, this solution is a motivation to learn about that. You said ther's no need to de-soldering everything, just 3 pins, could you show in the picture which soldering pins are those?
Sorry if I'm abusing with my dump questions.
Thanks. I will try to replicate your solution.
No problems about the questions and thanks for visiting this blog. Since this may be your first time soldering. What I would recommend is get yourself some scrap circuit boards that you can practice on. get really good at removing the components off of those boards. THEN dive into your Nvidia shield controller. In the worst case scenario you may know someone who is good at soldering and/or cel-phone repair. To which if they have a good iphone repair kit they should be able to get into the nvidia shield controller with ease and unsolder all of that..
The three pins we're talking about are the potentiometers themselves.. There's going to be two one each side as you could see in the pictures when we were showing the analog sticks. those potentiometers can be unclipped from the frame adn then taken apart further for cleaning. Which is why I state you can simply desolder the three pins instead of fighting with the entire assembly like we did. You can unclip the potentiometers and bend them away from the frame slightly and then heat up the three pins and pull with pliers. Again, get good at soldering first.. You don't want to overheat the board and burn out anything.
We're not fans of contact cleaner because all it does is it loosens up the dirt in the pots. It does not really clean them as there's no direct access to the carbon strips inside.
Thanks, i'll folllow your advices. By the way, is it good to use isopropyl alcohol for do the cleaning?
I will put your blog on my nvidia shield forum.
Greetings from Perú.
You can certainly use Isopropyl Alcohol. That will work fine as there is no power going through the circuit board during the time of cleaning. Thank you very much for checking out this blog! Hope you get to revive your controller.