
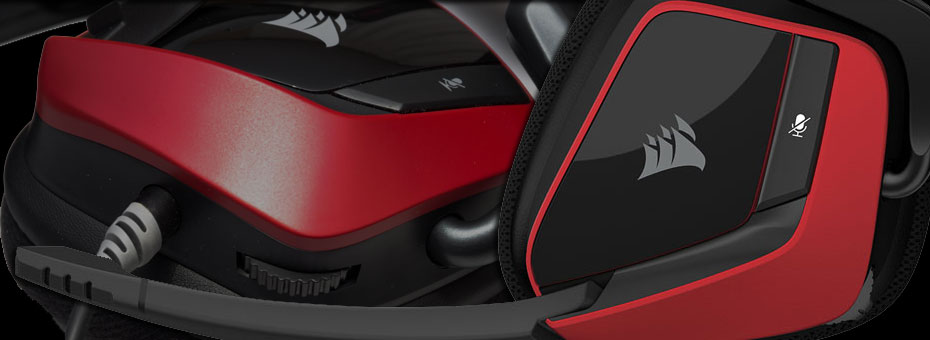
A Corsair Void Pro has now landed on my workbench.
We recently had a friend bring to me a Corsair Void Pro headset. That during their travels through airports, the headset sustained some damage that rendered it inoperable. Although this is a simple repair. It's still informative to those who don't want to see it on YouTube dealing with "shakey-cam" footage on the repair process of these headsets. On top of it since we've already gone off about other corsair products such as the M65 and their Scimitar. Why not start on their headset line?
Open up and put it in! Let us begin!

The problem.
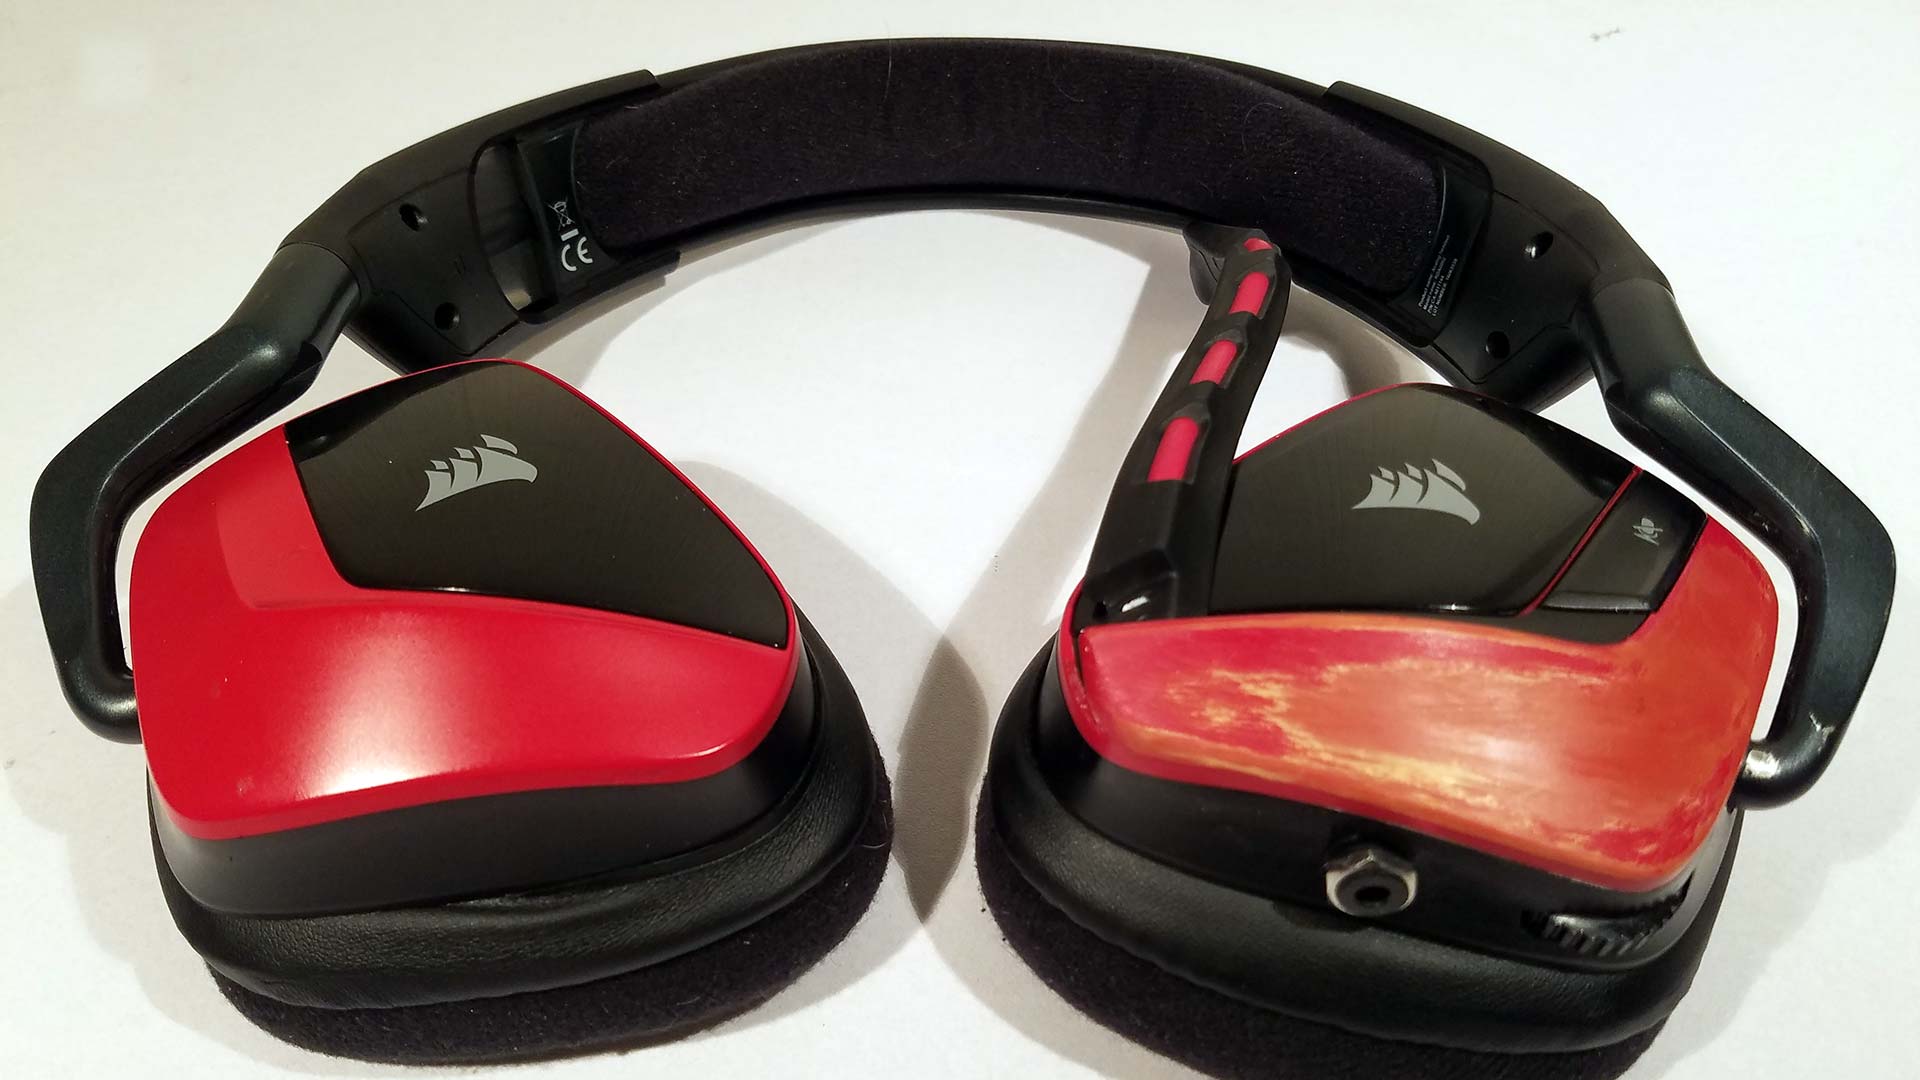
There are two problems with these headphones but we're going to just focus on the overall functionality of the headset. The paint job illustrated in the picture above is what happens when you decide to use a high-powered solvent to clean your headphones with, resulting in said solvent eating away the paint job a little. The real problem with these headphones is the fact that the cord is ripped away from its initial connector. Possibly due to a random angry gamer throwing their wireless controller across the room. Who knows and who cares it's broken right? Let's get to fixing this.
Tools of the trade.
For the repair you may need the following equipment:
- PH0 screwdriver for removing the plastic tapping screws.
- A rotary tool with a router/drill bit for reshaping the plastic and getting a female audio connector installed.
- Soldering Iron at around 30-40 watts with solder. Pointed tip preferred.
- Multi-Meter for performing continuity testing.
- Wire strippers.
- Some wire.
- 4-pin female audio jack connectors.
- 4-pin audio cable.
- Small shrink tubing.
- Electrical tape to insulate our wires after we are done soldering.
- Love.
Disassembly.
 The first thing that we're going to do is remove the foam pads which cover the speaker assembly. You can use your fingers to slowly pull up on the foam to remove however be careful. After they are removed now would be a good time to hit them with soap and water to get them nice and clean. Especially if you receive a pair used just like these!
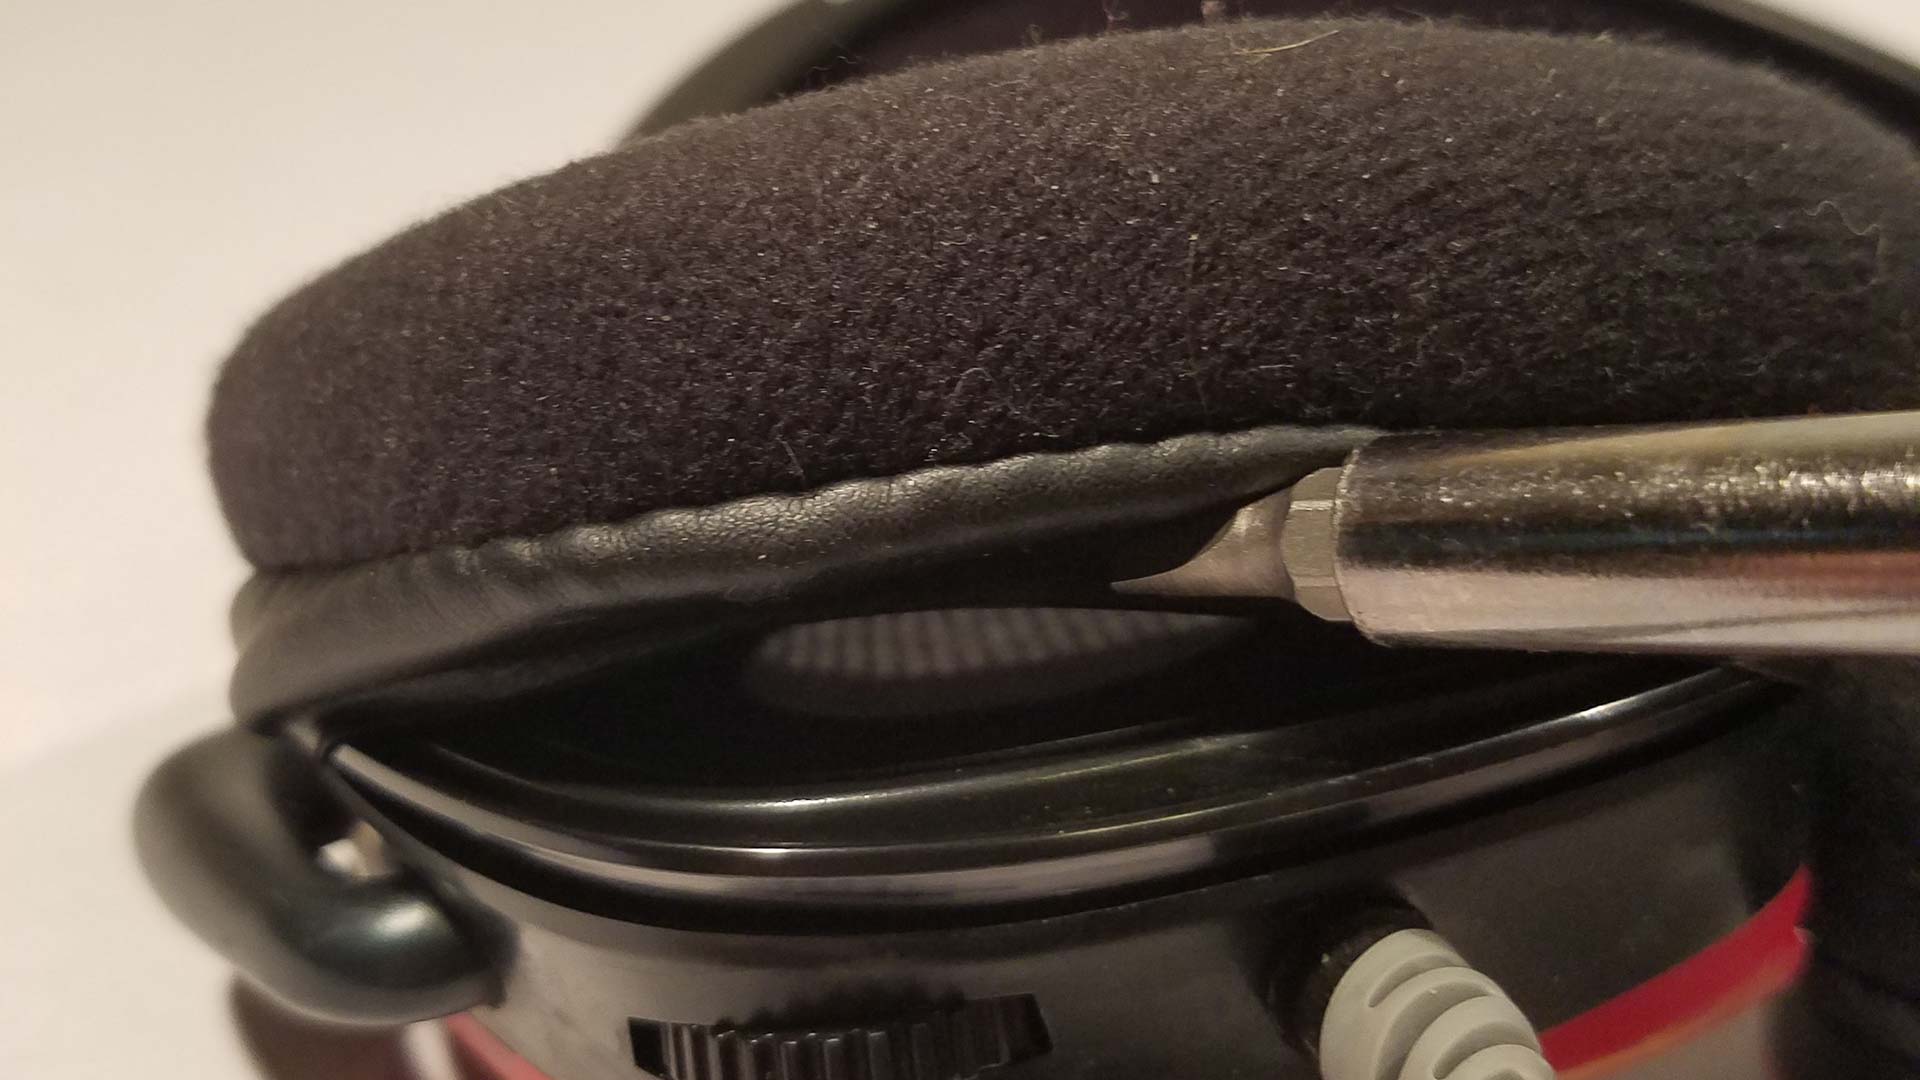
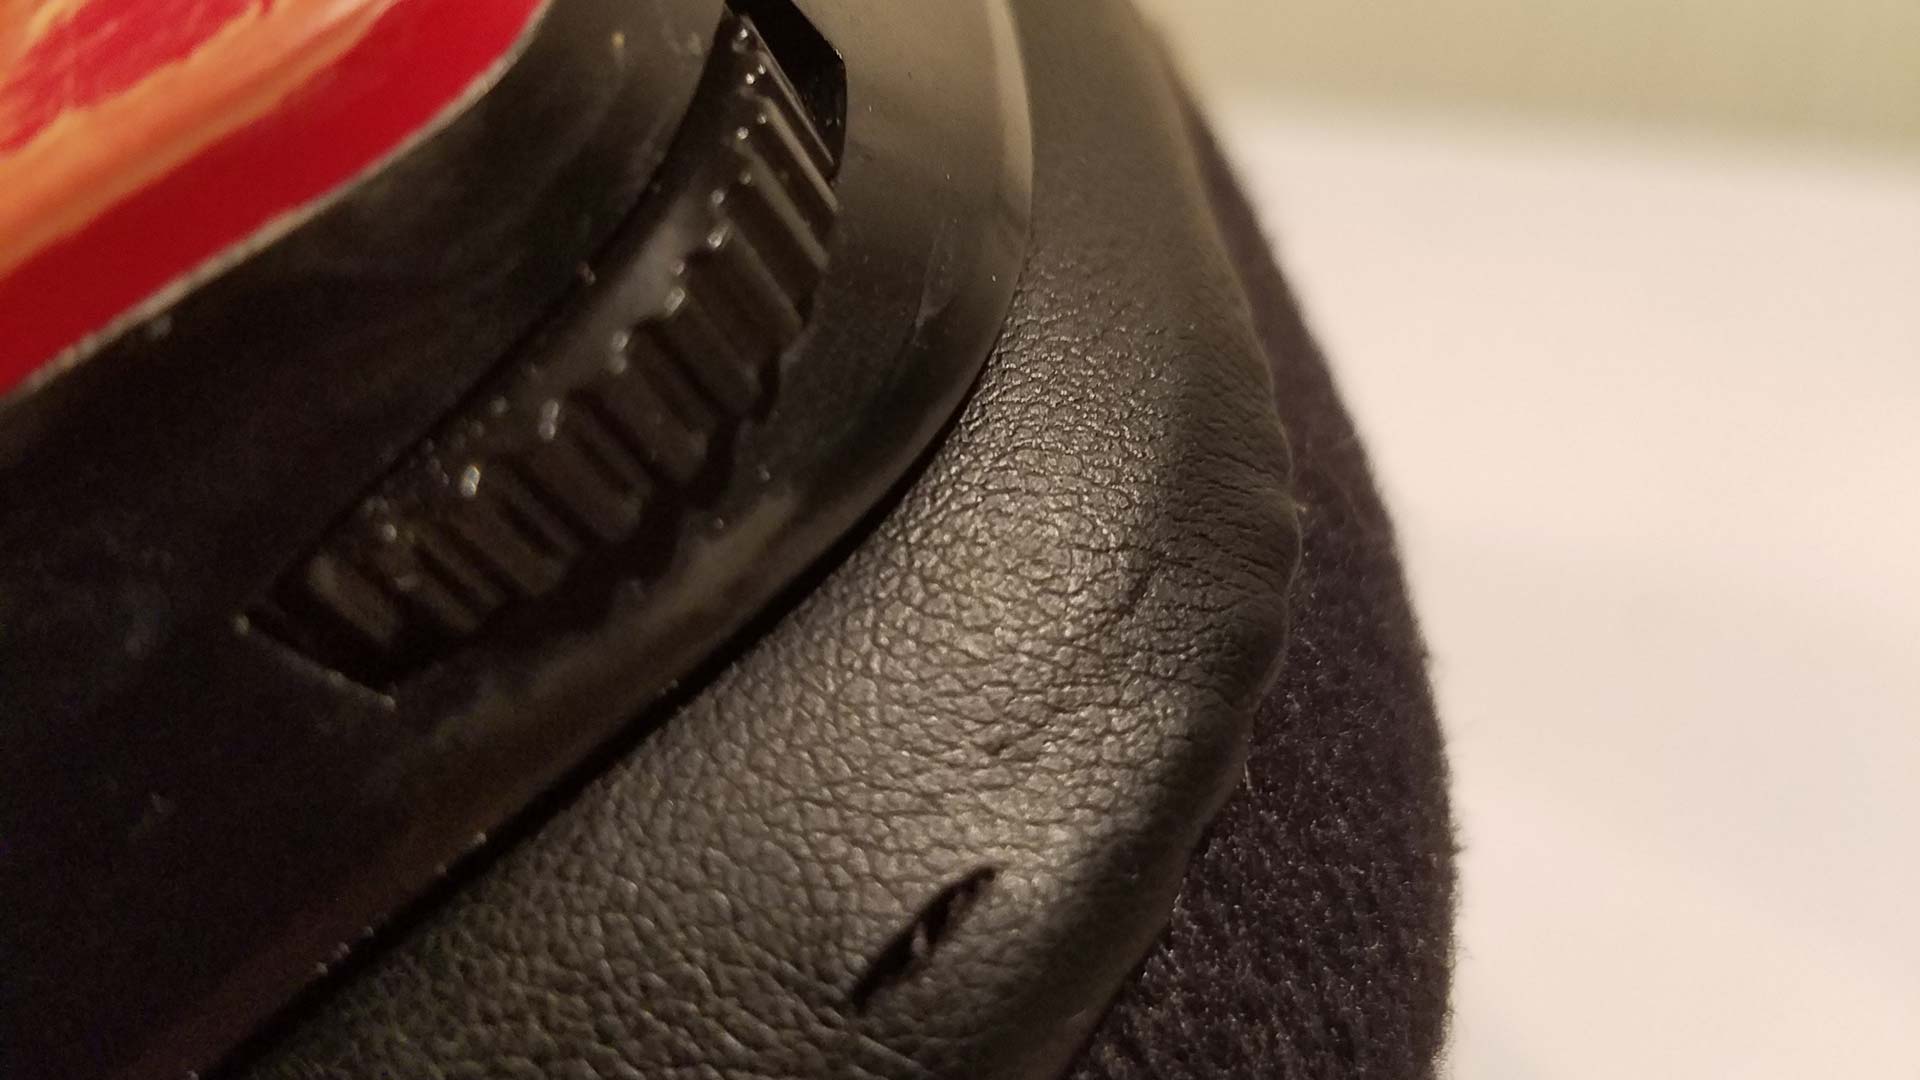 If you attempt to forcibly remove the headset by taking it off or by stretching the leather too far to wrap around the plastics on the inside. You'll quickly find out the low-quality leather used by Corsair tears very easily. Our advice when repairing your headset is after you fix them wear them without the foam pads for a little while before committing. This little step will save big on the wear and tear from popping them off.
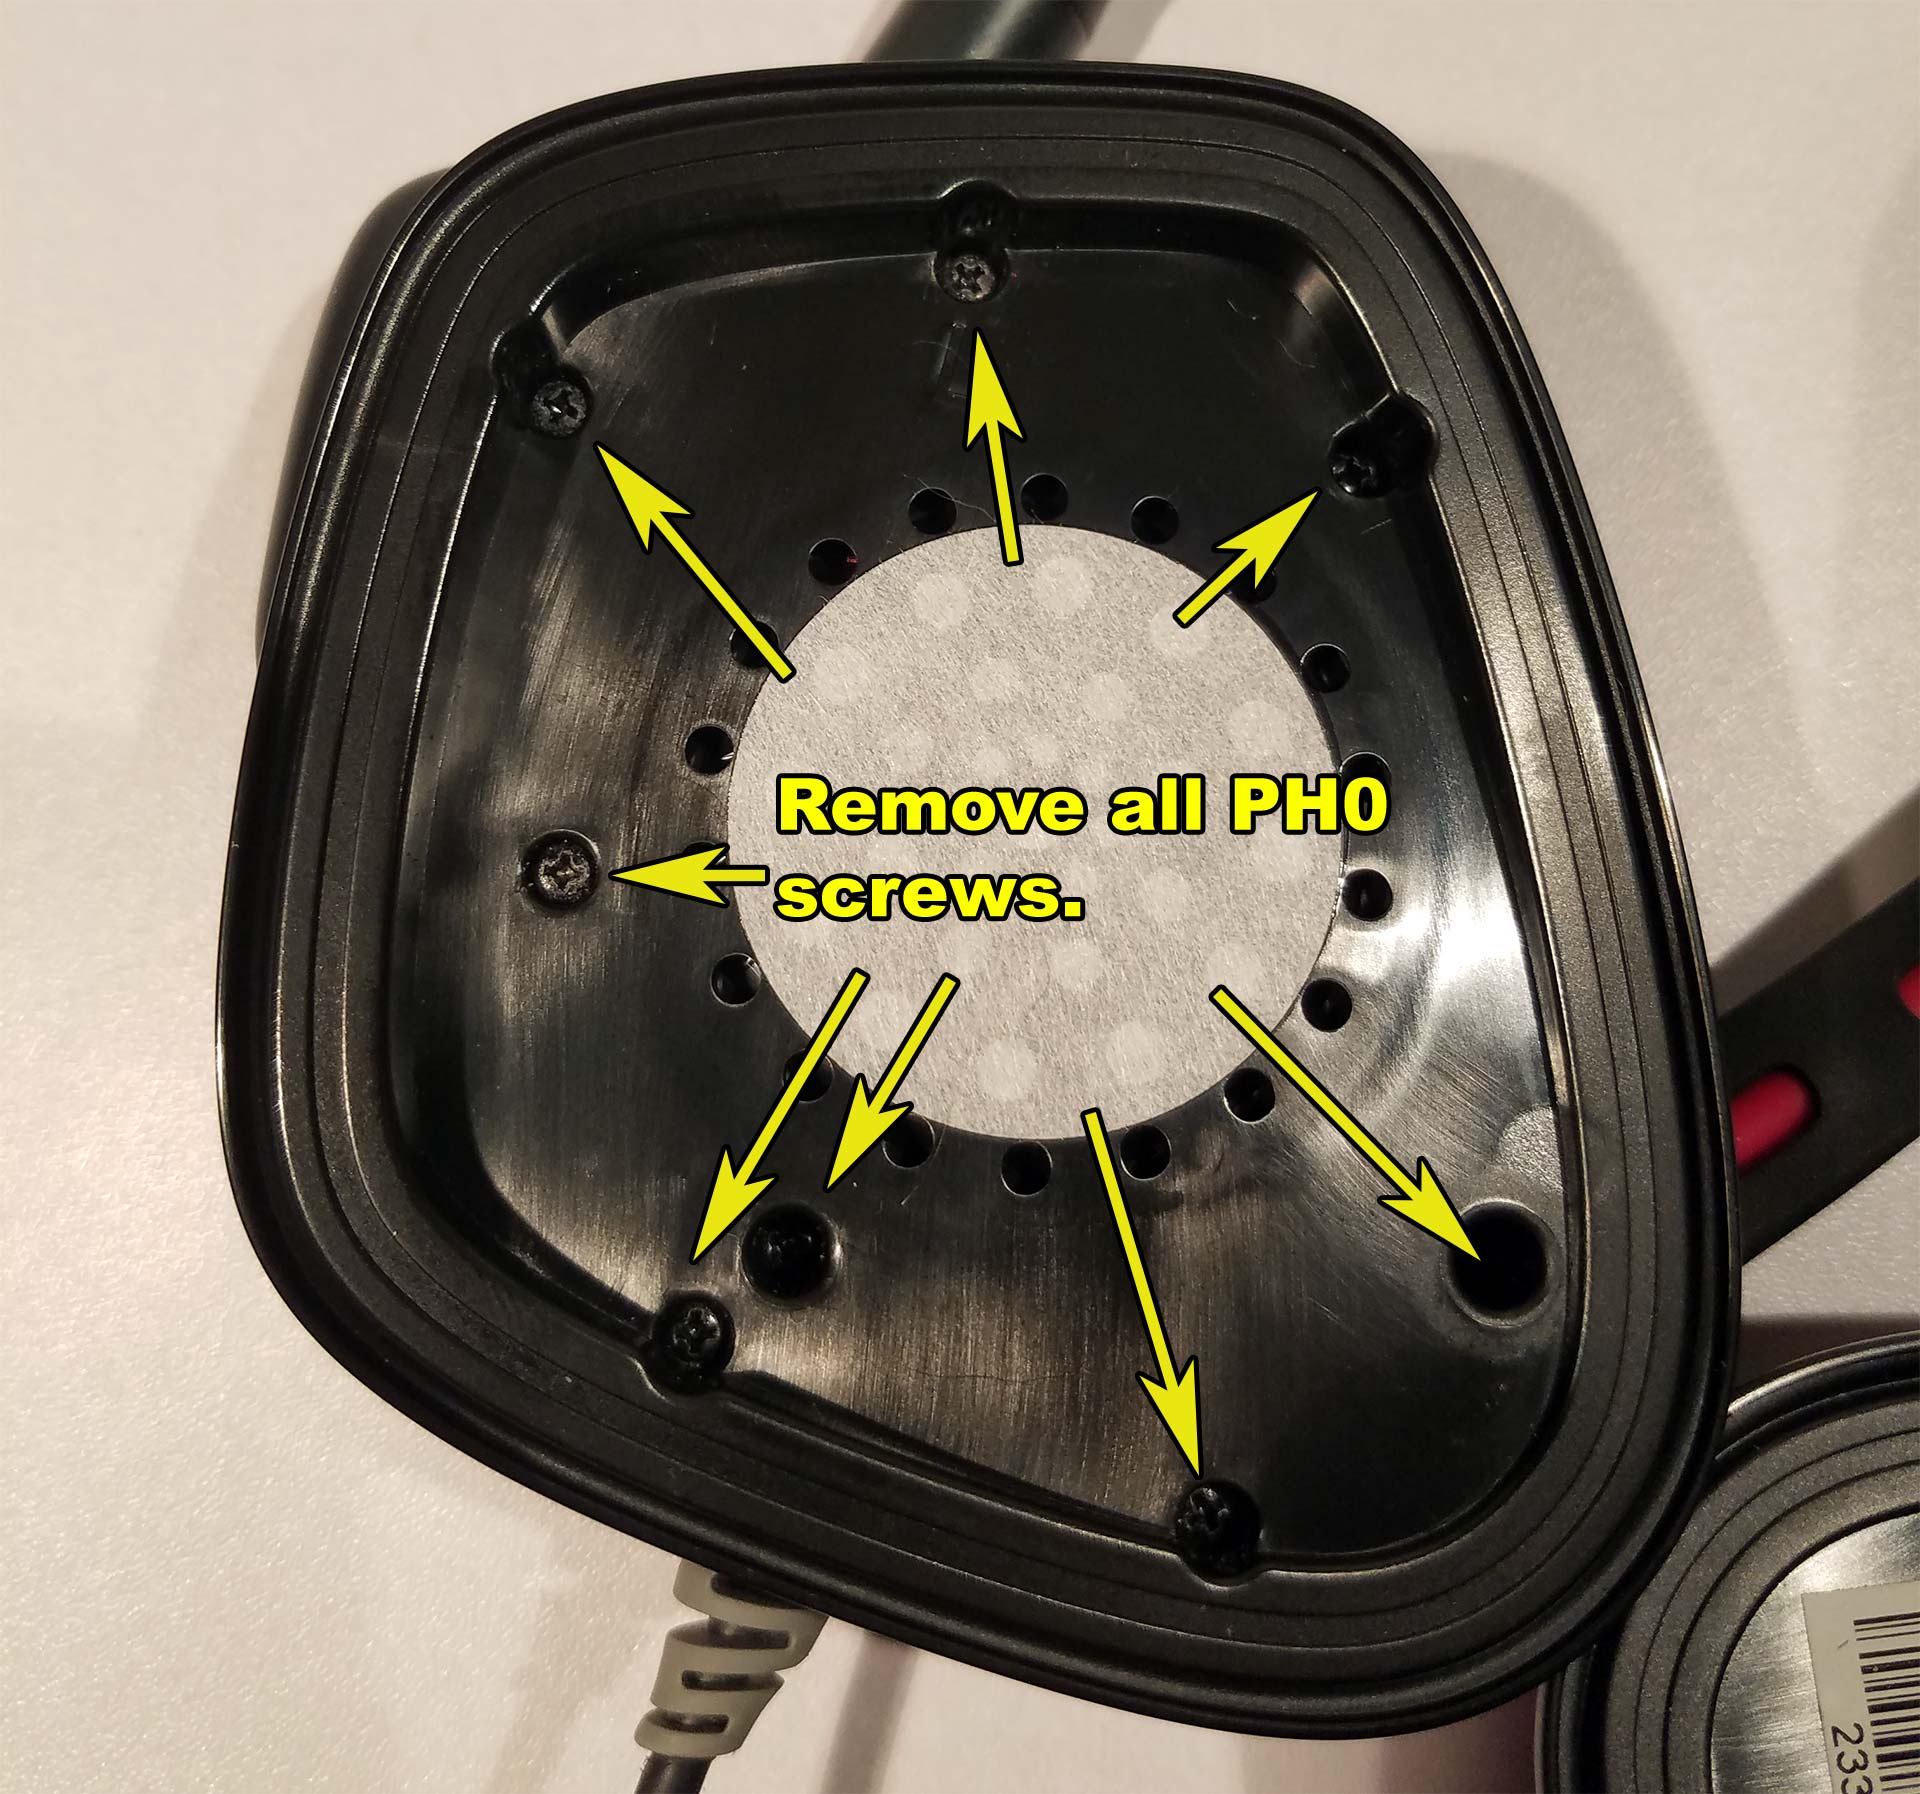 Next, we will be taking a PH0-bit Phillips screwdriver and removing the array of screws holding the speaker as well as the outer housing in the arrow tabs below. These are standard plastic tapping screws similar to what is used on the PS3 controllers.
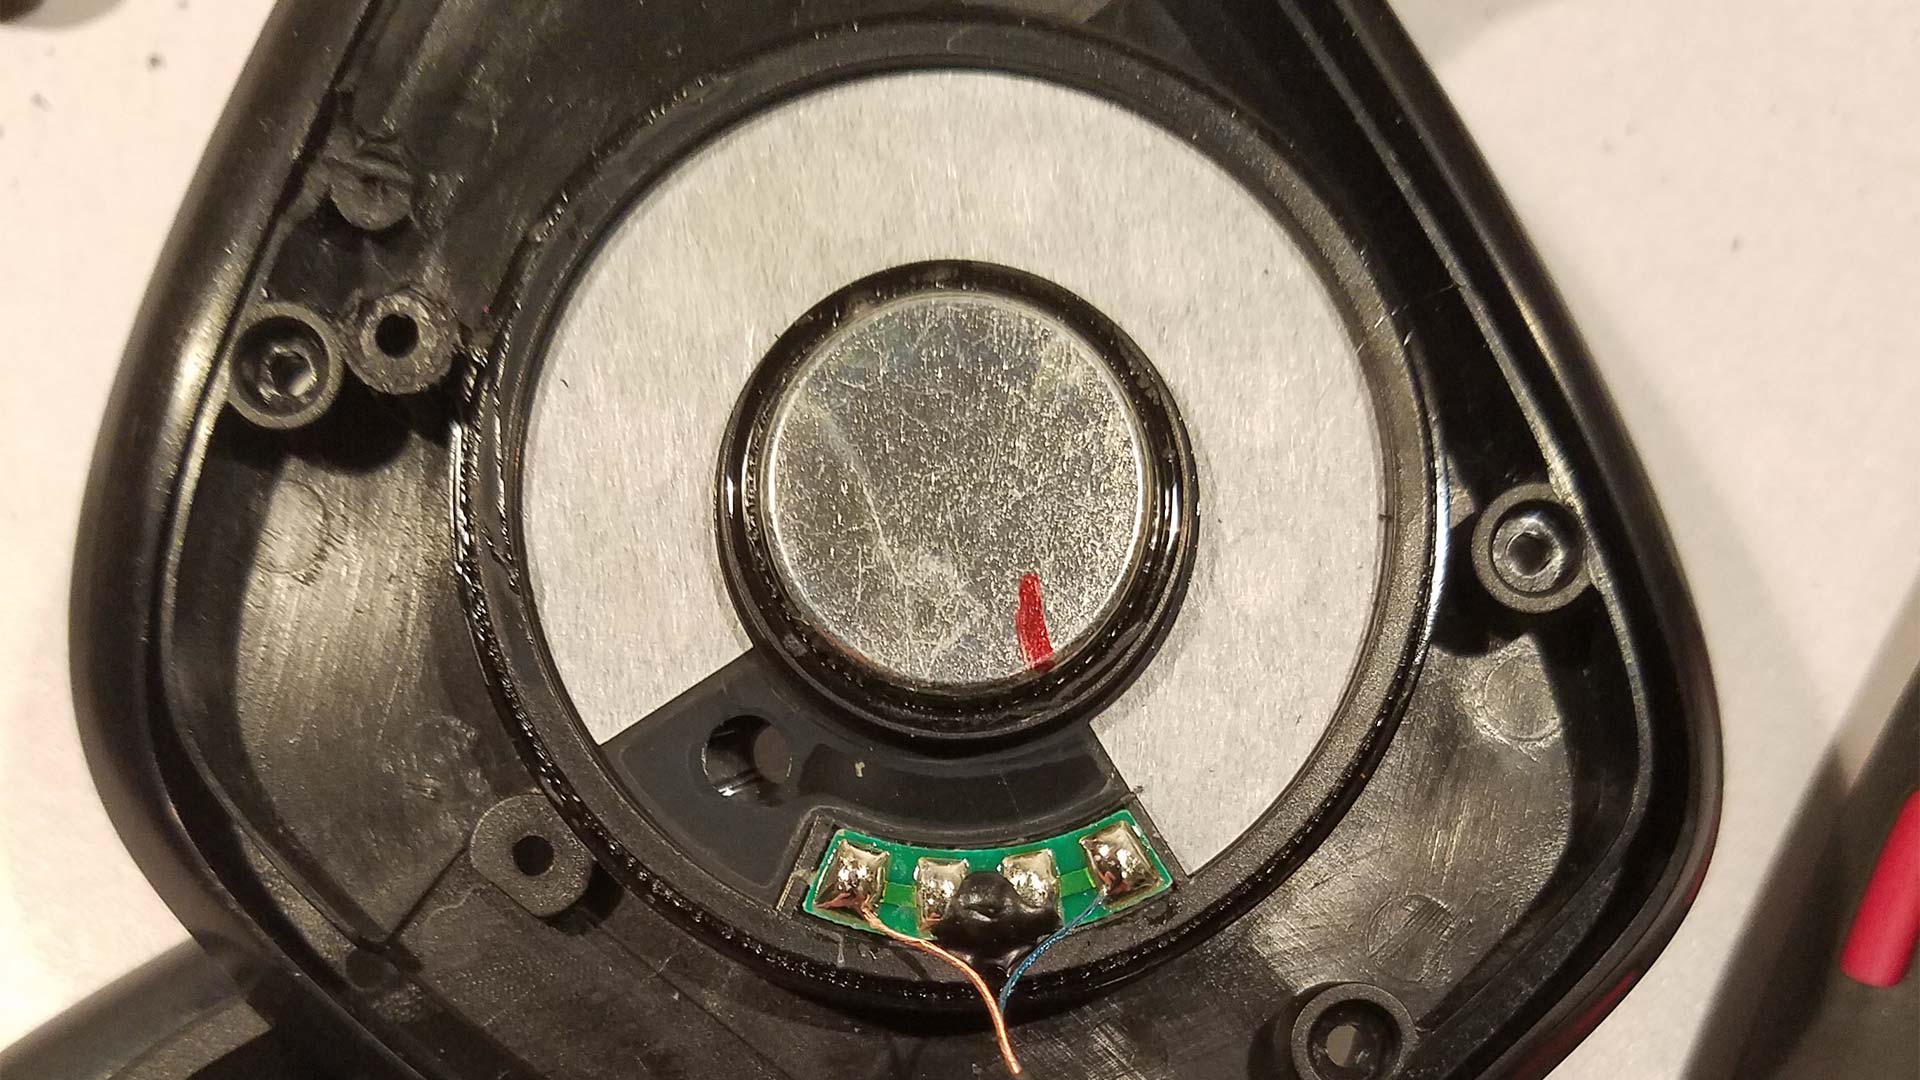
 The moment the speaker casing is released be careful to not use any force to pull it off as doing so will wreck the connection to your speaker wire due to the asinine way Corsair decided to perform cable management. We just gently removed the tape to reveal what it is that we are playing with inside.
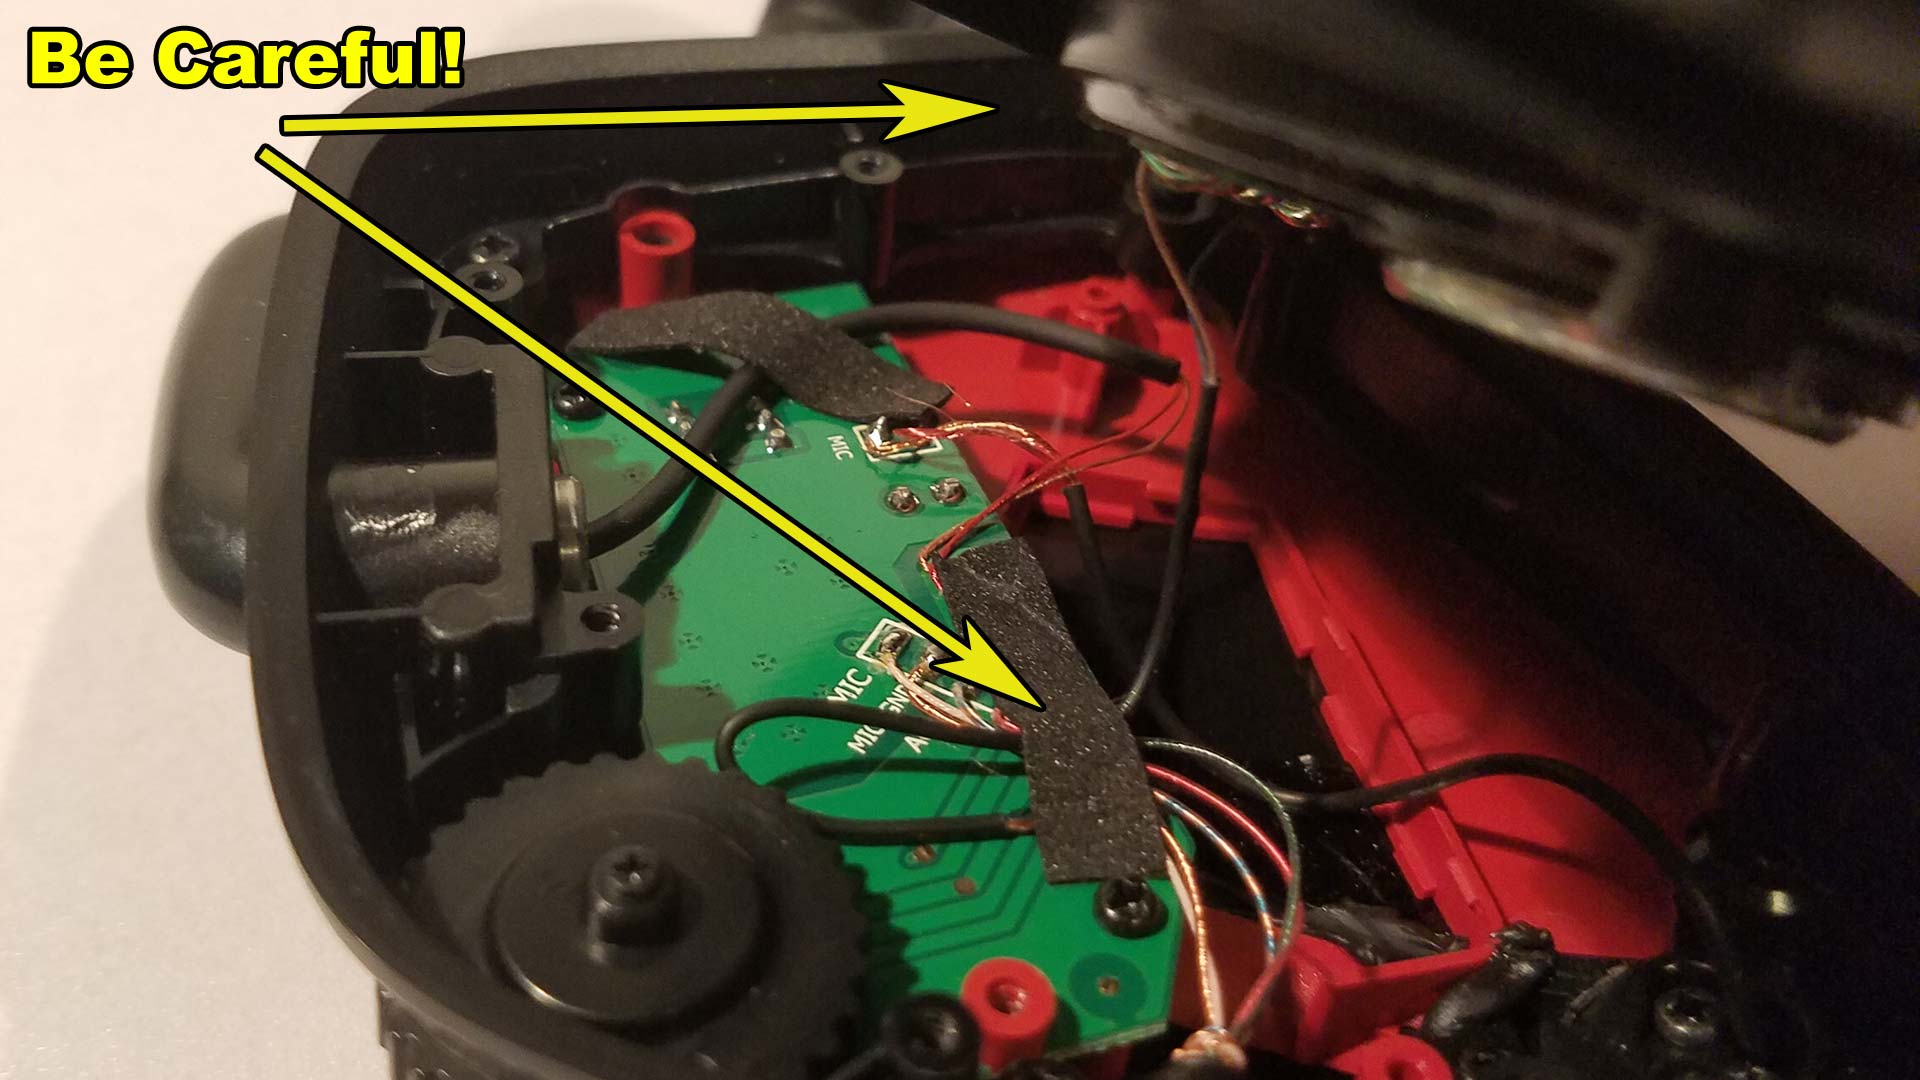
 Once again, similar to my M65 mouse repair. I have to give Kudos to corsair for properly marking what each of the pads does on the board making it very easy for us to wire it all up. Although we are a little confused as to why there's a MIC_GND and AGND plane when even after removing these wires they are both connected on a continuity test. In an ideal audio world, you would want to have these two grounds isolated so that your microphone cannot receive any interference from other electrical devices such as the speakers.
Perhaps this was something Corsair was thinking down the road on isolating the microphone portion from the audio? It would make sense, But why not insulate it further if they care so much about electrical radiation?
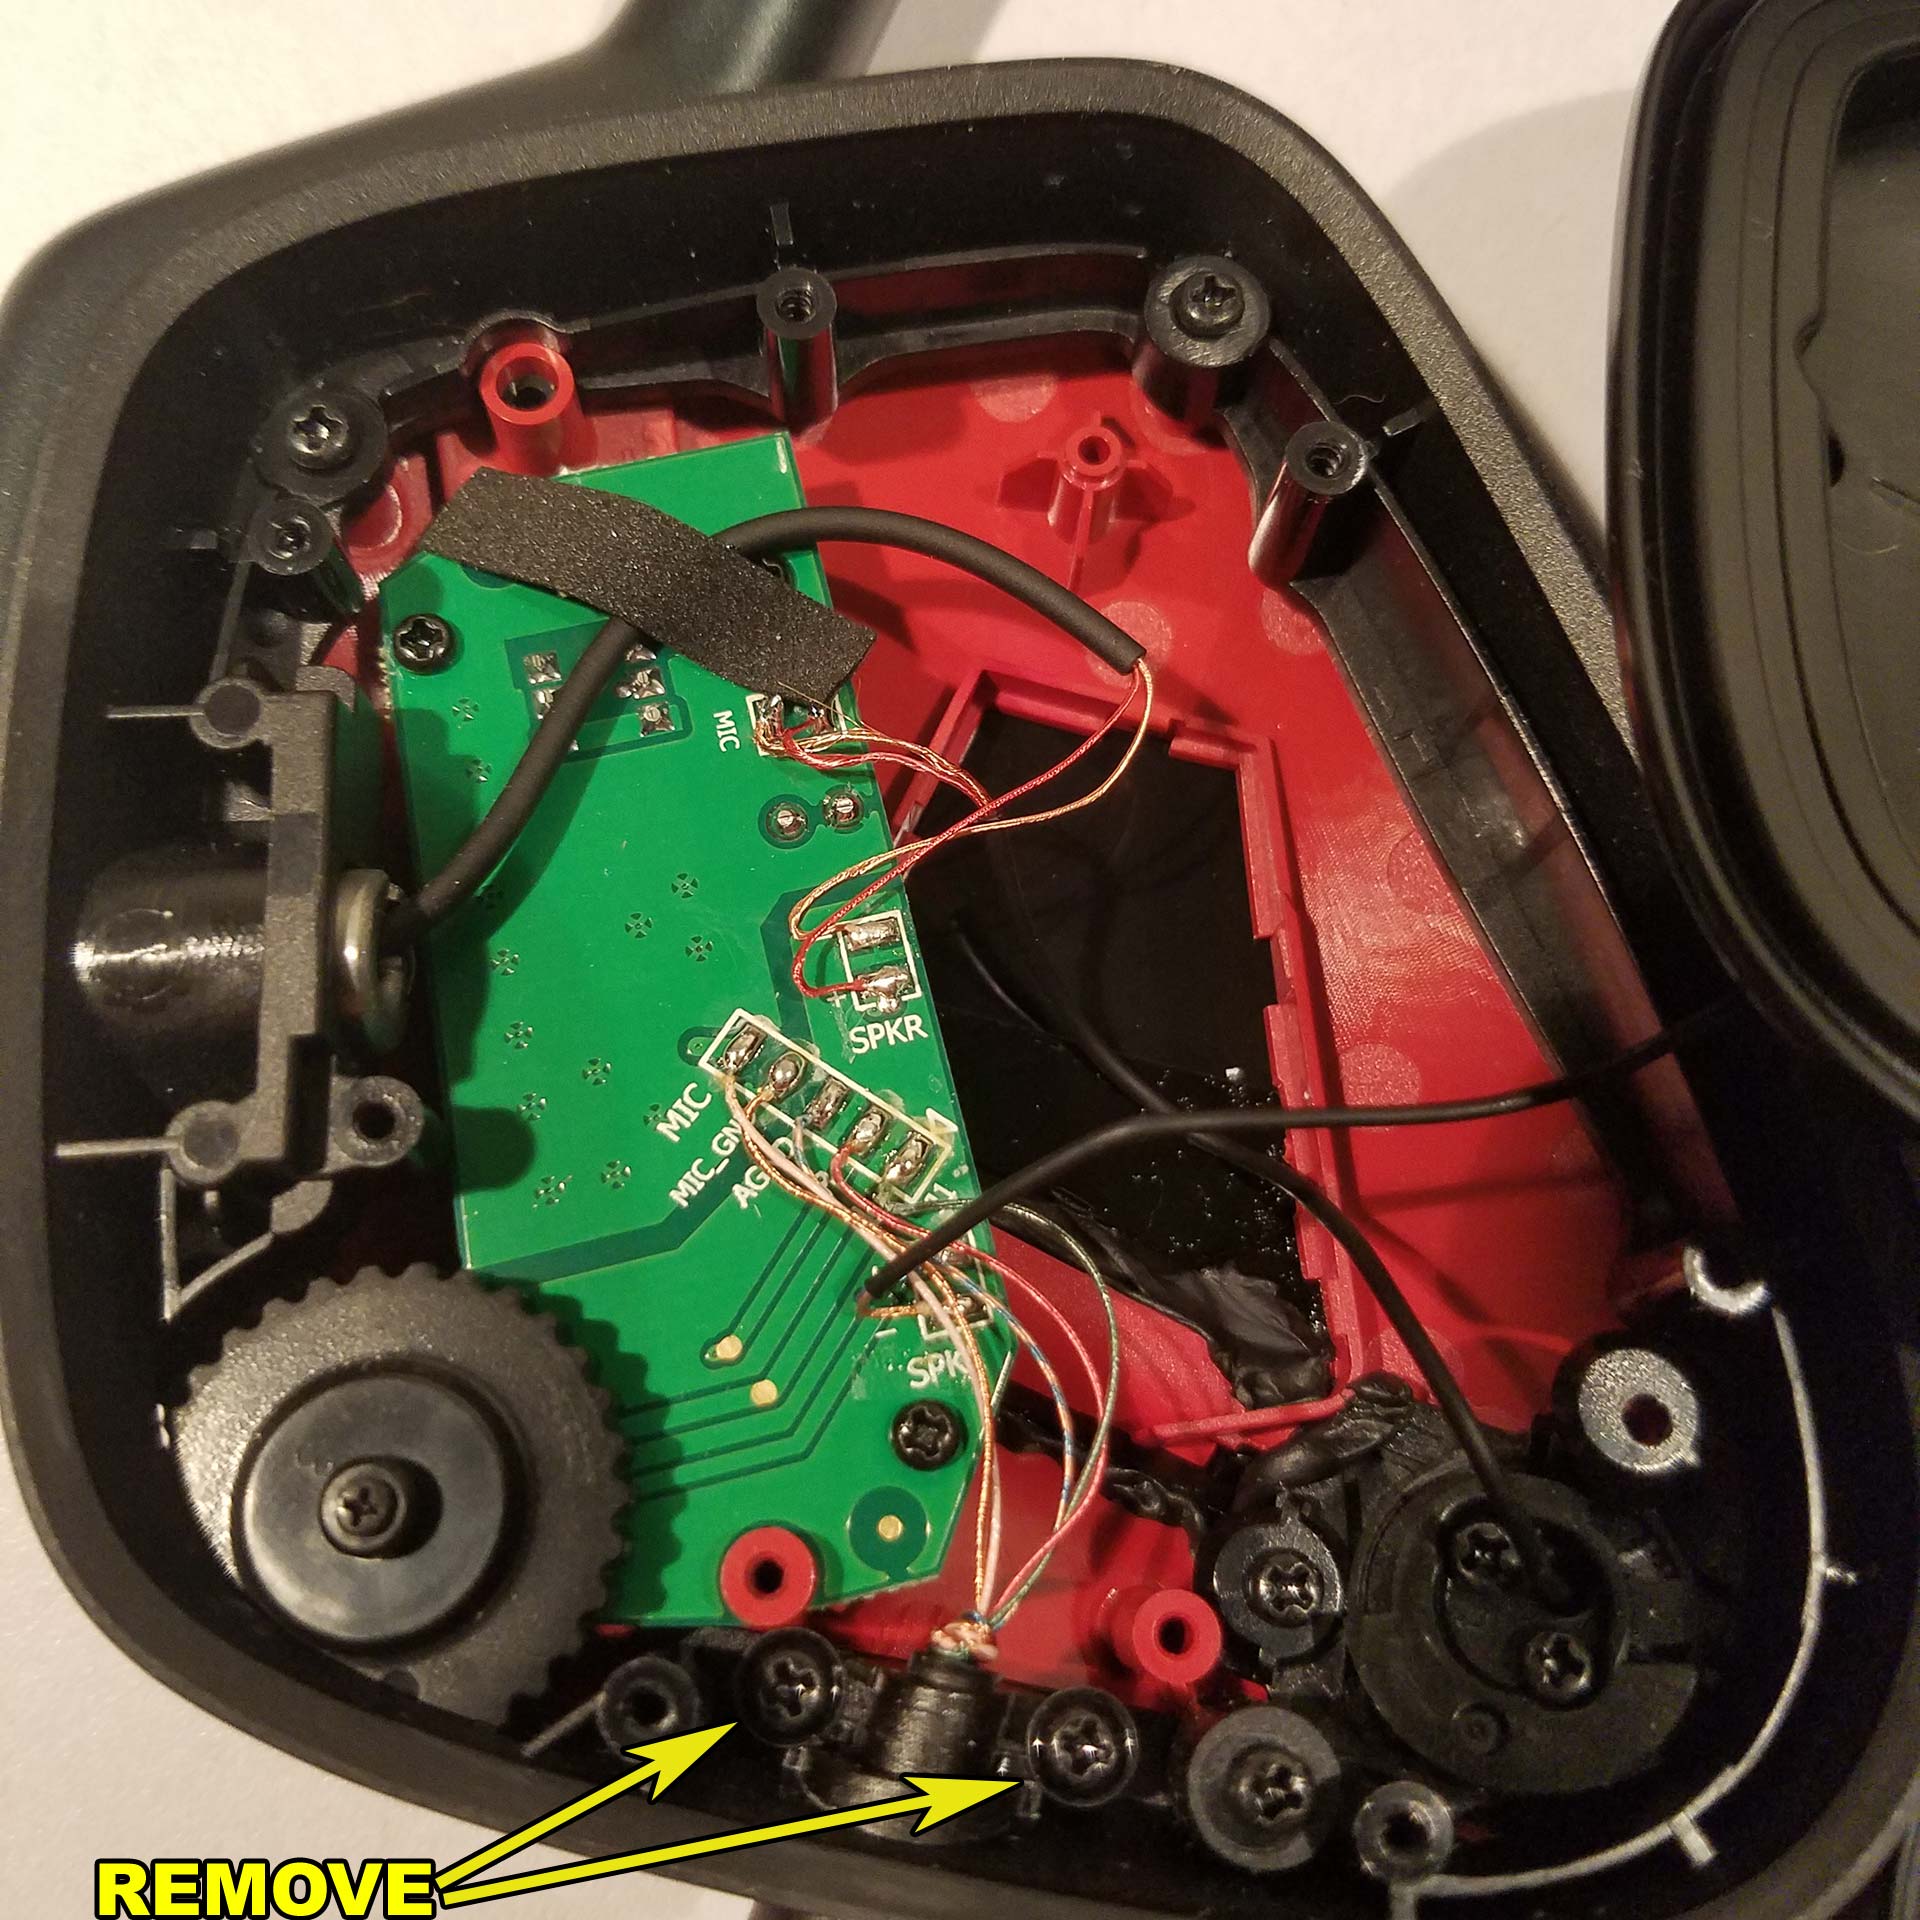
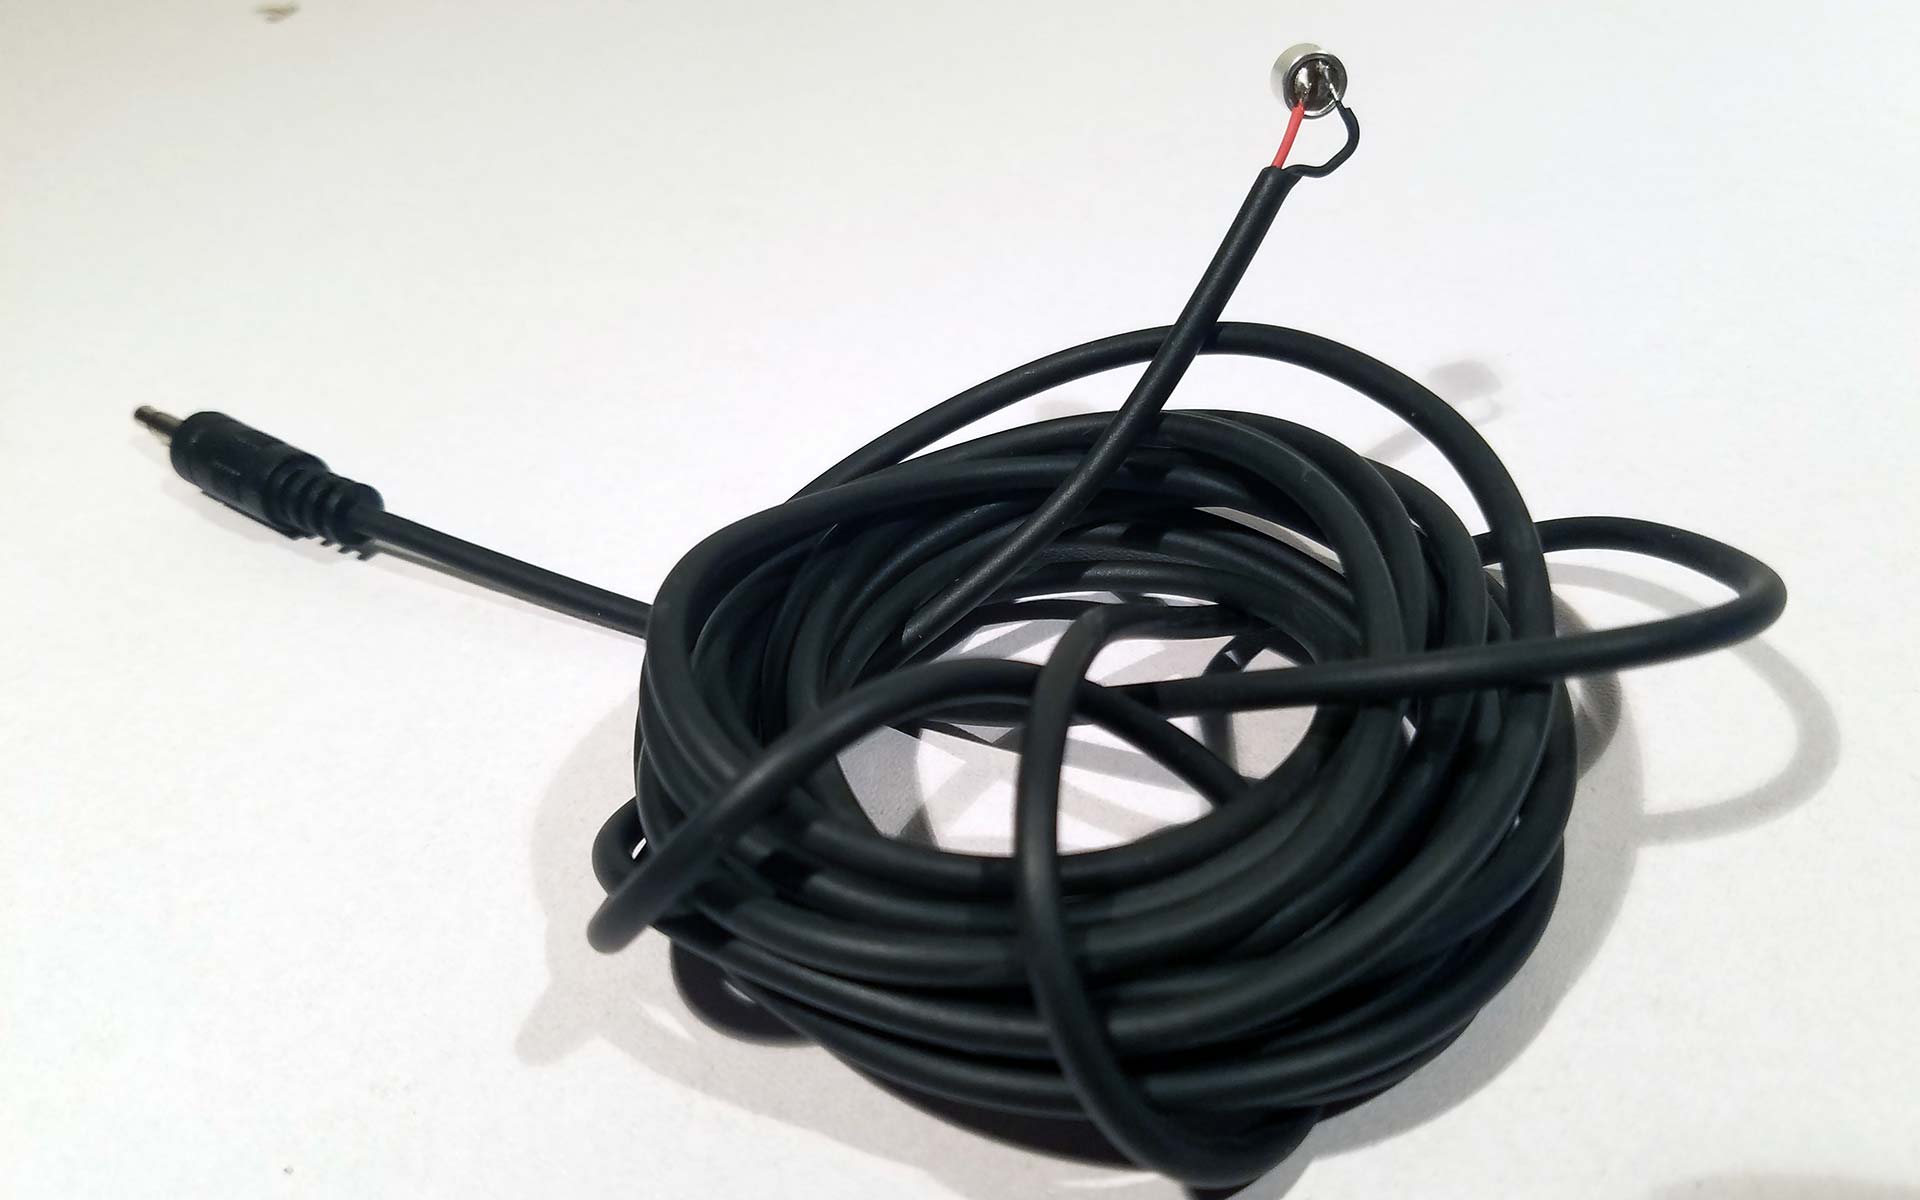
I'm left with more questions than answers on this one. Anyhow, we're going to remove the cabling by removing the two screws. Also, we will be de-soldering all of the pads to eject the old cabling. We should point out the overall size of the cables inside and how insanely thin the wiring is. If this was a regular gauge wire like what you would use in a mouse then perhaps it wouldn't have been destroyed in the first place. It was a bit of a pain in removing the old wiring harness as you had to twist the boot 180 degrees and then release it. But after a little bit of cutting of wires and some of the boot itself, it finally released.
 Now, we could do a re-cabling job as we did with our Wico C=64 joysticks by using a heavier gauge wire and boot replacement. But fitting the boot would be a bit of a pain in the ass in a setup like this. But with how much room there is in the cavity of the Corsair Void Pro why should I repeat the mistakes of the engineers at Corsair?
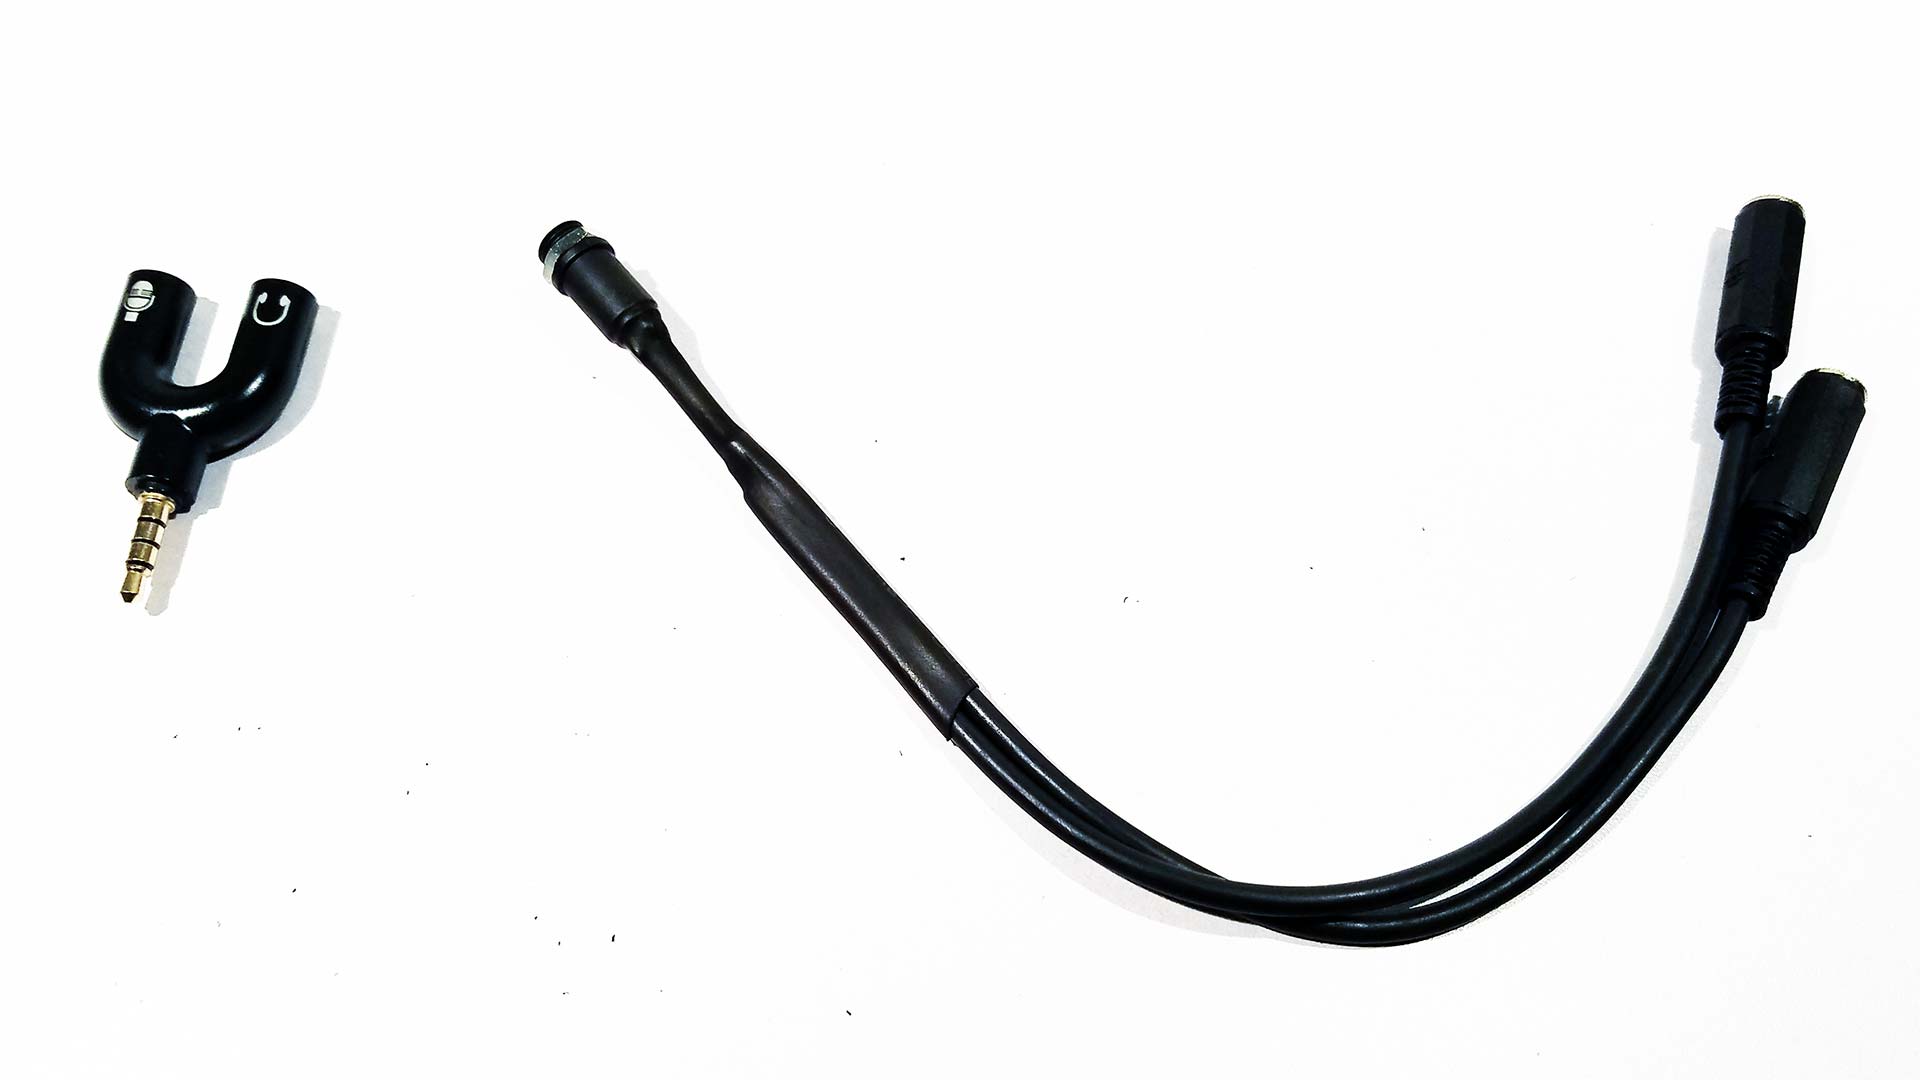
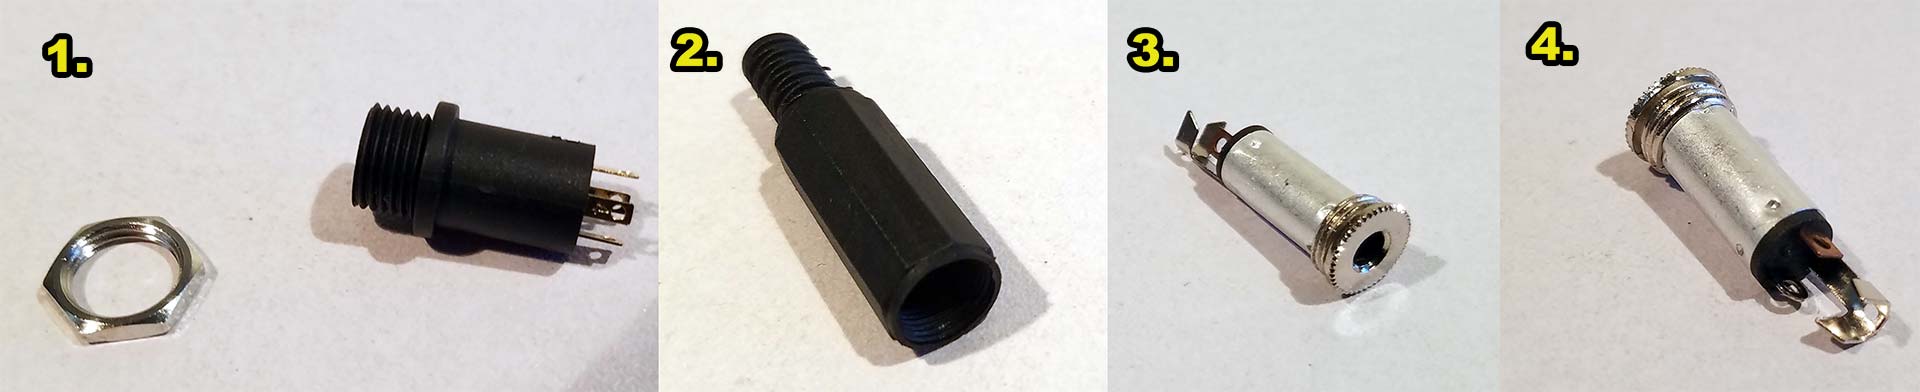 If fact, there was something already designed by Corsair to which they walked away which is simply adding a jack at the bottom of the headset as they did with the Corsair void standard edition. For this mod, we will be using a 4-position female headphone connector (image 1). The reason why a 4-pin version is to accommodate the microphone part of the jack and it also makes it easy to just purchase a male-to-male cable to hook into game controllers, cell phones, and whatever else you want at that level.
Also, if it rips again no need to open it! just purchase another straight-through cable for a few bucks! As far as cost is concerned you can purchase from a Chinese vendor for $2-$3 (USD) although the odds of them shipping it is low. We went through an American vendor for about $7(USD). Alternatively for those seeking a reputable dealer, there's always Digi-Key for barrel audio connectors.
 Regardless of where you purchase your female stereo connectors from always check the pins you are about to solder with a multi-meter that has a continuity function! Too many times have we purchased these types of connectors and the white papers are nowhere near to where the pin design is! You'll note that the sleeve (base ring closest to the cord) is always ground except for the 4-pin Microphone/audio adapter as the sleeve is the microphone signal and the ring closest to the sleeve is ground.
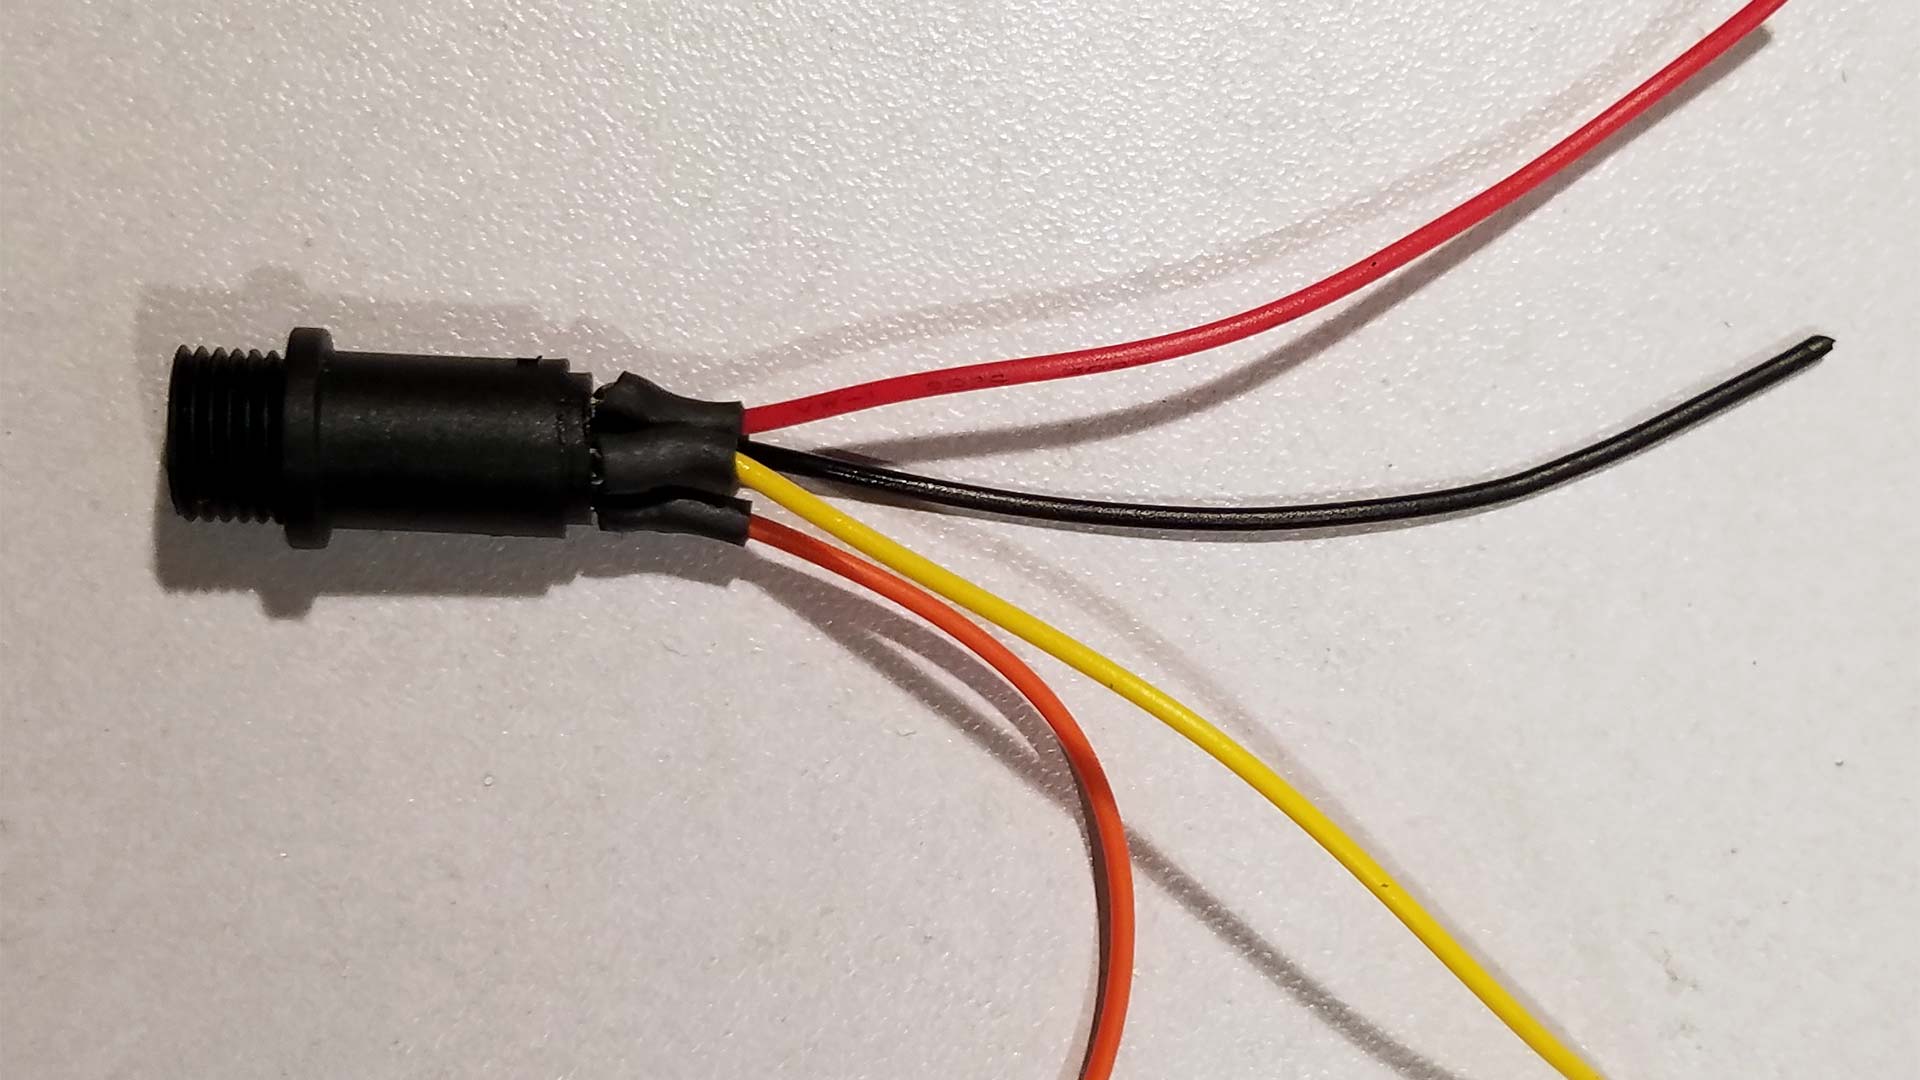 We will prepare our female connector by soldering a few wires onto it. Yellow for channel left. Red for channel right? Black for ground. Finally, orange for the microphone. We will use some shrink tubing here to prevent the connectors from touching each other and from accidentally pressing into the PCB inside of the Corsair Void.
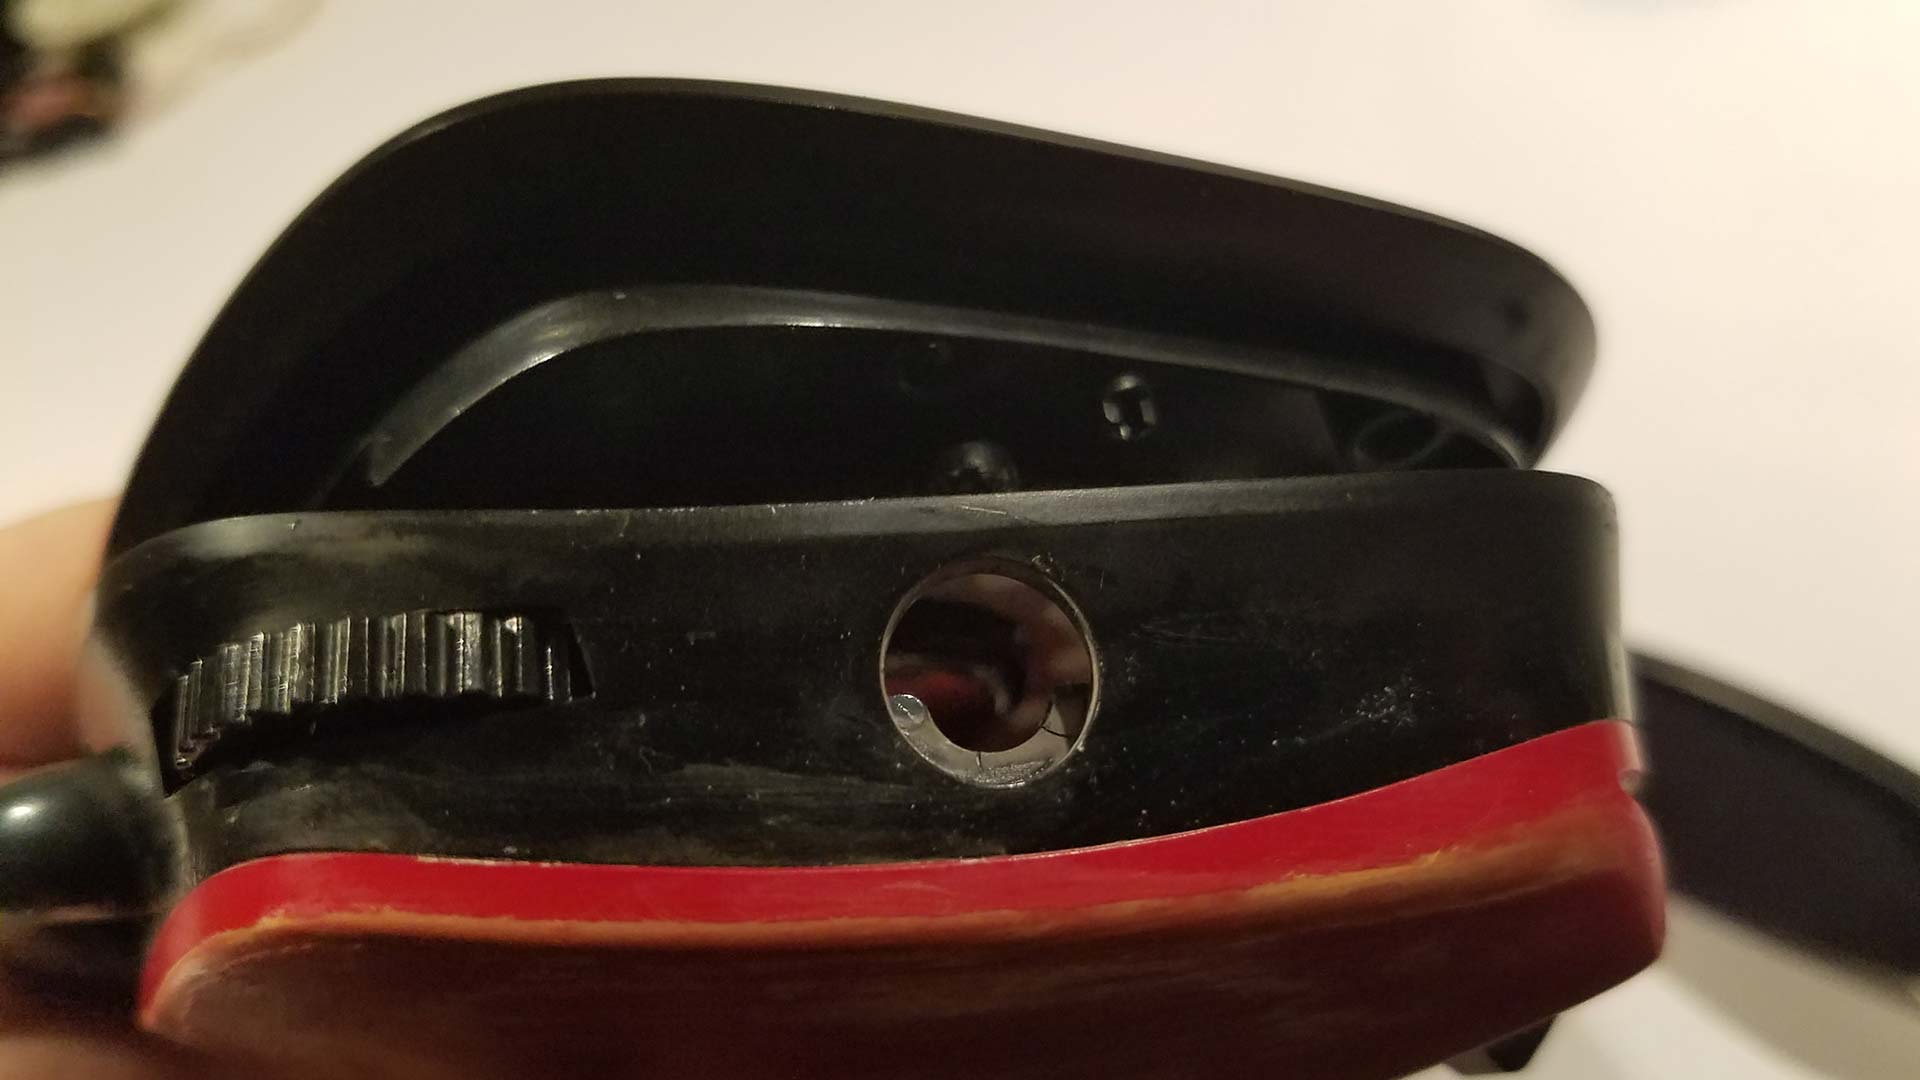
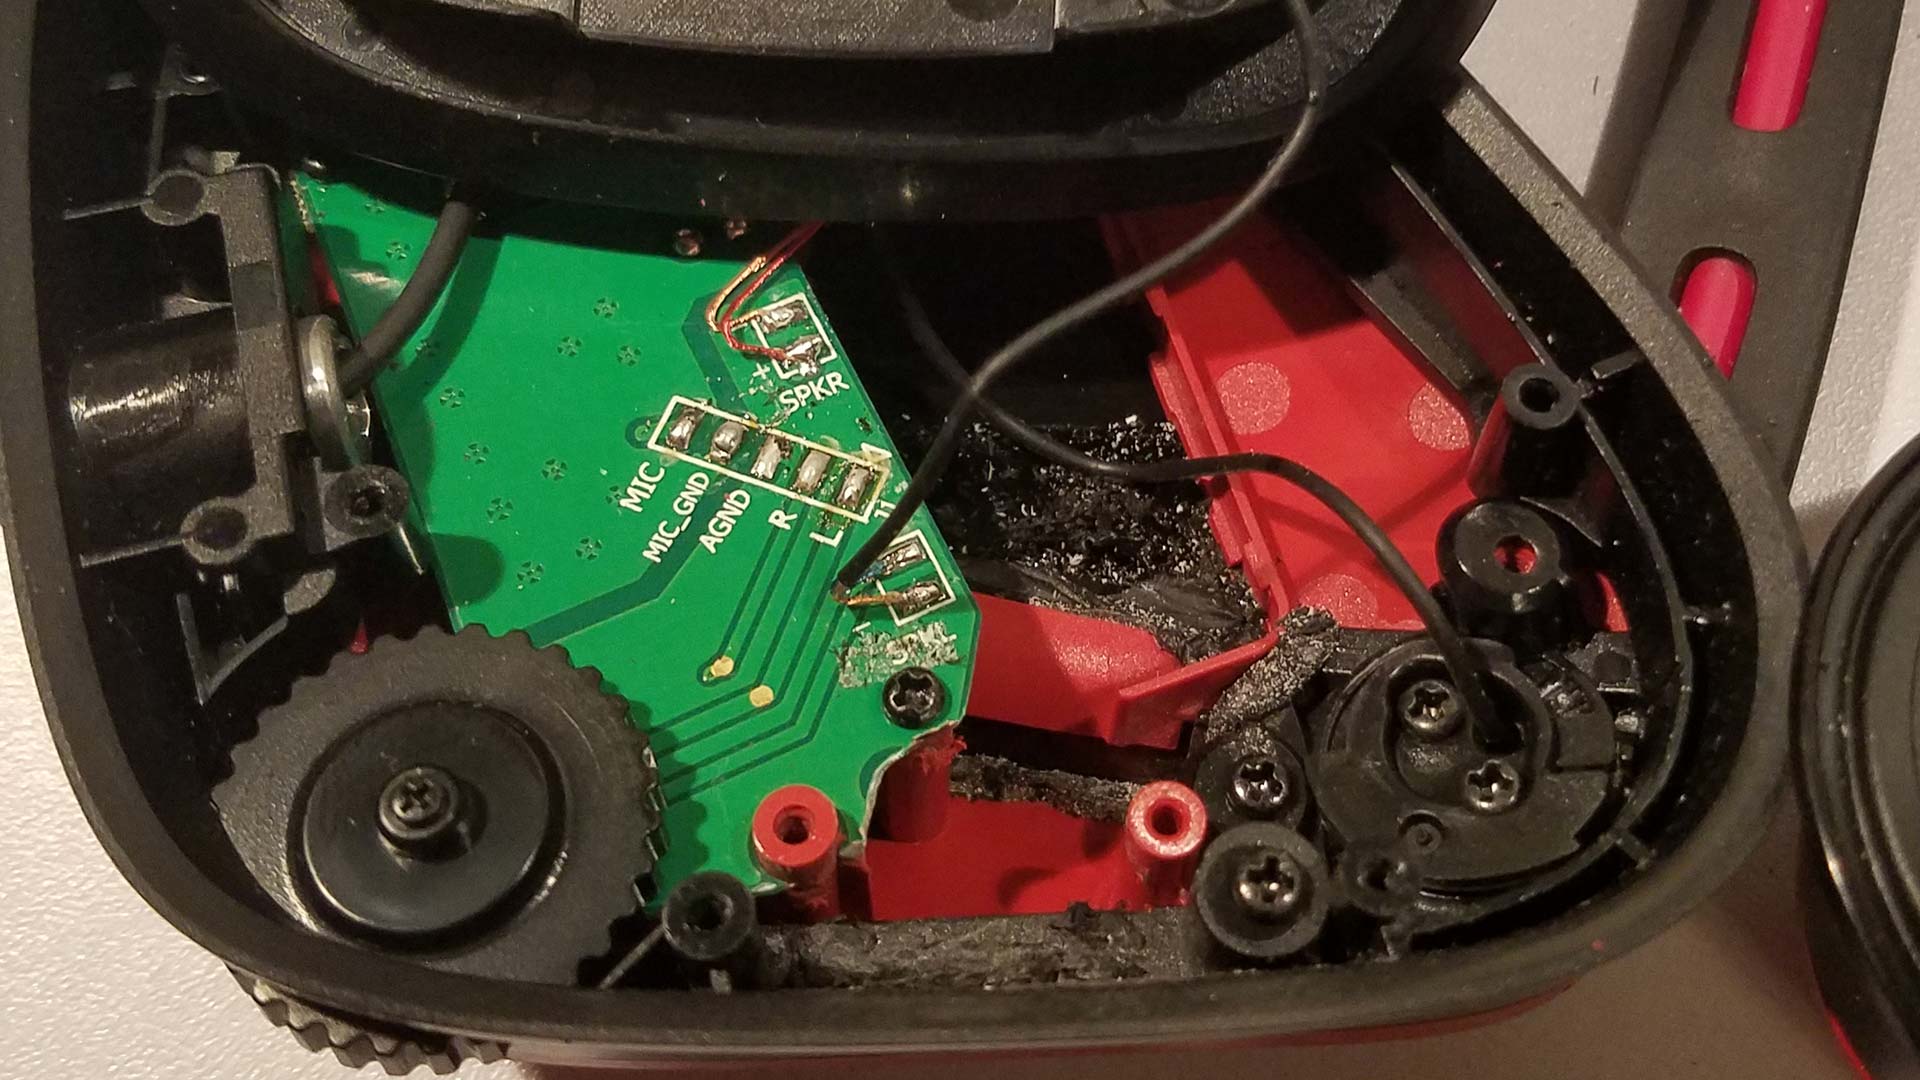 We need to make space for our jack. So using a rotary tool with a drill bit we can easily cut away all of the plastics that were surrounding the hole of the jack. Also, due to the way the plastics are molded at the bottom, the connector will not sit flush inside. Our female connector will stick up and smash into the speaker. So we also need to cut away some of the circuit board for the connector to be pushed back into the housing.
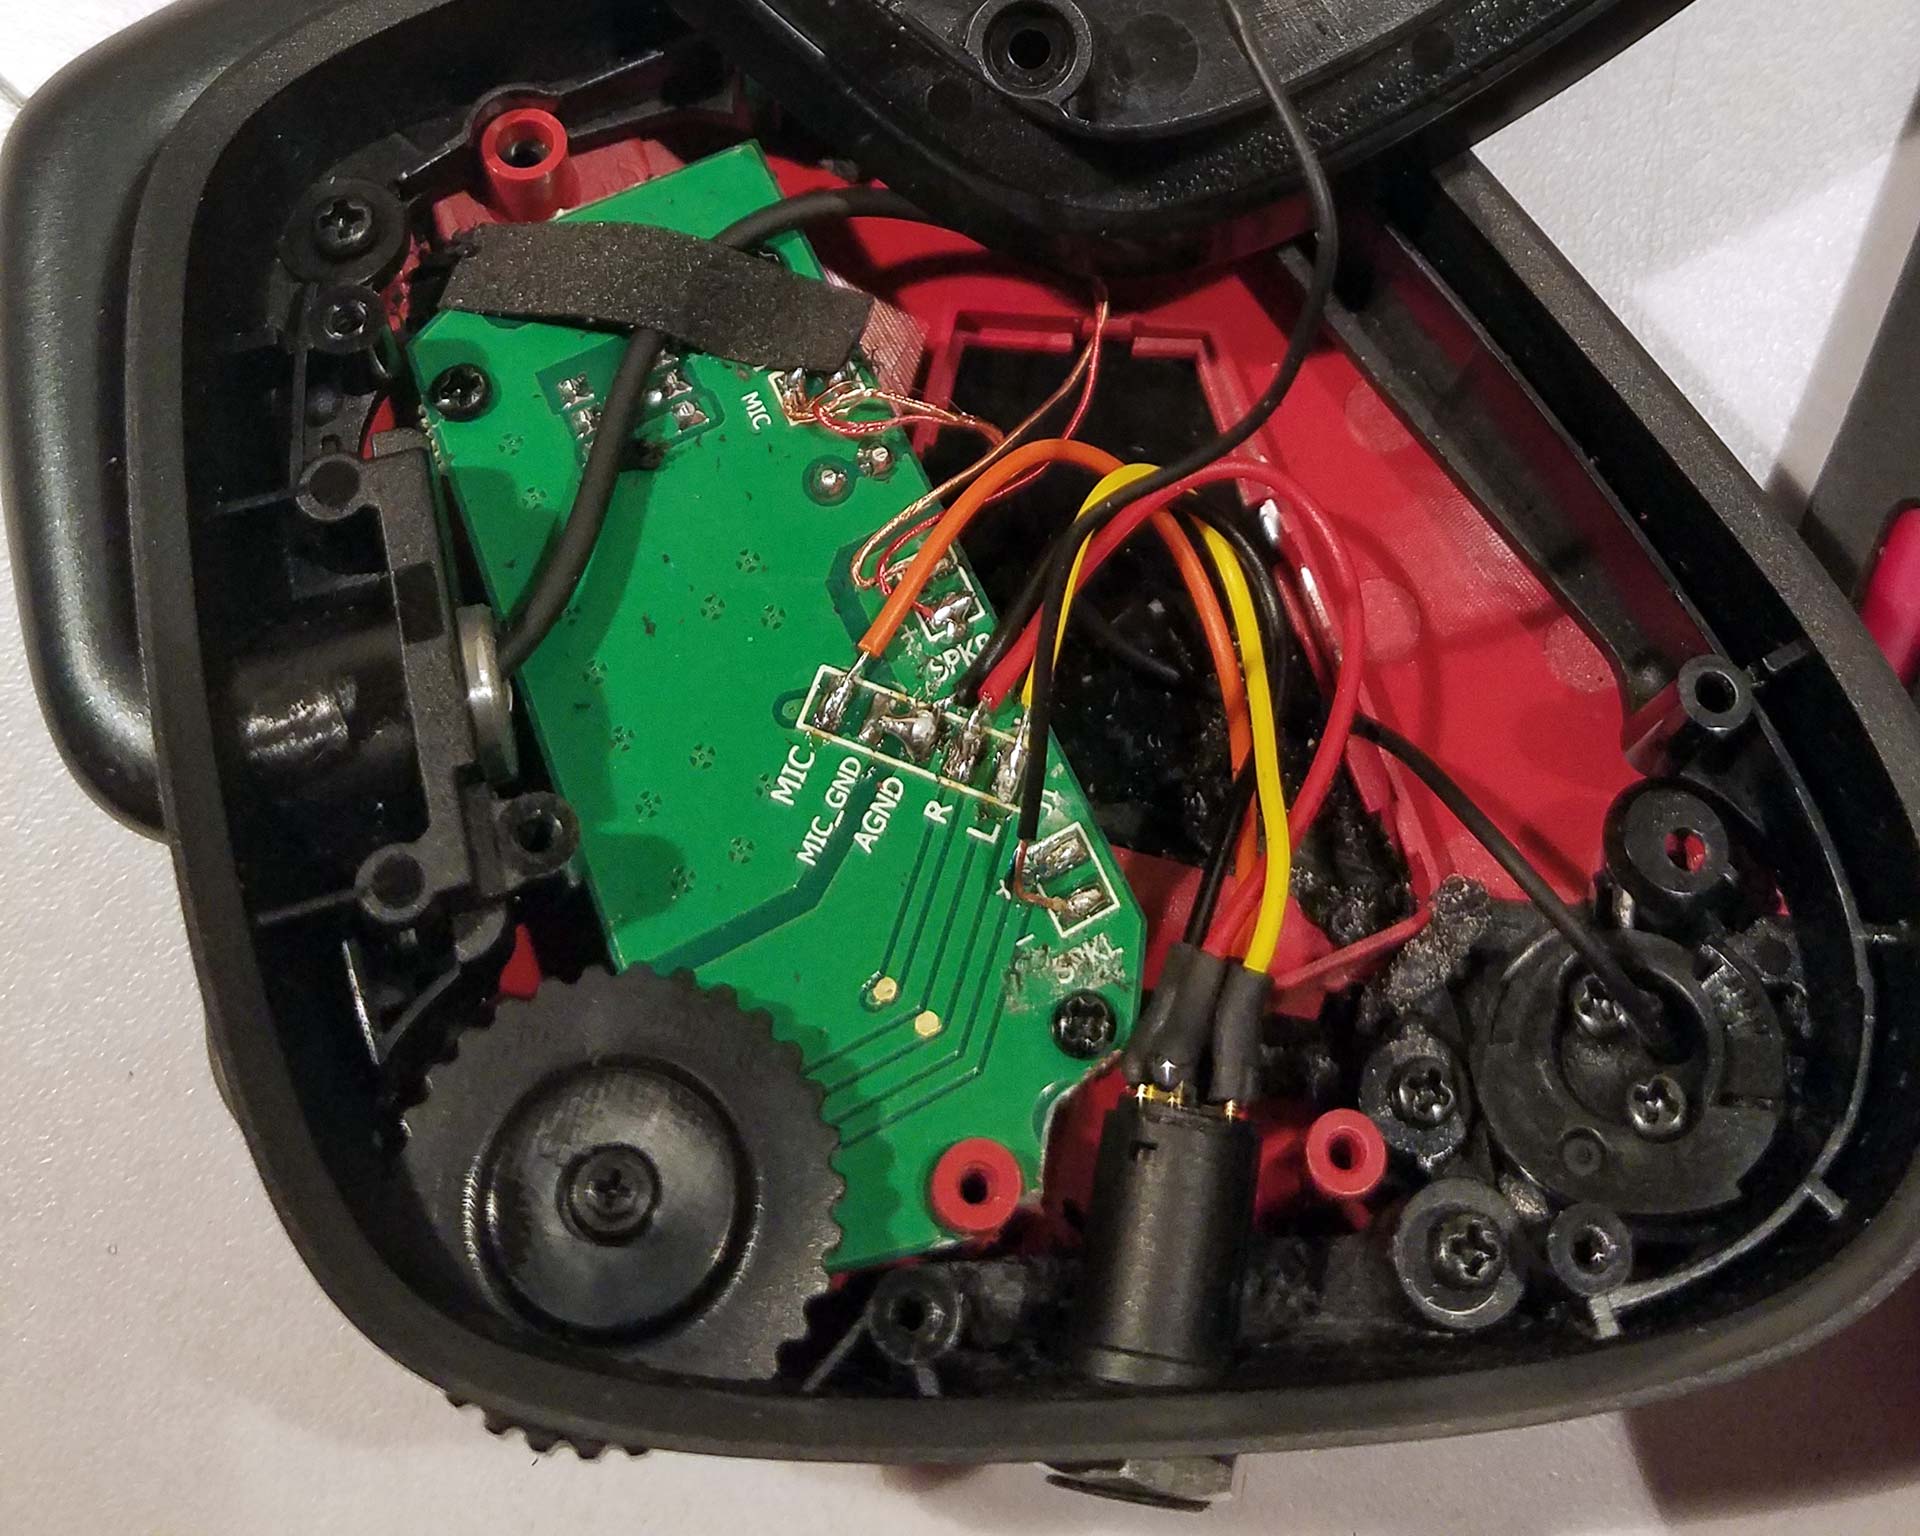 We did an initial fit-test to see if everything would go together nicely too which it does. The speakers can be clamped down and screwed into position. and despite using some thick wires they can be easily tucked underneath the circuit board so they do not touch the speaker housing to affect the sound coming out of them. At this point, we plugged the headset into the cel-phone just to make sure everything is working such as speakers and microphones. Once we were satisfied we bolted down the female connector and then threw in some hot glue into the corners to act as reinforcement. Once again we should note that the connector will not sit flush against the plastics because of the curvature. However, the washer still bites down on the plastics and does not move when we insert and remove our jack.
 To make sure that everything on this side of the headset sits perfectly. We also cut away some of the plastics where the female connector allows us to close it without too much worry if we're squeezing the plastics too hard. Also at this level, you can check the wires around your speaker, to make sure they aren't falling off. Or, if you are experiencing audio crackling as you move your headset around. A cold/loose connector on your speaker is what usually causes it on these headphones.
 With the jack repaired the only thing that is left is to go completely nuts with masking tape and spray-paint the damaged section of the corsair headset. However, we will save that for another project. From a functional standpoint, our headset is fully operational.
Some other notes to consider.
 For those who may not have the Corsair USB dongle or if you are like me and think that the audio chip on that dongle is utter crap. You may be tempted to get a 4-pin 3.5mm to 3-pin 3.5mm converter from china. The one that is pictured on the left is one that we purchased from china for about two dollars. It's not even wired correctly!!!! Pin1 and Pin2 for left and right speakers are reversed. Also, the microphone crackles and disconnects in the slightest of moves because the microphone jack is a female 2-pin jack! Not a 3-pin! So now we have Chinese manufacturers unable to tell the difference between right and left and also giving us terrible connectivity. great!
DIY to be sure.
As we can no longer trust the manufacturing processes overseas combined with the fact that all of the Radio-Shacks of the world are gone leaving you with Amazon which delivers the same garbage. We made our Splitter. using the same 4-pin female connector we used for the headset. And using 3-pin female connectors so we could simply patch it into our Audigy 5 RX sound card.
Pin-0uts of the audio connectors.
When building your headphone jacks and/or making your cables it is essential to have a multimeter set for continuity testing to ensure that you are indeed connecting to the right ports. Even if the whitepapers tell you what each pin is and it's marked on the connectors do not trust it! Many of these Garbage manufacturers can't even tell the difference between left to right speakers much less trust them with numbers. Each diagram shows the tip, the rings which are the pieces in the middle. Finally the sleeve.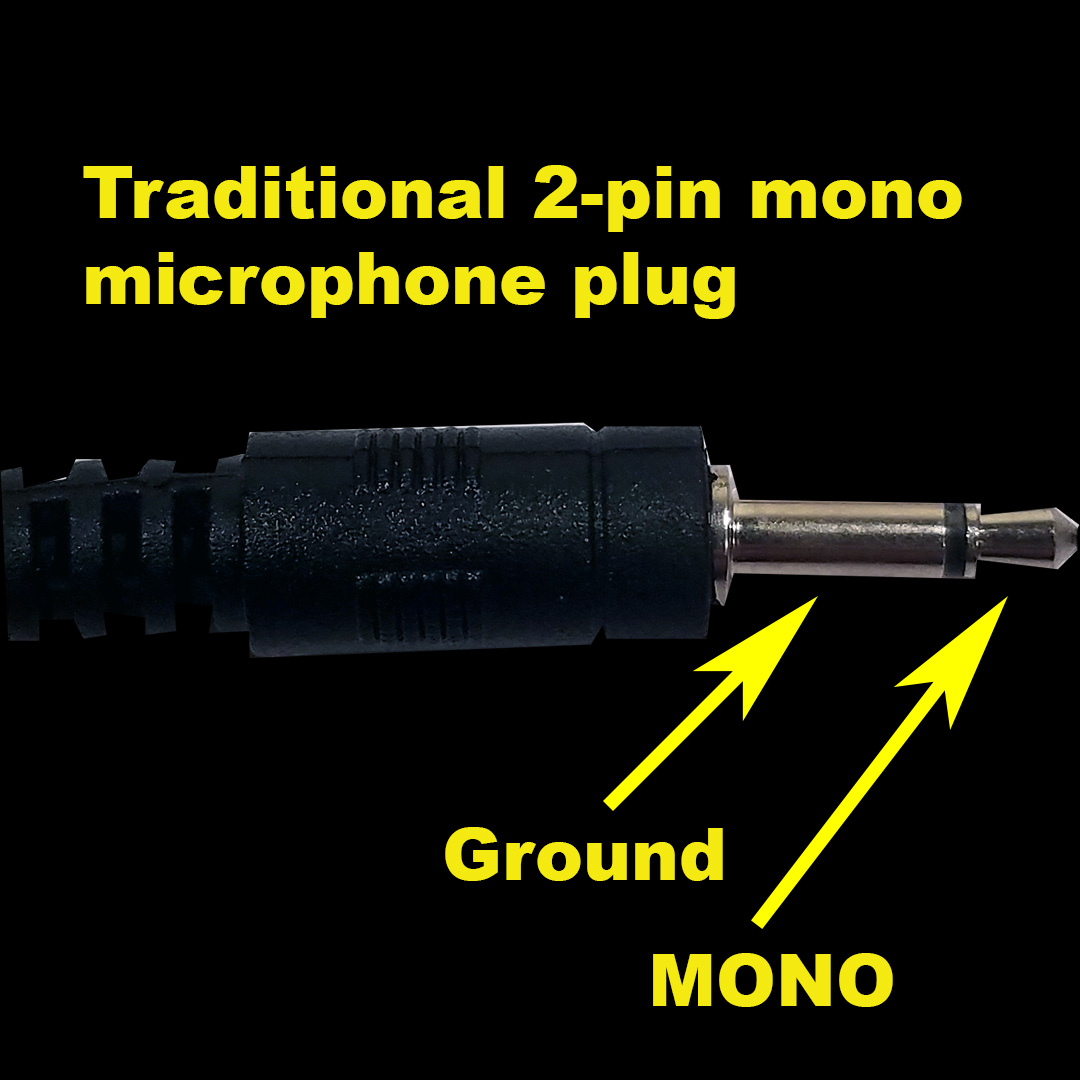 I also had to point out the traditional microphone in the respect that the ground position is elevated a little so if you decide to recycle a 3-ring jack that's fine. Just understand that the center ring shares grounding. Only the tip is for active microphone use. We made this mistake by assuming left-right was fused and upon plugging it into our sound card we were grounding out.
Testing your audio connectors for DIY
Plug in a patch cable into your female connector and go through each of the solder-able leads with a multi-meter to ensure everything is going to the right pins before plugging it into your computer. This step alone will save you a lot of time, money, and headaches.
Exclusions.
The diagram above only represents the most common audio formats of the 3 and 4-pin connector and does not include the following:
- Nokia, and Lenovo mobile connectors - ground and mic are reversed on the 4-pin adapter.
- Raspberry Pi, CHIP, Zune, AppleTV - pin 4 is a composite video and not a microphone.
- Certain camera microphones allow for stereo recording such as the Olympus ME51S pocket condenser mic. In this case, left and right are no longer fused but are operating as independent channels.
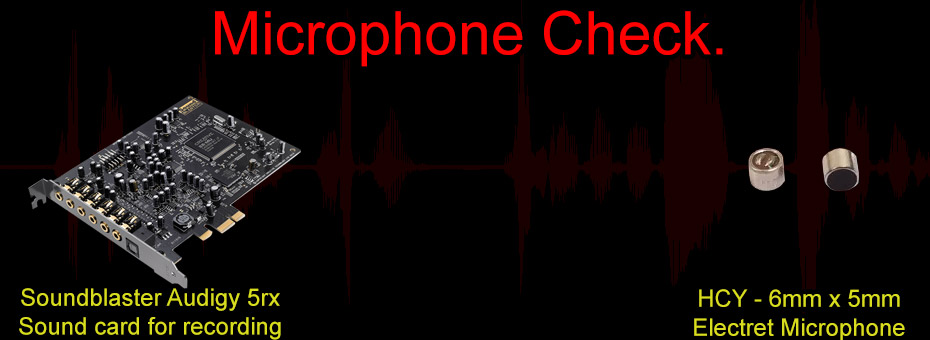
The microphone problem.
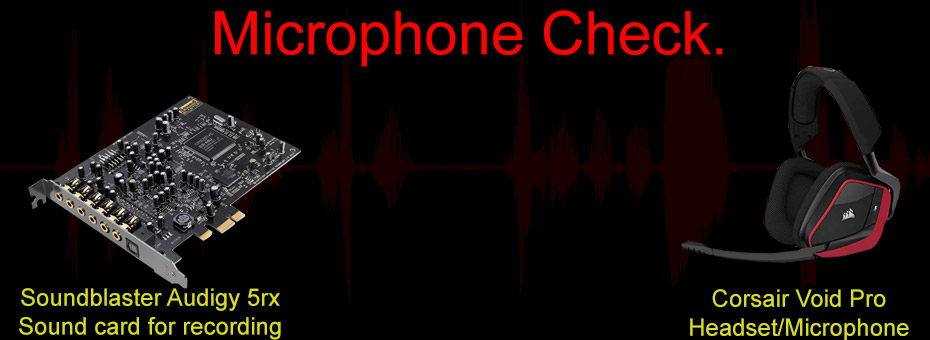
Recording device: PC with an Audigy Rx5 sound card. Microphone record levels at 100 percent with no amplification.
Microphone: Corsair Void Pro headset which retails at $69 (USD)
Download or play in your own external player: Opus and OGG audio files are available to download. WAV audio file is available as well.
Replacement time.
Since we've already re-cabled this headset why not fix that terrible microphone that's in the corsair headset? I mean just listen to that fidelity! It sounds like what you would expect from a McDonald's drive-through speaker for God's sake. Audio fidelity out of your headset is important because you don't want to be "That guy" in a chat room where everyone thinks you purchased some $5 headset from Walmart and... Wait... These Corsair headsets sell for almost $70 (USD)! My Koss CS-100 headset which is at $15 (USD) has a better microphone fidelity than these! Once again corsair seems to let their accounting department control the end-product of their headset instead of letting the sound engineering team do their job. As a gamer, your $70 is going off to pure marketing hype and not into the actual product!
 But this is a blog that helps people! We're going to help you by trying to fix the problem. We know that the microphones in the majority of devices such as cel-phones, PC microphones, and headsets are what is known as "Capacitive Electret Microphones." This style of the microphone is popular because thanks to the miracles of semiconductors you can make these things incredibly tiny, unlike the old days of condenser microphones.
Before even cracking open that part of our headset we took some quick measurements of the microphone part and determined that it should fit a 6mm by 5mm capacitive electret microphone. Ho-Boy were we wrong about but. But we'll get to the sizing issue in a moment.
| Specification. | Data |
|---|---|
| Product Name: | Electret Microphone. |
| Diameter | 6mm / 0.23" |
| Standard Working Voltage | 3Vdc |
| Sensitivity | 48DB to 66DB |
| Current Consumption | 0.5mA (Maximum) |
| Thickness | 5mm / 0.19" |
| Directivity | Unidirectional |
| Color | Silver Tone,Black |
| Weight | 1.2g |
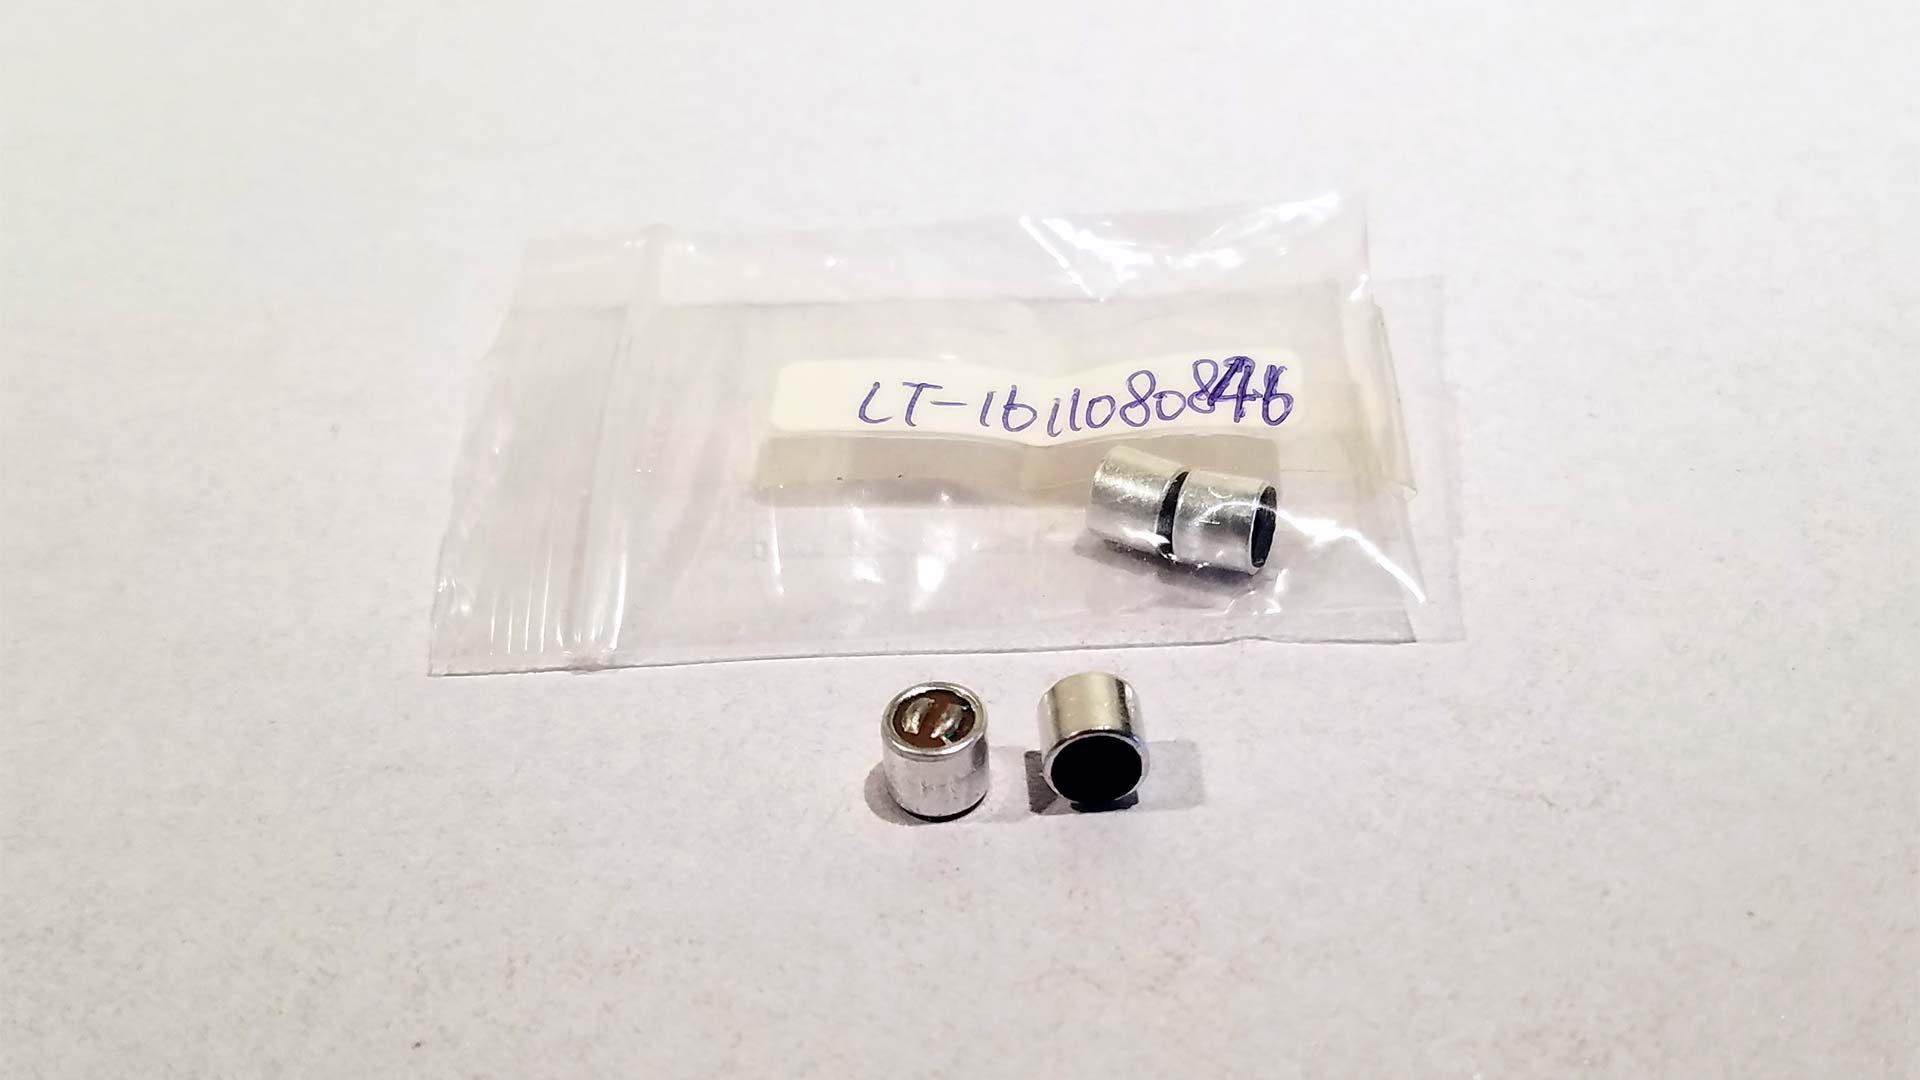
According to the eBay auction, these are 6mm x 5mm Capacitive Electret Microphone Pickup 48-66DB Sensitivity with the bag having several LT-1611080846 and the manufacturer of HCY engraved on the sides of each of these microphones. This makes it a little difficult to believe what China has given us considering there's no paperwork for the model of the microphone given. Or even any tests on how well it handles frequency and overmodulation. The good news is at $1.80 (USD) for four of them we couldn't go wrong! Or could we? Could we have bought something that sounds WORSE than what we already have?
 Soldering the cabling on was a breeze and we were easily able to determine which is ground since the PCB traces on the microphone go off to the base. Since Capacitive Electric microphones have their internal components used for communication there's no need to add a complicated pre-filter circuit. Instead, you simply solder the right connectors and plug it into the PC, and off we go!.
Disassembly of the microphone.
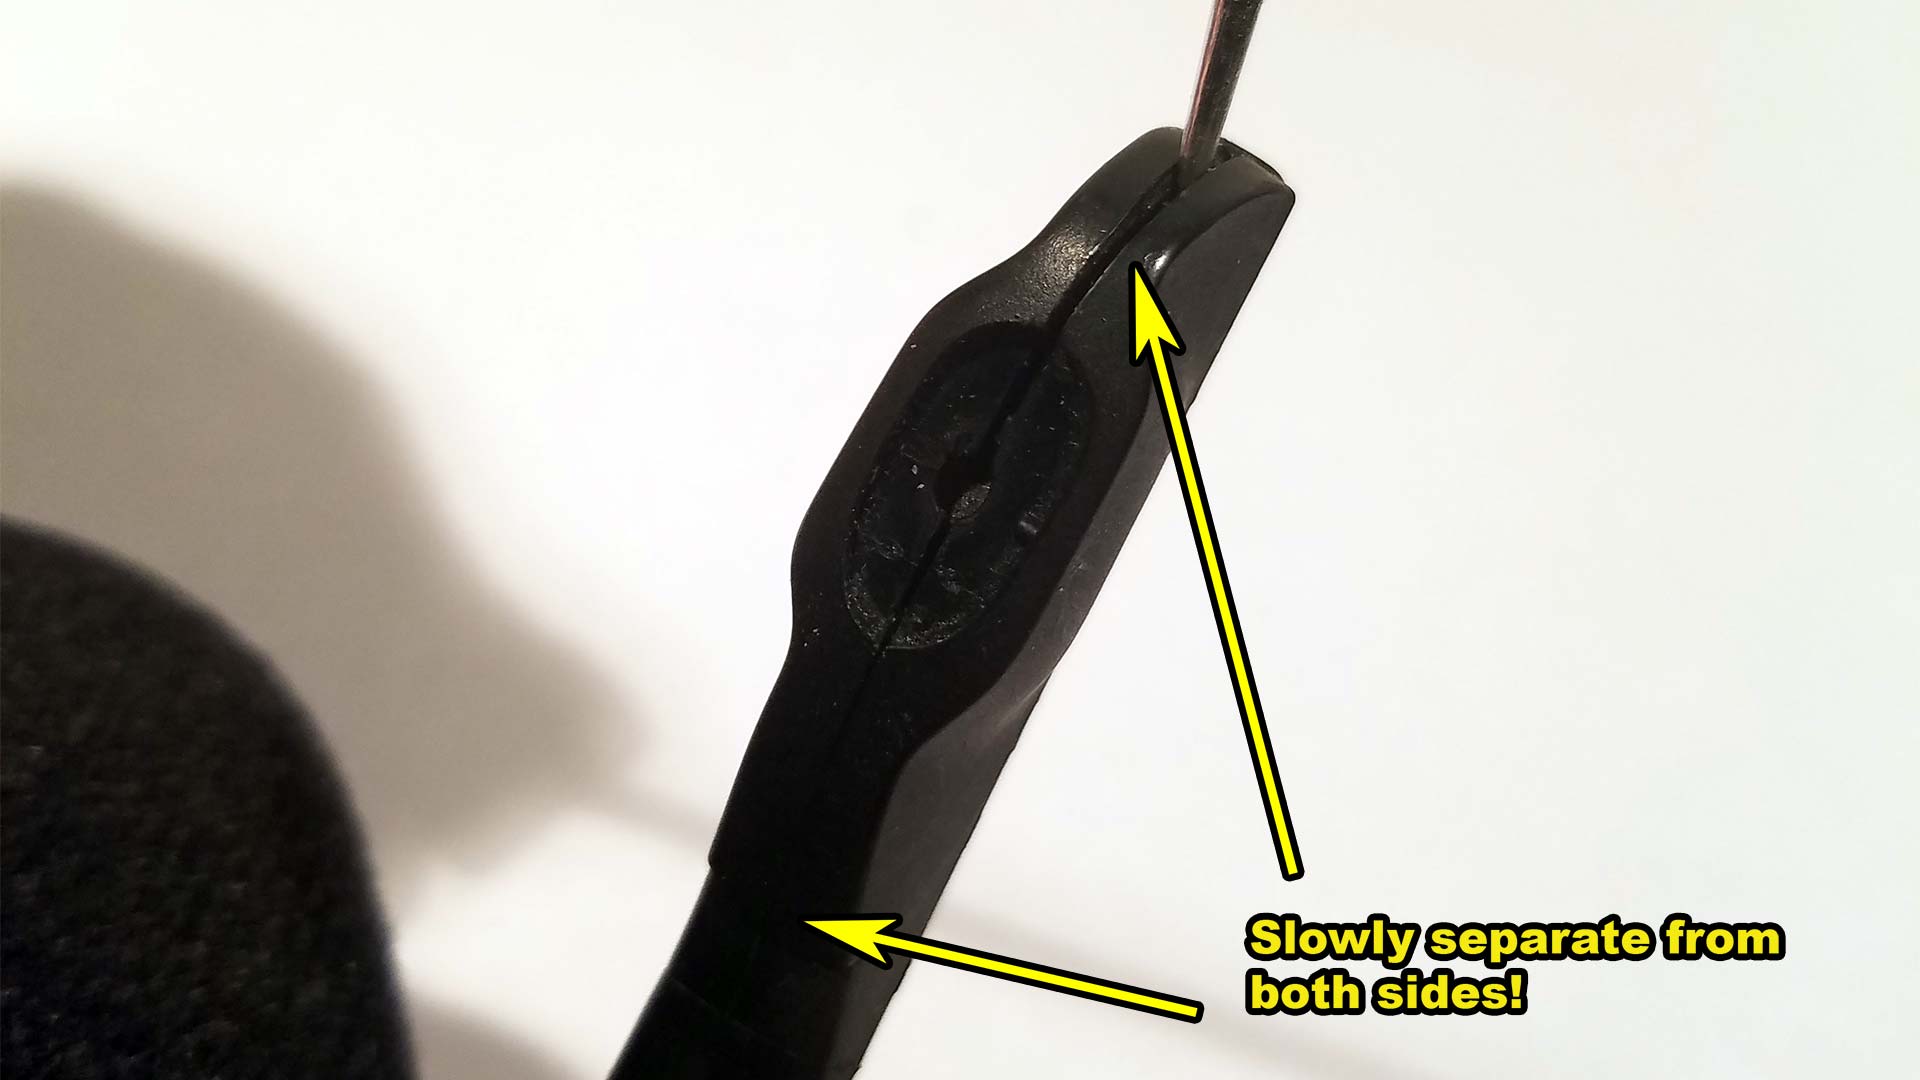 The plastic on the Corsair void is a lot like a clamshell. There are two posts that thread into the main plastics at the bottom. So to get access to the speaker inside we're going to have to pry the clam-shell apart. Initially, I did this with a 0.11-inch metal shim and pried on one side of the clamshell. This was a bad mistake. So our advice to people doing this repair slowly works one side apart. then work the other side apart. Take your time doing this or else-
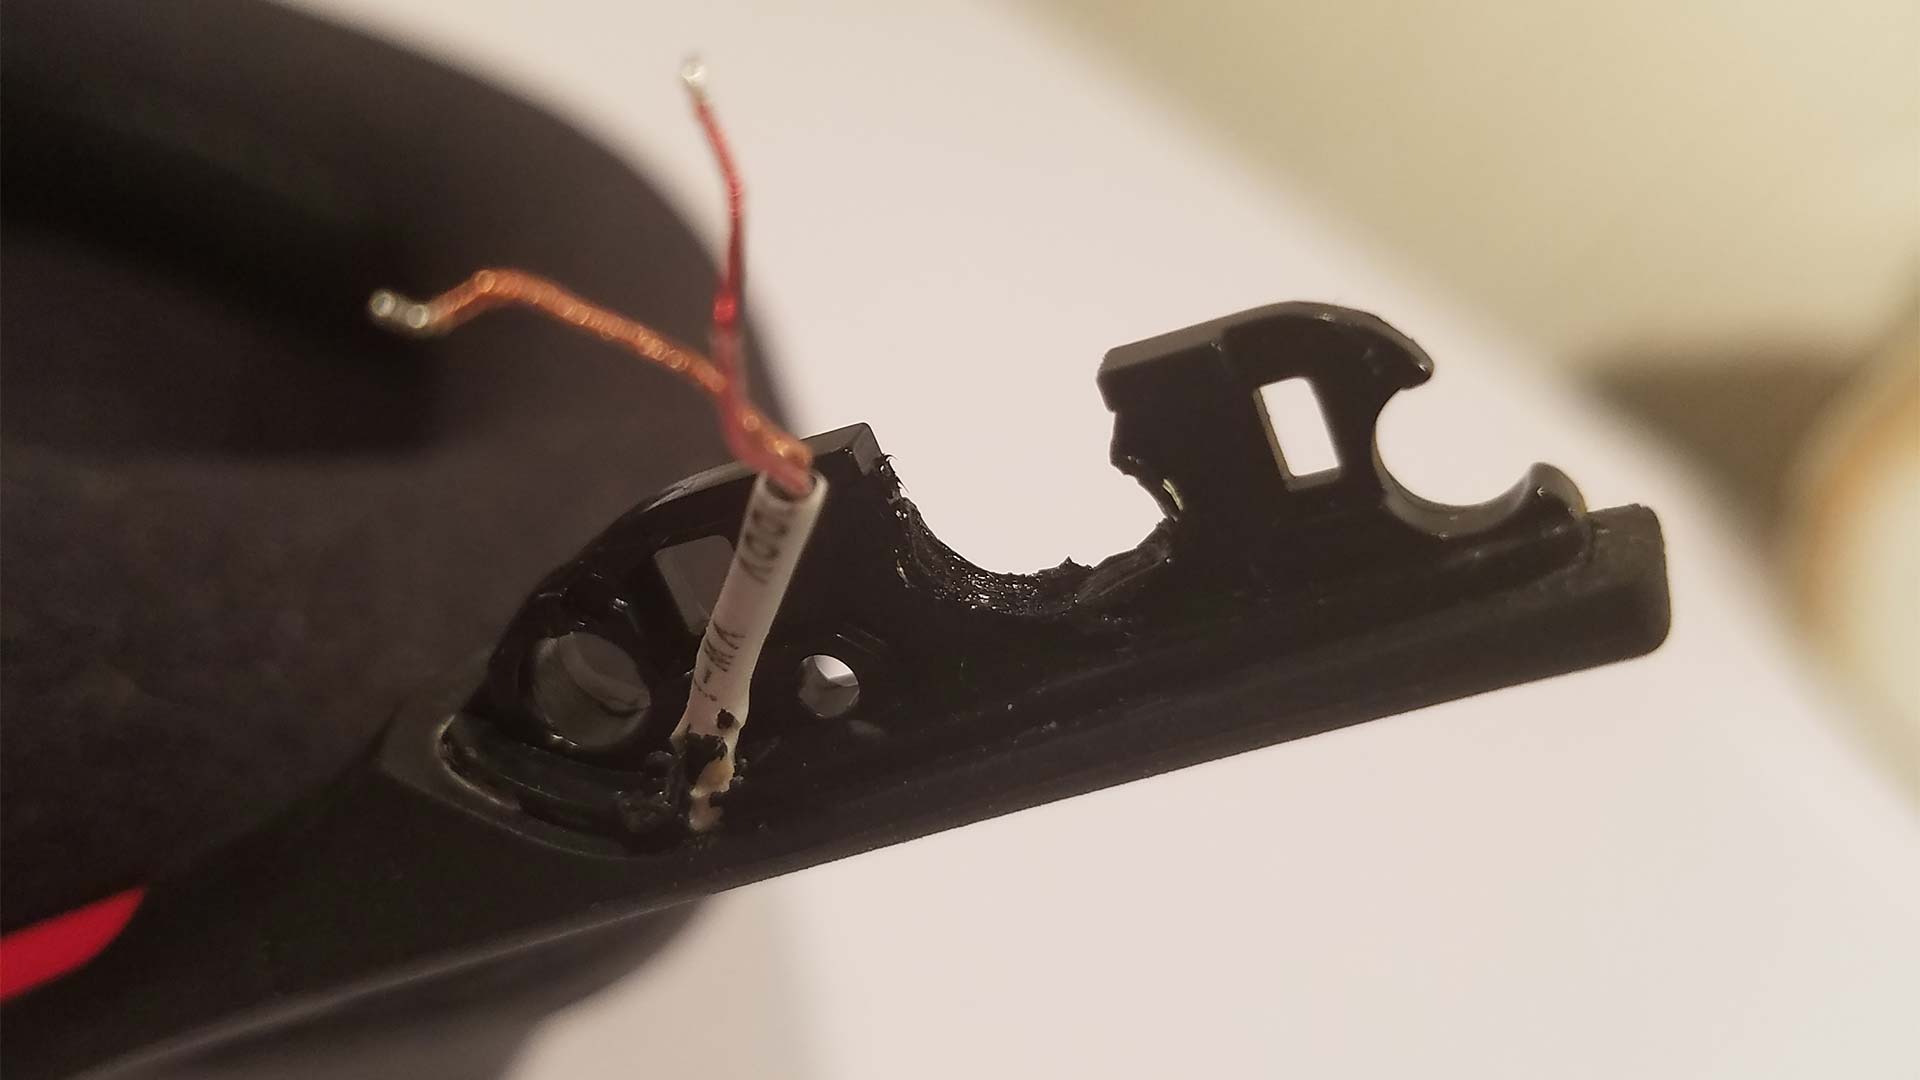
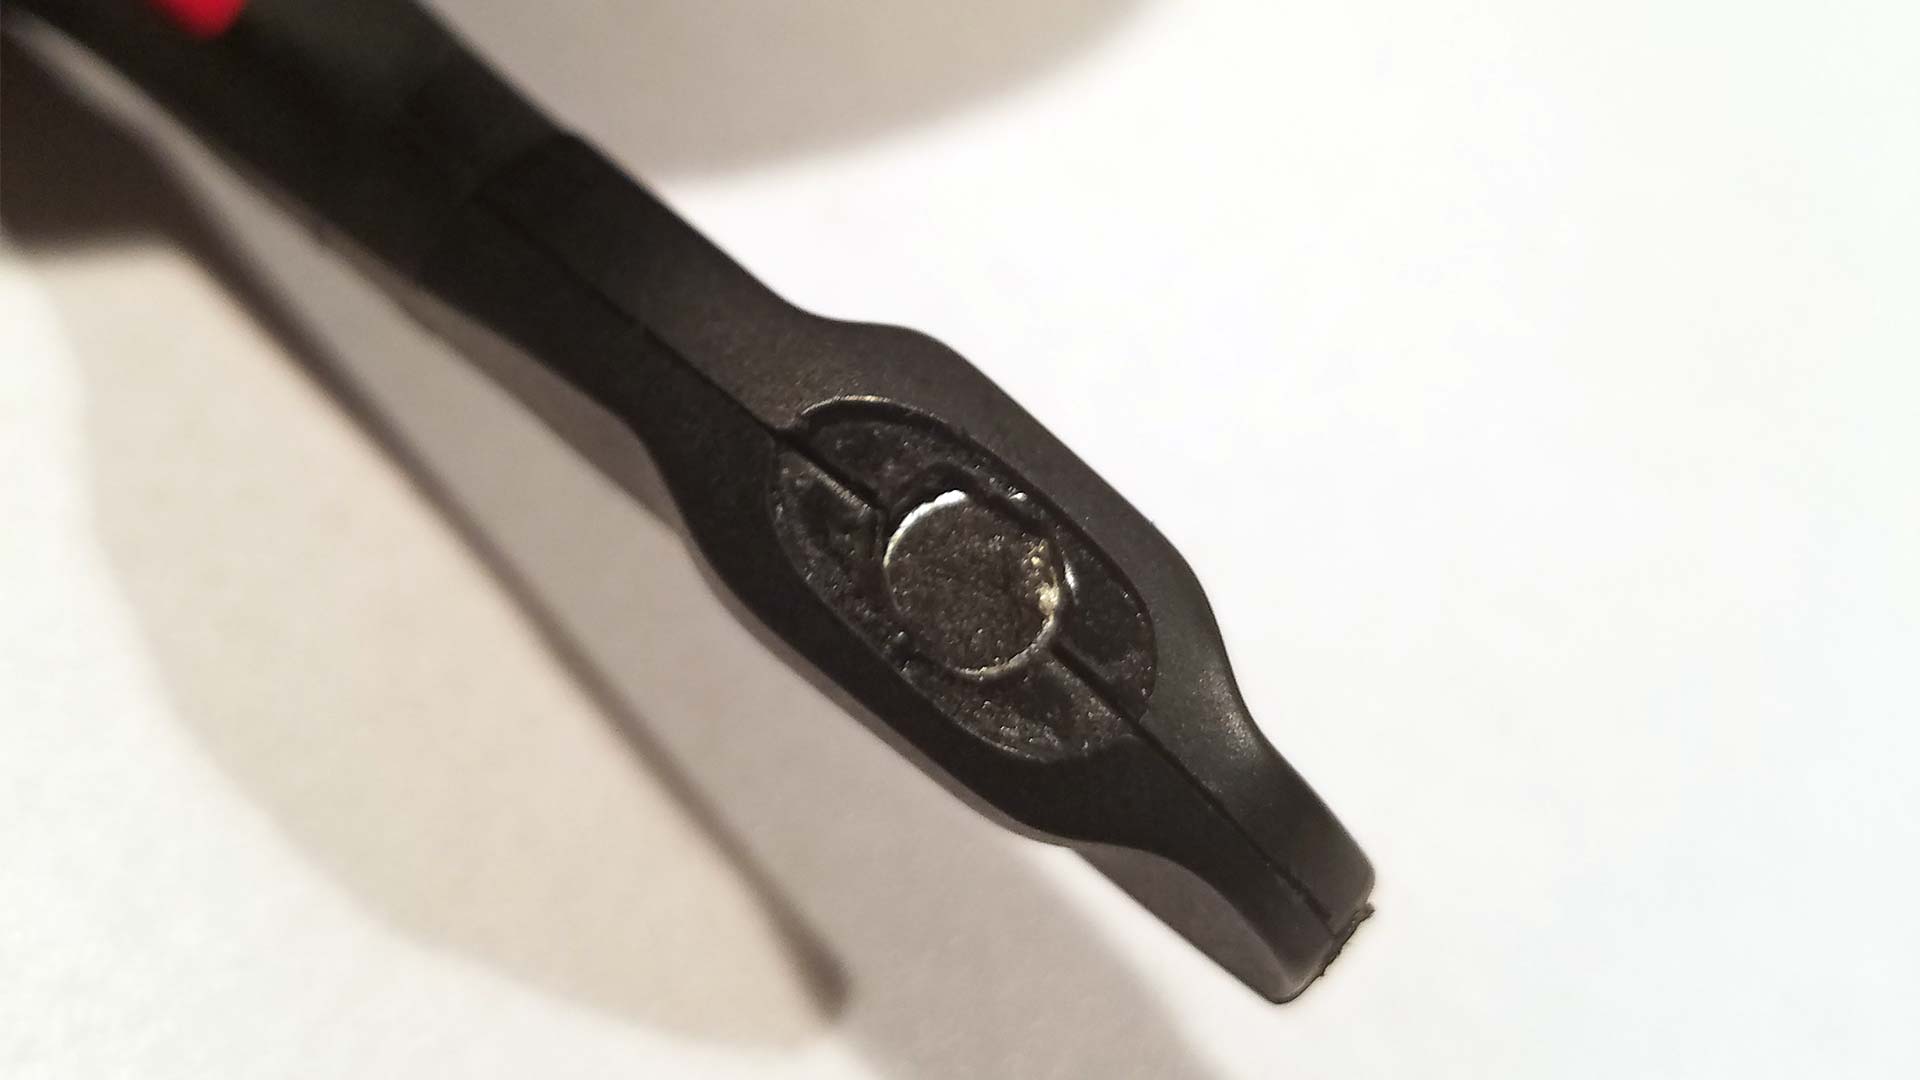
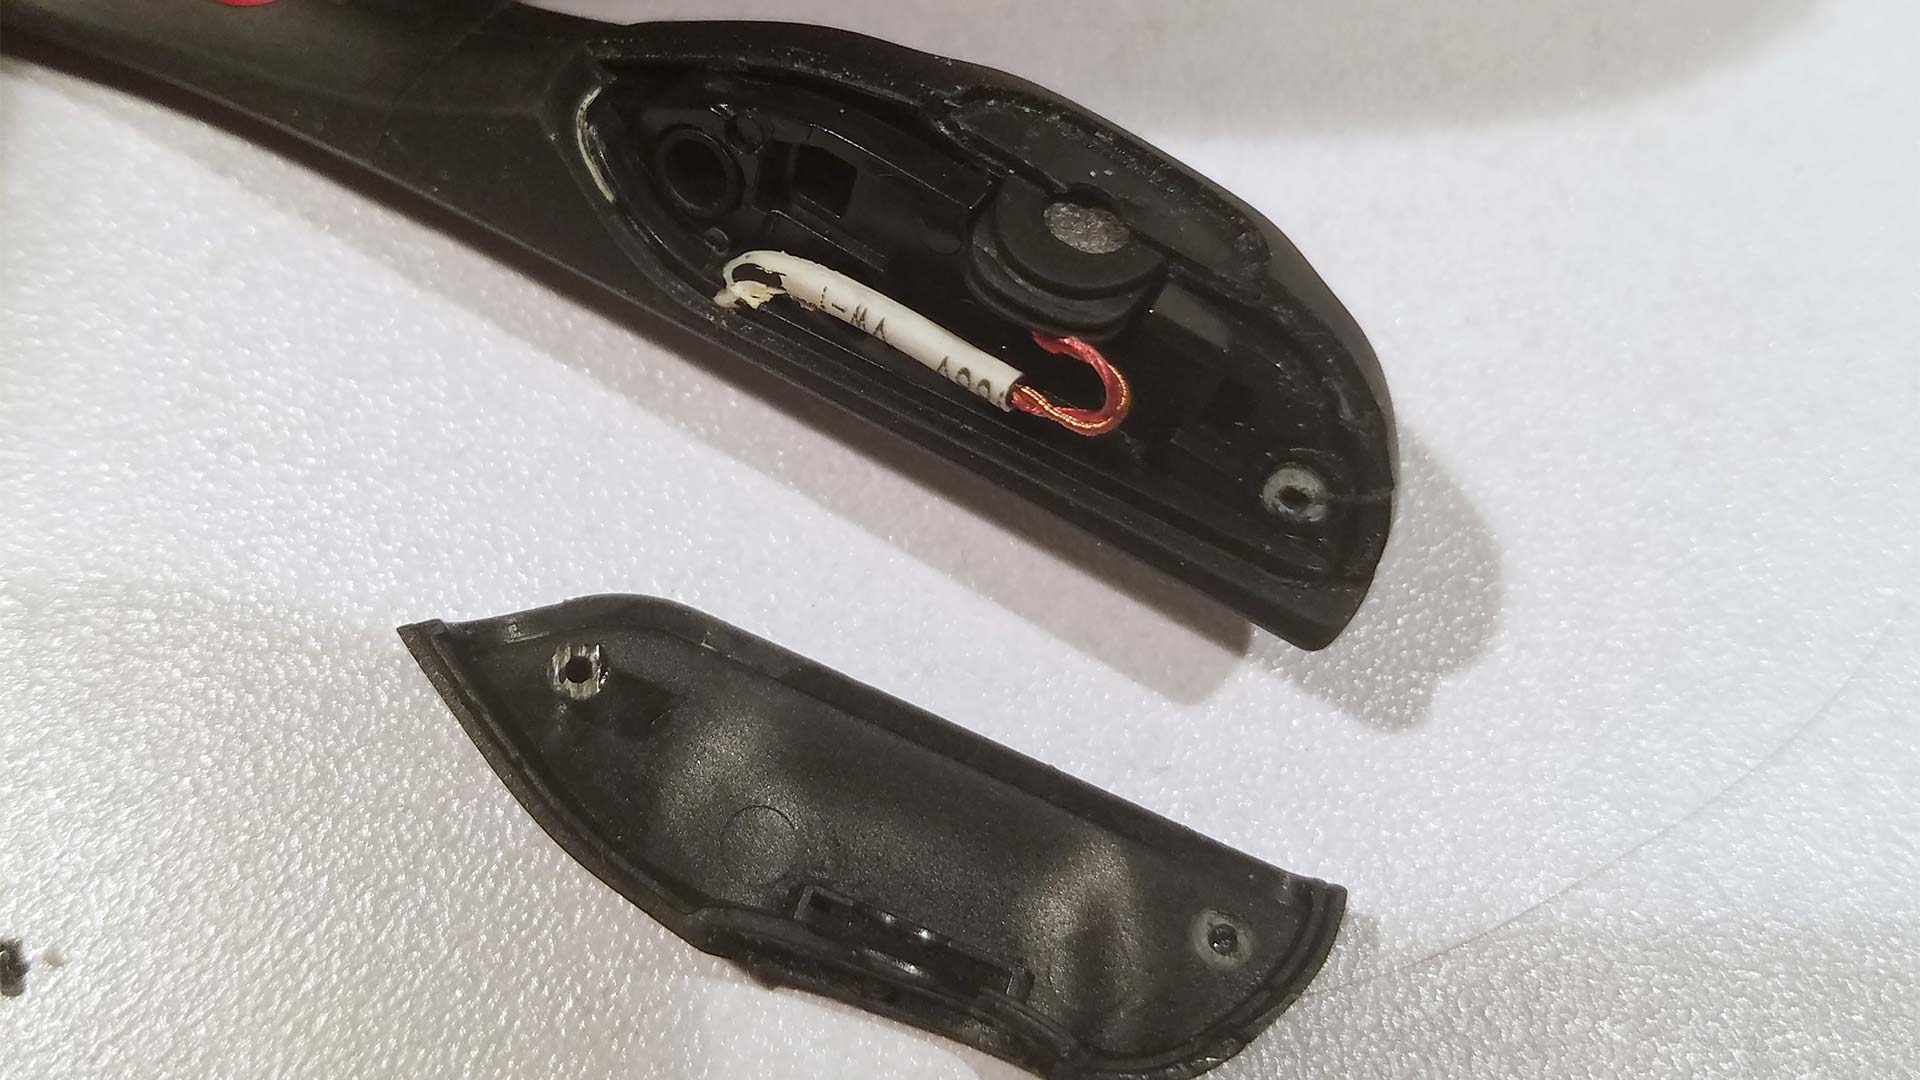 You will end up breaking the tabs like what is pictured above. We pried too hard on the back of the headset which freed the posts but snaped the ones in front. now, this isn't the end of the world as we could extract that post after and glue it down. But it's good that we break it so you don't have to!
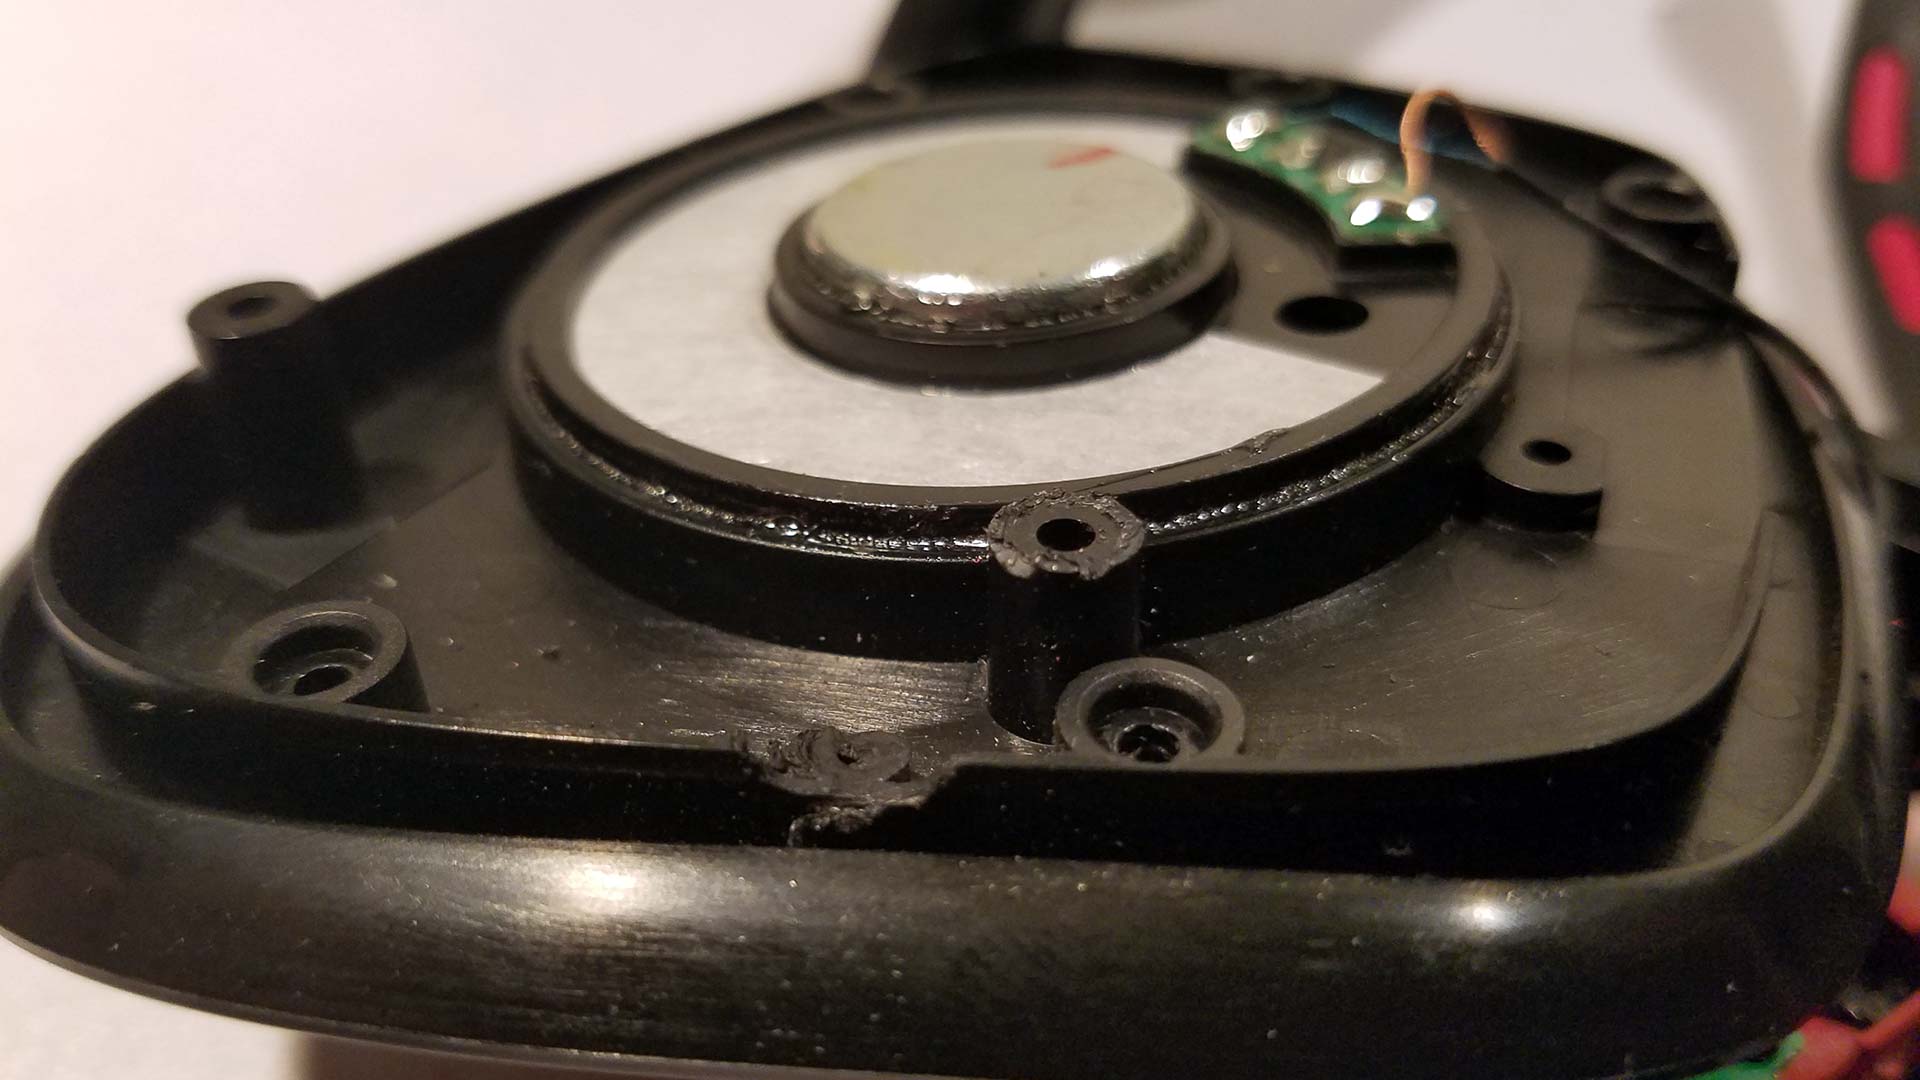
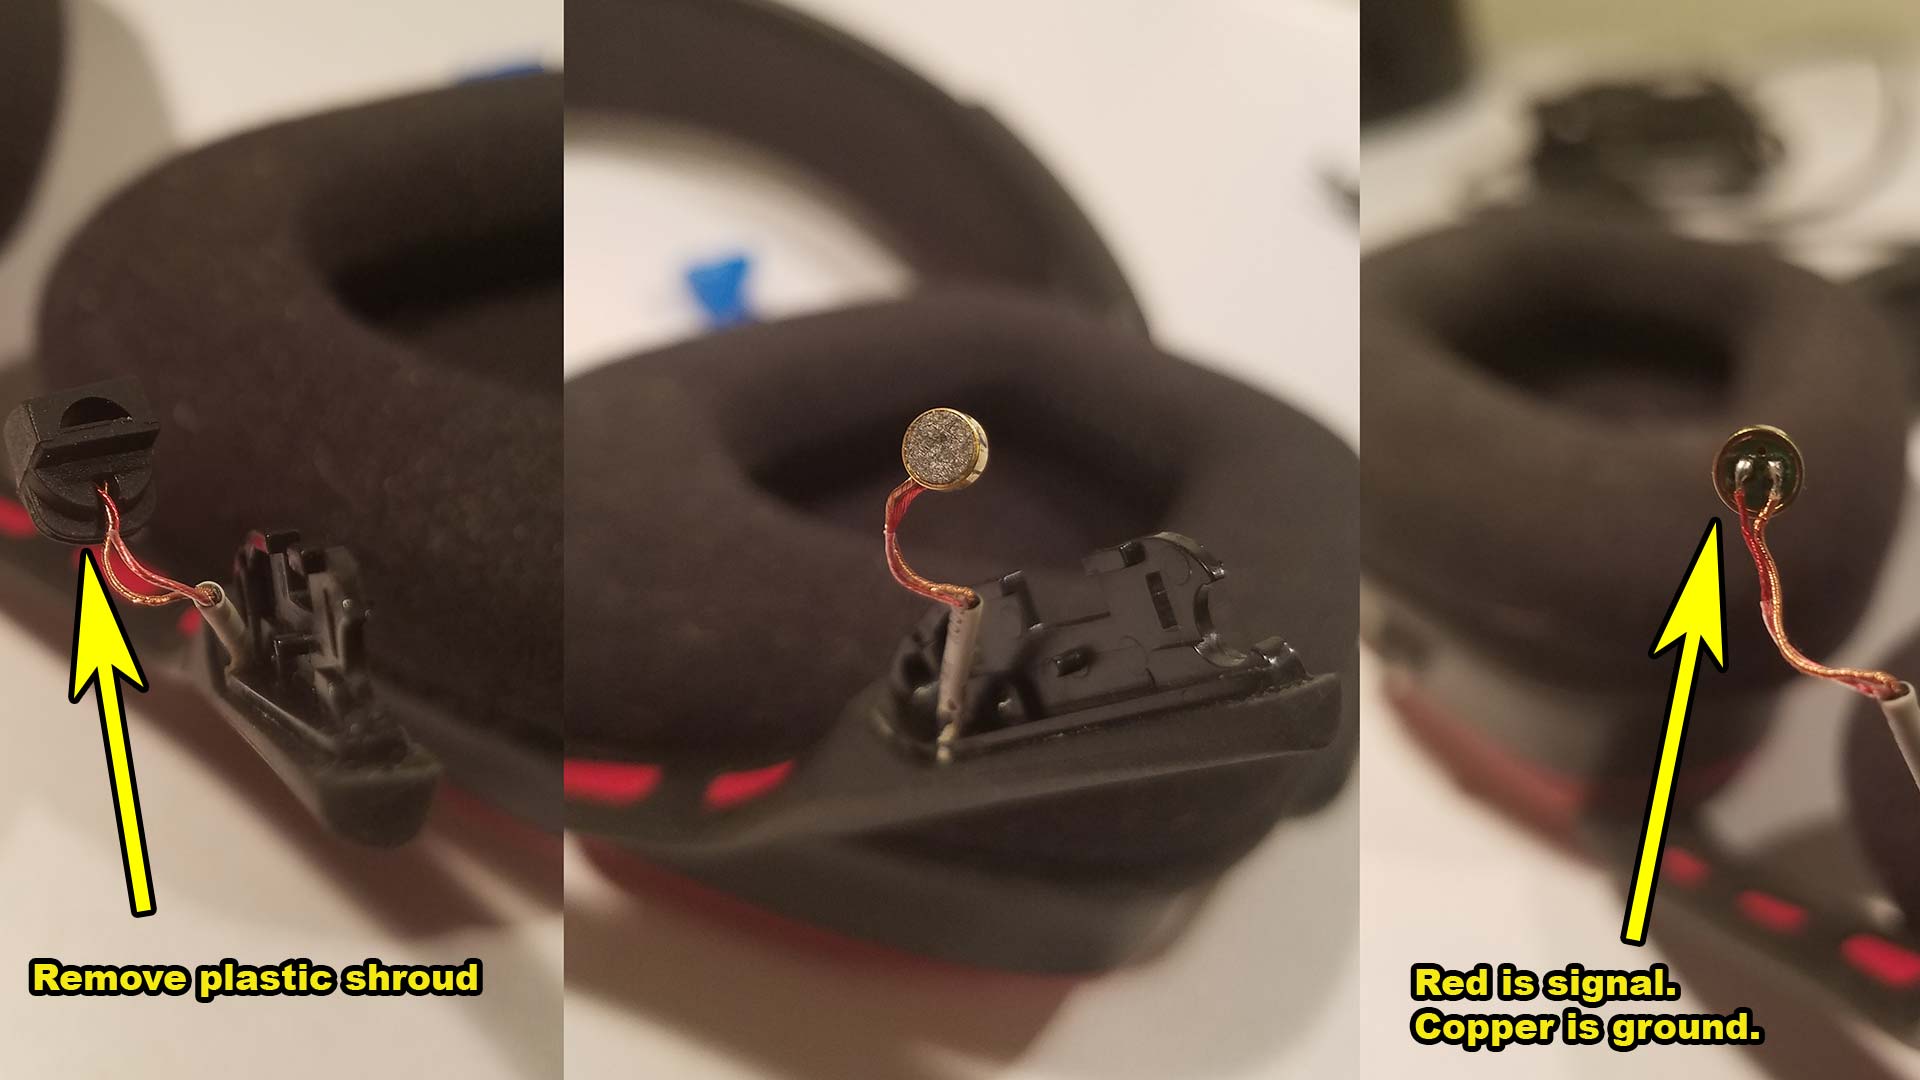 Once the clam-shell is separated away from the frame we can then pop the microphone out from its plastic housing. When you first get it you'll see that the microphone is encased in a rubber-like material to prevent shock. Now there's no way to get the microphone out of this housing. The only choice for us at this stage is simply clipping the rubber housing away to expose our electret microphone. You can use your multimeter set to continuity to verify this but in our headset we had red being the signal of the speaker and copper being the ground of the speaker. If you are getting cracking in the microphone when you move it around. Now would be a good time to replace the cabling harness by threading a new set of wires. Since ours is good and we want to be super-nice about it we simply used our soldering iron to tap against this microphone to desolder it. The microphone fell out very easily!
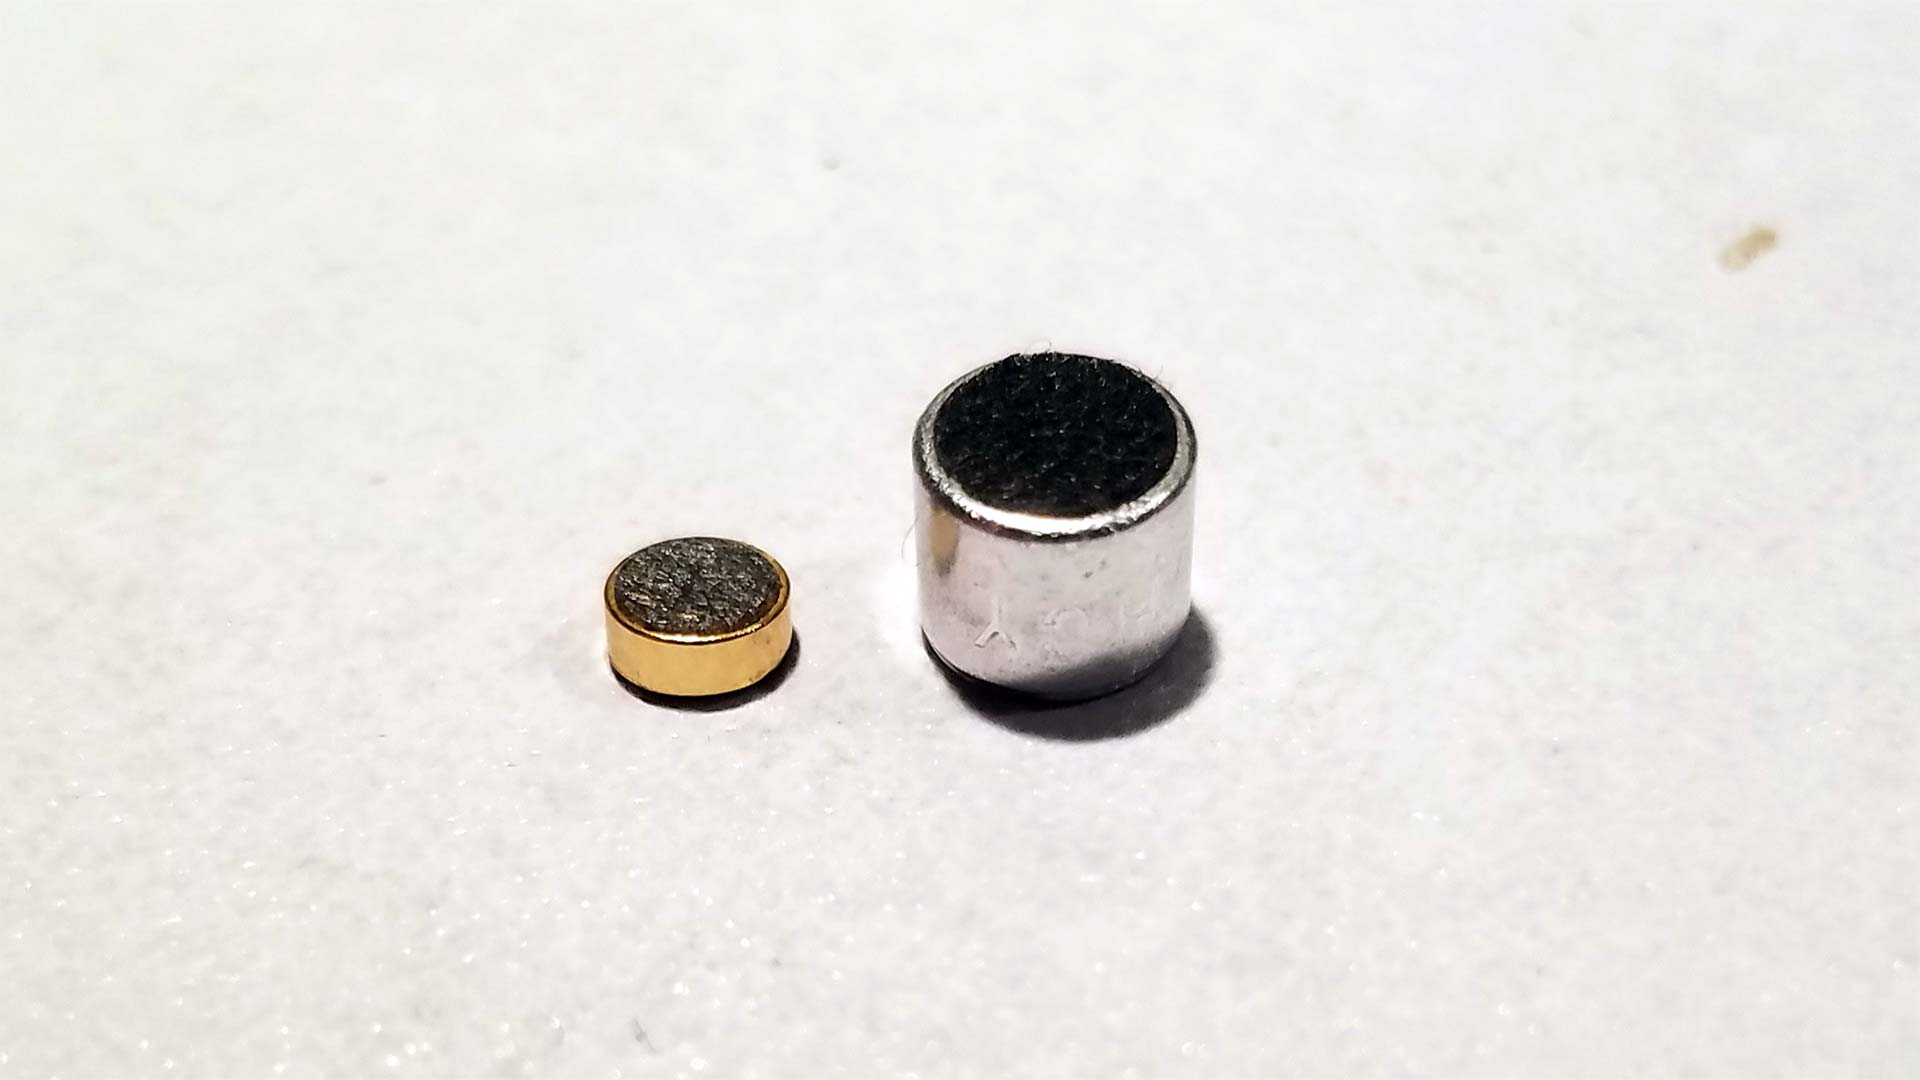 When we do a side-by-side comparison between the two microphones. The OEM Corsair Void microphone on the right and the one we got from eBay on the left. Ours is massive!! Initially, we were worried about this until we took a good look at the casing and realized that very much like the speaker housing of the Corsair Void that the Microphone housing was also very roomy in size. So much so that a 5mm difference in diameter meant nothing as adding the rubber onto the 3mm microphone made it 5mm.
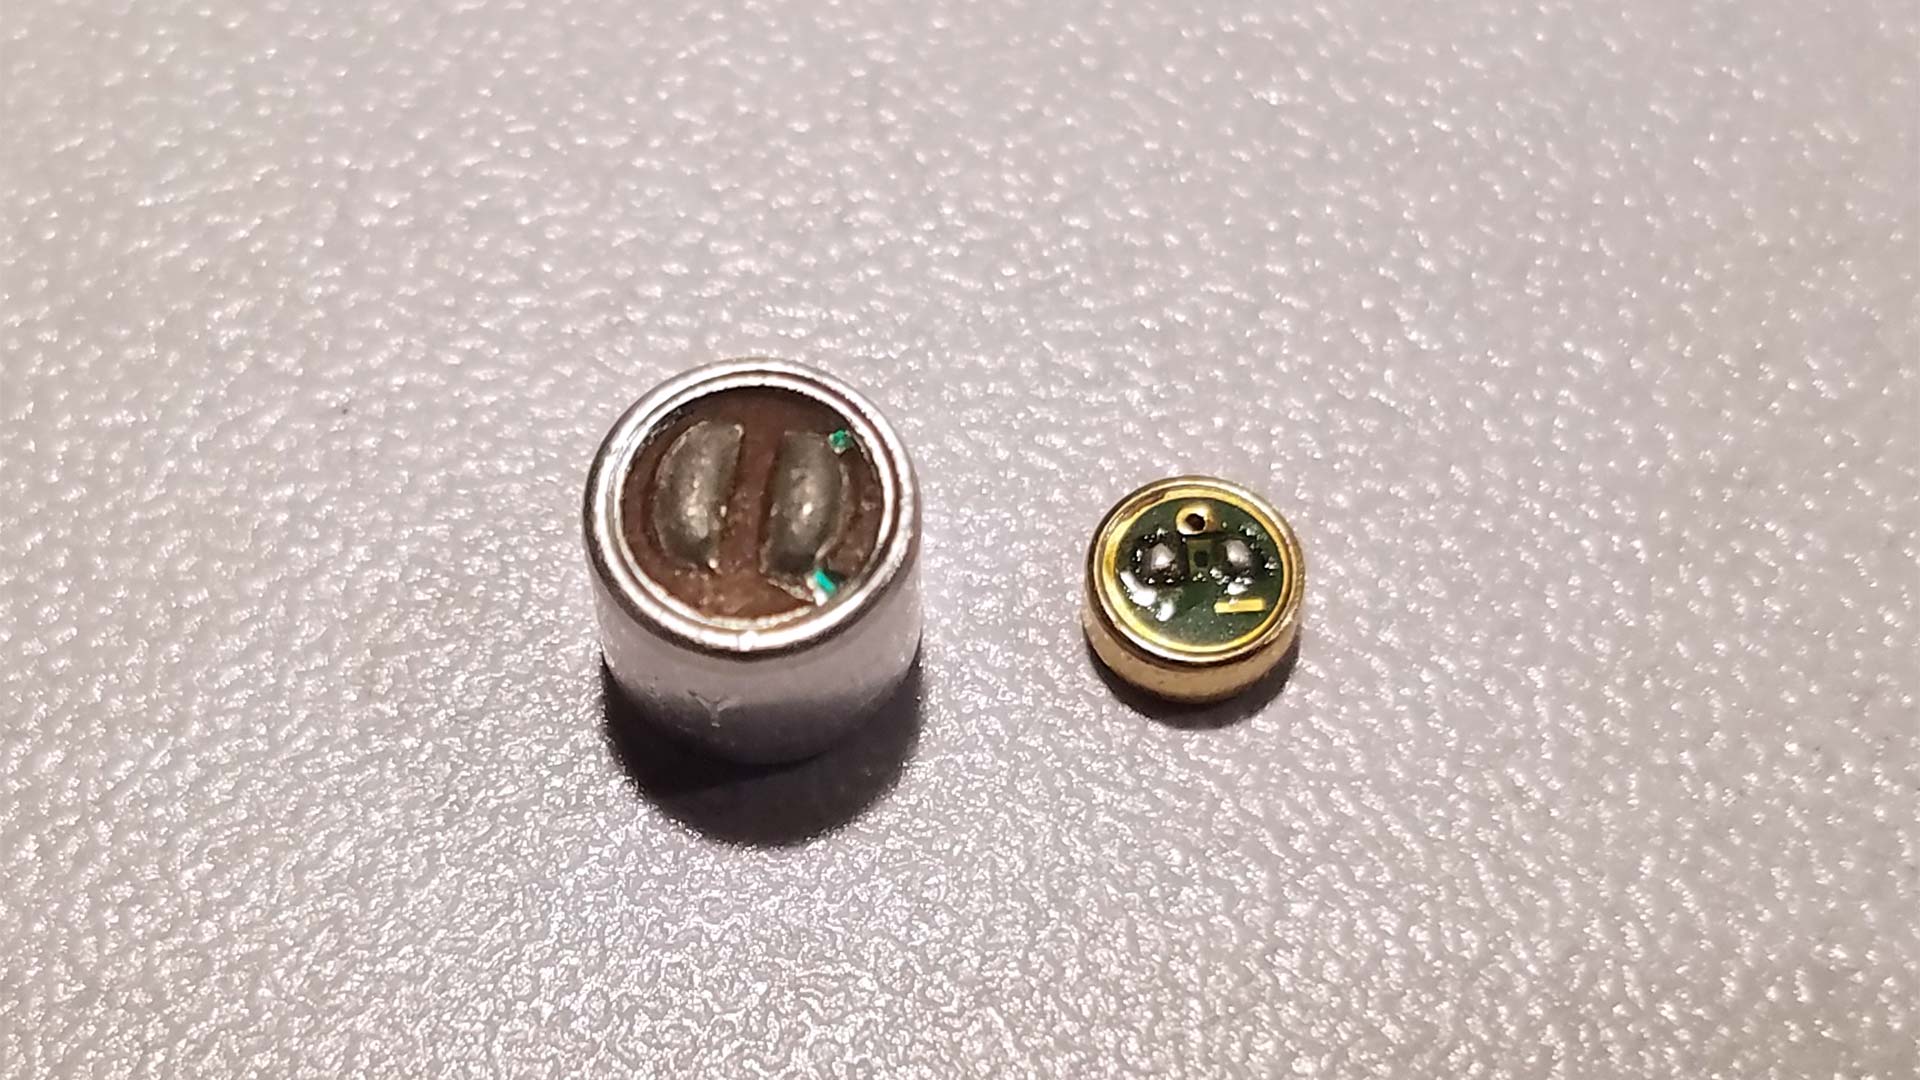 Here's also the backside of our eBay microphone on the left and the Corsair OEM microphone on the right. We wanted to show you a good picture of both without any of the wirings added. The Corsair has marked a "-" on it showing ground. Where our eBay China HCY microphone simply had leads going off to the edge of the microphone indicating ground.
 Next, we're going to make room for our eBay China HCY microphone as its height is 6mm which is almost double what the old microphone is with its plastic housing. We used our soldering iron to melt away the plastics a little but you can use a file if you so choose. You'll note that there's still plenty of plastic on the frame allowing us to fit the microphone into place and even giving us room to space to which we used double-sided VHB tape to keep the microphone in place on the frame to put the clamshell covering back.
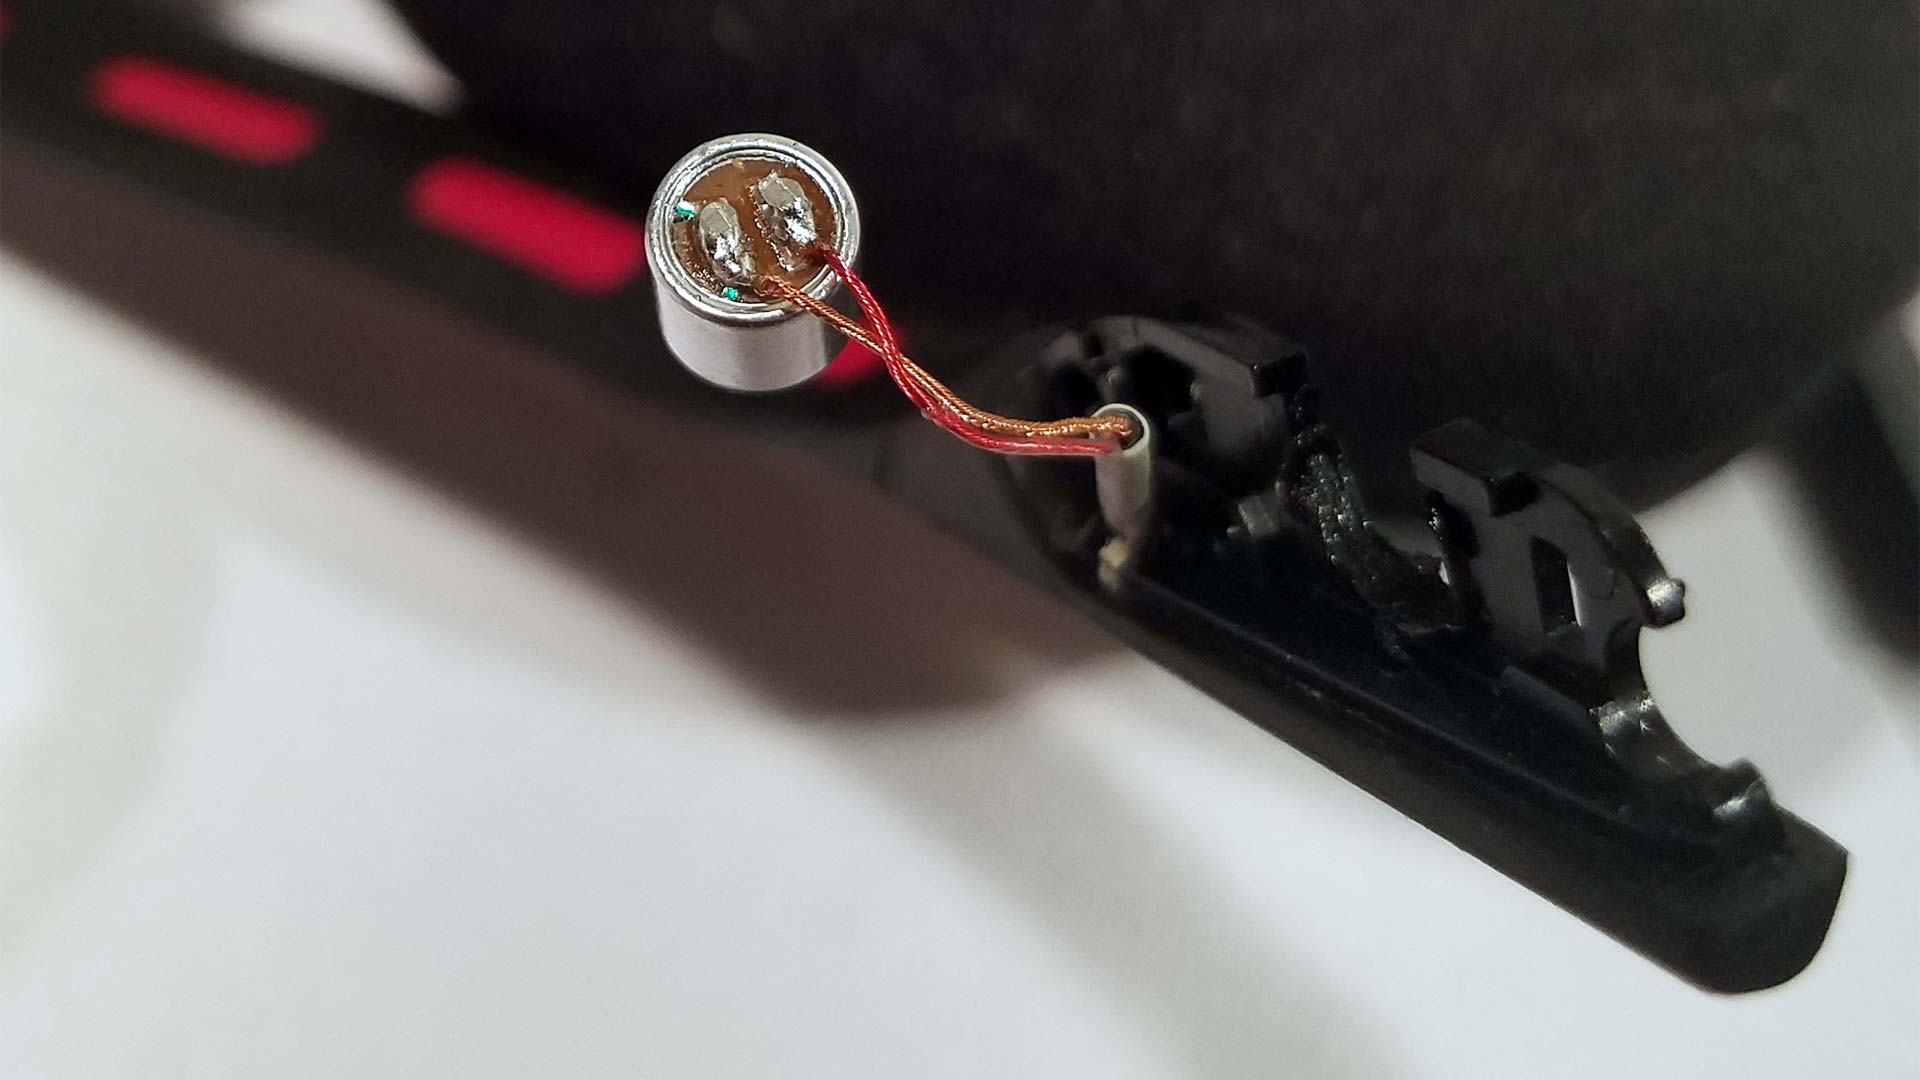 Finally, we solder the new eBay China HCY microphone using the existing wiring housing. we took some extra care to clip away any excess solder which could get in our way during re-assembly.
 Much to our surprise and after stripping away some of the internal plastics on the clamshells the microphone fits inside perfectly. We decided that we wanted zero obstructions coming between our mouth-hole and the microphone so we widened that pin-hole enough. You may wish to slowly file this outward as when we did it we were in a bit of a rush and over-exposed some of the sidewall of the microphone. However, it isn't a big deal as it sits inside perfectly.
The test results.
Recording device: Audigy Rx 5 PCI-e sound card.
Microphone: HCY LT-1611080846 6mm x 5mm Capacitive Electret Microphone from china.
Download or play in your own external player: Opus and OGG audio files are available to download. WAV audio file is available as well.
Holy fuck. These sound amazing! They are almost on par with my condenser microphones except when you hear "C"s and "S"s they static out a little bit. But it's generations better than the microphone built into the corsair headset. The audio is a little on the bass side by who the hell cares! Let's get this bad boy into my corsair headset! The sound didn't change at all when placing it in the corsair plastics. So to this end, we consider it a giant mission success on the microphone front. We installed a bigger superior microphone into our headset that will not piss off my friends on discord!
It's a win all around except for Corsair which decided they were going to cheap out on EVERYTHING!
Final thoughts:
All of the repairs were successful we're personally happy with what was accomplished. But this is the point where I'm going to illustrate a few things about what Corsair has done here.
 Corsair on all of their Void series goes out of their way to illustrate to us that they are a "Surround Sound" headset. The picture above is probably the most honest box I've seen them do which isn't saying a whole lot. It describes the Void as :
Hybrid stereo gaming headset with Dolby 7.1 USB adapter. - Corsair box as advertised above.
Now Corsair?
 How does this USB dongle supposed to achieve 7.1 surround sound if you don't mind me asking? Because we're not seeing it!
 You can't just throw around "7.1 Surround" and not show us that an audio interface or adapter can indeed control 7 independently driven mid-range speakers and a sub-woofer. Even if the audio chip inside can certifiably handle 7.1 surrounds on its white paper specs you can't turn around and cripple the chip while saying
Yup! It does 7.1 Surround! Buy it you stupid gamer!
 50mm headphone speaker driver inside the Corsair headsets.
The reason why people want surround sound is because of a thing called "Dynamic Range." Where each speaker can handle mid's, high's, and low's independently giving a richer sound instead of all audio being compressed into 2-channels where the speaker goes through a balancing act as to what to accent. Corsair used wordplay to effectively fool the gaming community into thinking they're getting a product that truly does surround sound while legally protecting their ass from fraud by starting their sentence by saying "Hybrid Headset." Using the term incredibly loose in the meaning that "Yes, it's a hybrid headset. Because it has a microphone built-in"
This headset made us far angrier at Corsair than our mouse failing after a year. Because they are playing the ugly game the third-party China knock-off companies are doing by saying you are official but when we start taking it apart it turns out to be a giant lie filled with low-performing parts that break easily. When it comes to headsets. Fuck Razer, fuck Corsair, keep the money in your pocket, and spend your hard-earned money on a knock-off product from Alibaba like a RedDragon headset as you will probably achieve the same effect as you would buying any of the leading brand name companies' headphones.
Or better yet! Buy a headphone from a respectable audio company and get a condenser microphone. All of your friends on discord will love you for your audio fidelity and you will have a better experience with quality headphones than buying ones from a company that flat-out lies to you. Good luck repairing your headphones. Keep them out of the landfills everyone.
Until next time, that's all server has to say.
+++END OF LINE.
looking for idea to change the wireless chip inside the Void and replace it with normal bluetooth headphone chip and see if that gonna be ok to transfer the audio??