
Wico Joysticks are now up for repair.
We're going to repair a Wico Joystick which is almost vintage at this level. In the early days of gaming ranging from the 4-bit consoles of the Atari 2600 all the way up to the 16-bit consoles of the Amiga Computer, the DB-9 Joystick was the most universal gaming device you could own. This is a quick entry showing how we are able to get these refurbished for another possible 10-15 years of service. Also, we're going to try not to suck at it as well. 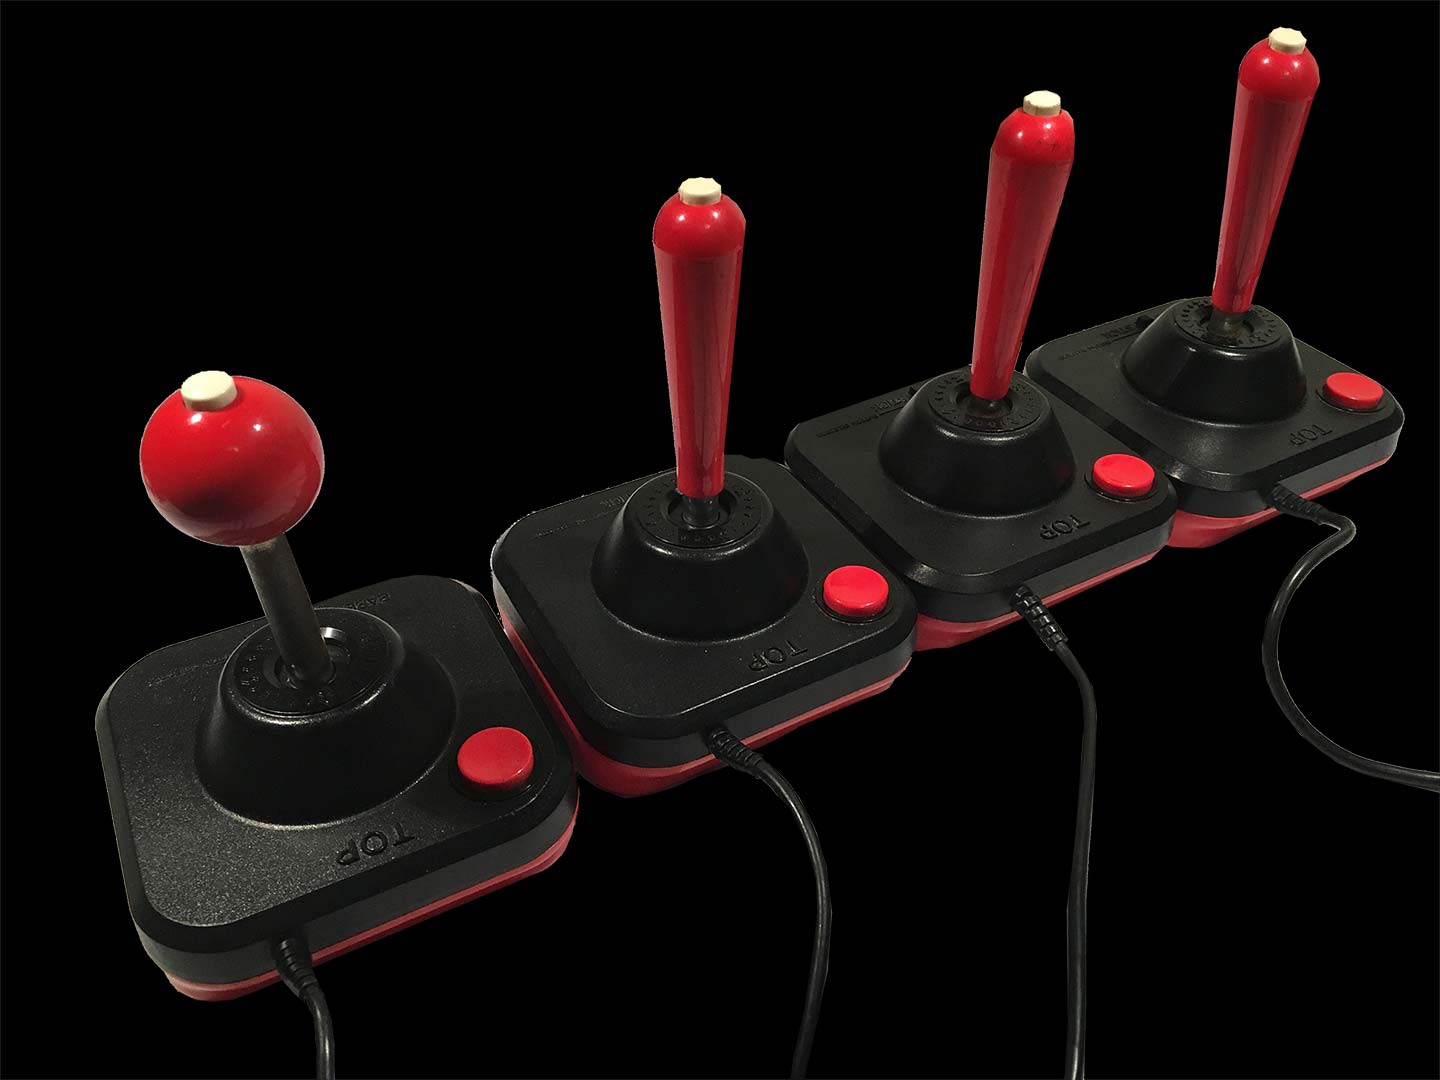
The candidates.
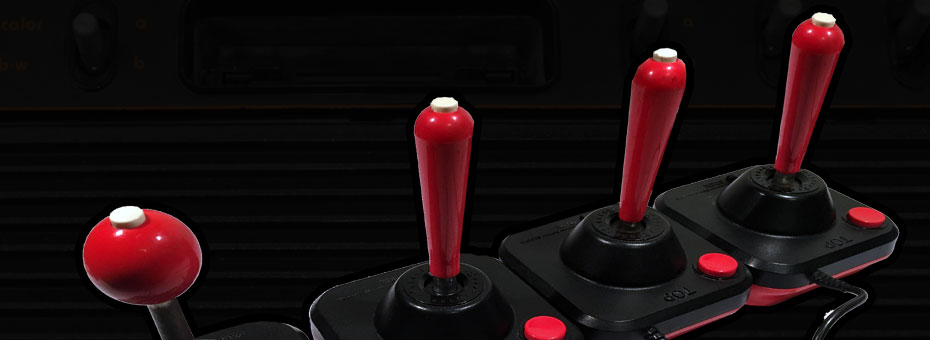
Our collection of older hardware has managed to hold onto a set of joysticks which are now considered vintage. To give you a little bit of background information about this brand of Joystick; These are Wico Command Control Joysticks. The first one in the picture on the far left is known as a "Ball-Top" Controller giving you the arcade feel for that arcades like Galaga and Pac-Man would give to a gamer. The other three are considered "Bat-Top" which in the area where we lived seemed to have been the most common controller to find. There is one that isn't pictured here which I never got which had a "Flight-Top" handle. When you purchased this joystick new you were given all three grips that you can interchange out for your preference of gaming.
Timeline of the Wico Joysticks.
The Wico joysticks above have varying manufacture dates from 1985 to 1988. But I have heard of these joysticks dating back as far as 1983. This falls into what is known as the "Golden Era" of video gaming where you have the Atari 2600 and Commodore 64 8-bit computer. These Joysticks also worked in computers such as the TI-99a, The Atari computer series, And later onwards into the 1990's third-generation gaming with the Amiga 16-bit computers. These joysticks were eventually faded out with the Sega Genesis which still used the traditional DB-9 connector but multiplexed the signals for the fire button in order to get three buttons (A,B,C) down a single wire. Third Generation gaming starting with the Nintendo entertainment system which also ushered in "gamepad" controllers to phase out the classic arcade joystick feel. 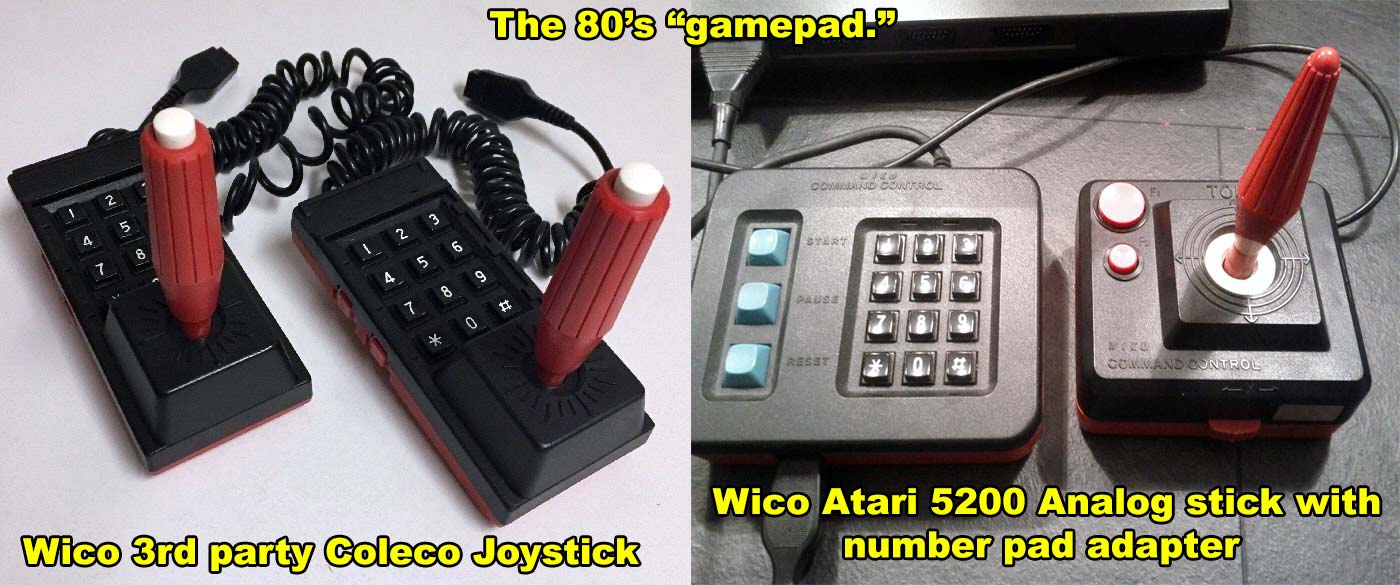
The golden era was also a confusing one at times!
It should be noted that the golden age of gaming also had game-pads. Sometimes considered second generation such as Intellivision by Mattel, or Coleco systems. But the style was unrefined leading many of them to be bulky. Hardware companies took a highly conservative stance by giving them a number pad system allowing games to adapt based on the original telephone. Some games used it well while others made you feel like you were war-dialing in order to get a good high score. 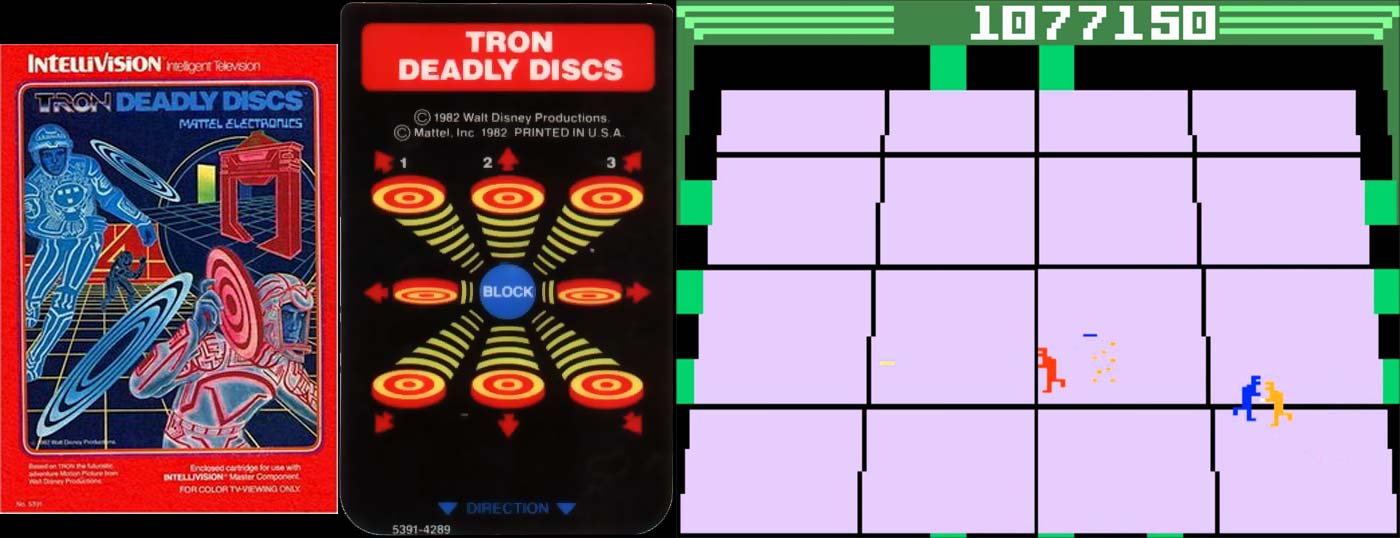 One game of note that the number pad system worked especially well was Intellevisions "Tron - Deadly Discs" allowing the number pad to act as the direction that you are shooting your disc towards while running at the same time. Among other options, this allowed bringing twin-stick action games to the home console systems. We know we're falling off track but it had to be mentioned just to illustrate that there is no such thing as a stupid idea. Just that it needed to be refined better.
Cost of the Wico Joystick.
These were highly sought after joysticks well past their production date because they were the most comfortable joystick to own and possibly the closest you could get before investing in cherry switches and building your own HAPP controller out of spare parts. Prices were around $45-55 (USD) for a new joystick and if you were lucky to find them $25-30 (USD) used. Because of their age, the price to acquire a new one via eBay is still around twenty to thirty dollars American. Building a legit arcade controller would've cost around $55-85 back then. Factoring in the cost in inflation and you could easily see why the average kid had one maybe two of these types of joysticks and that is it! We were incredibly lucky with two of them as we found them at Goodwill for two dollars American. So massive score on our behalf.
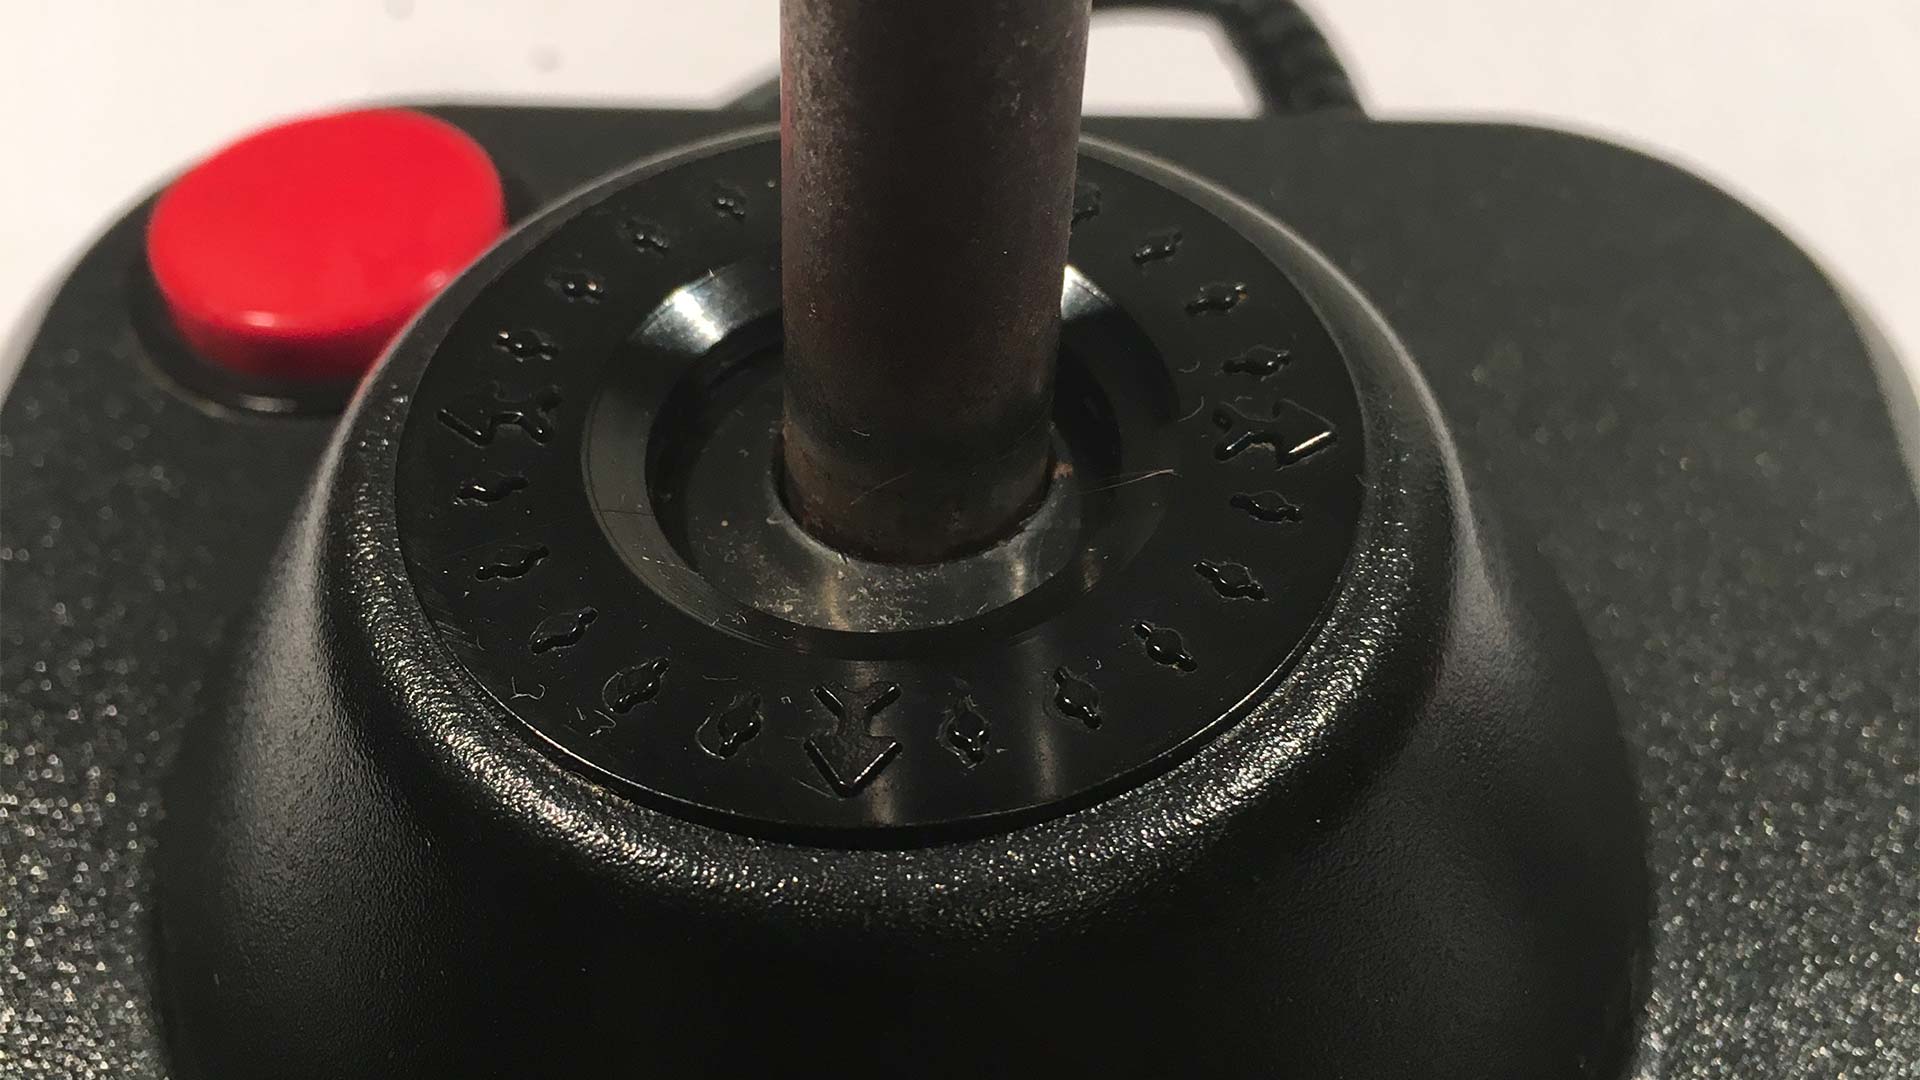
The problem of Wico Joysticks.
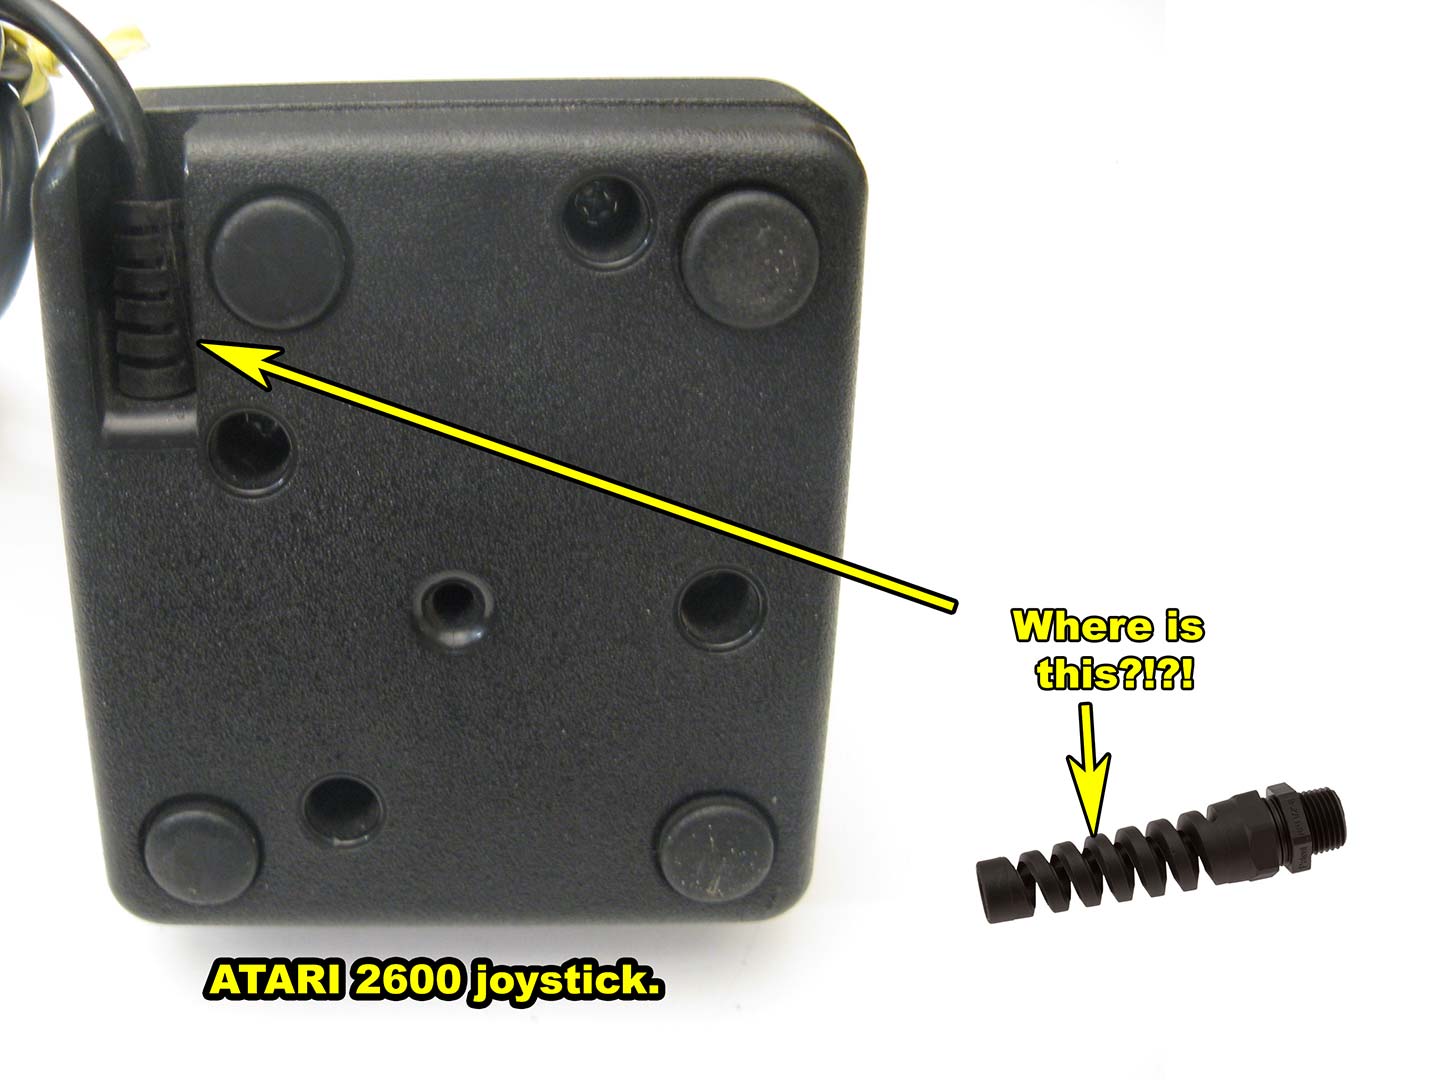
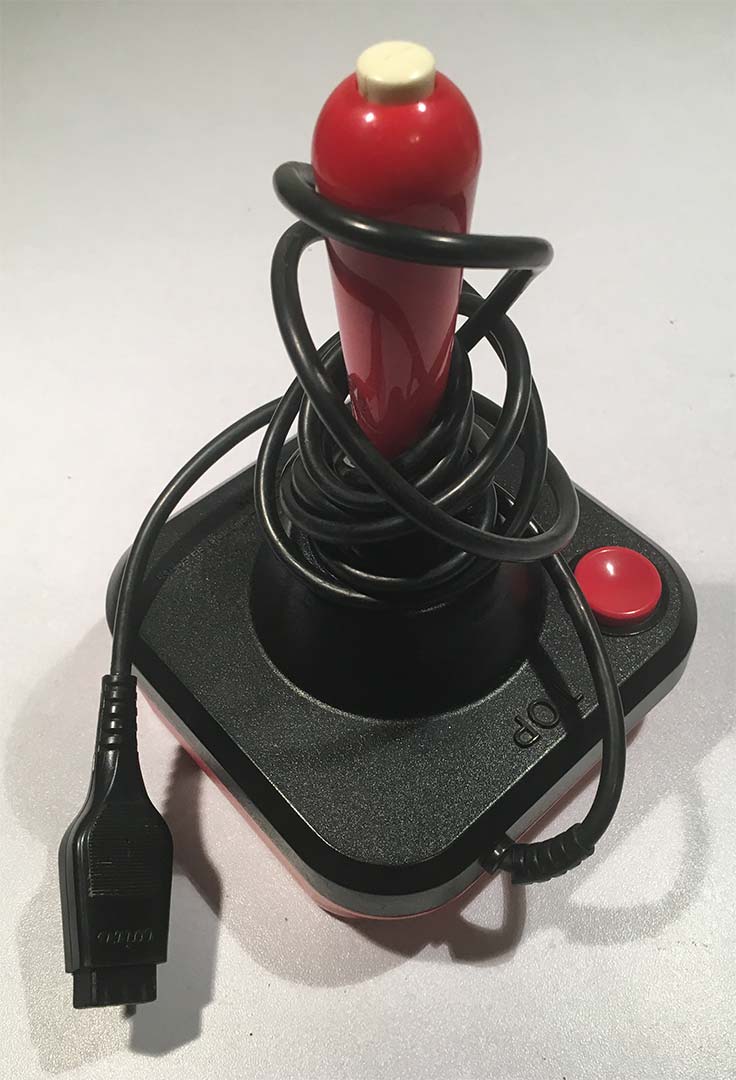 Do you remember as a child of being super careful with the cables so the copper doesn't crack inside? No? Well neither did we! It was very common for people to simply wrap the cable around the joystick for storage. The problem with this during the course of almost thirty years is the copper begins to stress and crack along the inside. This will result in direction pads being very static-like from the cold connection. Sometimes certain directions just don't work anymore. Also if you look closely at the picture above the boot around the joystick is cracking and giving way. If the boot is dislodged it starts to pull on the solder connections of the springs. This could lead to a major mess if the inner cables are ripped out.
Tools of the trade.
In order to repair this style of joystick we will need the following parts for things such as bad connection:
- 1 - Phillips #0 screwdriver - for removing the case screws.
- 1 - Flat-Head screwdriver - For removing the C-Clip inside.
- 1 - Soldering iron - Ideally, 35-40 watts but a 25 watt will be fine as you will be splicing and soldering wire onto contact pads.
- 1 - DB9 serial cable - This is ideal as serial cables usually have all 9 wires inside of its shielding.
- 1 - pliers for cutting and holding parts for soldering.
- 1 - solder and flux - You cannot recycle old solder.
- 1 - Multi-Meter - It can be cheap so long as it can measure continuity. Super important for those looking to re-wire your joysticks.
Optionally nice but not necessary:
- 1 - Wire strippers. Because you're going to be playing with an at least 9 wires right away.
- 1 - Cable boots - Otherwise known as "strain relief cords" - This makes the job look really professional.
- 1 - Rotary tool - This makes certain things like buffing steel and also sanding ABS plastic to feed a larger strain relief cord in way easier then using a file.
Disassembly of the Wico Joystick.
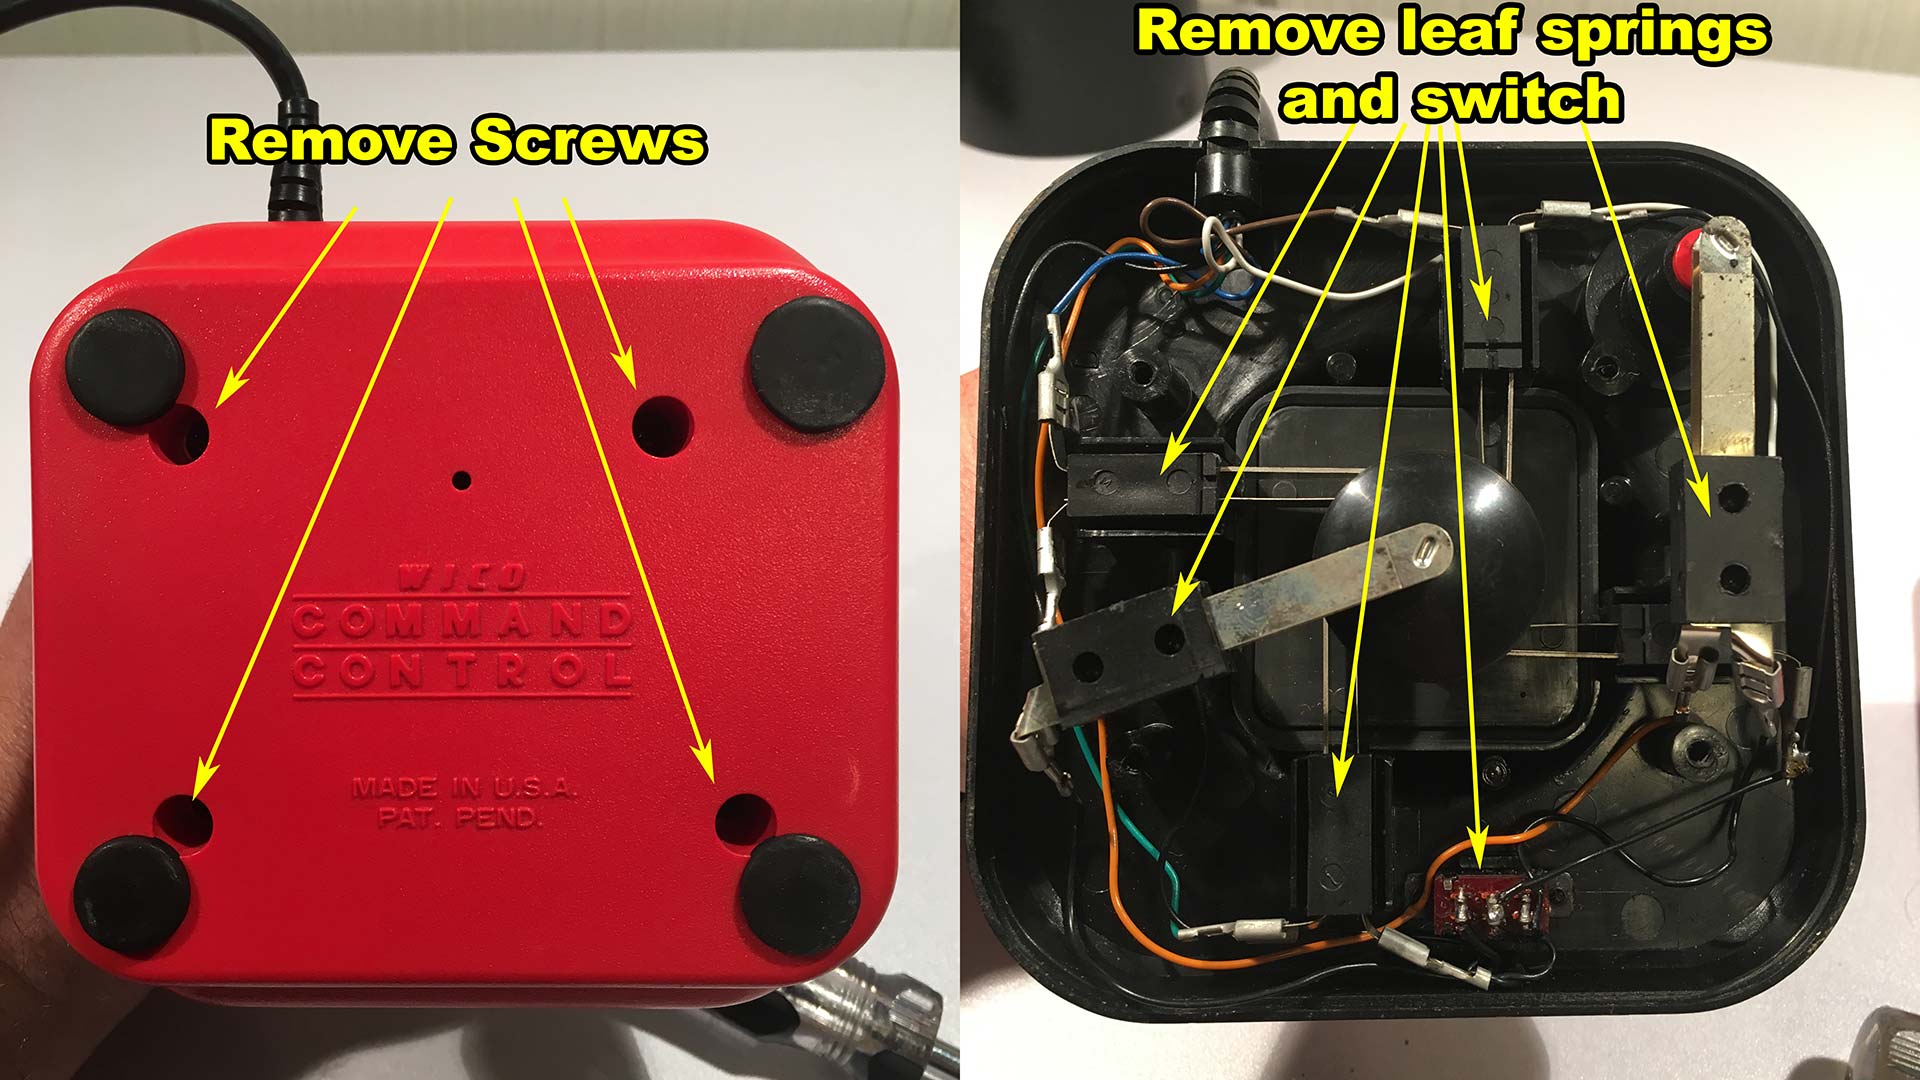 We had to pause and think about this joystick as we turned it over. Made in the U.S.A. Wow!
Getting into this joystick is crazy easy. Just four Phillips screws and separate the shell! You're In! You can even remove all of the electronics off of the plastic posts buy simply lifting each of the leaf sprints off of their respected posts. Finally, you can remove the switch-off of its post as well. Finally, pull up on the cable relief cord and all of the electronics should pop right out.  If for some reason the electrical will not get out of the way of the lower plastic button. you can simply remove it by hand after pushing the top leaf spring out of the way. Just remember the lower plastic piece is the only thing stopping the white button plastics from flying out of your joystick as it's spring-loaded.
 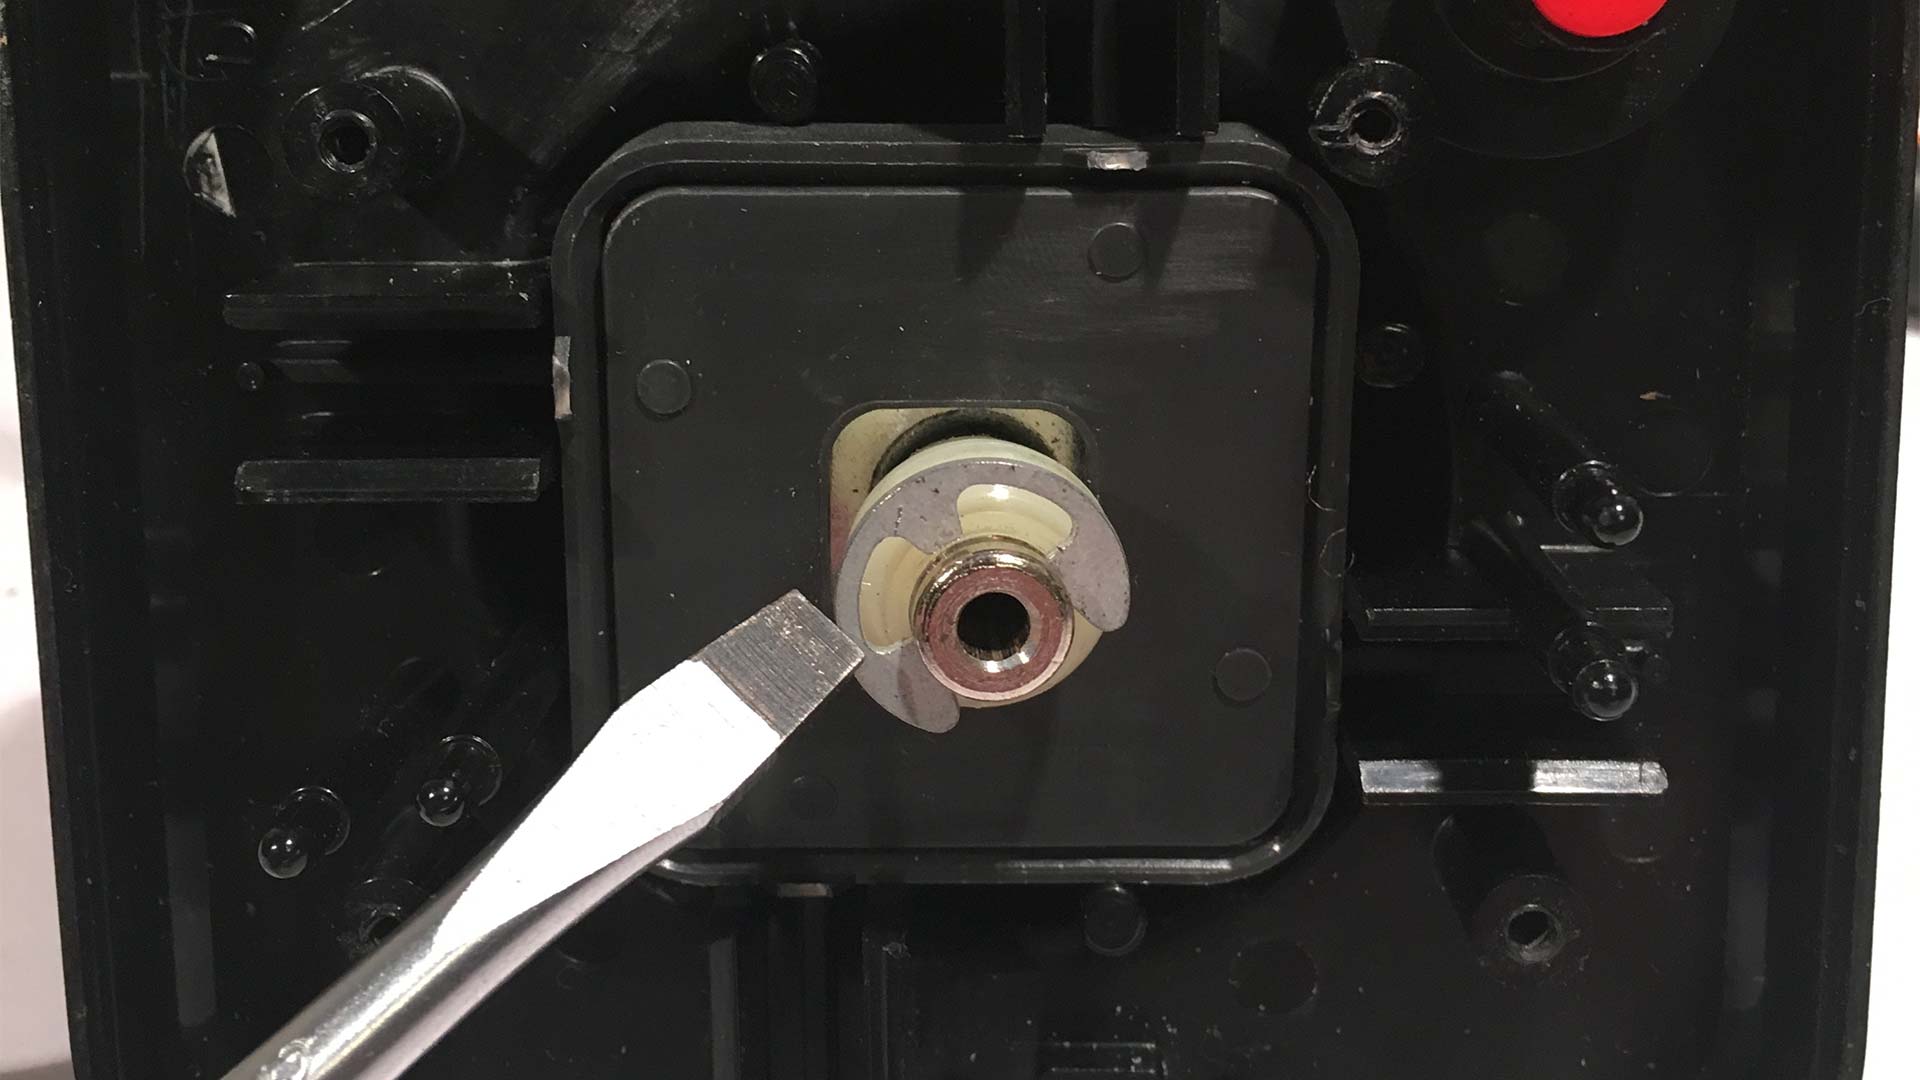 Now if the work you need to do is purely electrical like what we're doing then you may skip this step. This is for those people who want to really clean their joystick. The stick itself will come partially out but not all of the way as it's pressed in between the plastics. To remove it completely out you must remove the C-clip that is in the center base of the joystick.
 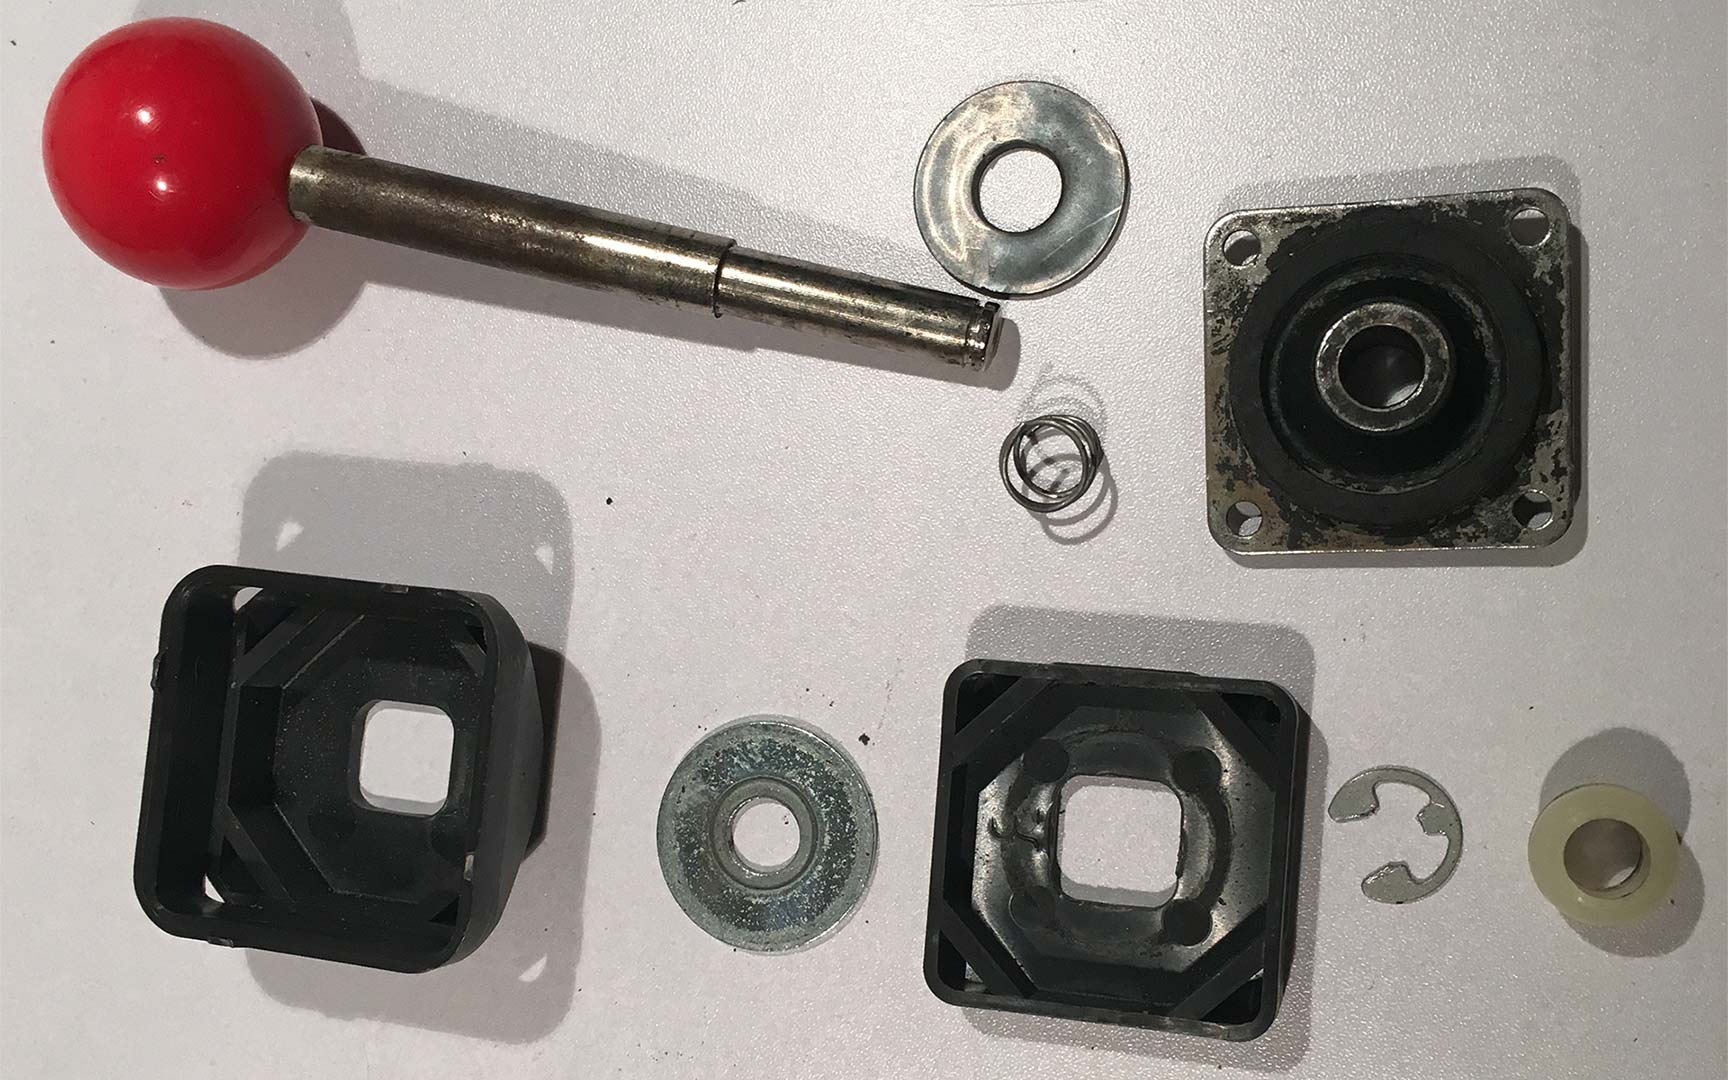 This is what is all inside the stick portion of of the Waco Joystick. Try to keep better track of the order of parts then what we did in this picture as assembling this wrong will lead to lots of connectivity problems when you actually put your electronics back together. We found this out the hard way. As you can see the Ball-Stick is heavily rusted from the general use and from time.
Ambient Rust and removal.
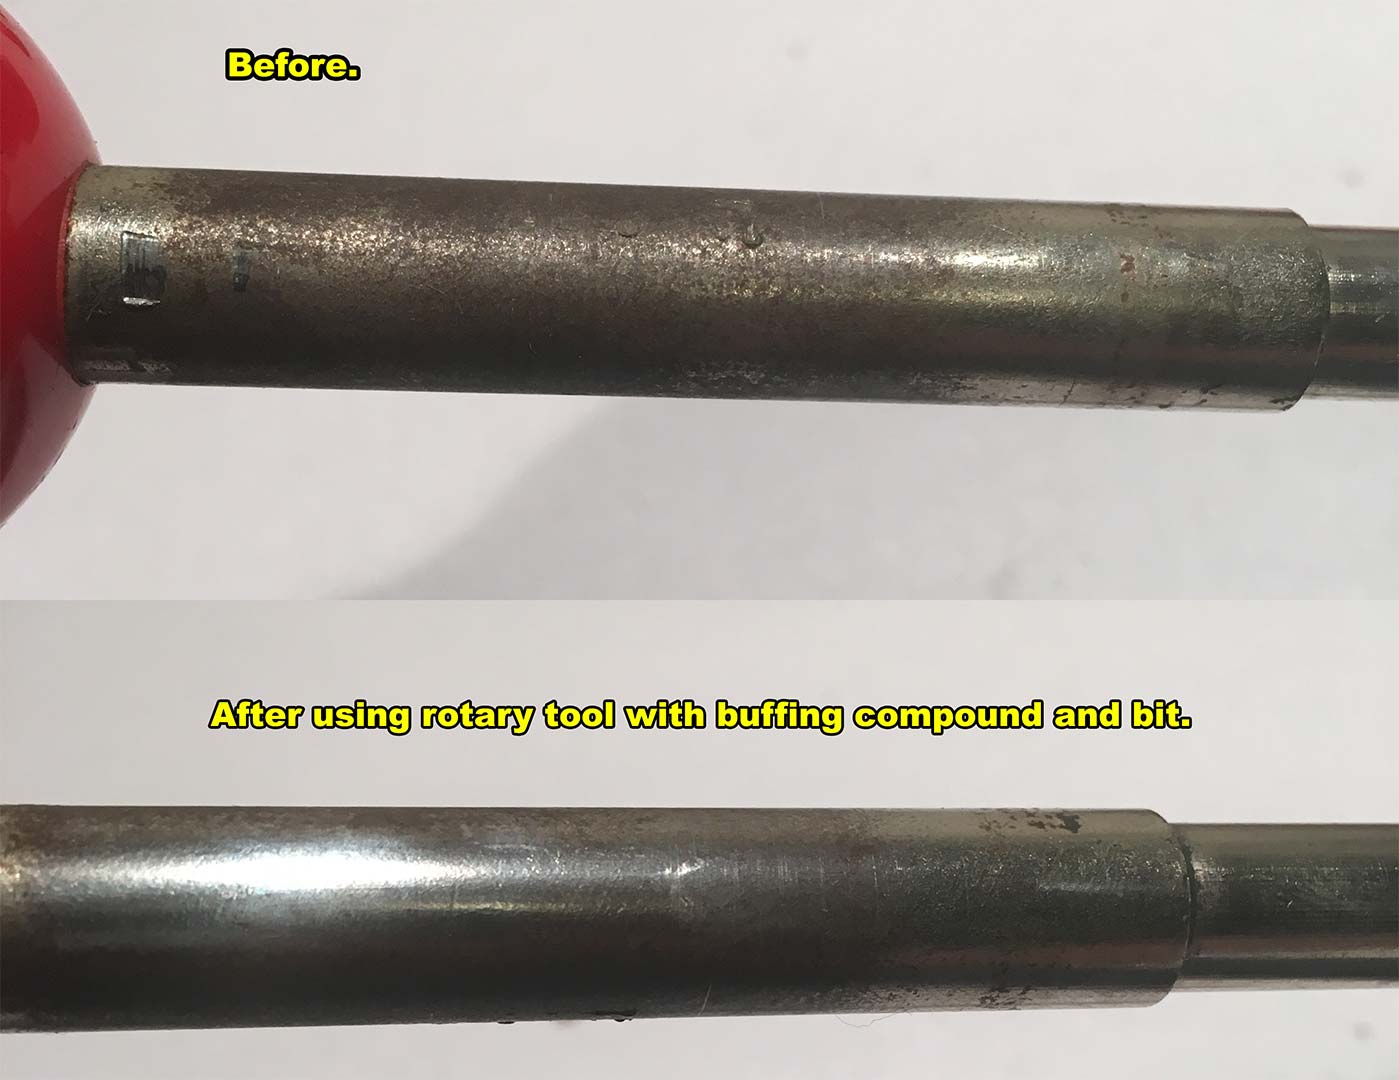 Using the rotary tool buffing compound and buffing wheels produced some rather good results in terms of cleaning up the metal on this Wico Joystick. Although it didn't get into some of the deeper rusted parts at least it removed a lot of the surface rust to give it its original finish and shine. As a note you can use the buffing technique on the leaf-spring switches if there is surface rust all over them.
Centering problems.
This tends to happen if a Wico joystick was stored on its side for a number of years instead of standing tall on its base. Over time it warps the base grommet losing its memory. It doesn't overly affect gameplay as it's still easy to handle. It just looks bad. We've tried Fedron and Citrus based roller rejuvenation to attempt to get the plastics flexible enough to remember again. But basic attempts are unsuccessful.
Update 11/172018 - Part found!
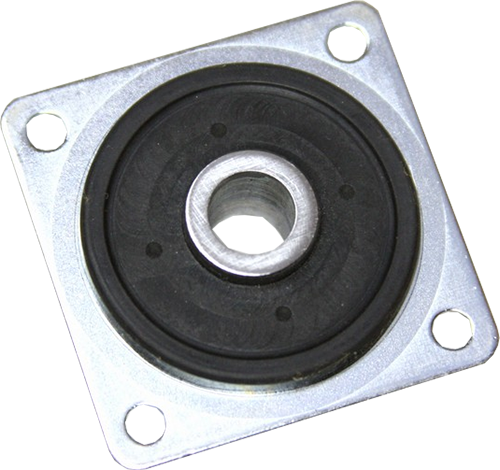 Wico 3/8" (0.375.in / 9.525.mm bore) Joystick Centering Grommet. Atari reference part number: 99-080031.
It looks like we might be able to get this grommet from an arcade part store as it was used in several vintage arcades as well. We are going to purchase a few and will let you know the results. Super thanks to user "jdryyz" for the heads up on this! This is actually really awesome that you can still get these parts as these are the same parts used to restore old school stand-up arcades which Wico had a hand in designing joysticks for. Alternatively, you can check Ebay for this as well. But make sure the Grommet has a 3/8" or 9.525mm bore to it. Wico made a 1/4" or 6.35mm bore as well which you do not want for this project! 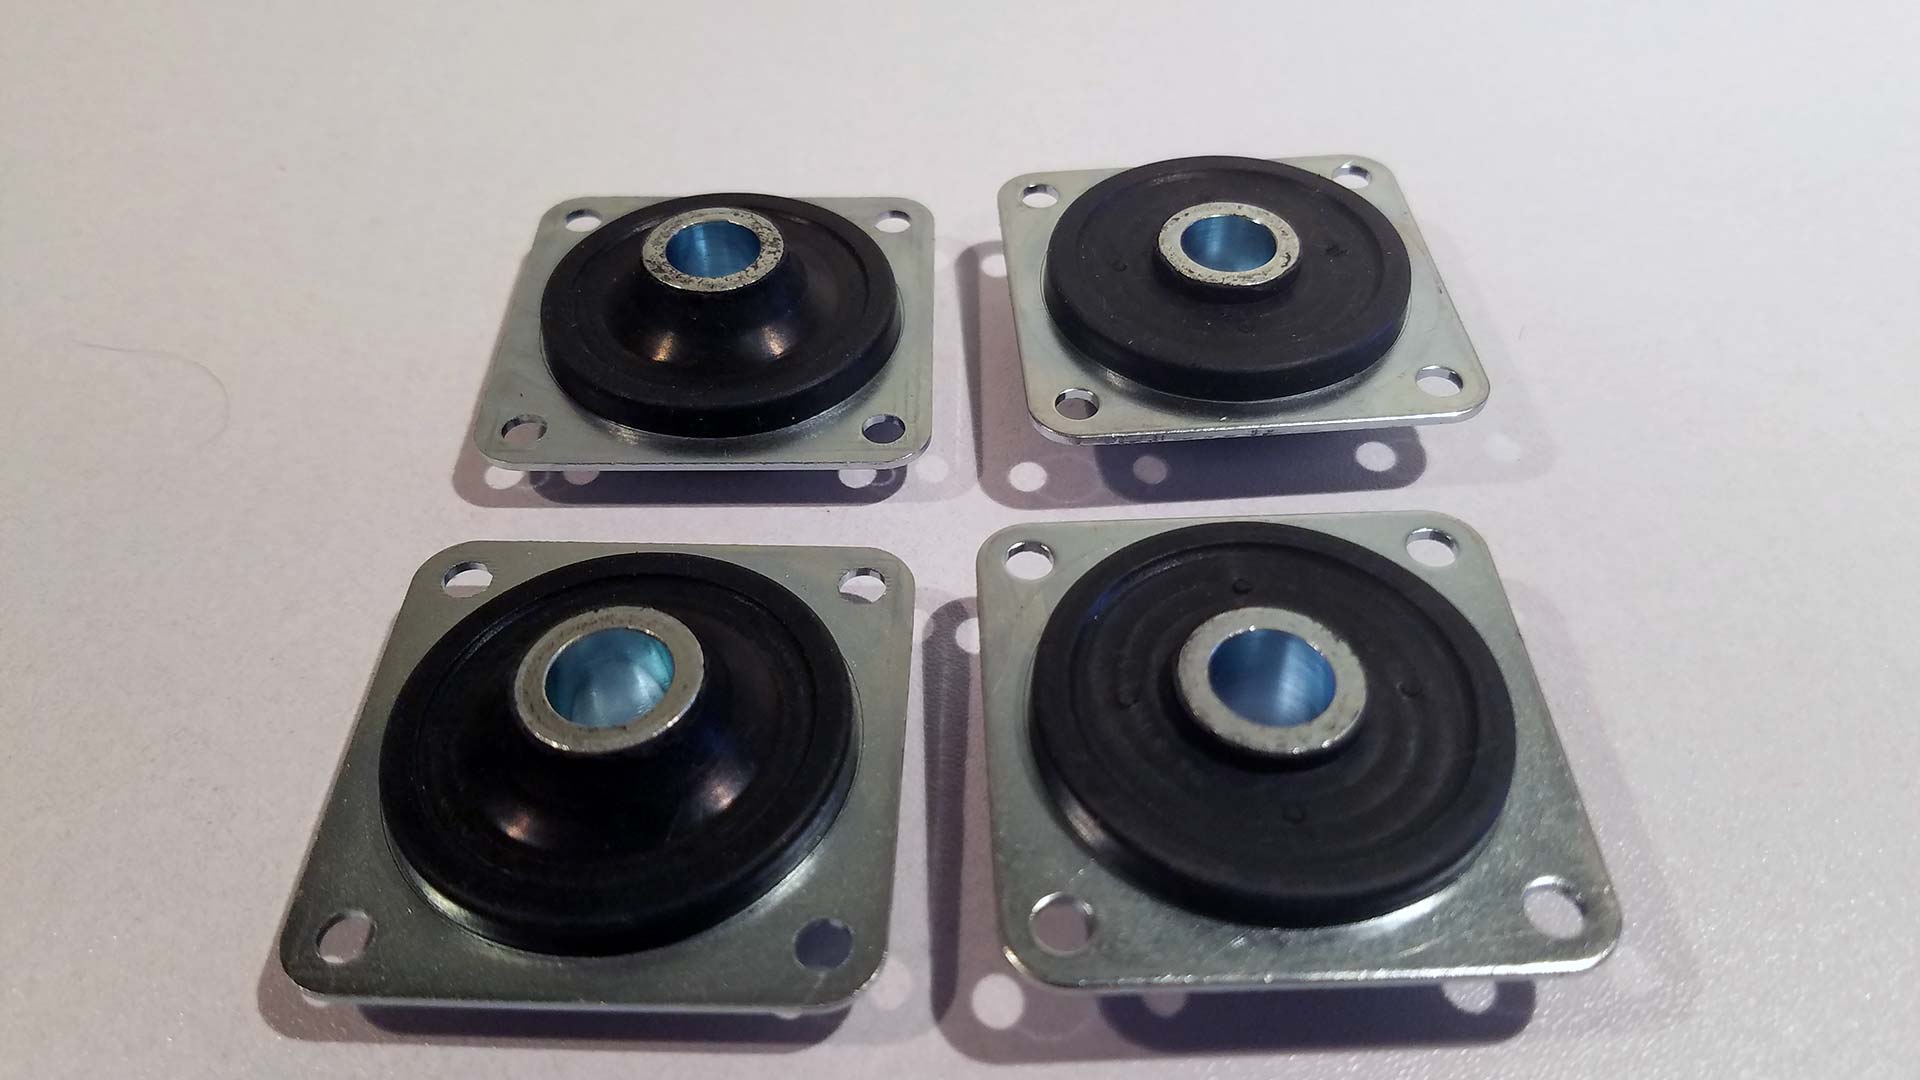 We bought 4 grommets to replace them all. The ones on the right are facing up that has a curved top allowing the joystick to flex around and the two on the left are upside down showing them as completely flat against the base.
 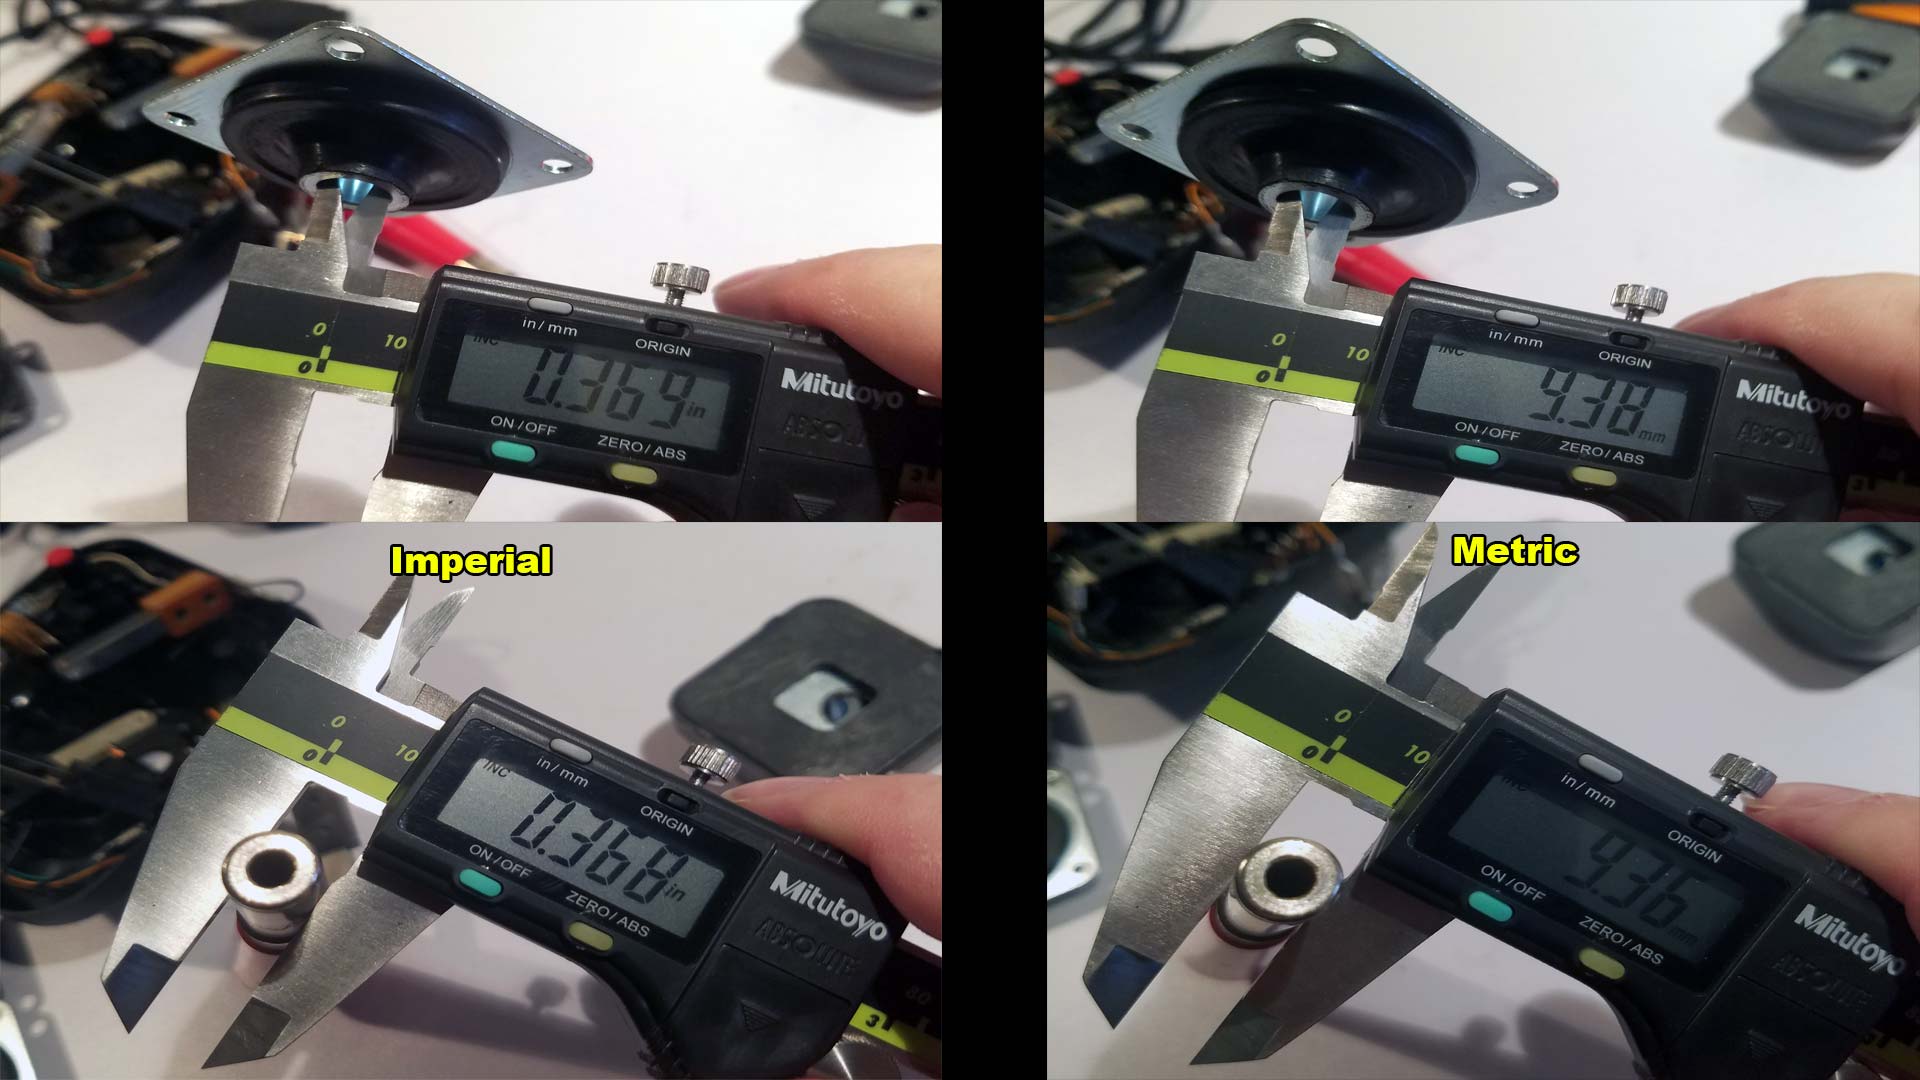 The machining tolerance is incredibly tight. So much in fact that our cheap-ass calipers were having a hard time getting a good reading as the variance was within the calipers zone of uncertainty. 0.001 inches or 0.02mm is incredibly tight. So much so that out of the 4 grommets i purchased only two of them fit onto the bat-sticks with easy. The other two I had to use some sandpaper just to file some of the machine work down so that those two fit. So if you do buy these arcade grommets to repair your original home Wico sticks have some sand-paper handy. Hell, given how much rust there could be on the bat itself that could alter the measurements from the rust alone. so clean and buff everything down and it should fit perfectly fine1
  If you're electronics is all in order installation of the grommet is super-easy and can be done in about 5 minutes. By simply moving all of the leaf springs aside as well as removing the plastic for the joystick button as well as the c-clip as described earlier in this blog. It's just a drop and go situation. Some users have reported that after the grommet installation their home Wico joystick feels incredibly stiff. Understand that installing new restrictive plastics into your joystick will change the feeling of the joystick. When I picked it up it felt new again! Yeah, you had to crank on that stick when you played games! All of these d-pad controllers has given the world bitch-wrists where they can't handle Atari and Wico sticks anymore! Anyhow, that's how you fix the joystick centering issue.
The electronics repair of the Wico joystick.
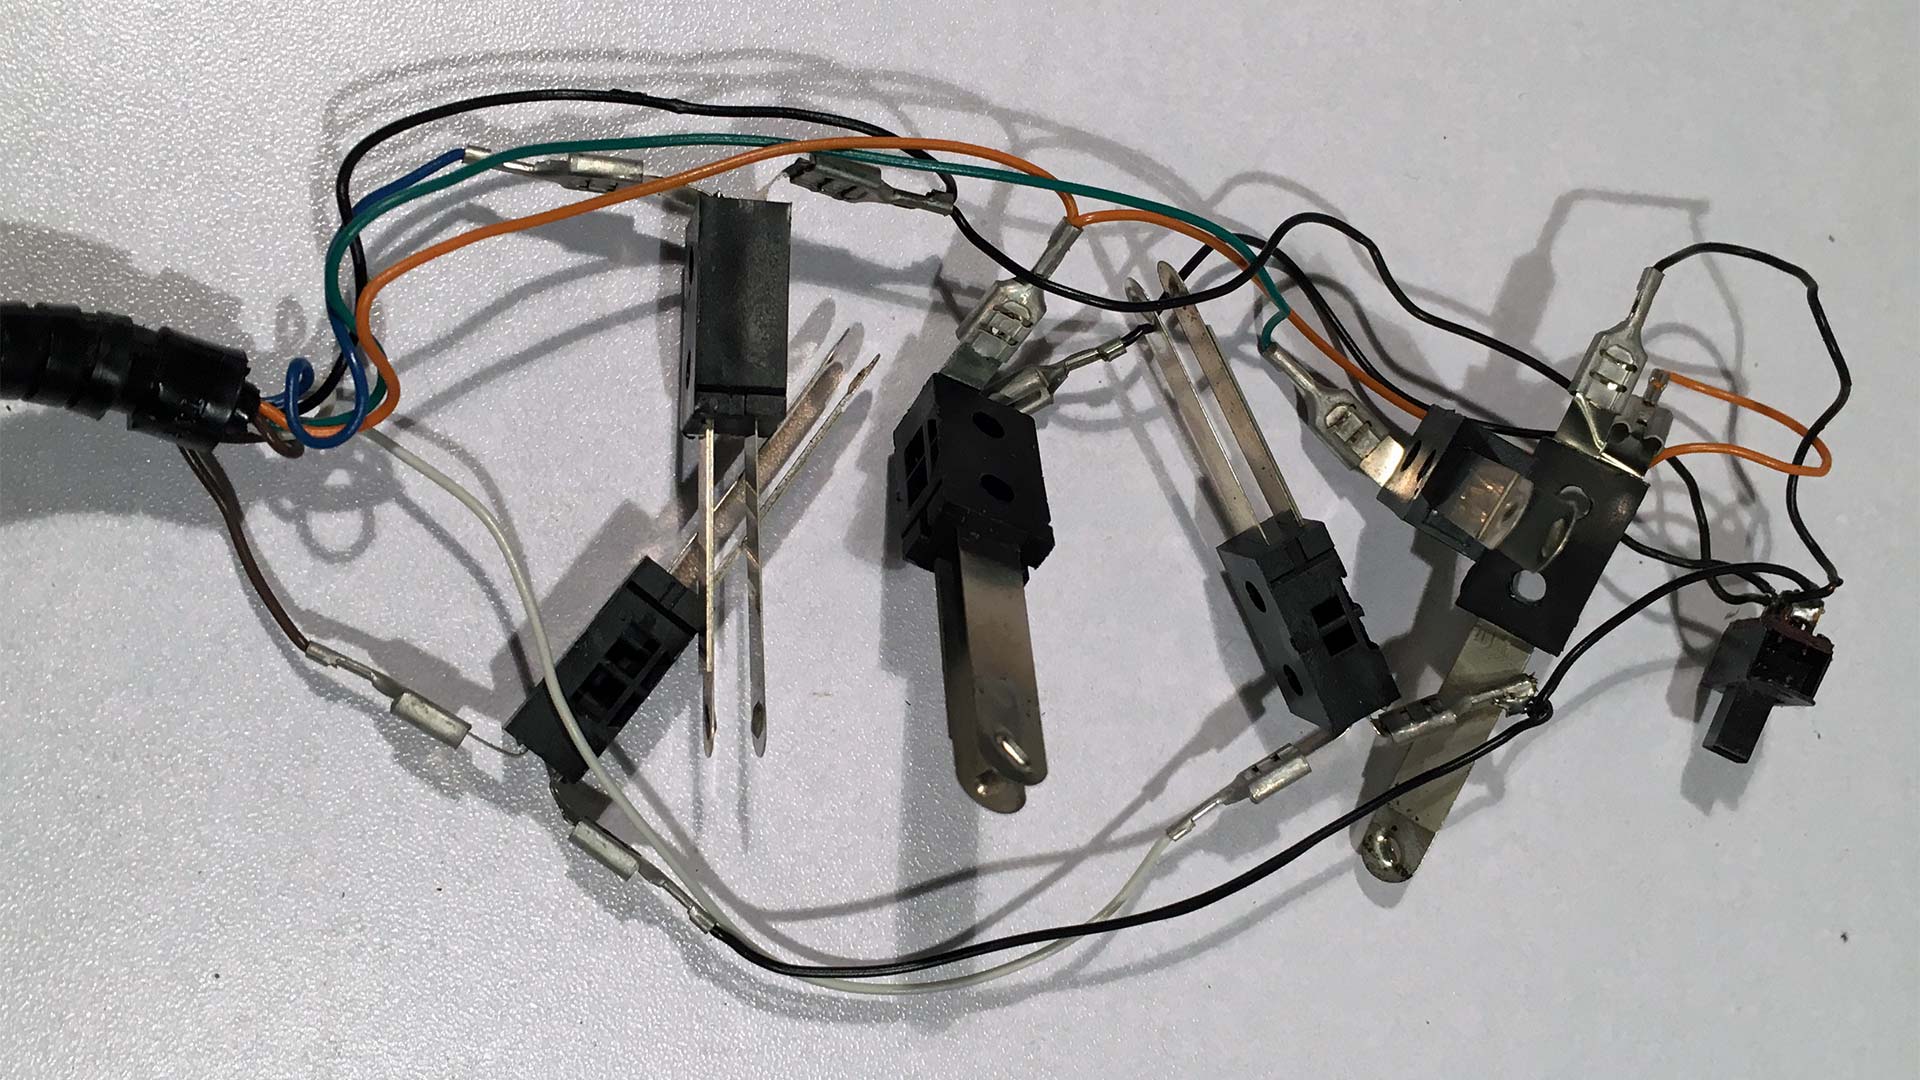 Looking at the wiring harness of the Wico joystick with it's collection of simply leaf springs you can now begin to inspect to see if any of the switches have any sign of warp to them and straighten them out accordingly. You'll notice that we didn't bother to really label which switch represents what button or direction. We probably should have done that. but with a simple continuity check we can figure that part out rather quick.
DB9 Connector for C=64/Amiga/Atari joysticks:
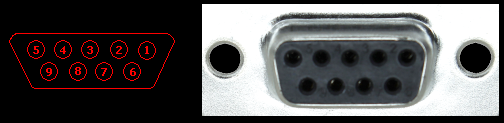 This is the pinouts for a DB9 Female connector Facing you:
| Pin Number | Action |
|---|---|
| 1 | Forward |
| 2 | Back |
| 3 | Left |
| 4 | Right |
| 5 | Button3 / Pot-Y |
| 6 | Button1 |
| 7 | 5vdc |
| 8 | GND |
| 9 | Button 2 / Pot-X |
Notes: Pot-X and Pot-Y come into play when working with analog joysticks for the Amiga. It's important to leave the alligator clips on each of the leaf springs. It will later be used for measuring wire length to keep the inner housing nice and clean upon re-assembly. Since we obviously can't re-crimp the alligator clips we will be simply soldering on our new wires to this controller. Also note that ground is just one wire which runs in series with all of the leaf spring and button direction switch at the bottom. Especially check this ground wire if you are missing an entire half of directions on your joystick! In some of the super-early Wico Joysticks, you will not find plastic leaf-springs but instead, you will find leaf-springs resin pressed underneath multiple layers of PCB. The earlier sticks were possibly done 100 percent in house where-as the ABS leaf-springs were eventually sourced from another company.
The joystick wiring - Purchase mode.
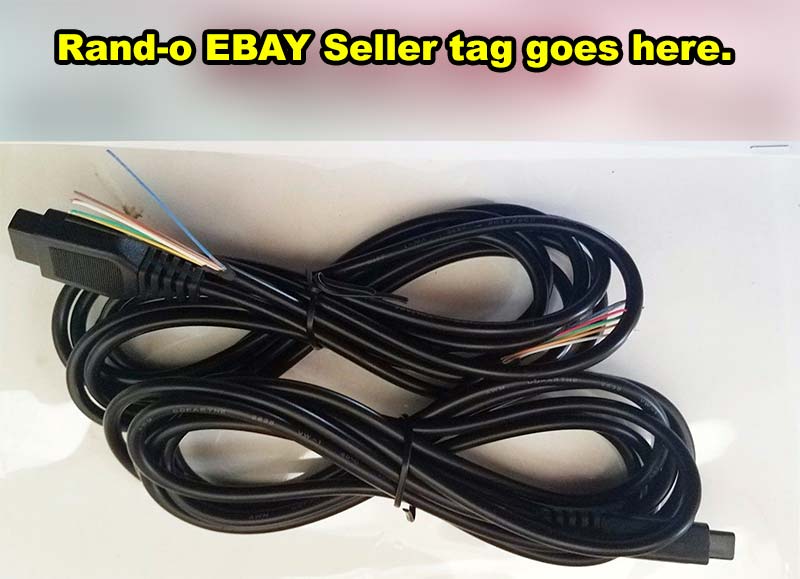 For those who are looking to refurbish their joysticks to make them look as authentic as possible Ebay does have vendors which are more then happy to sell them to you. Because we have criticisms of this we blurred out the vendors' names. The price is a little high on these but you can only blame shipping on this as when you start doing bulk orders of 10 or more the price then drops to something far more reasonable at four dollars American per cable.
Alternativly, you can recycle existing DB9 serial cables.
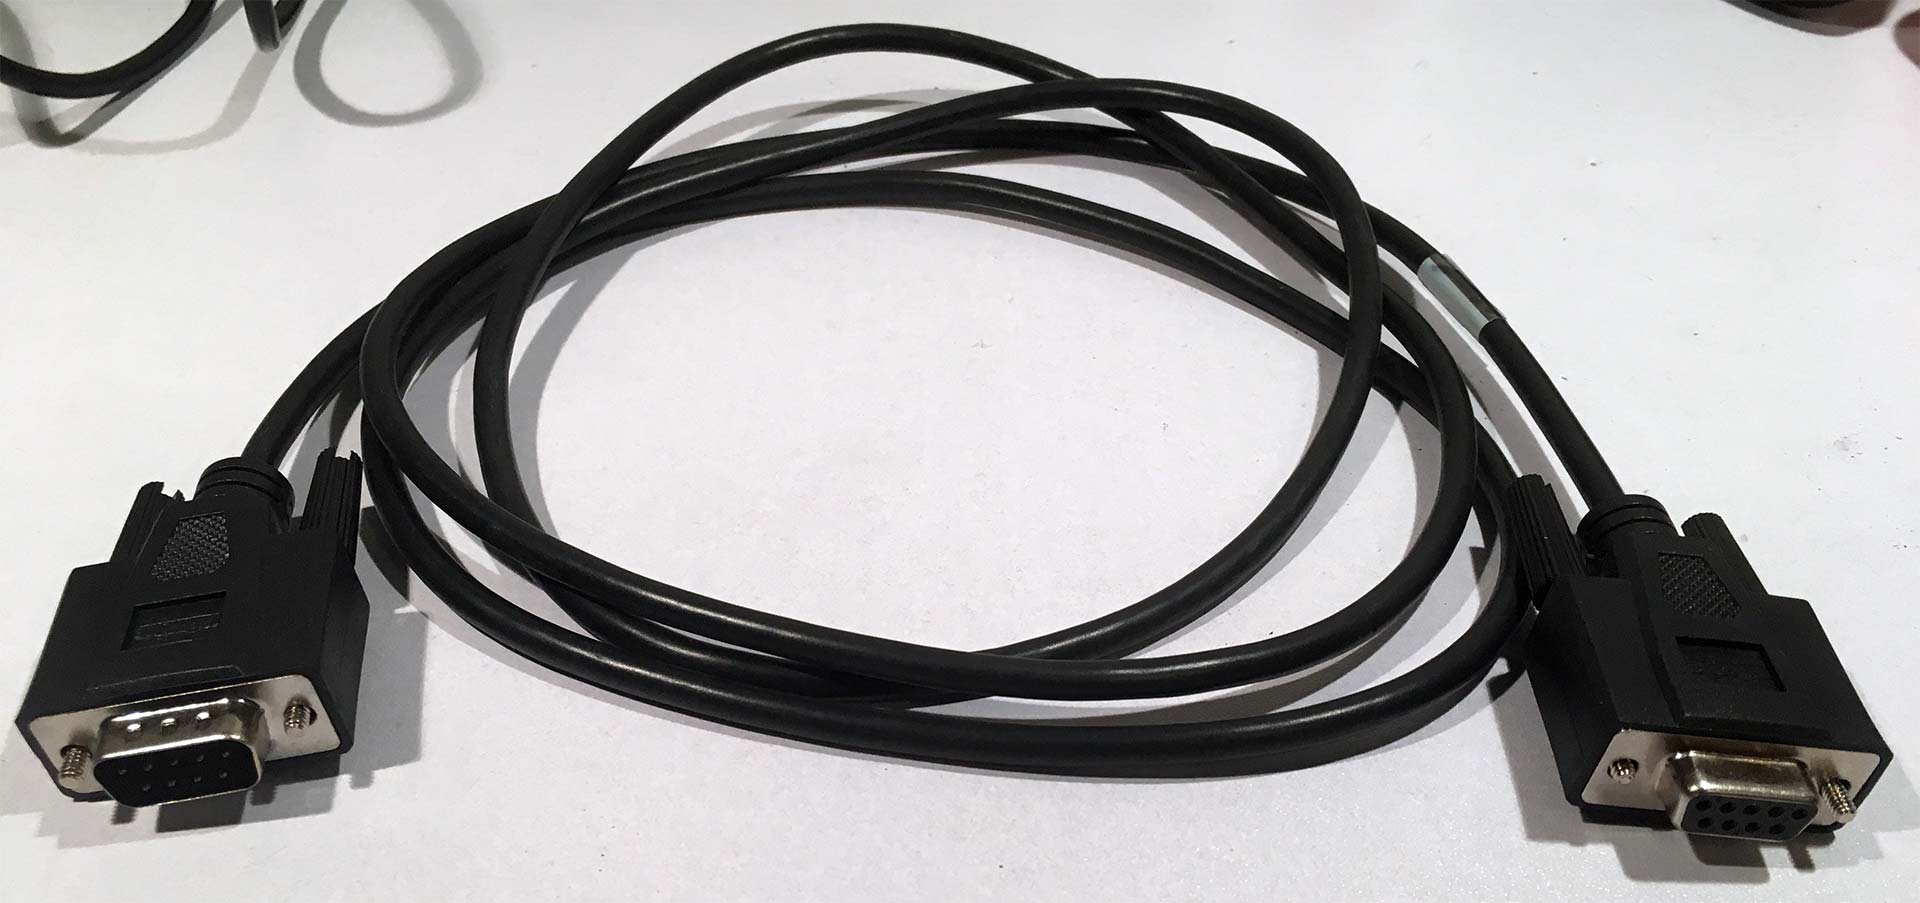 Now because we're absolute cheap skates we found a bunch of serial DB9 cables that were for UPS power supplies that are simply not needed as in most modern companies UPS power supplies are connected via network or USB. If you know someone who has a lot of computer parts around they are bound to have an old serial cable that you could use. As for the two screws on the side, they will not affect your build as in just about every console and vintage computer we've seen the two DB9 male ports are separated far enough. Hell, the Commodore Amiga just said screw it and used serial connectors anyways! When cutting the cable make sure you cut of the MALE connector as we will not be needing it.
Lack of strain relief boot.
 In the case of this eBay vendor; They are not supplying any sort of cable boot/strain relief cable plug. This little piece of plastic prevents the cable from being tugged after repair and damaging the wires and/or board. You can't remove the old strain relief boot from the old cable either. Even if it could it would brittle from 30+ years of existence. Ultimately a new one is required. Now you don't NEED this particular part but trust us when we say that the job will look more professional when you're done with re-wiring your joystick.
Purchase some strain relief boots.
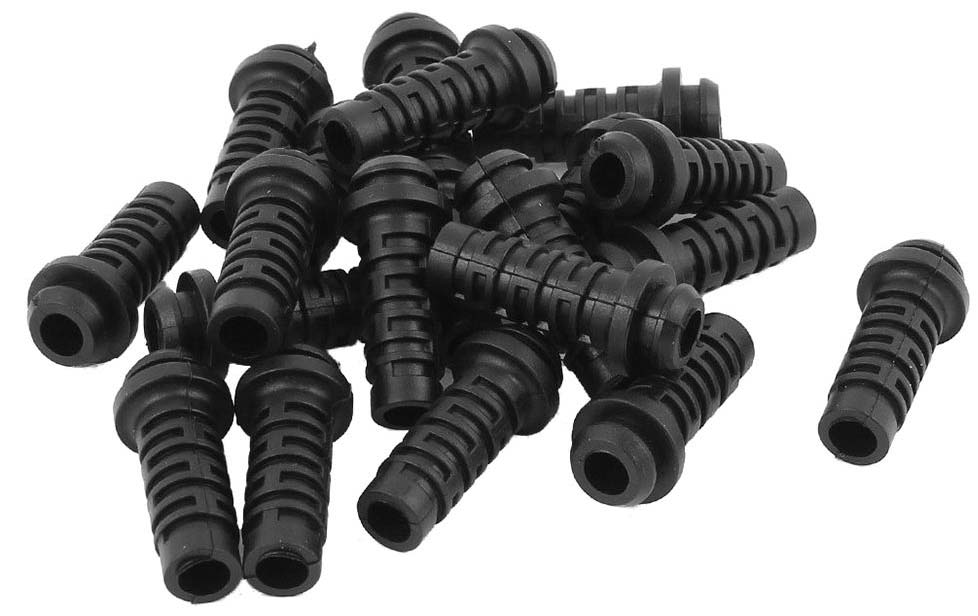
You can get strain relief boots on Ebay cheap (about two dollars American for a pack of 20) . But all of the vendors are in china so it may not come fast.
For those interested in doing a more professional job. If you type in "Strain Relief Boot Cord" into eBay. We had to go with 5mm inner diameter with an 8 mm outer diameter as all 9 wires are present in a serial cable. These strain relief cables are going to be fatter than stock. So there are two ways of modding these:
- You also may have to file the ABS plastics around the base of your joystick by about 1-2mm to accommodate the change. You could do this with a file, or with a soldering iron to melt the plastics a little. To us we find this is the best solution as there's a reason why strain relief cables have gotten fatter over the years which is to prevent them from cracking and failing again.
- You can also take a razor-blade or a rotary tool with a cutting bit loaded to sand/cut away the neck of this boot from any excess plastics. This option is good for people who want to keep the plastic base of the Wico in pristine order. but cutting/sanding away the strain relief boot may lead to premature breakage.
Installation of strain relief boot and setting up the wiring harness.
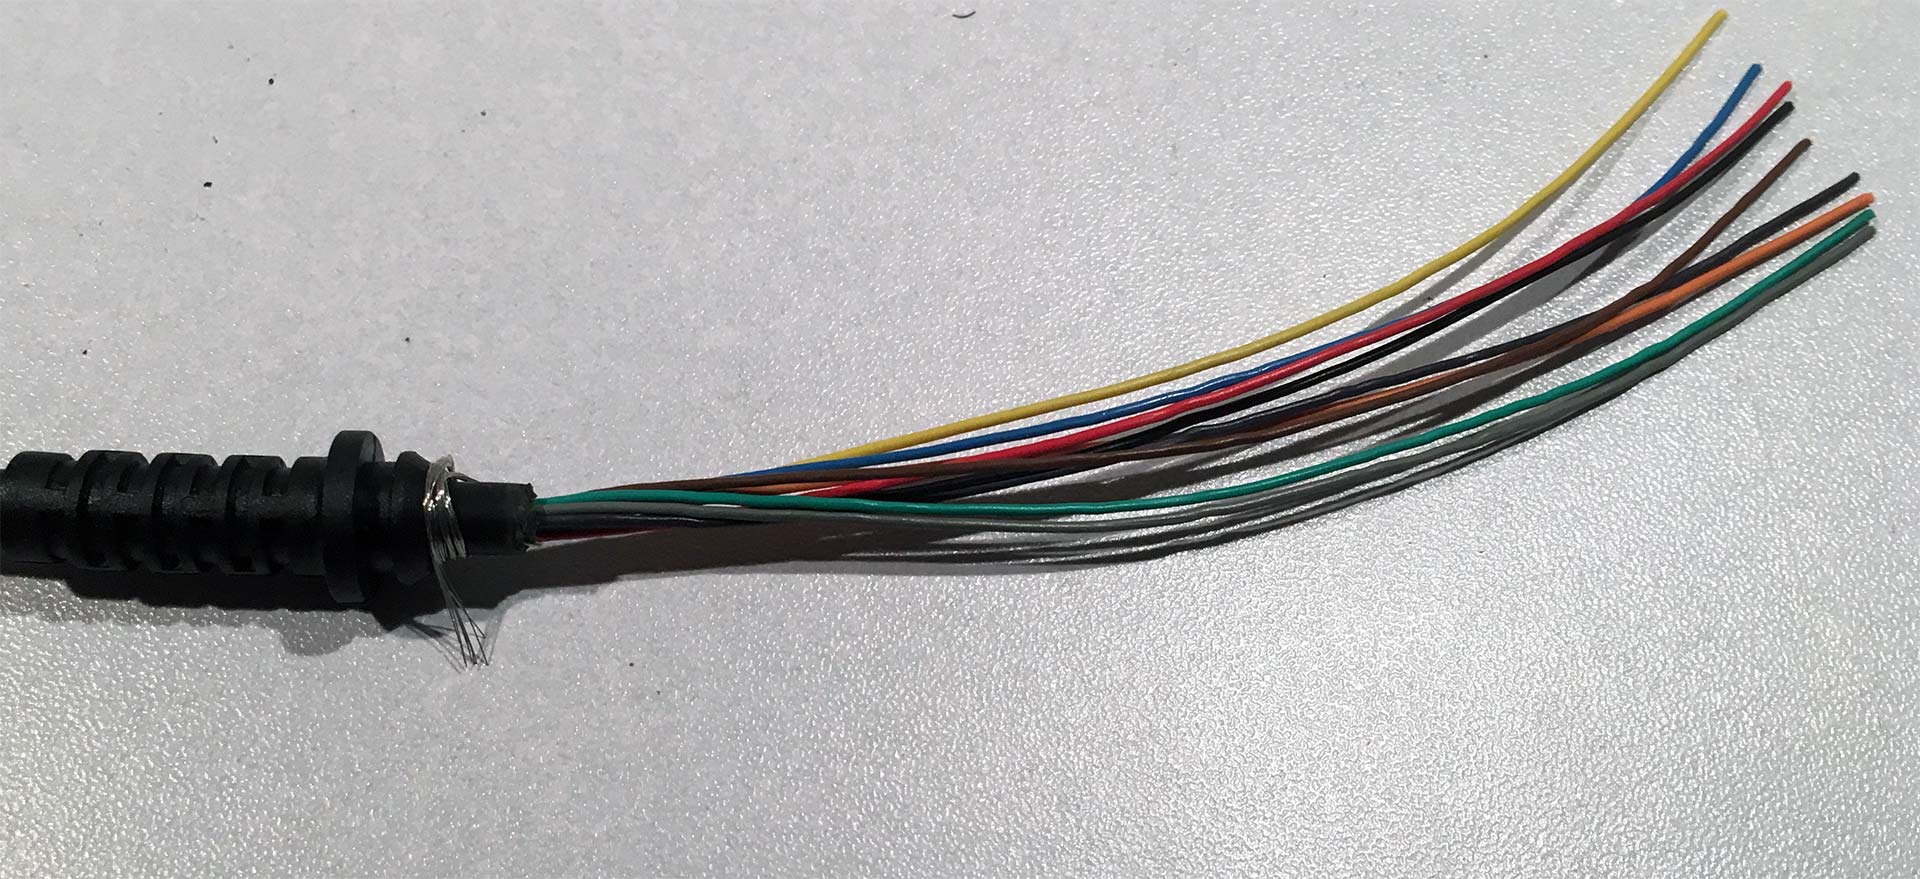 After you've remove the male DB9 header you're going to want to cut the outer insulation off without cutting the wires inside. Give yourself about four to six inches as some of these cables will be wrapping around the joystick housing. Others will be incredibly short and you will be cutting them to size prior to soldering them onto the clips. You'll note all of the different colors of wire as you strip the outer insulation away. Take a continuity check on all of the wires and write down which colors goes to what pin on the DB9 connector. Use a paper clip on the female connector to get better continuity while you are testing out the cable. We cannot give to a generic color table as there is no such thing in between cable wiring companies. The grounding strap will not be required so we wrapped it around the base. If you -really- want you could add a wire to Pin-8 to ensure it stays grounded. But not required given how simple of a design these joysticks are. We wouldn't worry about it!
Reassembly of the Wico Joystick.
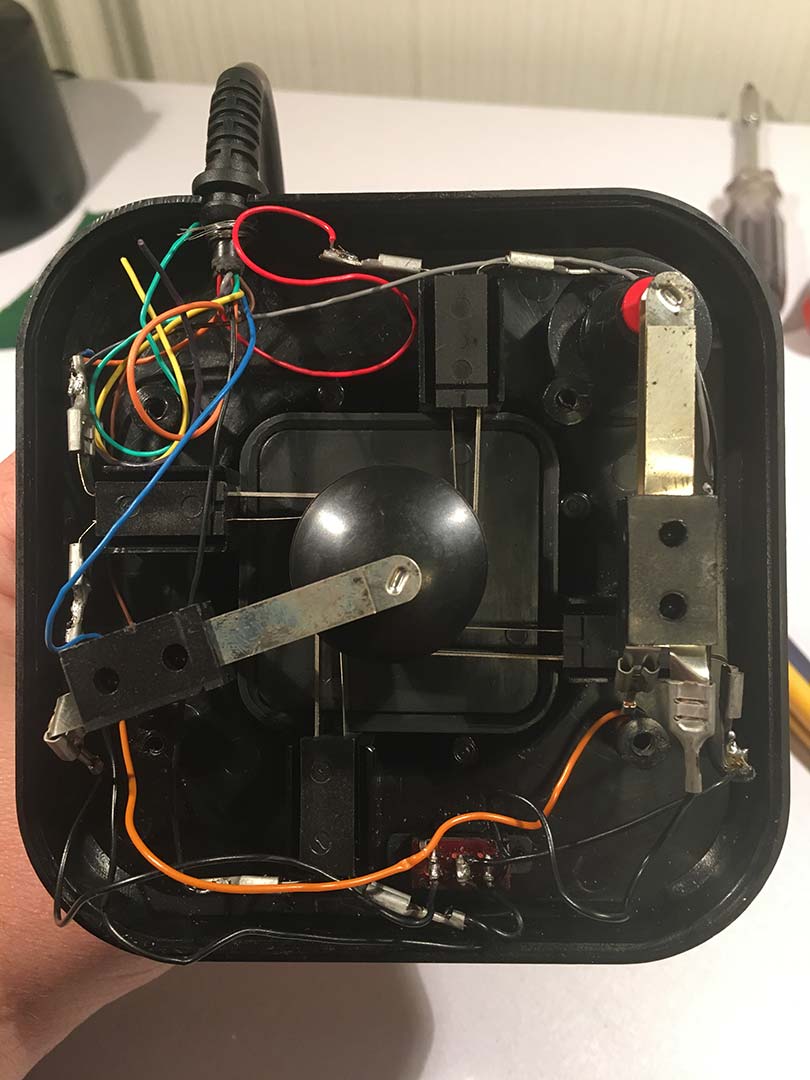 Be careful and don't have any wiring going over any of the switches like the blue one illustrated above. It may pinch/break that wires.
After you've re-wired your joystick you may begin assembling this unit back together. There is plenty of room to keep the wires underneath the leaf springs if necessary. I must stress this again as you could ruin your work. If you try to close it like the picture above with that blue cable over the switch the base will not clamp securely. The wires will be pinched and possibly cut. You may not have a good connection with the mechanical side. In some cases, the leaf springs inside may be warped and you'll have to bend them straight again to get good connectivity as you move the joystick around. As a final note, you will more than likely have extra wires left over as this Wico joystick only uses one button. You can simply tuck them away prior to closing the case making sure they are out of the way. 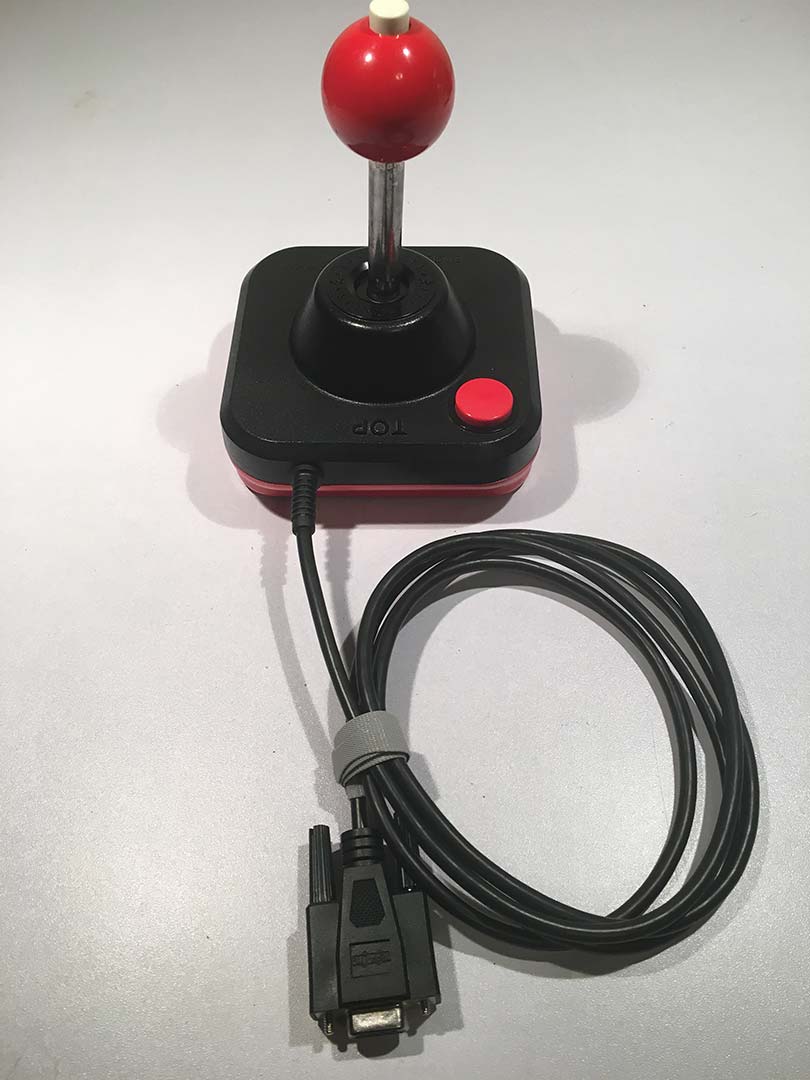 After testing with my USB zero response adapter. This joystick is reading each direction solid with no breaks in connection.
Final thoughts on the Wico.
This may be a considerable amount of work to get 30-year-old joysticks working again. But if you had that special joystick from your past that you want to relive the nostalgia via emulation with that very controller. This is possibly the only way you can get it done. With the cleaning and cabling job that we have performed the joystick is ready to go for another 15-20 years. This time as an adult we now know how to properly store and take care of things. The overall build and construction of this joystick is remarkable as the plastics aren't even discolored like what you can see in some Nintendo game-cube controllers from the mid to late 90's. Although it would be fun to modernize this stick with using cherry switches. It may be a blog for another time while we figure out the logistics as to how to place everything inside.
Notes for those who want a true arcade experience.
For those who have never experienced the 8-bit era yet want to play arcade games of the time with a legit joystick instead of keyboard or game-pads. We actually DON'T suggest that you buy one of these! And instead, build your own joystick using HAPP arcade joystick parts and cherry switches for that authentic mechanical experience. These types of joysticks are for those who wish to experience what gaming was really like in the 80's when only leaf-spring joysticks were easily accessible as arcade parts like the HAPP could only be ordered commercially in the '80s. If you found this little journey through time. Awesome. We thank you for checking out this blog and hope you have a wonderful day. +++END OF LINE.
I got an Atari 800 that came with 2 ball top Wico Command Control joysticks with boxes off Marketplace 3 years ago. One of the sticks never worked, the other one works great, but both have worn out centering grommets. I'm so thankful to have come across this tutorial with where you got your grommets. I don't think I'd ever have found them otherwise. Thank you!
Thanks for checking out my article. When you get the grommets they will be a little stiff at first as they're designed to go into arcade cabinets. But after using them for a week they went back to feeling normal like the OEM Wico's.
Chances are the one that doesn't work just needs to be re-cabled like what I had to go through.
Anyhow, thanks for checking out my blog!
- S
The Atari pin-out you provided is for the male connector, not female. The female pin-out is a mirror image as I electrically checked using a properly working joystick. Here is a website that shows the correct female pin-out for Atari computers:
http://www.epanorama.net/documents/joystick/ataristick.html
Thanks.
Hello!
Thanks for that catch. We accidentally ended up re-using some images for some of our joystick-to-USB adapters and didn't realize those were male pinout graphics. Anyhow, We got it all fixed and also noticed the table went 9-1 for pinouts.
Anyhow the graphics are updated as well as the table sorted better. Thank you for visiting this blog!
I received my grommets earlier this week and I just completed a "dry" reassembly after a small bit of cleaning. My Wico stick had no trouble sliding through the grommet. No adjustments were necessary. One thing I was curious about that this site and another site did not mention-- is there any amount of lube that should be added into the assembly? I noticed the presence of a small amount on the stick when I took it apart so I figured adding a bit more after the cleaning would be good. I'm wondering if I should add some into the compartment that contains the grommet too. I know the lubricants are supposed to break down rubber material though so not sure on this one.
There really shouldn't be any lubricants required for this joystick. I suppose if the joystick was emanating a metal on metal noise or any squeak from the spring perhaps a touch of white lithium grease wouldn't hurt anything. as for the grommet itself is a heavy duty polymer rubber similar to what is found in car tires. it will probably last you another good 15 or so years before any cracking or breakdown will occur.
I think I will wait and see how they work out for you before I order. :)
I decided to check the diameter of the shaft on the classic wico stick. I'm getting a mic reading of 0.43 or approximatly 7/16th of an inch. If true this would mean some machining may be involved to make it work in the home Wico sticks. I'm still going to order one just to try it out.
Just a correction.. it's only 7/16th on the upper half of the shaft. it's 3/8th on the lower half. Either way I shall purchase and document the results.
I just wanted to let you know that I purchased 4 3/8ths grommets for my wico sticks. The results I experienced were interesting. These are the correct dimensions for the grommets. Howwever! the machining tolerance is incredibly tight to the point where two out of the four grommets did not fit the stick at all. The differences we are talking about falls well below what my calipers were even able to measure accurately. you're looking at 0.001th of an inch or 0.01mm variance here. Such variances can be easily changed by simply sanding the inside of the grommet a little which I did and now all 4 fit without an issue.
So the answer is yes.. This is the right part for the Wico home joysticks as well as the arcades. It is safe to purchase. Have some sandpaper ready just in case. :)
Great! Thanks for the update. I'm thinking about my Wico "boss" joystick now also. It always had a lot of play in the handle early on. This part might be similar between the two models but I have not opened up the boss to find out.
I believe you are correct. I experienced different noises with both of the joysticks I worked on and just replacing the grommet took of it in both cases. I did still apply a little bit of lithium-based grease where the metal washer meets the grommet as well on the shaft and the plastic piece that makes contact with the leaf switches. I was sure not to overdo it. Both joysticks are working as new now! In fact, they're slightly on the stiff side but I am sure they will be broken in quickly. Something else about the Wico Command Control joystick I have noticed is one of mine is a different variation that I have yet to see out in the wild. The slide switch does not say BASE and STICK but rather 1 + 2. In addition, there is a plastic ring around the point where the shaft meets the base that says "Gatelock". I do not remember what this was for (maybe to restrict the movement?) but I do remember I never did anything with it. Internally, there are more connections on the slide switch which caused me some confusion because I needed to replace the cable (same eBay source you listed). I ended up with unused wires and the switch position allows both fire buttons to work simultaneously. No big deal for me but it would have been nice if I were to have located a photo online showing the wired connections. I could only find images of the simpler BASE and STICK version.
Hello.
Is this the correct grommet for this joystick?
http://www.arcadeshop.com/i/1061/robotron-joystick-centering-grommet.htm
That certainly looks like the correct grommet! I'm going to have to buy a few and see if it corrects the issue with the joysticks i have.. Awesome find BTW! Thanks for the reply!
Nice tutorial, thanks.
I need to rewire a Wico. I’m not especially comfortable soldering small items.
That said, I am wondering if it is (im)possible to get the “alligator” clips that Wico uses. Your tutorial suggests soldering these connections, but I trust my crimping more than I trust my soldering. I imagine they pull off and on easily, and will just need to be crimped onto the ?26? gauge wire.
If you know the size and where I might find them, it would be greatly appreciated.
However, I don’t know where to get these smaller sized connectors.
You can use probably use FFD push-on electrical crimp terminals as that is what Wico used during the assembly of these joysticks. I didn't go that route because of the overall age of the plastics combined with finding some of their original crimps rusted I opted to go the solder route instead. The wire that exists in the Wico i believe is 26AWG and the serial cables I recycled had 22AWG going into it.