
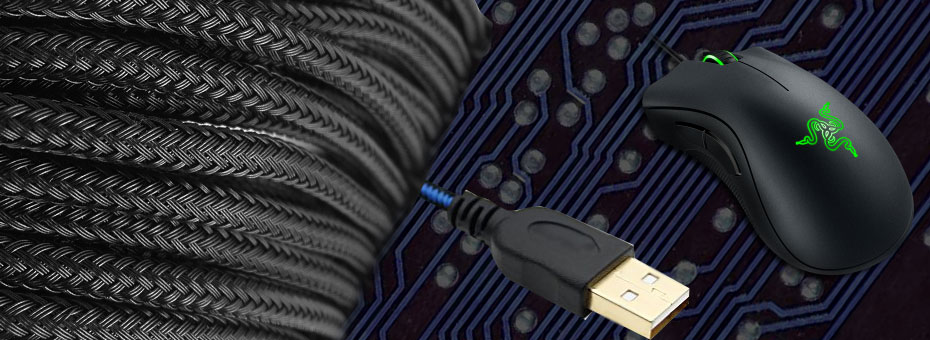
Now a Razer Mouse has appeared on my bench!
Now there's a Razer Deathadder Chroma 2014 mouse sitting on my bench! It is fitting that right after repairing a Razer Keyboard that there is now a mouse to go with it. Yes, ladies and gentlemen along with all of the boys at sea. We will be diagnosing and disassembling it. Hopefully repairing it! Note: The model of the razer mouse is: RZ01-0121 Read on if you want to see more!
The usual disclaimers:
Like with all guides or blogs on S-Config.com. This site will not be held responsible for any physical, mental , or psychological damage that could occur when performing this type of repair to your own mouse. By performing these types of repairs or modifications you void whatever warranty you may or may not have on your product. If you do not feel comfortable performing this type of repair then please find someone who is more confident to help you. Please check out the FAQ for a complete list of general questions and answers about this site.
The problem with the Razer Deathadder mouse.
There is not just one Razer mouse but two that have arrived with problems. the first Razer mouse produces no power upon plugging it into the USB port. The second one likes to drop out if you move the mouse in the wrong direction. Both of these problems are related to actual cable of the Razer Mouse.
Pretty braided cables are an illusion.
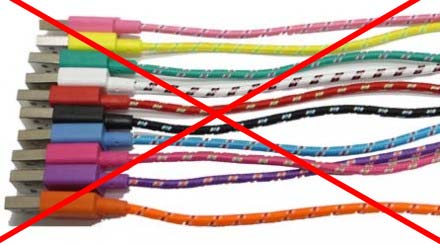 Now at first you're probably thinking to yourself that the braided cable would indicate some level of higher quality with their product. This mouse brand new it retails anywhere from 40-60 US dollars which to be brutally honest is stupidly overpriced. You would expect Razer to spare no expense. But no! the amount of copper in these wires is significantly less then a mouse from Dell computers. In fact, the amount of copper that is in your Razer Mouse is about as much copper as you would expect in a 3rd party android data cable from China.
End result.
I hate to say this to a proud Razer owner. But you kind of got pwned in the mouse department! This is a little sad to us because in many respects we do like the Razer mouse even over our Corsair RGB mouse in some cases. It flicks really good in FPS games. The buttons feel about as nice as our Microsoft Intellemouse.
Repair time!
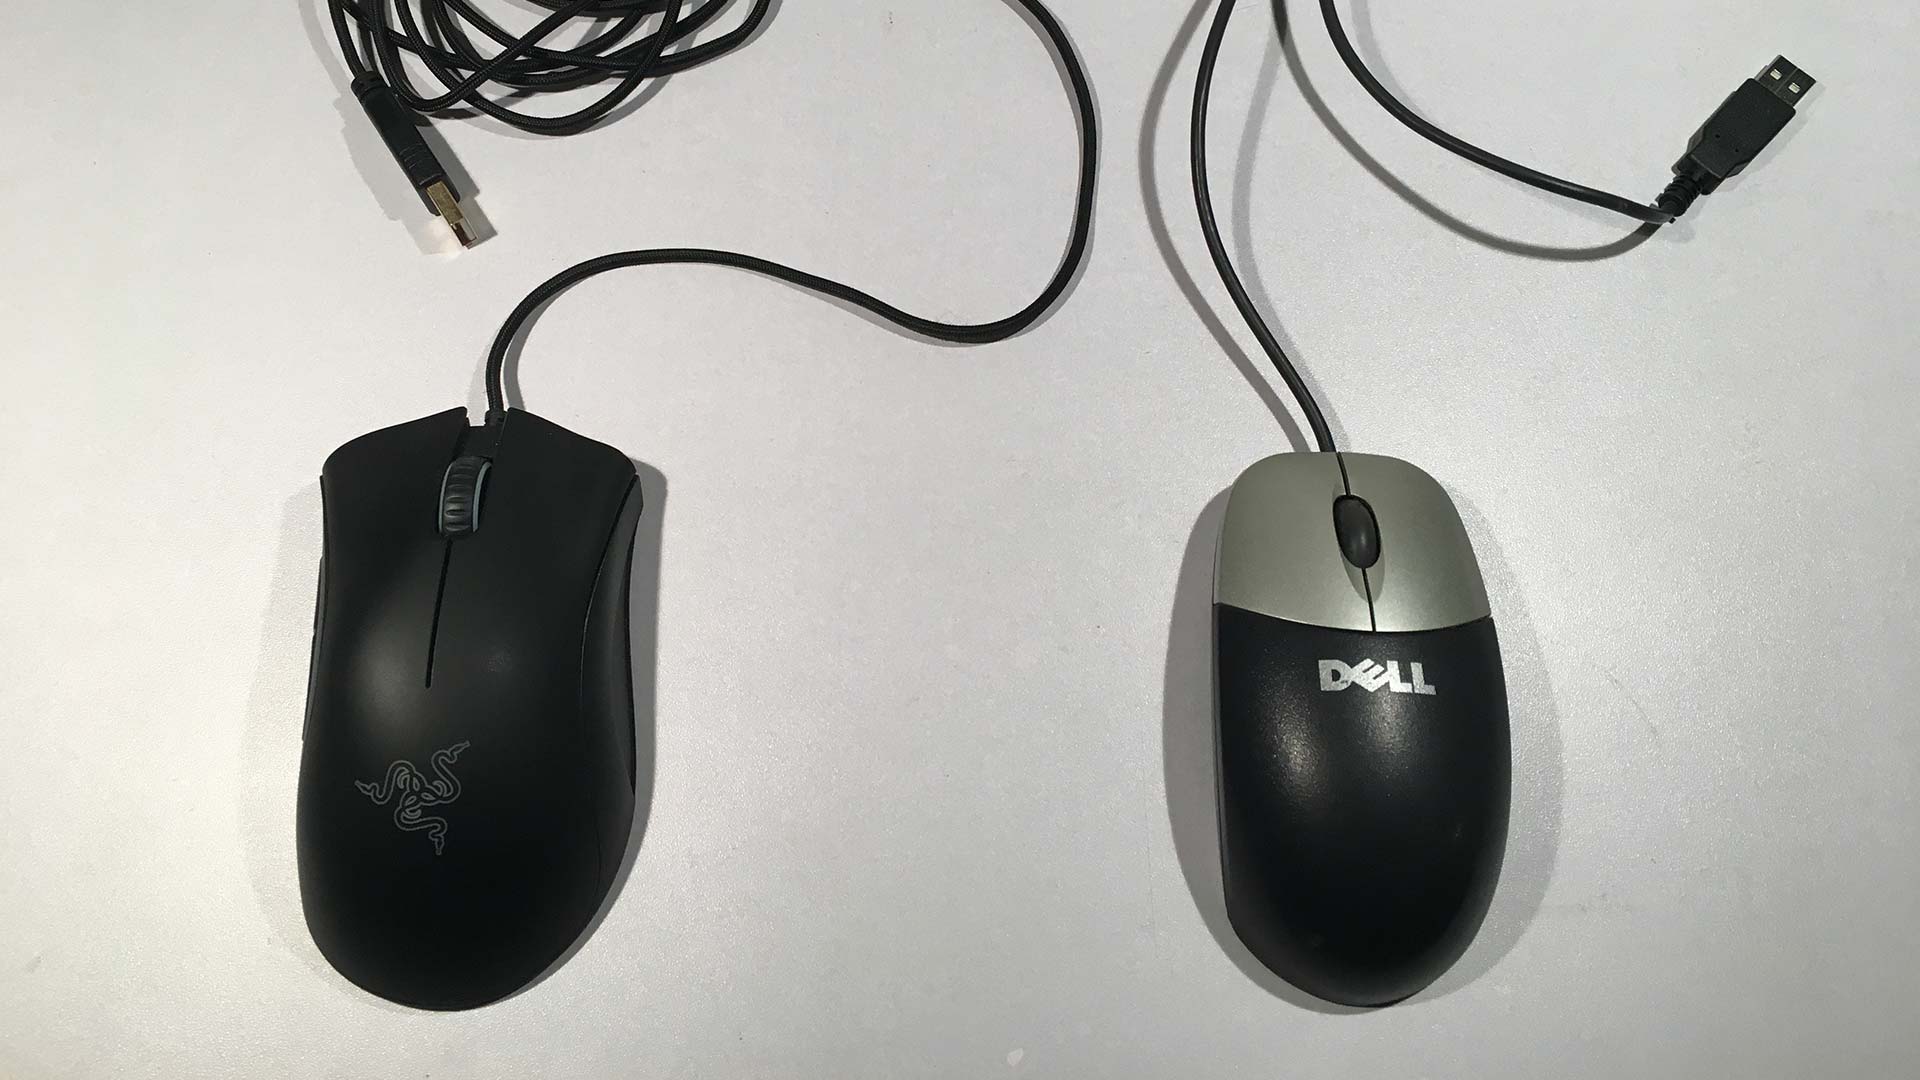 This repair is not even going to have me reaching for the soldering iron this time around! All of the electronics within the Razer mouse at the time of this blog entry are actually in perfect working order. It's just the cables on both of these mice that are giving us real crap. So what we will be doing is transplanting a cable from a Dell P/N: 0C8639 that we got for a whole dollar at a local used computer store! The average repair time is around 5 to 10 minutes. You will need a set of jewelers Phillips and Flat-head screwdrivers.
Recovering the replacement cable.
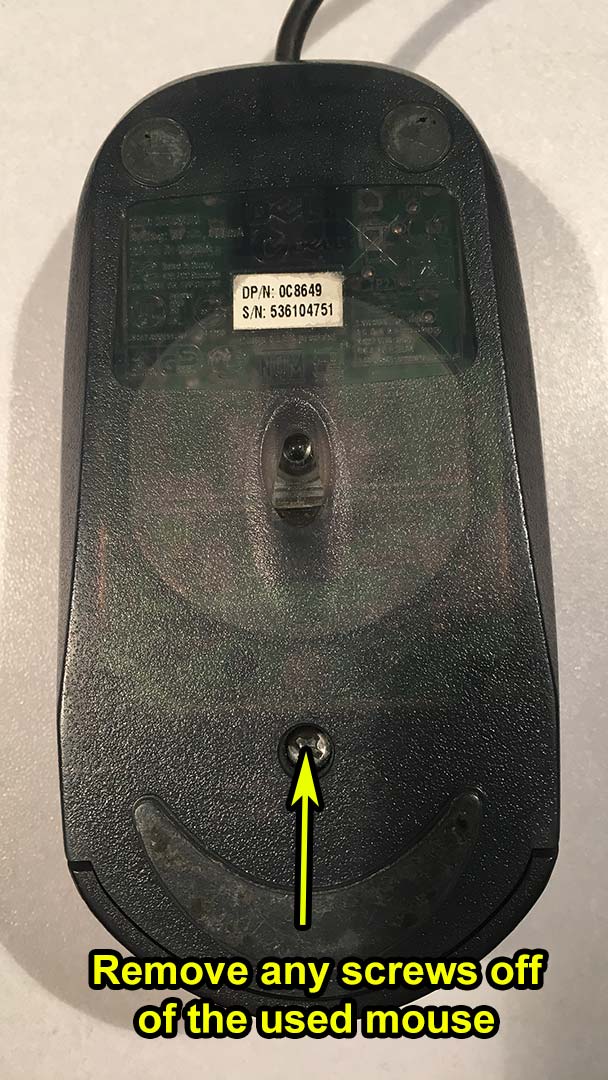 First, we are going to take apart the old mouse that we want to get the parts from. You don't have to be gentle with the plastics since we are about to scrap this mouse for all of its parts. This mouse only has one screw so and afterwards we have to pry the plastic clamps apart.
 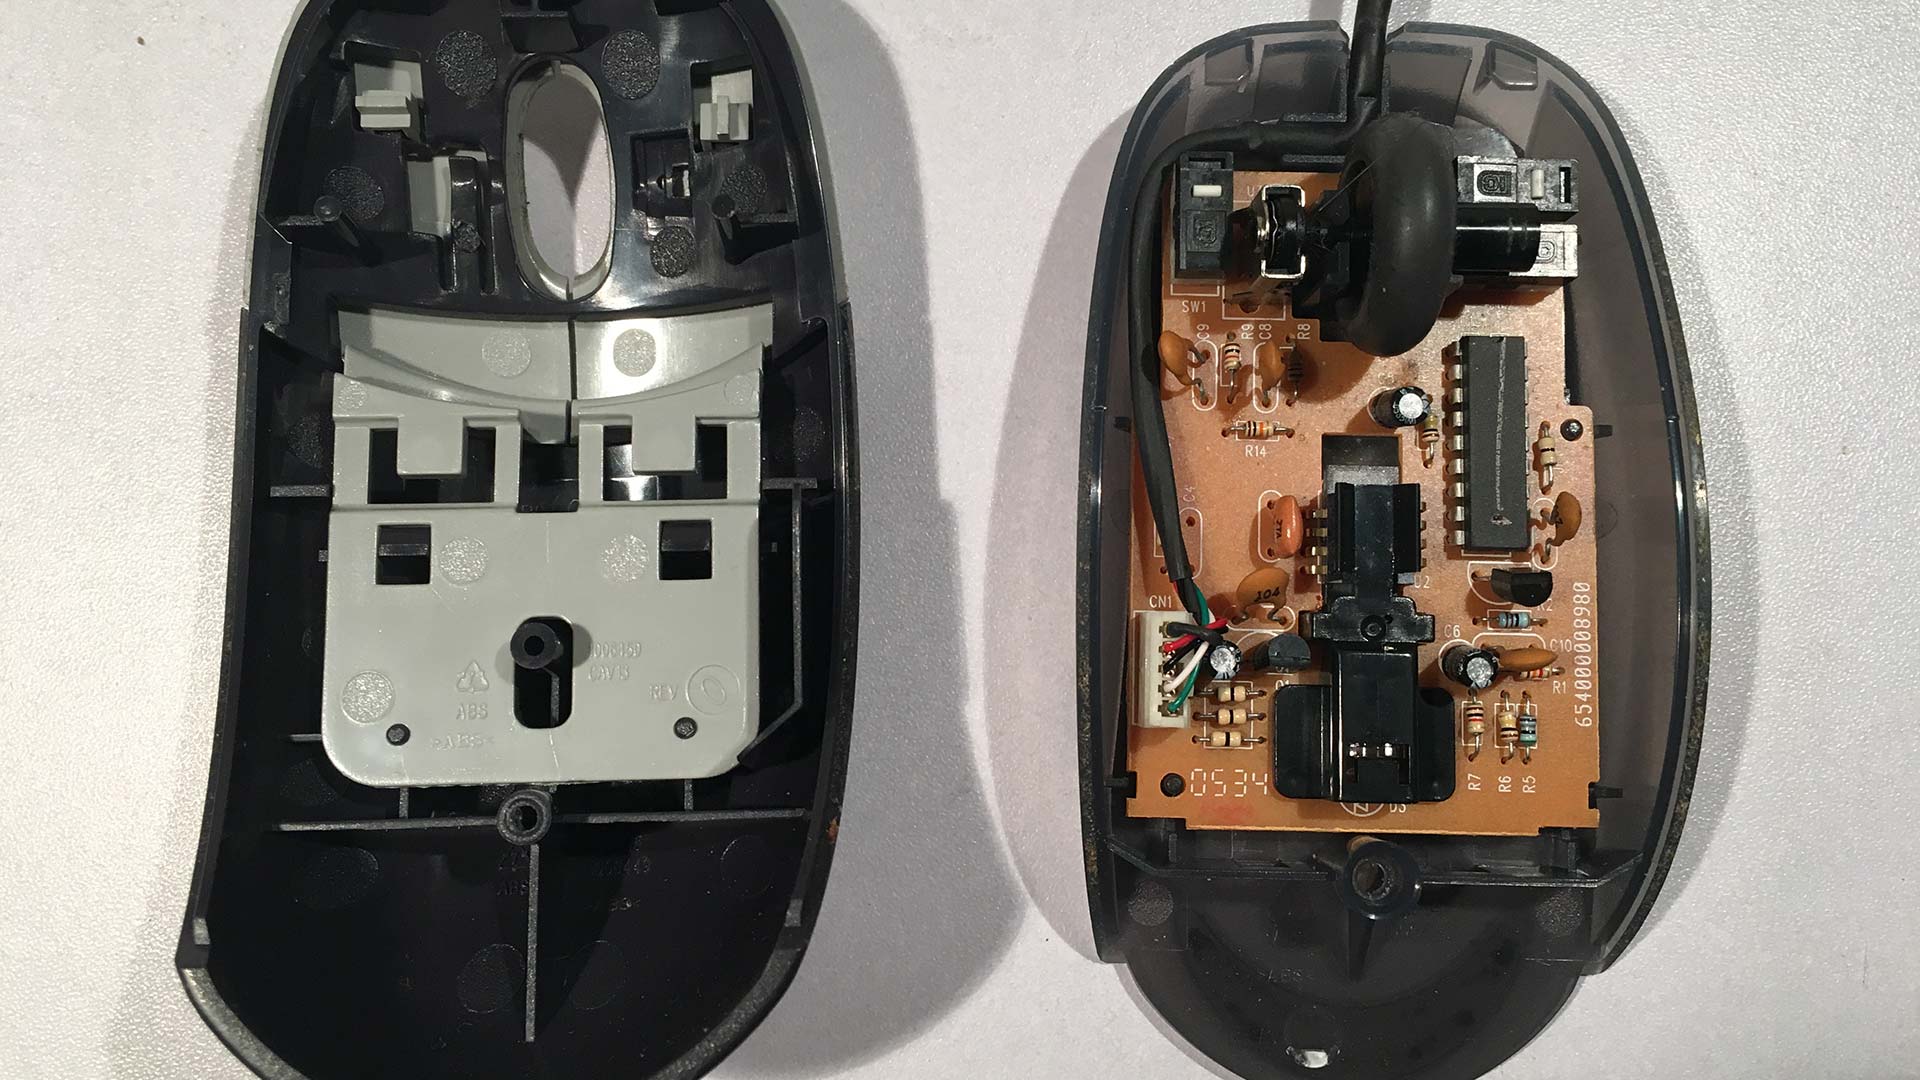 Once we popped the mouse plastics off the insides of this dell mouse are crazy simple! In fact we don't need to go any further and we can simply remove the 5-pin USB cable from the mouse main-board.
Other points of interest.
You may want to save the mouse board if you have soldering abilities as the left and right mouse button can be used to replace the Omron switches that are on the inside of your Razer Deathadder Mouse. Heavy liquid damage to the Omron switches will cause them to stick and it's practically impossible to clean out because of how small those switches are. There are other things that can be salvaged too such as the red LED but there really isn't much inside beyond that. Once you have recovered the USB cable from this mouse we are done with it.
Disassembling the Razer Deathadder Chroma mouse.
 Serial number blurred to protect the guilty
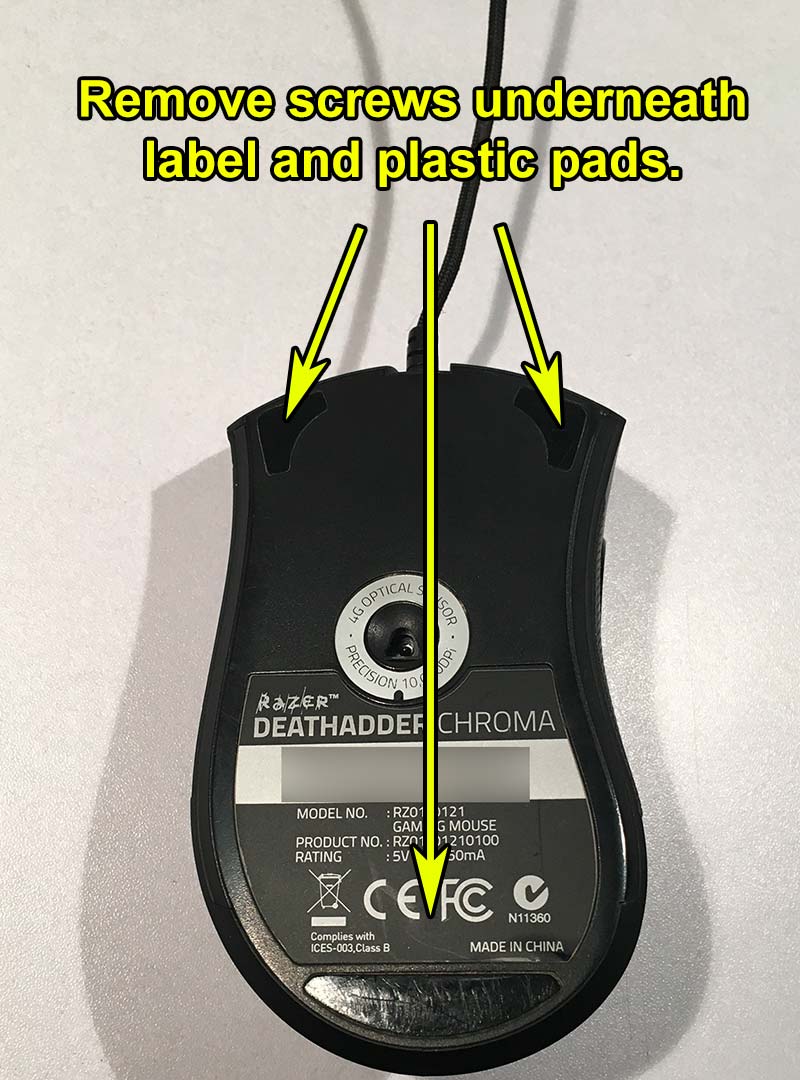
Razer decided to hide the screws underneath the label and underneath the PTFE plastics. Kind of annoying. But companies do not want their mouse serviced and want to shrug their shoulders and say that you broke the warranty too bad! Well, a one year warranty is crap anyway so let's rip this thing apart. 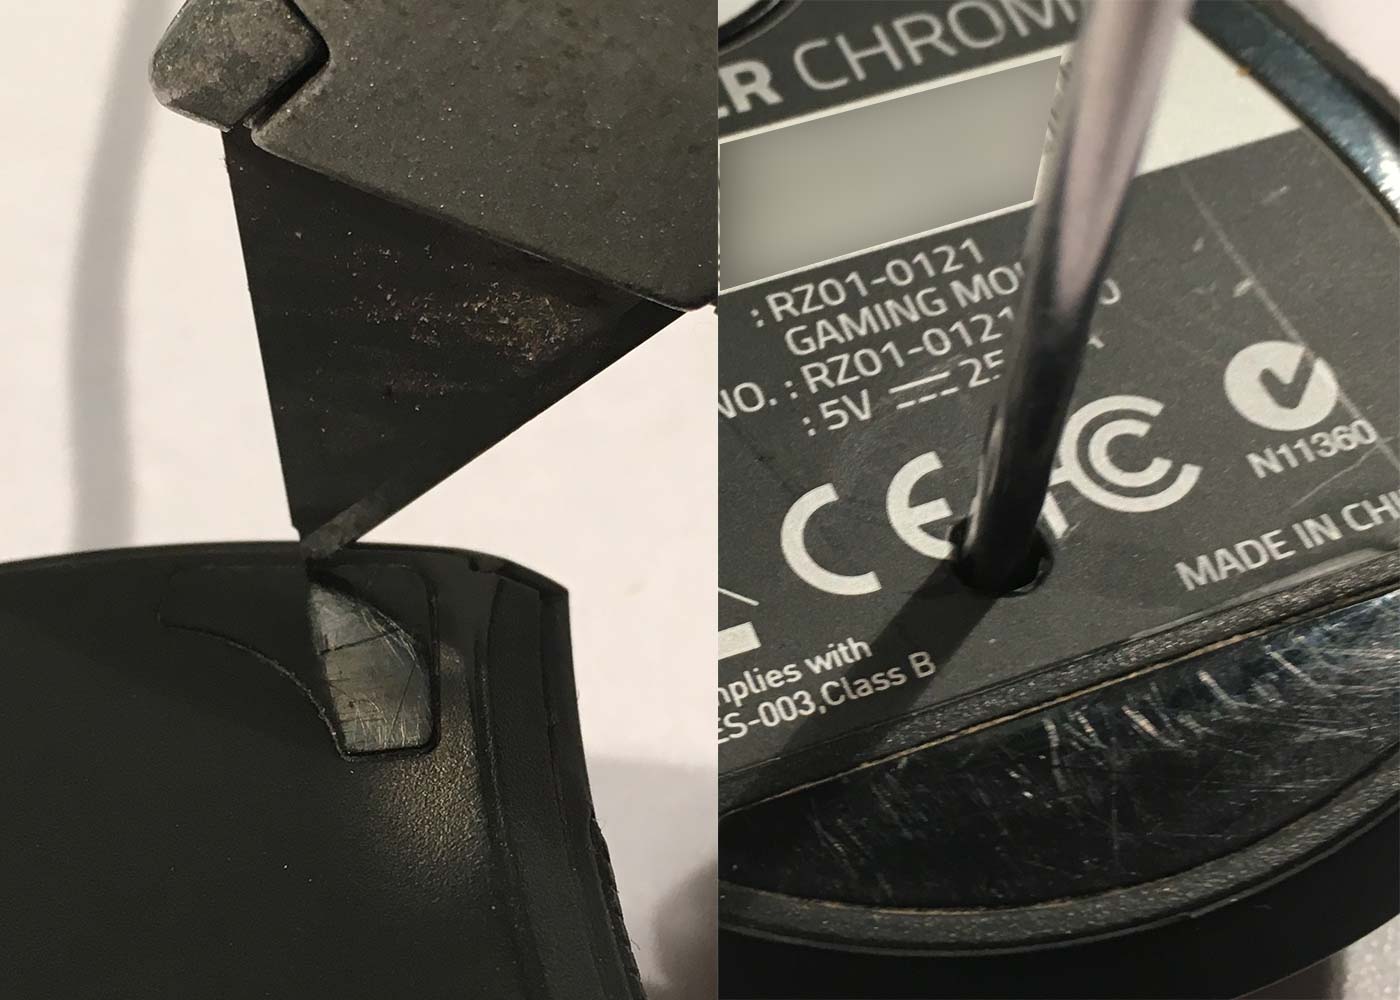 The best way to remove the PTFE pads is to take a razor blade to slide in between the PTFE and the plastic to pry up on the adhesive. Once you get one corner started you can slowly pry it up with your finger to preserve the adhesive of the PTFE pad. Razer does sell replacement PTFE pads if you care that much about it. To get to the final center screw punch a hole into the sticker with your screwdriver. All three screws will be plastic tapping screws.
 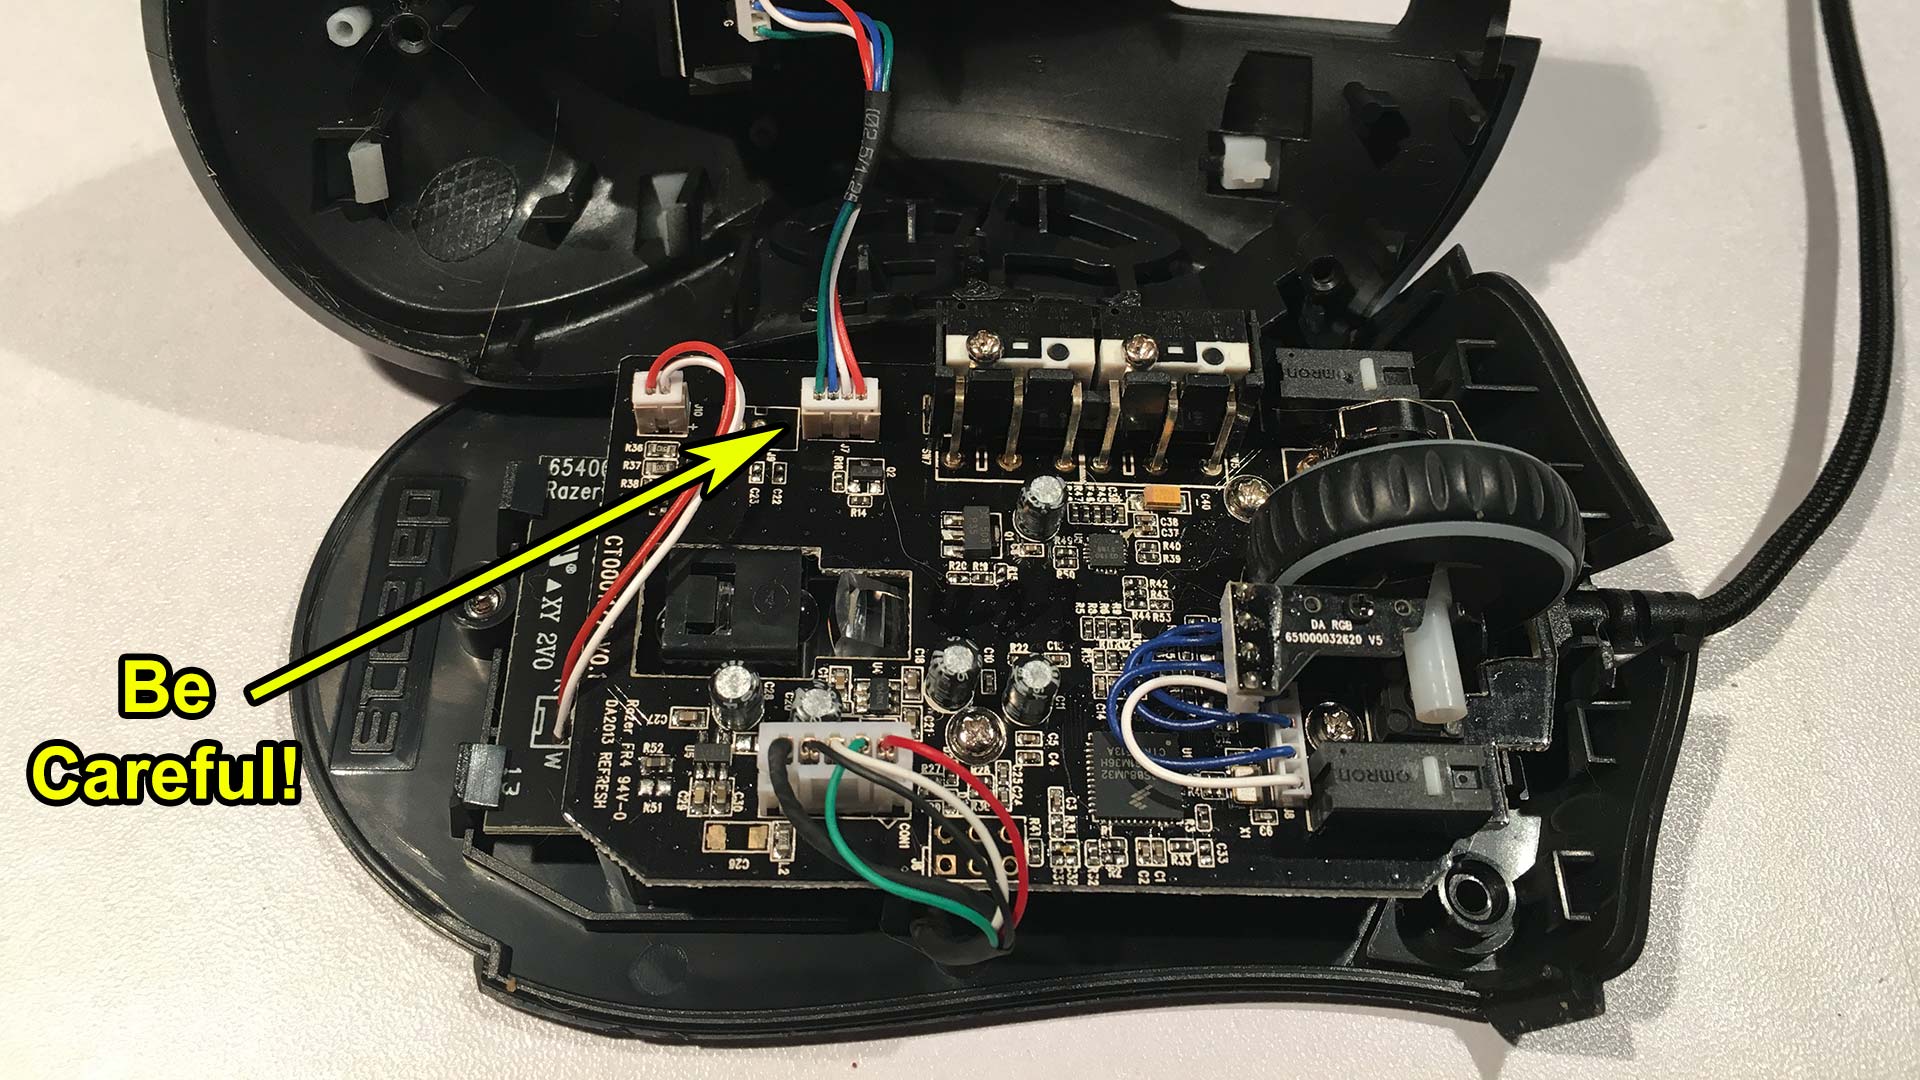 If this is your first time opening up your Razer mouse you may want to be careful as you pry open the casing. There is still some locking plastics keeping everything in place and if you pop it open without restraint you could easily tear the cable going up to the LED logo color changer. During this stage, we can also see the same 5 pin USB interface that was in our dell mouse. but it's buried underneath the board.
 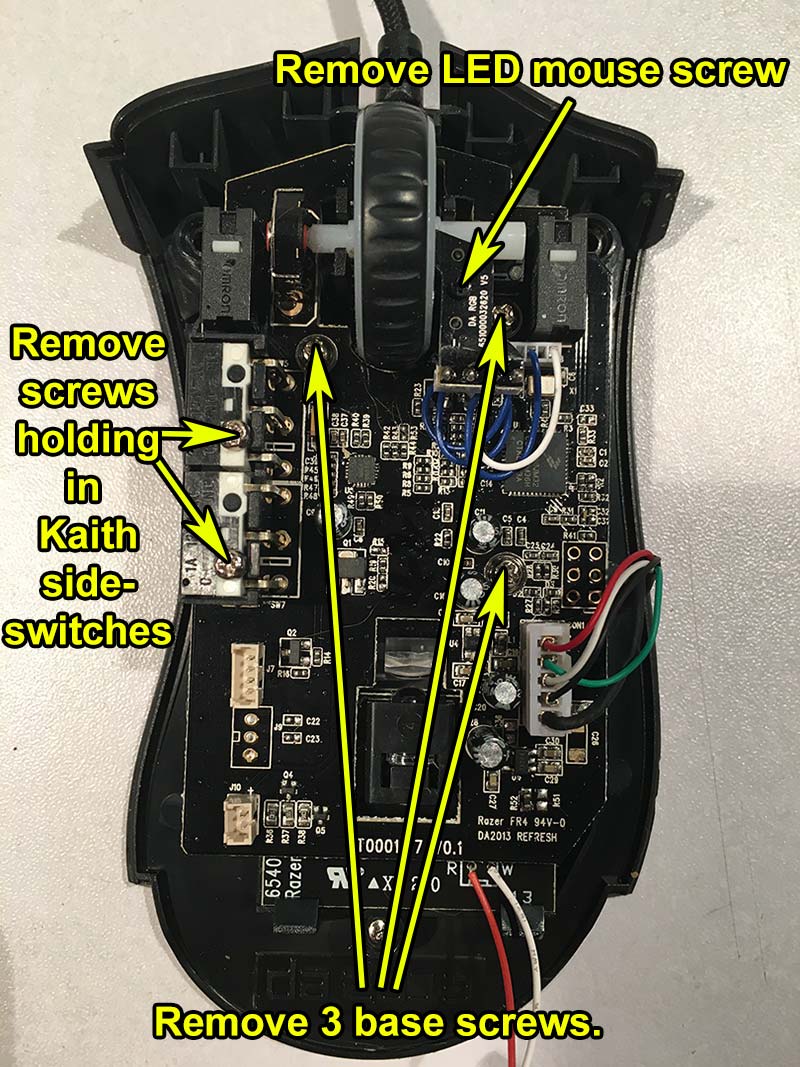 Razer threw in a ton of screws in an attempt to make their mouse durable. It's a shame that they didn't have this type of thinking on their mouse cable or else we wouldn't be making this blog entry right now. Remove all of these screws. the sizes will be different between the base screws, the Kaith side-switch screws and the micro-screw holding the mouse-wheel LED assembly. You may need to break out the jewelers set to remove the mouse-wheel screw.
 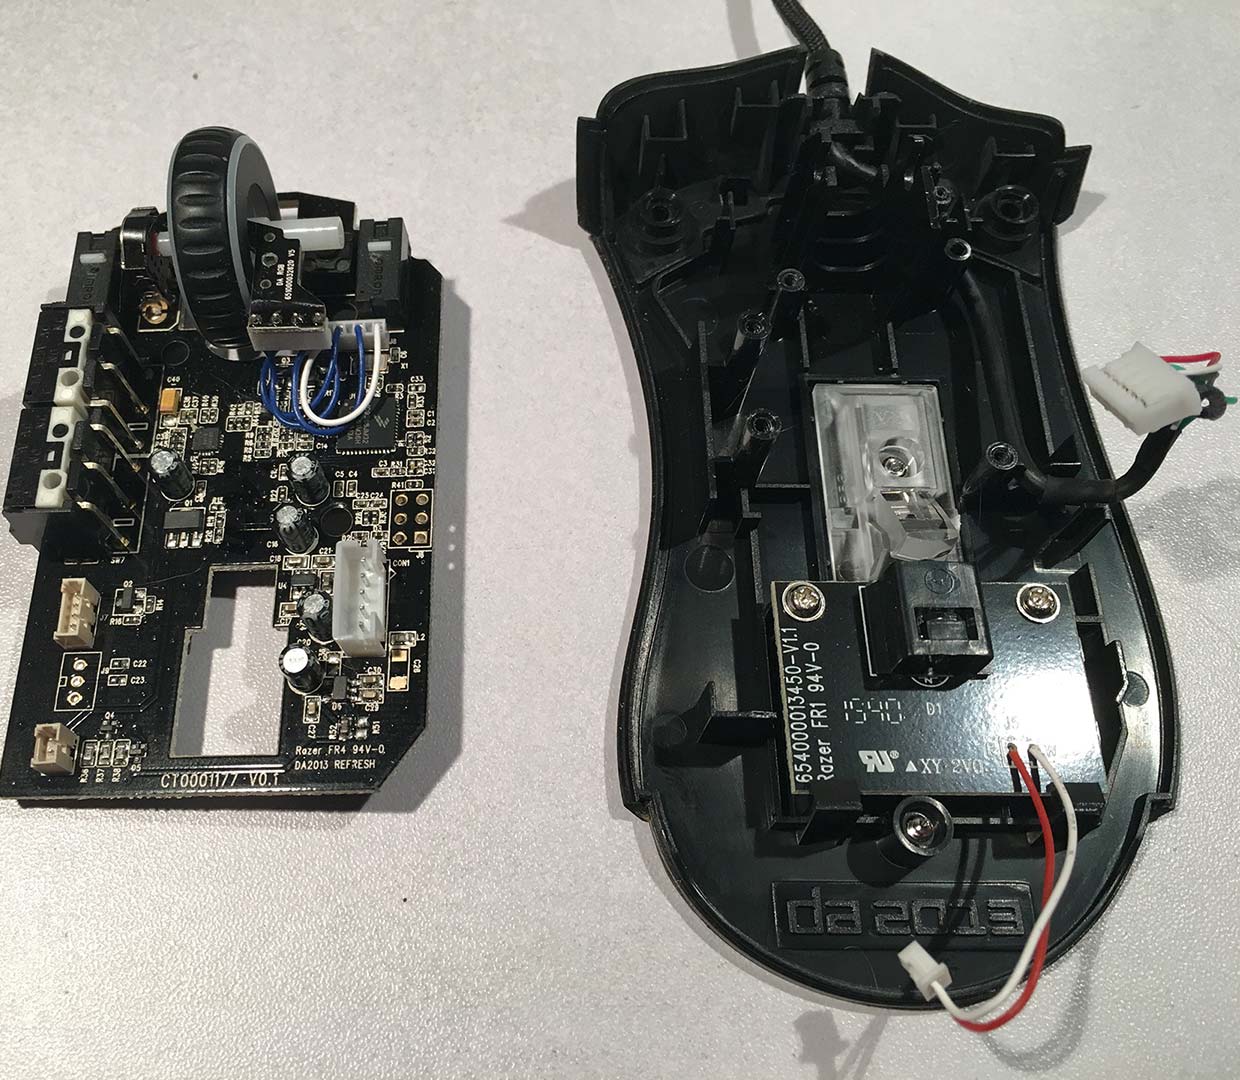 After all of the screws are removed and the final two cables (Laser and USB cable) are ejected you can gently pry the Razer Deathadder Mouse circuit board out of the three-pin plastic cradle it rests in. We now have access to the USB cable inside and can simply slide it out of its casing. At this point it's probably a good time to clean your mouse wheel of any hair or debris that has collected onto it during the course of using it.
 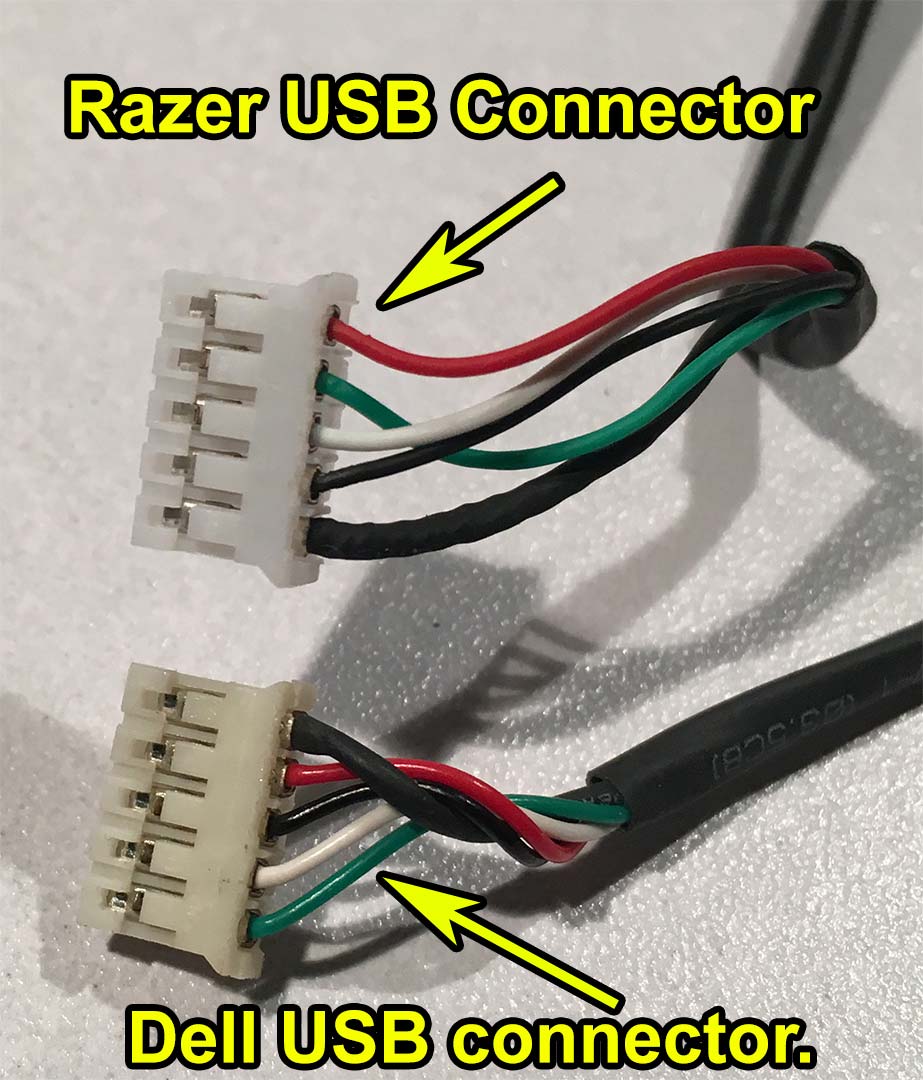 Now we get to the important part which is actually looking at the colors on the 5-pin connector. As you can see the color combination is totally wrong! This will result in terrible things if we plugged it in as-is such as feeding 5+VDC down the data line blowing up the chip on the USB mouse. or damage to your computer.
 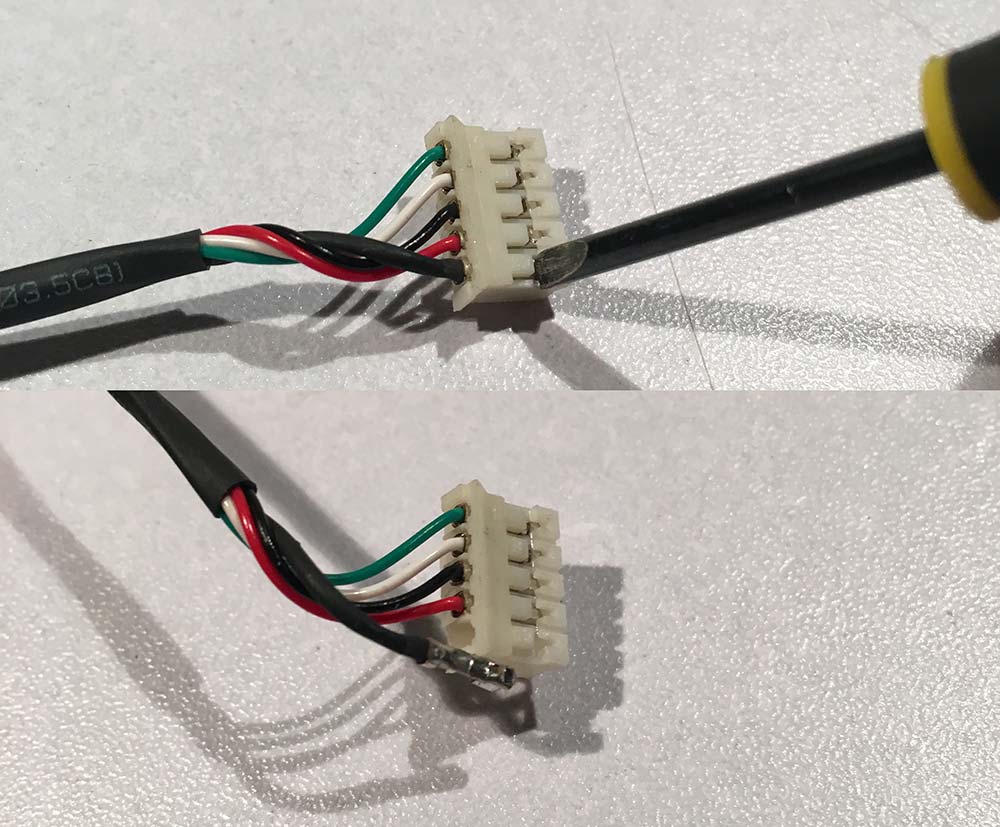 The connector is formed by a crimping machine that places a metal jacket around the ends of the wires that click into place inside of the plastics.Using a jewelers flat-blade screwdriver we can begin to pry on the plastics holding these pins in place. while prying up on the plastics we gently tug the cable out of its sleeve. We repeat the steps for all 5 pins since we have to re-organize them all. Note: if you break some of the plastic tabs its not the end of the world. you just have to make sure that individual wire is pressed all of the way down. In the unfortunate event that you completely shatter the plastic interface you can take a picture of the old razer interface and begin extracting that as well.
 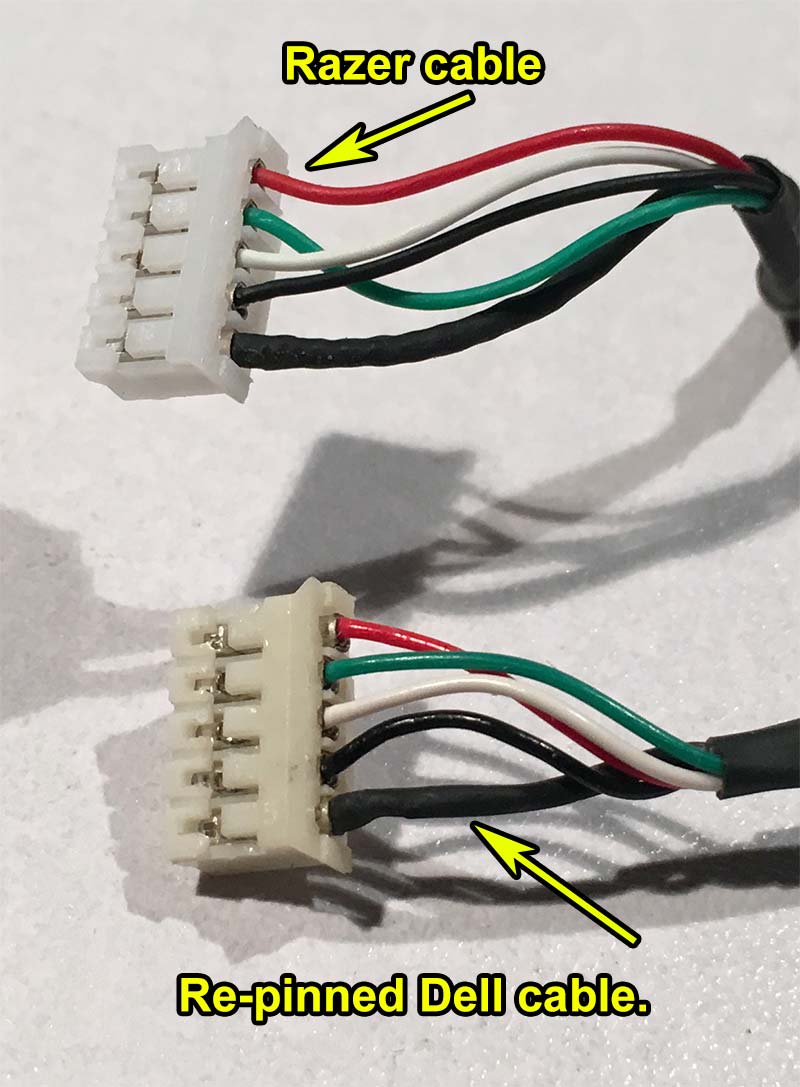 Lining the two cables side by side after re-organizing the colors shows that everything now looks identical. we can plug the salvaged dell mouse cable into the Razer Deathadder body.
 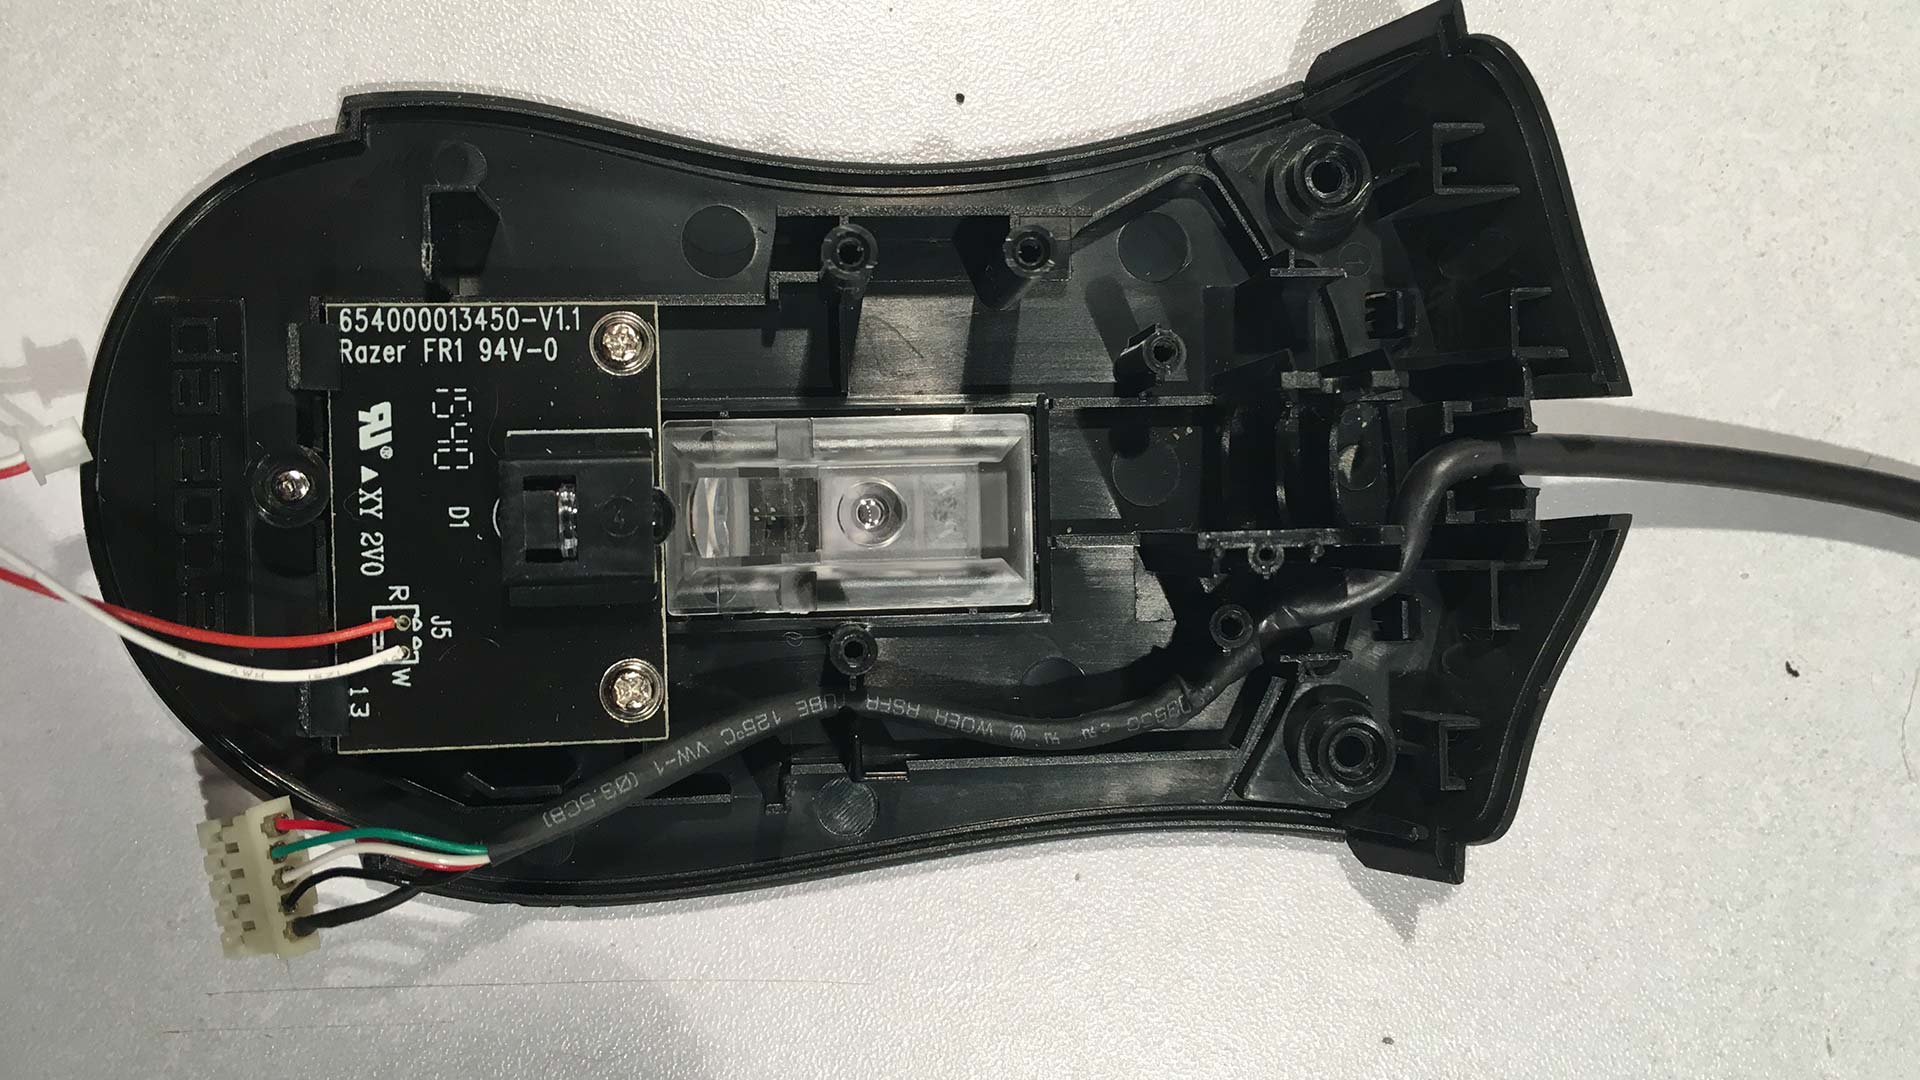 When placing the replacement USB cable into your Razer be sure to give your interface just barely enough room to wrap around the circuit board and hook back up. If you give your cable too much slack it could prove very difficult to close the casing of your mouse after you have re-assembled the unit.
 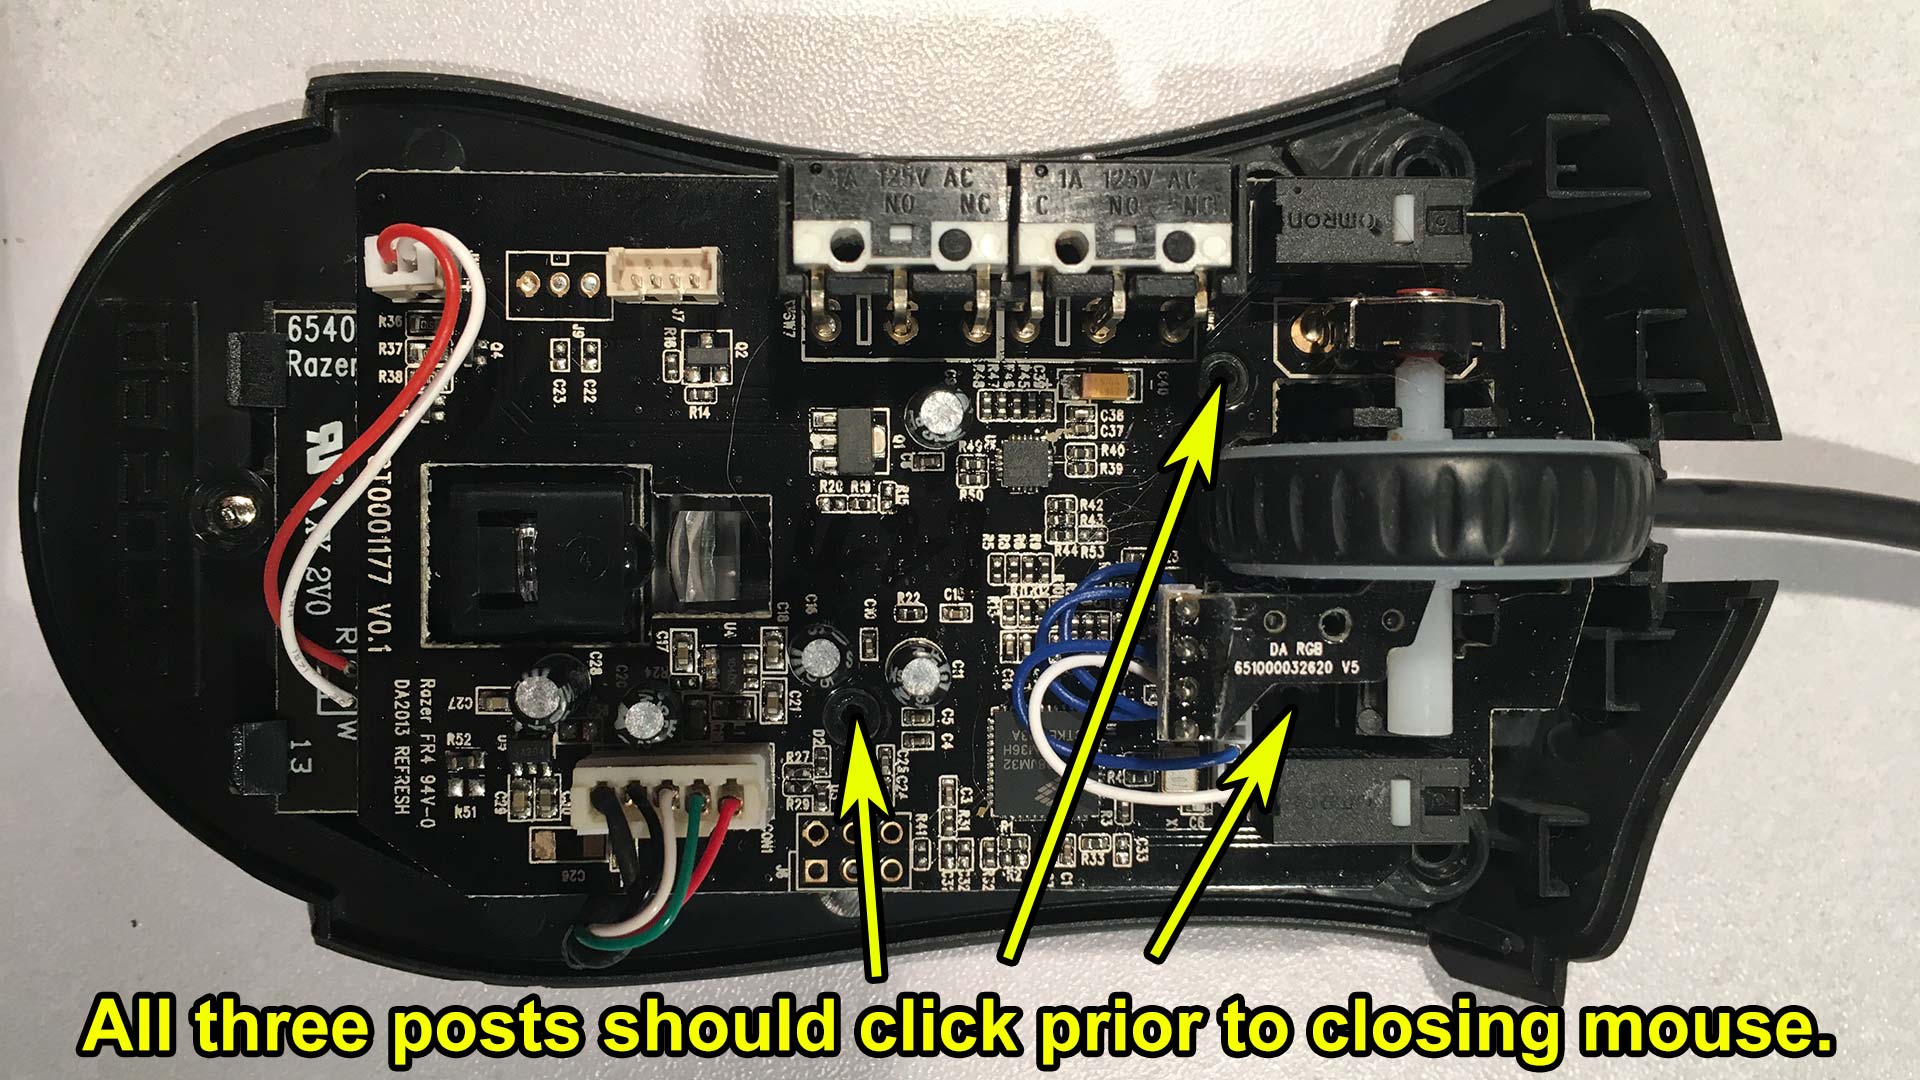 after you re-insert all of your 5-pin USB connector and the 2-pin laser connector you will want to line up the three plastic posts that hold the circuit board in place. You can press down lightly and you should hear the plastics pop into position. Afterwards you can plug in the 4-pin RGB Led color connector and put the upper shell onto your mouse. Prior to screwing the last three screws onto the bottom of your mouse check to make sure all of your buttons (wheel, left, right, two side buttons) are all clicking well. You don't want to be unscrewing the mouse too much since every screw is plastic tapping and can strip easy.
The cosmetic effect.
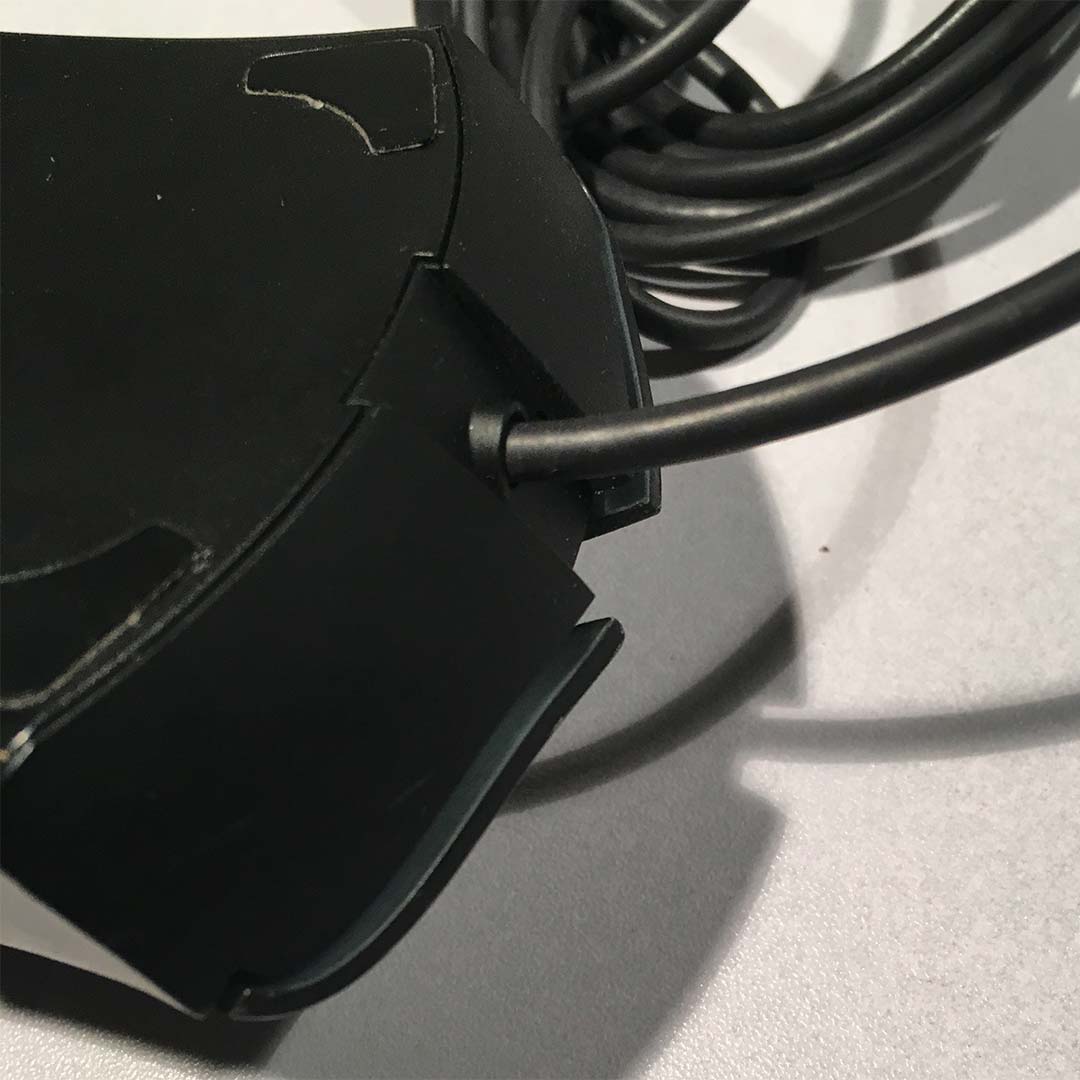 Since the replacement dell mouse cable lacks the cool stopper plastics (known as a Strain Relief Cord or a Boot Wire Sleeve.) There is going to be some minor cosmetic effects to your Mouse. However, do not worry about the lack of the Strain Relief cord since it's wired inside in such a way where it would be near impossible to unplug it from the circuit board in the event you use your Razer Deathadder mouse like a morning star.
  For those interested in doing a more professional job unlike myself. If you type in "Strain Relief Boot Cord" into eBay you should be able to find a few vendors that can supply you either a 4mm inner diameter one (the diameter of the dell USB cable) or 5mm inner diameter versions. You may have to shave down the clamp to size.
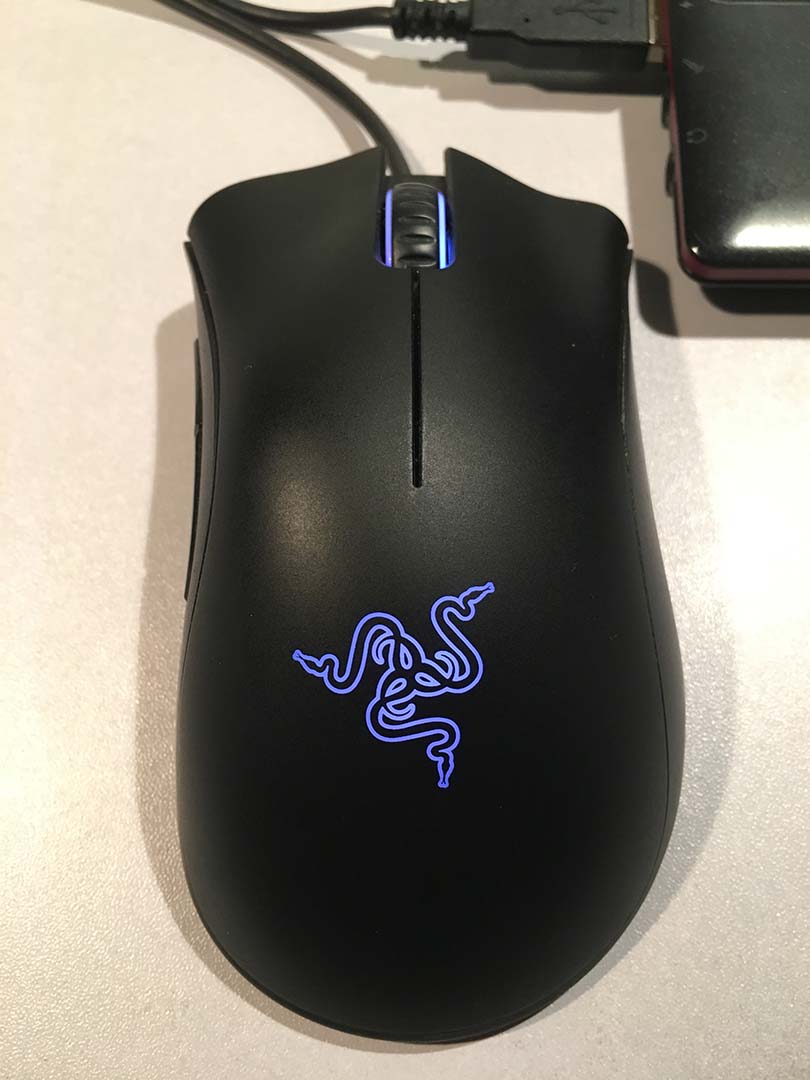
Cabling alternatives.
Well, with the cable replaced from a one dollar dell mouse both of the Razer Deathadder mice are back up and running once again. and will probably keep going like a tank now that the crappy cel-phone charging braided cable has been replaced with something that can be rolled up and packed away for travel and use. Sure, it's not pretty or gold plated. But it's functional. Because like Razer. I used to be a gamer too. I prefer to have my hardware functional over it looking pretty. I think a lot of people feel the same way. Now, for those who do not have a extra dell mouse to take apart. You can use a standard USB cable and with some soldering skill you can simply clip the wire-leads on the old Razer 5-pin interface short as the break is probably somewhere outside of the mouse. And from there you can crimp or solder and shrink-tube it back together again.
Update 7/25/2017 - An unlikely source for mouse-grips:
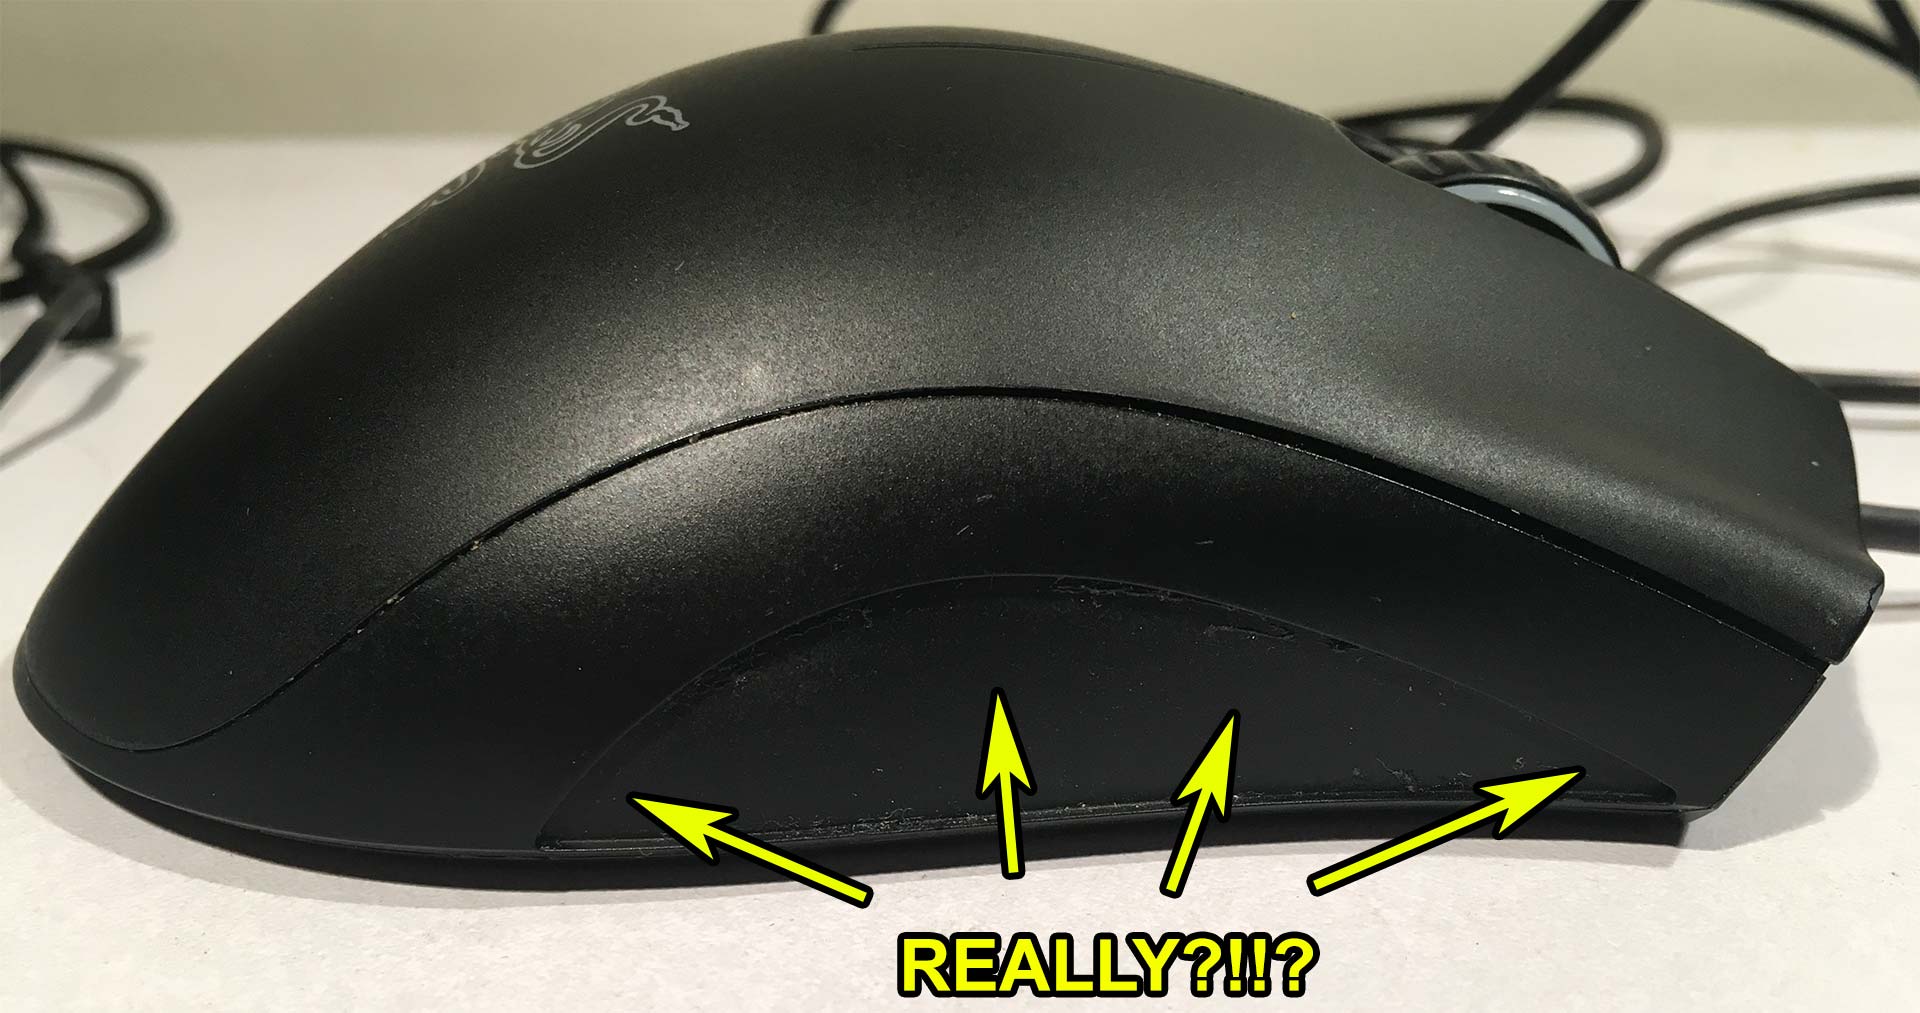 It seems that Razer has yet-another quality issue in regards to their mice in the fact that the grips on the side fall off easily. Although you can get the PTFE pads from Razer for a few bucks you unfortunately can't get the side-grips. You could glue them back provided you didn't lose them. However once the grip is gone it's gone!
 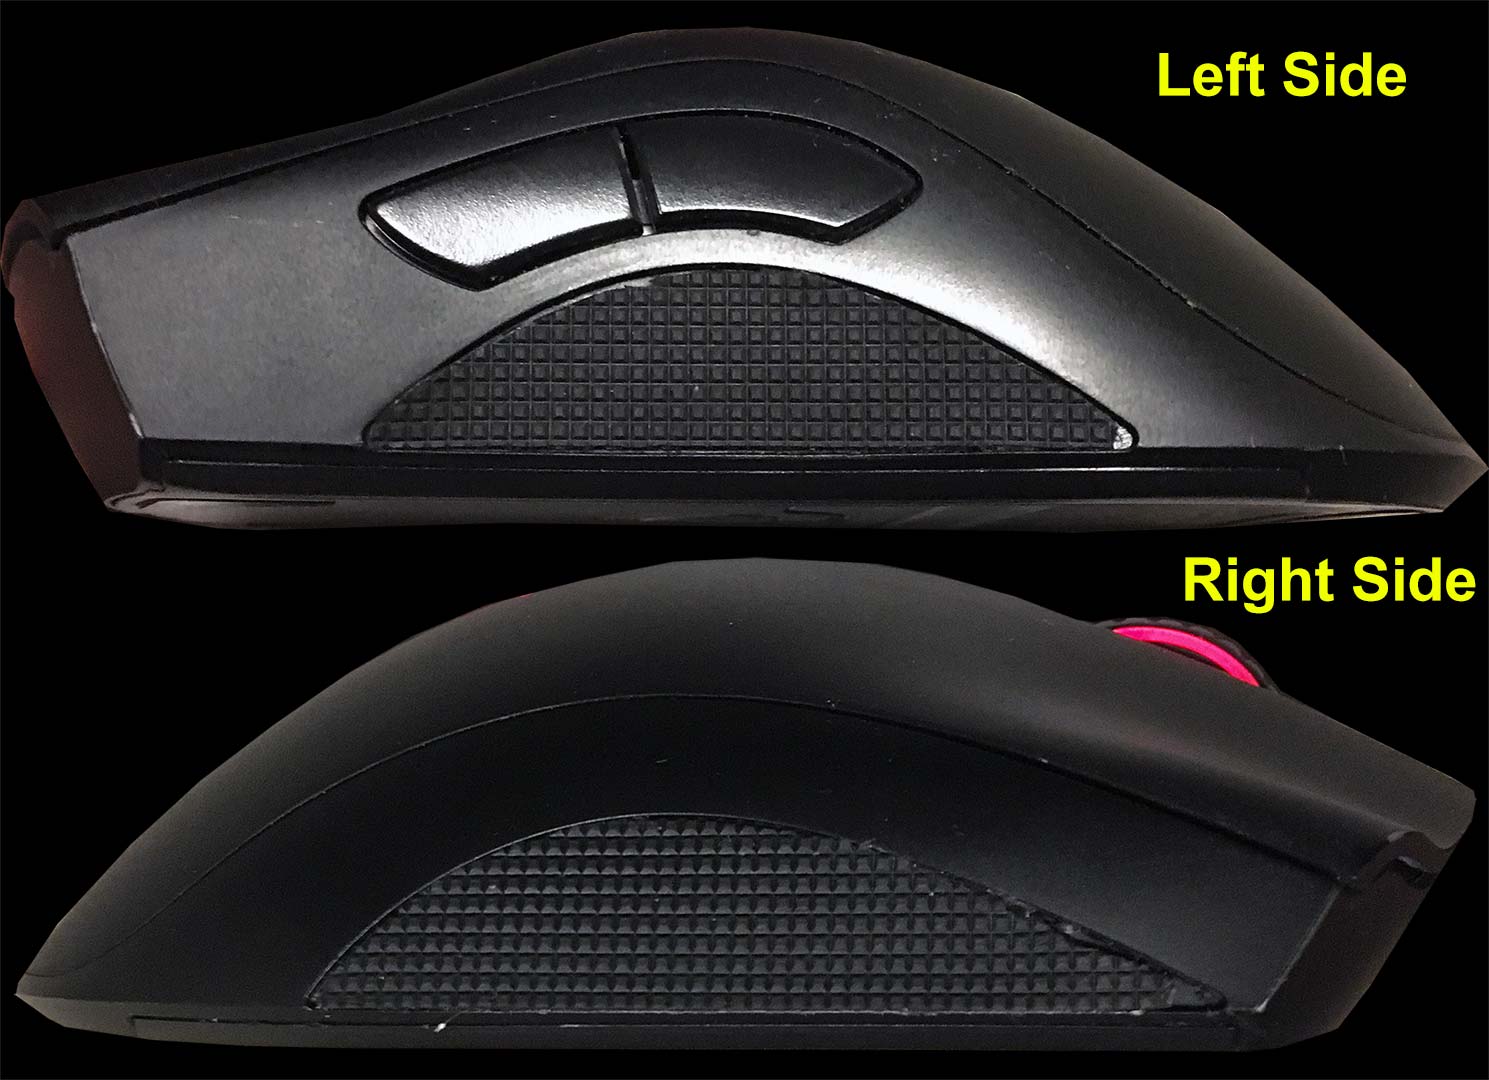 Despite Razer not providing mouse grips for their Deathadder for when the adhesive falls off due to intense gaming. I found replacement pads from an unlikely place. We've picked up the hobby of skateboarding here as pointed to you on our first blog and we love trying out new technology on our skateboards. One of those new types of technology with non-abrasive grip-tape made by Duckle or DKL Skateboards. After applying our grip-tape to our board we were left with the usual corner scraps one tends to have left behind when you cut grip-tape to your deck. DKL grip-tape feels very much like a ping-pong paddle which is perfectly fine to have against your fingers on a gaming mouse. Non-abrasive means it won't hurt our shoes on your skateboard and our fingers as we mouse. Right guys?!?
  Stenciling out the pattern was easy considering the Razer mouse has recessed plastics and it was a matter of using sharp scissors to cut out the DKL. A razor blade was used to try to fit the DKL grip-tape into the Razer mouse cavity. We probably could've done a better job with the edges but hey. It's better then nothing really!
Cost of grip:
DKL has it on their website for almost $10. Which is a bit much if you have no intention of skateboarding. But if you run a LAN gaming center of the cyber cafe with multiples of these types of mice then it may be worth getting an entire sheet just to replace the crap razer grip-job. Also noting application, you may wish to take some sandpaper to rough up the inside of the mouse so the adhesive sticks better.
Final thoughts.
Gamers can be petty and hyper-critical about certain things because they put their total faith behind a product or company. It's part of being a fan of something or of someone. But quality problems is where it is justified for the average gamer to completely flip out on them. Like the side-grips falling off of this mouse; This shouldn't happen because Razer, the company that holds the slogan "By gamers for gamers" should know better. Although you can get replacement PTFE pads for your Deathadder mouse. You can't get an extra cable or side-grips for your out-of-warranty Razer mouse. $60(USD) Planned obsolescence at its finest!
Anyhow, that's all server has to say.
END OF LINE+++
Hi, do you know the rating of the resistors used for the mouse click switch? if you do please reply. Thank you.
I have a Deathadder Chroma that no longer powers on. I have pulled out the wire, and tested the +5v Red connection with a multimeter, and it does get power...
I'm guessing there's an issue with the mouse PCB. Any ideas? Really need something to go off of here.
Thanks
How's the continuity of DATA + , DATA - ? The chip that governs over the colors may not enable if it cannot sense the computer.. I can see if there's some more test points you can try. typically there's a DC-DC chip inside that takes the 5v and brings it down to something that the chips inside can use like around 3.3v. I just have to pop mine open and see which one controls that.
thanks homie. wish I found this earlier, I ended up just throwing my mouse out and buying a new one
Aww, that sucks to throw out a $30-60 dollar mouse! Sorry I wasn't there fast enough for you!
THANK YOU fucking mouse lying to me saying this cable is better -_-
Never trust mice.;) Glad it helped out.