
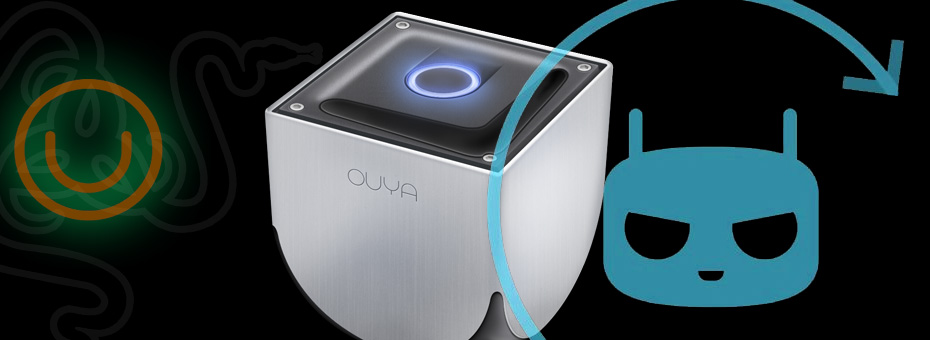
Cyanogen mod the Ouya.
Why Cyanogen Mod (sometimes referred to as CM11) you ask? The future of Ouya and the news of the most recent acquisition of the company to Razer has made a lot of Ouya owners such as myself feel rather uneasy with the console business as a whole. Couple this with an aging OS to the point where some favorite applications such as Kodi no longer work under android 4.1 due to programming issues. Razer is now stating that they will keep the Ouya servers up for another year. But then what?
I guess they pull the plug and tell console owners such as myself to buy the next latest/greatest razer box. I will probably laugh and buy an Nvidia shield if I ever get an Android box again. But that's not the point of this blog entry.
The point of this blog entry is to keep Ouyas running. Because both Ouya Inc. and Razer Gaming cannot tell users like me when my little silver box is dead, that is up to me to decide when my little silver box is truly dead. And Cyanogen modding is an alternative. By heavy software modding your Ouya, you can continue to use your box well after the servers for Ouya are long gone.
"Note: If you get a black screen but the audio is playing. Or you got a potato PC and it's studdering. We have fallback Links below."

Video tutorial fallback mirrors:
In case you have no script enabled or cannot see the title video on this website for some reason. We have provided direct links for these videos. For more information about the standards we use on this site click here if you would like to know more.
AV1       - Link
MP4/.h264 - Link
OGV       - Link
What the hell is Cyanogen?
For those that have never touched an Android device in their entire life; Cyanogen is open-source firmware that is typically modded onto cell phones. Many cell phone companies do not like people loading their custom firmware onto their phones and will go as far as to void the warranty on the said phone if you upgrade it as a scare tactic to keep users far away from Cyanogen.
 Is this procedure even legal?
The short answer is "yes." Unlike the original Xbox and its soft-modding and homebrew community where Microsoft would go after ANYONE making a .xbe file. Ouya founder Julie Uhrman stated in their Kickstarter video on Invidious indexed at 2:21 that
"The console is open for hackers who want to tweak the box and make it their own." - Julie Uhrman
So it almost makes sense for lovers of Cyanogen mod to port the software over to this game console. As for the new company Razor, they are only interested in the Ouya Dashboard with the "discover" store where all of the devs have signed up to have their games published. Razor has no direct interest in the legacy Ouya hardware. Pic was not relevant, We just like that "Pause face" at 2:21. :)
Why even install Cyanogen mod to the Ouya?
Like any decision that you make with your device, there are always advantages and disadvantages to installing new firmware onto a device. Let's go through some of them.
The good of Cyanogen mod:
- Kodi - At the time of this posting Kodi is moving away from Android 4.1 and onward to Android 4.2 for their latest release of Kodi v15 which makes it much easier to develop for what they need. This of course created a bit of a backlash in the Ouya community as the default firmware for Ouya is still sitting at Android 4.1. Kodi v14 is a perfectly fine video player that works brilliantly side-loaded onto the Ouya! But anyone who has witnessed the Kodi/XBMC progression will tell you that the moment the latest version gets released suddenly plugin development sort of stops on the previous versions. So Kodi is now telling Ouya users to upgrade to Cyanogen to experience v15 or to stay behind on v14.
- Google Play - I have published articles in the past on how to get google play working on your Ouya. But over time Google has gotten more and more obnoxious with the way it decides to update itself. Sometimes on the Ouya OS google doesn't update properly. The end result is getting a lot of 921 errors when downloading APK's of your favorite utilities and games off of Google Play.
- Side Loading - There always will be compatibility issues with sideloading any game or application on any Android device as it's just going to a newer version of Android it opens up the doors on games that otherwise would've crashed on the Ouya before. Once again, it gets back to how newer Android operating systems can handle older APKs as well as some of the newly compiled APKs.
The bad of Cyanogen Mod:
- Ouya Discover Store - If you like Ouyas Discover and do not want to screw around with getting your console working with weird controls or have to occasionally hook and keyboard or mouse to exit an application this can be problematic.
- Don't want google play - You've never rooted your Ouya and have no intention to.
- ROM flashing risks - Like anything, there is a danger of hard-bricking your Ouya
- Kodi v14 sideloaded on your Ouya - It's perfectly fine for what you do and has no reason/intention of going to Kodi v15.x and above.
- Hardware-based compatibility issues - see below.
Then Cyanogen mod will not be for you and you can stop reading right now.
Ouya Compatibility chart with Cyanogen Mod CM11:
All Ouya consoles can accept CyanogenMod. However, there is some compatibility issues in terms of Wi-Fi and Bluetooth. 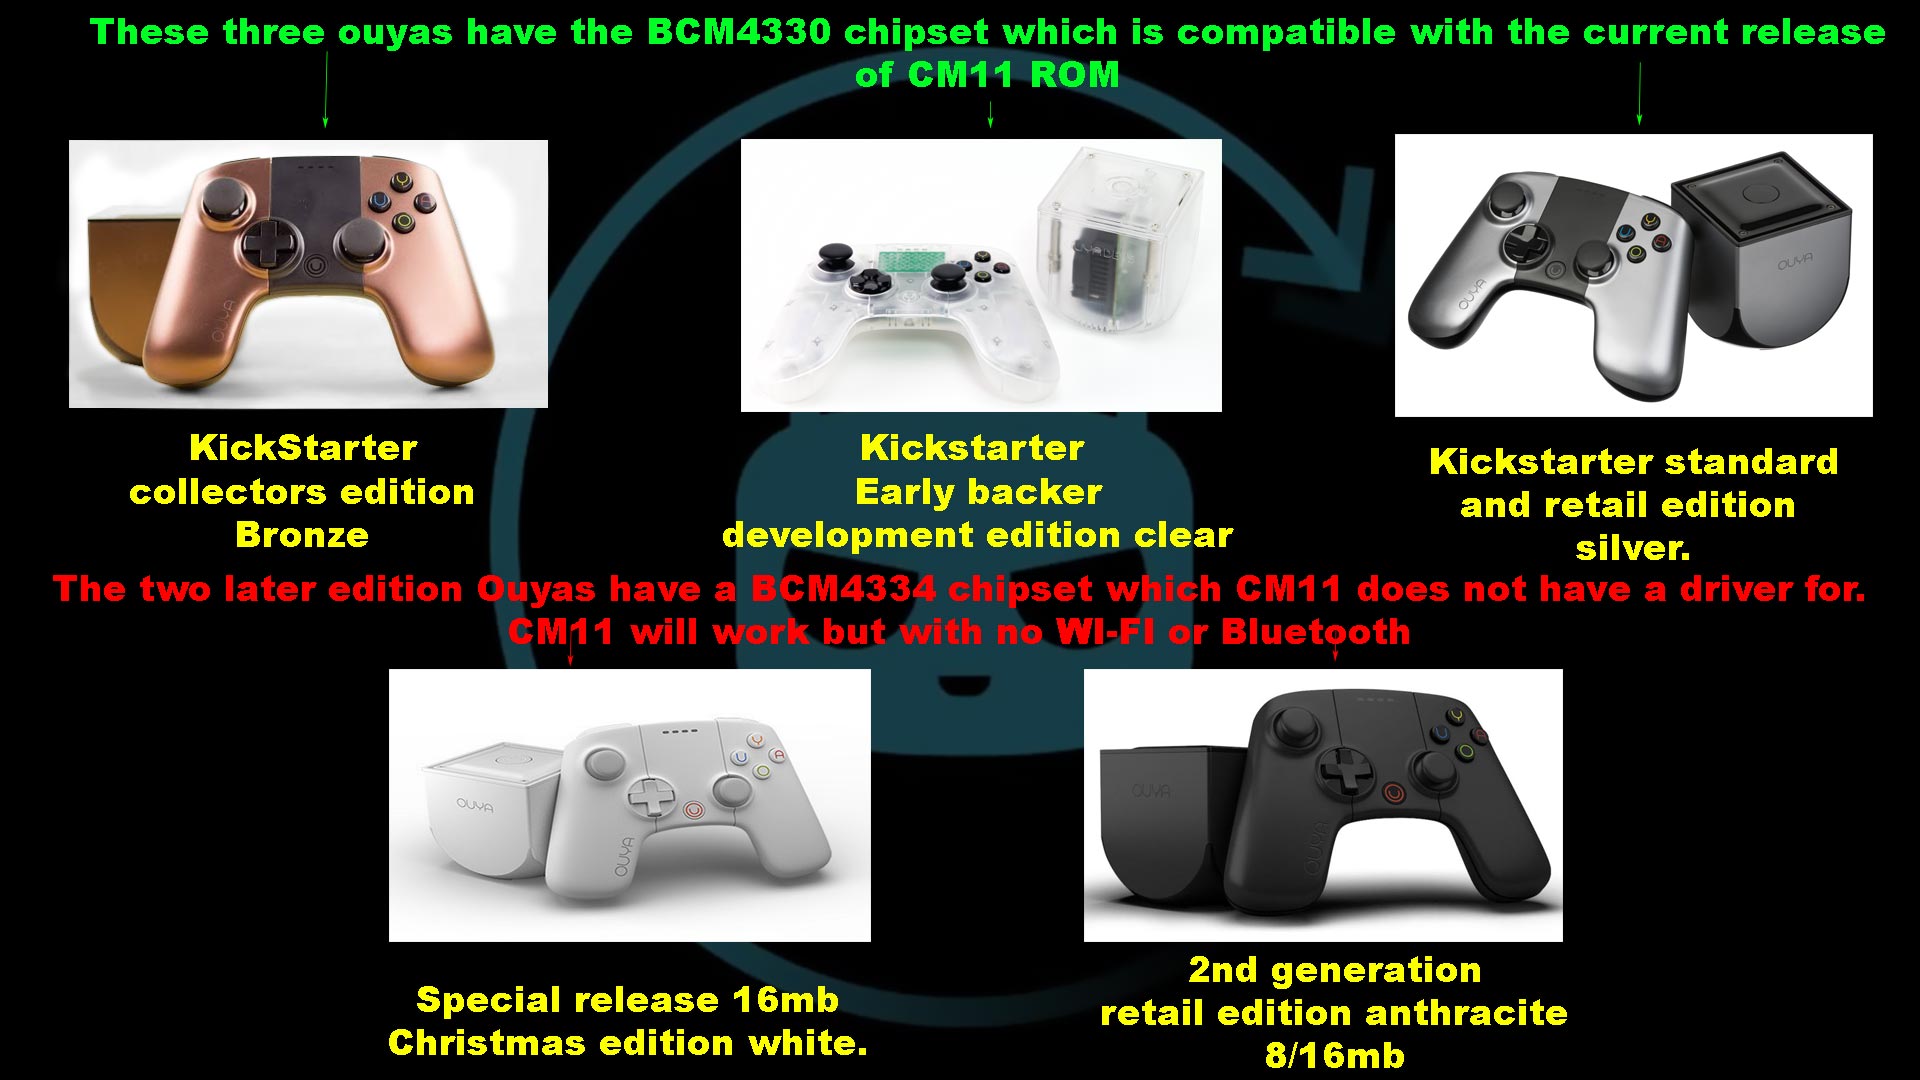 1/8/2016 - I have decided to provide a compatibility chart to help decide if CM11 is right for your Ouya.
- All Ouya systems with the BCM4330 chipset are compatible with CM11 for Wi-Fi and Bluetooth. This includes the development edition clear, Kickstarter bronze, and retail silver.
- All Ouya systems with the BCM4334 chipset are not compatible with CM11. Although it will load fine activating Wi-Fi and Bluetooth will not work. Someone on the XDA forums made a patch to at least get Bluetooth working for these models of Ouya however Wi-Fi is still crippled. This affects the Anthracite, Ninja Black, and Christmas White edition Ouya consoles.
3rd party controller compatibility in Cyanogen:
The good:
- Ouya controller for the most part works. The home button behaves as a minimize command in Cyanogen. The touchpad does work so long as you do not plug a USB mouse into the Ouya. For some reason when you plug in a mouse for playing FPS games like Quake, it knocks out the controller touchpad functionality. You can temporarily get it back by un-pairing and re-pairing your Ouya controller via Bluetooth. But on reboot, it's gone again until you reload Cyanogen.
- Xbox 360 controllers both wired and wireless work. I have taken the notes from the Ouya Chinese receiver and merged them into the key layouts zip file.
- A lot of your moble-based controllers such as Moga and Nvidia all work.
The Bad:
- PS3 controllers only work wired they do not work wirelessly. This was something that the original Ouya dev team actually worked on a bit with their variant of Android 4.1.
- It has been reported that Wii Motes may not work as well. Same reason.
Disclaimers about software and Cyanogen mod:
S-Config or anyone on the internet for that matter is not responsible for any damages that occur both physical, financial, mental, or psychological when hacking of modifying the software of your console. If you have an issue with this then stop immediately and purchase a different Android-based console that can better suit you for applications such as Kodi v15.
Hardware prerequisites:
 Basic hardware prerequisites for Ouya Cyanogen are as follows:
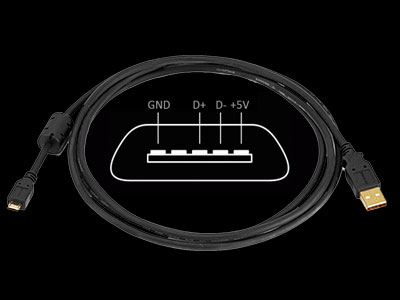
- USB male "A" to female "micro A" cable. In this tutorial, we will not even be logging into our Ouya account which makes this cable a requirement.
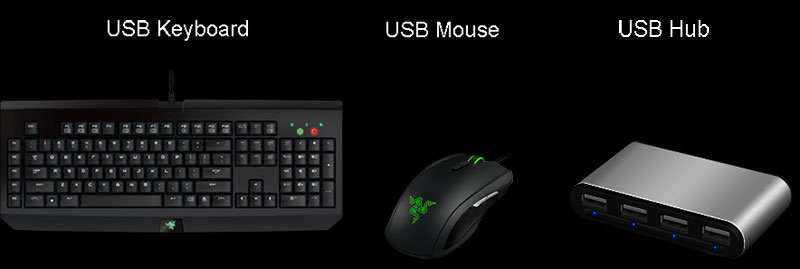
- USB Keyboard - This will be essential during the installation process as Bluetooth will not be active when we go through the boot-loader nor will it be active during the initial configuration of Cyanogen 11
- USB Mouse - Not nearly as essential during the bootloader process but very handy when doing your initial configuration. Update 1/17/2016: You may want to skip the mouse altogether on this installation if you want the trackpad of your Ouya Controller working. I have not figured out how to reset the mouse control back after we plug a USB mouse into CM11 yet.
- USB Hub - It does not have to be self-powered unless you are hooking large external storage such as a portable hard drive to your Ouya.
Acquire the software:
 I have set up a link for all of the Cyanogen mods to take place onto your Ouya known as "cyanouya.zip". Click here or on the Download icon to the right to begin downloading the 7-zip file.
Extract files from the archive:
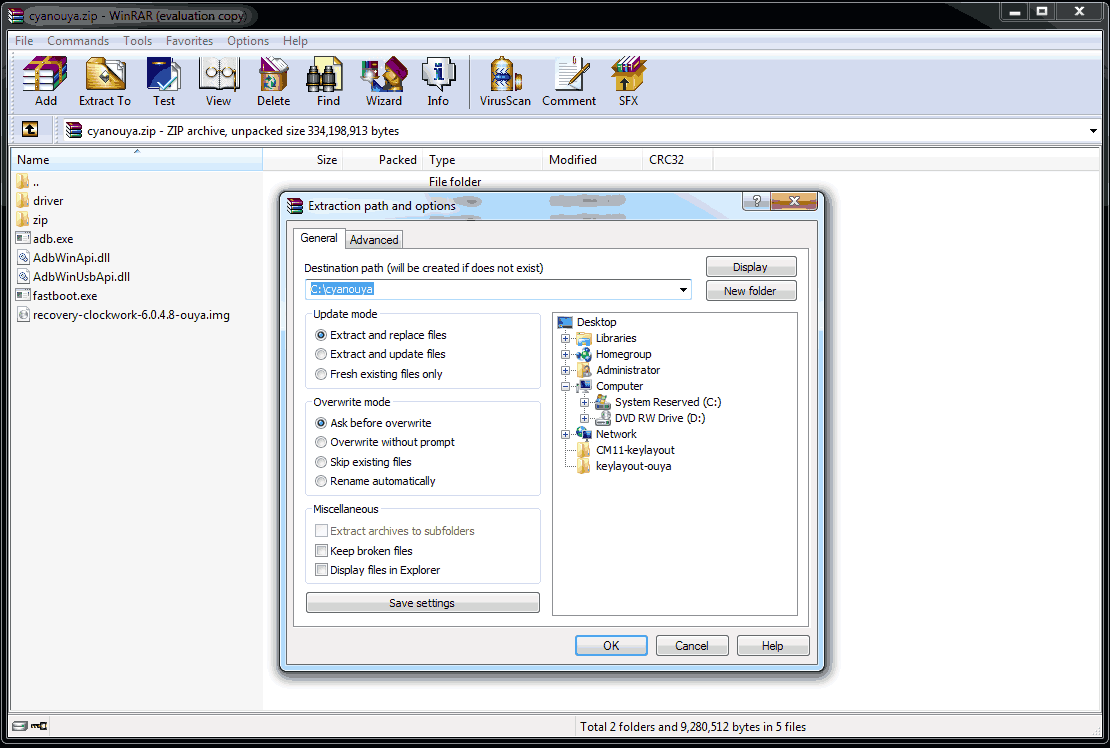 Use your favorite file extraction utility on the 7-zip file you just downloaded. For this tutorial, we will be extracting to C:\cyanouya which we will be using as a reference point throughout this tutorial. If you extract it elsewhere or if you are on a MAC or Linux box make note of where you extract it to and make adjustments accordingly.
The files that are in cyanouya.7z are as follows:
- adb.exe as well as the two DLLs required to run ADB
- fastboot.exe which will be required to upload the recovery-clockwork-6.0.4.8-ouya.img via the micro-USB cable.
- zip folder containing the following: cm-11-20160312-NIGHTLY-ouya.zip (Ouya nightly build of the Cyanogen OS) gapps-kk-20140105.zip (Google Play Apps) ouyabootmenu-mlq-v2.0.4.zip (required for Ouyas bootmenu) ouya-keylayouts.zip (which contains .kl files for the Ouya controller as well as a few other genetic controllers) recovery-clockwork-6.0.4.8-ouya.zip (This version of clockworks gets installed onto your Ouya bootloader and does not get removed). Please note: At the time of the article this was the most current nightly build. Newer versions can be acquired here.
- driver folder containing files that allow you to access your Ouya in both "ADB" mode and "Fastboot" mode. The android_winusb.inf is already modified to find an Ouya on USB device USB\VID_2836&PID_0010 .
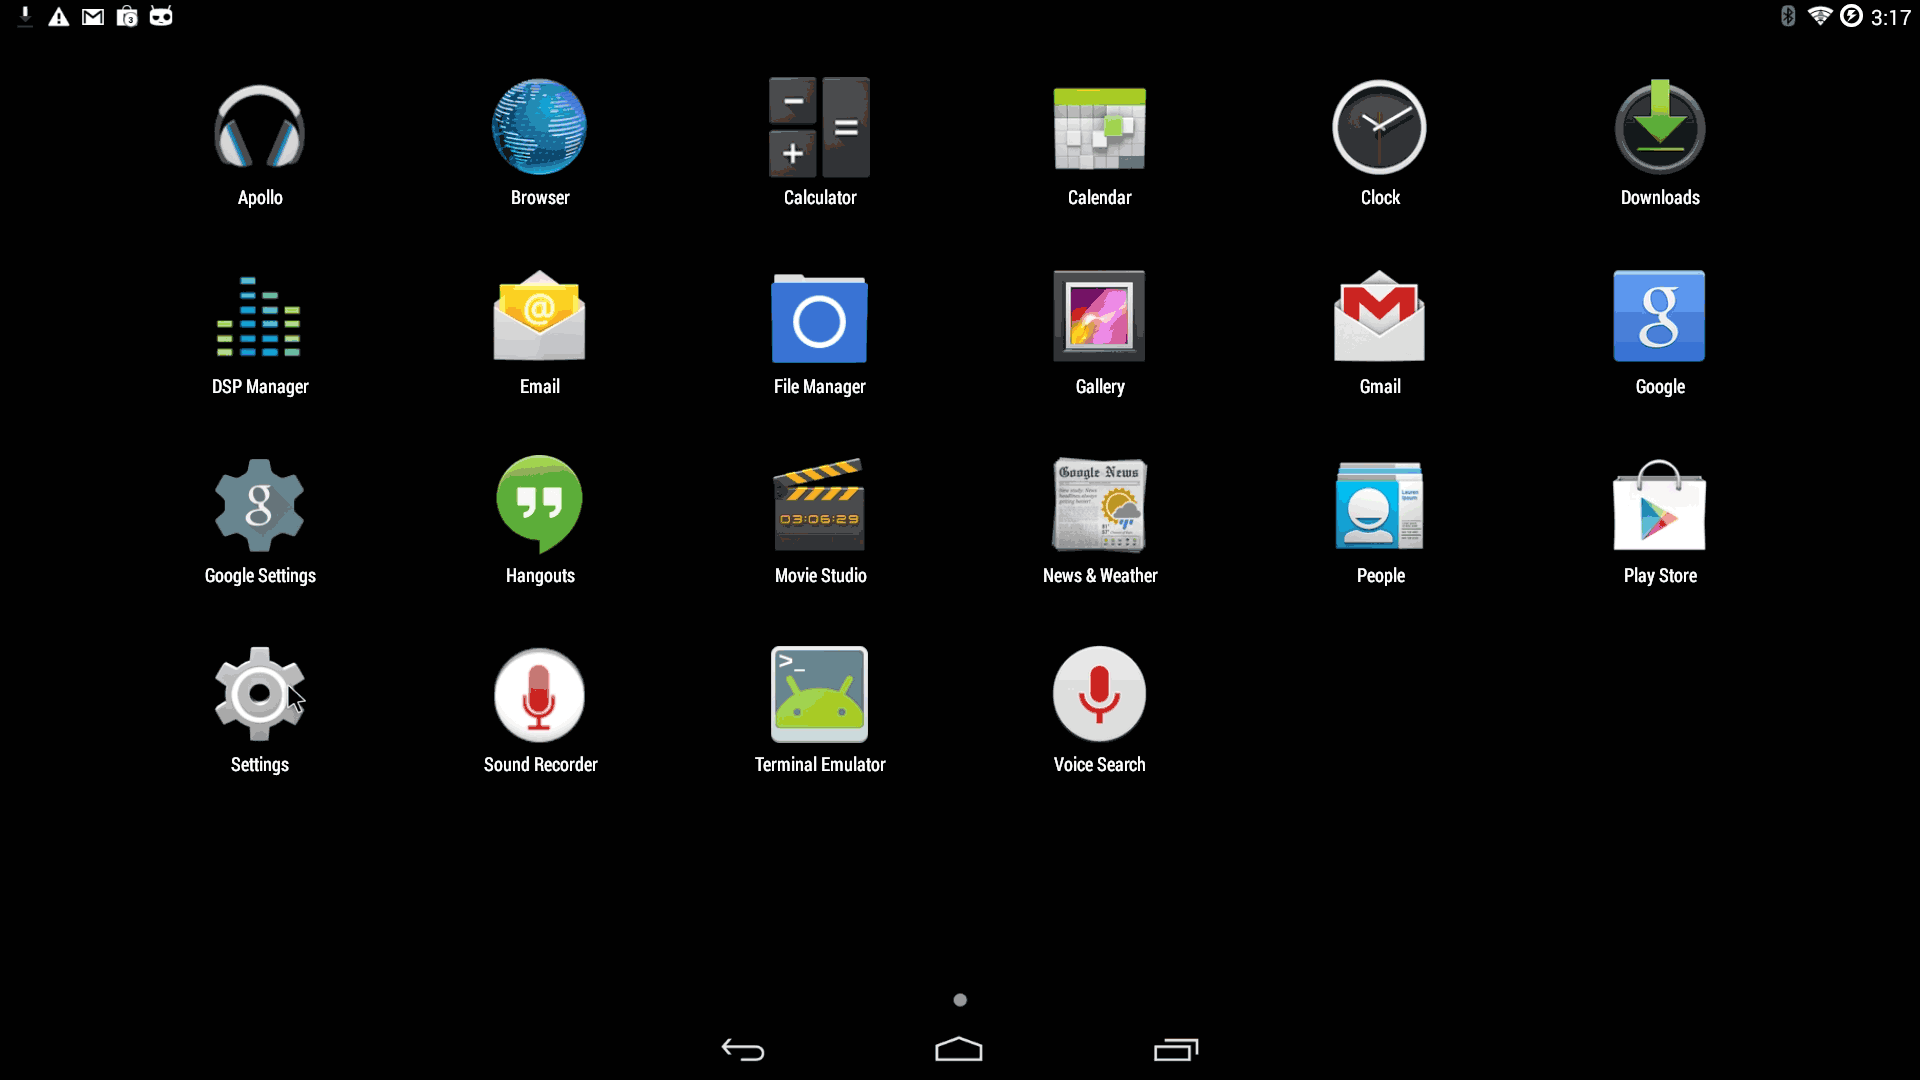
- apk folder which although we will not be using any apks during the installation of Cyanogen mod they are exceptionally handy to have after you have installed everything as I shall show you later.
Lets begin installing.
 We're going to power up our Ouya and leave it on the welcome screen. These instructions do not require your Ouya to be rooted or even logged into your Ouya account. If you had a mint Ouya still wrapped in plastic and opened it up and plugged and powered it up. Then that's all you need to do for now on your Ouya.
 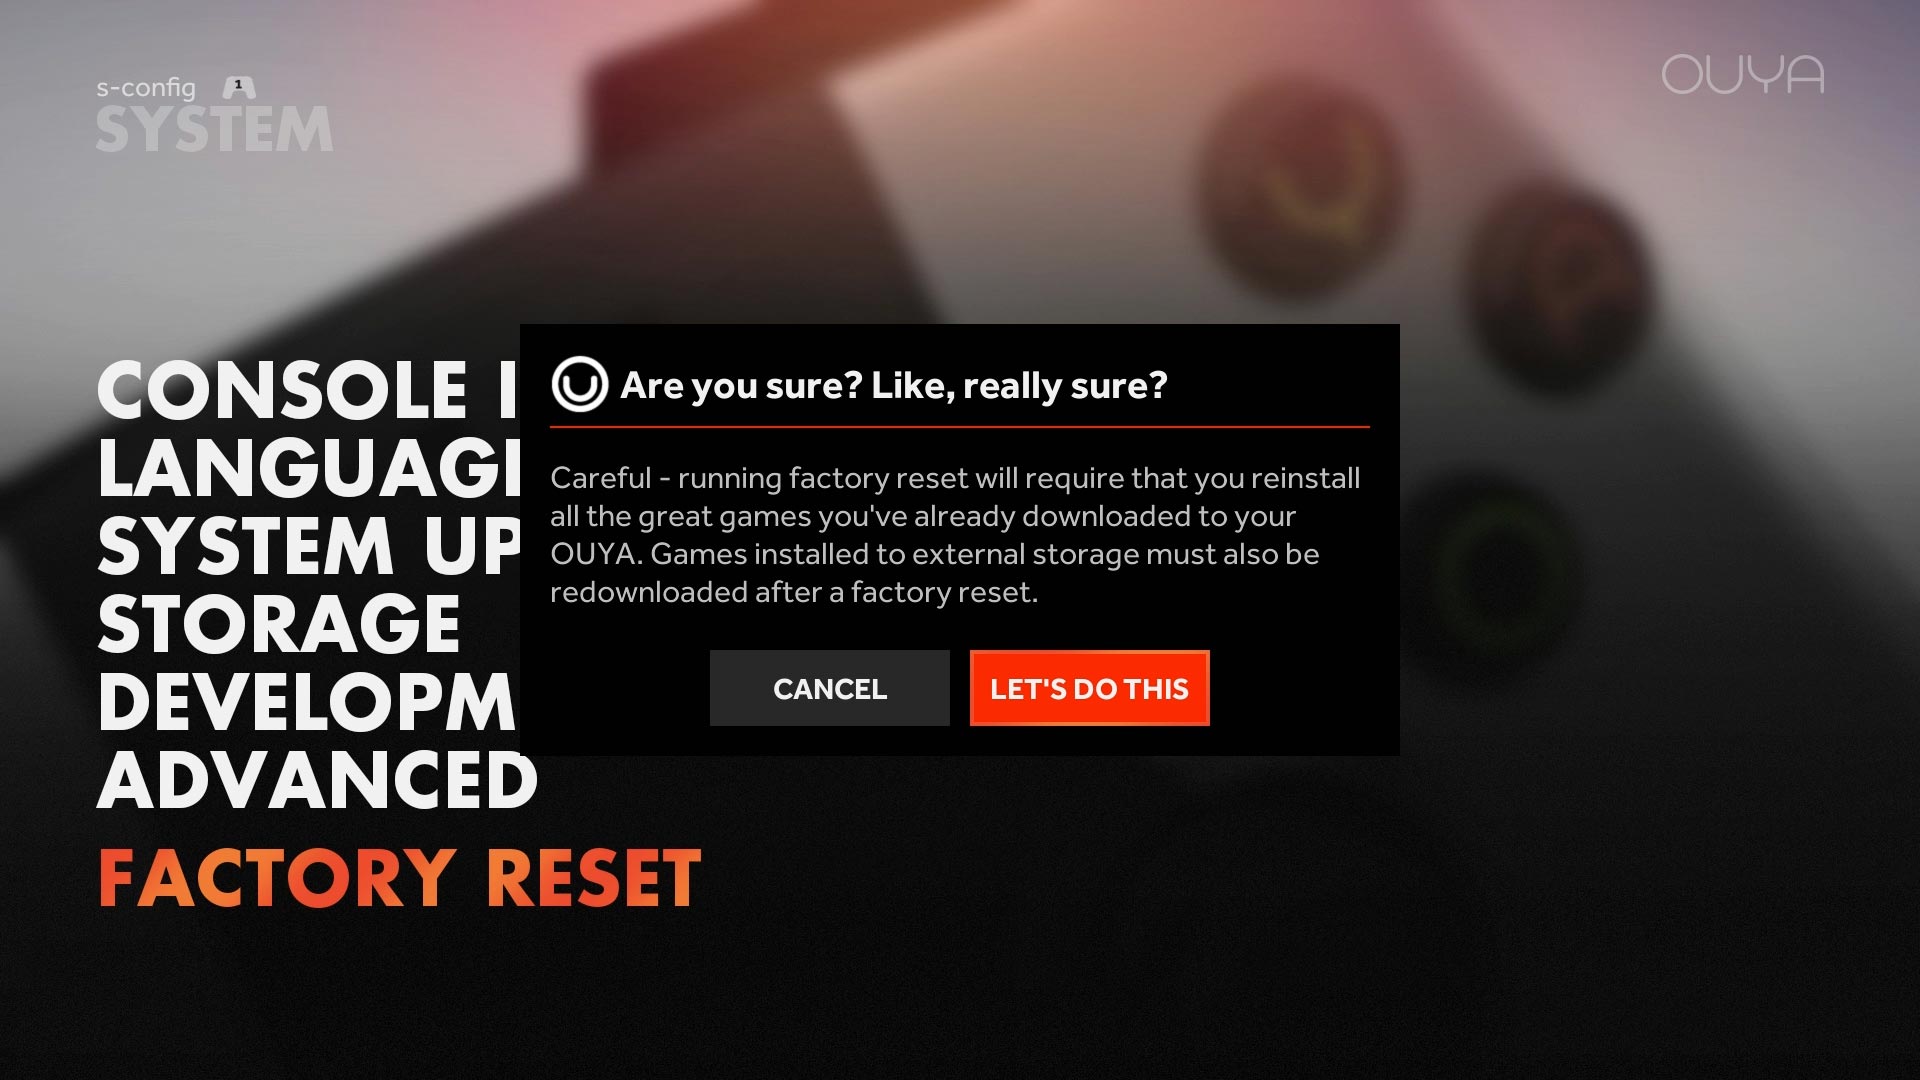 Now if you are already logged into your Ouya and you want to start fresh you can always do a factory reset to get the "welcome" screen. Just go under MANAGE > FACTORY RESET to continue.. Just keep in mind when you do a factory reset of your Ouya all data such as XBMC/KODI profiles, save games, and settings for your emulators may be lost. Once we are at the welcome screen on the Ouya now is the time you will be plugging in your micro-USB cable into the back of your Ouya, and the other end to the PC.
 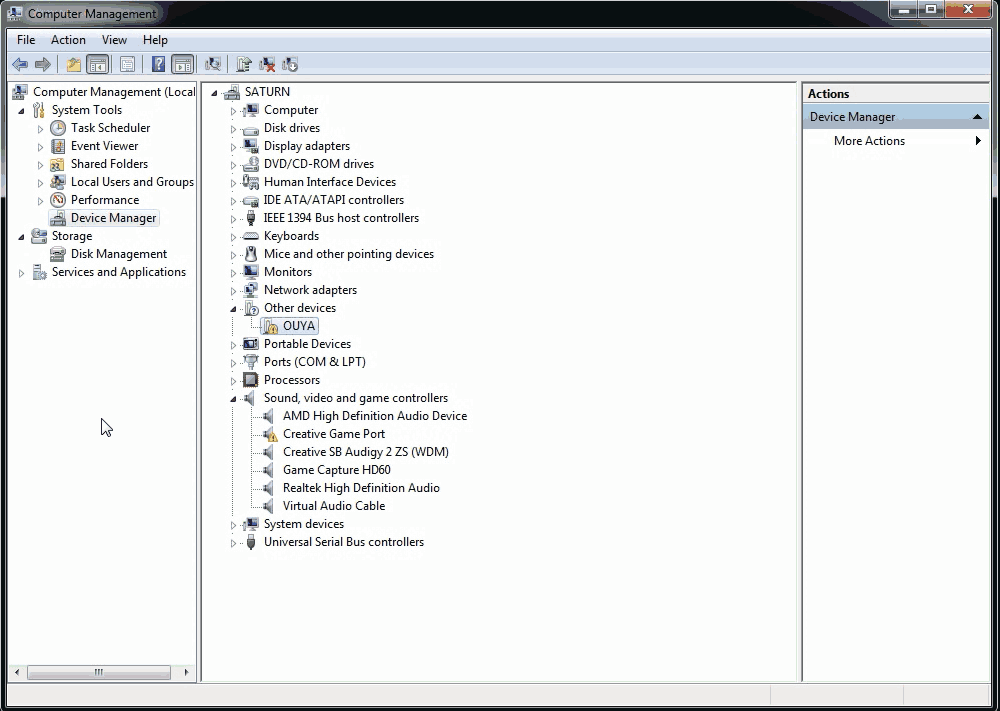 Now let's go over to the PC side to see if we can find our Ouya in the device manager (screenshots are all windows 7 and may vary between OS's). If this is your first time plugging your Ouya in via USB you should see something like my device manager where the Ouya is in the Other Devices category.
That's not going to work with ADB in the state it is in. So we are going to update the driver. Note: I have received a few users stating that they do not receive the "OUYA" underneath other devices category but instead only have the Ouya MTP underneath the "Portable Devices" category. If you are already logged into your Ouya do a factory reset as depending on what is going on with your Ouya the ADB function may or may not be disabled on it. Right-Click on the Ouya in Other Devices and click Update Driver Software to continue.
Also, if you are running Windows XP, 7, 10(32-bit-edition) and you do not see the word "Ouya" or something similar but instead see the words "Unknown Device" underneath other devices then your system has not properly detected your Ouya ADB port. The biggest cause of this problem is a bad or faulty USB data cable. Try a different data cable and try again.
I can't find the unknown device category on my Windows 10 x64-bit edition box! Help!
 You are not going crazy if you do not see "Ouya" under "Unknown Devices". We do however need to talk. Click here to learn how to correct driver issues with ADB inside of Windows 10 64-bit for the Ouya. Do not worry, this will open another tab so you can pick up right from this section the moment your driver is straightened out.
Continuing onward if you did find "OUYA" in "unknown devices"
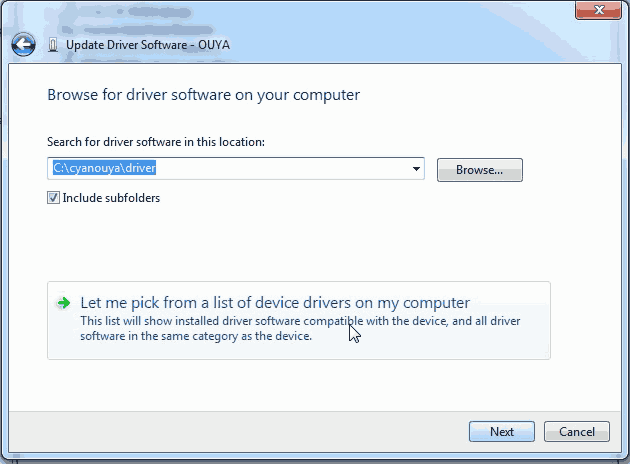 We are not going to let the OS choose the driver we want to use. We are going to pick it ourselves. Click "Let me pick from a list of drive drivers on my computer" and click next to continue.
 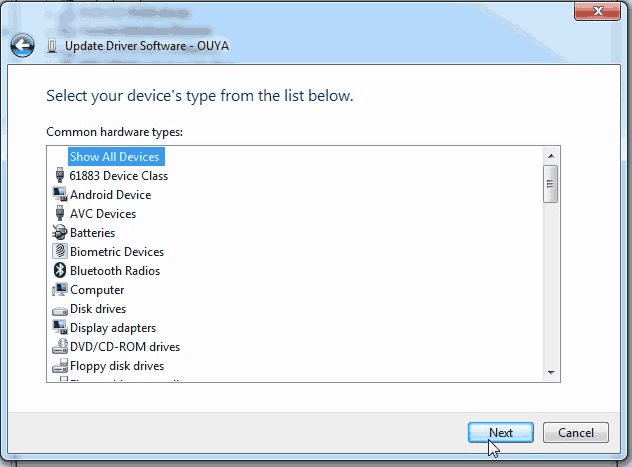 Click on "Show All Devices" and click Next to continue.
 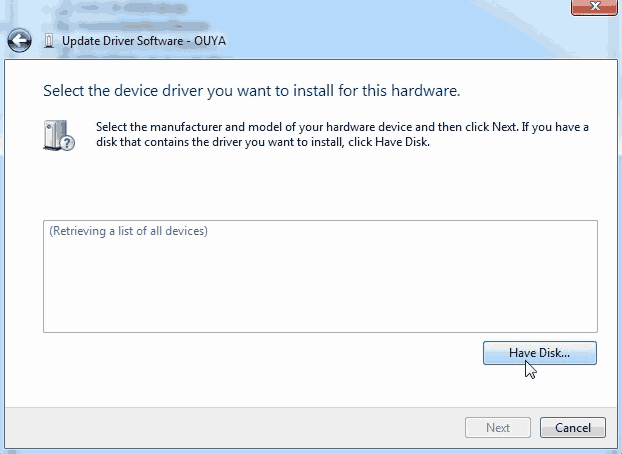 Click on the Have Disk button.
 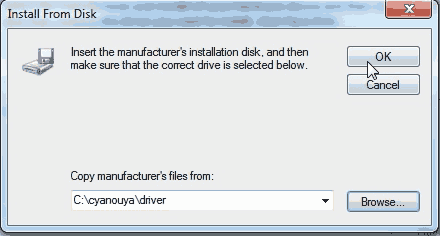 We are going to browse where our ADB drivers are. Since I extracted my cyanouya.zip file right to the root of C:\ I can simply type in C:\cyanouya\driver . If you placed your drivers elsewhere or you are using the Android SDK instead of the ADB binary included in the zip file. You will then have to click the Browse button to find where your ADB drivers are at. Click OK to continue.
 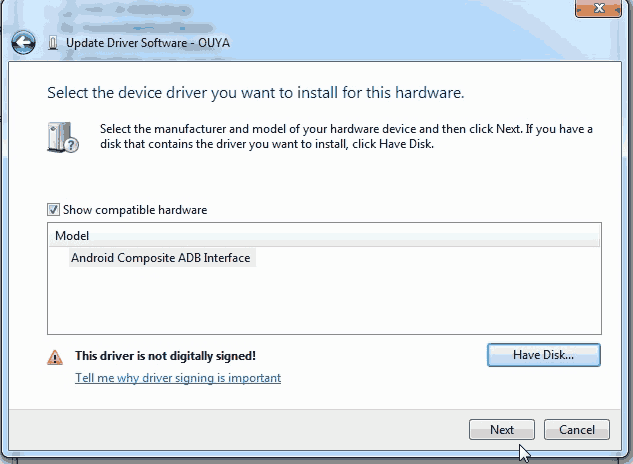 Windows should have already determined that the best driver is "Android Composite ADB Interface" if not or if this is blank, uncheck the "Show compatible hardware" box and select your Android Composite ADB Interface from there. Click Next to proceed with driver installation.
 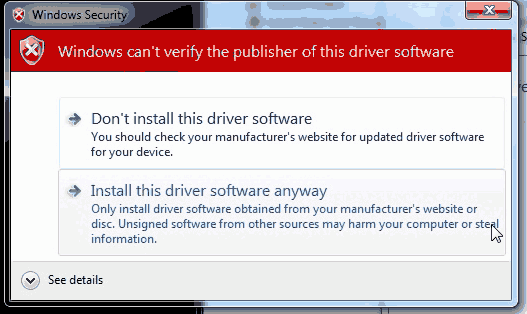 Windows does not like drivers it does not know about or where they come from. This is normal. Click "Install this driver software anyways."
 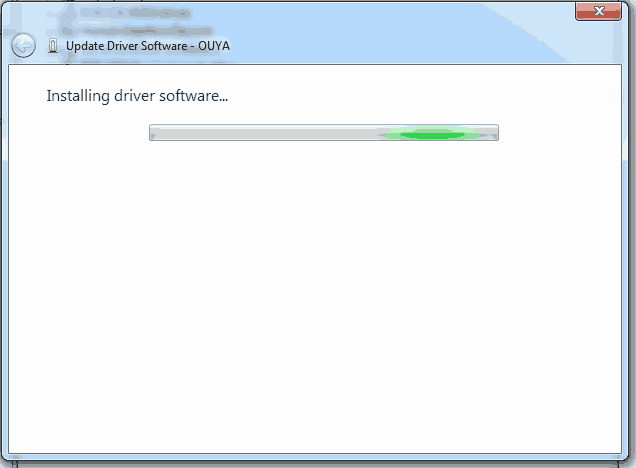 It should begin installing the driver. This may take around 10-30 seconds on your first time installing it.
 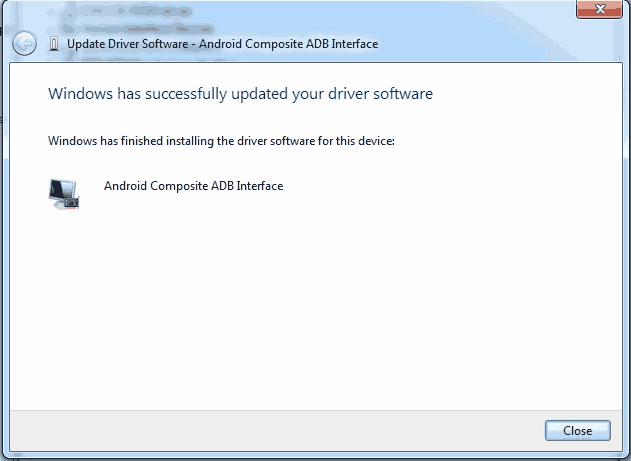 If everything went well then you will get a message like the window above. If for some reason there is an error code. Then there is something wrong with your Ouyas connection. Click close to continue.
 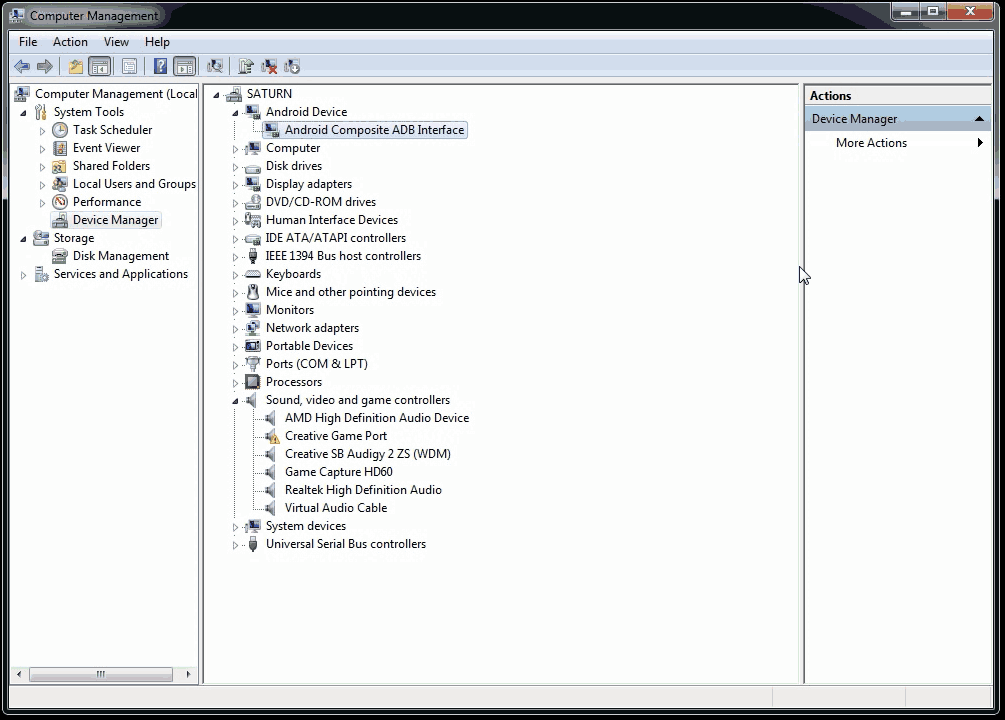 Your Other Device and your Ouya will disappear from the device manager. You should now have a new category called "Android Device" and the device known as "Android Composite ADB Interface" . Your PC will now understand what your Ouya is whenever you connect it to your PC. From This point, you can now close out of the device manager.
Installing the adb_usb.ini file:
This file exists in your user profile folder underneath a section called .android and it has a very simple one-line comment which tells ADB where to look for your Ouya on your devices. For example, if your username in Windows is "skippy" then the logical path for this file will be C:\Users\skippy\.android\adb_usb.ini . What is in that ini file is as follows:
0x2836
now you can either open up a command prompt and type in the following:
mkdir %USERPROFILE%\.android\
echo 0x2836 >> "%USERPROFILE%\.android\adb_usb.ini"
Say that your username in "Penguin" for logging into Windows. This will make the folder C:\users\penguin\.android\ and inside of that folder, it will make a very small text file called adb_usb.ini. The reason why we must create this file in a very particular area is without it the adb.exe file has no idea what vendor to look for in the device manager and it will come up blank in the next few steps.
Working with ADB to transfer data to your Ouya for the Cyanogen mod upgrade.
We can continue going to the command prompt by clicking "Start" and "Run" and typing in "cmd" to pull up a command prompt. Once you are there you will want to do the following.
cd C:\cyanouya
adb start-server
It should respond with the following:
* daemon not running. starting it now on port 5037 *
* daemon started successfully *
Next, let's see if Adb can actually see our Ouya.
adb devices
It should respond with:
List of devices attached
015d49062a501415 device
If it does not have anything underneath "List of devices attached" then ADB is not properly talking to the USB driver. Make sure your device is installed in device manager and the adb_usb.ini file exists underneath your %userprofile%\.android\ folder. Unlike the ADB screen capture blog, I did a while back there is no need to pass the ADB connect command. You will be already connected via hardwire. The ADB connect command is only required if you are connecting to a remote source over the network. now we are ready to push all of the .zip files to the Ouya /sdcard/ folder at once. Unlike previous documentation where they wanted you to ADB sideload each zip file in the recovery bootloader. We're going to push them all at once and then let the ClockWorkMod bootloader handle it from there.
adb push zip /sdcard/
If for some reason it errors on transfer. you can manually select each file.
cd zip
adb push recovery-clockwork-6.0.4.8-ouya.zip /sdcard/
adb push ouyabootmenu-mlq-v2.0.4.zip /sdcard/
adb push ouya-keylayouts-1.02.zip /sdcard/
adb push gapps-kk-20140105.zip /sdcard/
adb push recovery-clockwork-6.0.4.8-ouya.zip /sdcard/
adb push cm-11-20160312-NIGHTLY-ouya /sdcard/
Alternatively, if you are loading Lineage from the latest Milaq build. You will probably want to do this command instead of cm-11-20160312-NIGHTLY-ouya
adb push lineage-11-20190501-NIGHTLY-MLQ-ouya.zip /sdcard/
If you are in your C:\cyanouya folder then it should report something like this:
push: zip/recovery-clockwork-6.0.4.8-ouya.zip -> /sdcard/recovery-clockwork-6.0.4.8-ouya.zip
push: zip/ouyabootmenu-mlq-v2.0.4.zip -> /sdcard/ouyabootmenu-mlq-v2.0.4.zip
push: zip/ouya-keylayouts-1.02.zip -> /sdcard/ouya-keylayouts-1.02.zip
push: zip/gapps-kk-20140105.zip -> /sdcard/gapps-kk-20140105.zip
push: zip/cm-11-20160312-NIGHTLY-ouya -> /sdcard/cm-11-20160312-NIGHTLY-ouya
5 files pushed. 0 files skipped.
1291 KB/s (306718311 bytes in 231.945s)
Yes, it will take around 4 minutes to complete the transfer because of how much data we are sending. So far, everything we've done could've been easily done by an ADB network connection instead of going through the headache of USB connections. The next command is where ADB network will fail you.
adb reboot bootloader
This will place the Ouya into the bootloader state otherwise known as "fastboot" as your device manager will start chiming in finding unknown devices once again.
Note: At this time your Ouya will only have a power light and a pitch-black screen. This is normal as we have not given the Ouya any instruction as to what to load yet. If you reset your Ouya right now it will break out of the boot-loader and return you to the Ouya welcome screen. We have written nothing to the boot-loader of the Ouya as of yet. Make sure the keyboard is plugged into your Ouya at this time.
Working with fastboot:
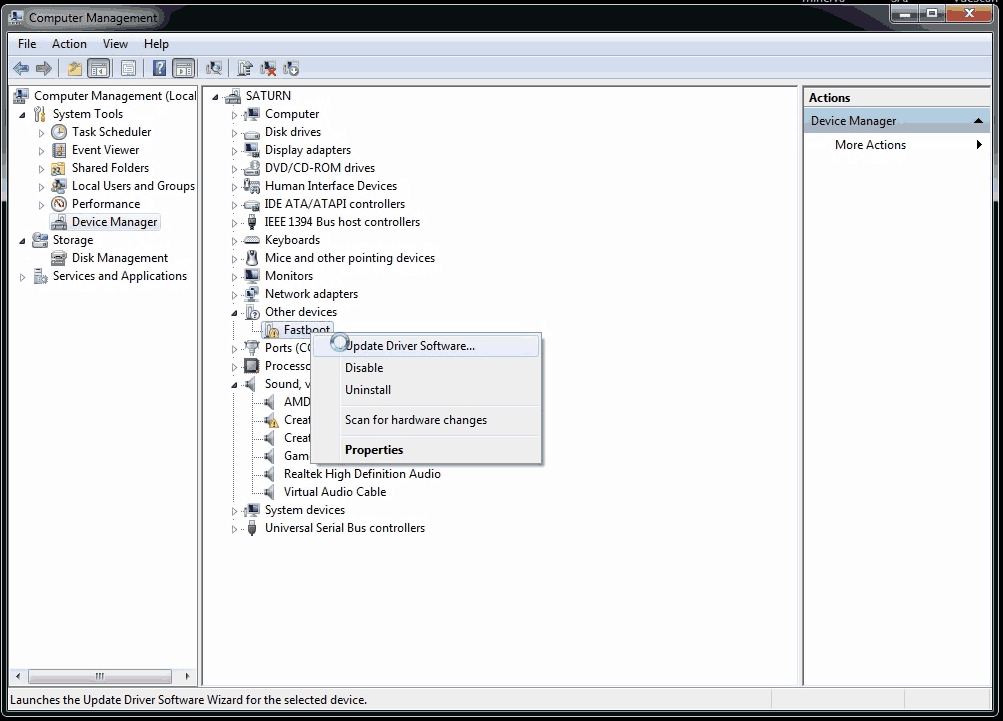 Just like with ADB when you first plugged it into your machine. The device manager now detects a new unknown device in the Other Devices category known as Fastboot . We need to install the driver for this as well in order for us to push the ClockWorkMod over USB to the Ouya.
Without ClockWorkMod the rest of the Cyanogen mod installation will not work. Note: If you do not see the word "Fastboot" under the "Other devices" category but instead see the words"Unknown Device" underneath other devices then your system has not properly detected your Ouya ADB port. The biggest cause of this problem is a bad or faulty USB data cable.
Try a different data cable and try again. 2nd Note: On some operating systems "Fastboot" may not show underneath "unknown devices" but in fact may automatically install itself under the "Android Device" category. This is due to updating the .inf drivers so that Windows XP users to perform this hack as well. If it does indeed install you may skip all the way down to passing the fast boot commands below.  Once again we are going to select "Let me pick from a list of device drivers on my computer" and click Next to continue.
 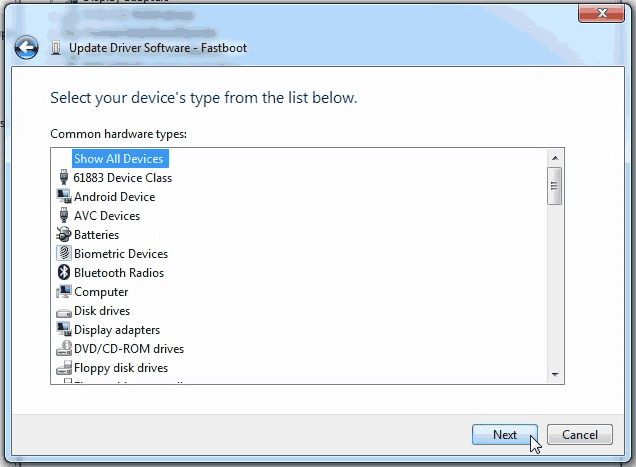 Click "Show All Devices" and click Next to continue.
 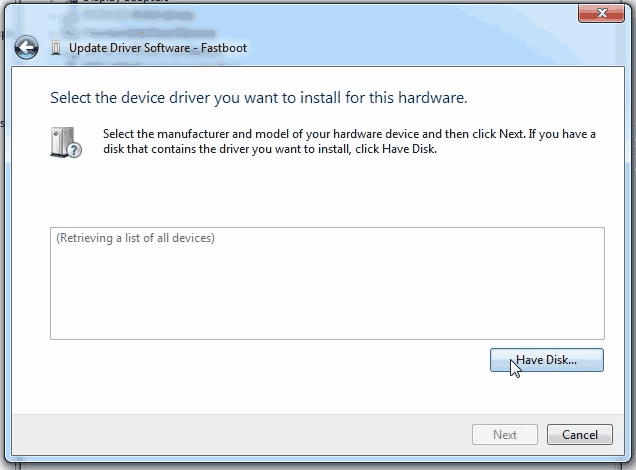 Click the Have Disk button to continue.
 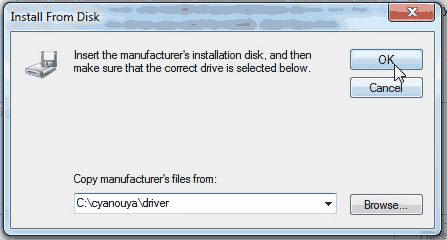 We are going back to the C:\cyanouya\driver as the ADB driver install. Click OK to continue.
 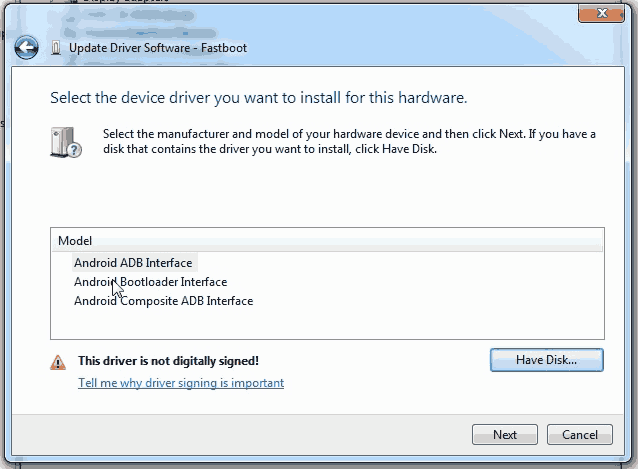 Unlike the ADB driver windows aren't quite sure what is going on as it cannot identify the correct driver. Click on Android Bootloader Interface and click the Next Button to continue.
 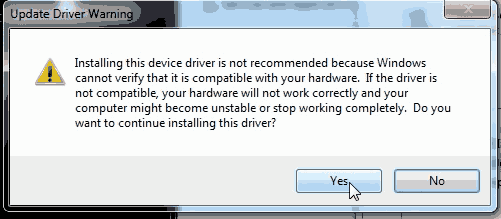 Windows is really not sure what you are doing. This is normal. Click Yes to continue.
 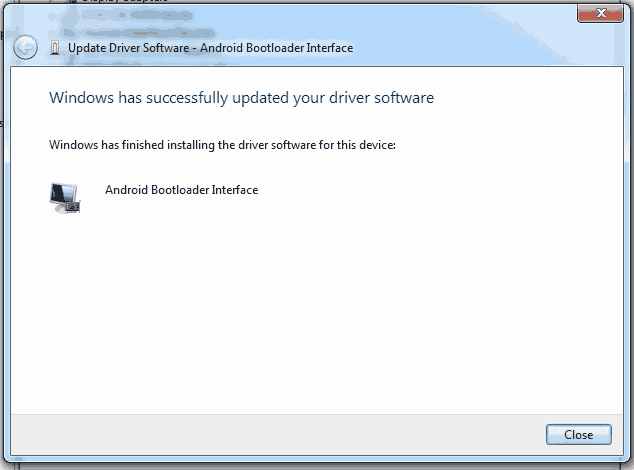 If everything goes well you should receive a screen like the one above indicate that the Android Bootloader Interface has been successfully installed. Click close to continue.
 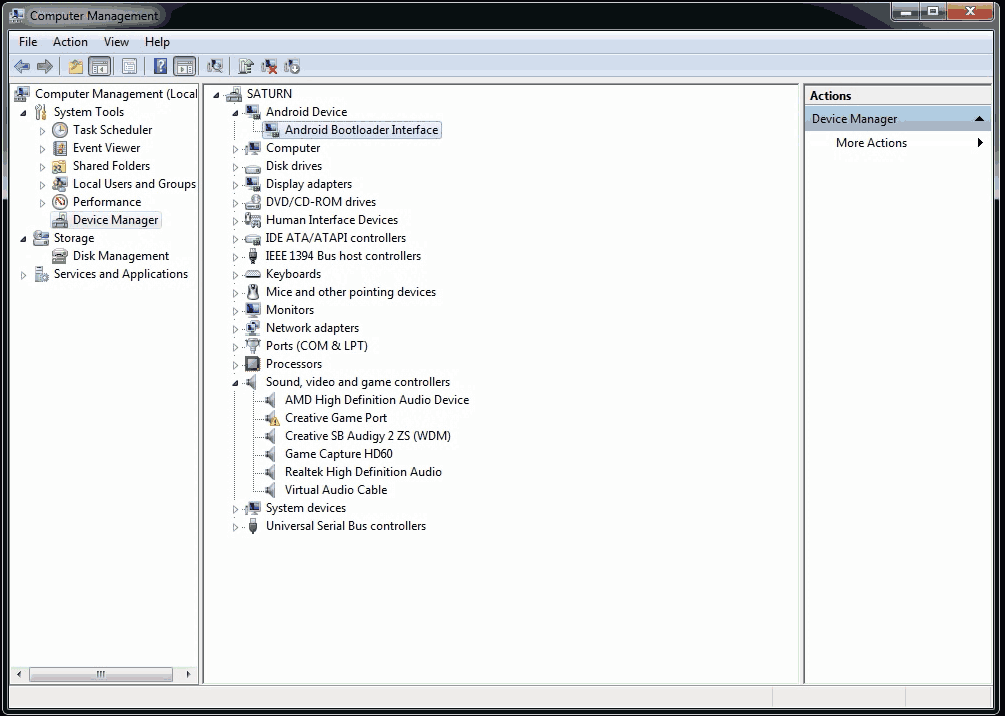 The device manager will be happy once again and we can go back to our command prompt. Instead of ADB, we will be using the other executable in the cyanouya.zip folder called fastboot.
Pass the Fastboot commands to your Ouya.
To test to make sure fastboot can see your Ouya type in the following:
fastboot devices
Just like before it will report back if it can see your Ouya or not.
015d49062a501415 fastboot
If returns with a statement similar to the above then everything is good. The next command you will be typing in will be the following:
fastboot boot recovery-clockwork-6.0.4.8-ouya.img
It will report back the following at the same time you will notice your Ouya come back to life with a signal on your TV.
downloading 'boot.img'...
OKAY [ 1.594s]
booting...
OKAY [ 0.264s]
finished. total time: 1.861s
Clockwork Mod loading Cyanogen Mod into your Ouya:
 At this time you should see your Ouya come back to life but instead of the typical Ouya splash screen, you will be greeted with something new. You will be welcomed to the ClockWorkMod splash screen. Out of interest in saving bandwidth and readability. I shall focus on just the upper-left-hand corner of the screen which is where all of the action of ClockWorkMod is at. There will be information text with each step we do and if the screen changes too much I'll make a full-screen shot. But Let's begin.
 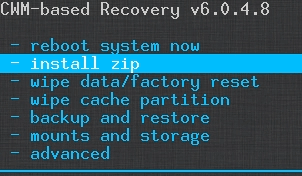 Using your keyboard, arrow down to "install zip" and hit enter.
  Arrow to "chose zip from /sdcard" and hit enter.
 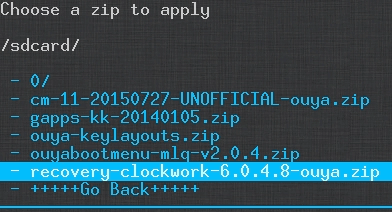 Arrow down to "recovery-clockwork-6.0.4.8-ouya.zip" and press enter to install. This will make ClockWorkMod your permanent bootloader recovery partition on your Ouya which is essential for Cyanogen mod to work properly.
  Arrow down to Yes and hit enter. This should only take about 10 seconds to install. The next section we are going to install is the Ouya Boot Menu which is a partial install that makes it a lot easier to return to ClockWorkMod in the event you wish to revert back to stock. Arrow to "chose zip from /sdcard" and press enter.
 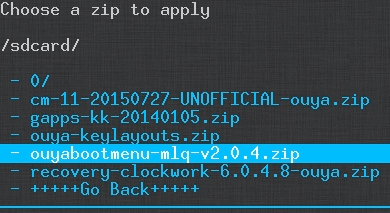 Arrow down to ouyabootmenu-mlq-v2.0.4.zip and press enter.
 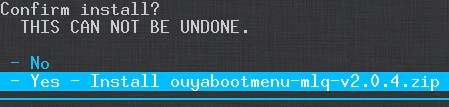 Arrow down to Yes and press enter. The next section we are going to install is the Cyanogen Mod nightly build which is the core of our OS. Arrow to "chose zip from /sdcard" and press enter.
 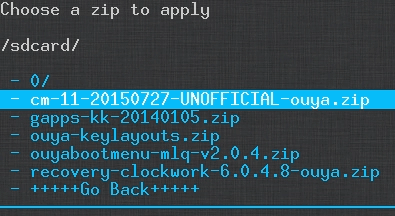 Arrow down to cm-11-20160312-NIGHTLY-ouya.zip and press enter Note: the dates will always change which is normal for nightly releases.
 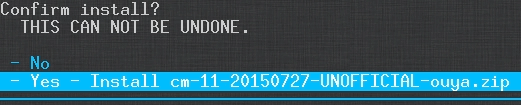 Arrow down to Yes and press enter.
 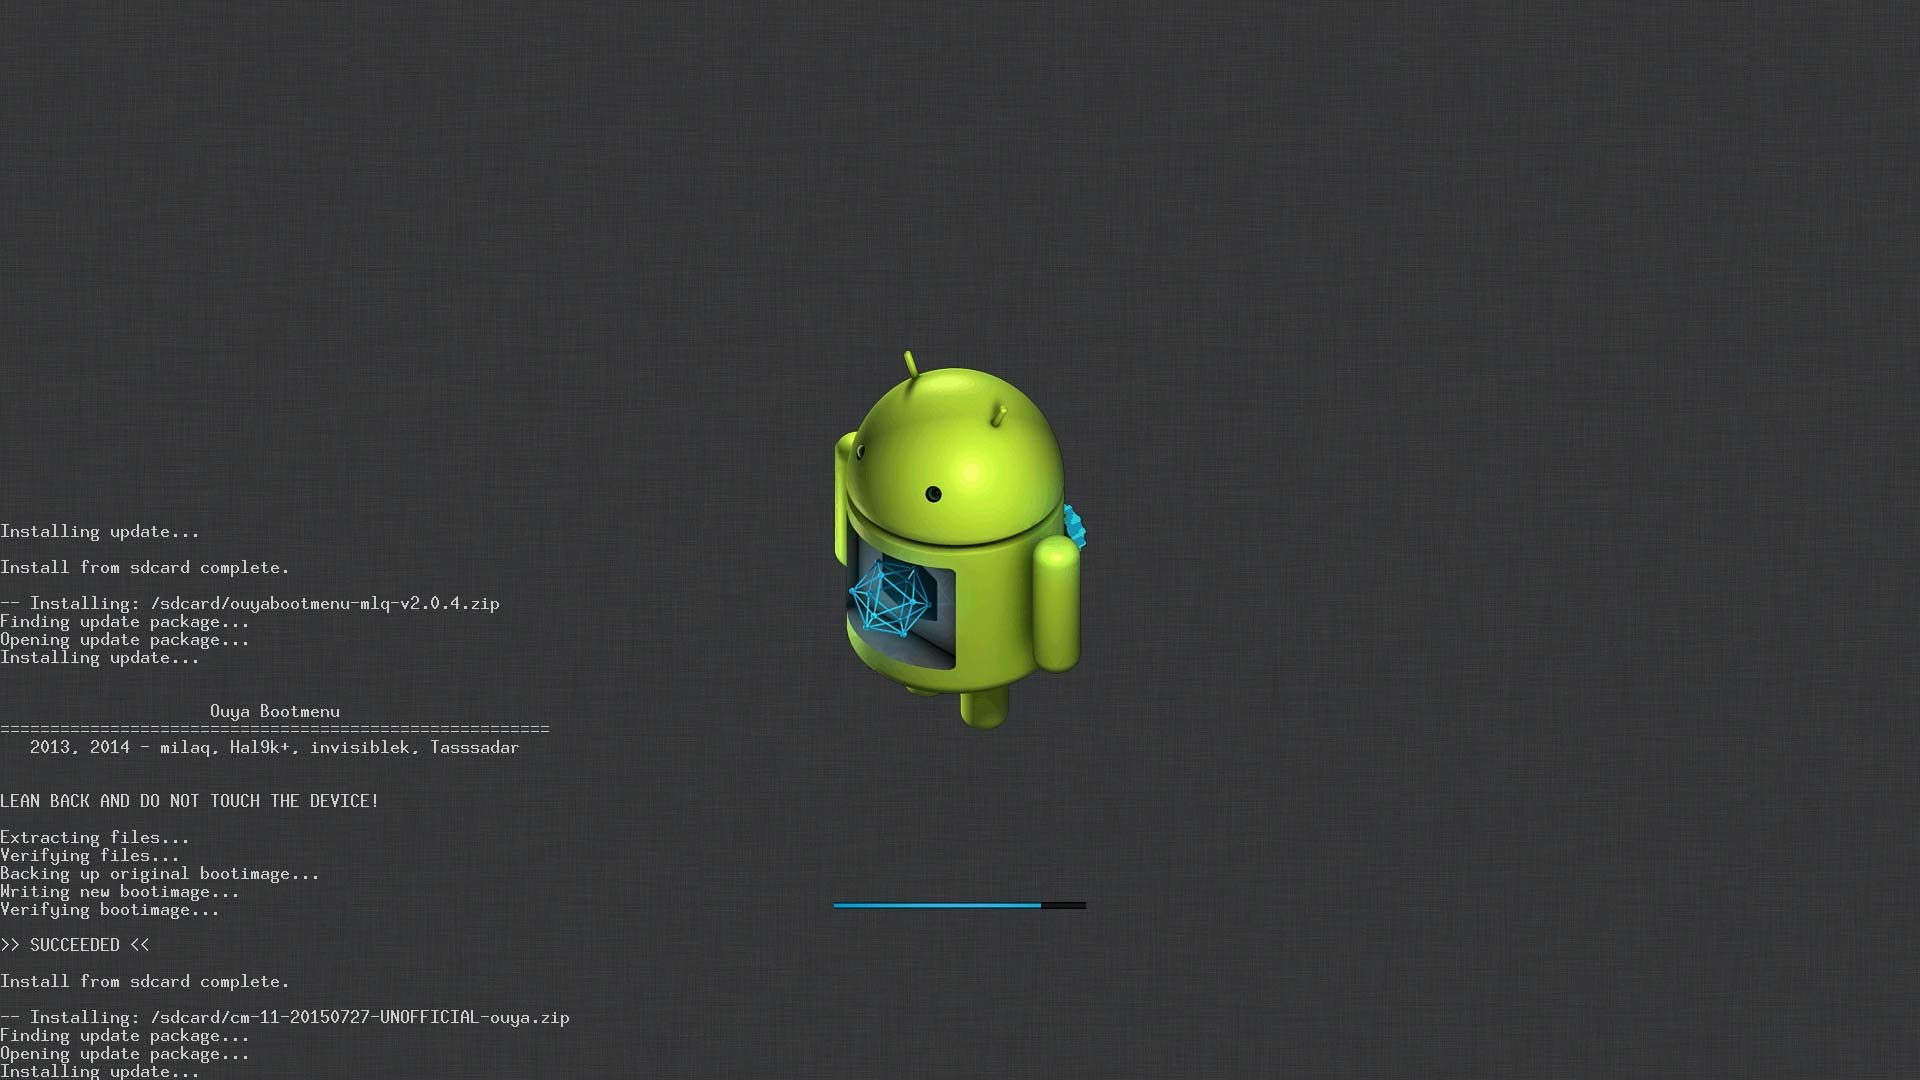 This process can take anywhere from 4-5 minutes to install as it has to unpack 300+ megs onto your Ouya. The next section we are going to add Google Play functionality to our Cyanogen mod. Arrow to "chose zip from /sdcard" and press enter.
 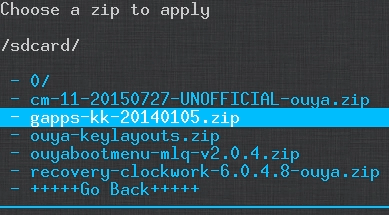 Arrow down to gapps-kk-20140105.zip and press enter.
 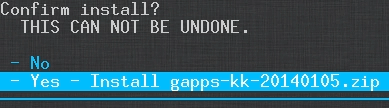 Arrow down to Yes and press enter. Installation should take around 30 seconds. The final selection that we will install is the key layout files or .KL files that are required to attempt to make not only your Ouya Controller compatible with Cyanogen but other controllers such as the PS3 controller and the Xbox Controller. Arrow to "chose zip from /sdcard" and press enter.
 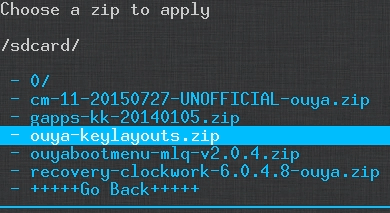 Arrow down to ouya-keylayouts.zip and press enter.
 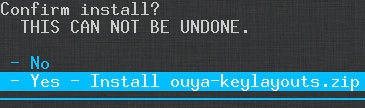 Arrow down to Yes and press enter. After all of these partial installs, you should have a complete Cyanogen Mod now loaded onto your Ouya. Now before we reboot there is one last thing we need to do.
Clearing cache and wiping user data in ClockWorkMod for Cyanogen Mod first-time boot.
Clearing all user data and cache from your Ouya is very important because if you do not. Cyanogen may simply sit and do nothing the first time you boot it because it's reading data from a previous launcher that it really should not read. So let's begin. 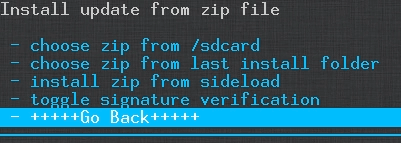 If you are still updating zip files. We need to back out of this menu. Simply arrow down to Go Back and press enter.
 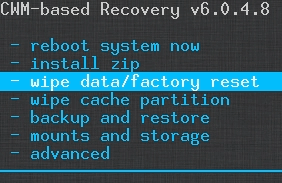 Arrow down to "wipe data/factory reset" and press enter.
 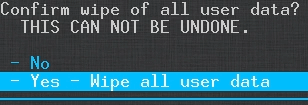 Arrow down to Yes and press enter.
 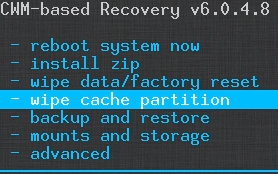 Next, we will wipe the cache partition. Arrow down to "Wipe cache partition" and press enter.
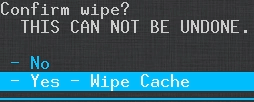 Arrow down to Yes and press enter.
 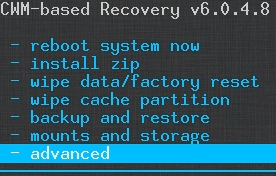 The last section requires us to go into advanced mode. Arrow down to advanced and press enter.
 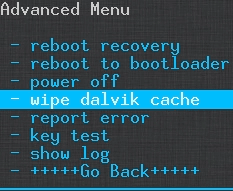 Arrow down to "Wipe Dalvik cache" which is what google play likes to use and press enter.
 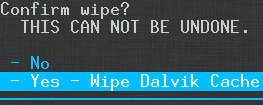 Arrow down to Yes and press enter.
 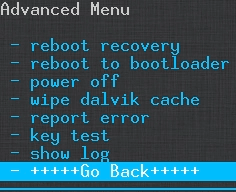 We are going to back out of the advanced menu now. Arrow down to "Go Back" and press enter.
 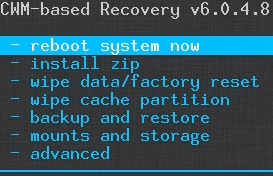 Finally, we are all done with CWM we can now reboot the system now to begin booting your new Cyanogen mod OS.
Welcome to Cyanogen Mod OS on your Ouya.
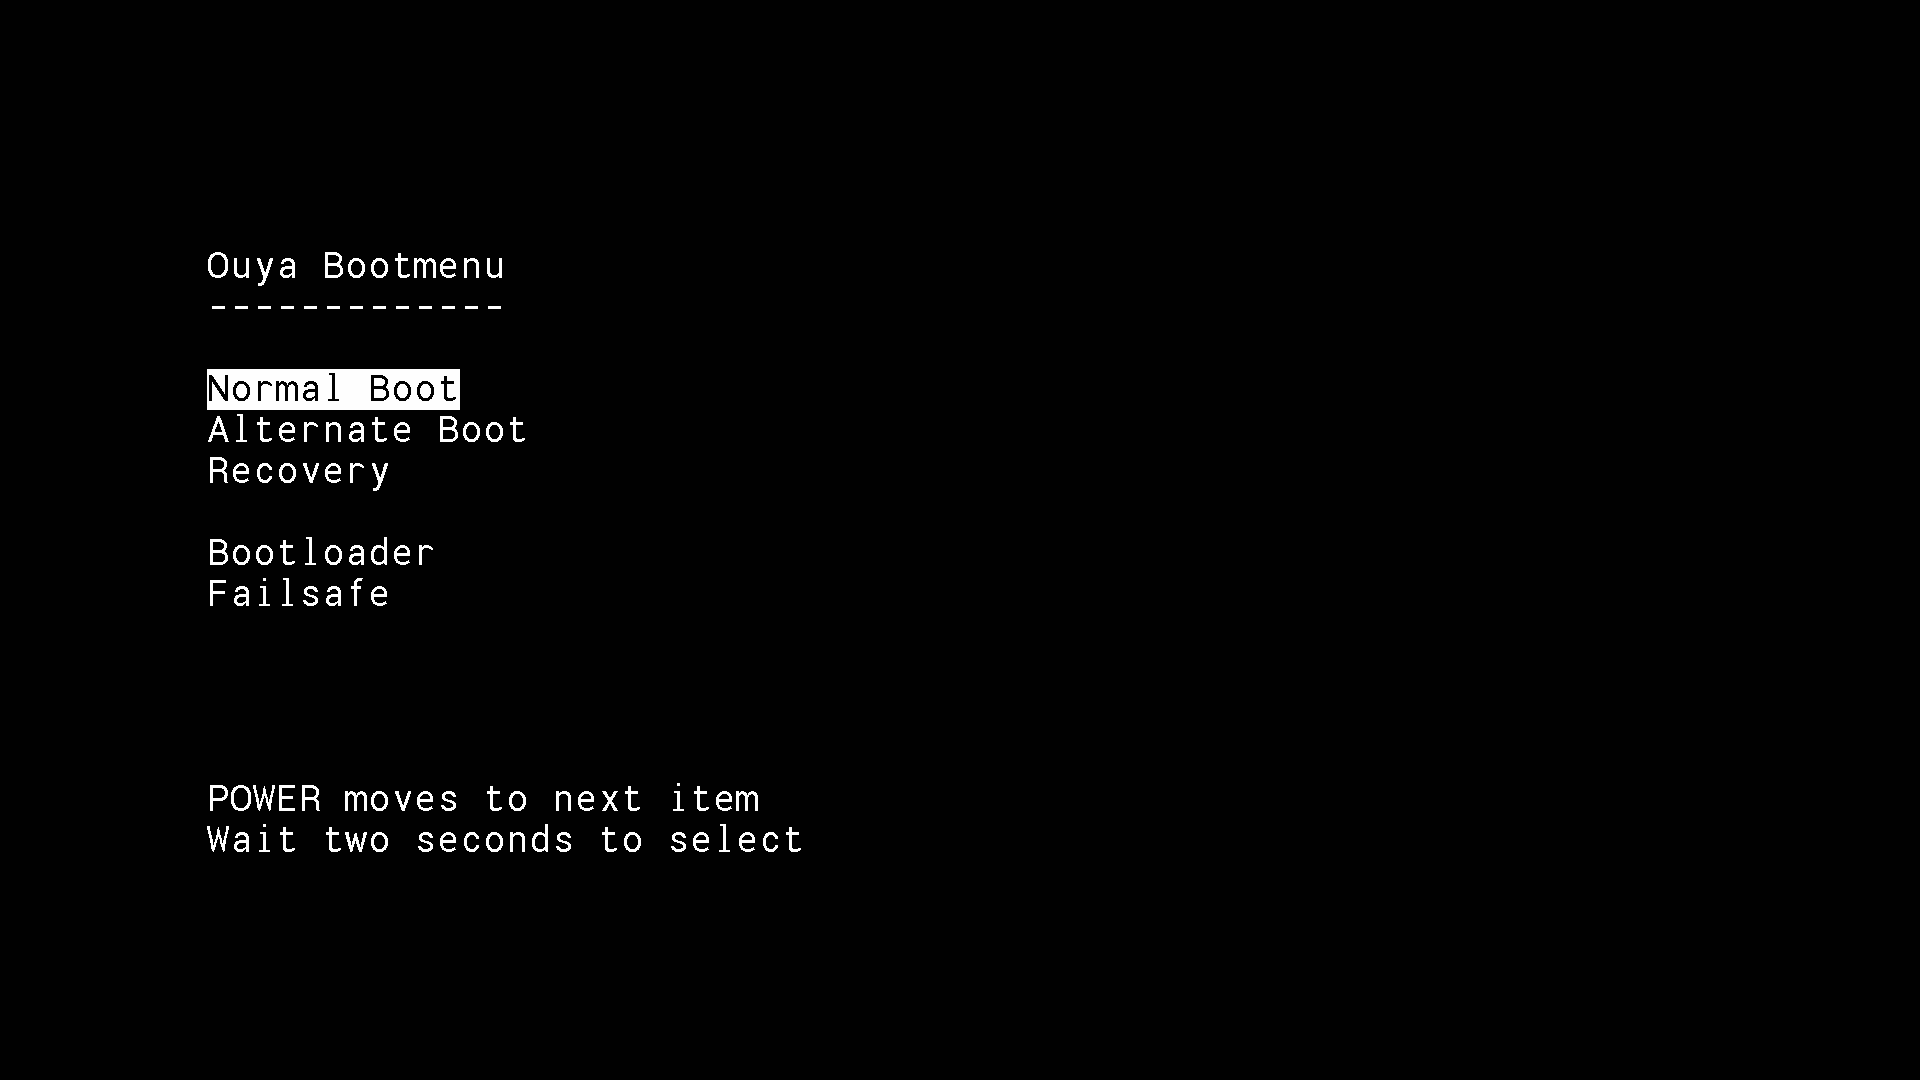 The very first thing you'll be greeted with is the Ouya Boot menu. You do not have to touch anything and it will disappear in about 3 seconds. But if you want to go back to the recovery partition you can simply click your Ouya power button to cycle through the menus on this screen.
 ![]() Once you let it go into Normal Boot mode it may take up to 3 minutes before Cyanogen Mod launches for the first time after the splash screen appear.
Once you let it go into Normal Boot mode it may take up to 3 minutes before Cyanogen Mod launches for the first time after the splash screen appear.  Your installation is successful if you get the Welcome to Cyanogen Mod screen asking for language. That means it was able to set up its profile and didn't encounter anything strange that would otherwise crash the first-time startup screen such as erroneous cache or user data left behind from another launcher. This is where having a mouse as well as the keyboard is super-handy since Bluetooth has not been enabled yet. From here you will be asked a series of questions such as your Wi-Fi (if you are already hard-wired then it will not ask you) as well as your Google Play account so that you can begin downloading from the new marketplace. As well as basic questions as if you are on a new tablet or phone device. you can leave all of the settings default if you wanted.
  From here you can customize your desktop by simply click-dragging widgets where you want. I personally get rid of everything including the backdrop because it saves some bandwidth when recording video. You may want to wait about 5 minutes to begin using Cyanogen Mod as it will be in the process of updating Everything such as all of the Google plugins as well as the play-store marketplace to the latest version. If you already downloaded items with the Google marketplace you can re-download them again by launching the Play Store and going into Apps.
Enabling Bluetooth in Cyanogen Mod.
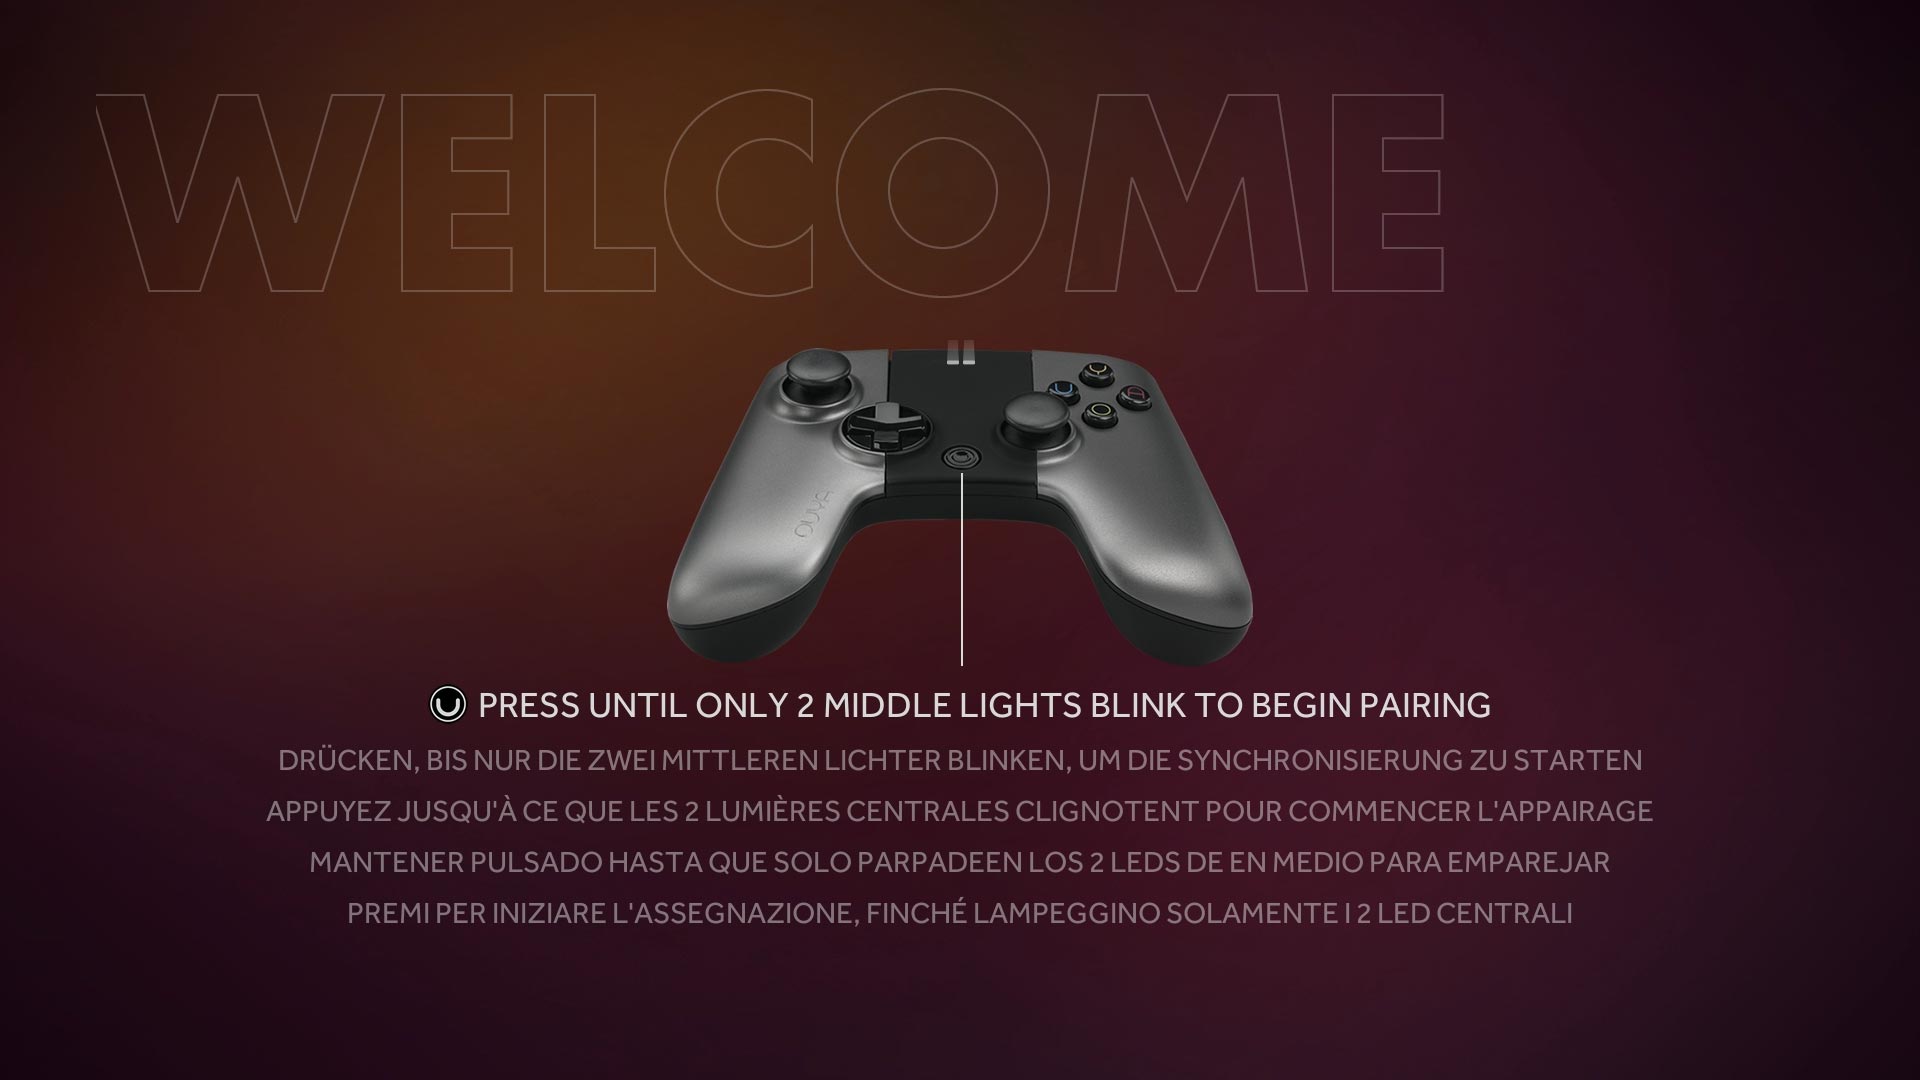
 One of the first things you may want to do is get Bluetooth working ASAP so you can ditch the keyboard/mouse and go back to your Ouya Controller. You will want to click the icon that is right above the default home screen of your Cyanogen which is where all of your installed applications are. From there find settings and click on that.
 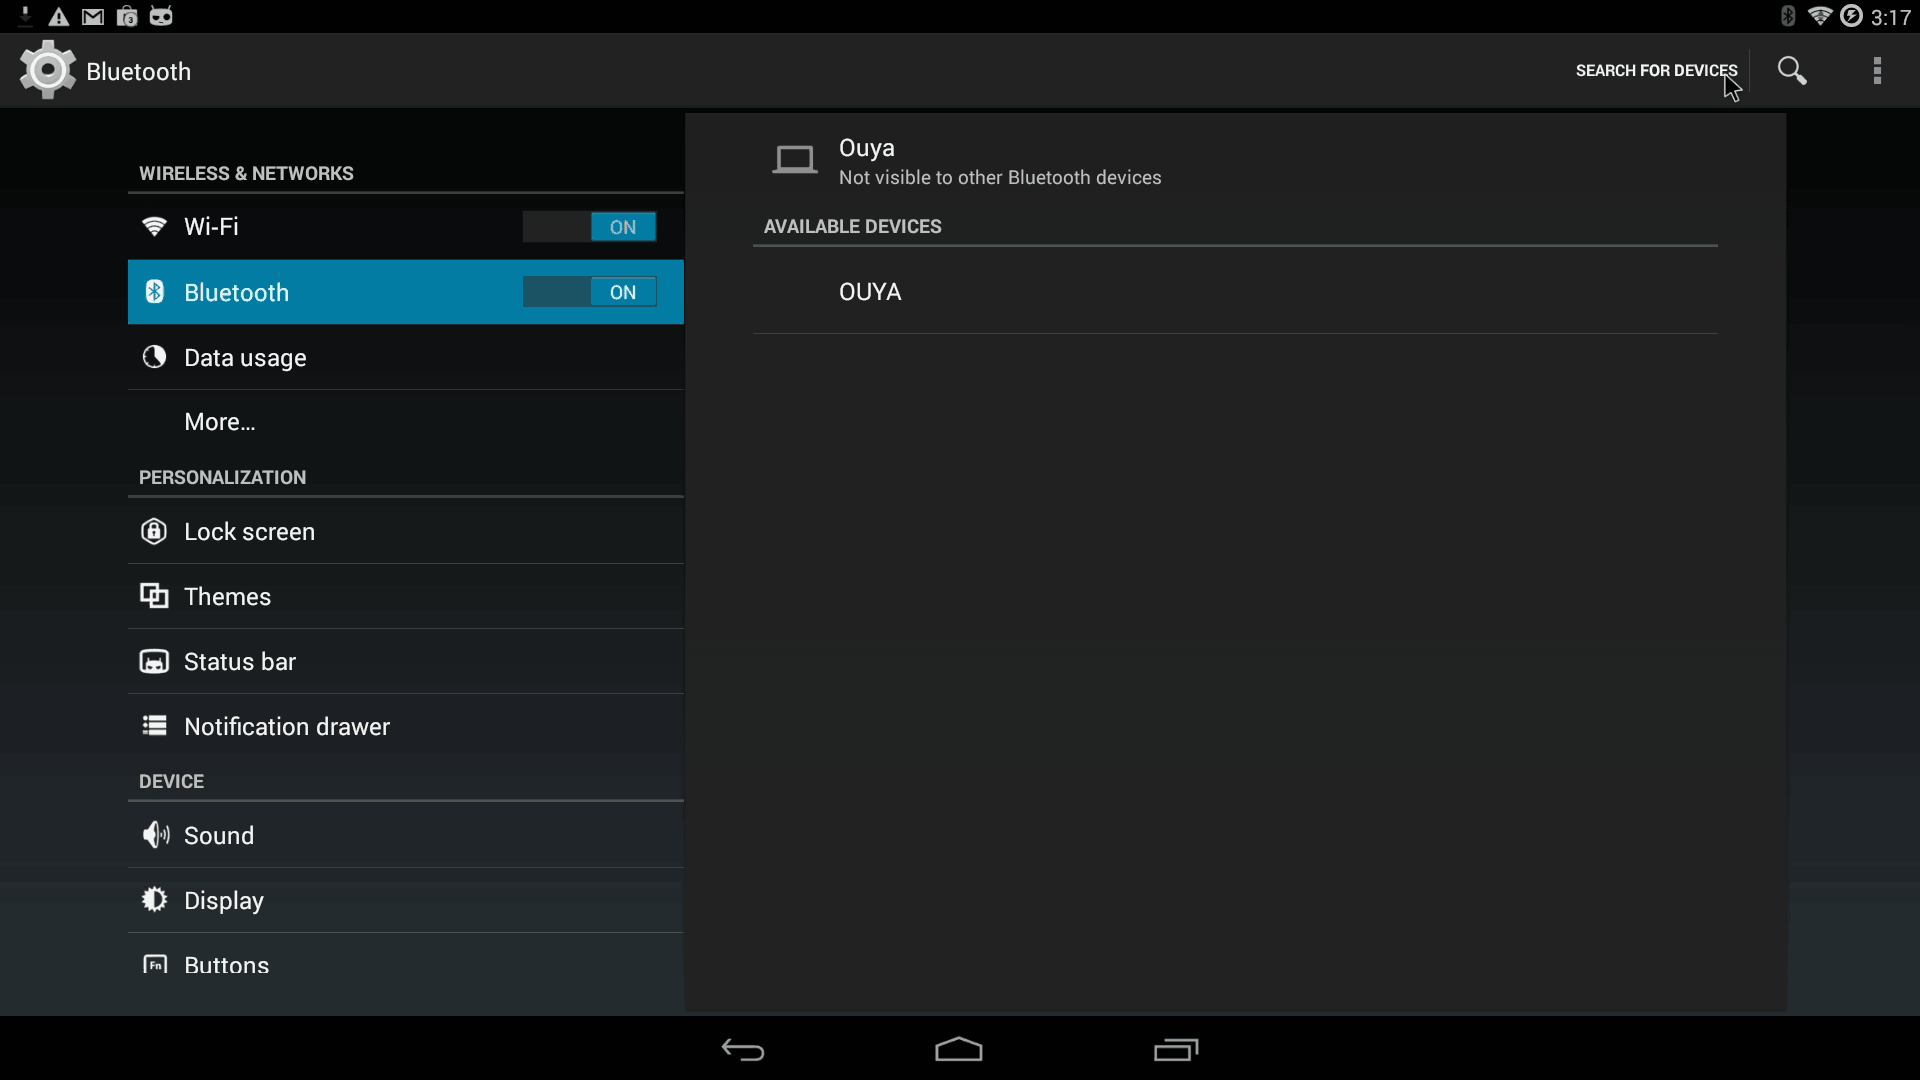 You should be approaching familiar territory for those Ouya people that have played in their advanced menu to get controllers working. And it even found my stock Ouya as I keep the Bluetooth running all of the time in my house. Click SEARCH FOR DEVICES in the upper right-hand corner to place the Bluetooth chip in discovery mode. While it is scanning. Hold the power button of your Ouya controller down until both lights are flashing.
 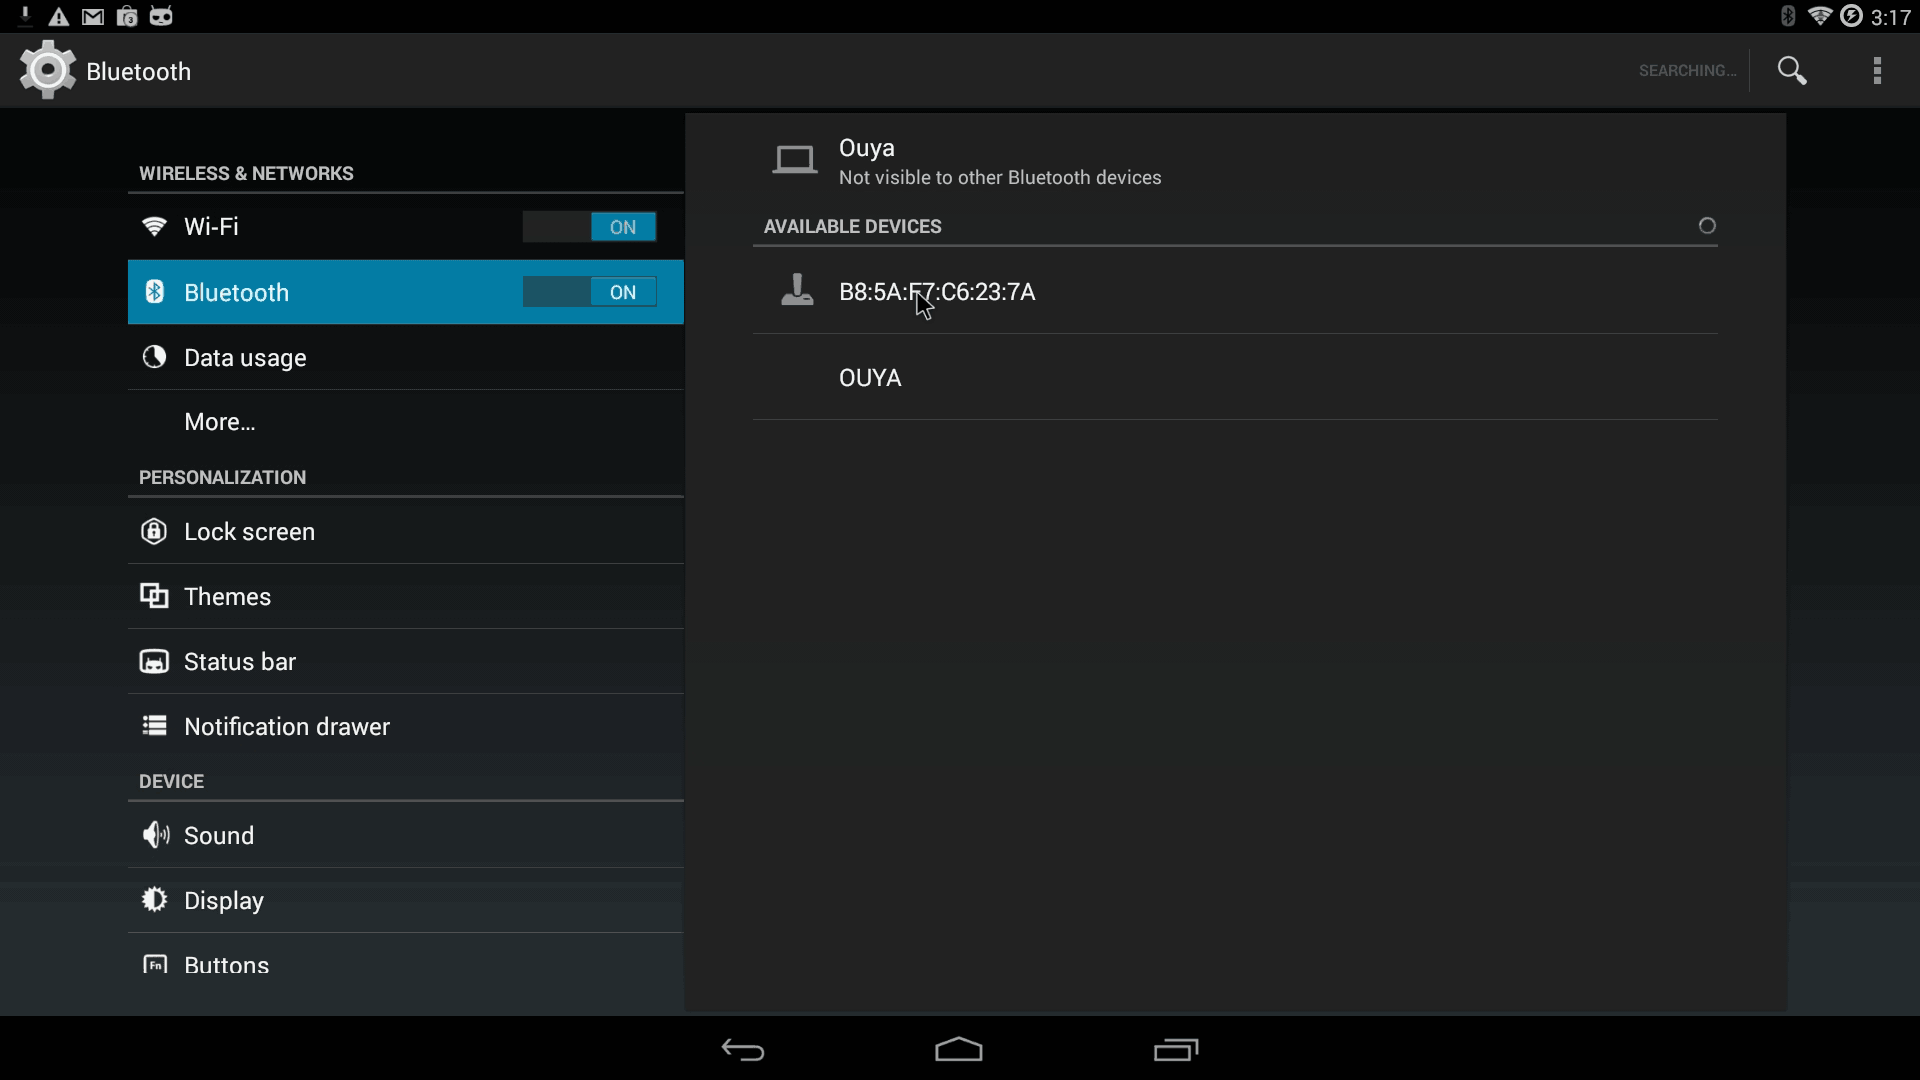 It will find your controller relatively fast in contrast to how Stock Ouya finds the controller. But it shows its Bluetooth network address instead of the actual name. This will straighten out the moment you click on it.
 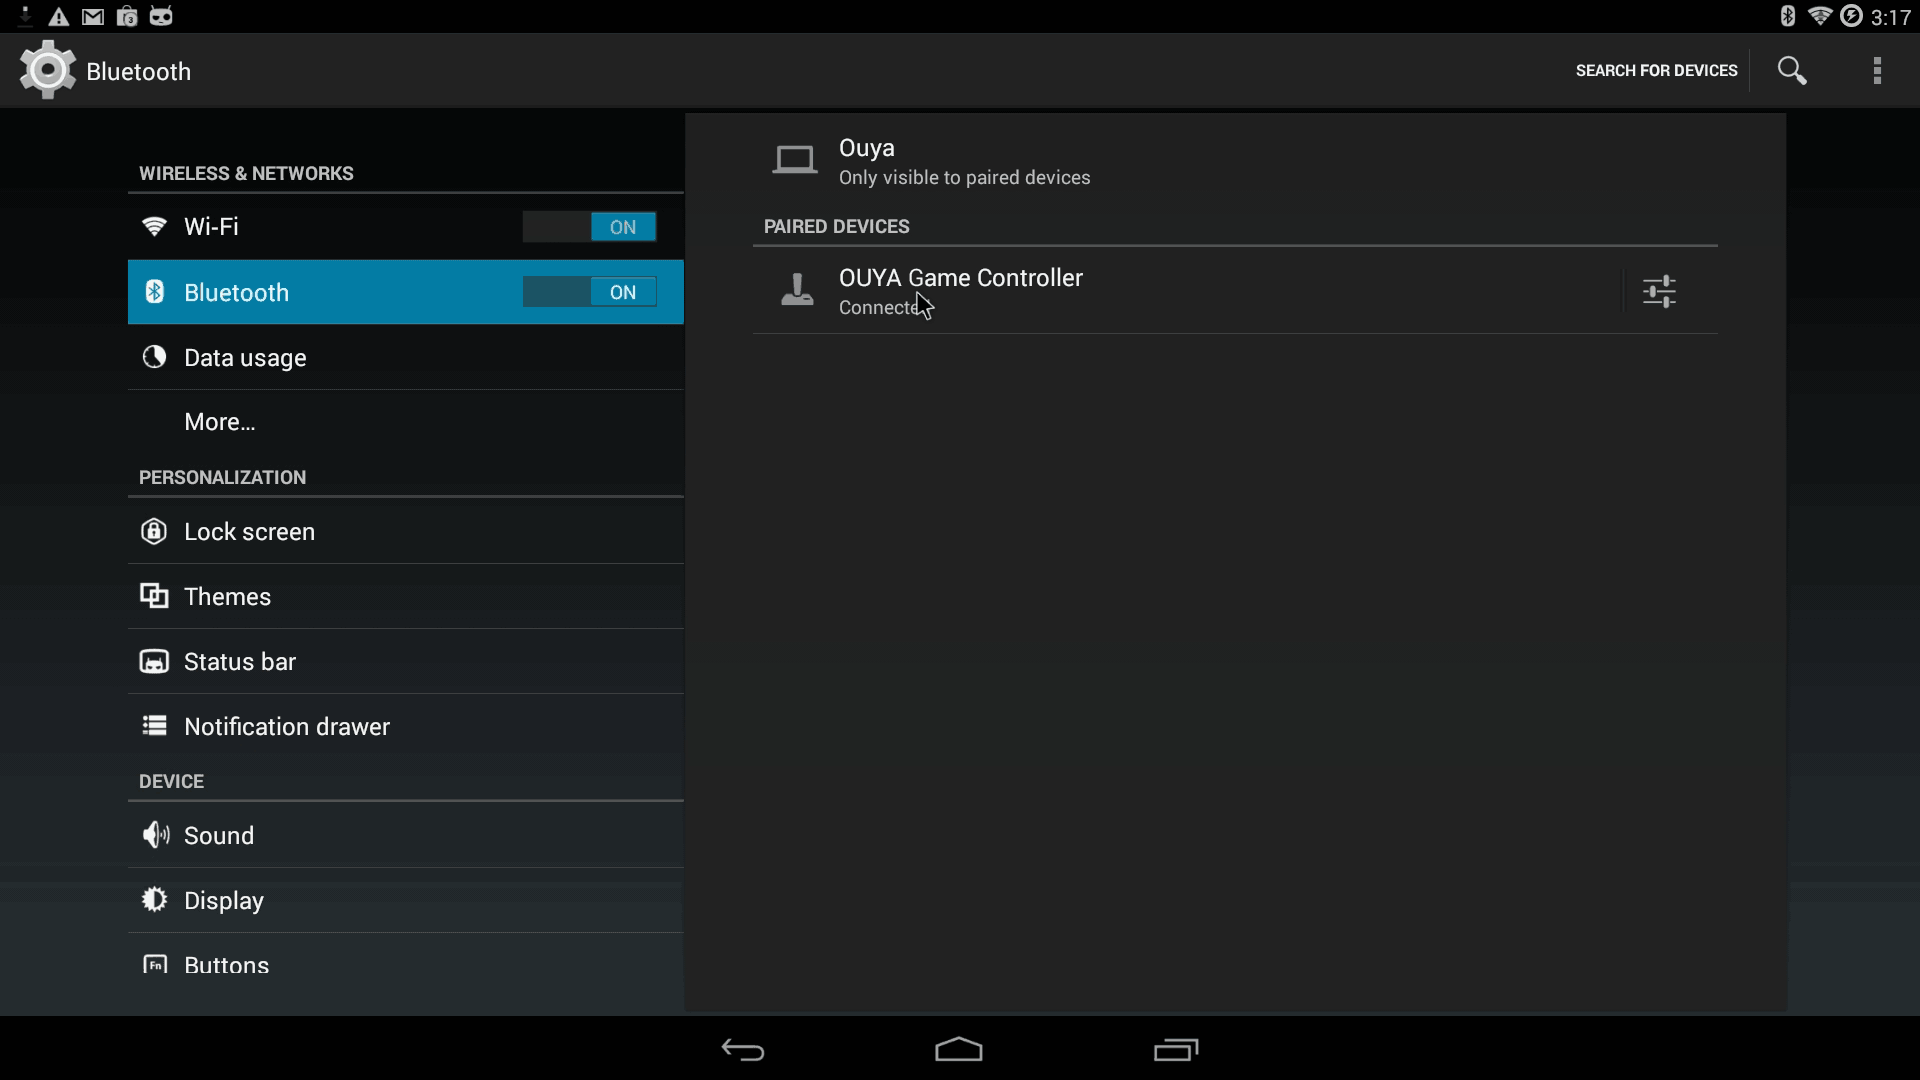 After you pair your controller and give it permission to pair. It will actually show the proper name. As well as player assignments on your Ouya Controller. You can now navigate around the menus with your analog or digital D-pad as well as use your mouse track-pad (depending on if you have a USB mouse hooked up to your Ouya or not).
Special thanks and credits:
XDA Developers - and Milaq for all of his work on the CM11 nightly builds. These people deserve real credit. All I did was write up a user guide.:) Kodi - For giving reasons why Ouya is still alive in 2016 and beyond. Ouya Forums - For kicking me in the ass to actually write this documentation.
Donations:
If you are reading this article just for Cyanogen/Lineage we're going to tell you to NOT donate to us! We don't deserve it, seriously. This is only here to make sense from the 2-4 XDA links of scattered data and put it in one place. The man who does deserve your hard-earned cash is Milaq for his continued support and updates to Cyanogen which is now Lineage OS for working on the Ouya. The man also donates his bandwidth to keep all of the images alive there. So throw money at that guy!
That's what server said.
END OF LINE+++
Wohh precisely what I was looking for, thank you for putting
up.