
Let's begin Screen Capture with the Ouya!:
This entry explains quickly how I do a screen capture for my Ouya articles so that I could show you certain key features and configurations that I have run across over the short while I have been playing with this unit. screen capture from the Ouya requires no special software beyond the Android development kits which are easily downloadable. And in a few commands, you'll be capturing your favorite screenshots from your Ouya console in no time!
Acquire the software for screen capture.
 Updated 8/23/15: The original blog talked about downloading the Android SDK which was well over 800MB in size in order to just get ADB functionality. It is incredibly excessive to do a function as simple as capturing screenshots off of your Ouya or any other Android game console that had ADB capability for that matter! So instead, I have created this download link which has the following items in it. All files are compressed with a 7-zip to ensure the fastest delivery.
- adb.exe for Windows along with the two. DLL requirements in order for you to contact your Ouya wirelessly throughout your network or via USB cable if you so choose.
- the /driver/ folder, This folder is only required if you hook your Ouya up via USB and the device manager of Windows detects the unknown "Ouya" device on USB\VID_2836&PID_0010. If you are connecting to your Ouya via network this folder will not be necessary.
Unzip this to your C:\adb\ folder so it's easy to access from the command prompt. This file is only 17MB in size. Which is a massive reduction of hard-drive space over the Android SDK download.
Alternate Step 1: Acquire the Android SDK
If you want to do more than just ADVB action or you wish to check out everything Android has in store in terms of development. Then Android SDK for Windows is here - A direct link for this is listed right here for the android SDK R21 Once unpacked this will eat almost 1 GB of hard-drive space. Keep track of where you have installed this SDK! I've installed mine into the 'android' folder right onto the root of C:. C:\android\ 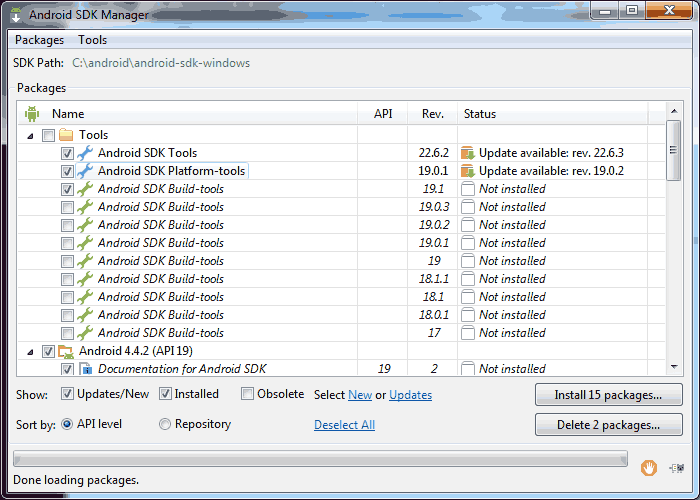 Upon installing the android software you will want to run the SDK Manager and install the platform-tools option like what is listed above. This will give you the directory that stores the ADB executable. In this example. C:\android\platform-tools\adb.exe . Keep in mind you may have to update multiple times in order to get access to the Android SDK Tool section. If you are running the Android SDK.
Run the ADB commands over the network for screen capture.
At first, you're probably thinking that I am going to ask you to set up some complicated Windows drivers to get the Ouya working with the help of this YouTube link. The truth is it has gotten a hell of a lot simpler with the network ADB connector which is in the updated versions of the Ouyas OS.
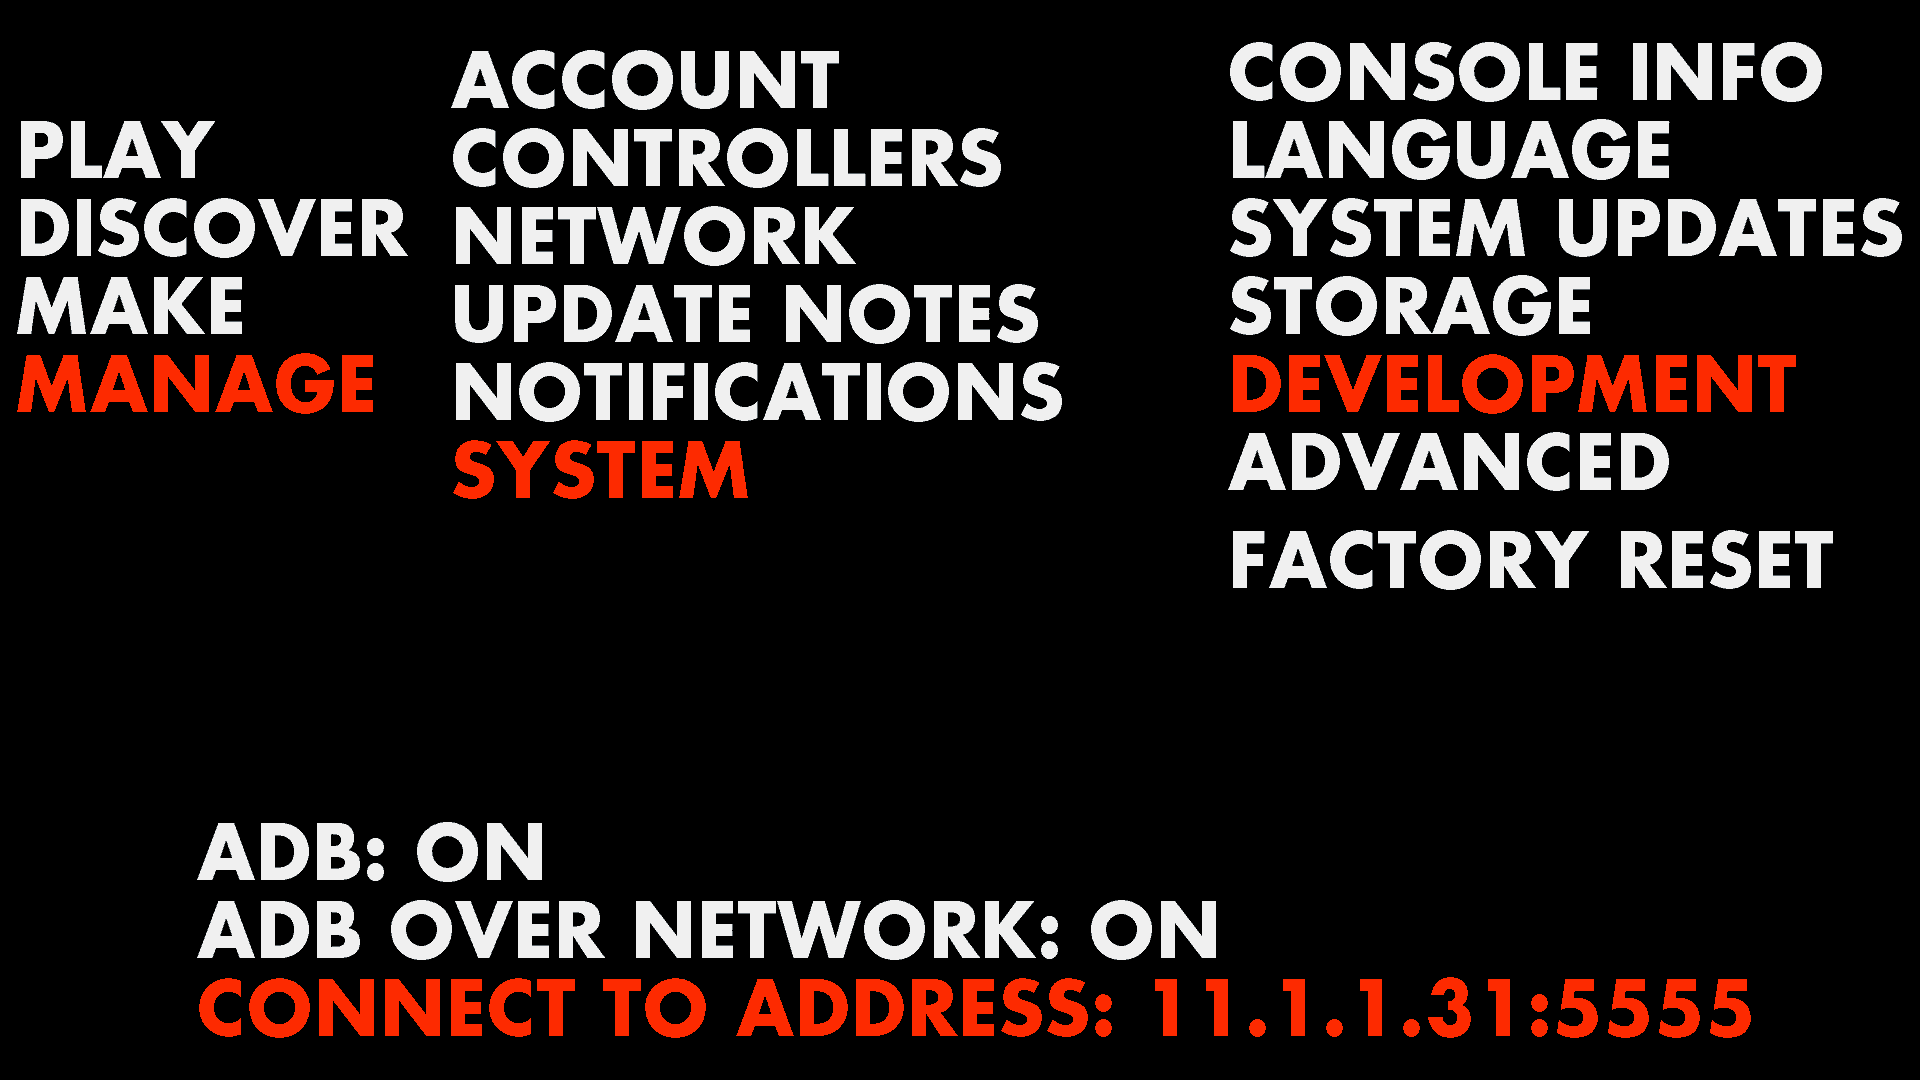
We first have to tell Ouya to open up the ADB ports so that we can connect to them wirelessly. Click Manage - System - Development. Turn ADB: ON and ADB OVER NETWORK: ON It will then show you the IP address of your wireless network. (Note: if you are connected via LAN and you also connect via wireless network as well. It may show you the IP address of the wireless network.)
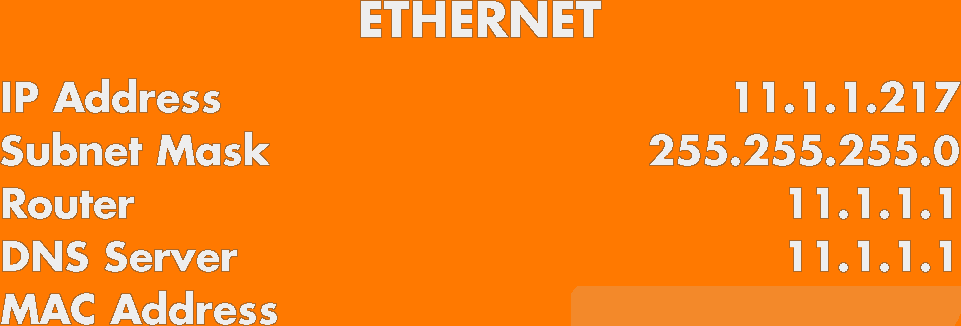
On the test Ouya for both wireless and ethernet connectivity. By going into Manager - Network from your main Ouya menu. You can see your real IP address.
Now that we installed our SDK and our Ouya is set up correctly. now we open a command line in Windows and launch ADB to begin screen capture. I should note this is how you do it in Windows. For Linux and Mac, your mileage may vary!
cd C:\adb\
adb connect 11.1.1.217
It should respond with something like connected to 11.1.1.217:5555
Next, let's pull some data
adb shell screencap -p /sdcard/screen.png
It will not offer a response if the screen capture command is successful.
Now that the picture is in the Ouya memory we want to pull it over to our main pc.
adb pull /sdcard/screen.png
It should respond with something like 1905 KB/s (1608127 bytes in 0.824s)
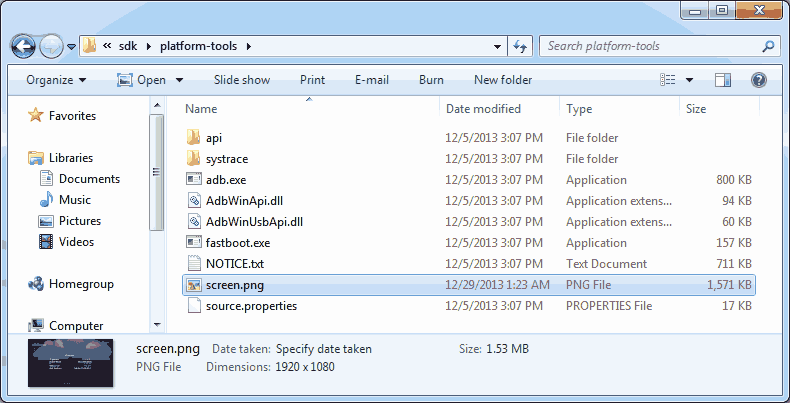
If it works then screen.png will appear in the directory where your ADB command line is at. If you are using the ADB download on this blog then it will appear in C:\adb. If the android SDK then it will appear in C:\android\platform-tools\
Alternate method - using the USB cable for screen capture.
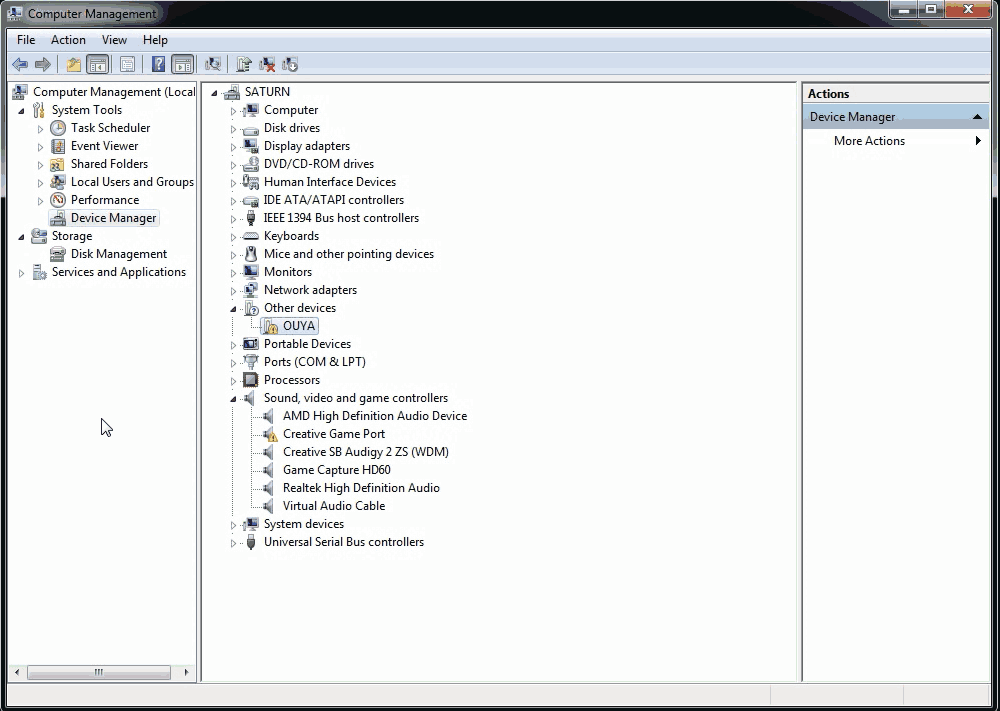 For those who do not have their Ouya on a network or simply want a direct connection to their Ouya or who do not trust their network on having the ADB port open. Then we will provide the following instructions for you (screenshots are all Windows 7 and may vary between OS's). If this is your first time plugging your Ouya in via USB you should see something like my device manager where the Ouya is in the Other Devices category. That's not going to work with ADB in the state it is in.
So we are going to update the driver. Note: I have received a few users stating that they do not receive the "OUYA" underneath the other devices category but instead only have the Ouya MTP underneath the "Portable Devices" category. The MTP device is not what we want. If you are already logged into your Ouya do a factory reset as depending on what is going on with your Ouya the ADB function may or may not be disabled on it. Right-Click on the Ouya in Other Devices and click Update Driver Software to continue.
Also, if you are running Windows XP, 7, 10(32-bit-edition) and you do not see the word "Ouya" or something similar but instead see the words "Unknown Device" underneath other devices then your system has not properly detected your Ouya ADB port. The biggest cause of this problem is a bad or faulty USB data cable. Try a different data cable and try again.
I can't find the unknown device category on my Windows 10 x64-bit edition box! Help!
 You are not going crazy if you do not see "Ouya" under "Unknown Devices". We do however need to talk. Click here to learn how to correct driver issues with ADB inside of windows 10 64-bit for the Ouya. Do not worry, this will open another tab so you can pick up right from this section the moment your driver is straightened out.
Continuing onward if you did find "OUYA" in "unknown devices"
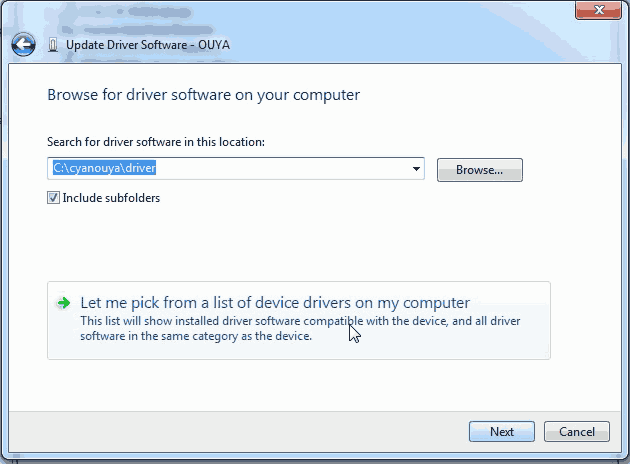 We are not going to let the OS choose the driver we want to use. We are going to pick it ourselves. Click "Let me pick from a list of drive drivers on my computer" and click next to continue.
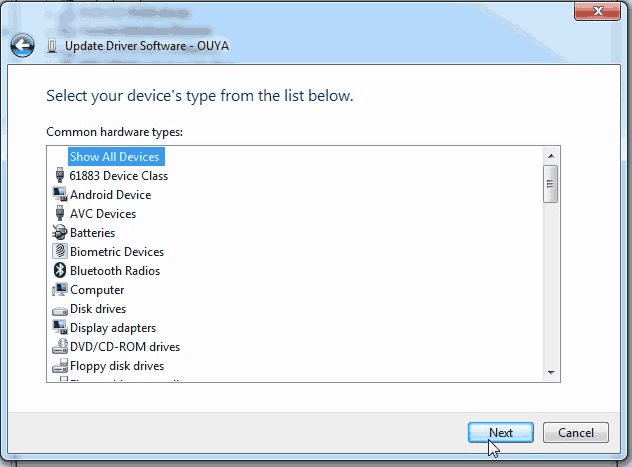 Click on "Show All Devices" and click Next to continue.
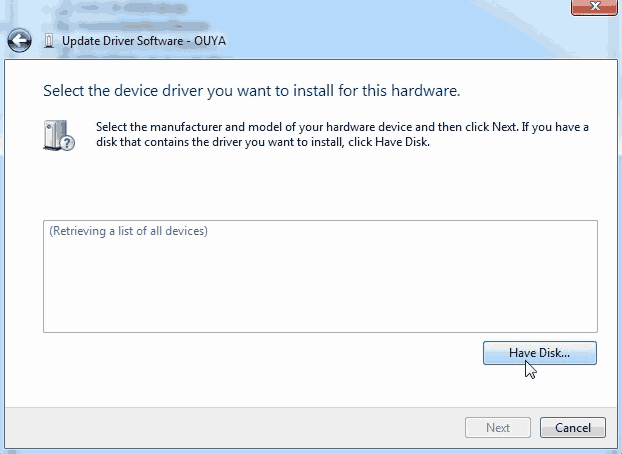 Click on the Have Disk button.
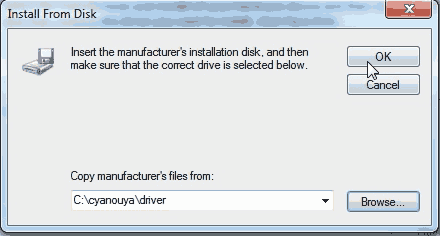 We are going to browse where our ADB drivers are. Since I extracted my adbouya.zip file right to the root of C:\ I can simply type in C:\adb\driver . If you placed your drivers elsewhere or you are using the Android SDK instead of the ADB binary included in the zip file. You will then have to click the Browse button to find where your ADB drivers are at. Click OK to continue.
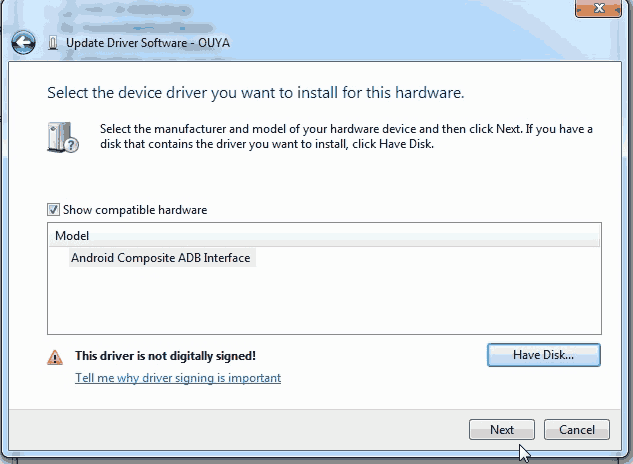
Windows should have already determined that the best driver is "Android Composite ADB Interface" if not or if this is blank, uncheck the "Show compatible hardware" box and select your Android Composite ADB Interface from there. Click Next to proceed with driver installation.
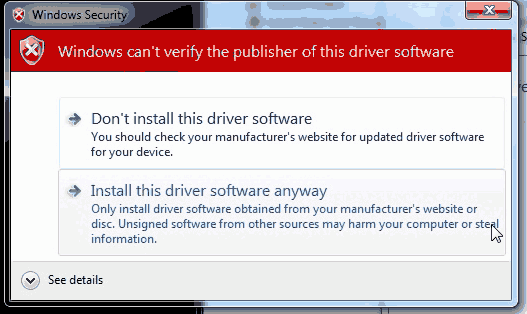 Windows do not like drivers it does not know about or where they come from. This is normal. Click "Install this driver software anyways."
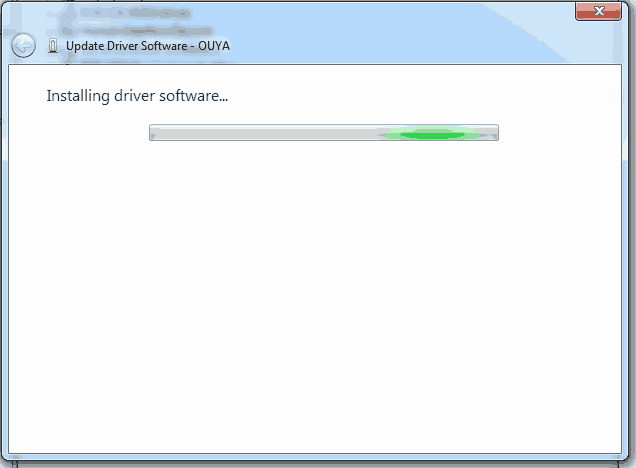 It should begin installing the driver. This may take around 10-30 seconds on your first time installing it.
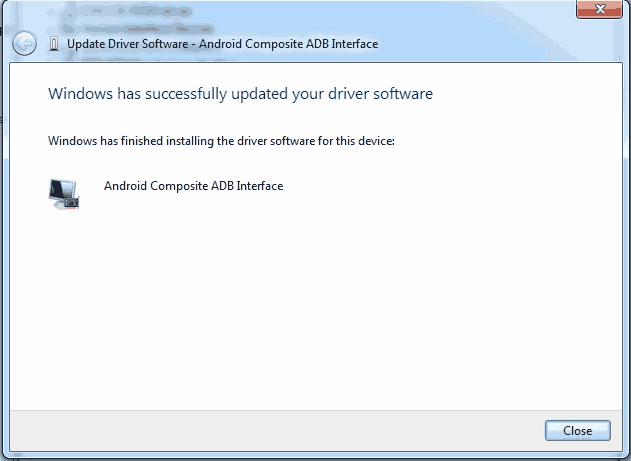 If everything went well then you will get a message like a window above. If for some reason there is an error code. Then there is something wrong with your Ouyas connection. Click close to continue.
 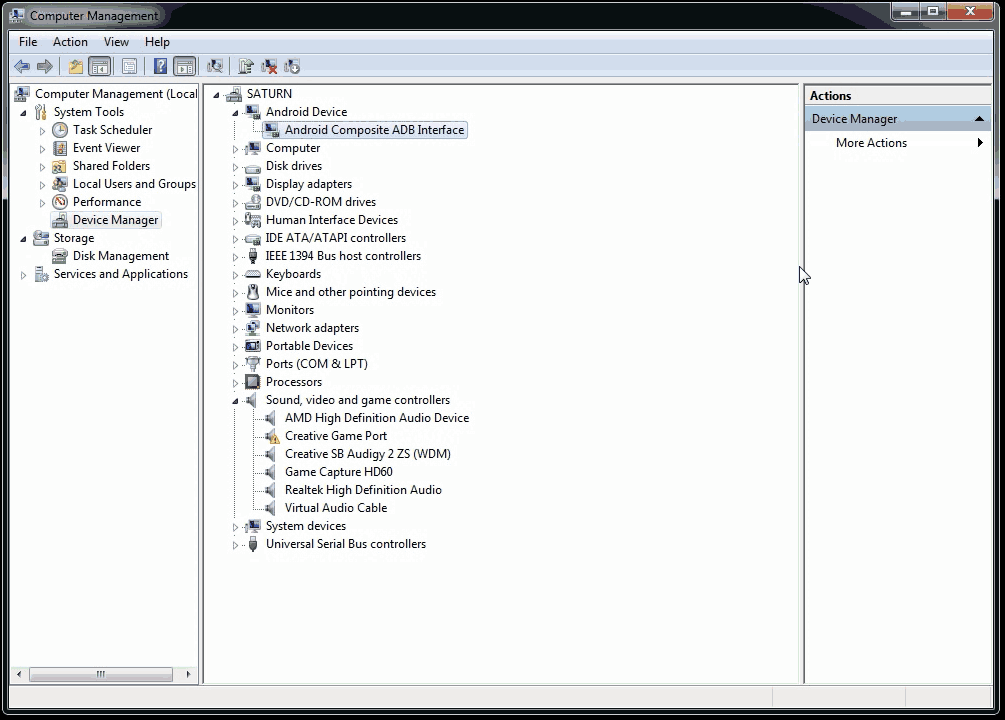 Your Other Device and your Ouya will disappear from the device manager. You should now have a new category called "Android Device" and the device known as "Android Composite ADB Interface". Your PC will now understand what your Ouya is whenever you connect it to your PC. From This point, you can now close out of the device manager.
Installing the adb_usb.ini file:
This file exists in your user profile folder underneath a section called .android and it has a very simple one-line comment which tells ADB where to look for your Ouya in your devices. For example if your username in Windows is "skippy" then the logical path for this file will be C:\Users\skippy\.android\adb_usb.ini . What is in that ini file is as follows:
0x2836
now you can either open up a command prompt and type in the following:
mkdir %USERPROFILE%\.android\
echo 0x2836 >> "%USERPROFILE%\.android\adb_usb.ini"
Say that your username is "Penguin" for logging into Windows. This will make the folder C:\users\penguin\.android\ and inside of that folder, it will make a very small text file called adb_usb.ini. The reason why we must create this file in a very particular area is without it the adb.exe file has no idea what vendor to look for in the device manager and it will come up blank in the next few steps.
Working with ADB to transfer data:
We can continue going to the command prompt by clicking "Start" and "Run" and typing in "cmd" to pull up a command prompt. Once you are there you will want to do the following.
cd C:\cyanouya
adb start-server
It should respond with the following:
* daemon not running. starting it now on port 5037 *
* daemon started successfully *
Next, let's see if ADB can actually see our Ouya.
adb devices
It should respond with:
List of devices attached
015d49062a501415 device
If it does not have anything underneath "List of devices attached" then ADB is not properly talking to the USB driver. Make sure your device is installed in device manager and the adb_usb.ini file exists underneath your %userprofile%\.android\ folder. Unlike the ADB screen capture blog,
We did a while back there is no need to pass the ADB connect command. You will be already connected via hardwire. The ADB connect command is only required if you are connecting to a remote source over the network.
If it does connect then you may happily start passing those ADB screen capture commands.
adb shell screencap -p /sdcard/screen.png
It will not offer a response if the screen capture command is successful.
Now that the picture is in the Ouya memory we want to pull it over to our main pc.
adb pull /sdcard/screen.png
It should respond with something like 1905 KB/s (1608127 bytes in 0.824s)
You can now go off and make your own crazy article reviews!
END OF LINE+++