
Yes, in 2021, we're staying topical as fuck with the Original Xbox DVD remote.
A long time ago, we received a commenter asking if I could provide instructions for the DVD remote control that was optional with the Xbox Original. RedCloud DID actually have drivers for this as well as the XBCD driver that we published in the past for getting our Xbox Duke controllers running in Windows 10. I, however, did NOT want to use the RedCloud drivers. In part, because they are actually OLDER than XBCD and harder to get working in a Windows 10 environment. Instead of fighting with Windows security. Fighting with aging drivers. It was easier to just make a new receiver with an Arduino.
Read on if you want to know more.
"Note: If you get a black screen but the audio is playing. Or you got a potato PC and it's studdering. We have fallback Links below."
Video tutorial fallback mirrors:
In case you have no-script enabled or for some reason cannot see the title video on this website. We have provided direct links for these videos. For more information about the standards we use on this site click here if you would like to know more.
AV1       - Link
MP4/.h264 - Link
OGV       - Link
History time.
As Xbox Devs Wiki could tell you; The receiver of the Xbox DVD is not just a simple IR receiver. There's also a 512kb memory flash chip on this containing the DVD player .xbe (Xbox Executable) file that was used to keep costs down on the Xbox itself. Putting yourself into Microsoft's shoes. Why would you raise the cost of your console by another $20 potentially making your console cost higher than the PlayStation 2 for a feature that very few console users will use? Many people back in the day had a separate DVD player. On top of that those 1st gen Thompson DVD drives that came in the original Xbox were not the most fabulous to play anything other than Xbox games on.
During these times of console wars. There's a certain percentage of revenue that goes off to Dolby Digital for the use of intellectual properties when you purchase a console or hardware. Other licenses could also be a payment to MPEG-LA for the use of their decoder on a commercial level. It's an unknown percentage as to how much of the console you pay is license fees. Now, AC3's copyright limitations have expired. But a financially painful lesson was learned in the console industry. This is ultimately why there are a lot of companies moving towards more open-source video codec standards like WebM and AV1F and staying far far away from MPEG-LA's X265. In part, to get away from licensing hell. But also to save money in too long term.
Infrared differences.
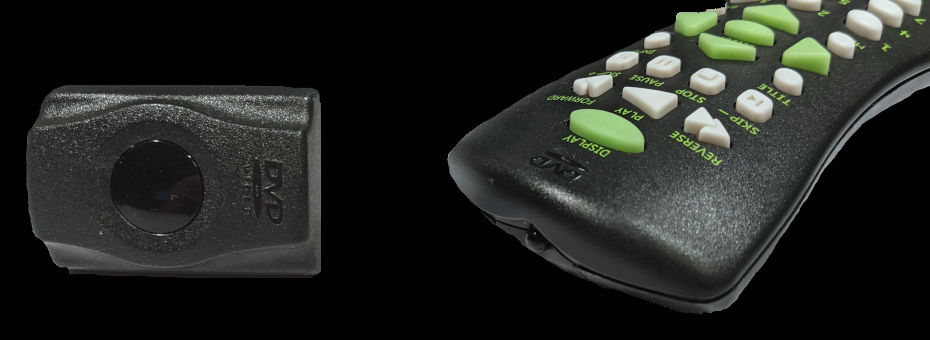
There's a site out there called Drone Bot WorkShop which will go into great technical detail about how Infrared operates. To keep things short and simple your Xbox DVD Remote uses Infra-red that will send pulses of light to an Infra-red receiver that picks up those pulses and in turn, your Xbox program (that 512kb on-chip DVD player) proceeds to perform the function of the button pressed. The key difference is that the Xbox Devs Wiki points out that the IR receiver is a TSOP-1556 manufactured by Vishay Telefunken which operates at 56khz. Not the traditional 38khz that every regular IR remote operates in. This is probably because they didn't want IR to cross-talk with anything else within the entertainment center.
As a note, we can't speak for the third-party remotes that you see on Amazon. They may have cheaped out and gone with a 38Khz IR-Receiver. We are only speaking about the OEM receivers that were originally designed by Microsoft.
The takeaway.
Knowing all of this. There's an on-stick USB program that will only get in our way if were to convert the proprietary adapter from Xbox to USB and then we have to work with really ancient drivers to get it to work. On top of overriding the security of Windows as we did with our XBCD blog. It's a disaster to use the included IR-Receiver. So, we won't!
We'll make our own receiver. This accomplishes two tasks.
- We will not destroy the original Xbox receiver. Even though the TSOP-1556 is no longer in production there are variants made by Vishay that will work just as well.
- We don't have to open our Xbox remote control and change out all of the circuitry for something like a Bluetooth keyboard. We can keep the original 56khz IR functionality intact. Thus, keeping the overall aesthetics of the remote control which is what a lot of XBMC/KODI fans wanted in the first place. (Unless your DVD IR controller is damaged like what you will witness in this article)
Disclaimer time:
We always have a disclaimer anytime we do hardware hacking or programming. S-Config.com takes no responsibility for any damages that can occur within a project like this. Be is mental, physical, psychological, and financial. We will strive to be as accurate as possible when displaying the information herein. If there are any inaccuracies in what we have produced you can drop them in the comment below. Also, understand that S-Config is not a magical programmer and thus the Arduino code could probably be done in a far more elegant manner than what will be shown below. A lot of this was thanks to a combination of many websites to which we will give special thanks at the end of this article. As always, you could read the FAQ if you have any more questions beyond this article.
 Download time.
I have provided a link to our Sketch file so that you may download it and slam this onto your own pro-micro. If you want a full breakdown of what this code does then read onward.
The file was compressed with 7-zip to save space and also includes the following files:
- PDFs of the two styles of transistors that are used. 38kHz TSOP34438 for those following along with a generic IR remote and the 56kHz IR receiver TSOP38156 that we used on an Arduino Beetle CJMCU Serial. Also, schematics of the generic Arduino Leonardo are included as well.
System check.
These DVD remotes are rather old. Pushing 15+ years. So let's pop them open to see what we are dealing with.
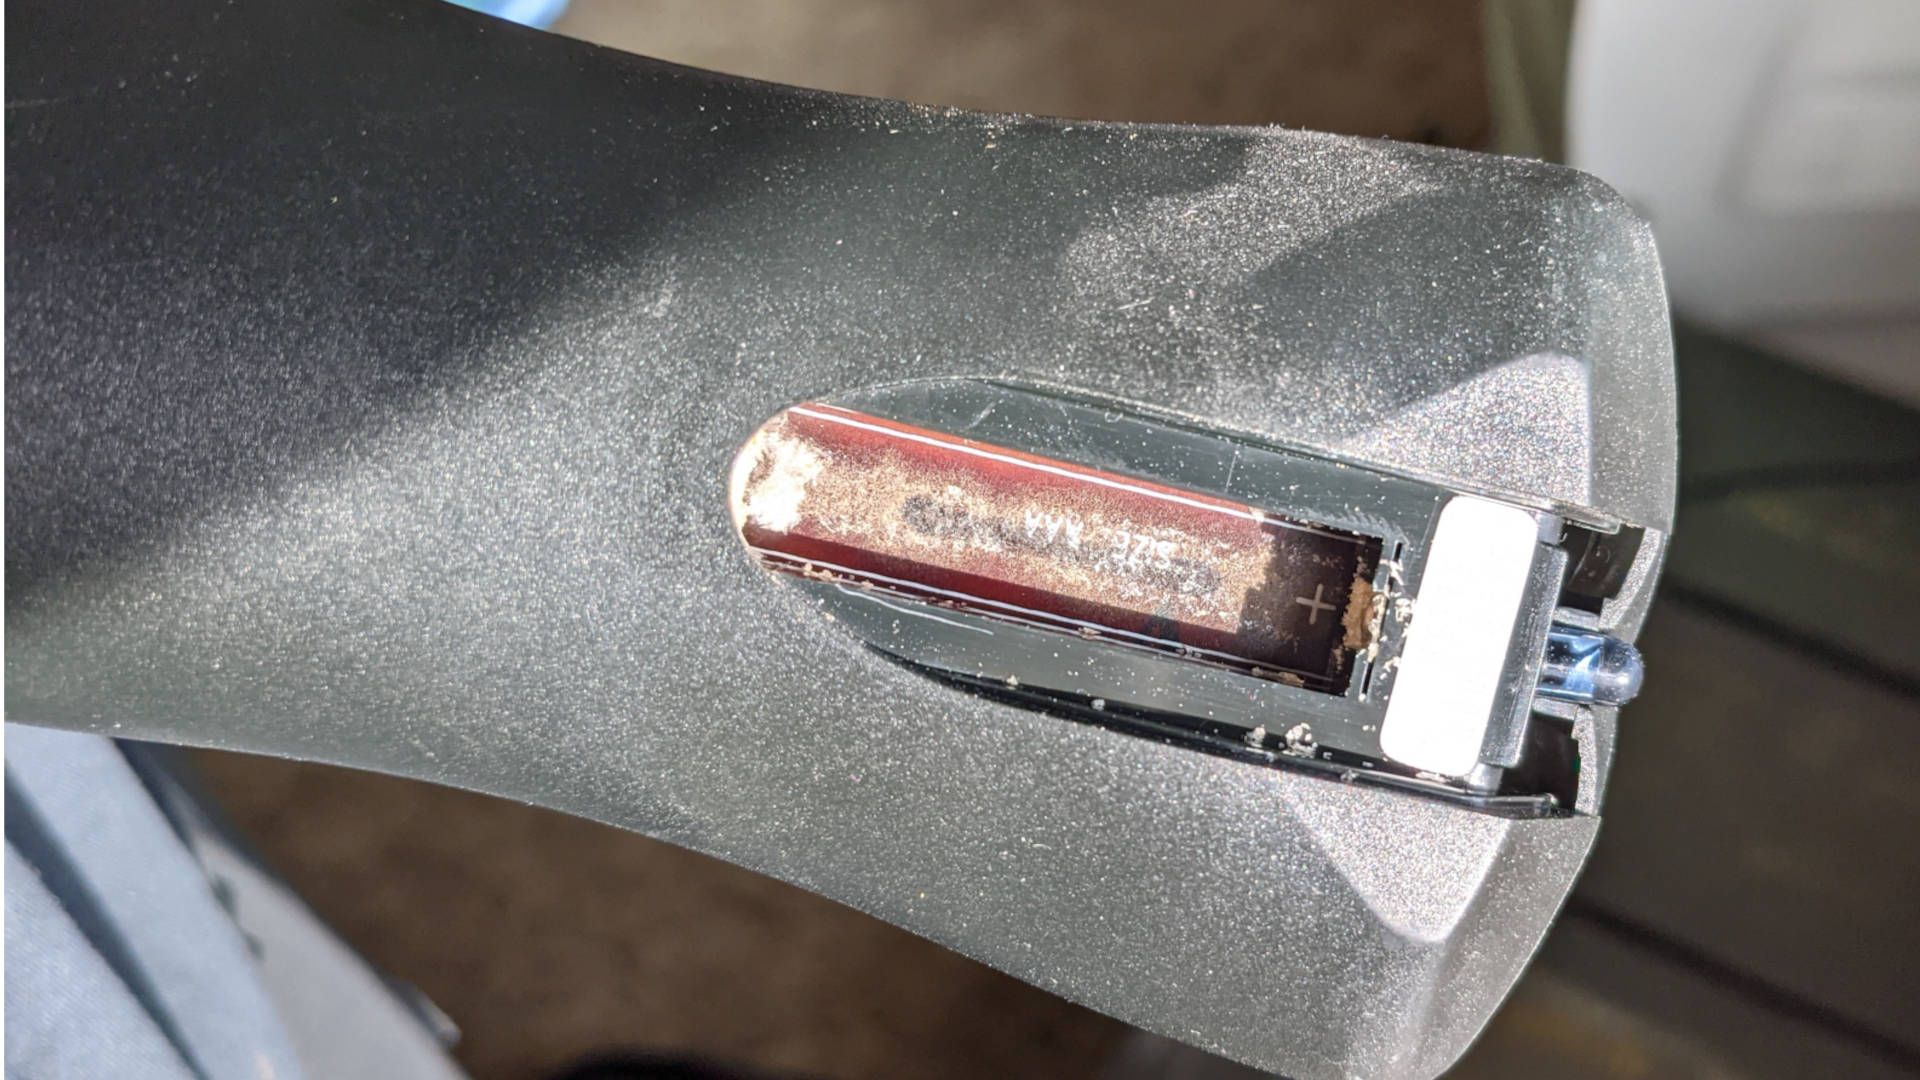
If you were like me. Or you could even be picking this up from Goodwill. Chances are most people did not eject their Alkaline batteries before putting their electronics into storage. After many years of oxidization, the battery ends up leaking all over the place creating a bit of a mess. There is actually ANOTHER battery in the cavity of this remote that we can't even remove.
So, we're going to take apart our remote. Now, if you're one of those lucky people that ejected your batteries after storing them. Congratulations. You don't have to tear it apart like what we're about to do.
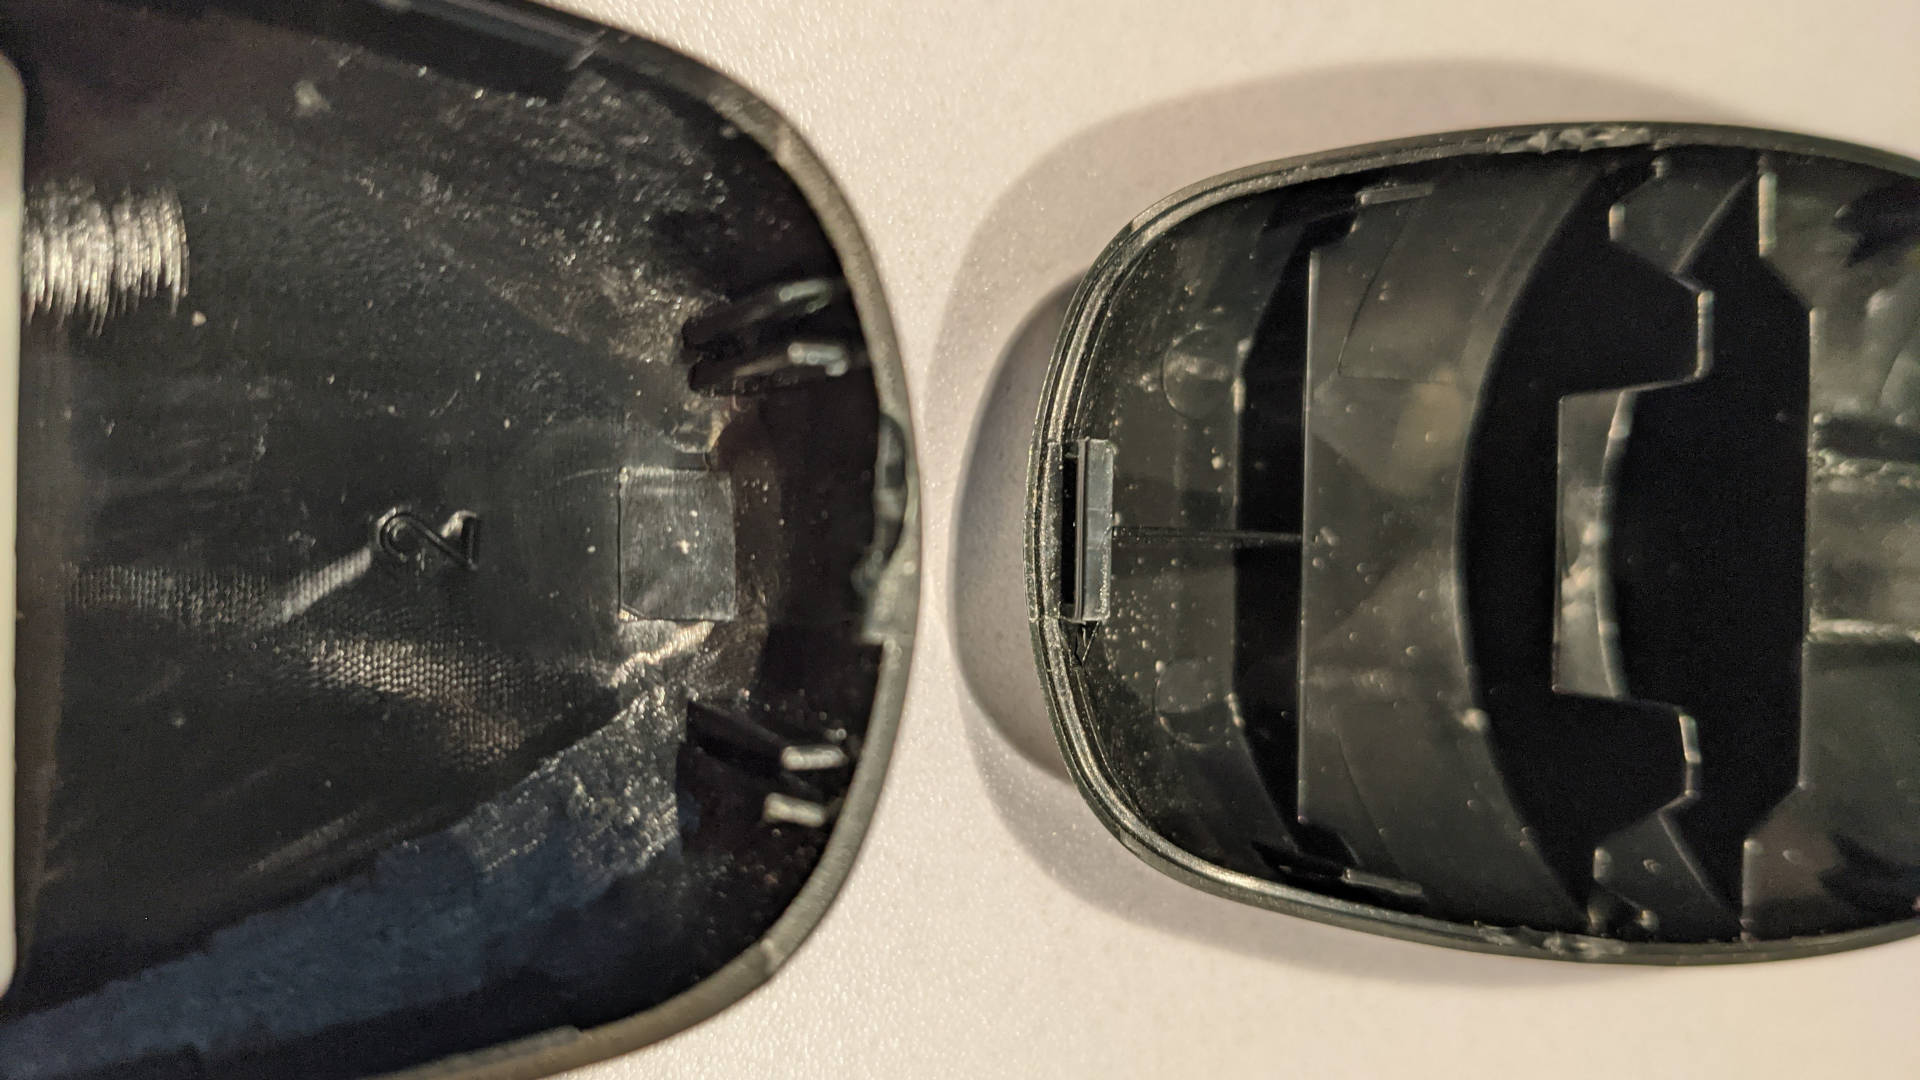
To take it apart it's best to use a plastic pic that you normally would use on an iPhone or a laptop LCD separator. This will MINIMIZE the damage. I'm going to say that when you open something this old you're bound to break at least a few tabs when opening these up. if it doesn't close up all the way after you are done a little hot glue will assist to keep it closed.
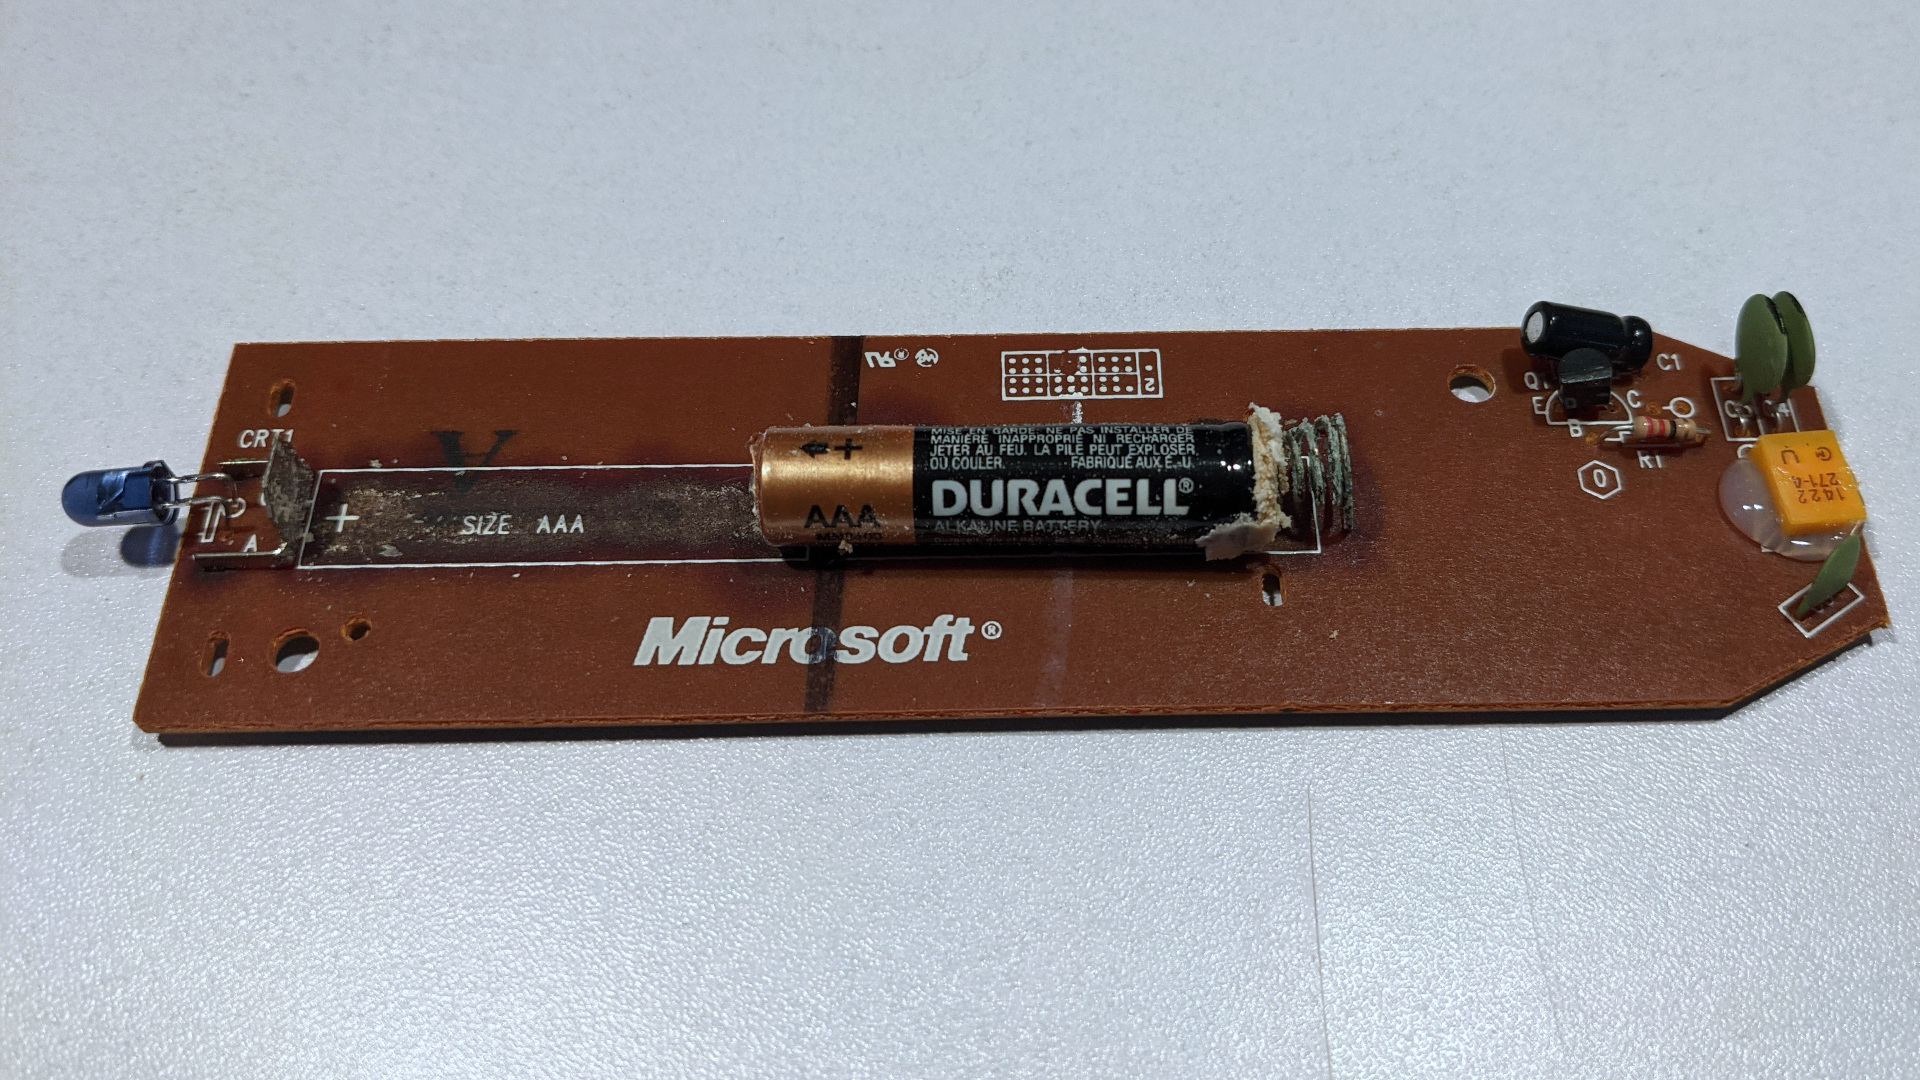
Oh hey! There's the second battery we couldn't get out of this case and now we see why. Fuck that's a lot of corrosion. Anyhow, we have to break out a steel brush to get the contacts looking something like a regular piece of steel after this battery had fun for an untold amount of years.
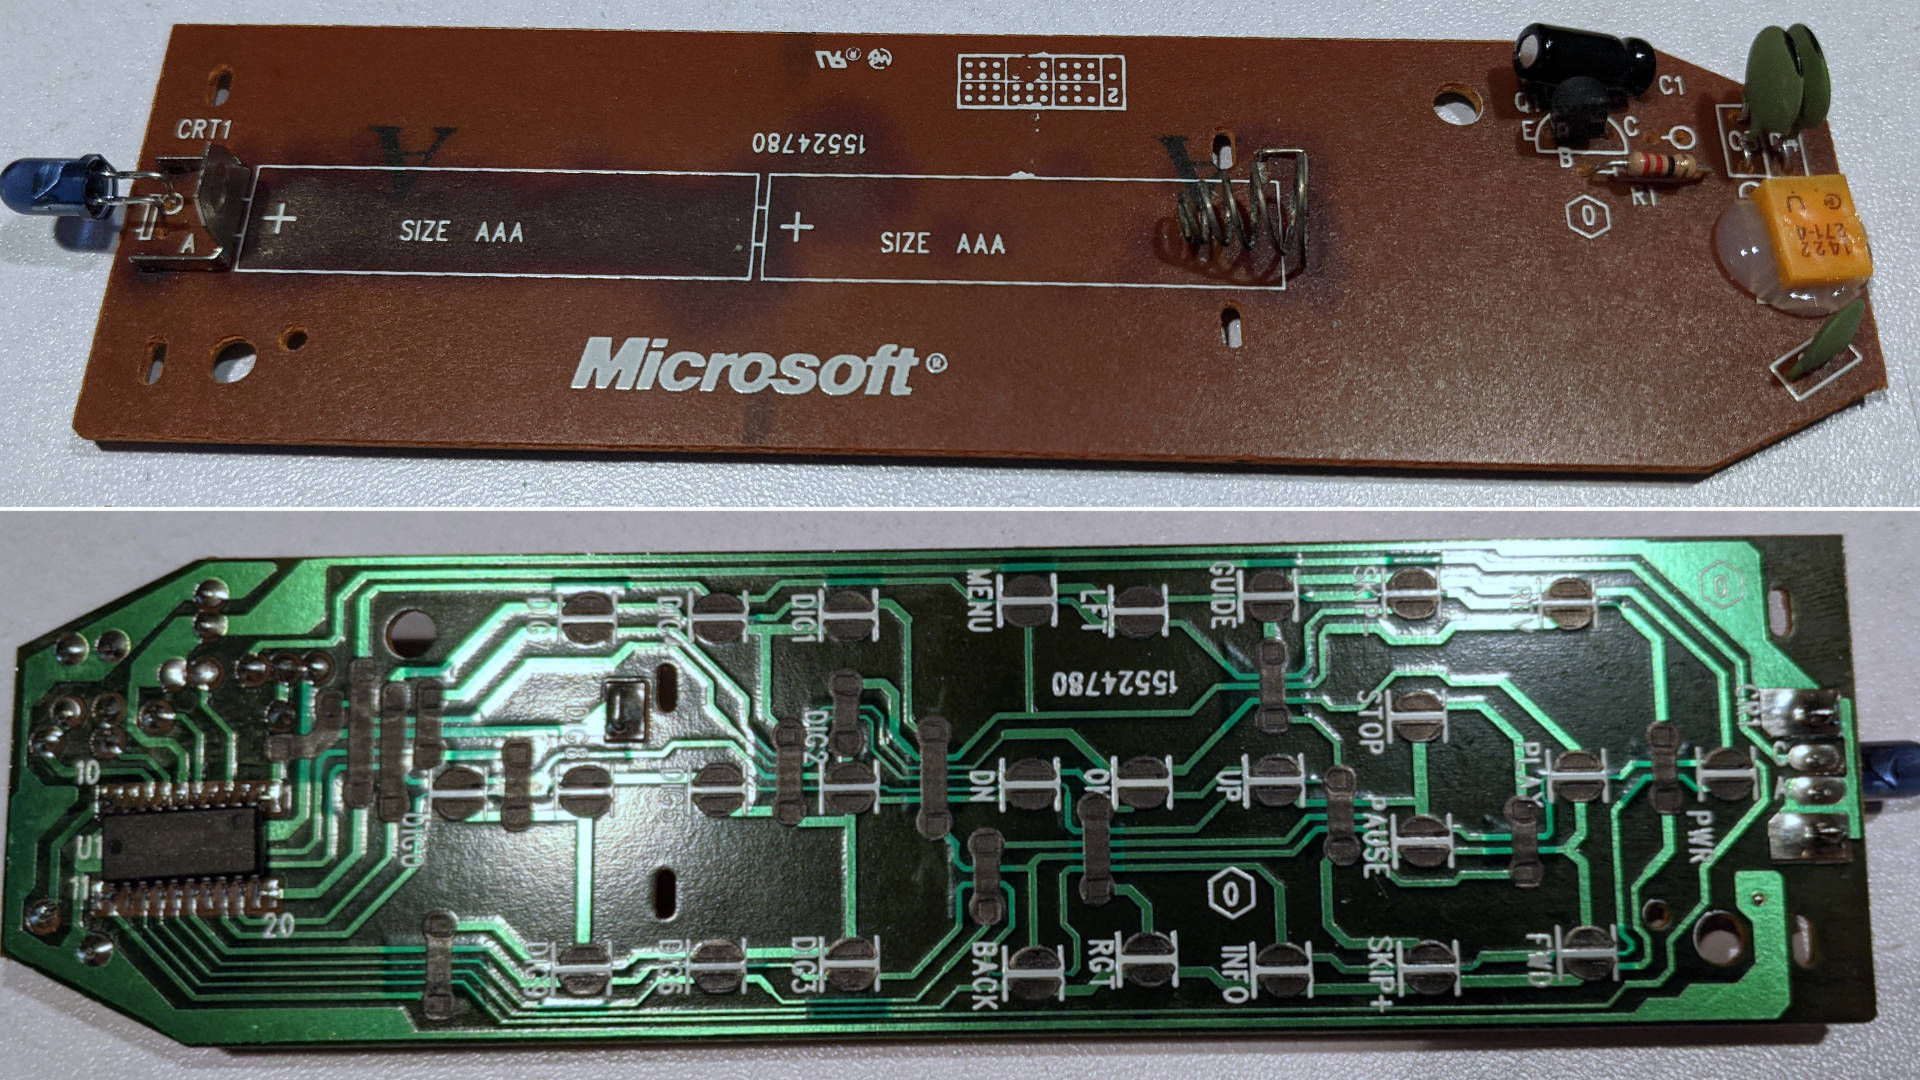
Since we have the board out we will give everything a good alcohol bath just to make sure everything is crazy clean by the time we are done and that the membrane can make good contact with the buttons on the opposite side of the circuit.
There is something that we would like to make note of here
When you open up the casing. the amount of free room inside is kind of huge. So, if you really wanted to convert this thing to Bluetooth it's easy to hide the board.. Or even lithium power the battery so you can have an even bigger mess after 15 years er, we mean so we can recharge it. Yeah.
The Arduino build.
Let's first discuss the biggest issue which is the cost of a project like this.
- 1x TSOP38156 from Digikey - $1.12(USD) + approximately $3.00(USD) in shipping - So let's just round up and call it $5
- Arduino Leonard Pro-Micro and/or Beetle with ATmega32U4 on eBay - Anywhere from $5.00 (USD) to $9.00 (USD) shipping can vary from free to another $3.00 (USD)
So if you want to build this project quickly it will probably cost you about $14. Which is MORE than the cost of a used Xbox DVD remote control kit. If you are willing to wait for shipments from China or you buy Arduino in bulk then this may not be as painful in cost for you to build as a person buying one of each item.
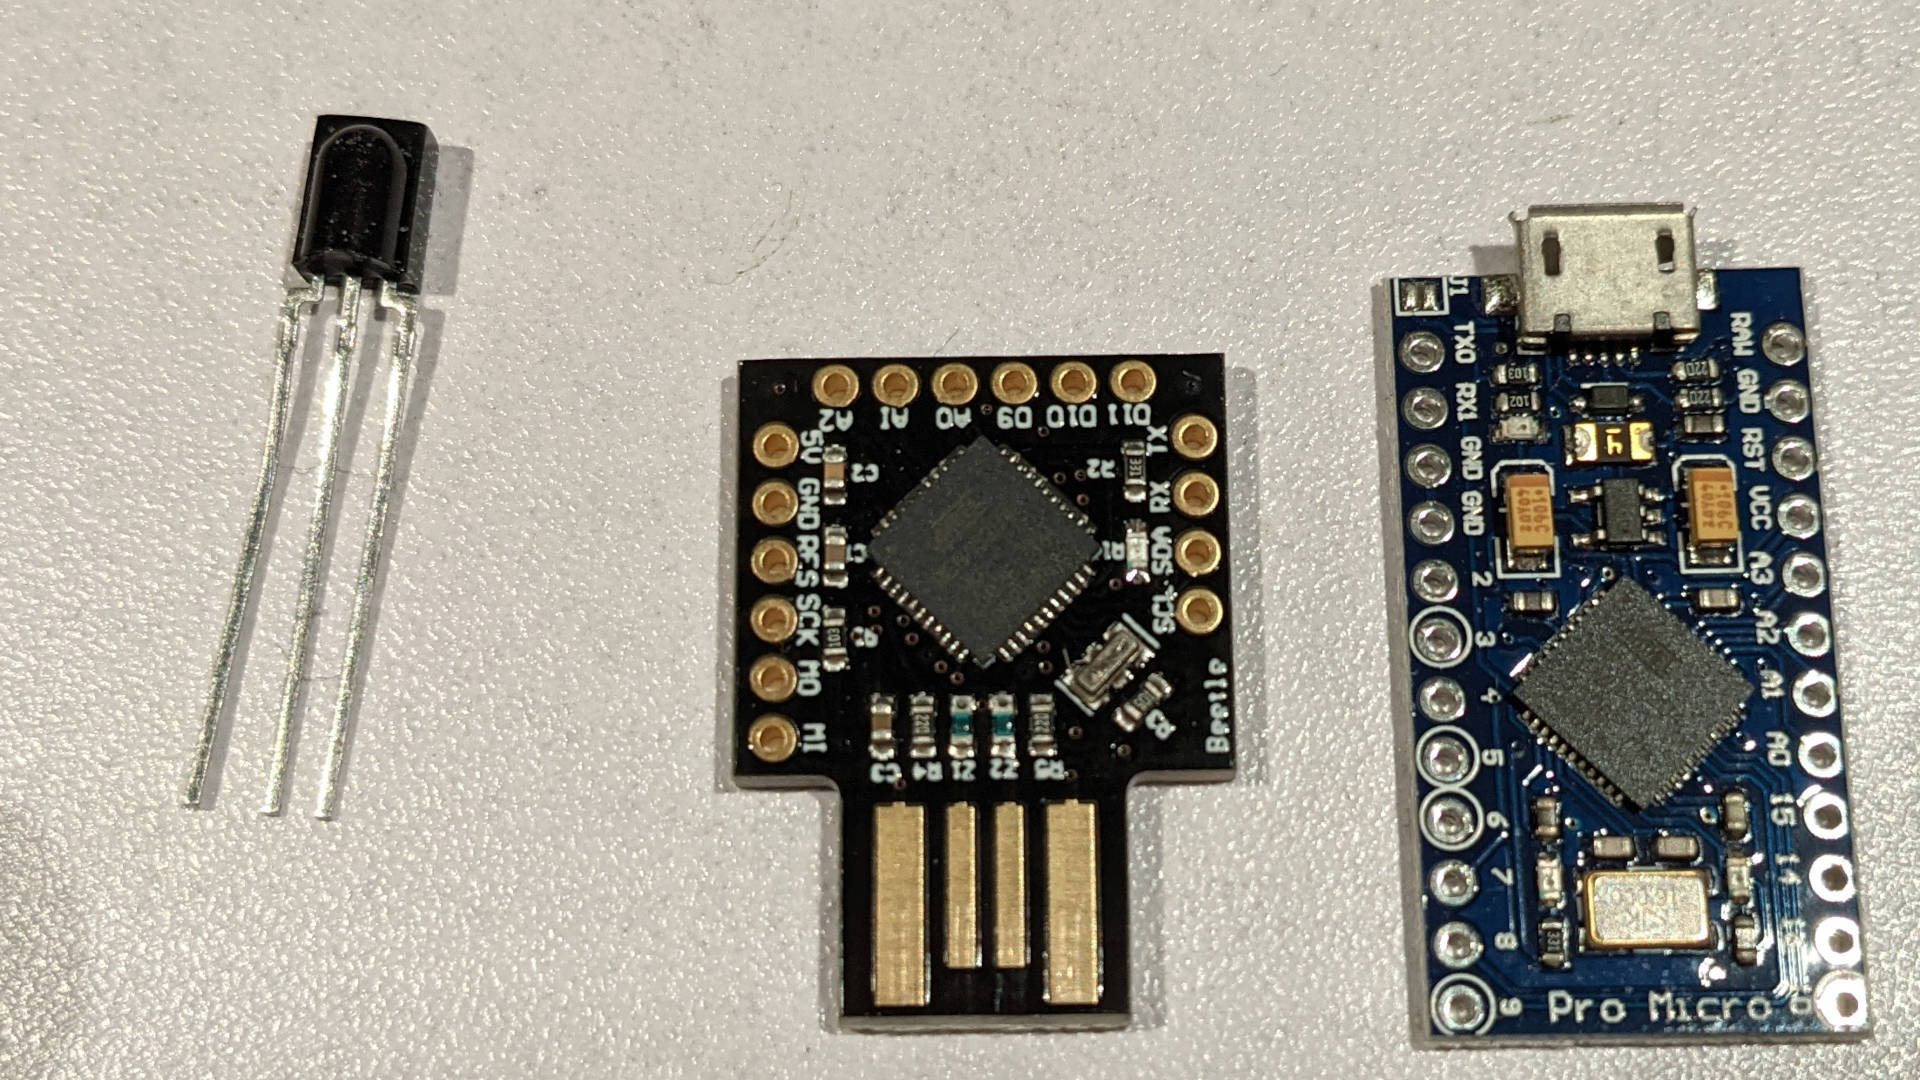
You are welcome to use either the Beetle series or the standard Pro-Micro series Leonardo chipsets. Also, if you have a regular old remote and still wish to follow along. Then you can replace TSOP38156 with a TSOP34438 to give you a 38khz frequency range from Vishay.
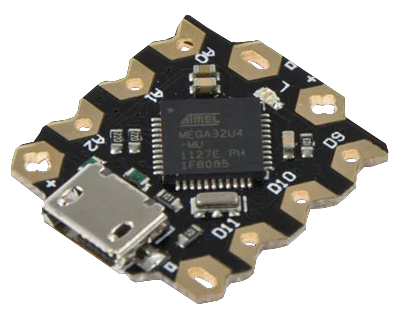
In retrospect, we probably should have gone with the Arduino Beetle package from DFRobot as it has a micro-USB port on it making it easier to reposition the IR sensor.
Other tools.
Some other tools you will need.
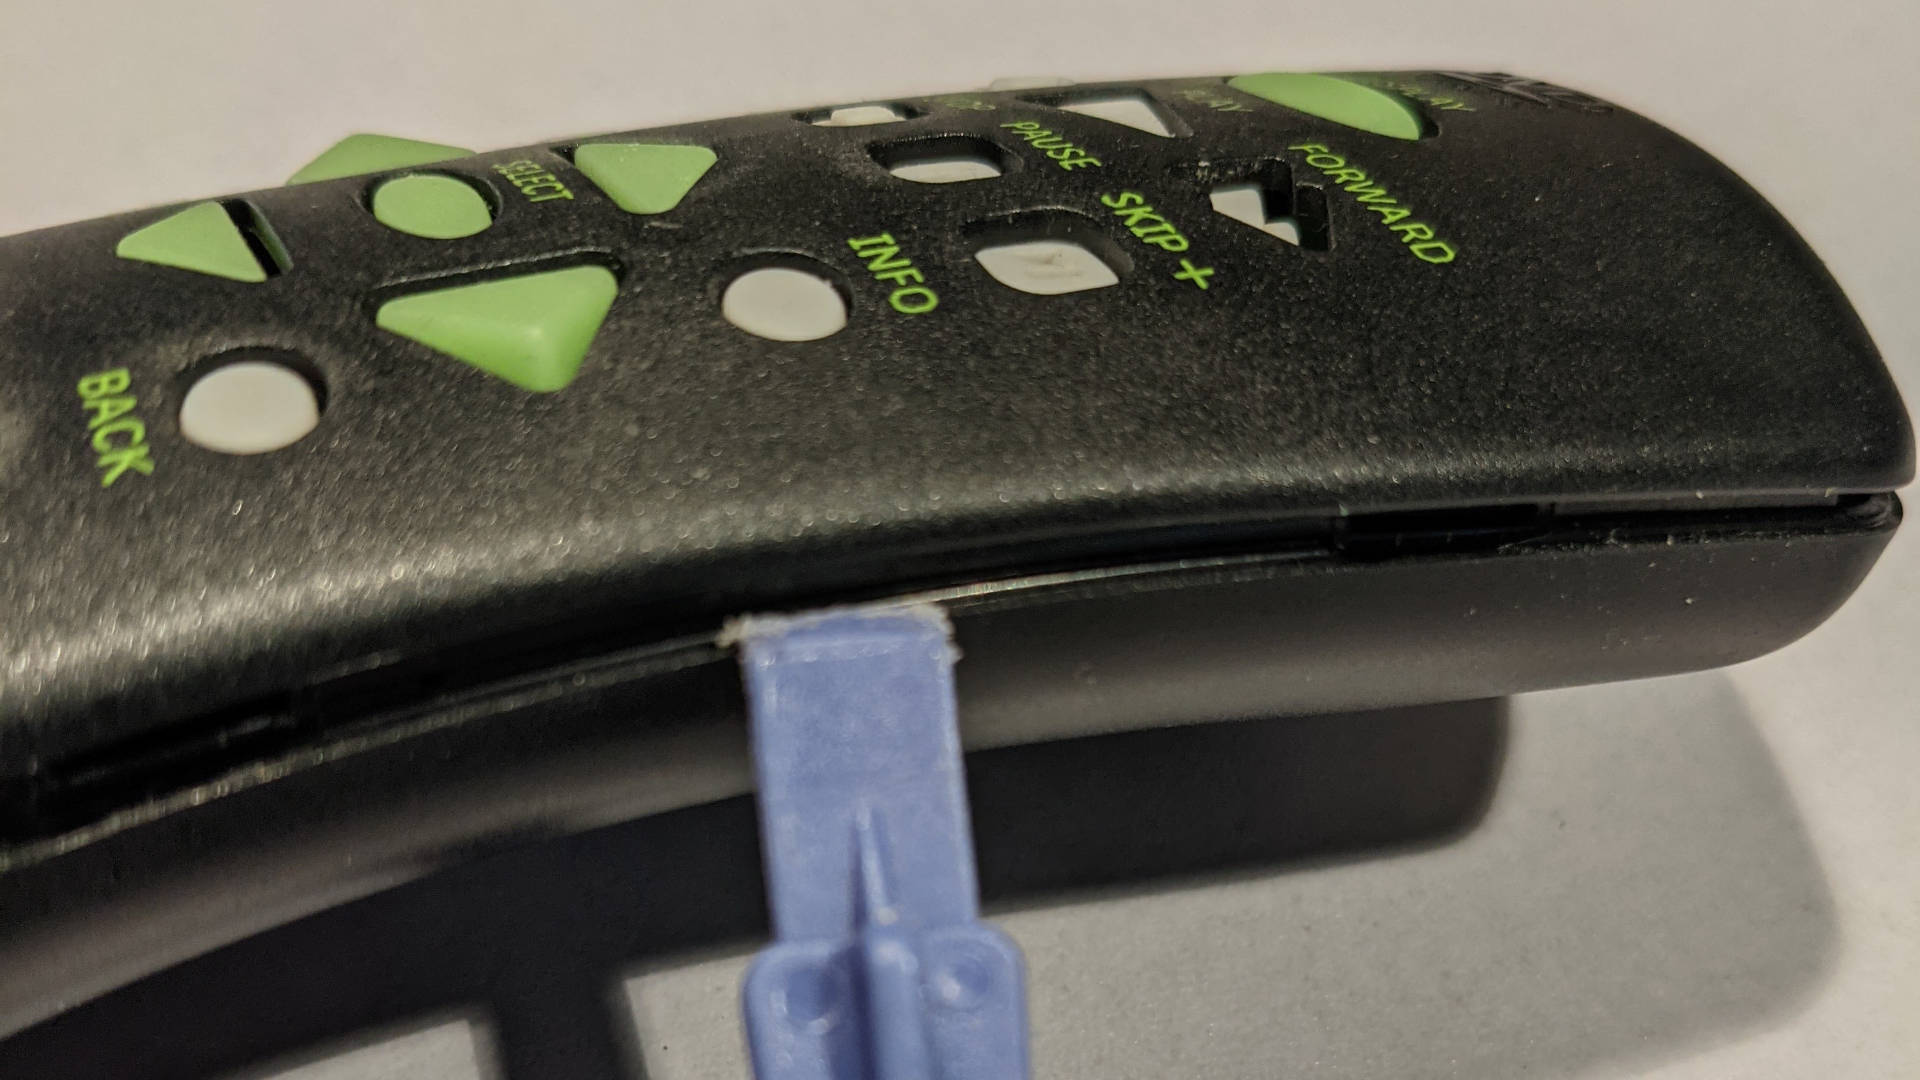
- A soldering iron - If you are working with this small of a package. If you have an Arduino Leonardo that uses patch pins then you could easily get an IR receiver that has the same pin configs on eBay.
- Wire-Clips - To clip the legs off after soldering.
Yeah, this is simpler than our ArduinoDECK from the hardware perspective.
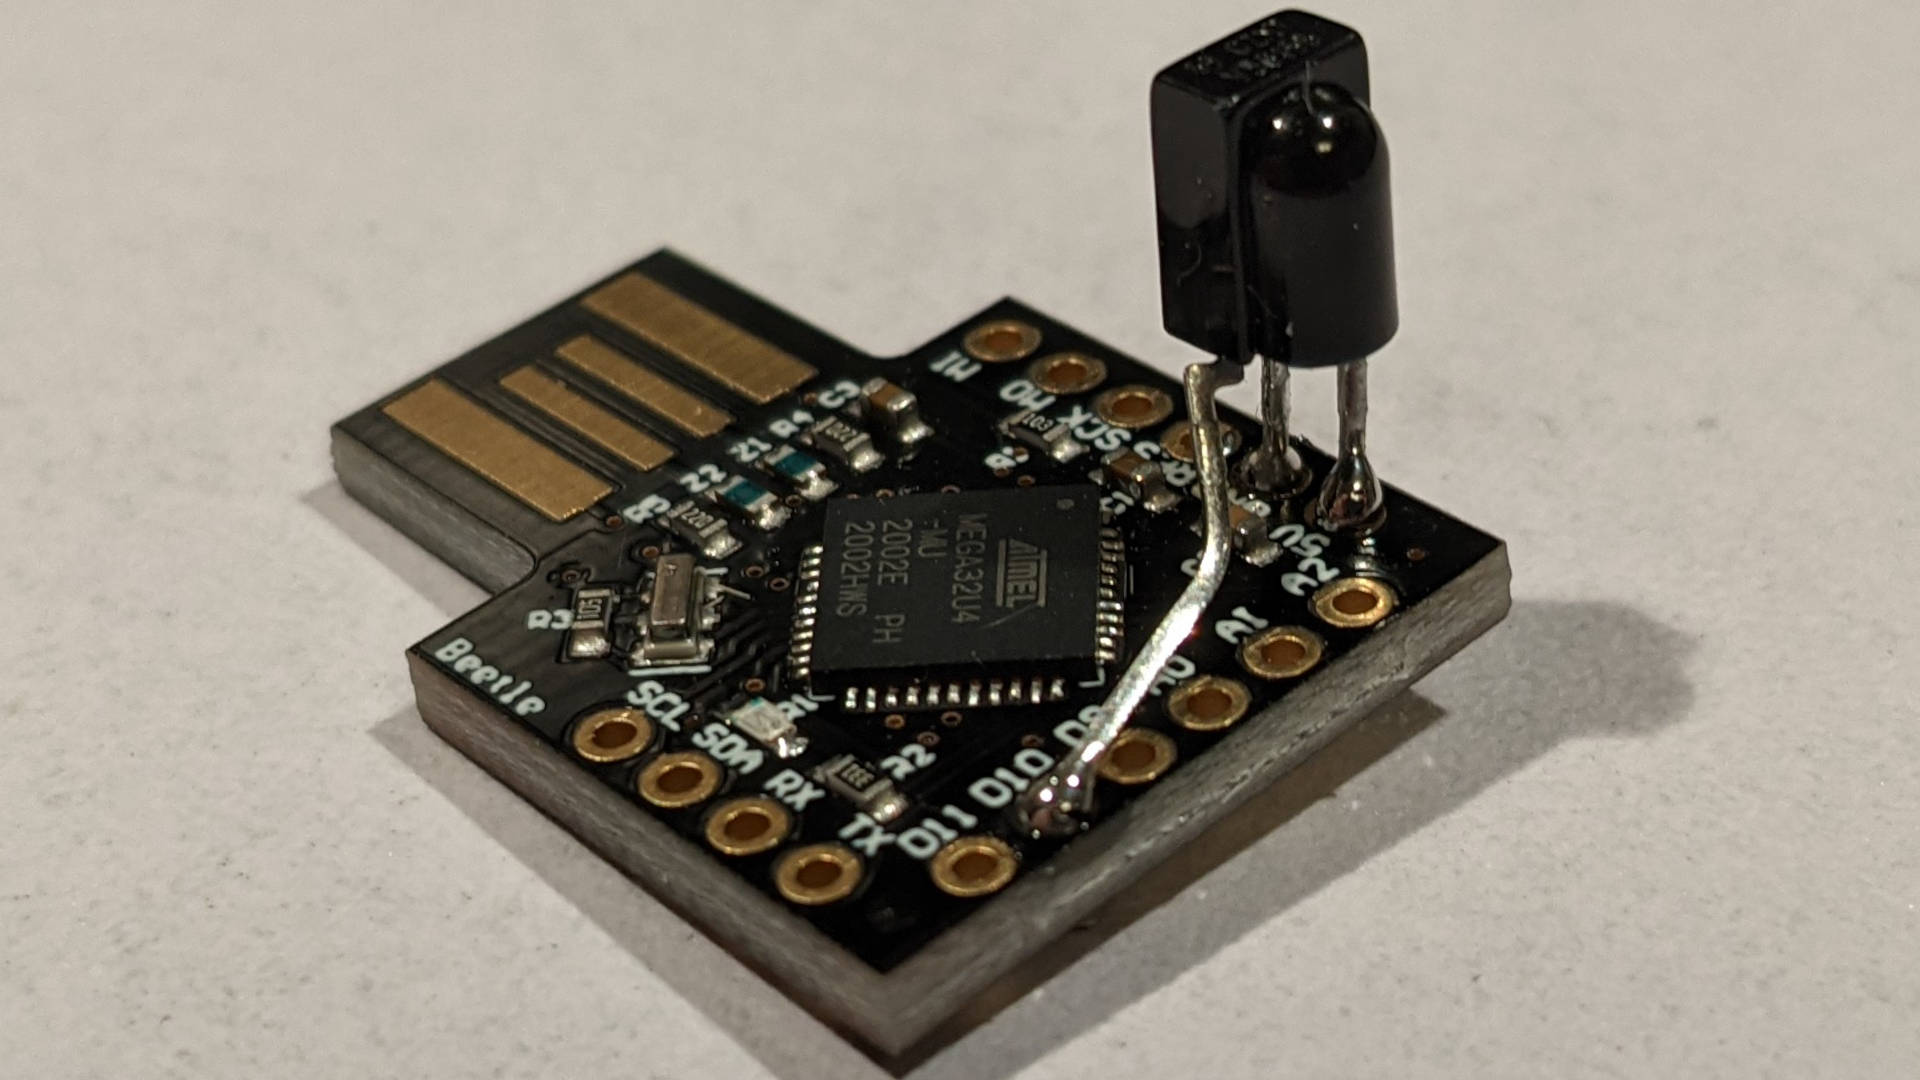
For starters, the soldering is crazy easy. If the IR is facing you. Right-leg goes to 5vdc, the center leg is ground, and finally, the signal leg goes to D9 through D11, OR D2 through D9, and D14 through D16 on the pro-micro
We soldered it to pin 10 on the Arduino Leonardo bootleg beetle, because why not! Soldered both sides to ensure it will connect no matter what.
Programming the Arduino.
The first thing is first. We need to figure out what is being thrown at us from the Xbox DVD remote control. Because the way the Arduino picks up IR is different than the chipset that Microsoft used.
// Include IR Remote Library by Ken Shirriff
#include <IRremote.h>

// Define sensor pin
const int RECV_PIN = 4;

// Define IR Receiver and Results Objects
IRrecv irrecv(RECV_PIN);
decode_results results;


void setup(){
  // Serial Monitor @ 9600 baud
  Serial.begin(9600);
  // Enable the IR Receiver
  irrecv.enableIRIn();
}

void loop(){
  if (irrecv.decode(&results)){
    // Print Code in HEX
        Serial.println(results.value, HEX);
        irrecv.resume();
  }
}
From there we can open up the serial console and record the results coming off of our Xbox IR remote.
These are the findings:
| Remote Button | Hex Translation | Keyboard Map | Optional Consumer Map | XBMC/Kodi Representation |
|---|---|---|---|---|
| Display | 0x8F3A25F9 | 0x2f | -NONE- | '\' Key Toggle FullScreen Display |
| Reverse | 0xE8572B7A | 0x72 | 0xb4 | 'r' 'MEDIA_REWIND'- key to rewind |
| Play | 0x5A03C83E | 0x70 | 0xCD | 'p' 'MEDIA_PLAY' - Key to play |
| Forward | 0x89DEE1B9 | 0x66 | 0xB3 | 'f' 'MEDIA_FAST_FORWARD' - Fast Forward |
| Skip (-) | 0x94DF0175 | 0xD3 | 0xB6 | 'Page-Up' 'MEDIA_PREVIOUS' - Previous Chapter |
| Stop | 0x32A6223E | 0x78 | 0xB7 | 'x' 'MEDIA_STOP' - Stop Media |
| Pause | 0xBAD4D9DE | 0x20 | 0xCD | 'SpaceBar' 'MEDIA_PLAY_PAUSE' - Pause/Play Toggle Media |
| Skip (+) | 0xC5EF9F9 | 0xD6 | 0xB5 | 'Page-Down' 'MEDIA-NEXT' - Next Chapter |
| Title | 0x7A56B2D9 | 0x63 | 0x40 | 'c' 'MENU' - Title Menu Key |
| Up | 0xEEB21A42 | 0xDA | -NONE- | 'Up-Arrow' - Up |
| Info | 0xBD0B58F5 | 0x7A | 0x40 | 'z' 'MENU' - Info Key |
| Left | 0xDAF86EDD | 0xD8 | -NONE- | 'Left-Arrow' - Left |
| Select | 0xCEBCDBD9 | 0xB0 | -NONE- | 'Enter' - Select Key |
| Right | 0xBFA9B6DE | 0xD7 | -NONE- | 'Right-Arrow' - Right |
| Menu | 0xA11E6F9 | 0x6d | 0x40 | 'm' 'MENU' - Menu Action |
| Down | 0xA003A639 | 0xD9 | -NONE- | 'Down-Arrow' Key |
| Back | 0x2EF93F1A | 0xB2 | -NONE- | 'BackSpace' Key - Go Back |
| 1 | 0x49641316 | 0x31 | 0x30 | '1' key default OR 'POWER' Button |
| 2 | 0x1CF35919 | 0x32 | 0x61 | '2' key default OR 'CLOSED-CAPTION' function |
| 3 | 0xF14FF65A | 0x33 | 0xE9 | '3' key default OR 'MEDIA_VOLUME_UP' key |
| 4 | 0x3E81CB71 | 0x34 | 0x31 | '4' key default OR 'RESET' Action |
| 5 | 0x8D303F7A | 0x35 | 0x61 | '5' key default OR 'CLOSED-CAPTION' Action |
| 6 | 0X39297135 | 0x36 | 0xE2 | '6' key default OR 'MEDIA_VOLUME_MUTE' action |
| 7 | 0xD860E76 | 0x37 | 0x32 | '7' key default OR 'SLEEP' Action |
| 8 | 0x8F890759 | 0x38 | -NONE- | '8' key default |
| 9 | 0xEE01511A | 0x39 | 0xEA | '9'key default OR 'MEDIA_VOLUME_DOWN' |
| 0 | 0xEAEBC955 | 0x30 | 0xB1 | '0' key default OR 'escape' key |
These are the hex values received from the Xbox DVD Remote Control. If you are following this tutorial with your 38Khz controller you will need to run the serial program first to see what is coming at your IR receiver.
Now that we know what signals are coming to our Arduino; Making the references between what is being pressed and how to assign it can be all done via code. Another thing to note is we based our keyboard commands on the Kodi standards referenced on the KODI/XBMC Wiki and cross-checked again xbmc4xbox's wiki on how the original DVD remote is supposed to behave.
Unlike our ArduinoDECK blog; We will not be using the standard keyboard.h header that comes with Arduino. Instead, we will be enabling NicoHood's HID library. This will give us the capability to enable 'consumer' HID modes for more keys that almost every media player on Earth can understand. Also, the Xbox DVD Remote does not throw any “FFFFFFFF” repeat codes so no worries there.
Here is the code that we found worked best between the systems tested.
#include <IRremote.h>                           //load the Ken Sherrifs IRremote library
#include <HID-Project.h>                        //load NicoHood's HID Library
#define HID_CUSTOM_LAYOUT                             //This is required for the Improved-HID-Library which works better with Linux and Android
#define LAYOUT_US_ENGLISH                             //Defining this allows us to call additional keys.

#include                                  //load the Ken Sherrifs IRremote library by Ken Shirriff
#include                               //load NicoHood's HID Library
int RECV_PIN = 10;                     //Set the IRreceiver on pin 2 on the Arduino
int led = 13;                          //LED for the power light on the Arduino

IRrecv irrecv(RECV_PIN);                              //Create an instance for irrecv
decode_results results;                               //Create an instance to store the collected data in

void setup()
  {
        pinMode(led, OUTPUT);                         //Get the onboard LED going.
        // Serial.begin(9600);                           //start the serial monitor
        // Serial.println ("Press any button");          //print the line between the quotes
        irrecv.enableIRIn();                          //start the reciever
        Consumer.begin();                             //start the consumer HID keyboard for multimedia functionality.
        Keyboard.begin();                             //Also, start the regular keyboard HID
  }

void loop()
  {
        if (irrecv.decode(&results))                  //this line checks if we received a signal from the IR receiver
          {
            // Serial.println(results.value, HEX);       //Print the value captured in HEX

         if (results.value == 0x8F3A25F9)             // 'Display' Key is pressed
            {
              //Keyboard.write(0x2F);                 // '\' key
              Consumer.write(0x40);                   // 'Menu' System Action.
              digitalWrite(led, HIGH);
            }
         if (results.value == 0xE8572B7A)             // 'Rewind' Key is pressed
            {
              //Keyboard.write(0x72);                 // 'r' key
              Consumer.write(0xB4);                   // 'MEDIA_REWIND' Action
              digitalWrite(led, HIGH);
            }
          if (results.value == 0x5A03C83E)            // 'Play' Key is pressed
            {
              //Keyboard.write(0x70);                 // 'p' key
              //Keyboard.write(MEDIA_PLAY_PAUSE);     // 'MEDIA_PLAY_PAUSE' Togglke Action - Only works on Linux and Android
              Consumer.write(0xCD);                   // 'MEDIA_PLAY_PAUSE' Togglke Action
              digitalWrite(led, HIGH);
            }
          if (results.value == 0x89DEE1B9)            // 'FastForward' Key is pressed
            {
              //Keyboard.write(0x66);                 // 'f' key
              //Keyboard.write(MEDIA_FAST_FOWARD);    // 'MEDIA_FAST_FOWARD' Toggle Action - Only works on Linux and Android
              Consumer.write(0xB3);                   // 'MEDIA_FAST_FOWARD' Toggle Action

              digitalWrite(led, HIGH);
            }
          if (results.value == 0x94DF0175)            // 'Skip Minus' Key is pressed
            {
              //Keyboard.write(0xD3);                 // 'PG-UP' key
              //Keyboard.write(MEDIA_PREVIOUS);       // 'MEDIA_PREVIOUS' Togglke Action - Only works on Linux and Android
              Consumer.write(0xB6);                   // 'MEDIA_PREVIOUS' Togglke Action
              digitalWrite(led, HIGH);
            }
          if (results.value == 0x32A6223E)            // 'Stop' Key is pressed
            {
              //Keyboard.write(0x78);                 // 'x' key
              //Keyboard.write(MEDIA_STOP);           // 'MEDIA_STOP' Togglke Action - Only works on Linux and Android
              Consumer.write(0xB7);                   // 'MEDIA_STOP' Togglke Action
              digitalWrite(led, HIGH);
            }
          if (results.value == 0xBAD4D9DE)            // 'Pause' Key is pressed
            {
              //Keyboard.write(0x20);                 // SpaceBar key
              //Keyboard.write(MEDIA_PLAY_PAUSE);     // 'MEDIA_PLAY_PAUSE' Toggle Action - Only works on Linux and Android
              Consumer.write(0xCD);                   // 'MEDIA_PLAY_PAUSE' Toggle Action
              digitalWrite(led, HIGH);
            }
          if (results.value == 0xC5EF9F9)             // 'Skip Plus' Key is pressed
            {
              //Keyboard.write(0xD6);                 // Page-Down key
              //Keyboard.write(MEDIA_NEXT);             // 'MEDIA_NEXT' Action - Only works on Linux and Android
              Consumer.write(0xB5);                   // 'MEDIA_NEXT' Action
              digitalWrite(led, HIGH);
            }
          if (results.value == 0x7A56B2D9)            // 'Title' Key is pressed
            {
              //Keyboard.write(0x63);                 // 'c' key
              Keyboard.write(0x63);                   // 'Menu' Action
              //Consumer.write(0x40);                 // 'Menu' Action - Not going to call it here as i'm using this on the 'DISPLAY' button
              digitalWrite(led, HIGH);
            }
          if (results.value == 0xEEB21A42)            // 'Up' Key is pressed
            {
              Keyboard.write(KEY_UP_ARROW);           // 'up-arrow' key
              digitalWrite(led, HIGH);

            }
          if (results.value == 0xBD0B58F5)            // 'info' Key is pressed
            {
              Keyboard.write(0x7A);                   // 'z' key
              digitalWrite(led, HIGH);
            }
          if (results.value == 0xDAF86EDD)            // 'Left-Arrow' Key is pressed
            {
              Keyboard.write(KEY_LEFT_ARROW);                   // 'Left-Arrow' key
              digitalWrite(led, HIGH);
            }
          if (results.value == 0xCEBCDBD9)            // 'Select' Key is pressed
            {
              Keyboard.write(KEY_ENTER);                   // 'Enter' key'
              digitalWrite(led, HIGH);
            }
          if (results.value == 0xBFA9B6DE)            // 'Right-Arrow' Key is pressed
            {
              Keyboard.write(KEY_RIGHT_ARROW);        // 'Right-Arrow' key
              digitalWrite(led, HIGH);
            }
          if (results.value == 0xA11E6F9)             // 'menu' Key is pressed
            {
              Keyboard.write(0x6D);                   // 'm' key
              //Keyboard.write(MENU);                 // 'Menu' Action
              digitalWrite(led, HIGH);
            }
          if (results.value == 0xA003A639)            // 'Down-Arrow' Key is pressed
            {
              Keyboard.write(KEY_DOWN_ARROW);                   // 'Down-Arrow' key
              digitalWrite(led, HIGH);
            }
           if (results.value == 0x2EF93F1A)           // 'Back' Key is pressed
            {
              Keyboard.write(KEY_BACKSPACE);                   // 'BackSpace-0xB2' key
              digitalWrite(led, HIGH);
            }
           if (results.value == 0x49641316)           // '1' Key is pressed
            {
              //Keyboard.write(0x31);                 // '1' key
              Consumer.write(0x30);                   // 'Power' Action
              digitalWrite(led, HIGH);
            }
           if (results.value == 0x1CF35919)           // '2' Key is pressed
            {
              //Keyboard.write(0x32);                 // '2' key
              Consumer.write(0x61);                   // 'Closed-Caption' Action
              digitalWrite(led, HIGH);
            }
           if (results.value == 0xF14FF65A)           // '3' Key is pressed
            {
              //Keyboard.write(0x33);                 // '3' key
              //Keyboard.write(MEDIA_VOLUME_UP);      // 'MEDIA_VOLUME_UP' Action - Only works in Linux and Android
              Consumer.write(0xE9);                   // 'MEDIA_VOLUME_UP' Action
              digitalWrite(led, HIGH);
            }
           if (results.value == 0x3E81CB71)           // '4' Key is pressed
            {
              //Keyboard.write(0x34);                 // '4' key
              Consumer.write(0x31);                   // 'Reset' Action
              digitalWrite(led, HIGH);
            }
           if (results.value == 0x8D303F7A)           // '5' Key is pressed
            {
              //Keyboard.write(0x35);                 // '5' key
              Consumer.write(0x61);                   // 'Closed-Caption' Action
              digitalWrite(led, HIGH);
            }
           if (results.value == 0x39297135)           // '6' Key is pressed
            {
              //Keyboard.write(0x36);                 // '6' key
              Consumer.write(0xE2);                   // 'MEDIA_VOLUME_MUTE' Action
              //Keyboard.write(MEDIA_VOLUME_MUTE);    // 'MEDIA_VOLUME_MUTE' Action - Only works in Linux and Android
              digitalWrite(led, HIGH);
            }
           if (results.value == 0xD860E76)            // '7' Key is pressed
            {
              //Keyboard.write(0x37);                 // '7' key
              Consumer.write(0x32);                   // 'Sleep' Action
              digitalWrite(led, HIGH);
            }
           if (results.value == 0x8F890759)           // '8' Key is pressed
            {
              //Keyboard.write(0x38);                 // '8' key
              Keyboard.write(KEY_ESC);    // 'Escape' key
              digitalWrite(led, HIGH);
            }
           if (results.value == 0xEE01511A)           // '9' Key is pressed
            {
              //Keyboard.write(0x39);                 // '9' key
              //Keyboard.write(MEDIA_VOLUME_DOWN);    // 'MEDIA_VOLUME_DOWN' Action - Only works in Linux and Android
              Consumer.write(0xEA);                   // 'MEDIA_VOLUME_DOWN' Action
              digitalWrite(led, HIGH);
            }
           if (results.value == 0xEAEBC955)           // '0' Key is pressed
            {
              //Keyboard.write(0x30);                 // '0' key
              Keyboard.write(HID_KEYBOARD_ESCAPE);                   // 'Escape' key
              digitalWrite(led, HIGH);
            }


            delay(100);                               // Debounce so we don't accidently double-press a button
            digitalWrite(led, LOW);                   // set the LED to low
            irrecv.resume();                          //receive the next value
          }
  }
Now we're sure that someone better at Arduino programming would've told us to place all of the values into an array and then call the array in a loop instead of the endless barrage of if/then statements. But it works.
#define HID_CUSTOM_LAYOUT
#define LAYOUT_US_ENGLISH
This is a requirement to engage the enhanced keyboard layout. By defining the keyset. OS's like Android know how to set up the .kl file properly and make the keys actually work for us.
Even though we've heavily commented on every step. we'll still go through the steps here.
#include <IRremote.h>
#include <HID-Project.h>
We begin our project by calling out to the libraries we loaded in the Arduino IDE by going to sketch > include libraries > manage libraries. Remember, if you don't load these libraries the project will error out.
int RECV_PIN = 10;
int led = 13;
Next, we define our variables, RECV_PIN 10 because we soldered to digital pin 10. led to 13 because that is how you can turn on and off the LED on the Arduino beetle to give us visual feedback when a button is pressed.
IRrecv irrecv(RECV_PIN);
decode_results results;
Now, we create an instance of the IR-Receiver using the value we just stored in RECV_PIN which is 10. And finally an instance for decoding the results.
void setup()
{

    pinMode(led, OUTPUT);
    // Serial.begin(9600);
    // Serial.println ("Press any button");
    irrecv.enableIRIn();
    Consumer.begin();
    Keyboard.begin();
}
Now we define our setup look. This is the area where we begin activating parts of our header libraries and Arduino to work for us. pinMode defines the OUTPUT pin of the LED we will be flashing. Serial parameters in the final sketch are commented out as the keys are already defined for us and serial logging is only used for debugging. irrecv.enableIRIn(); Is a statement to enable digital pin 10 in our project to start receiving data from that to the library. Consumer.begin() is to activate the multimedia keyboard functionality and finally Keyboard.begin() is to enable the general keyboard similar to the keyboard.h used in the ArduinoDeck.
It was necessary to call both the consumer and enhanced keyboard sets at the same time as consumer keys are more compatible with Windows and have better control with other programs beyond XMBC with Android.
void loop()
  {
        if (irrecv.decode(&results))
          {
            // Serial.println(results.value, HEX);
         **CODE CONTINUES**
As we begin the loop of the program we check for data coming from the receiver and pull it into our results area.
Once again, the serial is commented out at this time as we're past the point of debugging keys.
           if (results.value == 0x5A03C83E)            // 'Play' Key is pressed
            {
              //Keyboard.write(0x70);                 // 'p' key
              //Keyboard.write(MEDIA_PLAY_PAUSE);     // 'MEDIA_PLAY_PAUSE' Togglke Action - Only works on Linux and Android
              Consumer.write(0xCD);                   // 'MEDIA_PLAY_PAUSE' Togglke Action
              digitalWrite(led, HIGH);
            }
Now, you will see this statement for every key that we press on our Xbox DVD Remote. In this example, we took the play button.
- The first commented out Keyboard.write(0x70) would in fact be the original key sequence XBMC is looking for.
- The second commented out Keyboard.write(MEDIA_PLAY_PAUSE) is an enhanced HID Keyboard function that only works on Linux and Android.
- The last line Consumer.write(0xCD) is a multimedia consumer command that works on Windows, Android, and Linux.
- digitalWrite(led, HIGH) Turns our onboard Arduino LED on.
Ideally, we try to keep to consumer rights as much as possible. However, keys such as navigation go back to the enhanced HID keyboard. We never turn on the joystick during any of this because it leads to further issues with operating systems such as device detection.
This statement is repeated for each key until we get to the end.
 delay(100);                               // Debounce so we don't accidently double-press a button
            digitalWrite(led, LOW);                   // set the LED to low
            irrecv.resume();                          //receive the next value
          }
  }
Breaking down the end of this statement:
- delay(100) - most would set the delay to 300. But this delay stops the IR Receiver from 'bouncing' or sending too many of the same characters at the receiver.
- digitalWrite(led, LOW) - Turn off the onboard Arduino LED.
- irrecv.resume() - Tell the IR Receiver to receive the next values to process and start the main loop all over again.
Special thanks:
Now, we're not geniuses here. We simply followed in the footsteps of others with the slight deviation of using a 56hz IR Receiver instead of a 38hz and then doing the research with the Xbox DVD Remote. We would like to present a list of people who deserve far more credit than us.
- Mirror of - https://uboopenfactory.univ-brest.fr/Les-Labs/MusicLab/Projets/Arduino-Media-Keys - Arduino Media Key Mapping
- http://www.asciitable.com/ - Standard HID key mapping.
- https://www.arduino.cc/en/Reference/KeyboardModifiers - Additional HID Key mappings that helped in previous projects.
- https://dronebotworkshop.com/using-ir-remote-controls-with-arduino/ - This is probably the best IR Remote tutorial site there is.
- https://github.com/NicoHood/HID - the Nico Hood HID Project for the 'customer' mappings for multimedia keys
- https://github.com/NicoHood/HID/blob/master/src/KeyboardLayouts/ImprovedKeylayouts.h#L659 - Master-List of Improved Layouts
- https://github.com/Arduino-IRremote/Arduino-IRremote - The specific library we used for the IRremote. Not the default one in Arduino.
Final thoughts.
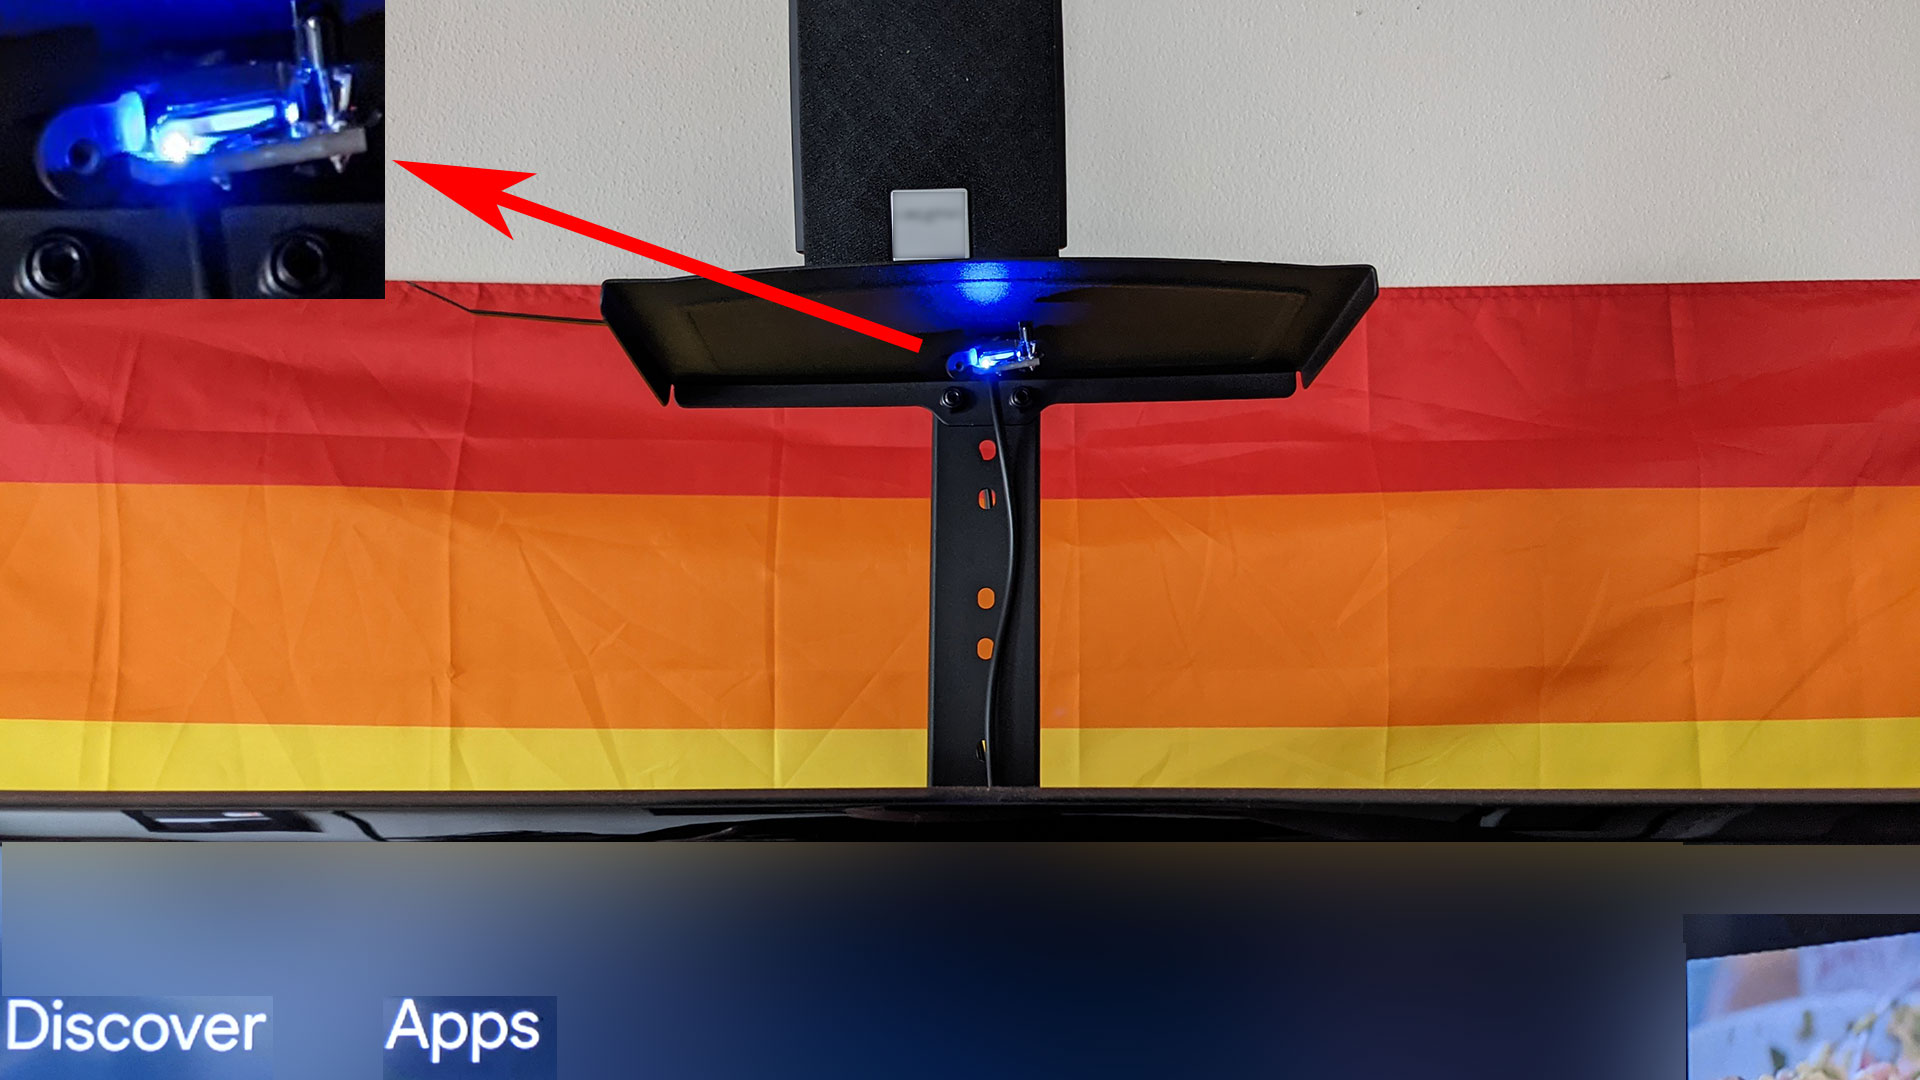
Since we keep our Nvidia shield strapped to the back of the TV we had to bust out some USB extension cables to wire it appropriately to have a line of sight of practically anywhere in the living room. Now, we could build a small ACM case to put it into. but for now, it's fine as it blends in. With the LED light only flashes when it receives input from the Xbox DVD Remote.
The end results? It feels good to have this remote back in my paws once again. In some ways, We like this remote on our Nvidia Shield better than the Nvidia Shield remote. With the membrane covering there's no guessing if you are hitting the pause, play, or fast-forward buttons. Which we've done many times mid-movie and find ourselves starting from the beginning again.
However, it would be problematic to keep my Arduino IR Receiver in my Nvidia Shield while still having an IR receiver in the Xbox. We just won't! The Original Xbox can stay as a gaming console with all of my hacked homebrew goodness on it while my Nvidia Shield can remain as my media player of choice. I suppose for a few bucks; Saving a remote that Microsoft would rather have you throw in the dumpster is a win for the environment as well. At least for me.
Keep your technology alive long after a company is dead. It's your hardware, not theirs.
That's what the server said.
END OF LINE+++
My dad prototyped this remote at RCA back in the 90s. I never had one because, as you said, I had a DVD player already. I ended up buying him one of these for his birthday and he got a nice nostalgia hit. He hadn't thought about that thing for decades.
I will show him this project, he will get a kick out of knowing someone is still using it for something.
Have you tried linux drivers? It would be great if we could just buy a cable to use on kodi linux. I know windows is a mess with drivers. I like your Arduino approach.
I bought and tried to use a flirc dongle to use the xbox dvd remote but it doesn't record the keys correctly. Now that you explained it is using a different frequency that makes sense.
Man, I would love to use my xbox remote with my pc. I have no experience in something like this though. You guys wouldn't make an arduino for commission would you?
Nice job
Thank you, the video is coming soon.
Thanks for checking out this blog!
Oh, the classic Goodwill battery crust. Something about that company seems to provoke even recent batteries to dump their guts. I once found a camera in the electrical section, complete with spoogy nickel-cadmiums. Yummy! I went to report it to the teenage ditz assisting the point-of-sale, who had no clue what I was talking about when I explained it to her (something about the way I was implying "this shit is fucking toxic" didn't sink in) so she wrote "as is" on the price label and stuck it in the display case for somebody else to find. Facepalm. Goodwill Industries of the Columbia and Willamette; what can you do.
To this very day, there’s a certain percentage of revenue that goes off to Dolby Digital for the use of the intellectual properties when you purchase a console or hardware. Other licenses could also be a payment to MPEG-LA for use of their decoder on a commercial level.
Shouldn't be if the system uses AC3 and I think (not gonna swear to it) AC3 Plus since its patents expired in 2017, effectively making the codec freeware. (I don't know if they're using AC4 which, being a newer codec, is patentware. I don't really keep up with consoles.) MPEG video codecs may be (probably are) another story. Fraunhoffer's patents on MP2 and MP3 ran out about the same time Dolby AC3 did, which means us poor Linux shlubs now have real industry-standard audio codecs to play with (erm... those faithful to the open-source religion, anyways; I've always just used whatever works for me, licencing and Stallmanist politics be damned). Newer Leenoks distros are shipping with Twolame and LAME built in, so there's little compelling reason to continue using that "OGG Vorbis" crap, which never actually worked all that well to begin with, and it can finally be put out to pasture. Even Internet Archive won't derive in that format any more.
Now I suppose I'm going to get hate mail from the orthodox Vorbisite jihadists...
Not hate here! As for Goodwill, if anything it's a good lesson to always check a used product.
Thanks for clearing up the whole MPEG-LA license ordeal. Actually explains a lot as to why FFmpeg recipes are incorporating AC3 into their conversion systems.
On some of the audio sections of our site, we use Ogg Vorbis just on the principle of being safe versus sorry when it comes to licensing. The same goes with video blogging where we alternate from WebM to OGV just to cover all bases. Again, it's to avoid MPEG-LA and their intellectual properties altogether. With every modern browser supporting these alternative standards there's no reason as to why not.
Anyhow, thanks for commenting and checking out this blog!
- S
Dolby and MPEGLA can still try to licence AC3/MPEG-1 audio layers all they want until the cows come home. It won't get them anywhere and may create a Streisand-effect paradox. Legally it wouldn't hold any more water than when a shop owner threatens to report you for photographing their sacred temple from a public sidewalk across the street. "Go ahead, I'll even dial 9-1-1 for you!"
True, now-a-days the licensing behind these wouldn't hold much in the courts these days. But history time was mostly to explain why Microsoft placed the .XBE file onto the chip of the DVD remote instead of embedding it into the Xbox OS right next to the dashboard. From a corporate standpoint it may be expensive to get licensing taken care of but it saves a legal disaster in the future such as what the makers of the rumble pack pulled on all of the major console companies.
Now-a-days. The XBE memory chip is more of a nuisance then anything.