
ADB Sideloading Lineage onto your Ouya via Raspberry Pi.
This tutorial assumes that you have already set up your base Raspberry Pi OS and that you are either operating locally on the Pi or via SSH from another PC. This tutorial uses a more traditional "Push" method that we've used in previous tutorials such as Cyanogen but updated for performing the same task underneath Lineage. This tutorial also assumes that This is our current 2019 method of flashing and programming Ouya and Android devices due to the nature of commercial OS's locking the security down on hardware devices. If you have already unlocked ADB on your commercial OS and you have the ADB bridge drivers installed you can follow along on that OS with this tutorial.
Read on if you want to learn more.
"Note: If you get a black screen but the audio is playing. Or you got a potato PC and it's stuttering. We have fallback Links below."

Video tutorial fallback mirrors:
In case you have no-script enabled or for some reason cannot see the title video on this website. We have provided direct links for these videos. For more information about the standards we use on this site click here if you would like to know more.
AV1       - Link
MP4/.h264 - Link
OGV       - Link
Prerequisites:
This tutorial assumes that you have performed the following tasks from previous blog entries. Describing everything in a solid blog article would tend to lead down the path of insanity as it would be 10,000+ words and over 27 minutes of video that some more experienced users may or may not need.
 Section 1: Loading your Raspberry Pi image and adding ADB.
 Section 2: Adding SSH and Samba for headless or remote wireless connection.
If your Ouya OS is bricked or you cannot gain access to it in any normal fashion ADB sideloading might be a better option for you.
 Section 3 Method 1: ADB Sideloading Lineage onto your Ouya.
Acquire the software:
A blog or tutorial should be responsible enough to provide you with all the tools you need to perform what it is teaching. This is why we use a blog CMS service instead of just joining a forum to dump this content upon. This is the belief that we hold. The downloads that you click on here are being hosted locally and with no tracking/spyware/adware/malware attached to it. We are not going to throw you off into some garbage "Free-Filez" site that's going to load your Android or PC with crap either! However, I should also throw a disclaimer that anything you download off of the internet is suspect. That you should have a virus scanner on your machine to ensure that the files you are getting are legit.
Always check your data!
![]() I have set up a link for all of the Lineage to take place onto your Ouya known as "lineageouya.7z". Click here or on the Download icon to the right to begin downloading the 7-zip file.
I have set up a link for all of the Lineage to take place onto your Ouya known as "lineageouya.7z". Click here or on the Download icon to the right to begin downloading the 7-zip file.
Extract files from the Lineage Ouya archive:
Use your favorite file extraction utility on the 7-zip file you just downloaded. For this tutorial, we will be extracting to /d0/ on the Raspberry Pi which we will be using as a reference point throughout this tutorial. If you extract it elsewhere or if you are on a MAC or Windows box make a note of where you extract it to and make adjustments accordingly.
The files that are in lineageouya.7z are as follows:
- adb.exe for Windows (which isn't necessary) as well as the two DLLs required to run ADB
- fastboot.exe for Windows (which isn't necessary ) which will be required to upload the recovery-clockwork-6.0.4.8-ouya.img via the micro-USB cable.
- zip folder containing the following:lineage-11-20190501-NIGHTLY-MLQ-ouya (Ouya nightly build of the Lineage OS) gapps-kk-20140105.zip (Google Play Apps) ouyabootmenu-mlq-v2.0.4.zip (required for Ouyas boot-menu) ouya-keylayouts.zip (which contains .kl files for the Ouya controller as well as a few other genetic controllers) recovery-clockwork-6.0.4.8-ouya.zip (This version of clockworks gets installed onto your Ouya boot-loader and does not get removed). Please note: At the time of the article this was the most currently nightly build. Newer versions can be acquired here.
- A windows driver folder containing files that allow you to access your Ouya in both "ADB" mode and "Fastboot" mode. The android_winusb.inf is already modified to find an Ouya on USB device USB\VID_2836&PID_0010. This is placed here for the convenience of windows users and not used for the Raspberry Pi Linux tutorials mentioned here.
- APK folder which although we will not be using any APK during the installation of Lineage they are exceptionally handy to have after you have installed everything as I shall show you later. Such as quick boot.
"Push" vs. "SideLoad" Methodologies.
Push method involves you the user to ADB push <<FILE>> to the /sdcard/ folder of your Ouya which seems like a good idea but it can take of valuable space on your Ouya with it only being an 8GB console (the Lineage OS alone is 300MB that has to sit on your /sdcard/ this way.. The sideload method means that as the files are ADB sideload <<FILE>> to our Ouya they are installed and discarded.
We feel it's important to cover both methods as sideloading will be the method used in the event of an unrecoverable or "Bricked" OS partition.
The Push method of preferred if your Ouya OS partition is intact and you want to save a lot of going back and forth between your Raspberry Pi or Linux box and your Ouya. The Push method is also handy if you download an upgrade to Lineage from Milaq and you can simply reboot your Ouya and jump back into recovery without needing to hook up your Raspberry Pi back up to your Ouya back.
Let's begin!
This is probably a good idea to power on your Ouya and connect the ADB cable between your Ouya and your Raspberry Pi. Also, if you have an extra keyboard now would be a good time to also have that plugged into the back of the Ouya on the regular USB port as it will be necessary to navigate menus with the recovery system.
The first thing you will probably need to do is either open up the terminal on the Raspberry Pi if you are directly using the Pi as a desktop. If you are using the Pi in a headless state or you are SSH'ing into the Raspberry Pi be sure to log in to begin. First, we're going to go to wherever you downloaded and extracted the lineageouya.7z archive. For the sake of this tutorial, we are going to assume that is located in /d0/lineageouya so:
cd /d0/lineageouya/zip/
Because we want to push our zip files to our Ouya before recovery. Then we're going to start up our ADB server and check the connection with our Ouya.
adb start-server
and
adb devices
To verify that we have connectivity with our Ouya.
This is where the tutorial diverges a little from the ADB sideloading methodologies.
adb push gapps-kk-20140105.zip /sdcard/
adb push lineage-11-20191201-NIGHTLY-MLQ-ouya /sdcard/
adb push ouyabootmenu-mlq-v2.0.4.zip /sdcard/
adb push ouya-keylayouts-1.02.zip /sdcard/
adb push recovery-clockwork-6.0.4.8-ouya.zip /sdcard/
adb push SR3-SuperSU-v2.79-SR3-20170114223742.zip /sdcard/
By dumping our zip files onto the /sdcard/ folder of our Ouya it will make it way easy to access them the moment we boot into recovery.
cd ..
lets back out to the /d0/lineageouya folder to proceed with the ClockWorkMOD image boot.
We need to get the Ouya into bootloader mode so we can load our recovery software.
adb reboot bootloader
Do not be alarmed! Your Ouya will blackout! This is because we're starting the Ouya off in a bootloader state meaning it has no program loaded into memory right now. Now that we are in a bootloader state we will now use another Android utility called 'fastboot' to check to see if our Ouya is ready.
fastboot devices.
Your Ouya should respond with the following:
015d49062a501415 fastboot
if for some reason you don't see fastboot but you can see the Ouya in ADB devices then the quality of your USB cable is probably crap and you should get another cable. Once we have confirmed our connectivity we can pass the command to load an image from our Raspberry Pi to the Ouya and boot it.
fastboot boot recovery-clockwork-06.0.4.8-ouya.img
It should respond with the following:
downloading 'boot.img'...
OKAY [   1.572s]
booting...
OKAY [   0.263s]
Within a few seconds, your Ouya should come back to life and begin displaying the ClockWorkMOD interface.
Onward to Ouya ClockWorkMOD recovery mode.
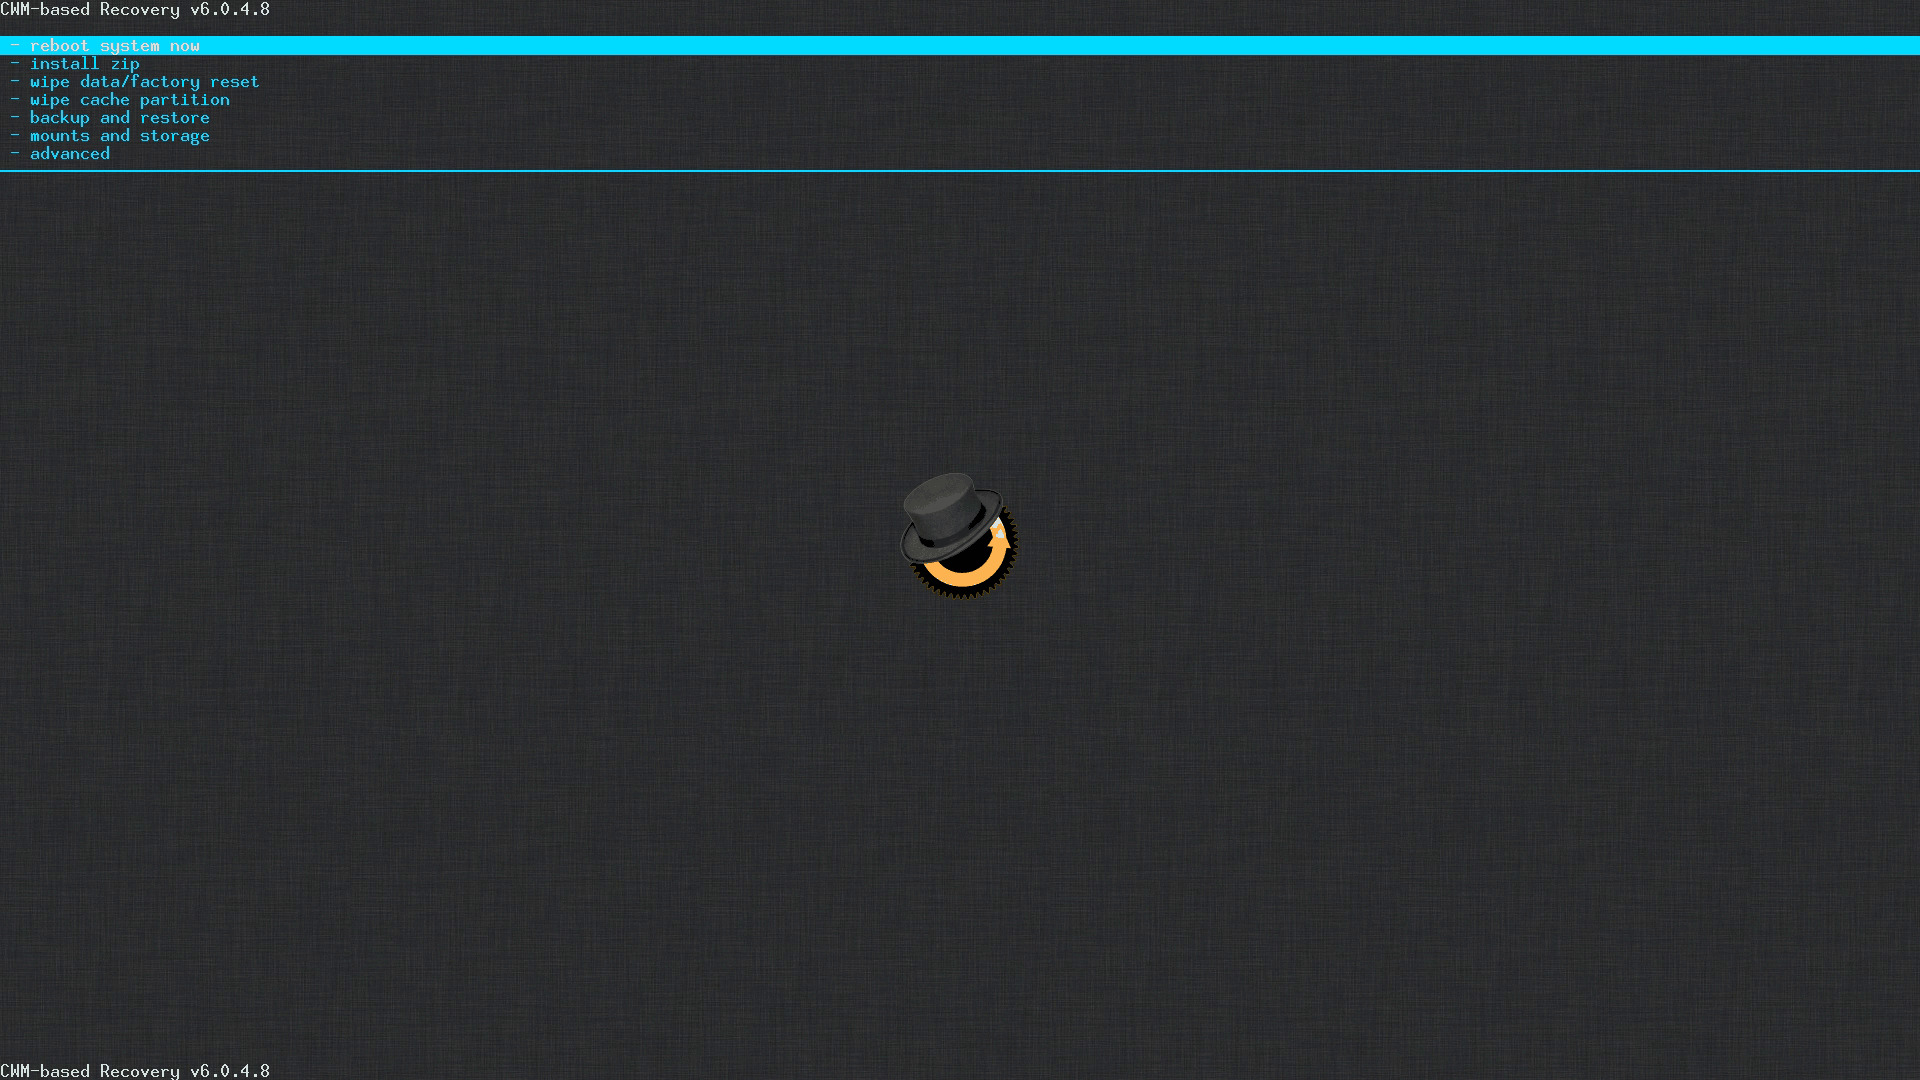
Out of interest in saving bandwidth, we shall only focus on the menu selector in the upper left-hand corner as that is probably the most important aspect of this utility.
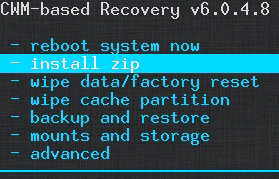
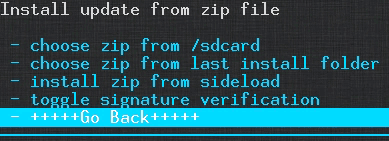
Using your keyboard connected to your Ouya we're going to arrow down to "install zip" and press enter.
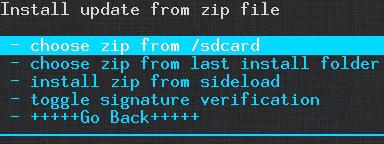
Next, we're going to "choose zip from /sdcard" and press enter.
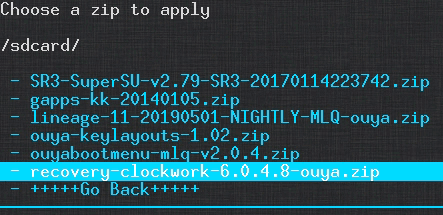
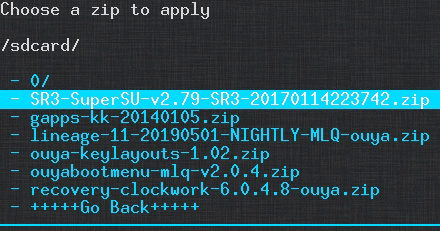
You should be presented with all of the files that you pushed from your Raspberry Pi to your Ouya Stock Firmware. If you have pushed additional files via Cyanogen or Lineage there may be a "0/" directory that you may have to go into to find those files. You will probably notice that I tend to install things in a particular order. That order being:
- Recovery Partition
- Boot Menu
- Operating System
- Google Apps
- Keymaps
- Super-User
Which we found it working consistently every time we flash an android OS.
So, let's arrow down to "recovery-clockwork-6.0.4.8-ouya.zip" and press enter.

Arrow down to "Yes" and press enter to proceed with installing the recovery partition. once complete it will dump you back to your /sdcard/ menu.
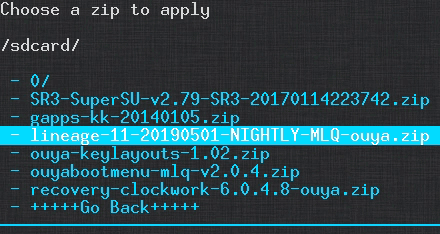
Next, we install the OS. Arrow down to your Flavor of Lineage or Cyanogen that you wish to flash to your Ouya and press enter.

Confirm your selection by arrowing down to "Yes" and pressing enter to continue. Once complete it will kick you back to the /sdcard/ folder.
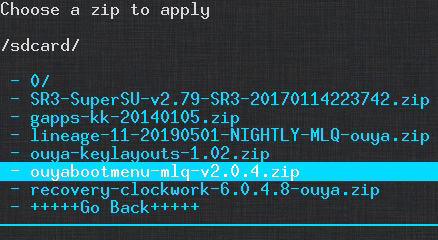
Next is the boot menu. Arrow down to "ouyabootmenu-mlq-v2.0.4.zip" and press enter to continue.
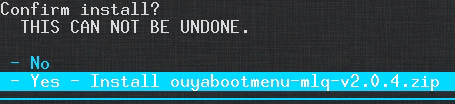
Arrow down to "Yes" to install and press enter. Once the installation is complete it will kick you back to the /sdcard/ menu.
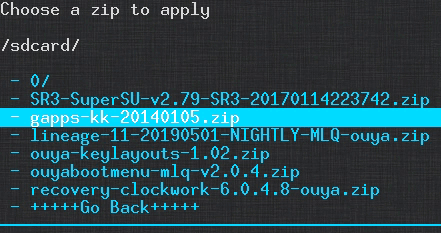
Although optional and unnecessary if you sideload APKs yourself or if you have another distro that you pull APKs from.
You can install Google Apps at this time. Arrow down to "gapps-kk-20140105.zip" and press enter to continue.
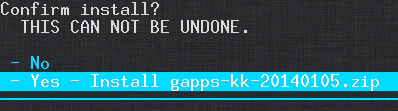
Arrow down to "Yes" to confirm the installation. It should run its script and then push you back to the /sdcard/ menu.
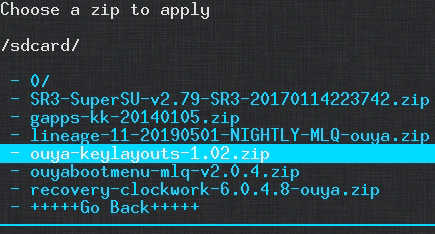
Next, we're going to arrow down and install the "ouya-keylayouts-1.02.zip" or KeyLayout or KL files that are responsible for all of the different controllers that we can hook up to the Ouya. Press enter to continue the installation.
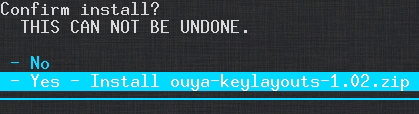
Arrow down to "Yes" to confirm the installation and press enter. Once complete it will push you back to the /sdcard/ menu.
Another optional but super-handy file in the SuperSU or SuperUser command line and application. This will allow for applications to attain root control which is necessary for things like file explorers or anything that modifies the OS directly.
Arrow down to "SR3-SuperSU-v2.79-SR3-2017114223742.zip" and press enter to begin the installation.

Arrow down to "Yes" to confirm the installation. Once complete it will kick you back to the /sdcard/ menu in ClockWork Mod.
Clearing all forms of cache.
This is probably the most critical step in a successful flash or OS load of an Ouya so pay attention!
We will need to wipe the system cache folder, clear user data, and finally remove the Dalvik cache that Google services would use. The reason we must do this is we need to clear any garbage that the previous OS left behind on the Android OS and make way for the new Lineage load for it to properly set up our user profile. So let us begin!
Since we are all done processing zip files and flashing our image to the Ouya we can arrow down to +++++Go Back+++++ .
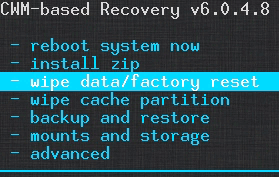
At the main menu of ClockWorkMOD, we're going to arrow down to wipe data/factory reset and press enter.
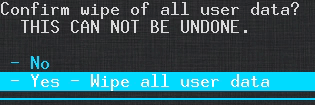
Arrow down to Yes and press enter. The Ouya will go to work clearing all non-essential data from the user folders. After it is complete it will dump you back to the main menu.
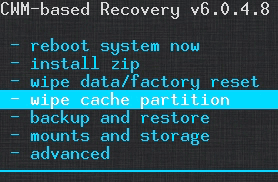
Arrow down to wipe the cache partition and press enter.
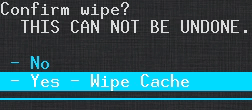
Arrow down to Yes and press enter. The Ouya will then empty its cache partition and dump you back to the main menu.
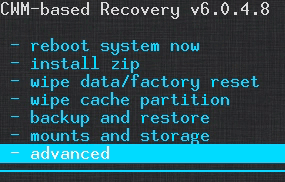
Arrow down to advanced and press enter.
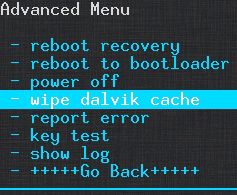
Within the advanced menu, we are going to arrow down to wipe Dalvik cache and press enter.
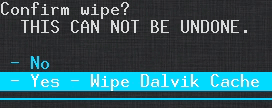
Once again it will ask for confirmation. Arrow down to Yes and press enter. The system will go to work and remove any of the cache files the Google Service may use.
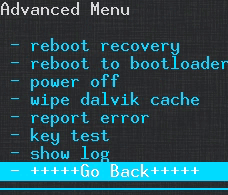
Arrow down to +++++Go Back+++++ and press enter.
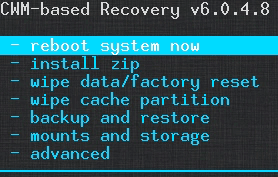
Arrow over to reboot the system now and press enter.
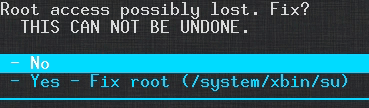
If you ran the SuperSU script you may get an error like this warning you that root access is potentially lost. This is normal because of the way SuperSU operates. simply press No to continue and your Ouya will reboot.
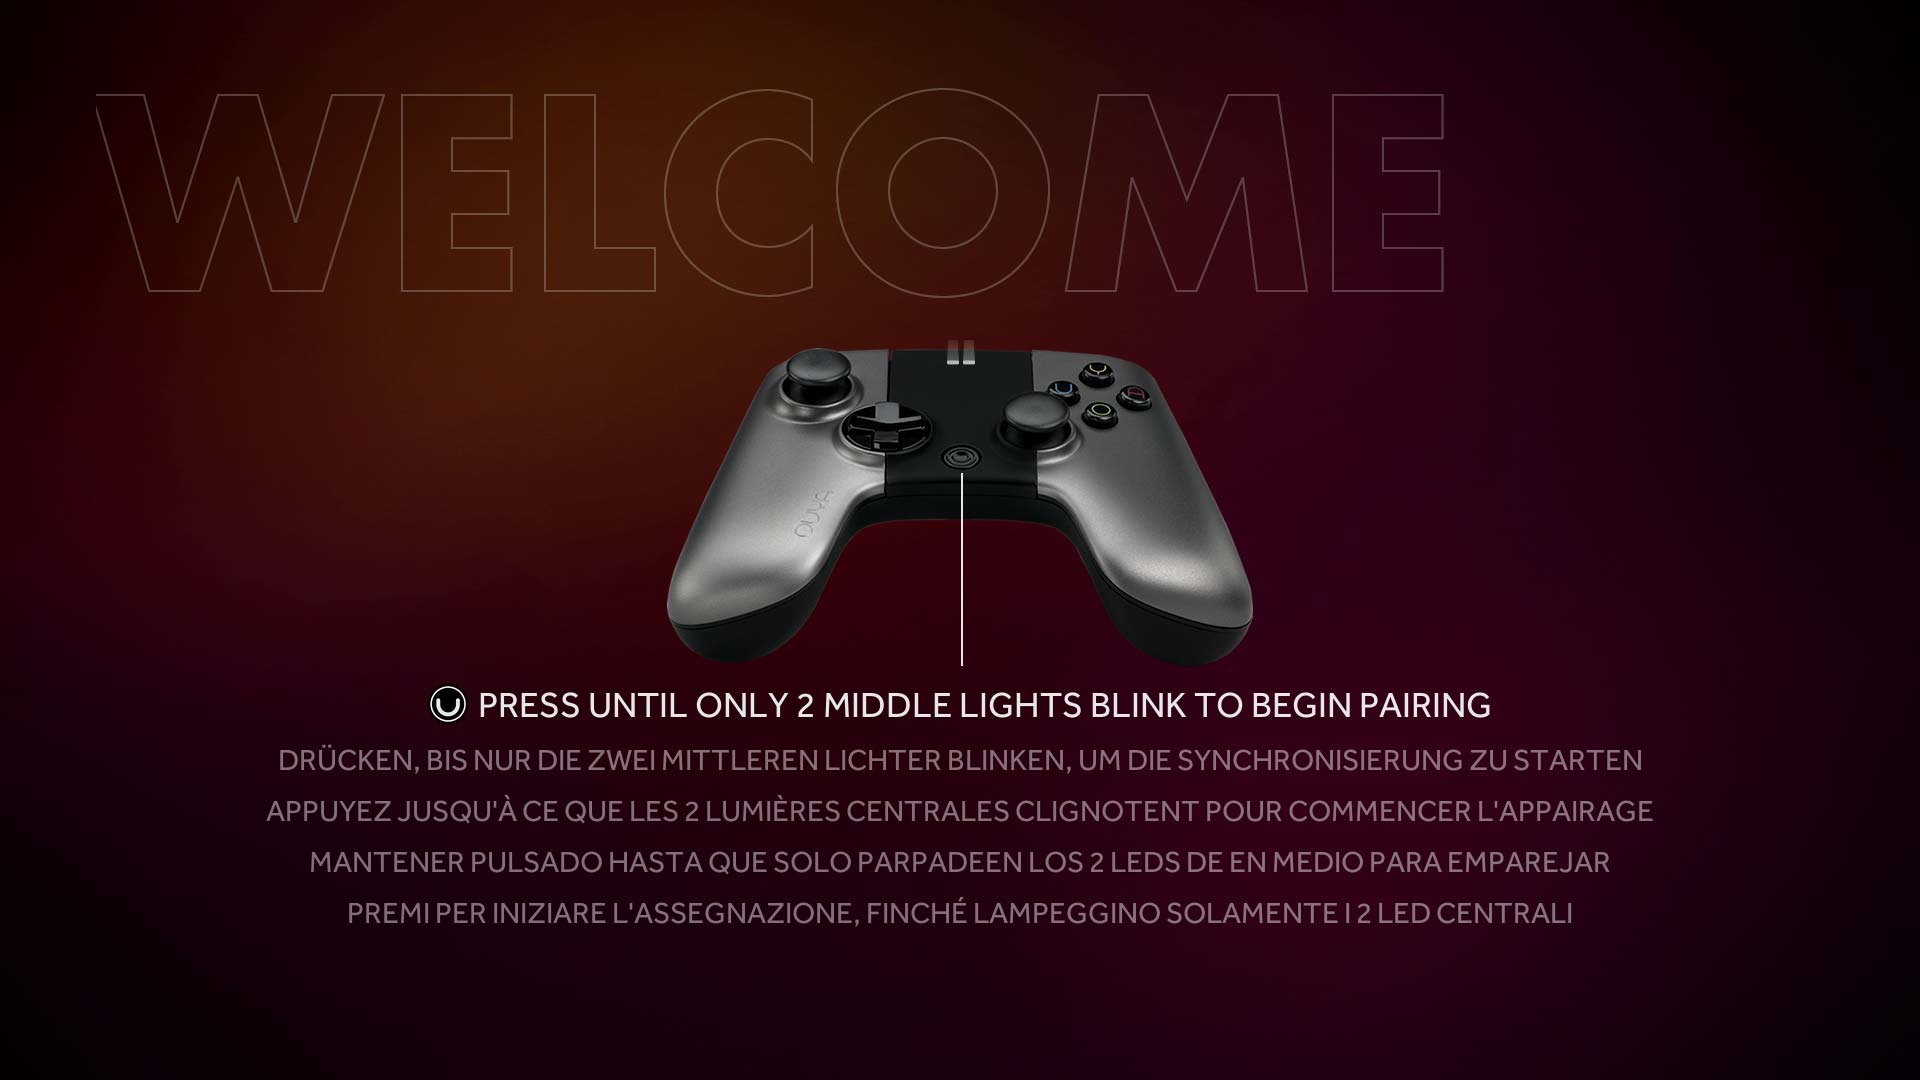
Welcome to the Ouya Afterlife.
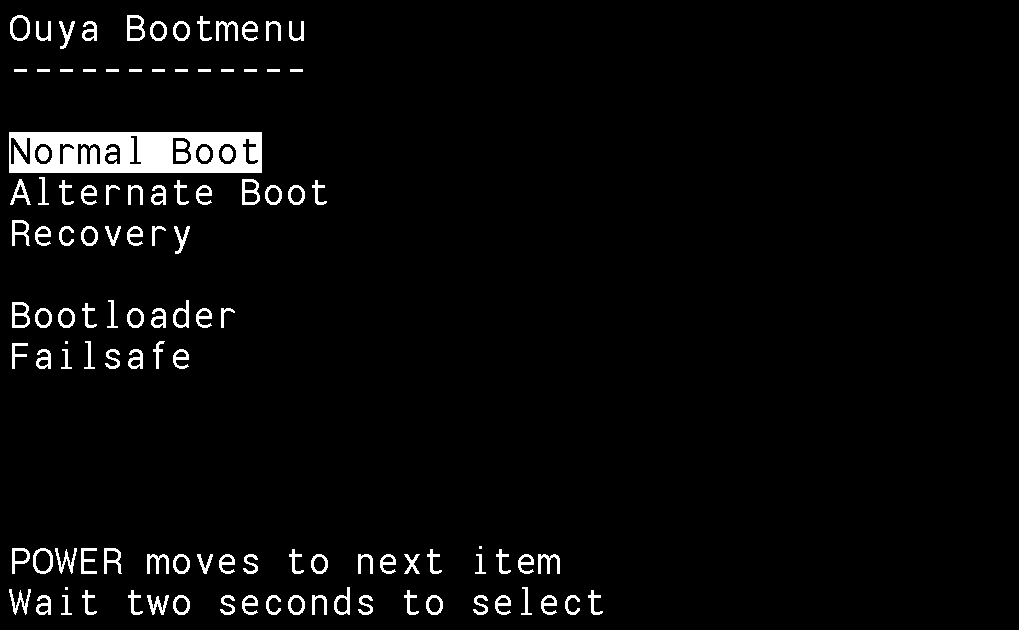
After the reboot, this screen would appear for a few seconds. You can use the Ouya power button to cycle down to "recovery" if you ever want to get back to ClockWorkMOD in case you forgot to clear that cache as we asked you to do. ;) Also, it's useful for flashing newer versions of lineage or reverting the system back stock.
After 3 seconds it will disappear and begin to load the OS.
Lineage may take up to 5-10 minutes to load and cycle. So be patient during this step. It has a lot of unpacking and figuring out the fact that you placed Lineage on an Ouya of all things!
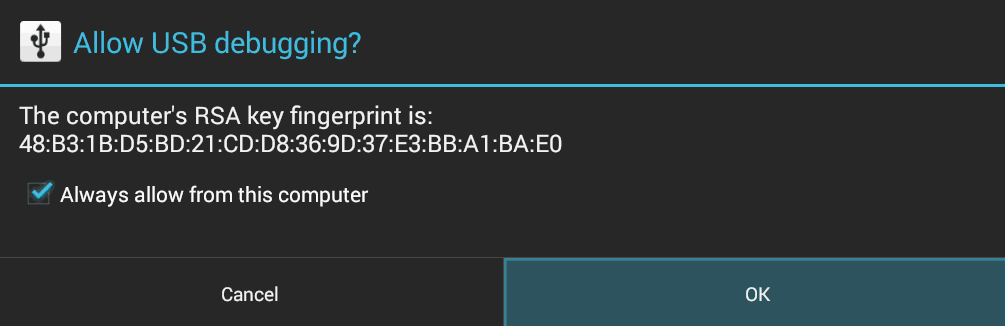
This warning window may come up if your Raspberry Pi is still connected via the ADB cable. Since we might pass additional commands in Lineage such as ADB install <<APP>> we're going to use the keyboard to tab over to "Always allow from this computer" and then tab down to the "OK" button.
Final Thoughts
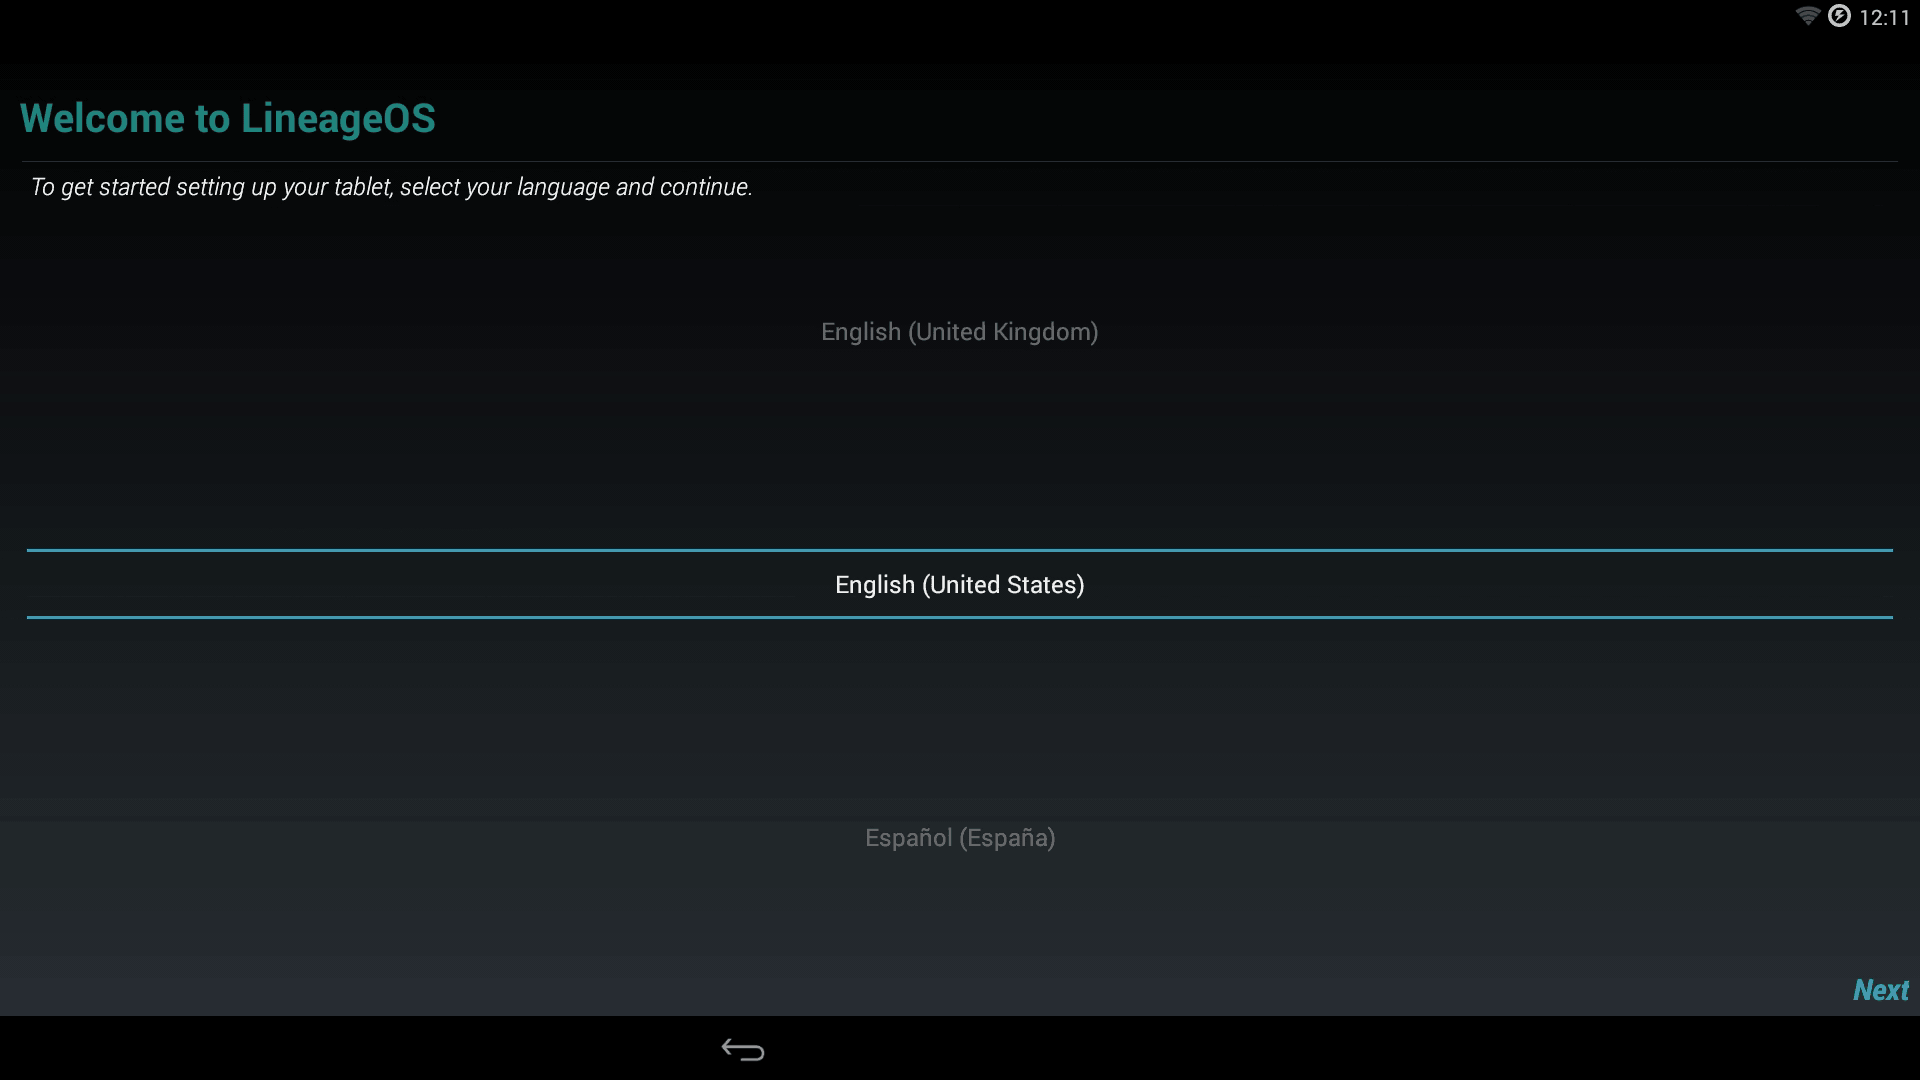
With the "Welcome to LineageOS" screen this tutorial ends and the new life of your Ouya begins!
 This tutorial is a part of a series on how to ADB Lineage with a Raspberry Pi.
We do hope that you found this tutorial useful until next time.
May Server Protect you
+++ END OF LINE.