

Adding SSH and Samba onto the Raspberry Pi.
Now it's time to add SSH and Samba. For those who do not know what that is. SSH is a secure shell system that allows us to remote into our pi from any computer capable of loading an SSH client such as PuTTY onto their system. SSH can also be used for FTP transfers as a way of uploading files such as apk's and images to your Raspberry Pi so you can then access them via ADB to your Ouya. But instead of SSH-FTP, we're also going to load Samba which is a windows network sharing protocol allowing us seamless transfers from our PC or MAC over wireless to our Raspberry Pi.
Now, for those who are using the Raspberry Pi as a desktop or don't care to use it in a headless manner like we do having it hooked up in our living room to the Ouya. You can probably skip this tutorial altogether! However, for those who are using it as a headless unit then read on as we provide all of the instructions down below.
"Note: If you get a black screen but the audio is playing. Or you got a potato PC and it's stuttering. We have fallback Links below."

Video tutorial fallback mirrors:
In case you have no-script enabled or for some reason cannot see the title video on this website. We have provided direct links for these videos. For more information about the standards we use on this site click here if you would like to know more.
AV1       - Link
MP4/.h264 - Link
OGV       - Link
Let's begin on the Raspberry Pi side.
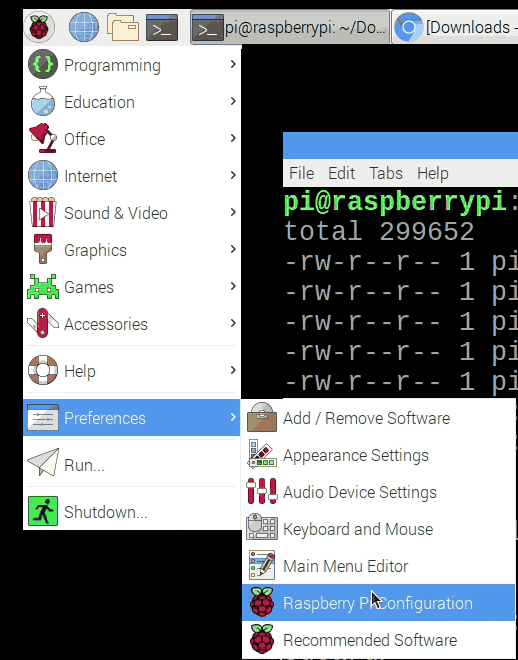
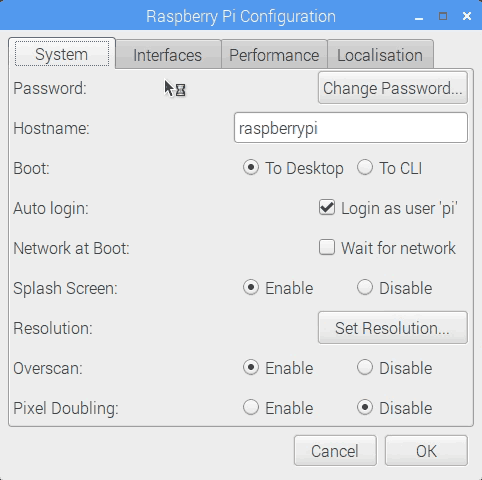
Boot up your Raspberry Pi until it hits the desktop and then click on the Pi start icon in the upper left-hand corner of the screen. Then click on Preferences > Raspberry Pi Configuration.
In the Raspberry Pi Configuration GUI, we need to click on the Interfaces tab to enable SSH service.
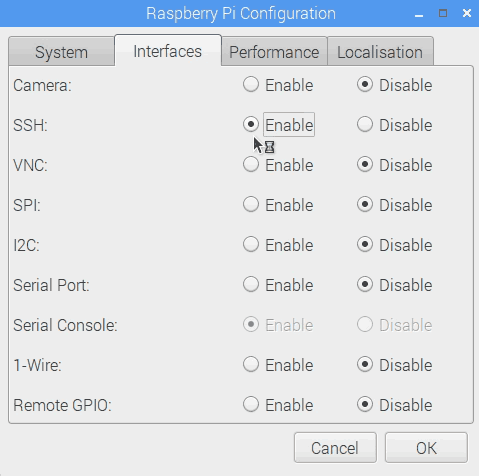
Click the radio icon button to Enable the SSH service and press the OK button to continue.
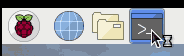
Next, we're going to jump into Terminal. There should be an icon on the top of your application menus as illustrated above.
We're then going to type the following command:
sudo ifconfig

The area that we are looking for when we SSH into our Raspberry Pi is the net IP address which we have illustrated above. If your Raspberry Pi is like ours and you are going through your wireless network then you're going to want to look for a section called "wlan0" if you have your Pi hard-wired you're going to want to find "lan0" or "eth0". Your IP address will differ based on the DHCP settings that you have placed on your router. In some cases you could resolve the DNS entry of "RaspberryPi" however we tend not to rely on DNS as in some network configurations and routers it's simply not properly set up.
Now, go into Terminal and type in the following command:
sudo reboot
Or, you can reboot from the shutdown button in the Raspberry Pi start menu as well.
We're going to let the Raspberry Pi reboot all by itself and then we head over to our PC client that we're going to login from. In this case, it's a Windows box but if you are on MAC it should be approximately the same as the application PuTTY.
Jumping over to our PC.
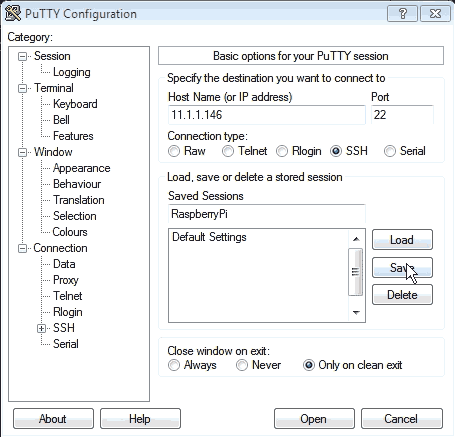
Putty configuration for our first-time usage of Raspberry Pi is super simple. Place the IP address that we found on the Raspberry Pi under wlan0 into Putty. Port is always going to be 22 unless you change it to something else. Finally, make sure the radio button is checked for SSH, and click the open button to begin!
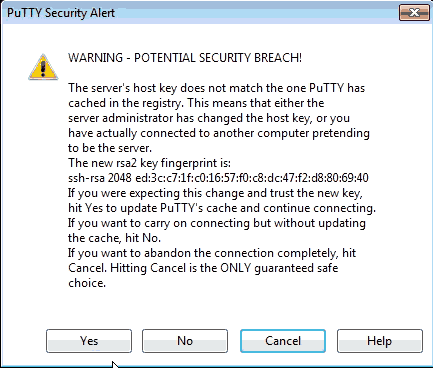
Now if this was a server that was publicly available on the internet we might be a little concerned with this message. However, since the Pi is securing itself with a self-generated certificate PuTTY is warning us the user that this could be a spoofed server. Since we know (via physical access to it) that this is our Raspberry Pi click the yes button to continue.
Embrace the Raspberry Pi shell mode.
This is where all of that lovely shell access will now begin. So after you have logged into your account we're going to need to install the Samba files.
sudo apt-get install -y samba samba-common-bin smbclient cifs-utils
Sit back and enjoy the wall of text fly by as it installs the samba service for you.
After you've passed that command we'll, of course, need a common directory to share. something that can be referenced throughout our tutorial. In this example, I'm going to choose the /d0 folder as our directory of choice. But first, we're going to need to make it!
cd /
sudo mkdir d0
sudo chmod 777 d0
So we first change the directory to the root of our drive to "/" then we make the directory of "d0" and finally we grant full permission rights over this folder with chmod. Now, it may be a little dangerous to 777 a directory but to eliminate any troubleshooting problems when we upload/download files from this folder that's what we will set it up as. You can always change the permissions later!
Now that our folder is made we can configure samba and point to this folder.
cd etc
cd samba
sudo nano smb.conf
page down to the end of the configuration file and add the following lines:
[d0]
                 path = /d0
                 available = yes
                 valid users = pi
                 read only = no
                 browsable = yes
                 public = yes
What this does is tell the Linux samba service to create a share of d0 that is within the brackets []. Then point it to the path of the same name /d0. Make it available but only to the Linux user of 'pi' (you may wish to change this to your user name or make another user that shares the same name as your Windows login.) Do not make it read-only and instead make it fully browsable and visible to the public via network neighborhood.
Control-X to save this file and after this type in
Now, we've defined a Linux user to this folder. We need to let the samba service know that a user 'pi' is acceptable to login via this service by typing in the following:
sudo smbpassword -a pi
Note: If you are using Ubuntu it may be smbpasswd instead.
It will then request a password that you can use to log in via Network Neighborhood.
New SMB password:
Retype new SMB password:
We generally keep it the same as our Linux login to avoid confusion. probably not safe doing it that way! But in general, we only keep this box running on our network when programming android boxes so it's not that big of a deal.
sudo reboot
The Raspberry Pi can reboot everything including the samba services.
Back to our computer!
Alright, we did everything we're supposed to do on our Raspberry Pi lets jump back and see if it all works!
If you open up file explorer you should have a "Network" icon out there. Since by default the samba service will log into the "WORKGROUP" directory which should be the same as the defaults of a windows OS it will then make the Raspberry Pi Visible.
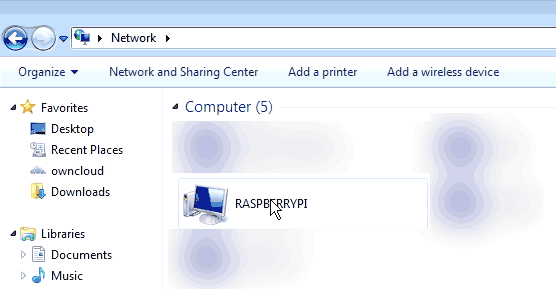
In the event you do not see this you could press the Windows + R key and type in \\raspberrypi which is the default DNS or if you don't use DNS on your network you can try the IP address of your wlan0 that you set up at the beginning of this tutorial. In our example, it is \\11.1.1.146.

From here you can click on our d0 folder.
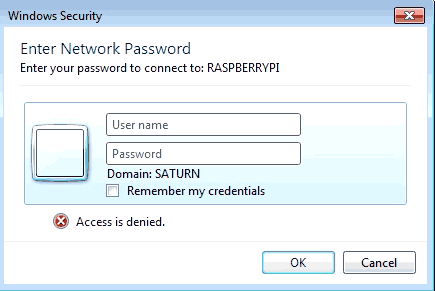
On a MAC the screen will look different but it's the same concept. enter your username and password.
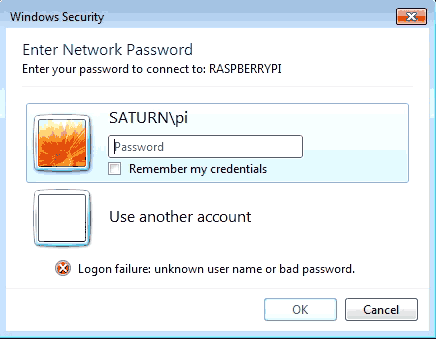
If you do what we did in the video tutorial and just enter in a username it may insist that you give it a password. Type in the same password you gave to the smbpassword command when you were in Linux shell.
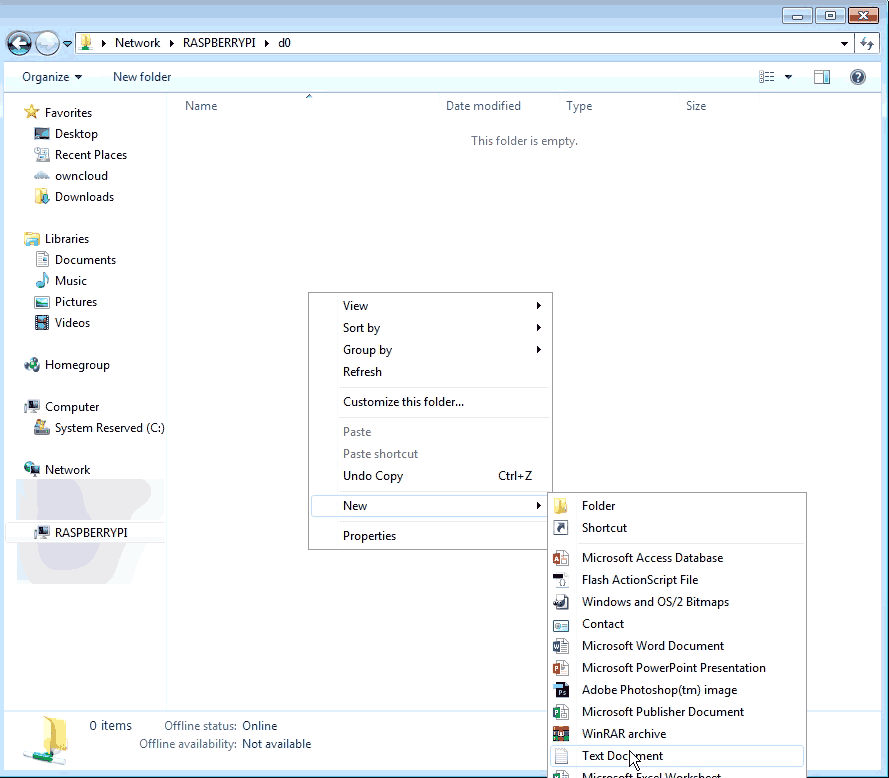
You should be presented with an open and blank directory in d0. This would probably be a good idea to test your access by making a text document on this folder. If you have made it this far then congratulations!
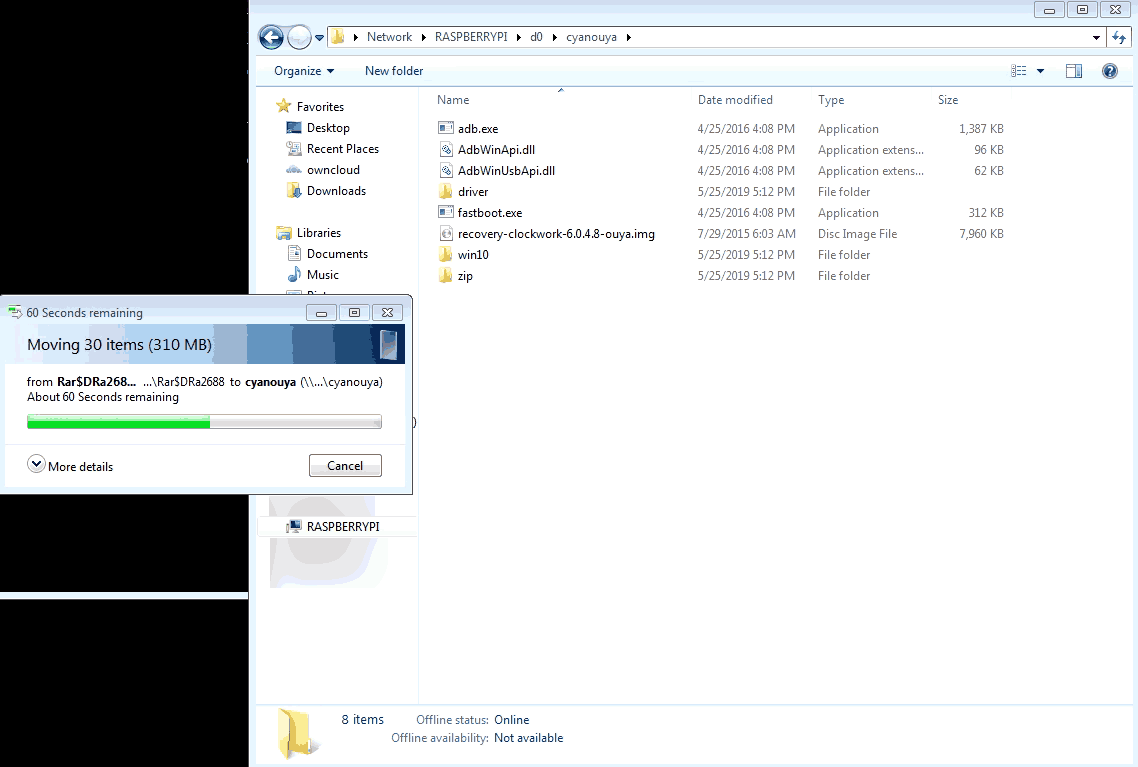
You can now go nuts with transferring all of the contents from our lineageouya.7z archive or hell just the 7z file itself right into the d0 folder for use and accessibility on your Raspberry Pi.
S, this is WAY to complicated! Don't you have an easier solution?
Enter FTP via SSH.
For those who either feel leaving samba on your Pi open is a dangerous security risk or for those who simply hate samba, there's another way you can get those precious files back and forth between your PC/MAC and your Raspberry Pi for Ouya ADB action. This program is called Filezilla.
Filezilla is probably THE FTP client of choice and for those who are too young to know what this is. FTP or (File Transfer Protocol) was the carrier used to transfer files from one server over to the other.
During the dark ages of "The Internet" communication was limited to Use-Net, IRC, and the occasional telnet login. To pull a file from one server to your local server you had to use FTP to perform this task. After you FTP'ed it to your server you could pass a send z-modem or 'sz' command to send the file from the shell over to your computer. Yeah, it was a lot of bullshit. Be grateful for the magic of the HTTP protocol that made the internet stupid take care of most of this for you.
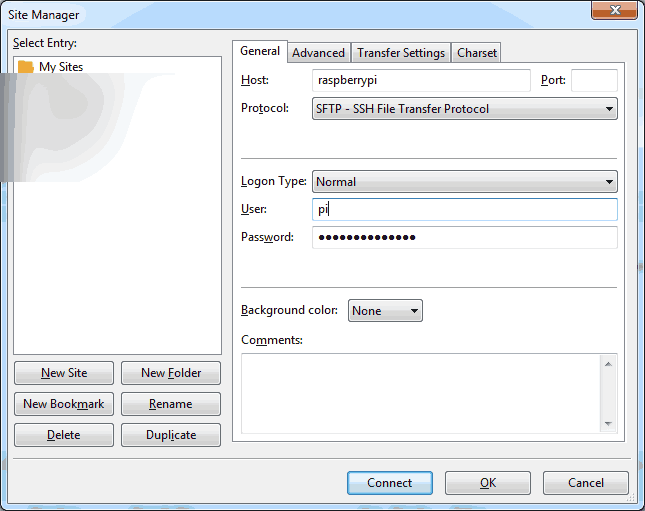
FTP has evolved over the years. In particular, the protocol we're interested in is SFTP where you can FTP in your Raspberry Pi via SSH just like how you can use PuTTY to login. simply click on File > Site Manager and fill in your Host category. Make sure you select the drop-down protocol for SFTP - SSH File Transfer Protocol. Finally, under Login Type choose the drop-down for "Normal" and finally enter the username and password you normally would use to log in to your PI with.
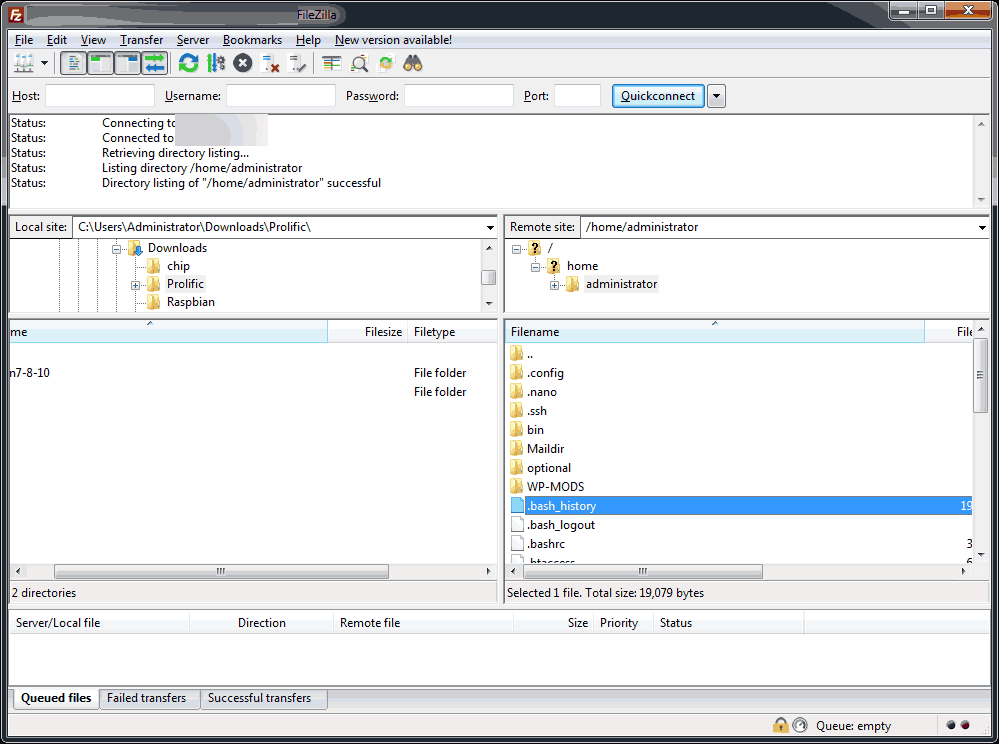
If your login is successful then you should see the right side of the screen populate with all of the directory contents that are in the user profile on your Raspberry Pi. Congratulations again! You can now make directories, transfer files to your Raspberry Pi and get them ready for that sweet ADB Action to your Ouya!
S! I need a simpler way then that!
No..............
Just stop.
Final thoughts.
There will never be a 'One Button Solution' for working with Linux or ADB'ing and modding your Ouya. It's our responsibility to tell you this in advance. We shall try our best to guide you through this because if you feel that is not acceptable documentation then we wish you the best of luck in finding documentation that works for you. While we are on this subject we will not perform the mods to your Ouya for you because we refuse to deprive you of the opportunity of learning how Linux and the Ouya work just like the Ouya taught us throughout the years.
 This tutorial is apart of a series on how to ADB Lineage with a Raspberry Pi.
We thank you for checking out this tutorial and until next time.
May server protect you.
+++ END OF LINE