
DIY Lighting for the camera, for the home, and for the lulz.
We tried LED commercial lighting. It was a mistake for the most part. We think the very first bulb we purchased was one called "Switch" from Batteries Plus. It was an LED bulb that was liquid-cooled using some type of oil inside of it that was non-conductive keeping the entire assembly cool. It was promised to last up to 10 years.
Guess what? That didn't happen. So after watching some YouTubes, give it a few tries. I have something that's far superior and frankly wish I had done it sooner in my life. Read on if you wish to know more of my diatribes into DIY.
LED bulbs.
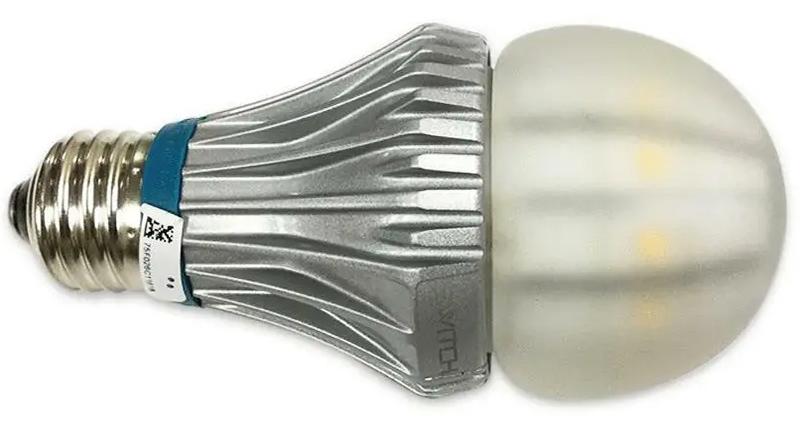
The picture above is a bulb made by a startup company known as Switch. We were paying anywhere from $40-60 USD per bulb! Yeah, these things were stupidly expensive but promised because of its oil suspension technology coupled with a sizable aluminum base that will keep cool no matter what.
Fun fact. Even with an open lighting system where you just have a diffuser plate on the ceiling. It was boiling fucking hot! The safest place to touch it was the diffused bulb itself because the heatsink would straight up burn you. Although the LEDs may have not experienced failure doesn't mean the filter capacitors that drive the AC-DC conversion to the bulbs were covered in magic oil juice. Thus, when the electrolitycs started to dry out they would in turn flicker rapidly. Never keep a stable signal of DC power to the LED grid inside.
To make matters more fun the vendor "Batteries Plus" was lying to its customer base saying that Switch is moving on to commercial accounts and won't be getting new bulbs into the showroom anytime soon.
We tried to open one of these things. Turned into a total mess as the oil blew out of it. Needless to say, the technology didn't assist in what it's supposed to do which is "keep it cool and have a long life." guess it's no surprise they died from customer complaints in 2014.
We then tried Phillips lights for a while. Again, really fucking hot. and only lasted about 2 years before the power circuit once again killed the bulb. Now whenever we move into an apartment we would take out whatever bulbs the landlord had (which seemed like whatever hand-me-down bullshit bulbs the previous tenant had) and put in some Phillips 100 watters for utilities sake and that's about it.
But. stupid bright hot lights aren't something we want to exist in 24/7.
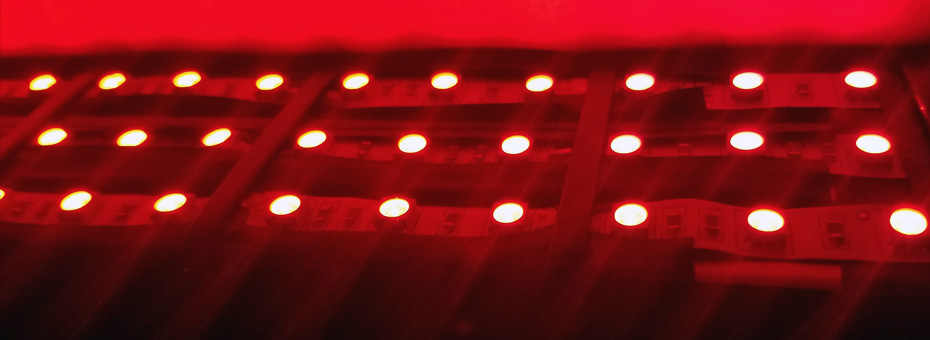
Now granted, we toyed around with some DIY party lighting in our previous place of residence using extruded aluminum as a heatsink. It worked surprisingly well but the weight was a problem. You see, I didn't want to drill a bunch of holes into the apartment which would then force me to patch and paint everything up. It was great for movies with the deep reds. and for nailing that vaporwave aesthetic with the cyans and purples. When you follow some basic rules with LED strip placement they can really compliment your home. If you don't then it ends up hurting your eyes from it looking cheap. What are some of those basics you may ask?
- Do you see the picture above were we shot our camera right at the LED elements themselves? don't mount LEDs directly like that. Your eyes will thank you.
- Use a diffuser. If you don't have one. Face the LEDs towards a bright surface like a white wall.
- It's okay to point LEDs directly at a surface like a countertop so long as it's not shiny and the LEDs are tucked away so far that no matter what angle you come into the room you cannot see the individual lights directly.
- You don't need to spend extra on waterproof LED strips unless you're doing things in the bathroom or outside. Possibly kitchen too depending on placement.
 Danger - Youtube link. Proceed at your own risk of being tracked and cataloged.
Instead.
While searching for alternatives this guy appeared in the "all-mighty algorithm" his channel is known as DIY-Perks and had pretty much everything we were looking for in an LED setup.
- Something light.
- Something serviceable.
- Something that (HOPEFULLY) will not burn the house down.
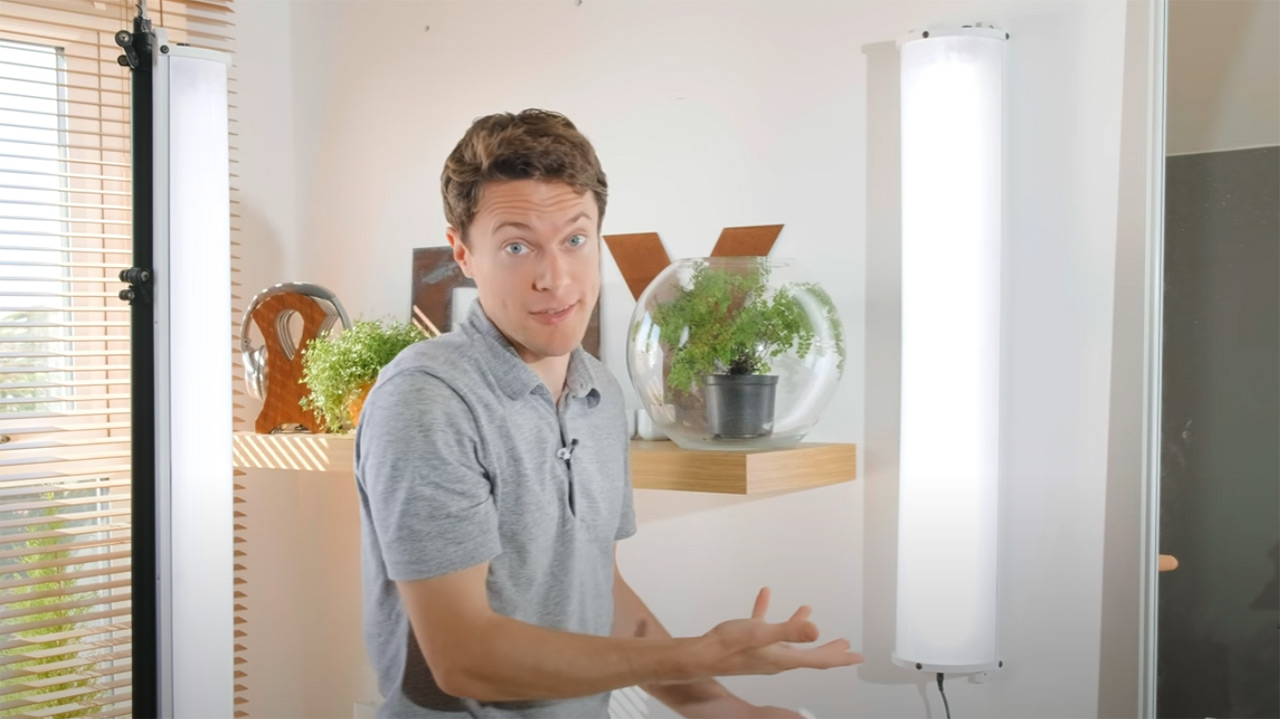
Now, design-wise I love the half-dome lighting system. But after playing with my party lights we weren't feeling like having to run around the house twisting knobs on these lights all of the time. We wanted something wireless.
So, here is our variant of what he was doing:
Let the DIY begin!
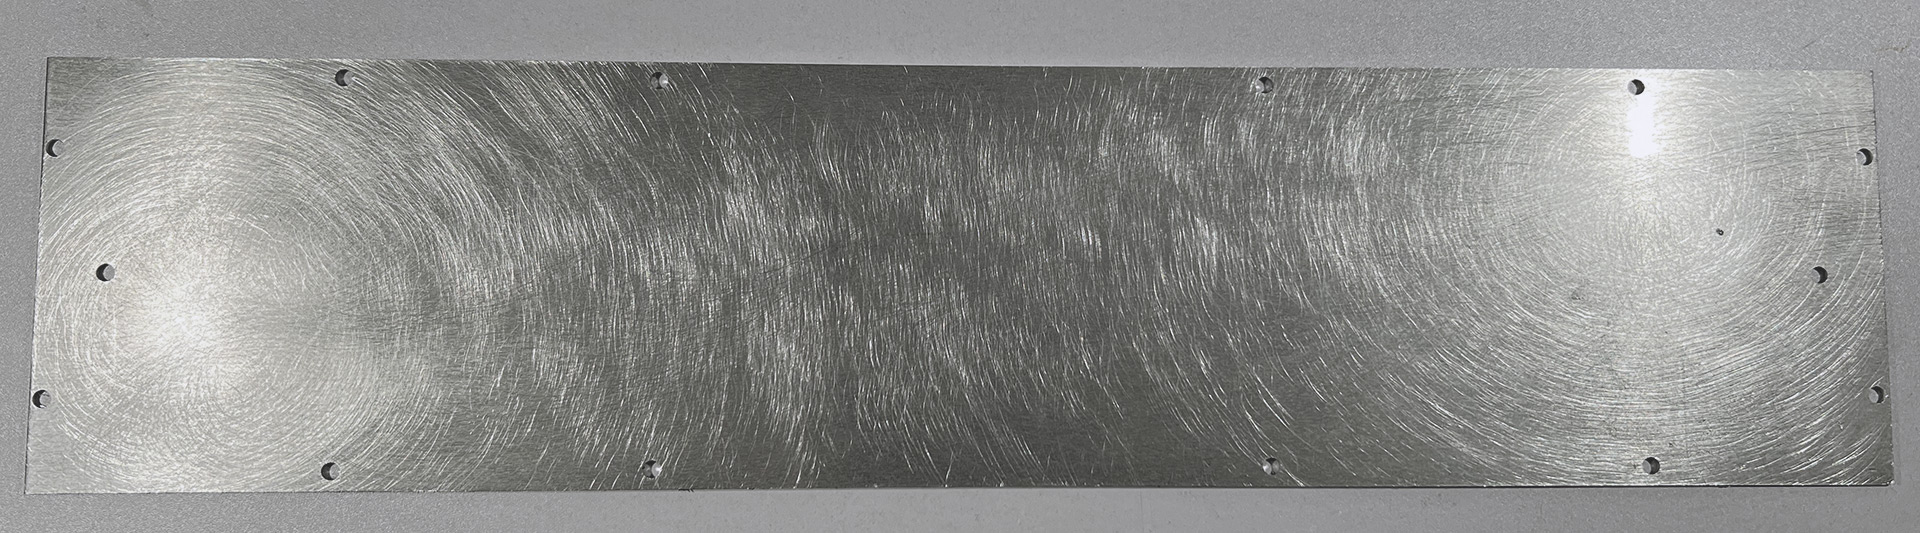
Starting off with the base we managed to get a bunch of aluminum from a government auction. Apparently, this stuff was designed for street sign usage and it even has the reflection sticker material on one side but it was considered rejected for reasons unknown! Now before the monsters which are also readers of my site even start thinking of it.
S-Config does not condone the theft of road signs! You do it and get arrested we will laugh at you! - S
$10 later we got 4 sheets of 24x24" or around 610x610mm each of them about 2mm thick. Which is awesome. If we were to buy virgin aluminum this probably would've cost us about $40(USD) per sheet. Not only are we recycling by saving the time/energy to remelt this aluminum into something else. But got a sweet deal on it all. Always keep your eyes out for sign companies or recycling yards that have sheets of metal kicking around.
If you can get aluminum thicker than 2mm. Badass on you. Understand it gets incrementally more expensive the thicker you go. We wouldn't go thinner than 2mm either because you need some kind of rigidity for your lighting.
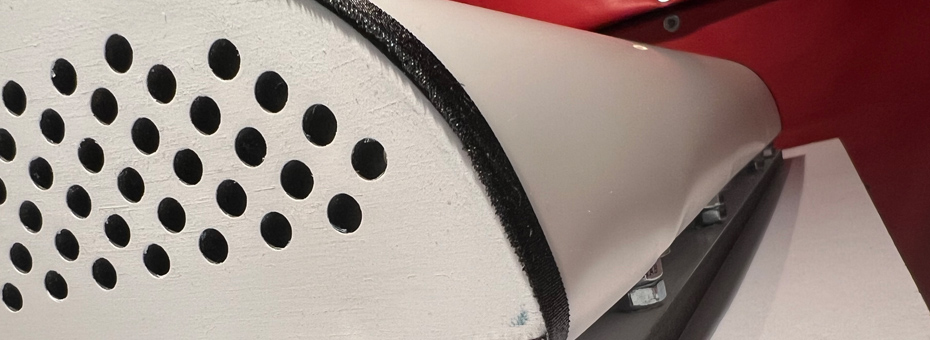
We cut the sheets into 200mm wide leaving 610mm in tact. so realistically we only had to cut it twice per panel and that's it to get three lights out of one sheet.
The holes drilled are 6mm-diameter. With the two holes on the short side for the end-caps. the four holes along the long side are for standing screws to elevate the unit away from any surface as the aluminum also serves the purpose of cooling as well as structure. and finally, the holes in the middle for aluminum pole mounting which can be used if we want to mount it on a tripod or have it on a fixture of a machine.
In case you are wondering, yes. we sanded the fuck out of it. It's important to rough up the surface for what is about to come later in this project.
The wonderful world of LED's.
Okay, before I continue on with this we need to explain that there are certain 'models' of surface mount LEDs out there that light bulbs and other fixtures use that we should explain first. Most of the model numbers came strictly off of the dimensions of the element we'll be seeing shortly. This is by far not a complete list as LED technology is constantly evolving.
3528 LED -
Size: 3.5mm by 2.8mm in size
Lumen: From 6 to 8 lumens/flux (depending on color and type).
Power Consumption: 20-30 mA @ 2.8-3.4 Volts per LED.
Description: 3528 LEDs is almost the SMD that started it all. It was easily accessible. came in an array of types and colors, RGB + Warm White, Cold White, Ice Blue, Ultra Violet and so on. They were also known to be a 'safe' LED to install in homes because the elements do not emit much heat at all.
Also, the 3014 model ended up replacing the 3528 as it was smaller, produced double the lumens, and its power consumption was just %20 higher than that of the 3528. the 3014 may be tempting to use over the 5050 but the cost is generally higher as you need a lot more.
5050 LED -
Size: 5mm by 5mm
Lumen: From 16 to 22 Lumens/flux (see description below)
Power Consumption: 60 mA @ 2.8-3.4 Volts
Description: The 5050 style LED to us was a little deceiving because it was the first LED to have RGB merged into a single element. This is of course problematic when talking about "Lumens" because you're measuring off of the total intensity of all three elements inside of an RGB instead of just the color of Red, Green, or Blue. When dealing with flat colors like "White" or dealing with a dedicated "Red" "Green" or "Blue" 5050 the lumen factor remained true. Thus, if you get an RGB strip the lumen power would be the same as 3528 on each color band. Beyond that, the 5050s cost double the power but gave slightly more than double in lumens.
5630 LED -
Size: 5.6mm by 3mm
Lumen: From 45 to 50 Lumens each
Power Consumption: 150 mA @ 2.8-3.4 Volts
Description: These are the style of LEDs that DIY-Perks/Marswall is using because they managed to tune the 5630 cold white scales to as pure to white as possible. Unfortunately, we have not found a 5050 variant of what Marswall provides as when you start factoring power consumption to lumens it's better to get a double-density (120 elements per meter) of 5050s than a single-density (60 elements per meter) of 5630s. This is the lighting type we settled for our project as we could get independent "Red", "Green" and "Blue" 5630s due to the demand in automotive ground effects.
Alright, so what did we get?
- 1x 5 meter spool Marswall Cold White 5630 single density (60 lights per meter) LEDs - Amazon
- 1x 5 meter spool Marswall Warm White 5630 single density (60 lights per meter) LEDs - Amazon
- 1x 5 meter spool Ice-Blue White 5050 double density (120 lights per meter) LEDs - eBay
- 1x 5 meter spool Red 5630 single density (60 lights per meter) LEDs - Aliexpress
- 1x 5 meter spool Blue 5630 single density (60 lights per meter) LEDs - Aliexpress
- 1x 5 meter spool Green 5630 single density (60 lights per meter) LEDs - Aliexpress
What the hell kind of configuration is that?!? - Anonymous
We got 3 levels of white which will go off to one PWM-dimmer control circuit. While the RGB goes off to another. In effect, each of the lights in my house will still have the party mode of my lights from the previous blog. But the functionality is down to being almost photogenic like it does in DIY-Perks. By having each of the colors separate also makes the project a lot less of a wiring nightmare.
About "Ice Blue" white.
This type of light by itself is incredibly harsh and makes the entire room look like a cyan blue. Which is great if you want to attain that vaporwave aesthetic throughout your home. Add some purple and you're set. But the reason why Ice Blue is important for light mixture is mostly for photography. By adding just a little bit of Ice Blue to white you could take pictures and it would tend to look more natual like sunlight versus just the traditional "Cold" and "Warm" LED setup.
About purchasing things online.
The number one advice we would give when doing projects like this is the following:
Stay the fuck away from Amazon. - S
Bezos doesn't need another yacht. Also, for most of this project, we don't need to pay three times the cost to get the exact same product. We've chosen Marswall for the pure white because we want pure white, no compromises like the cheap cold whites which throw in greens and make whatever picture you take look sickly. We -could- have gone through Aliexpress for "Warm-White" but you really have to get a definition from the vendor of what color spectrum of "Warm White" they are talking about or else you'll just end up with defective cold white.
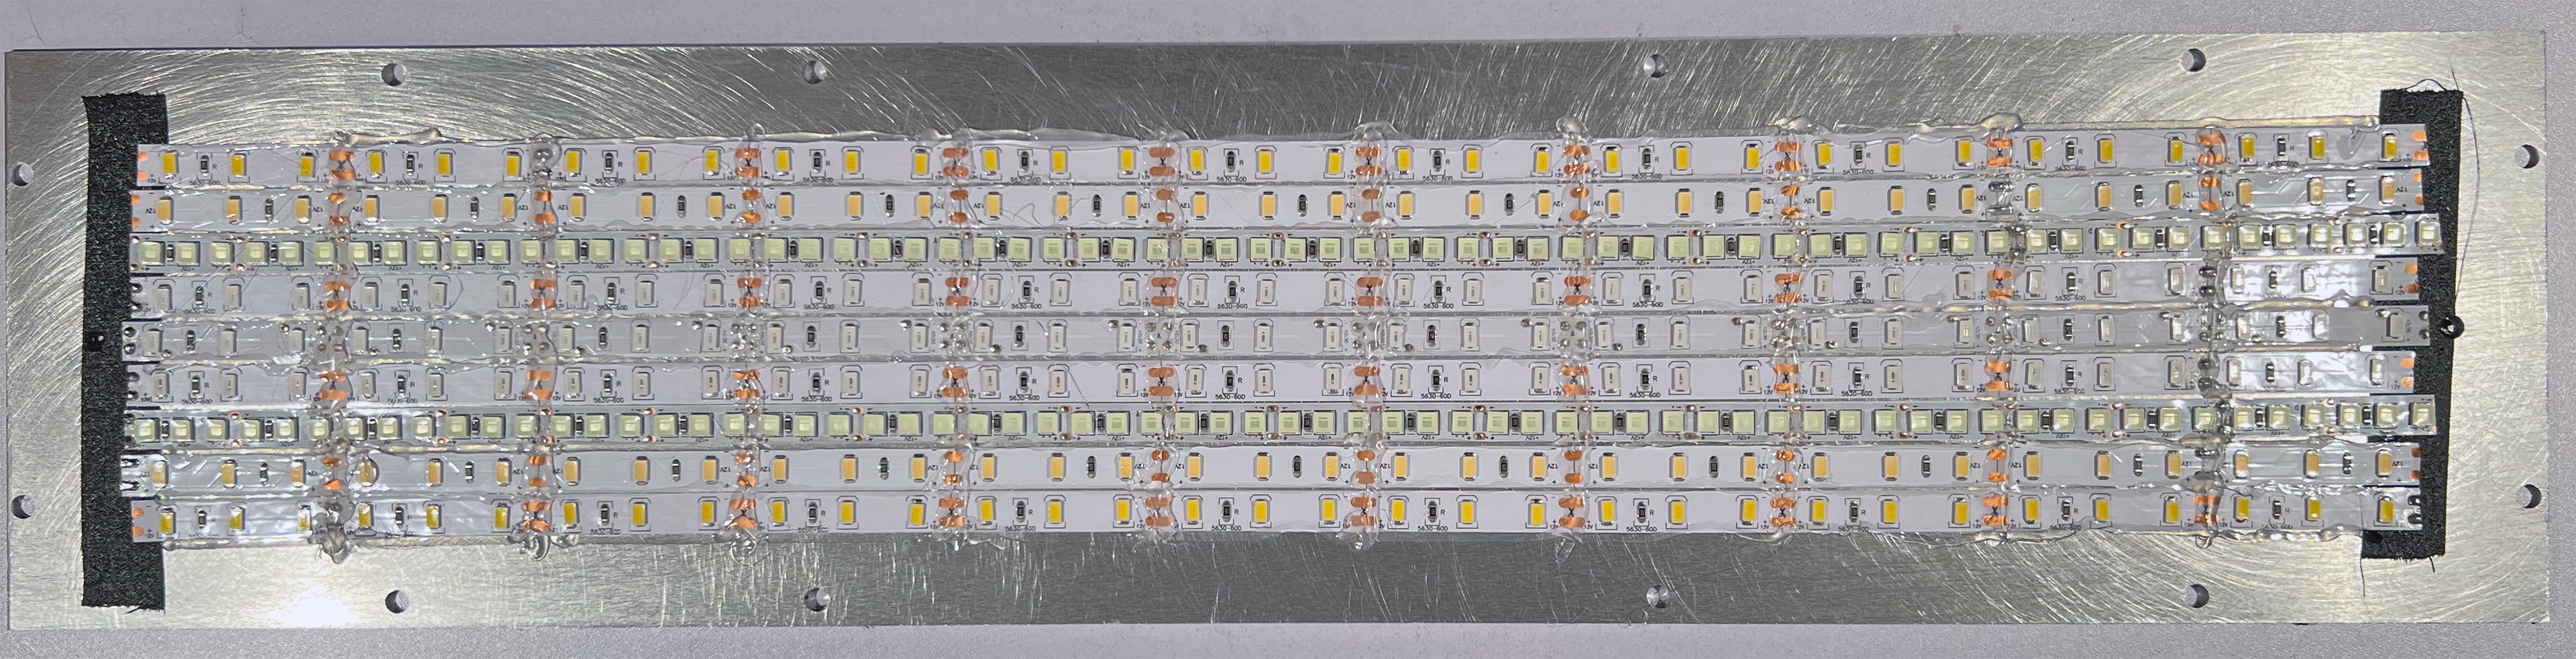
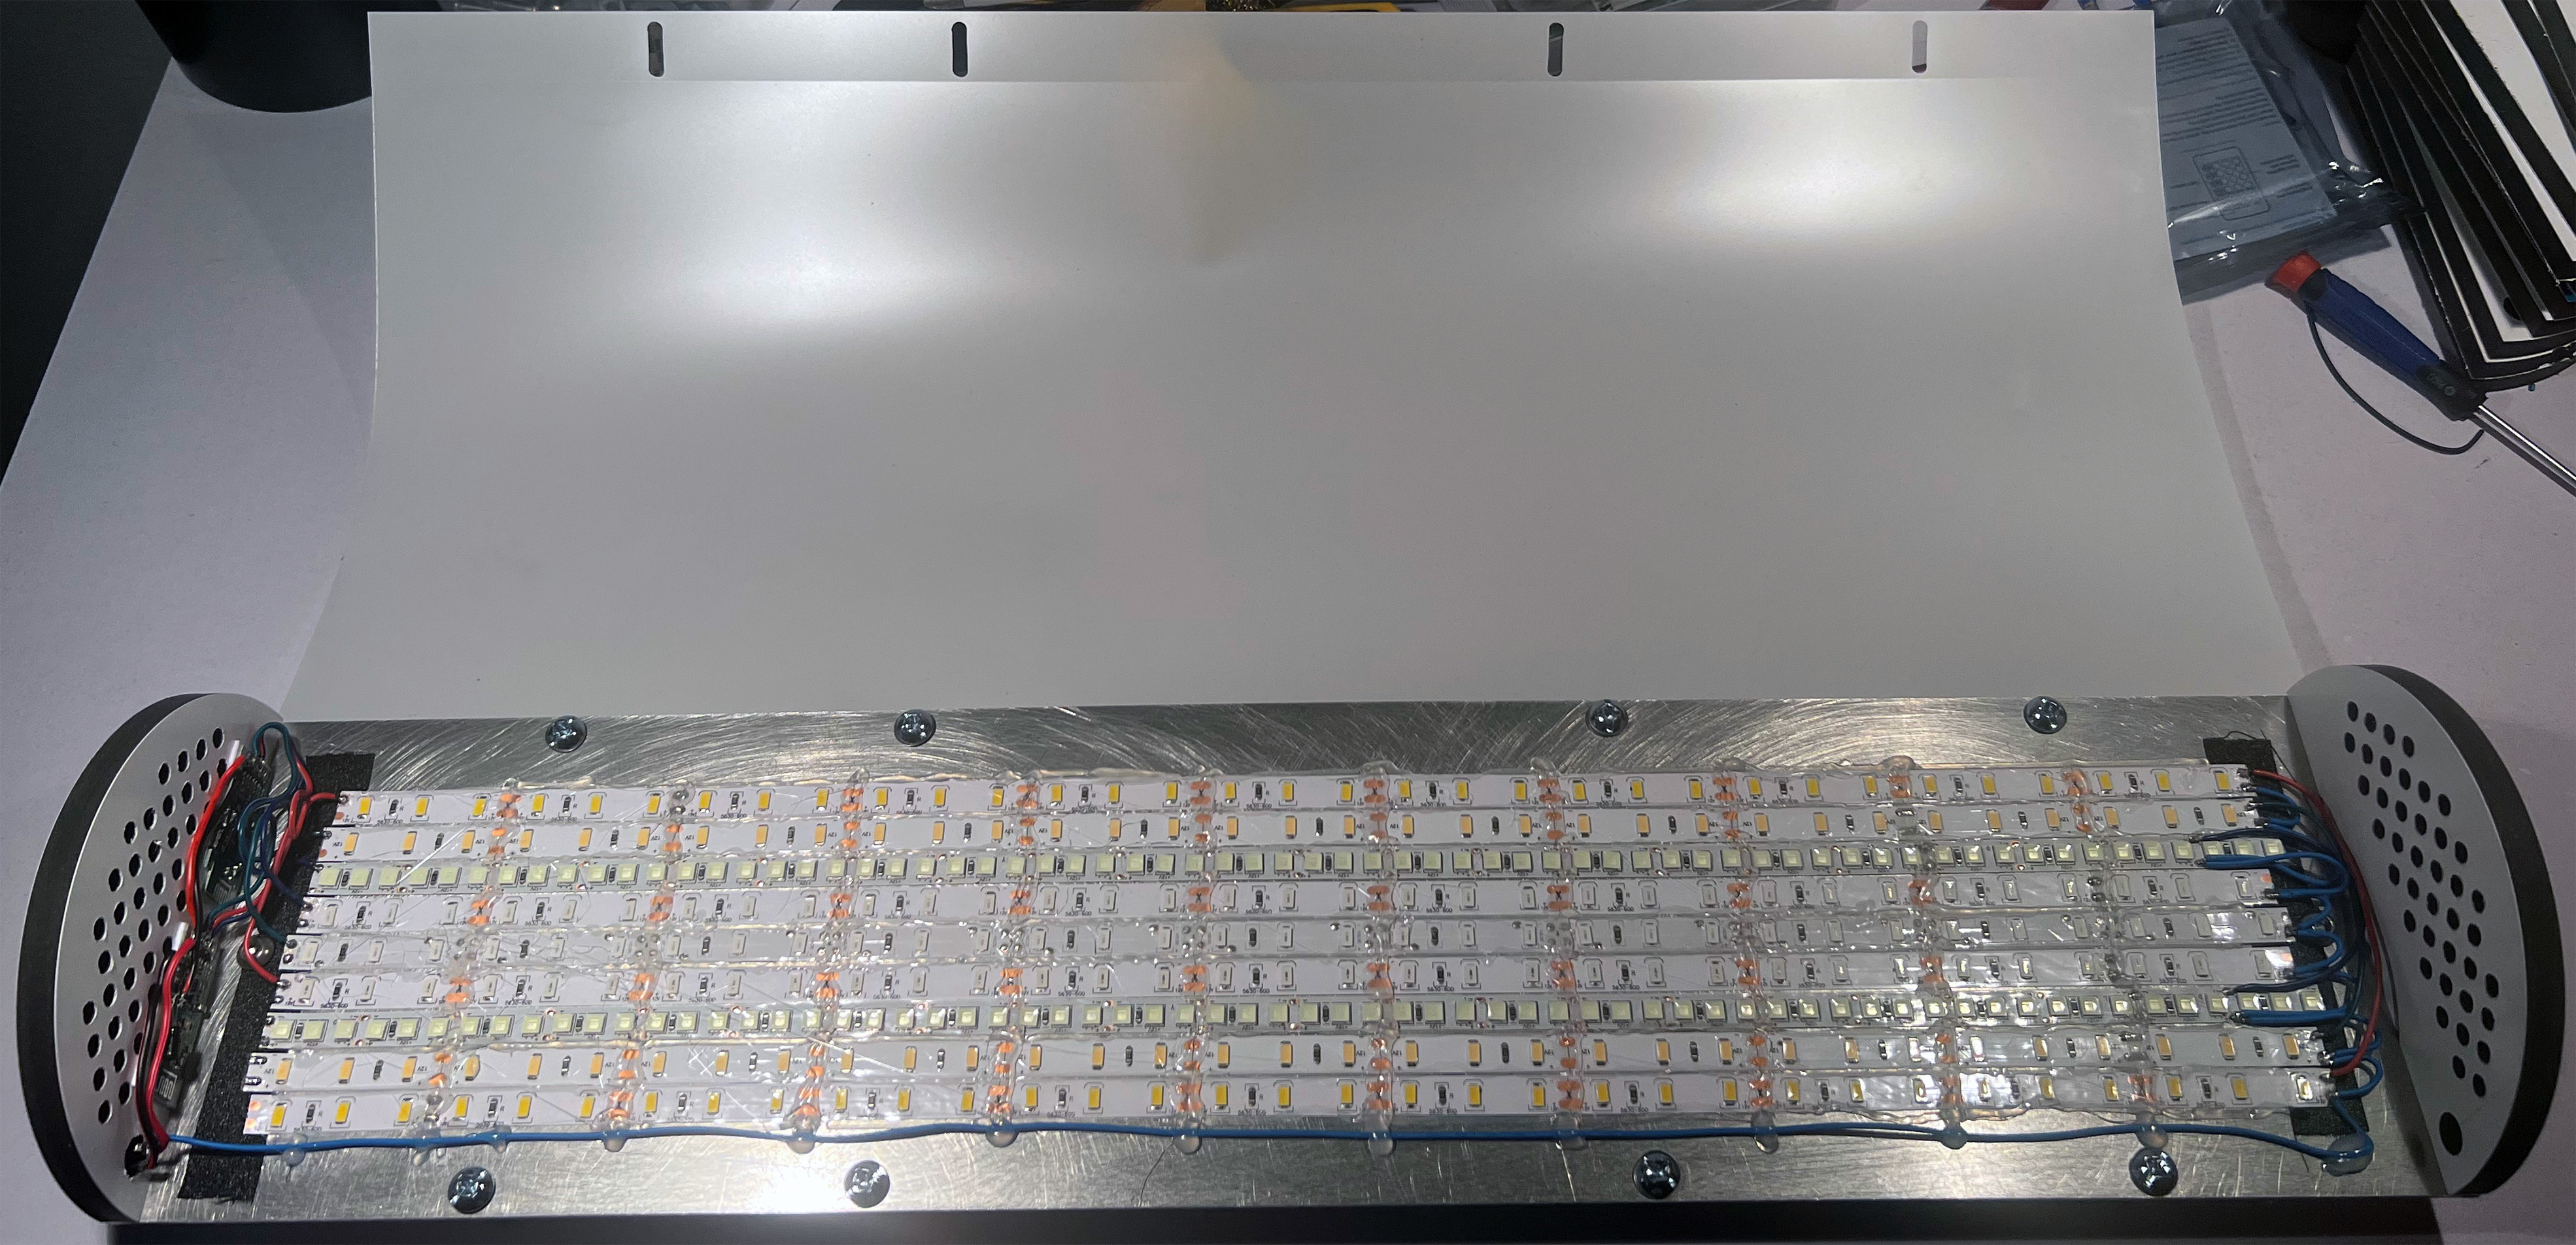
Right, Using the double-sided tape sticks -really- well to the sanded aluminum. However, just as a precaution we also hot-glued around the lights to keep everything stuck together as one unit. Yeah yeah, we know hot glue is a shitty way to go with electronics. We would've made an aluminum jig to sandwich the lights together. But from a repairability aspect, it'll be good enough. Finally, because we don't trust the ends of the terminals that are clipped off. We threw down some gaffer tape to prevent the tips from touching the aluminum.
Placement from top to bottom is as follows:
- Warm White
- Cold White
- Ice Blue White
- Red
- Green
- Blue
- Ice Blue White
- Cold White
- Warm White
You need to keep the RGB together so that when it hits the diffuser it doesn't separate. After that, I just balanced each side with White so it would be even when it hit the diffuser.
66 of cold white alone is close to 3,000 lumens using the lowest projections. That's rather punchy!
of course, the RGB is only 33 elements together at 1,500 lumens. Not bad for ambient party lights.
Combining everything together will get us to an almost painful 7,000 to 8,000 lumens! But the secret sauce of a lot of commercial lighting such as Lutron is to actually underdrive your LEDs to get the maximum life out of them. So, we will need a controller that can dim these lights in a responsible manner where it won't produce flicker or eye strain.
Quick note about addressible LEDs.
They're fine to use in a project like this as well! They make the wiring job way easier and some of the controllers on Aliexpress work directly with Alexa and Google. The number one reason why we didn't use addressive (or waterproof for the matter) is cost. If we could find an LED set that was powerful, addressable, white balanced perfectly, and could be bought for just a few dollars we're totally in!
Controller get!
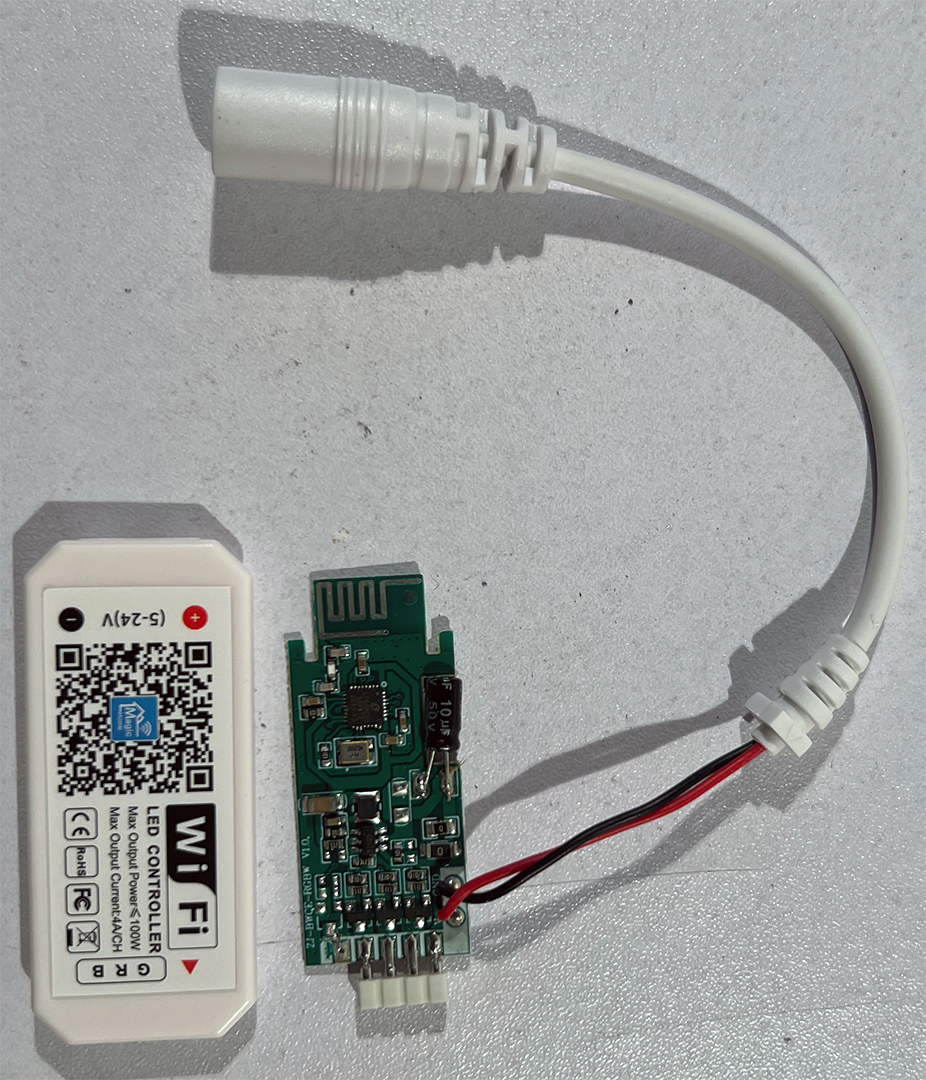
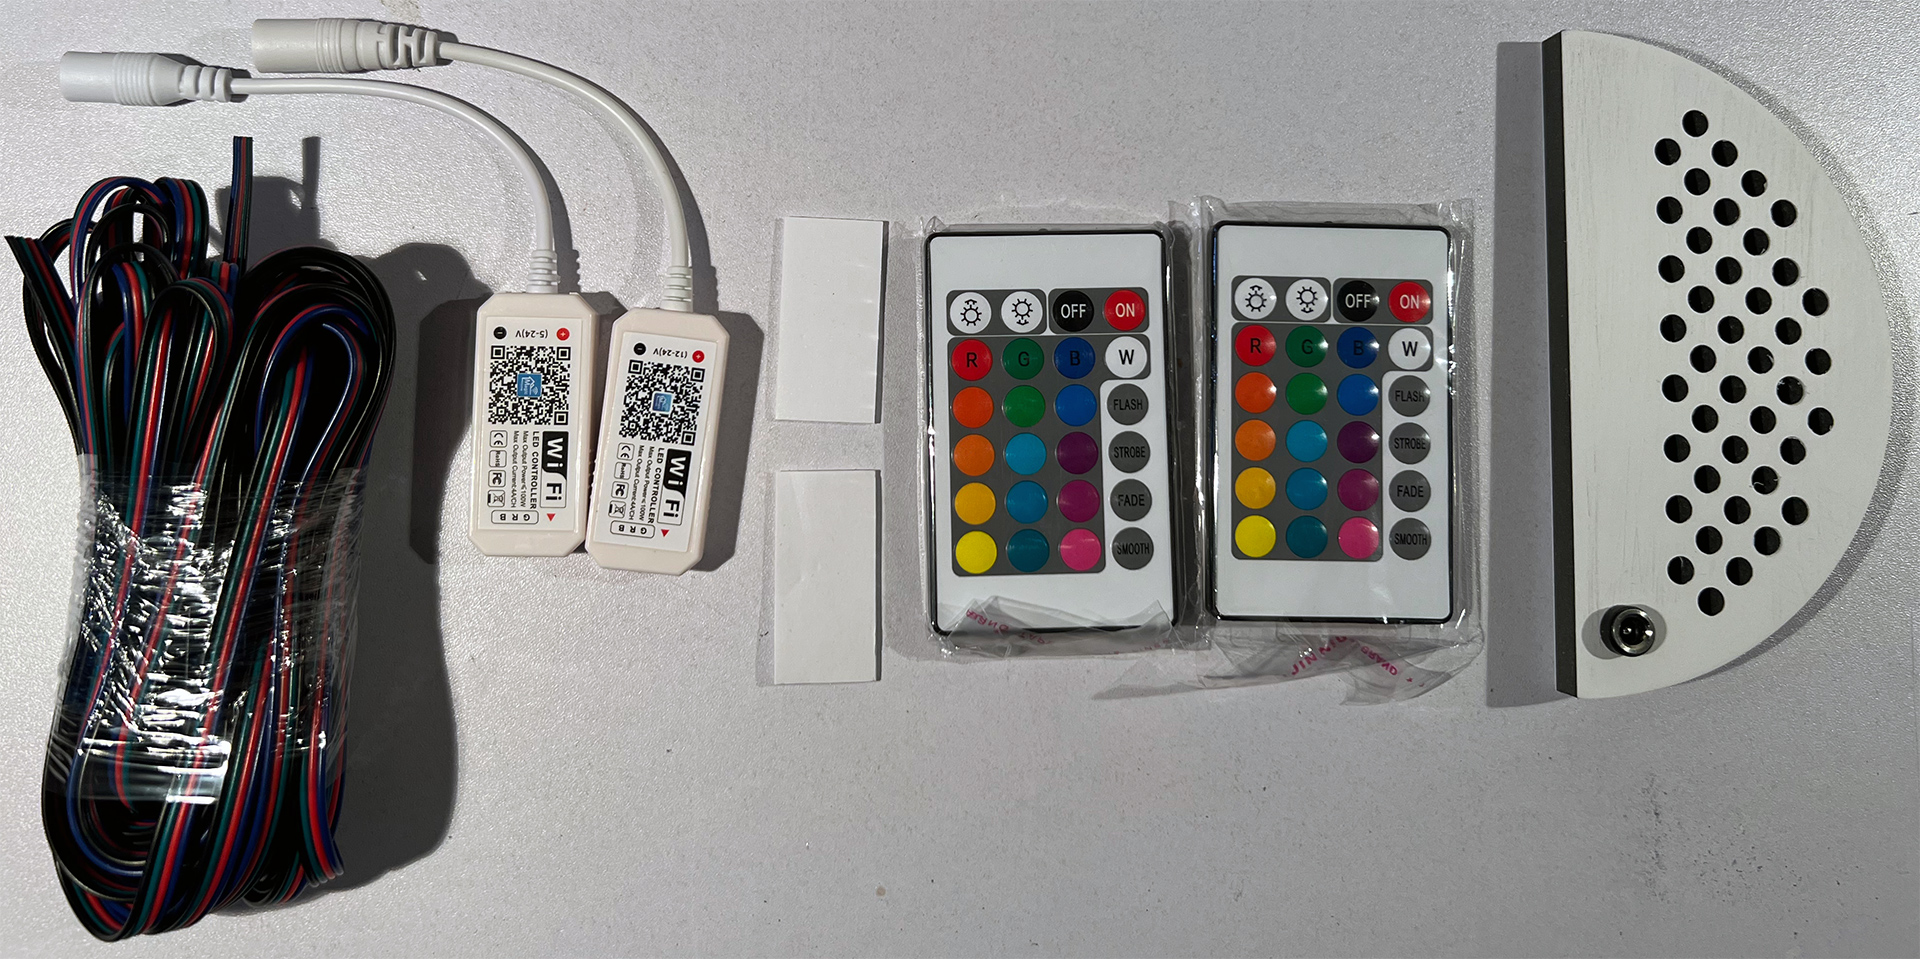
For this project, we're using some MagicHome Wi-Fi controllers. Now, Magic Home has a lot of different ways of interfacing:
- The one above is the Wi-Fi variant which hooks to your home network. The good is if you use their website you can control your lighting anywhere even when you are out. The bad is there's no way for Google Home/Alex to interface to it (I have neither, so don't really know too much about this)
- They make a Bluetooth variant which we should've gone with in the first place. Because the Bluetooth may not have internet on/off capability your lights don't really need a router to keep running. Also, if we were to be using these lights for filming. Having the bars leave the home and rely on your cell phone or tablet for control would be a far better idea.
- Finally, they make ones with IR remotes. Which If we were just making "white" LED bars, or "RGB" LED bars that would be perfectly fine! But because we're controllers 6 channels of light. the IR mode wouldn't be a good idea for us. Also, the IR remote feel really shitty when you use them.
Magic Home controller also makes an RGBW which is totally fine if you KNOW what kind of white you like in your home. Perhaps we could've used the "W" function for ultra-violet strips. However, we're just not goth enough so we went with the simpler (and cheaper) 3 channel variant.
Again, do not go through Amazon on these. They charge $12-18 (US) while Aliexpress charges $1-3 (US) depending on what you want. Also, Aliexpress has really cleaned up their act with the bad reputations of vendors as they have another Chinese electronics site they're in competition with. I'd trust Aliexpress MORE than I'd trust eBay at this time of writing. If you don't mind waiting just a little bit longer Aliexpress is a great way to go.
Downsides of the MagicHome Controller.
For total transparancy we feel it's important to talk about some of the negative things about using these cheap controllers.
- Similar to my zero delay controller the Chinese used positive as 'common' instead of negative. This is why, unlike DIY-Perks you'd logically want to ground your aluminum plate. I didn't because negative is actually the control end of what the MOSFETs are controlling for dimming. No way in hell I'm making the aluminum frame a positive ground plane.;)
- The MagicHome Controller instead of having a button to reset the lights for when you want to change wi-fi networks or move them out of the house for someone else. It has this annoying "feature" where if you unplug them three times in a row then the unit resets itself. This was almost a dealbreaker for me because we have smart switches throughout the home where we turn everything off completely when we are away..
Anyhow, we won't be using the plug, nor will we be using the terminal plugs, and will instead be clipping all of that mess off. Also, we are removing the plastic case as we will be putting this into the lightbox which in a sense, is a different plastic/metal case!
Alright, for the control system, I got two of those Wi-Fi adapters that will be going onside with the cable and plastics stripped away. The two-way sticky tape will come in handy as we'll be taping that PCB right to the end cap on the far right which is just 6mm or 1/4inch expanded PVC foam (plastic surface, hard foam in the middle, plastic surface)
When we made our first PVC plate we used a drill and a coping saw. Afterwards, when we knew what we wanted Grandma stepped in and her CNC machine to make me 20 sets which allowed for a way clean grill system. To fasten the PVC to the aluminum we used some wood tapping screws to drill the pilot and tap into the software foam inside.
Those remote controls are totally useless in this application as my controller doesn't even have IR sensors.
I did purchase some RGB wire for like $9 to make the installation look reasonably clean.
We could've simply recycled the pigtail off of these Wi-Fi controllers and had them hanging out of our assembly. But instead, we purchased some female barrel plug connectors that were 5.5mm by 2.1mm. supposedly rated for 5amps. But can't find any spec sheet to prove that. but at least they sit flush against the PVC board
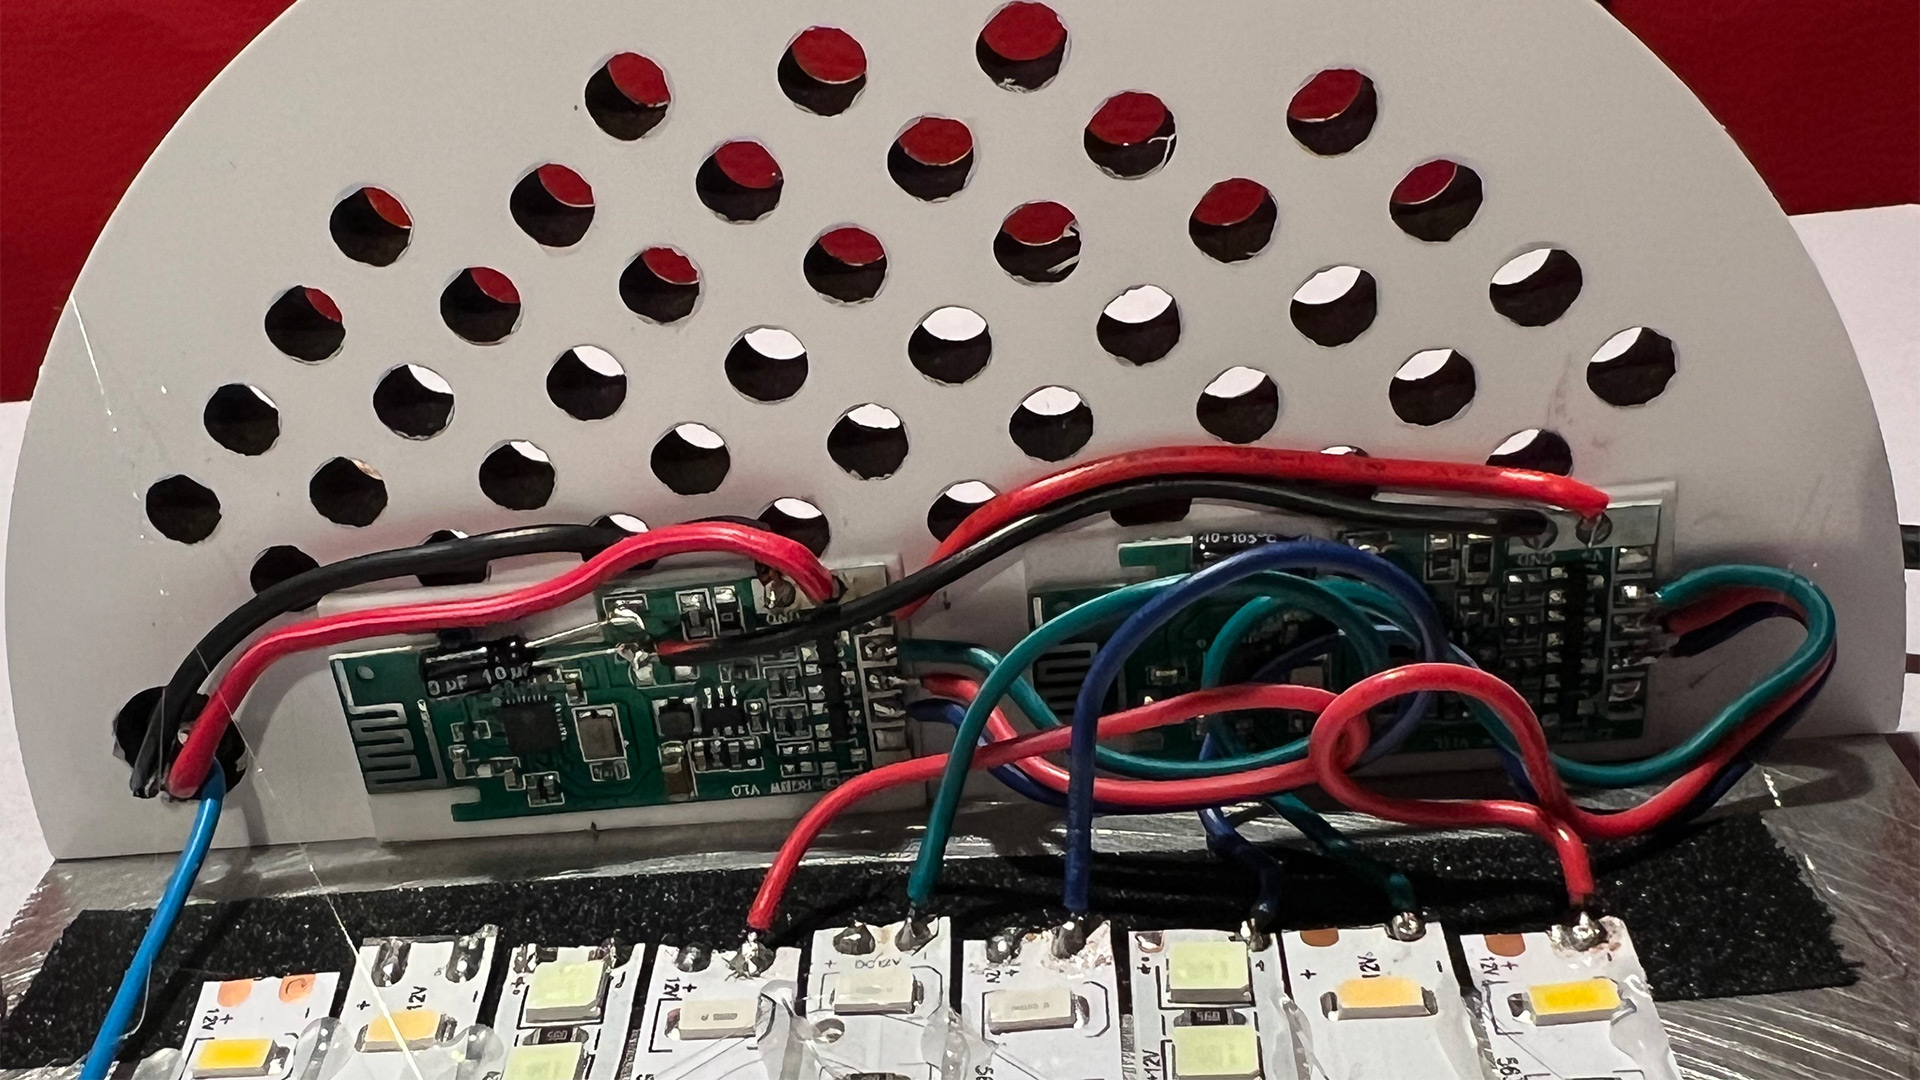
From the barrel plug we simply daisy chain power to the two controllers. there are multiple points to solder and in this case we went from the negative lead of the capacitor over to the ground to the next board. From the controller, we then soldered onto the negative lead to the board. Now, where's the sky-blue cable running off to that is the positive?
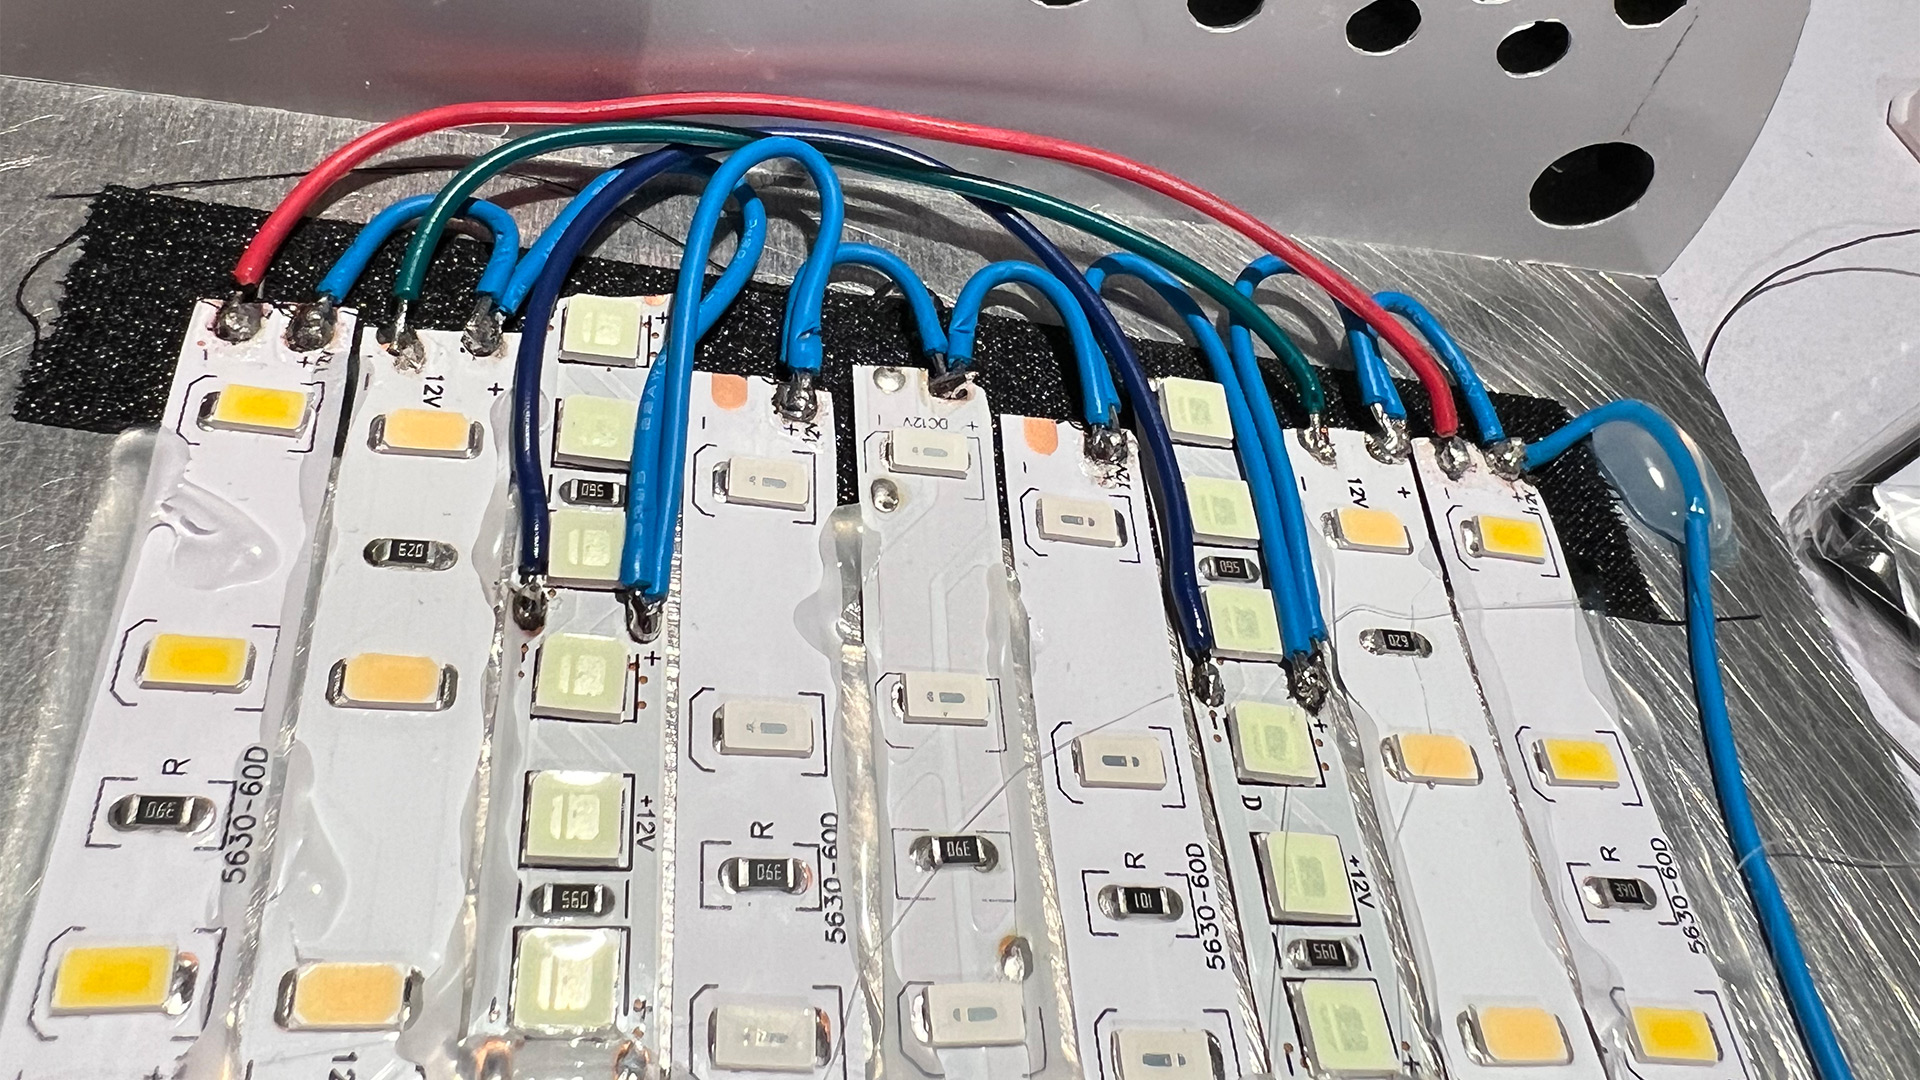
To daisy chain all of the positive power to the strips of course! As a note, you also see the RGB jumpering between the first set of white lights and into the next set. this effectively completes the chain of LEDs that we have on both sides of the RGB while keeping the cables neat and tidy. Note how we soldered onto the ice-blue 5050s. This is because when you cut double-density LED they're kind of a bitch to solder to. It's easier to solder to a complete pad and then hope the partial one can hold the amperage.
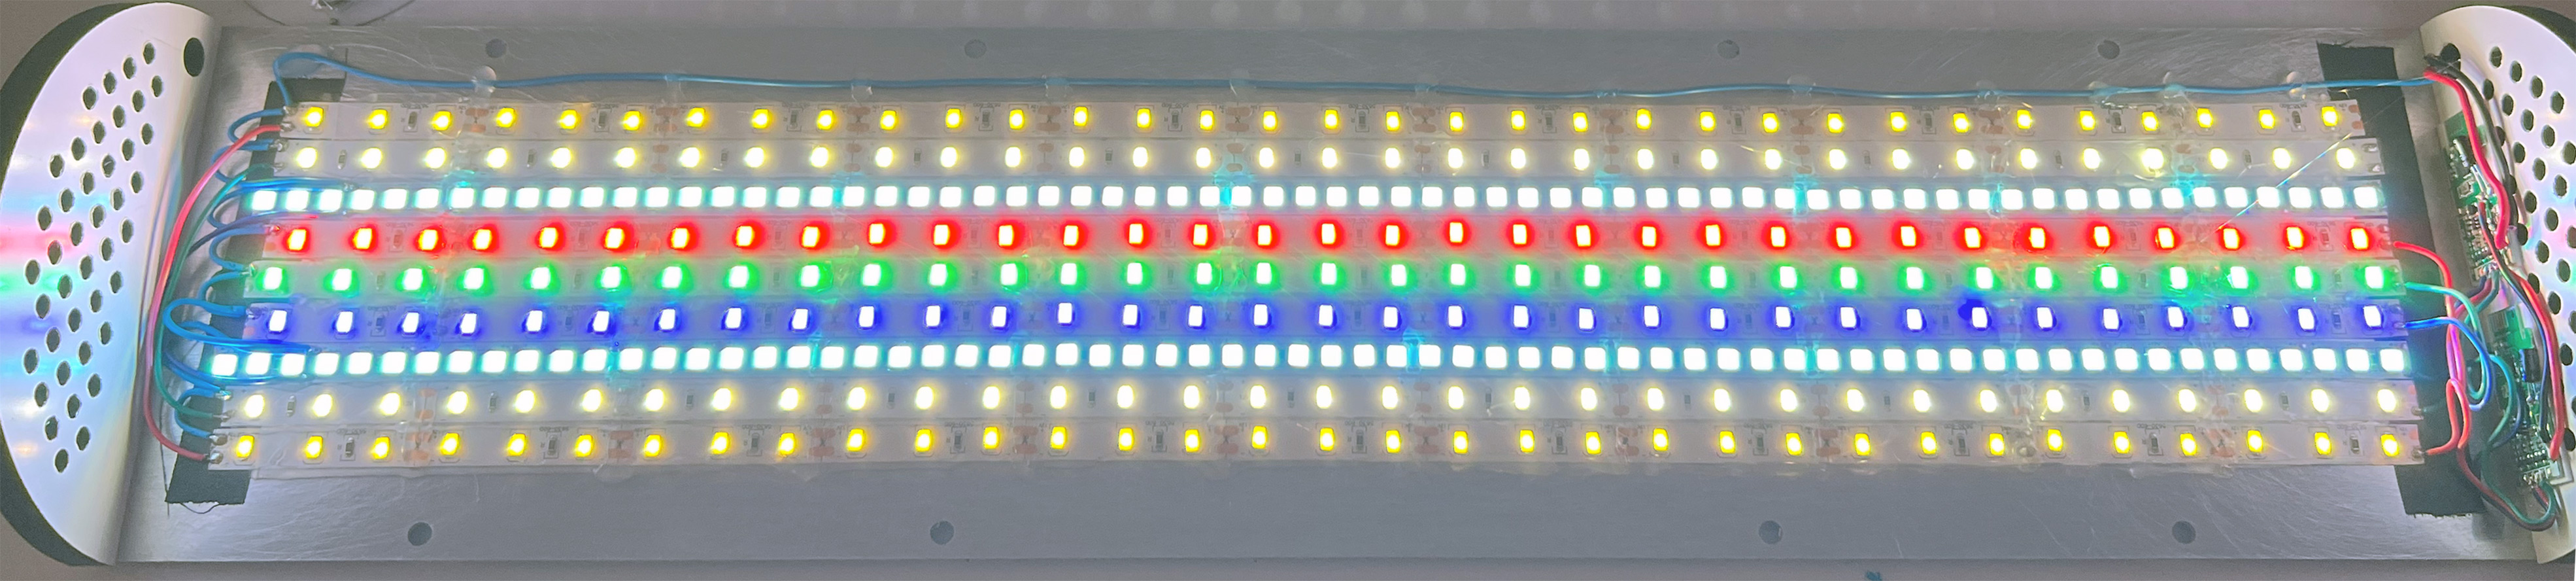
Before powering up we of course brought out our multi-meter and ran a continuity test. Ensuring that positive and negative were not grounded at all due to shitty soldering job or the controllers weren't doing anything fucked up. Depending on your multi-meter (ours is a Fluke V-87) you can almost power some of the LEDs with your terminal connectors to verify that you have the right LEDs in place. Then, we finally plugged it in. The picture above shows the LEDs at only 10 percent power. going past 10 percent really made the CCD of our phone wig out (not flashing, but destroying the background to compensate for how bright it was)
This is a far more visual representation of how the lights are laid out inside my case and just one possibility of what you can do with a DIY project like this. We could have easily added one more strip but for the sake of keeping balance, we opted out of that.
Light diffusion.
Now we get to the answer:
Why didn't you use addressible LEDs S? The wiring job would've been so much cleaner!
Which is when you're making home lighting of this nature. It's a total waste of money for addressable LEDs. As mentioned before, if you manage to get a 5-meter roll for $5 sure! Get yourself a different controller than the Magic Home and go nuts. But we're going to lumen power while trying to maintain the best bang for your buck.
 Getting some kind of diffusion on their LEDs is important because the first time you power on your LEDs you'll probably get spots in your eyes. not necessarily fun to live with nor is it healthy.
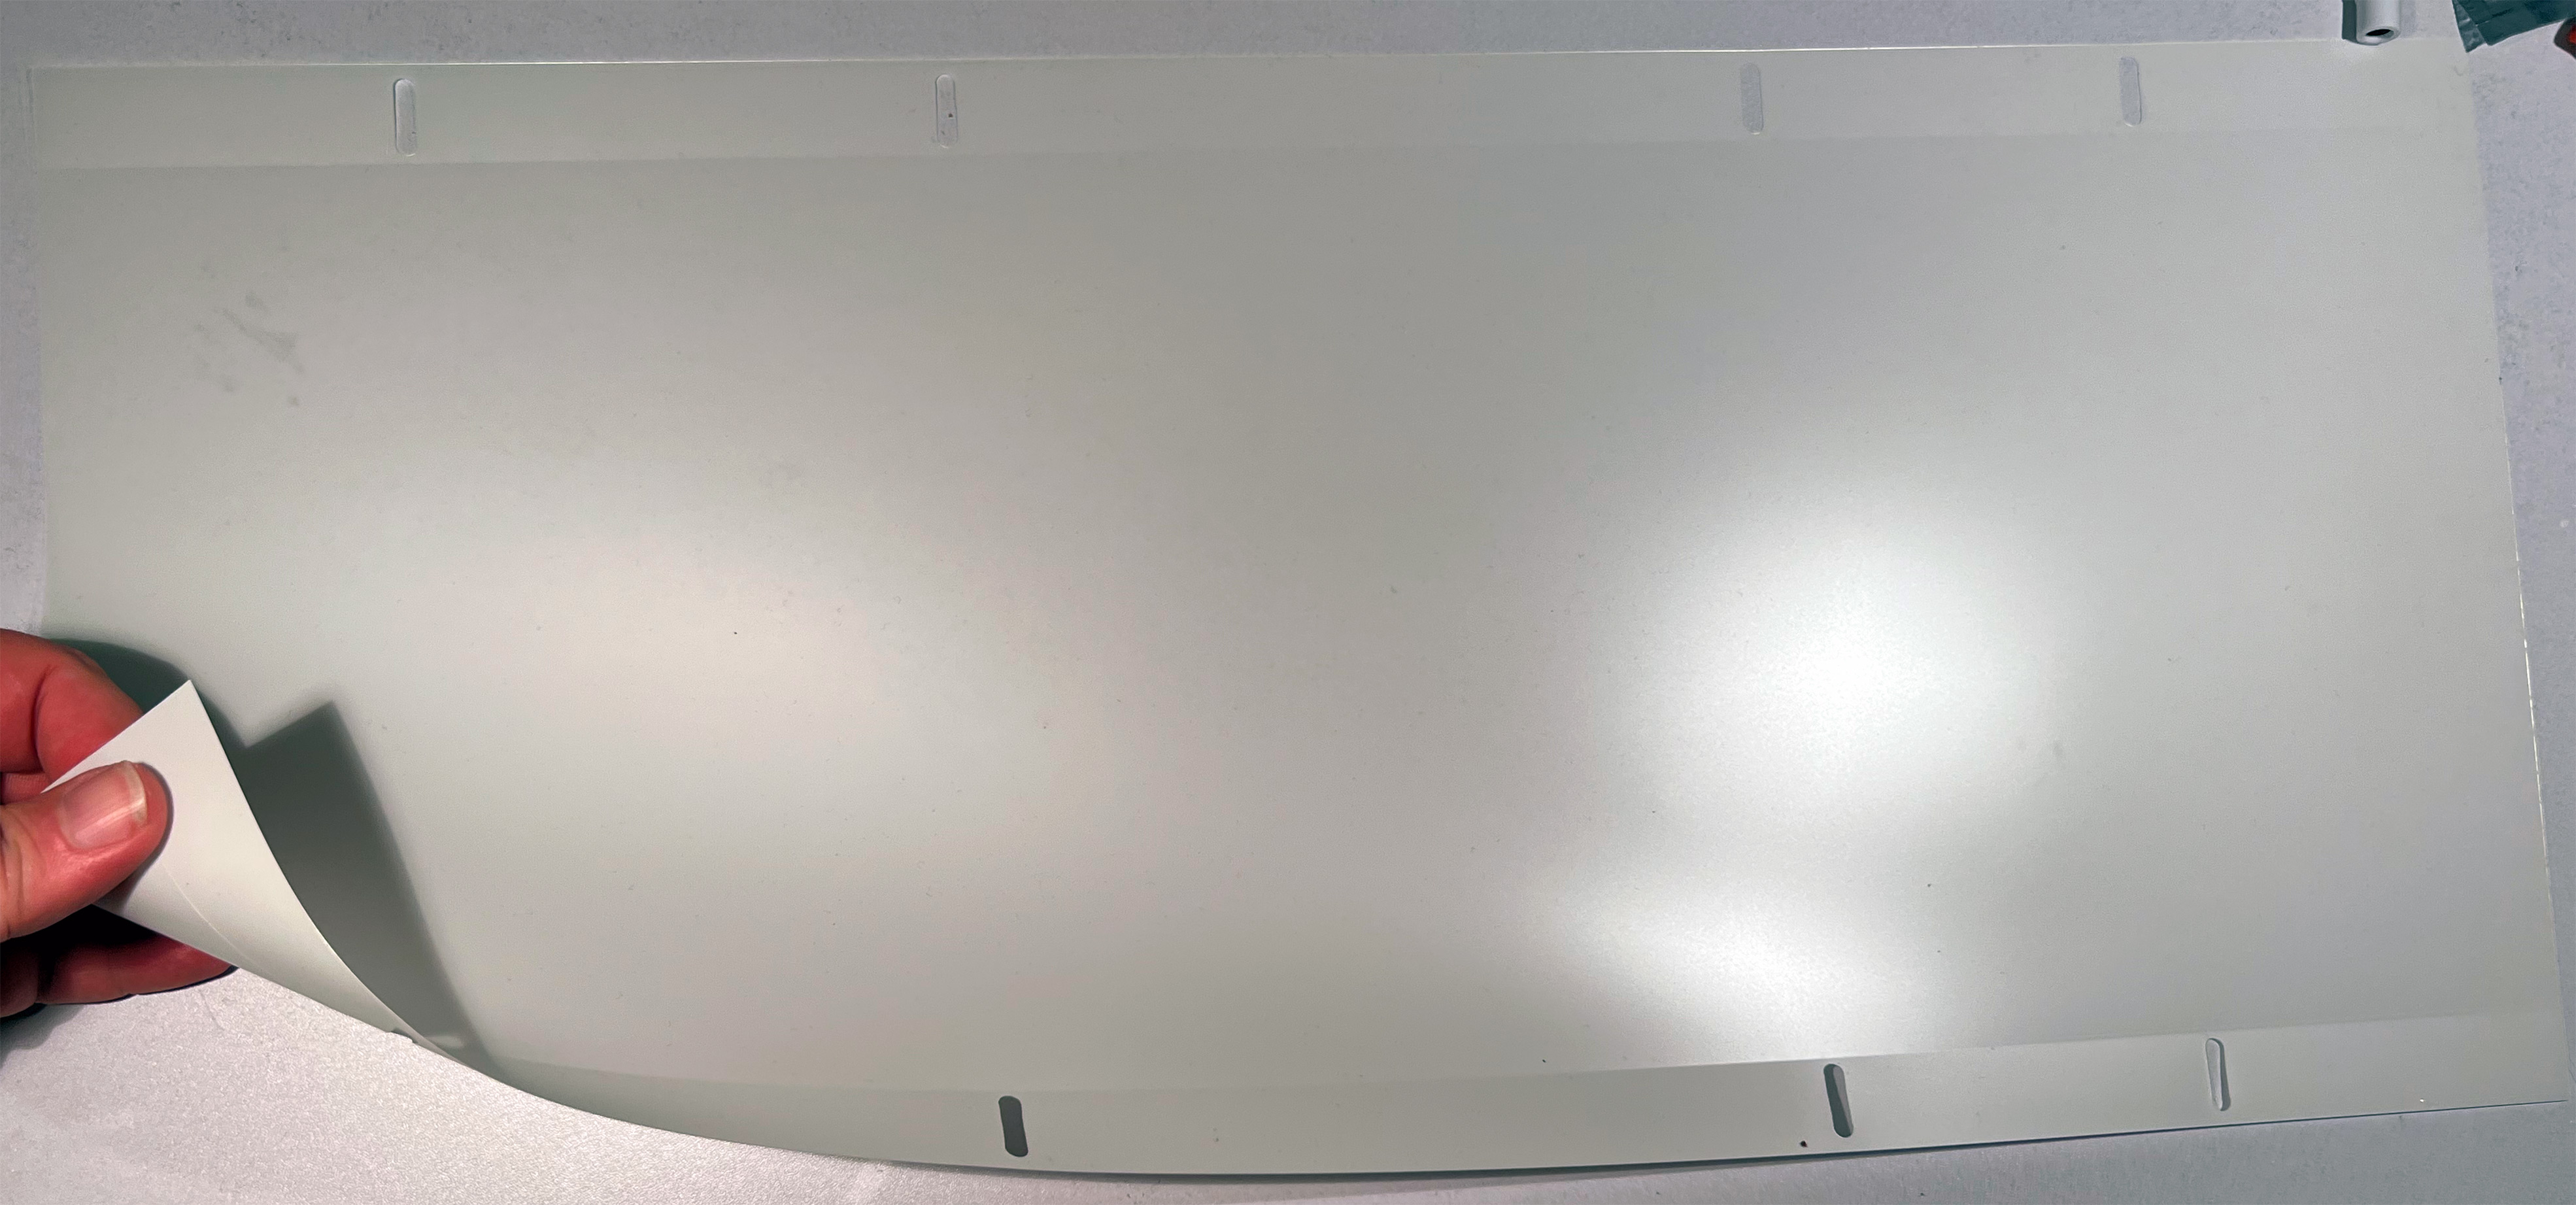
What we purchased was an LG125J diffuser sheet. This is fairly aggressive as the transmittance is only at 71% however the fog of the material is at 95%. There's LGT188S which is denser and thicker. But this is the nature of diffusers. The more you block harsh tones from your light the less light actually gets through.
Again, purchased through Aliexpress because I was getting sheets that were wildly off-spec on eBay.
We just used some 1/4th inch machine bolts on the side of the aluminum however you can also use M6x24mm bolts as well. we designed the diffuser to have oval slits so that it will fit onto the aluminum even with the screws fully in place. Makes it so much easier to get on and off.
Also note, that we took a blade and scored the top of the diffuser material so that it creases nicely around the assembly.
Now, we opted to not go with an Acetate or thin polycarbonate outer sheet as these things will be hung up around the house. If we were using these lights for traveling then we would most certainly re-enforce it. Since LG125J bends easily at only 0.1mm in thickness it's up to you if you wish to re-enforce.
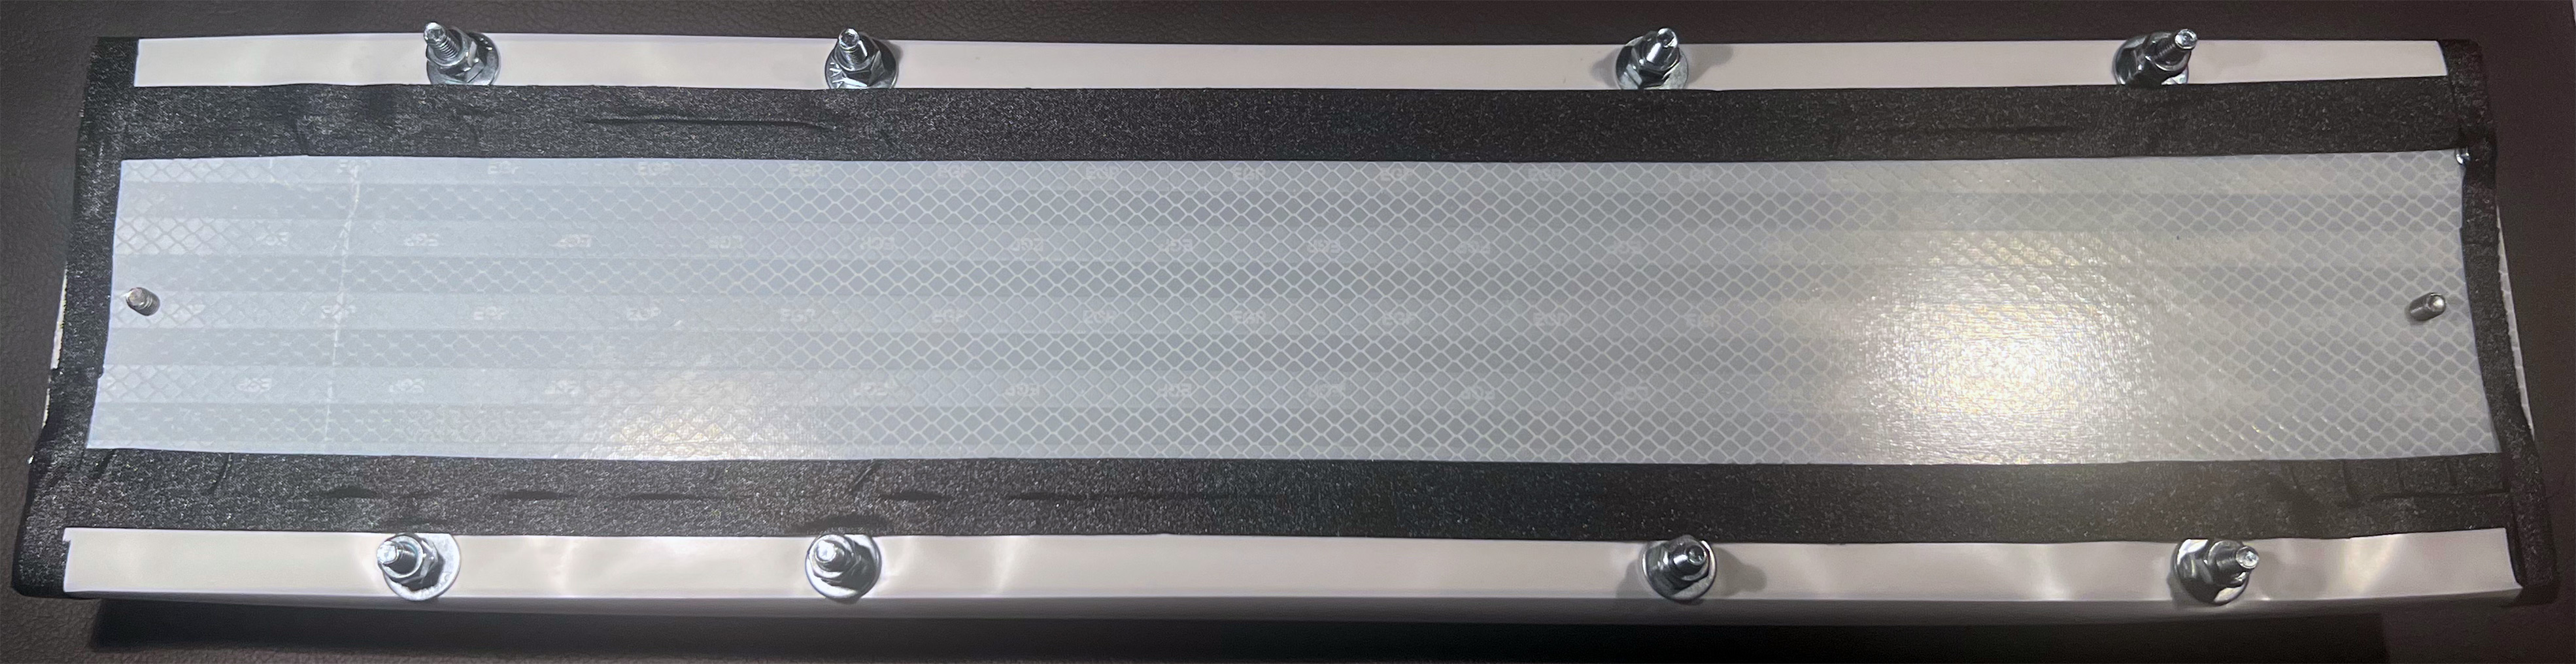
As you can see we're getting a little bit of ripple near the washers. This is because we gave a little too much slack around the outer diameter of the archway. Again, polycarbonate or acetate would straighten this right out. But for now, we're just going to gaffers tape it flat. Also, check out that Department of Transportation-certified sticker on the backing of this aluminum! Not ideal! as the sticker could act as an insulator. But for the price we got it for combined with the fact that kind of sticker is kind of a bitch to remove. we'll take it!
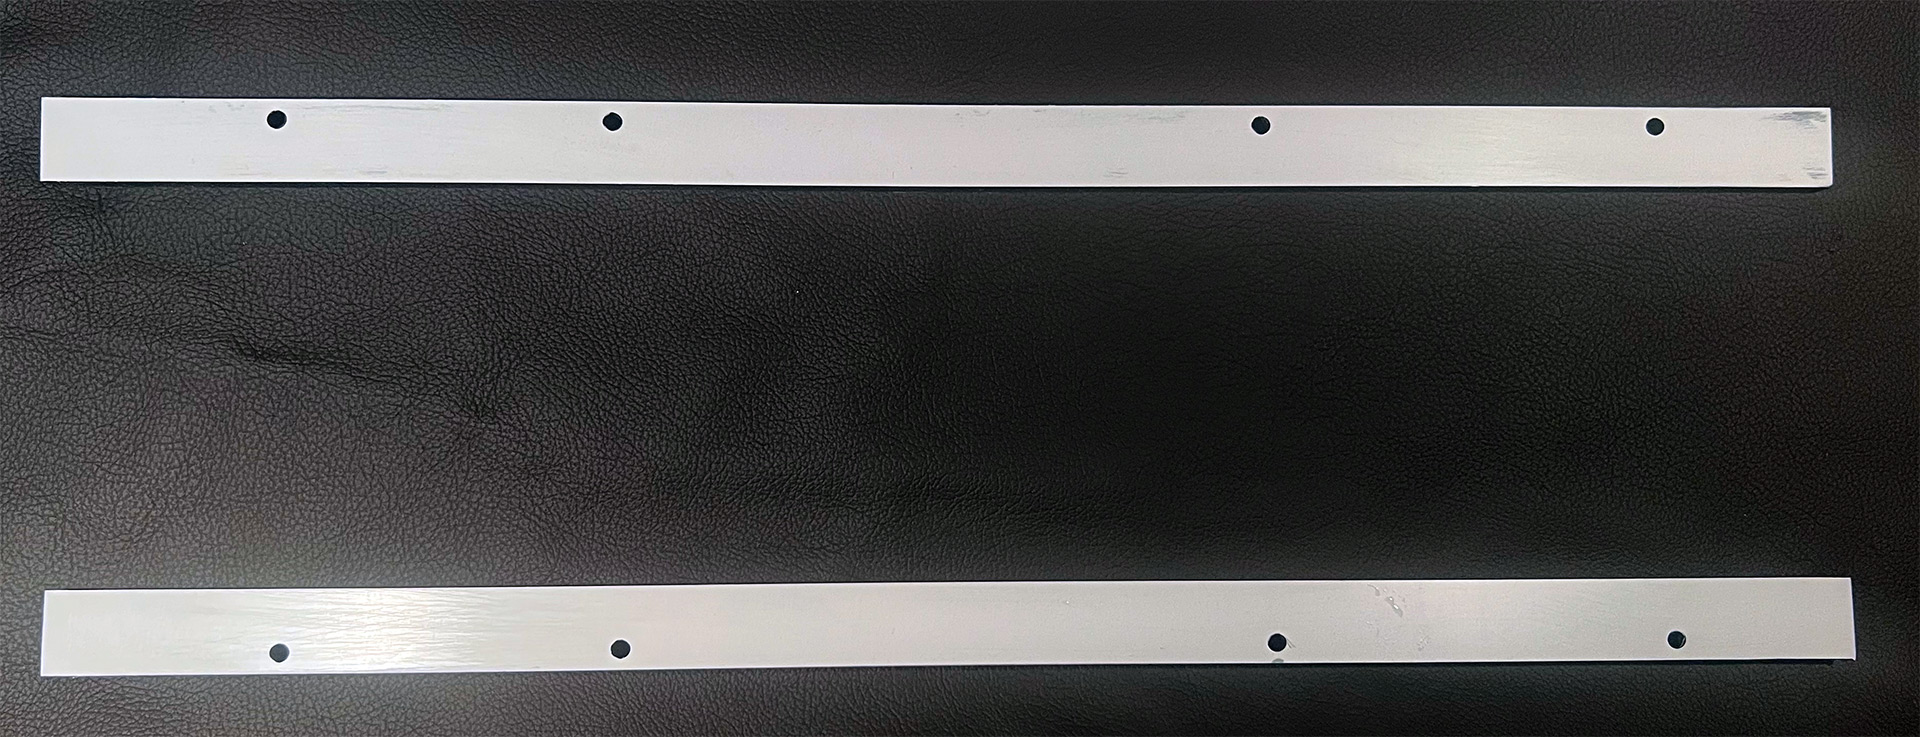
These little strips of PVC board are again made out of 6mm PVC foam board. The manufacturer of the company we went through is Palram in America for those curious. Really love this stuff because it's super lightweight and easy to work with even with a drill and some hand tools.
Unlike DIY-Perks which used their sled as a gasket to press board against the bolts and acetate so it has a clean and even surface when folding. We pushed sleds out by 12mm. The logic of this is we are going to mount these onto a wall and want to make sure the metal has as much breathing room as possible to vent out any possible heat coming off of our LED array. It is from there we can attach double-sided tape so they mount to the walls or even to the ceiling if we countersunk the nuts on the other side of the sled.
Now, since they're going on the wall, we simply made 6mm holes and then pre-drilled one of the bolts through the board so the fit is very snug and will not fall out. However, if we wanted to service we could pull the sled away leaving it secure to the wall while we service, and then just push it back into position.
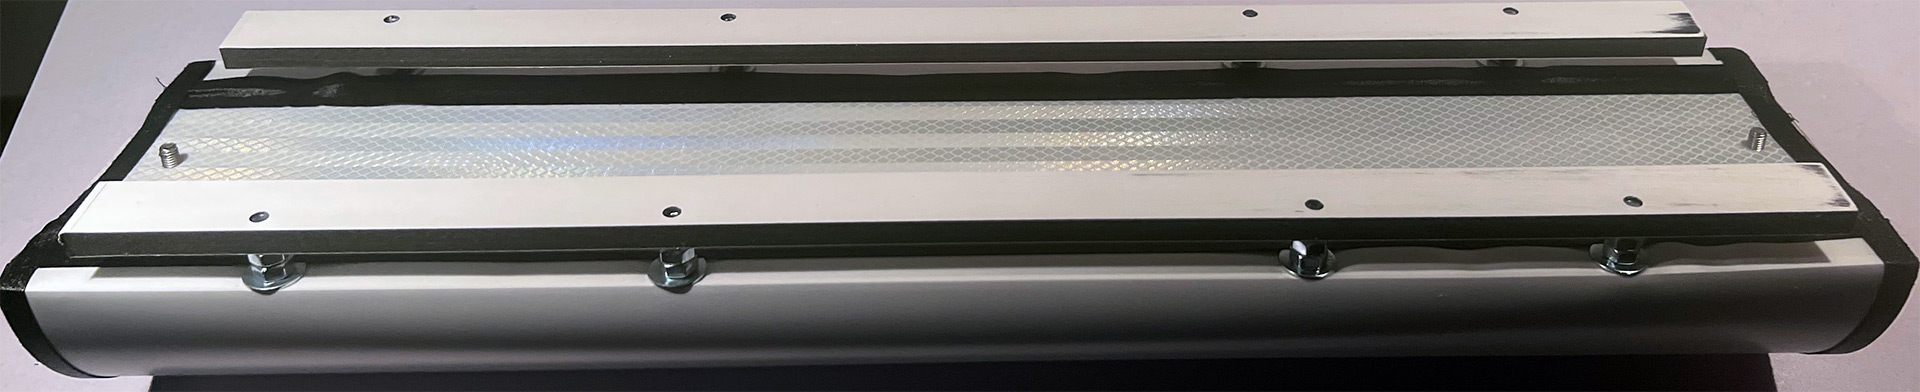
With the sleds in place, it's ready to be mounted on a wall, placed safely on the floor, Whatever the hell we want really.
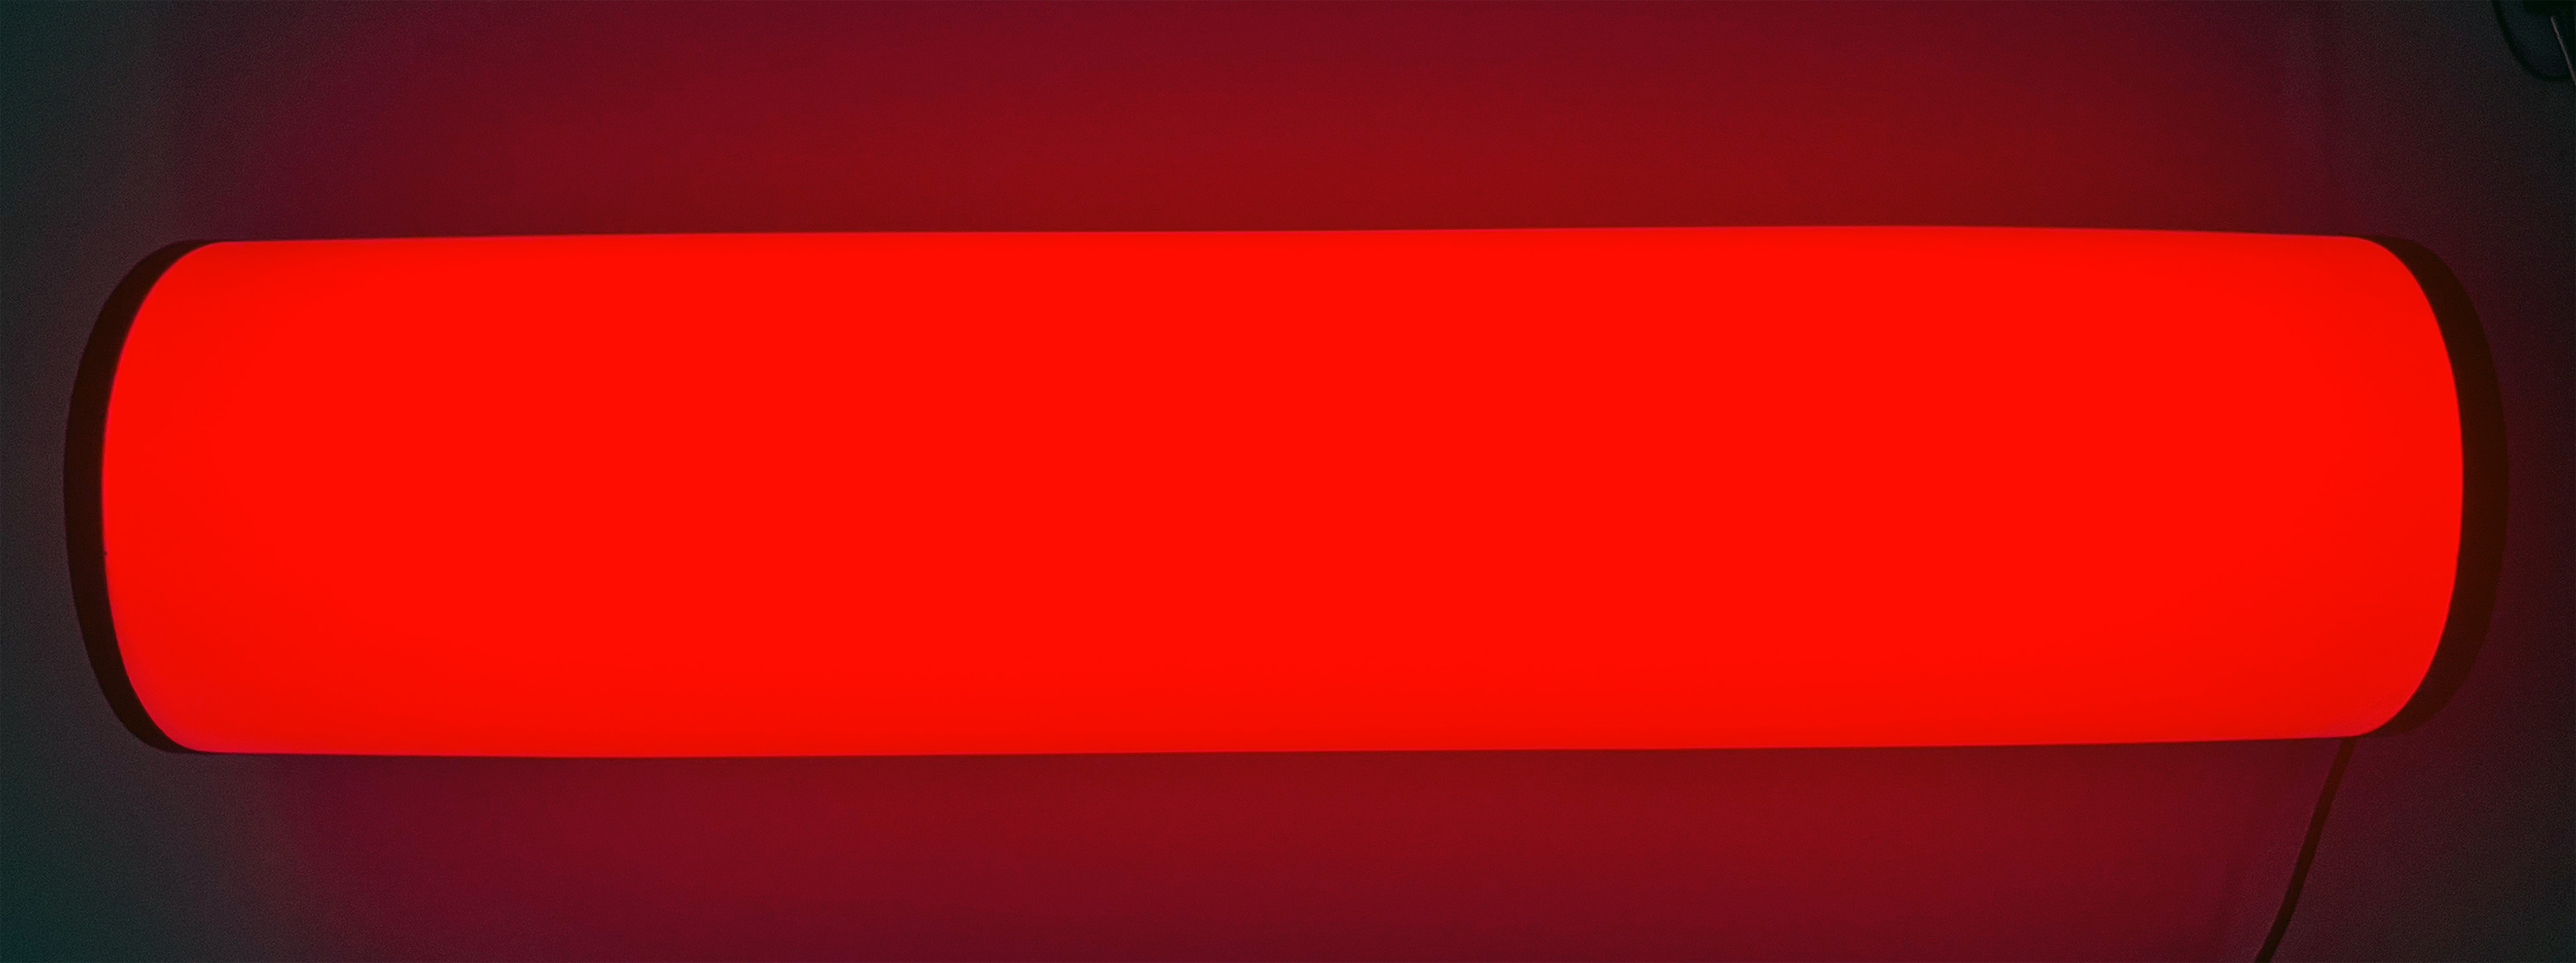
Even though the diffuser takes away a percentage of the light it's certainly hella better than staring at individual LED emitters. The individual RGB LEDs have time to mix color together properly as well and the whites make every room in the house comfortable. We tend to go 50 percent cold white 10 percent warm when working and then 30 percent warm when chilling or watching TV.
Power consumption.
One of the things about building your own DIY lighting is the simple fact that you have to choose your own power supply. Because we went with the Magic Home controller. This type of controller can take anywhere from 5vdc to 24vdc of power. This is great that it has this level of variety to it because potentially it allows you to recycle a used laptop brick that you may have around the house. Or, if you have a used PC power supply lying around and you know how to jump the ATX side to keep it running without blowing it up. you can use ALL of the rails of that PC power supply for home lighting.
However, if you want to be ultra-safe you can of course by waterproof LED power supplies from Amazon, Aliexpress, and eBay.
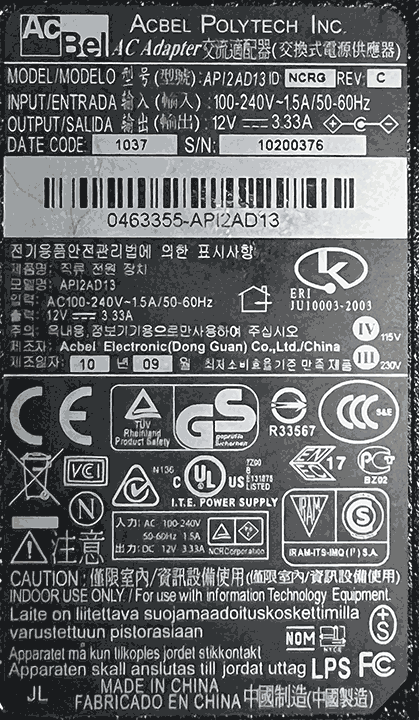
This power supply is an excellent example of things to look out for. This is a 12vdc Acbel power supply that apparently powered an NCR 7878 bag scale. This power supply is switchable which means American/European power is no problem. 12 volts at 3.33amps. Seems like a good candidate. However, pay attention to the very last part after the amperage. Notice how negative is going in the middle while positive is outside. Polarity is reversed on this PSU. If we plugged it in as-is we probably would've blown up our MagicHome LED controller.
Now, this can be easily fixed. either externally with the use of female/male connectors to flip the power leads. Or internally by popping open this power supply and swapping the wires around.
Afterward, always test with a meter to ensure the positive (red) is in the center and the negative (black) is on the outside of the barrel connector.
Now that we've chosen our power supply. Let's verify some things here.
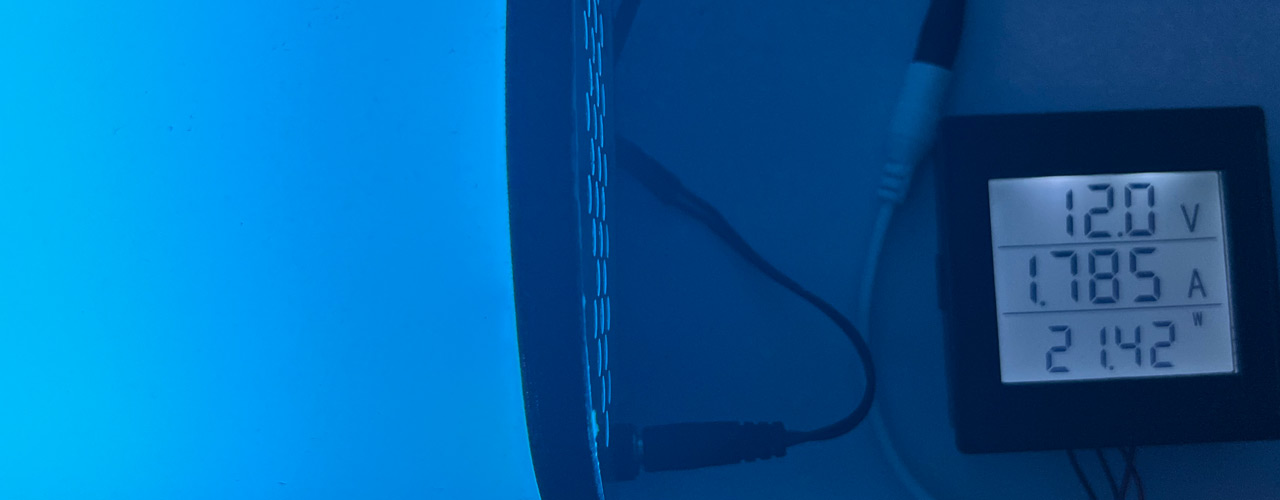
Inline voltage check.
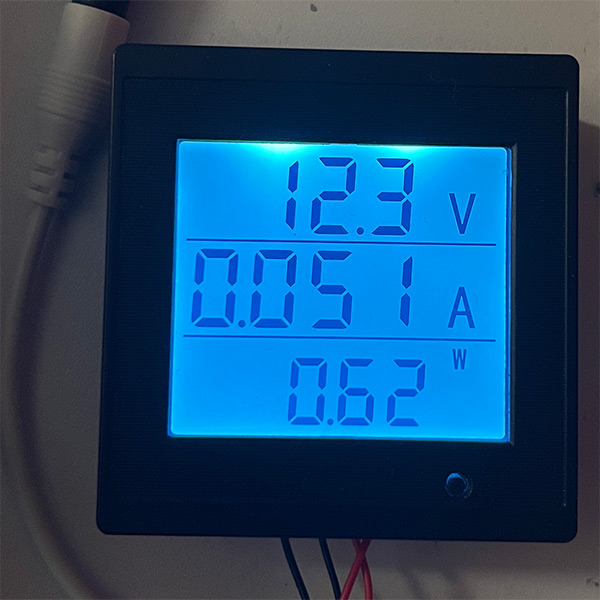
Another thing that we got off of Aliexpress for like $7 is this inline voltage checker. Using some extra barrel connectors we can make a passthrough allowing us to view the power that is coming from our power supply and into our lighting system to get the wattage and amperage going through it. Currently with just plugging in our lights both of the MagicHome LED controllers have a baseline power draw of half a watt at 0.051 amps. This would be considered the "vampire effect" of leaving these lights plugged in 24/7.
Also keep in mind when you look at the spec-sheet of LEDs they mention amperage draw based off of the voltage each LED can accept. Thus, when you see 150ma @ 2.8vdc to 3.4vdc. Actual amperage draw will differ due to the in-line DC-DC converter the LED controller has built into it.
In this example. We're using a 12vdc power supply. If you use a lower voltage power supply. Amperage would be higher. Larger voltage supply the amperage would be lower.
Now, we're going to power up each light individually to see the draw.
The RED 5630 LED with 33 elements.
At 100 percent. It appears to be the most punchy when it comes to power consumption.
The Green 5630 LED with 33 elements.
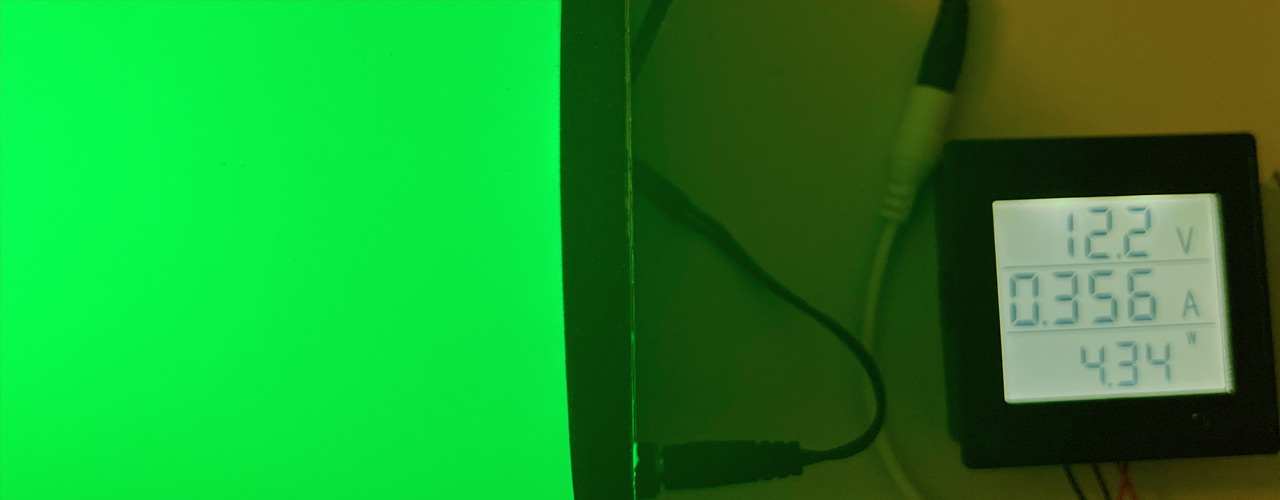
Around 60 percent less power consumption then the reds.
The Blue 5630 LED with 33 elements.
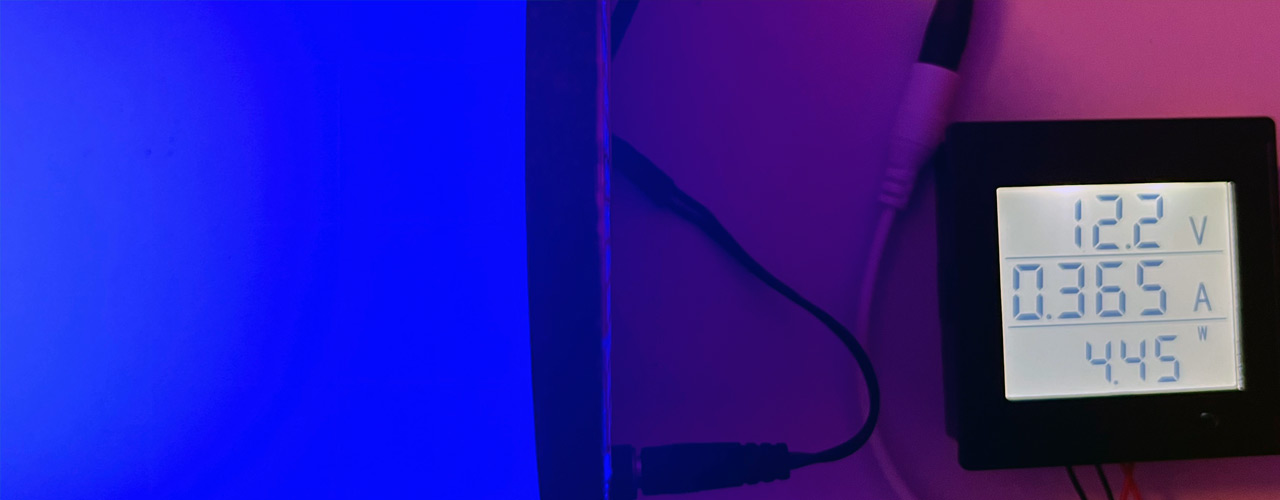
Same power consumption. And the camera is freaking out a little filming this hence the purple on the desk.
The warm white 5630 LED with 66 elements.
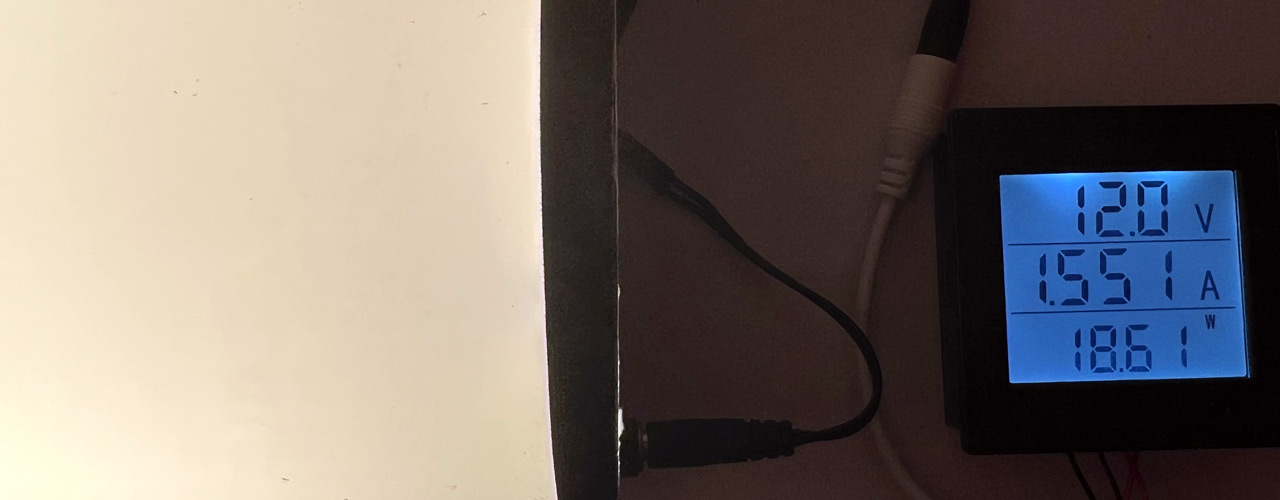
Even if you half the results to 33 lights like the other samples. The amperage draw is considerably higher on these versus even red lighting.
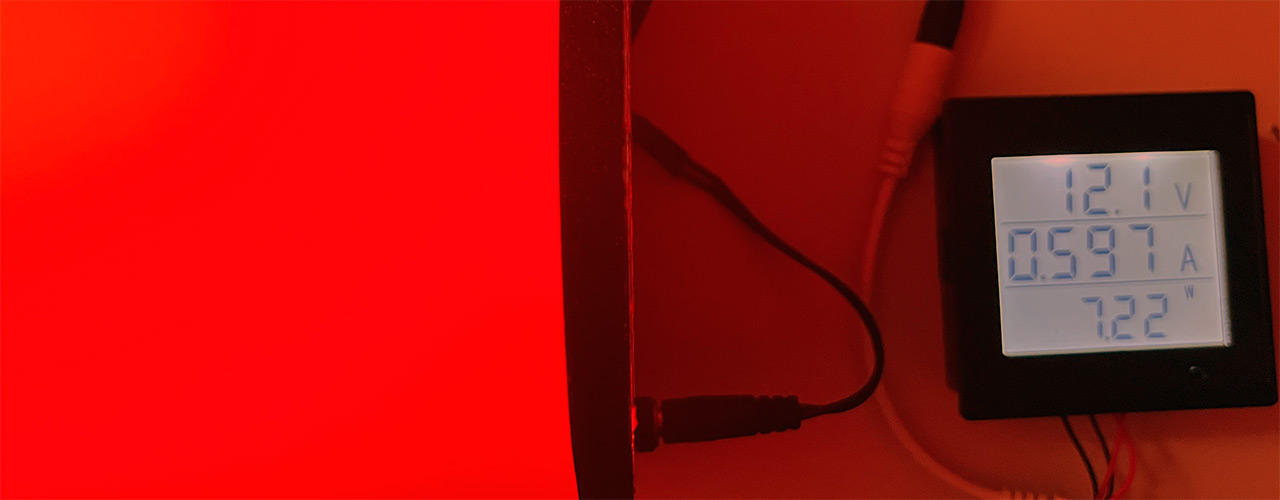
The cold white 5630 LED with 66 elements.
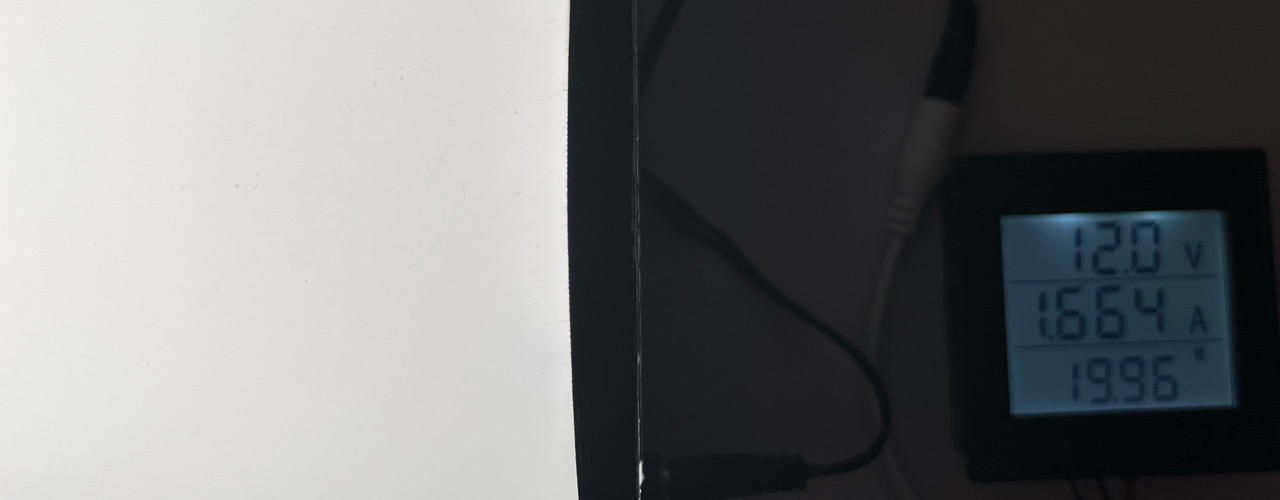
The cold white (66 elements) was so bright that it made my camera lose focus on the gauge a little. ALthough on both of them you can certainly see the voltage drop to exactly 12 volts. This is the load our power supply is expecting. About 1.5 amps.
The ice blue 5050 LED with 132 elements.
Ice Blue white lighting (132 elements of 5050 series) pulled the most amperage at full power. Understandably as the elements are double-packed and they're using the 5050 standard versus the other strips we have installed.
Grant total of all lights turned on at 100 percent.

Pulling almost 4 amps of power and causing the PSU to voltage drop doing so. This is why you always check your power consumption. Now, kudos to Acbel for keeping working at 4 amps of power despite it being only rated for 3.33amps. Usually, when you overload a PSU it will either trigger a ground fault circuit or shut itself down temporarily (light pulsing failure). Or, if we kept this on for more than a minute or two of testing it would most definitely heat up the power supply brick to dangerous levels As for WHY such a voltage drop.
This could be the wires interconnecting to the meter of being such a small gauge that could be causing this to occur. Either way. This more than justifies our cost of purchasing a 300w LED power supply. which has 3x 100watt rails each totaling around 8 amps of sustained power. even if the power supply is at 50 percent load. it's warm at best. Not burning hot.
Now, what are the odds of us cranking these lights to 100 percent? It's rather rare, to be honest! These things are stupidly bright at those levels. the only time you might get close to these power settings is if we were to film something. At which point we would probably build something like a 600-watt supply to drive that hard.
Issues and troubleshooting.
Something that we had to figure out ourselves was some of the issues we had when building a good LED light system. There was one common thing that plagued a lot of DIY people when building an LED array system.
Video banding.
Video banding is a defect that occurs mostly with cameras, however, if the LED array is cheap and shitty enough can also give headaches and eye strain. This is because the PWM (Pulse-Width-Modulation) circuit inside of your LED controller turns on and off the LED at a nanosecond level. The best way to capture this defect in action is to go to a local hardware store that shows these LED panels on a display and take a picture. You'll be sure to find a handful of them throw this defect at you.
Now, in the picture above we really don't know which one (or group) of LED lighting is causing this defect. And you can't go into the display turning them on and off as that would just upset the store employees. So ultimately we would walk away and not buy a single one of these for the home. And yes, we know that since there are multiple PWMs running at different frequencies from different manufacturers it could also cause horrible banding like you see above. But when it happens to one light, or more particularly, your DIY light. That's a problem.
A lot of Youtubers end up taking a defeatist attitude about this problem, and rather than attempting to tackle the problem they would suggest you live with it and do the following instead:
-
- Change the shutter speed of your camera to something that does not interfere with your LEDs.
- Go into After Effects and remove the video banding in post-production.
- Crank your lighting to 100. Fuck the PWM and then adjust the ISO of your camera.
- Buy better lights you fucking pleb! Here are some camera and studio-grade lights you can't possibly afford!!!
Wow! That last one was a bit harsh! But luckily we're not Youtubers. on top of that, we're building our own lights.
But the fact is. After building these lights I was having a lot of problems with the 5630 LEDs strobing but not the 5050s. Which is odd as both are drawing from the same power source. And although you could get this issue if your DC power run is super long (like in the 50-100 foot range) it should happen to ALL lights, not just some.
What our problem was is the following:
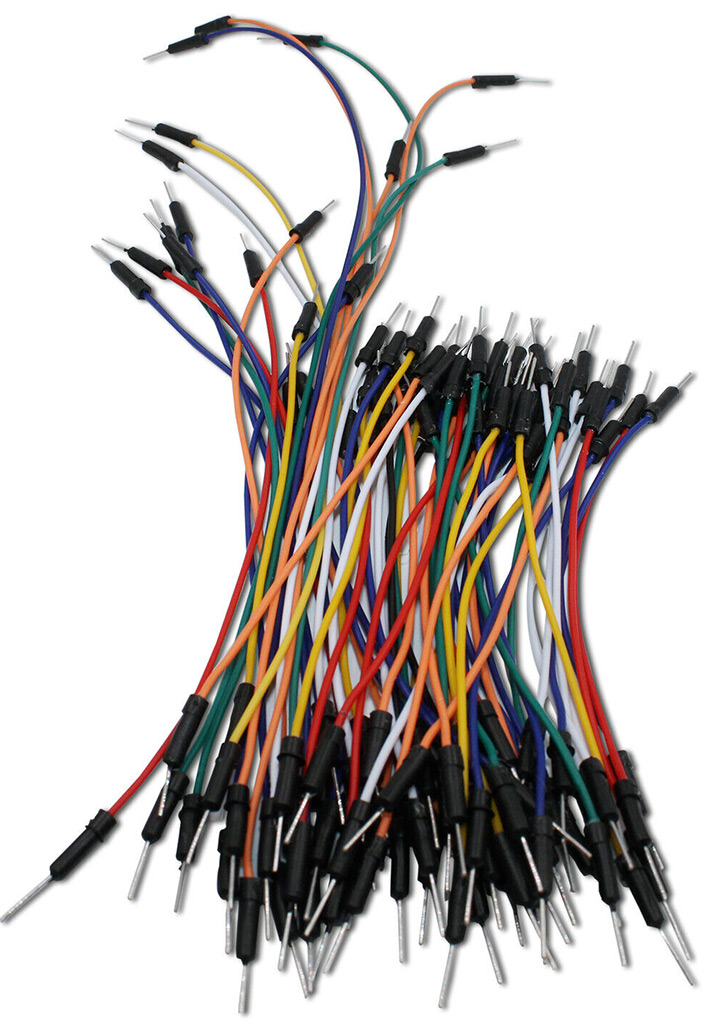 The gauge of the wire is too thin!
We used Arduino patch wire because the end connectors fit into the plugs of the RGB-led controllers perfectly if you snip off the excess. The problem is these types of wires were designed to carry low voltage and low amperage. these LED grids when you wired them together even though the voltage was low it became higher amperage. So when the PWM opened and closed its circuit, that slight resistance on the wires was enough to cause them to strobe horribly on camera. This ultimately solved the strobing issue but we tried a bunch of other things before this.
This is why you see in my current generation of LED lighting that the wires are not only soldered on but are a little thicker as well. This is all it took to fuck with the dimmer circuit.
Which of course makes me question the LED arrays at that hardware store. Are they suffering from the same problem where the wiring is too fucking cheap? Or is the problem worse?
Power supply fun.
When we first started making these LED bars we grabbed whatever power supply in our recycle bin. Old Compaq laptop power supply at 19.5v DC? Fine by me! Why? Because the LED controllers state they can accept anywhere from 5 to 24 volts DC. Perfect. What we found out with one power supply we pulled from the recycle bin is that you could audibly hear it 'squeal' when the lights were dimming on and off. That's -really- not a good sign. This could be because the filter capacitor in your power supply is dried up causing that AC-DC transformer inside to sound off. If we kept using that power supply it could damage the LEDs from the noise, or just melt down the power supply.
The power supply that squealed like a pig -really- set off the PWM as it was introducing noise on the positive line. So this could be another problem point when making your own DIY lighting.
Also, some of the power supplies were getting abnormally hot. This could be because of the amperage we were pulling from each of the light bars at 100 percent.
Finally, every time you plugin an AC-DC power supply efficiency is lost during the conversion. Since the living space is rather small, no risk of running DC cables too long. Thus wanted to control everything from one power supply.
We thought of just hooking up a PC power supply and calling it a day. It would have the conditioning circuits to keep LEDs going. But really didn't feel like having more fan noise.
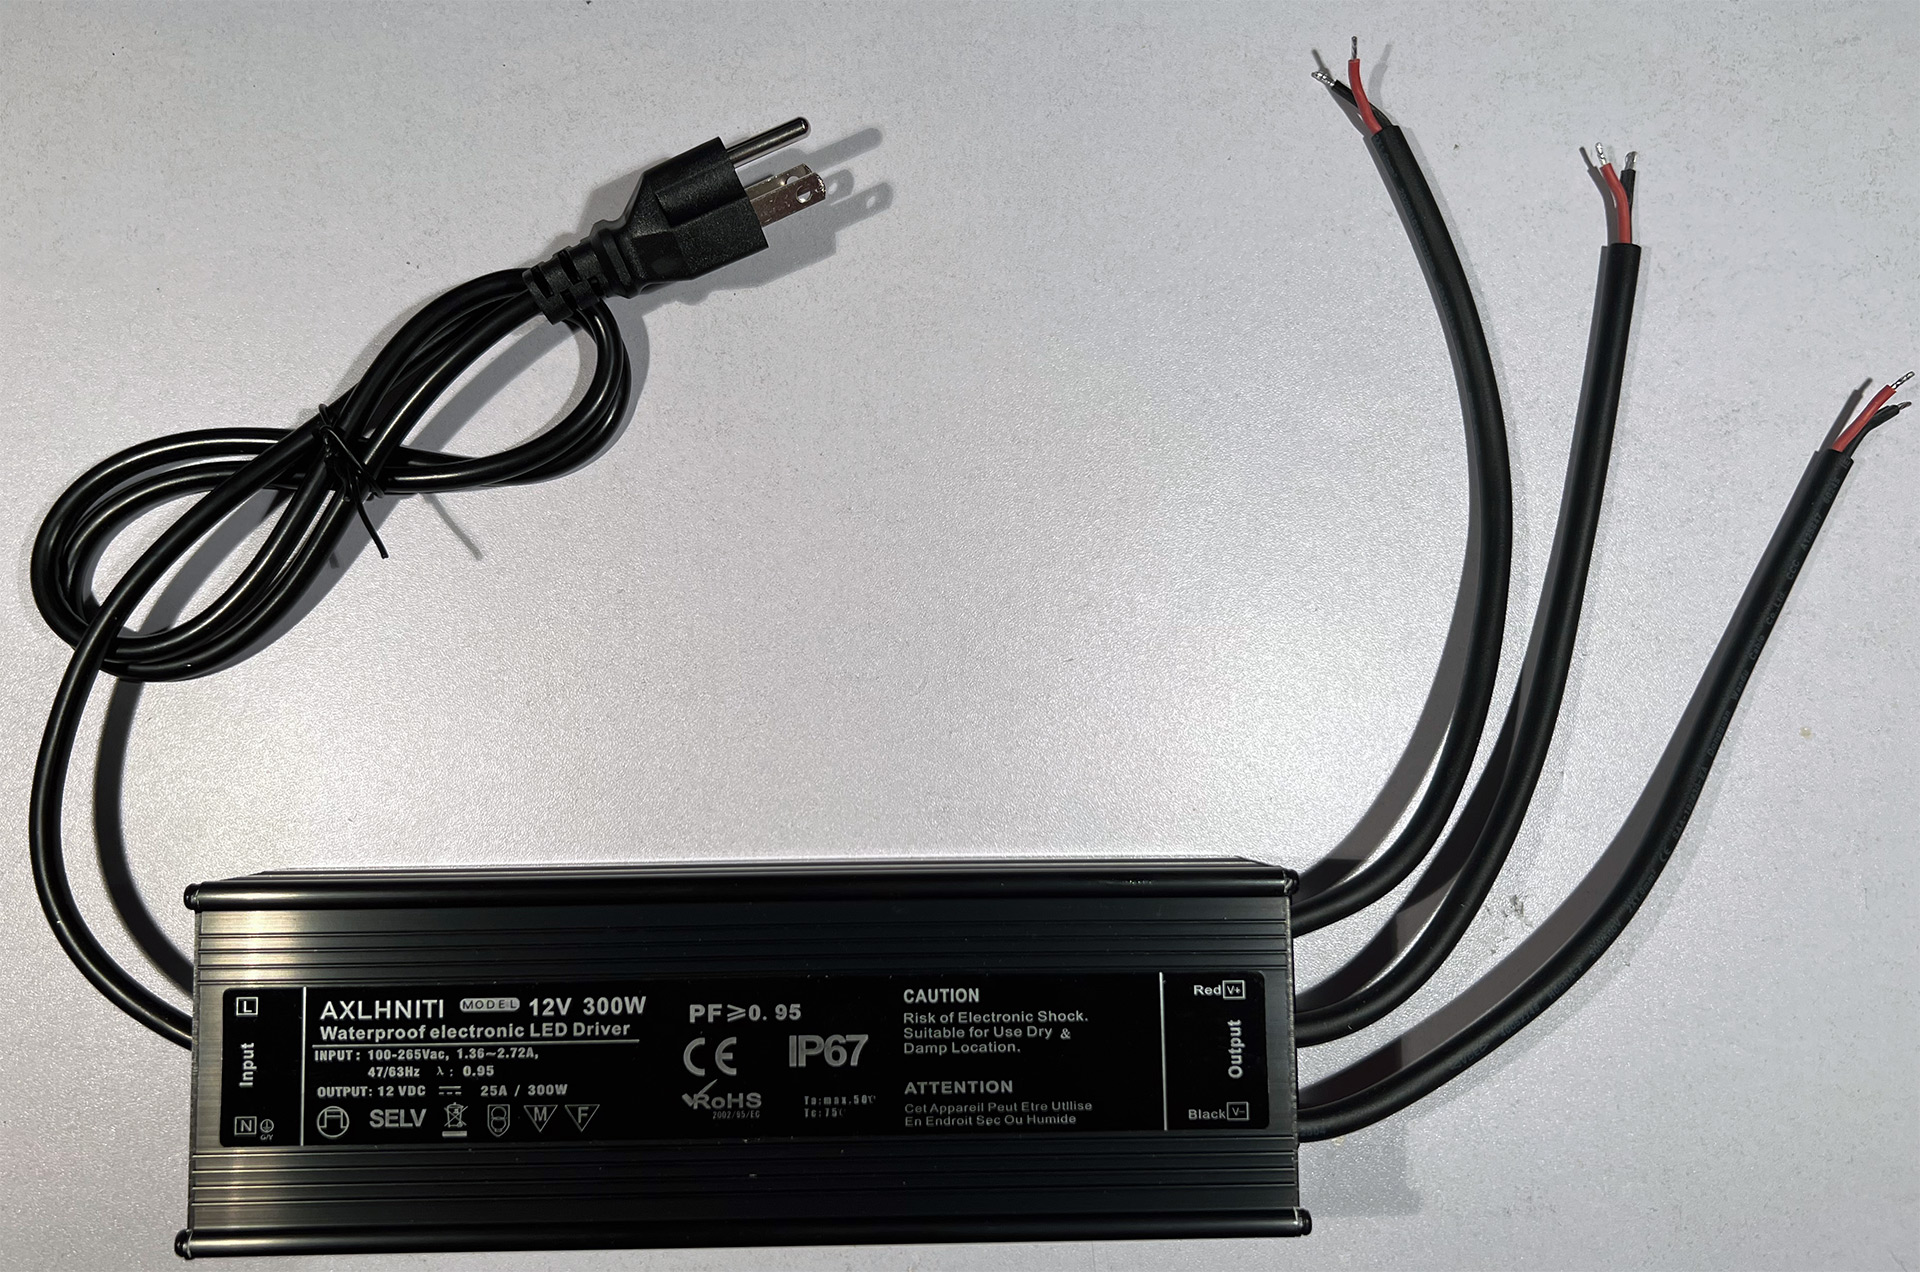
So to bite the bullet; We got this LED power supply from Aliexpress for like $45. Really like this one because each of the cables coming out is its own individual rail of 100watts. which should cover the amperage we're pulling from each. As well as having three light sources to cover the room very nicely in light.
Arguably this is something you cannot easily do with some pre-fabricated hardware store lights. As the power supplies in those were made by the lowest bidder they could also be why there was so much strobe when taking the picture.
Commercial alternatives.
But S, I won't wanna build lights! I just want to buy good lights!
Okay, we get it. Some of you may not have days on end to build lighting from scratch. Some of you may prefer to just buy lights because your in the middle of a home rennovation project and just want some nice on the eyes lights that are adjustable.
 superbrightleds.com
If you are in the states and you're in the middle of a film project that needs zero strobe from your led arrays. These guys have come in handy. They're out of St. Louis so shipping is rather consistent reguardless of where you are. We had to use these kinds of lights to train a bunch of Cannon 5Ds cameras on products for a robot to capture and understand. As the lights can dim to prevent hot-spotting it was rather awesome.
For those wondering. S-Config makes absolutely nothing recommending this company. SuperBrightLeds.com has not reached out to me in any way endorsing their product. I just want to point people to a better place then a Lowes, or a Home Depot where they give zero fucks about the quality of lighting they sell.
Currently, they don't do 'quite' like what we did in this tutorial with having RGB AND Warm White/Cold White/Ice Blue. But the 2x4 foot panel lights that adjust from cold to warm white are great for people with false ceilings.
Some of their prices may be a little high. But unlike alibaba at least there's a physical place to return to if something goes wrong. So, there you go.
Final thoughts.
Like a lot of our articles, we'll revise it occasionally as we'll need to rebuild some of our 1st generation lighting systems. With that said, our first-generation lights have been going for 9 months now. The only fire we had was due to our own stupid mistake where we didn't clean enough flux off of one of the LED connections and thus the controller FETS smoked and exploded. However, nothing else was set on fire and that was during our burn-in test on the bench. Also, most power supplies have a protection circuit to prevent ground-out. So out of all of the lighting systems to DIY LEDs are by far the safest to work with. Use common sense. Don't wrap your circuit in highly combustible materials and you should be okay.
We love the light coming off of these and perhaps when we can actually buy a house ourselves. We would probably install a solar panel and battery wall system to wire the DC lights directly to the battery to try to reduce our energy bill even if it is a little bit.
Like with many of our blogs we'll keep a record of how long each of them last and what had to be done "if any" for a damage report.
Until then, that's what server said.
END OF LINE+++
Now Make Video Tut, and i'll come back to build stuffs on your behalf. you can inform me via email when you got one.. botsrequired@proton.me
To be honest, DIY perks did a rather good job explaining the basics. It's why I linked to their video instead. The only thing I would film video wise that would be different from his would be mounting the lights and soldering it together. That's about it!
This is awesome. I have been tinkering with LEDs but haven’t figured it out, yet. I was hoping to repurpose lights from old laptops. Thank you for writing this ~
If your laptops are more modern that use LED grids that's perfect. You can also recycle the diffuser sheets inside of the LCD laptops as well to have a calming light instead of dealing with the harshness of the LEDs.
If your laptops are older then you're working with flourescent lighting which generally requires a high voltage AC conversion to work with. Not impossible but would take more wiring to accomplish.
Contact me please it's my information 🙏🏻
I wanna talk with you
Phone number:- +91 ***********
Email:- d*****@gmail.com & b**********s@gmail.com
Name:- Nakul d******s
start:- P*****b
Dude, I may not want to talk to you. Ever think of that?
Use the contact form if you want to get ahold of me direct. blasting your number or e-mail any further and will be automatically marked as spam.
– S
that turned out realy nice . great write up too
Thank you very much! Be safe out there!
- S