
Welcome to the 3-d model tutorial guide for Stepmania Characters!
This is a guide for transferring a model from a 3d program and make it into a completely usable character inside of StepMania. Included are all example files.
This guide is to help with the transition of characters that are pre-made either 3rd party apps such as Lightwave or 3d-Studio MAX. This is NOT a complete how-to-model guide and assumes that you have already had modeling experience along with a pre-made model in either professional package with correct UV-Mapping and now wish to export said character into Stepmania. All information documented in this is effective as of Stepmania 3.9 RC3 and can change at any given version time. In the event of change. I'll try to update as best as possible.
Update: 1/12/13
As of Stepmania 5.0alpha, you are still able to make characters for it. However! using the default skin there is no way to export or import characters into Stepmania as the SMPackage.exe is missing out of the 5.0a build. downloading version 3.9 will allow you to get SMPackage.exe which allows you to pack up your models.SMZIP for download.
Prerequisites
- Milkshape 3-d - download a demo of it here - The cost for this program is rather cheap!
- The game itself: http://www.stepmania.com - download 3.9 or 5.0 does not matter (Note: 3.9 does use a character selection menu whereas 5.0 default theme lacks character selection and thus will choose characters at random when you are playing)
- Character bones: Hosted locally, CLICK HERE TO DOWNLOAD - This is REQUIRED in order for ANY character in Stepmania to function and all animation files must go into the /Characters/ folder of your Stepmania program directory. Note: This file is a backup of the archive from stepmaniathings.com however the site is non-responsive.
- A 3-d model that you are going to use to make into a dance-able character! It doesn't matter what format it is made in because Milkshape is very adaptable in terms of 3-d files. You can even make the model in pure Milkshape if you so choose. If you want data files for this tutorial feel free to check out the downloads section.
- If you want to follow along with this tutorial, I have placed all of the lightwave, 3dsmax, and text files all in one easy-to-download file that you can click on here.
The StepMania file format.
The Stepmania file model format is a malformed version of the "MilkShape ASCII" exported file system. The mesh data is saved into the file 'models.txt' file which contains all of the mesh data and is assigned to the ./characters/<foo>/ folder. While the bones are saved in the root of the characters folder as _DDRPC_Animations_XXX.txt.
Why the ugly skeleton hack?
The animation files were a temporary hack made by the "DDRMX" crew to bring the authentic feel of a DDR arcade by hacking the DDR: PC edition of the game for its models and skeletal files. When they did this they inadvertently created their own proprietary file where, unlike Milkshake 3d where the bones access is parented to a child's bones, all of the bones in the hierarchy as root bones and operate on global access. We shall discuss the specifics of this process.
Import your 3-d mesh model.
The first thing we're going to do is import your model. Before you import your model. make sure that the conversion process of your model runs smoothly by doing as much editing work as possible in the 3-d rendering program of choice, make sure to triple your polygons to ensure that they are all three-sided. and to remove all bones from the model as none of the bone structure nor animations will be used Imported via Milkshape.
If you want to follow along with this tutorial and don't have your own 3-d model ready to import to Stepmania. It's okay! the raw files are available to download right here:
 To download either model. Click here to receive the zip containing everything I used in this tutorial.
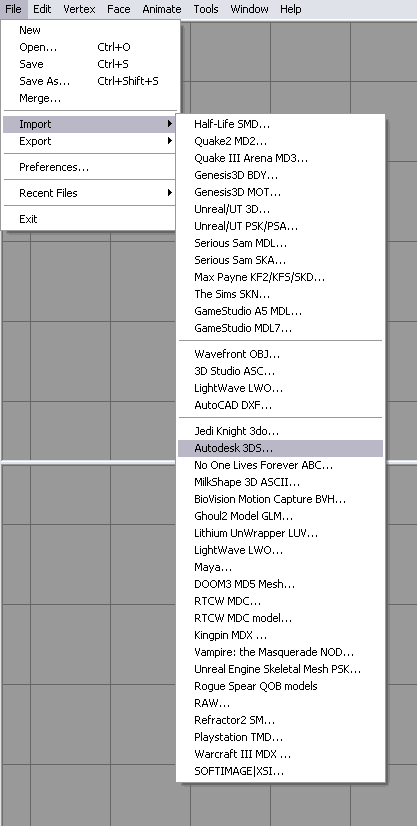
For 3d-Studio MAX or .3ds files
Select File, Import, AutoDesk 3DS, and choose the 3DSMAX object that you have generated. It will come up with a window questioning what you want to import. If everything is UV'ed properly in 3dsMAX everything should come in perfectly fine.
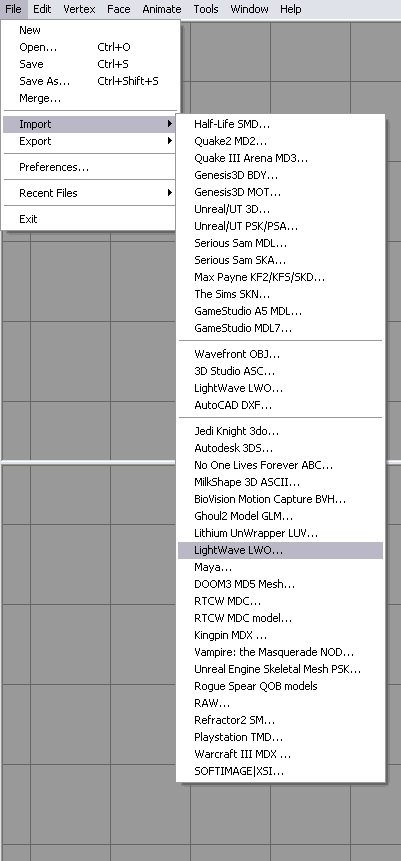
For Lightwave or.LWO files.
Select File , Import, Lightwave LWO, and choose the lightwave object that you have generated. It will come up with a window questioning what you want to import.
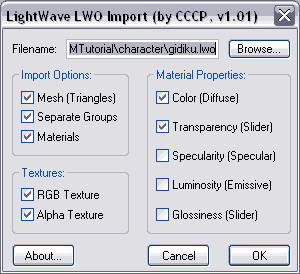
These are the default settings.. you don't have to change anything. Click OK
This is normal. Click Okay.
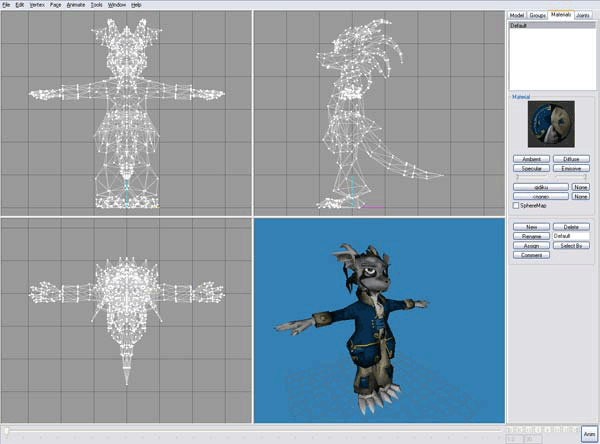
If the import is successful you should see a fully imported and textured version of your model sitting in front of you on your MilkShape 3d construction screen.
Note: If your model imports into MilkShape and you do not see a textured model right away, do not panic. You have not lost your UV's on your model. Click on the 'Materials' tab and click on your 'UV.bmp' file , or whatever BMP file you use to UV your character with.. and it should return to normal. In the example below. my filename is gidiku.BMP
The model is loaded and ready. Next!
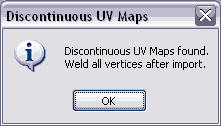
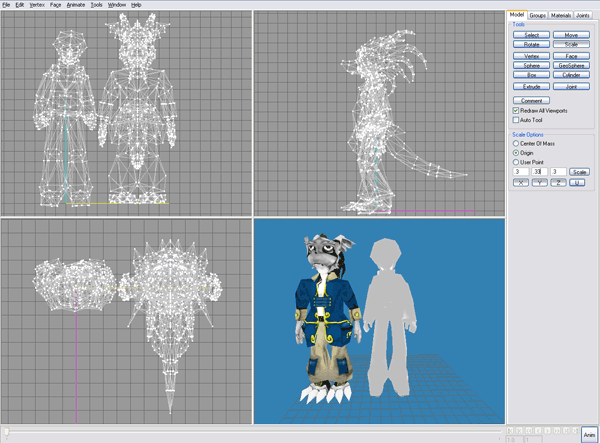
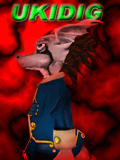
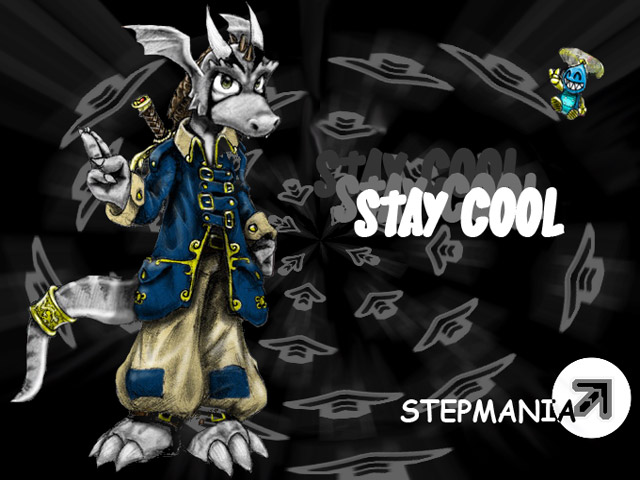
In this tutorial. We will be using a model that is totally unrelated to Stepmania, in this tutorial I will be using a character named 'Ukidig' for a project under a Torque gaming engine that has been abandoned. The model is 1 material and 1653 polygons and the material is tied to a 512x512 discontinuous UV bitmap..
Note: the average Stepmania character is two materials, a facial animation material, and a VRAM or 'default' material. and the mesh itself is around 700 polygons. Not to say that you can't go big. but when importing your model. think of those which are lesser-powered systems or are on X-box which are very limited on RAM. use polygon reduction tools at any given chance you can. and attempt to resize yourBMPs as small as possible without losing all of your detail or crippling your ability to animate your character.
In your materials tab open. set your 'Ambient' 'specular' 'Diffuse' 'Emissive' color values to 255,255,255 all white so that we're not looking at a dark shadowy model.
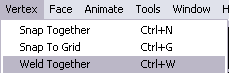 If you have imported your model from Lightwave and your model is running on one material only.. click on 'Vertex' and then 'Weld Together'. if your running on multiple materials welding might cause distortion. try and weld and if it becomes distorted you can always 'edit' and 'Undo'
Default "T" Model positioning for StepMania.
The first modification that we will be doing with your Stepmania model is placing its arms to its side. By default a lot of modelers 'rest' positions are with the arms stretched out, and the legs nice and straight, this is to give total flexibility to the model and to make it easier to add bones. However, the Stepmania bone rest positions have the arms at the side.
You could go back to your modeler of choice and re-do your model and re-import it back into Milkshape.. or... Click the 'Select' Button and select the 'Vertex' option and then click-drag your mouse over areas of the model to grab the points you want to rotate, when while all vertexes are highlighted, clicking on the 'Rotate' and 'Move' buttons to place the limbs at their side.
Note: When in selection mode, you can hold down the shift key for multiple selections at one time.. if you over-selected too many vertices that you wanted to move, you can de-select without starting over by keeping the shift key on hold while click-dragging the right-mouse button. you will be doing a lot of this selection/deselection later on.
Resizing your StepMania Character.
The next thing that we're going to be doing is re-sizing our model. Unless you are super lucky the size of your model will be different than the size of the DDR character. We Must keep your model the same size as all of the other Stepmania models before. This is very important when we map out the skeleton of the character. Before we begin, Click on 'Edit' and then 'Select All' and click on the 'Move' Button to drag the model off to the side. We will not import Emi in the resting mode to give an approximate difference of size. If you want the ms3d version of Emi that I used. you can click here to download it. We are going to do a 'File' and 'Merge' and then select our newly modified emi.ms3d file to do our size comparison, our model is extremely huge compared to the Emi model.. What we are going to do is we are going to select our Ukidig Mesh and 'Scale' it to match the Emi model that was just imported in.
You might want to use the numerical panel on the right-hand side of the screen to scale your character. You can control exactly how far your character gets scaled down.. my scaling values for Ukidig were X 0.3 Y 0.33 Z 0.3. and also. Since the Design of Ukidig was a little different. such as proportions from the pelvis to the shoulders. I adjusted it accordingly by doing a vertex selection and moved accordingly to match Emi as close as possible. Once you are all done. Select EMI and delete her and then move your character back to the center plane of the modeler.
Adding joints to your Stepmania Character.
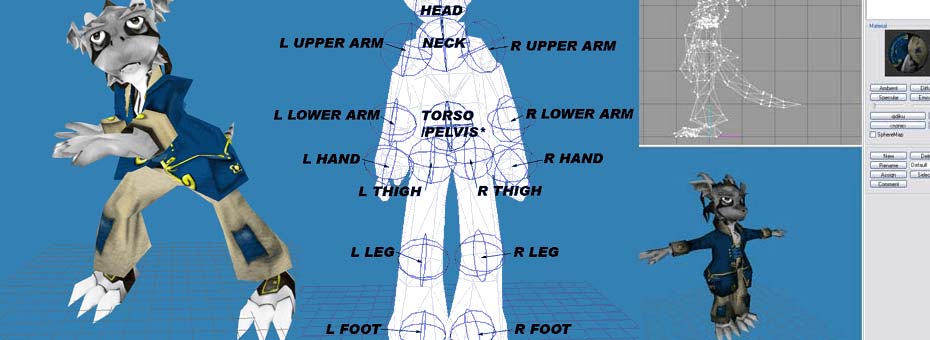
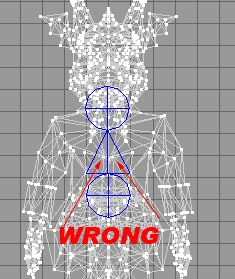
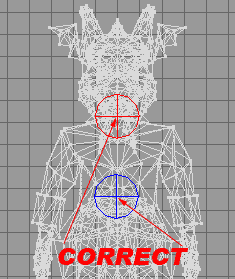
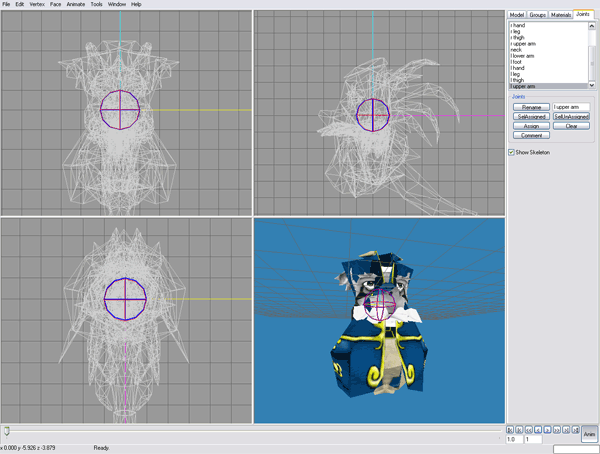
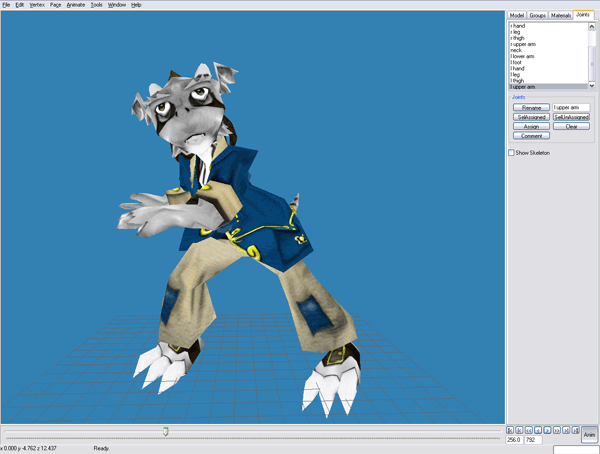
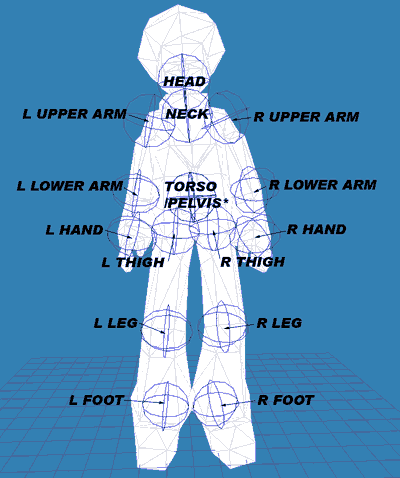 Setting up the joints on your new model is actually easy. The biggest trick in having an effective and workable Stepmania model is to try to keep the relative positioning of all of the joints in YOUR model the same as the model presented on the right. There are 16 bones in all. These bones are un-parented and run off of global accesses (meaning none of the bones are linked to one another).
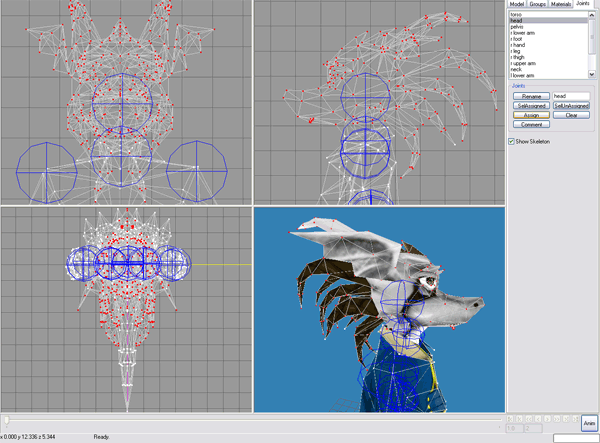
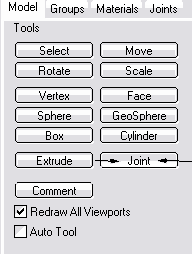 To begin, click on your Model tab and select the Joint button, and begin by placing down the 16 joints that we will need. Remember to click on the 'Select' button and deselect the joint that you have just made so that you don't have parented joints. Once you have set up your bones completely inside of your model.
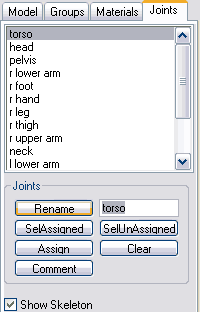 Then go to the Joints tab in Milkshape and select each of your newly generated bones.. each bone you select will show up in red, type in the name according to the bone, and hit the 'Rename' button to change the bone name. repeat this process until all of the bones are renamed just as they are on the left-hand side of this document.
 Remember, Stepmania as of 3.9 RC3 and 5.0a cannot read relative joint position, By setting up your joints normally in Milkshape by using joints to connect in a relevant position will result in a failed joint structure and you would've wasted a lot of time.
Click Here if you want to download the Milkshape Emi model for resizing purposes.
 The next step that we will be doing is assigning the joints to parts of the vertices of the model. This tells Stepmania whenever it moves a joint in a dance move what polygons to affect, and how to affect it. Proper placement of these points is essential to having a nicely animated model for all to enjoy the model that you've created.
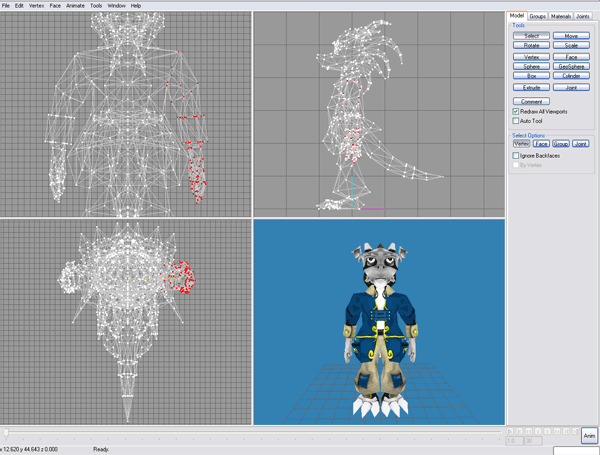
Click on the 'Model' tab and click on 'Select' and then 'Verts'. With all options highlighted click on the 'Joints' tab and select the 'Head' for starters. NOW, while holding down the shift key begin click-dragging your selection box over the areas you want the head bone to affect. (Always remember, is you select too much, you can right-click-drag a box to deselect without losing your entire model selection). Once you are satisfied with your selection, click on the 'Assign' button in the Joints tab to assign the vertices to the head joint.
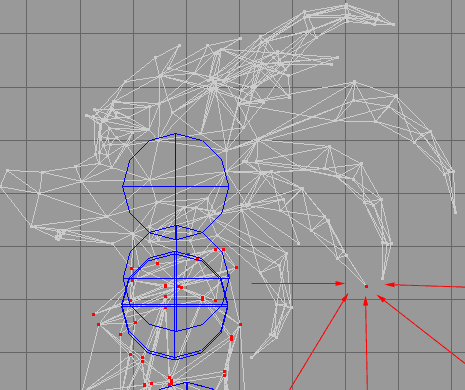
You don't want to have any vertices that are left unassigned to your model, to check the region that you just assigned, click on the 'Sel Unassigned' button in the Joints menu to see if you are missing any vertices in your selection. In the example above. I missed one vert when assigning it.. which is no problem. Click on the 'Sel Assigned' button and while holding down the shift key highlight the missing vertices and hit the 'Assign' button again to complete your selection.
Repeat this process under all verts is joints as respectively assigned to the body. Here are some hints I can give you when assigning vertices to your joints..
- On low polygon objects - when working on limbs, always assign the verts up to the next joint.. this will cut down on the raggedy-ann effect that would normally come when assigning verts around the bone outward.
- If the backside of your polygon has a very low poly (like mine) make sure that you assign the verts around the arms to the back as well.. this will especially help to keep body form when crouched over as some of the dance moves are.
- If your Mesh alignment is a little off.. then keep mapping your verts until finished, and go back to re-align your mesh. make sure to get it as closely linked up to your joints as you can.
Note: This is the most tedious portion of the tutorial. It took me an average of 1 hour the very first time to assign all verts respectively to a model and not have the model in Stepmania turn into a distorted disaster.
 Once you are satisfied with your vertex assignment, joint Positioning, and Mesh alignment, we prepare the model to be exported to Stepmania as a 'model.txt' file. To begin, click on the 'Anim' button located in the lower right hand corner to switch Milkshape into animation mode. What you then must do with your model is go through and select each of your joints, and move them to the center of the board.. that is.. where the cyan/yellow/magenta lines intersect on your coordinates board. Once you have all of the bones as close as you can to 0,0,0 then click on the 'Animate' button in the menus and select the 'Set Keyframe' option.
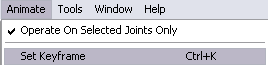 Note: It is VERY important that you set a keyframe, or else a lot of wasted time and effort will occur when you save your file. And always keep a backup of your MS3D file, you will need it in case you have to re-assign it as a new vertices map for your joints.
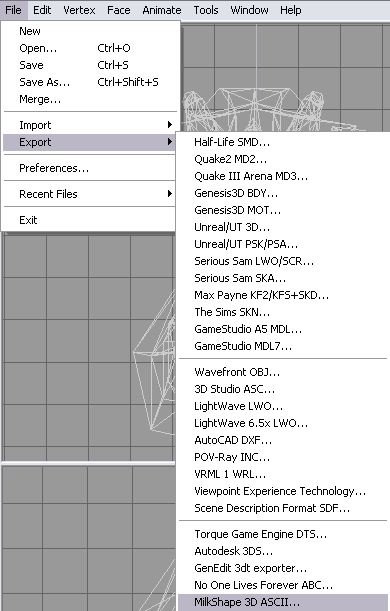
At this point we can now click on 'File' 'Export' and 'MilkShape 3D ASCII' and name it respectfully model.txt for Stepmania to read.
We are not finished with the model yet!!!!!!! the last and final thing we need to do is we need to make SURE that all of the coordinates for the joints X,Y,Z are zeroed out so they don't cause us ANY trouble when they begin to animate. down below is the text that you will need to copy and paste over your current bones in your model.txt file. you may use any text editor to accomplish this task.
"torso"
 ""
 8 0 0 0 0 0 0
 0
 0
 "head"
 ""
 8 0 0 0 0 0 0
 0
 0
 "pelvis"
 ""
 8 0 0 0 0 0 0
 0
 0
 "r lower arm"
 ""
 8 0 0 0 0 0 0
 0
 0
 "r foot"
 ""
 8 0 0 0 0 0 0
 0
 0
 "r hand"
 ""
 8 0 0 0 0 0 0
 0
 0
 "r leg"
 ""
 8 0 0 0 0 0 0
 0
 0
 "r thigh"
 ""
 8 0 0 0 0 0 0
 0
 0
 "r upper arm"
 ""
 8 0 0 0 0 0 0
 0
 0
 "neck"
 ""
 8 0 0 0 0 0 0
 0
 0
 "l lower arm"
 ""
 8 0 0 0 0 0 0
 0
 0
 "l foot"
 ""
 8 0 0 0 0 0 0
 0
 0
 "l hand"
 ""
 8 0 0 0 0 0 0
 0
 0
 "l leg"
 ""
 8 0 0 0 0 0 0
 0
 0
 "l thigh"
 ""
 8 0 0 0 0 0 0
 0
 0
 "l upper arm"
 ""
 8 0 0 0 0 0 0
 0
 0
Finishing the files in Stepmania.
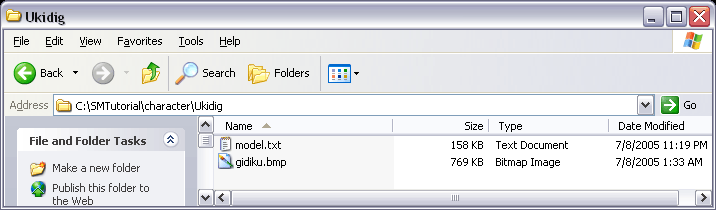 Okay, you now have your completed model.txt file. as well as your BMP that's going to be used for the UV Texture. In order to make it a fully functional StepMania character folder. We are going to need a couple of things.
 A 'card.bmp' file is the picture that everyone will see at the character selection prompt in StepMania. It could be a picture of anything you want (preferably of your SM character) and the picture must be a BMP of 120x160 or else your character will break certain skins in Stepmania 3.9a
NOTE: In Stepmania 5.0a the default skin does not have a character selection menu and thus will not use the card.bmp file for character selection.
A 'break.bmp' file. This is the file that comes in during certain game modes in StepMania.You can add any artwork you want in this screen. This file should be a 640x480 .BMP file.
Note: You can use PNG and JPG file formats as well for your card.bmp or break.bmp. Such formats can be also used on the model.bmp or face(x).bmp file as well however it is highly advisable to keep said models in a lossless format such as BMP.
A 'character.ini' file. From my personal experience. I've only seen this used in 'Rave' mode. and that the entries in the .INI are essentially attack moves that you can do to the other player. here is an example of what the. INI file looks like this:
[Character]
 Level1Attack1=1.5x
 Level1Attack2=hidden
 Level1Attack3=reverse
 Level2Attack1=2x
 Level2Attack2=sudden
 Level2Attack3=expand
 Level3Attack1=3x
 Level3Attack2=boost
 Level3Attack3=brake
A 'face.ini' is an optional script that controls animations of the face material as well as how long it should use a certain face material before cycling to a new face. the face.ini file is applied to the model.txt in replacement of its material UV reference (Example: ./face1.bmp <=> ./face.ini) . I have given an example of what the face.ini looks like:
[AnimatedTexture]
 Frame0000=face1.bmp
 Delay0000=2.00
 Frame0001=face2.bmp
 Delay0001=0.30
 Frame0002=face3.bmp
 Delay0002=2.00
 Frame0003=face2.bmp
 Delay0003=0.30
 Frame0004=face1.bmp
 Delay0004=2.00
 Frame0005=face3.bmp
 Delay0005=2.00
 Frame0006=face1.bmp
 Delay0006=2.00
 Frame0007=face2.bmp
 Delay0007=0.30
 Frame0008=face3.bmp
 Delay0008=2.00
'face(x).bmp' where x is the number, face BMP's are the actual images of the facial changes themselves, from blinking to happy, sad, etc.
For the sake of the tutorial, I will add the face.ini into the tutorial model along with four dummy .BMP files just to act as a placeholder.
There are also the following folders. which are as follows. 'Dance' 'HowToPlay' 'Rest' and 'WarmUp'. These are directories that reference all of the bones for your model. and commonly there is .redir files in each of the directories symbolically linking them to where the actual animation files are in StepManial. These are text files that refer to where the 'real' joint hierarchy resides. This is important to remember for those who make custom animations, as you can isolate your custom animations in these directories so you won't overwrite and possibly damage the other dancer files.
(Optional Step) Testing.
Testing is always important to make sure that your animations are fluid, that your bones are operating perfectly, and that there's no clipping. It is also a very important step before deploying your model for obvious reasons.
While you could inject the model into Stepmania cross your fingers and hope for the best, it is not the best way to diagnose what it wrong with your mesh.
Note: This step is completely optional.
With a text editor open any one of the many Stepmania dancing bone files. The one that I used is _DDRPC_Common_Dance0001_Bones.txt
Open the dance .txt file into a notepad and click 'Edit' and 'Select All' and then click 'Edit' and 'Copy' next.. open up your model.txt file and highlight the entire area where your bones are.. and click 'Edit' and 'Paste' to insert all of the keyframes of said dance moves into your model.txt file.
Once you are done.. make sure you save this file as a different name. as you will only be using this .txt file to test your model.
Open up Milkshape and re-import your Milkshape ASCII format back in. and set your keyframes to the length of your model (in the example on the left, it is set for 792 frames of animation) and then use your slider bar to go through the animation.
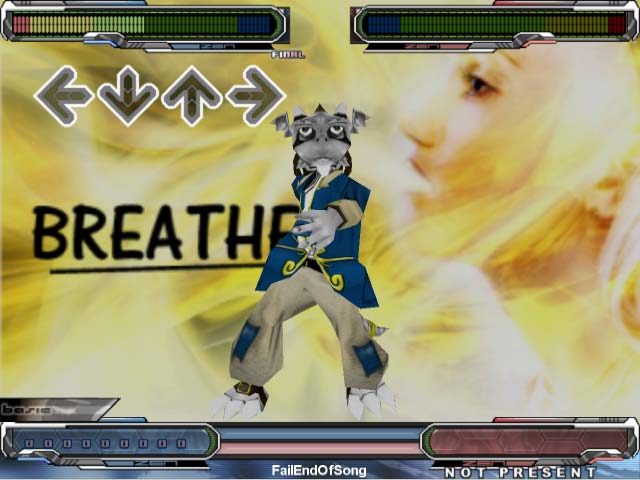
The results?
What... want you see the end result? okay!
 Thank you for reading this tutorial and hope to see more characters being made for StepMania.
Thanks and Acknowledgements
I'd like to thank the following for providing resources and links to make this tutorial possible.
-
DDRFrance - For being the first site that published the how-to-model Stepmania using Gman. Without them, I wouldn't have gotten as far with my own tutorial.
-
Stepmania - And all of its developers. Because without them well there wouldn't be a tutorial. or a game to do a tutorial for.;)
-
thebusdr5er - for providing a full English translated version of the how-to-model from the Stepmania France site.. as much fun it is to use Babel fish. it was very hard to understand.
-
DDRManiax - For providing me with a lot of great info on my own ventures in Stepmania.
-
Anonymous - For the character concept and design.
Modifications to tutorial
The last modification was on 7/9/05
Updated formatting to conform with the responsive website as well as re-uploaded all of the example files. Some clean up with sentence structure and moved the images around to the appropriate sentence. Re-Uploaded this guide because without the images like how StepMania wiki has it. It would make little to no sense. Feel free to copy any of the images off of this site for your own. you are free to use any data from this tutorial. So long as no money is being made it's all cool with me.
License for this guide or any of the 3-d models in this guide.
![]()
This work is licensed under a Creative Commons Attribution 3.0 Unported License.
Based on a work at /a-guide-for-transferring-3-d-models-into-stepmania/.
Basically, don't be a jerk. Give credit where credit is due. As this character was abandoned by the creator we don't even care if you port the character to a commercial game. If you use it in something awesome sauce, just contact us and let us know. We love screenshots!
Until next time, that's what server said.
END OF LINE+++
Hello! Thank you for this guide! I'm simply an illiterate dumbbell, so I resulted in failure with the model which I was trying to convert. So, I just wanted to ask you if you would be willing to convert a model for me to work in Stepmania. It's a PS2 low poly model, also confirmed to be importable in Milkshape. Like I've mentioned, I'm just totally a lost cause when it comes to 3D modelling and rigging. I would, of course, pay you for your time to do this.
We do hope you are the developer of this PS2 model that you are exporting. If it's an original model we might take a look at it. But it's it's another games IP we will not. The two stepmania characters were ported with the artists permission. there was 3 other models where the artist did not want it open to the public and were held back. We just don't want to start any legal shit shows.
Thank you for checking out this blog. Best of luck to you.
- S
Hey, I just wanted to leave a comment to say thanks!
This guide has been super helpful and I'm amazed I managed to stumble upon your site
I haven't quite figured out the vertex assignment stuff yet but I got a T-Posing model into the game so that works for now
Cheers!
-Grum
i want to trying make not human, after done, i try test animation, the result, a hand, and a foot are dislodged, i don't know can you help me to fix it?
Hey, I'm new to this 3D modeling. I'm having a problem here
I was transferring tommy vercetti from gta vc, I'm having a problem with the adding joints and assigning the joints to parts of the vertices part, I tried and I tested out, the model just distorted everywhere. Is there some mistakes that you help me how to fix this?
http://imageshack.com/a/img908/9827/jCEQpB.png
The distortions looks like what happens when you save your milkshape 3d ASCII file without the bones of your rigged model being at absolute 0 making the ball of your character. When dance-moves are applied it unfolds your model placing the mesh in the proper position. This is necessary to do as none of the bones are linked to each other. Re-Open your MS3d file and see if your model retained its ball-like form. If it did not then the keyframe was not pressed which is why the model stretches and distorts all over the place.
I wanted to use one of the already made characters as a base, but whenever I try the characters are always in a ball like this: https://www.s-config.com/core/wp-content/uploads/2013/01/018.png
Is there anyway to unfold them?
Of course! There's two ways of doing it.
If you just want this model that I used. Where throughout my tutorial I have included the template files that I have used. Click here if you want "LWO - Lightwave" "3ds - "3d-Studio Max" - "ms3d - MilkShape3d file with default rest position"
Also do not forget to download the texture UV bitmap file too - right here for a link
I will update my downloads page so that all of the asset files that was spread out throughout this tutorial is all in one place! Apologies for that!
Now if you would rather want to understand how reverse the stepmania model.txt file in case you want to take a look at other characters then the one on this site. Then check out the addendum tutorial that I uploaded and click here!
Hope it helps and good luck editing!