

I got the NextThing CHIP in the mail today!
Let me tell you it's always a good feeling to get a new Kickstarter project in the mailbox today and this time around It's the NextThing CHIP or C.H.I.P. as they abbreviated however if I did the proper acronym for it then this article would get buried with probably my first postings online! Anyhow, let's dive right into this device.
A little bit of CHIP/kickstarter introduction.
A long time ago, well, more like a year or so, There was a buzz going around KickStarter about the worlds cheapest computer known as CHIP or C.H.I.P. The world's first $9(USD) computer! I along with thousands of other people decided:
Seriously? Cool, take my money! In fact, give me two of them.
Actually I also spent the $15(USD) for HDMI because in the future I hope to capture some video of the NextThing CHIP in action for you guys. More to come on that.
Outside of the periodic e-mails that were received from TheNextThing Co. We didn't think much else about it. There were other projects running on this site so whatever. Sometime between all of the e-mails, there was announcements of some delays which frankly happens to every single Kickstarter project in existence so I was not worried about it. Even if the project was a complete and total failure I have to shrug and say it was approximately $33(USD) and not a huge deal even if it did end up like other KickStarter projects in infamy.
Arrival of CHIP.
 It's original date was supposed to my March, however we will take the blame about this because we did miss a crucial step during the Kickstarter process which is to actually Confirm your mailing address via your E-Mail. Why did NextThing do this? Because they understood that their project would take a year from idea to completion. This is after-all not their first Kickstarter Rodeo as their first creation was a camera a while back. People move and change addresses. They want to make sure the product gets to where it's supposed to go without any terrible backlash from KickStart people saying they never received the product.
So to those people who are still waiting for your NextThing CHIP to arrive. CONFIRM YOUR ADDRESS!!!
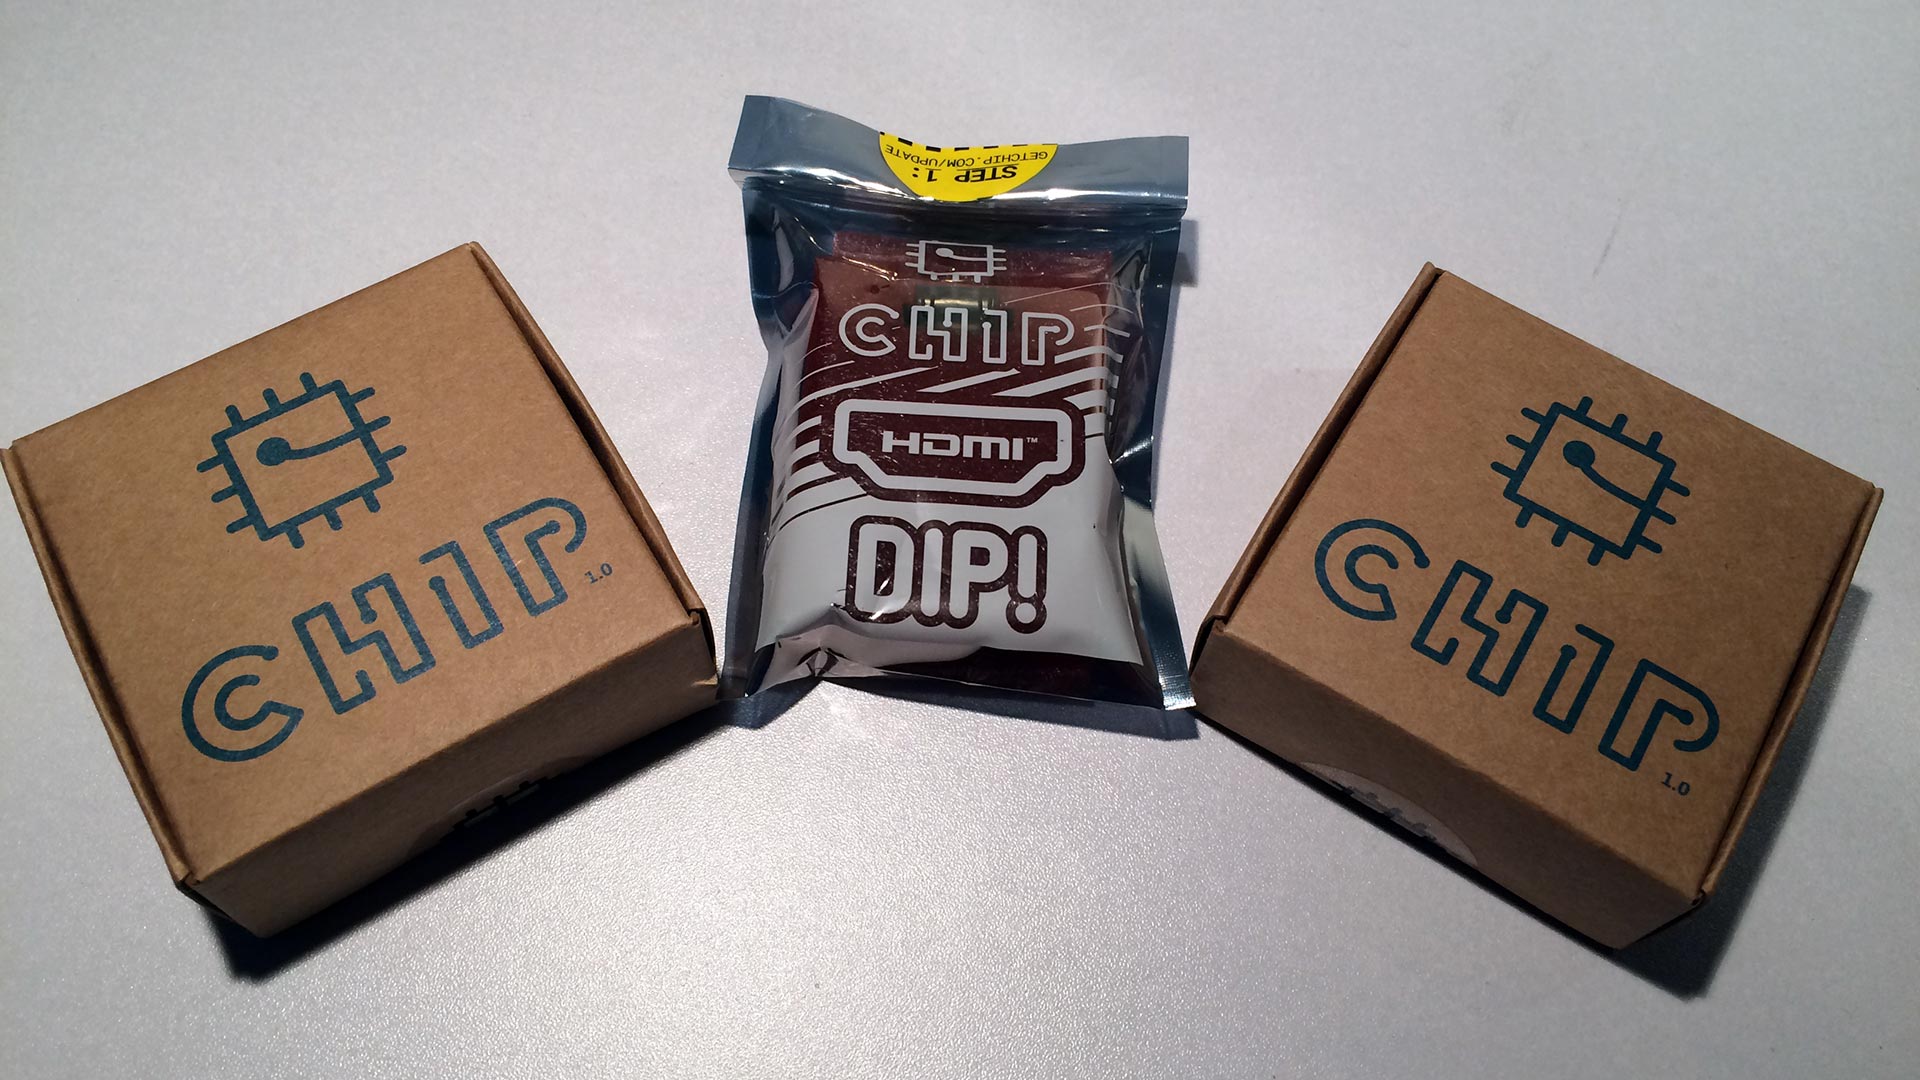
So, as you see in the Picture Above we received two NextThing CHIP devices and a "NextThing CHIP HDMI DIP!" Because the DIP to go with your CHIP.
This would be considered the middle-of-the-road purchase. We did not get just the basic NextThing CHIP device but we also didn't get the top of the line contribution which is the NextThing PocketCHIP which included its own LCD and keyboard. PocketCHIP gives you everything for $49(USD)
NextThing CHIP unit itself and features.
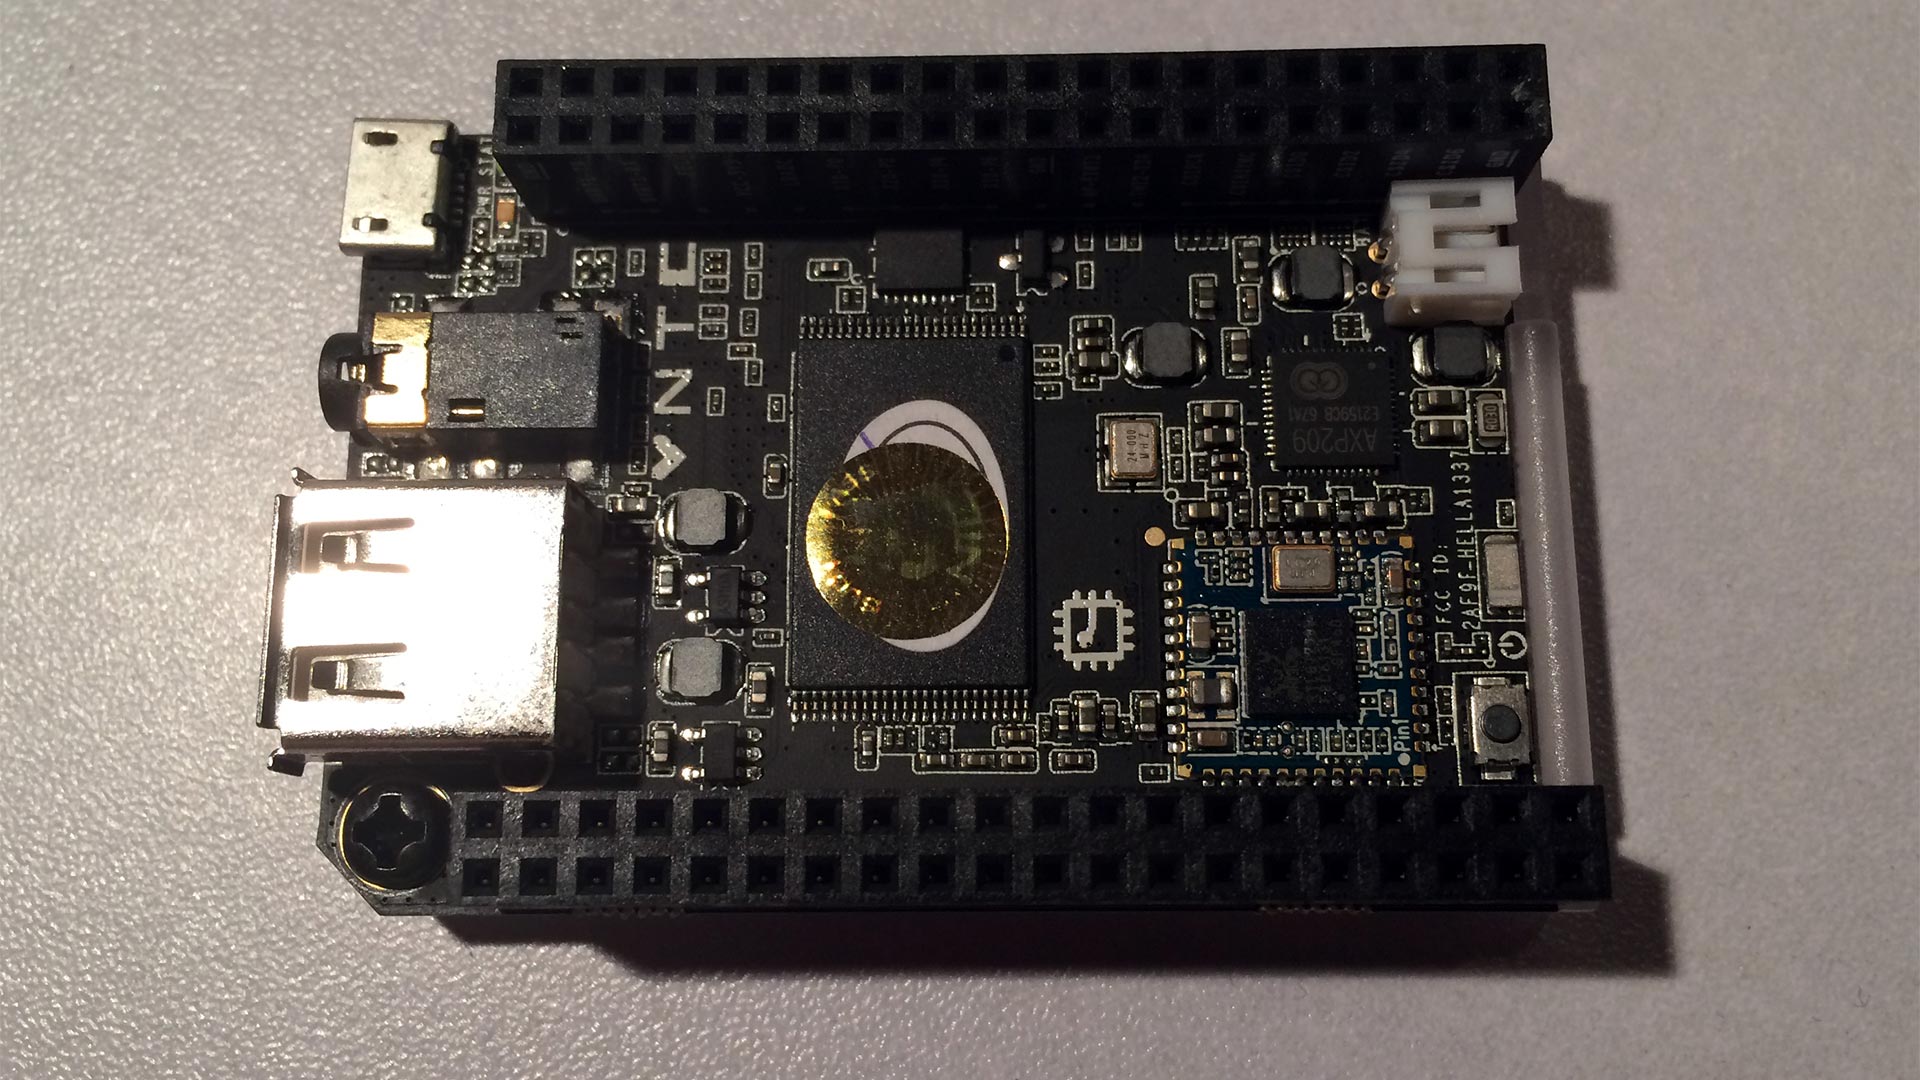 Upon opening the box and taking it out of the Wrapper we are presented with a board that is just loaded with features. It has Wi-Fi/BlueTooth built right onto the chip.
- A reset/power button I didn't have to solder onto the board like the Pine A64 (yes, we're still bitter about that!) .
- The CHIP uses a 1ghz single core processor which is slightly better than the original Raspberry Pi B+ at 700Mhz.
- The use of female header pins over male makes it not only easy to stand upside down for those who didn't get a case for their CHIP. But also gives room for the company to very clearly mark what each and every one of the GPIO pins actually does on the CHIP which frankly no other Pi company has done before.
- The NextThing CHIP has it's only Li-PO/Li-ION battery charger using a 2-pin Molex styled connector very similar to the PS3 batteries. Before you get all crazy and hook a PS3 battery to it know that the pins are inverted! You'll see what I mean later in this blog entry. For your safety DO NOT HOOK UP A PS3 BATTERY TO IT UNTIL YOU READ THE REST!!
- 4GB of NVRAM is a little problematic as it doesn't leave a whole lot of room for much of anything. It's doubtful that we will get an android OS flasher for this unit. But for $9 I'm not really expecting the world here.
Extra NextThing CHIP Stuff:
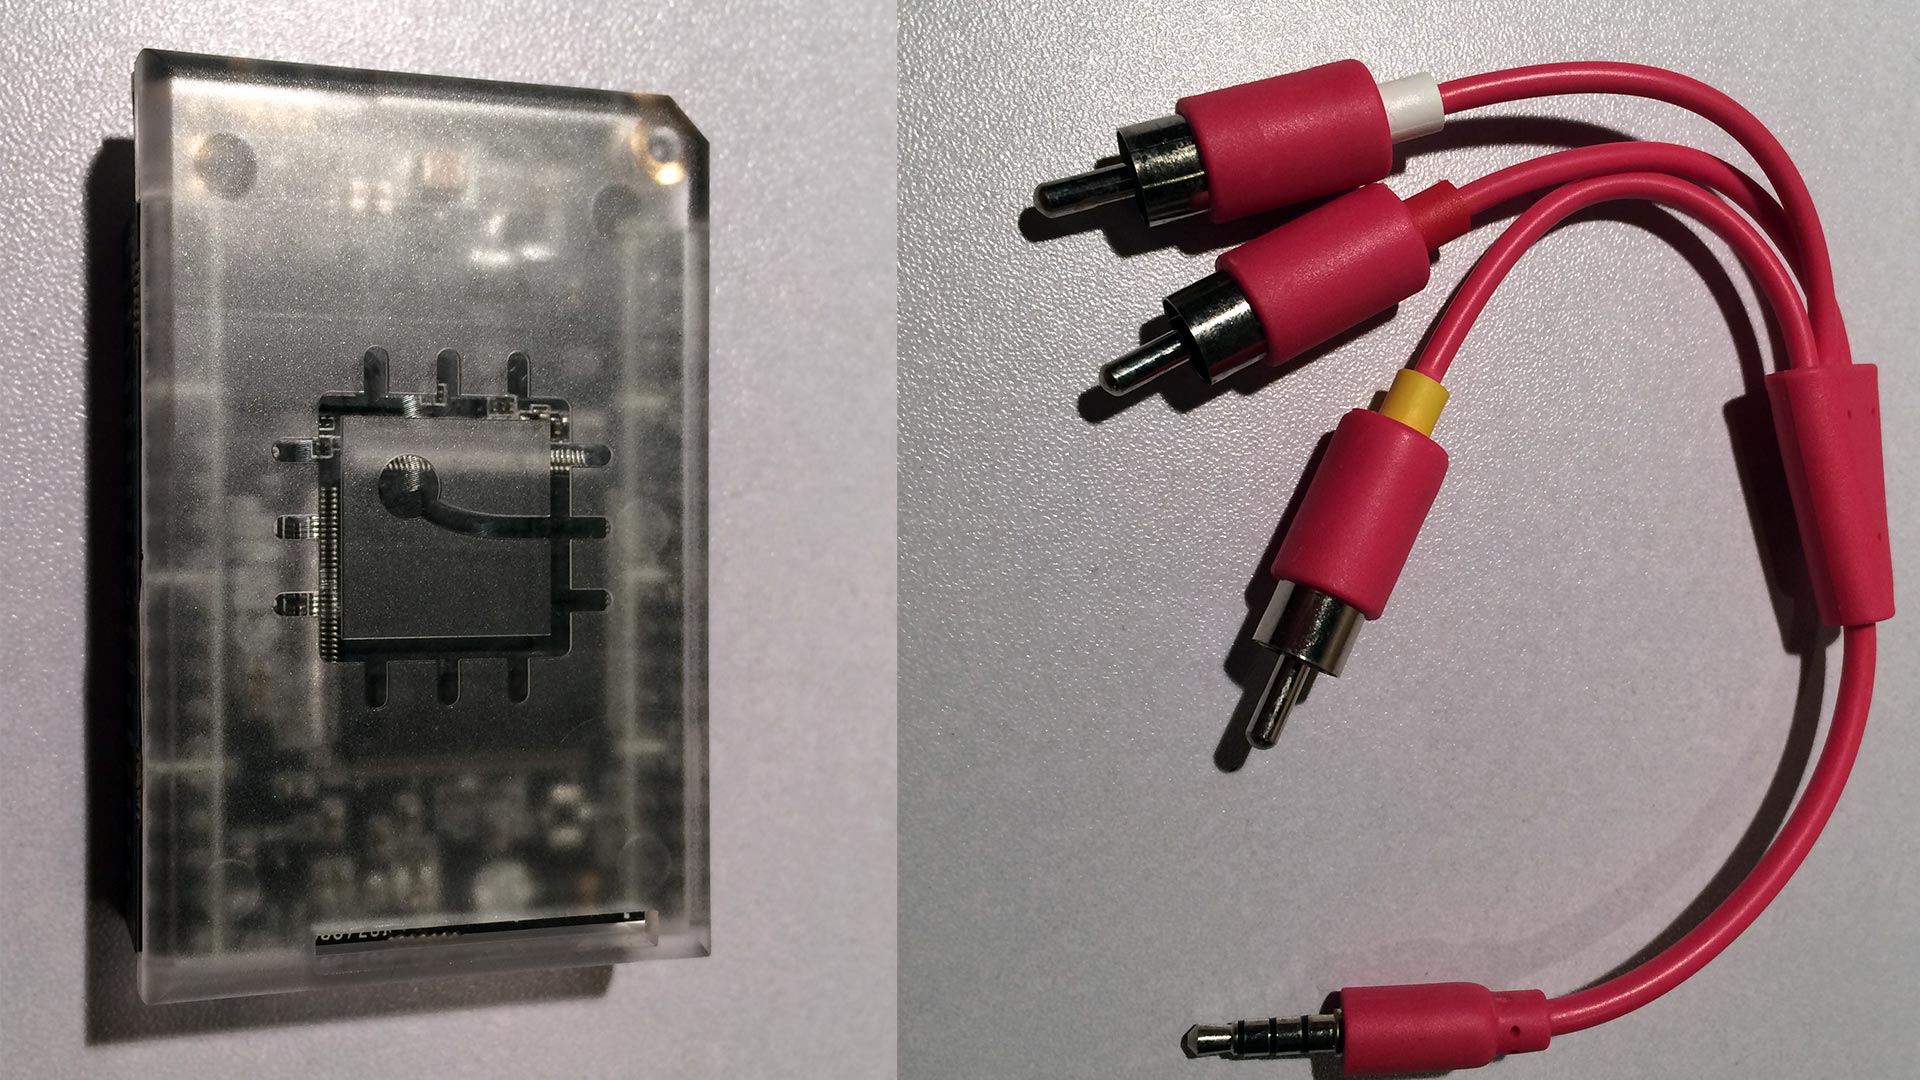 Although I kind of remember hearing the NextThing Co. guys talk about this it didn't really click until I opened the box. They gave me extra things as sort of a "Thank You" for being a Kickstarter Backer. They gave me a Video/Audio cable as well as giving me a CHIP Case for both of my devices. a $7 value all on its own.
About the NextThing CHIP case.
There isn't a whole lot to say about the CHIP Case except for the fact that it does indeed do its job by allowing you to place it on your desk right-side-up without grounding anything out. What would have been a little nicer is if the CHIP case wrapped around the other side of the unit protecting the circuitry such as Wi-Fi and the NVRAM between the GPIO headers. But for FREE we are certainly fine with what we got here.
Right out of the gates NextThing Co. is doing far better than many of my Kickstarter Pi related projects that I have.
NextThing DIP! HDMI Adapter.
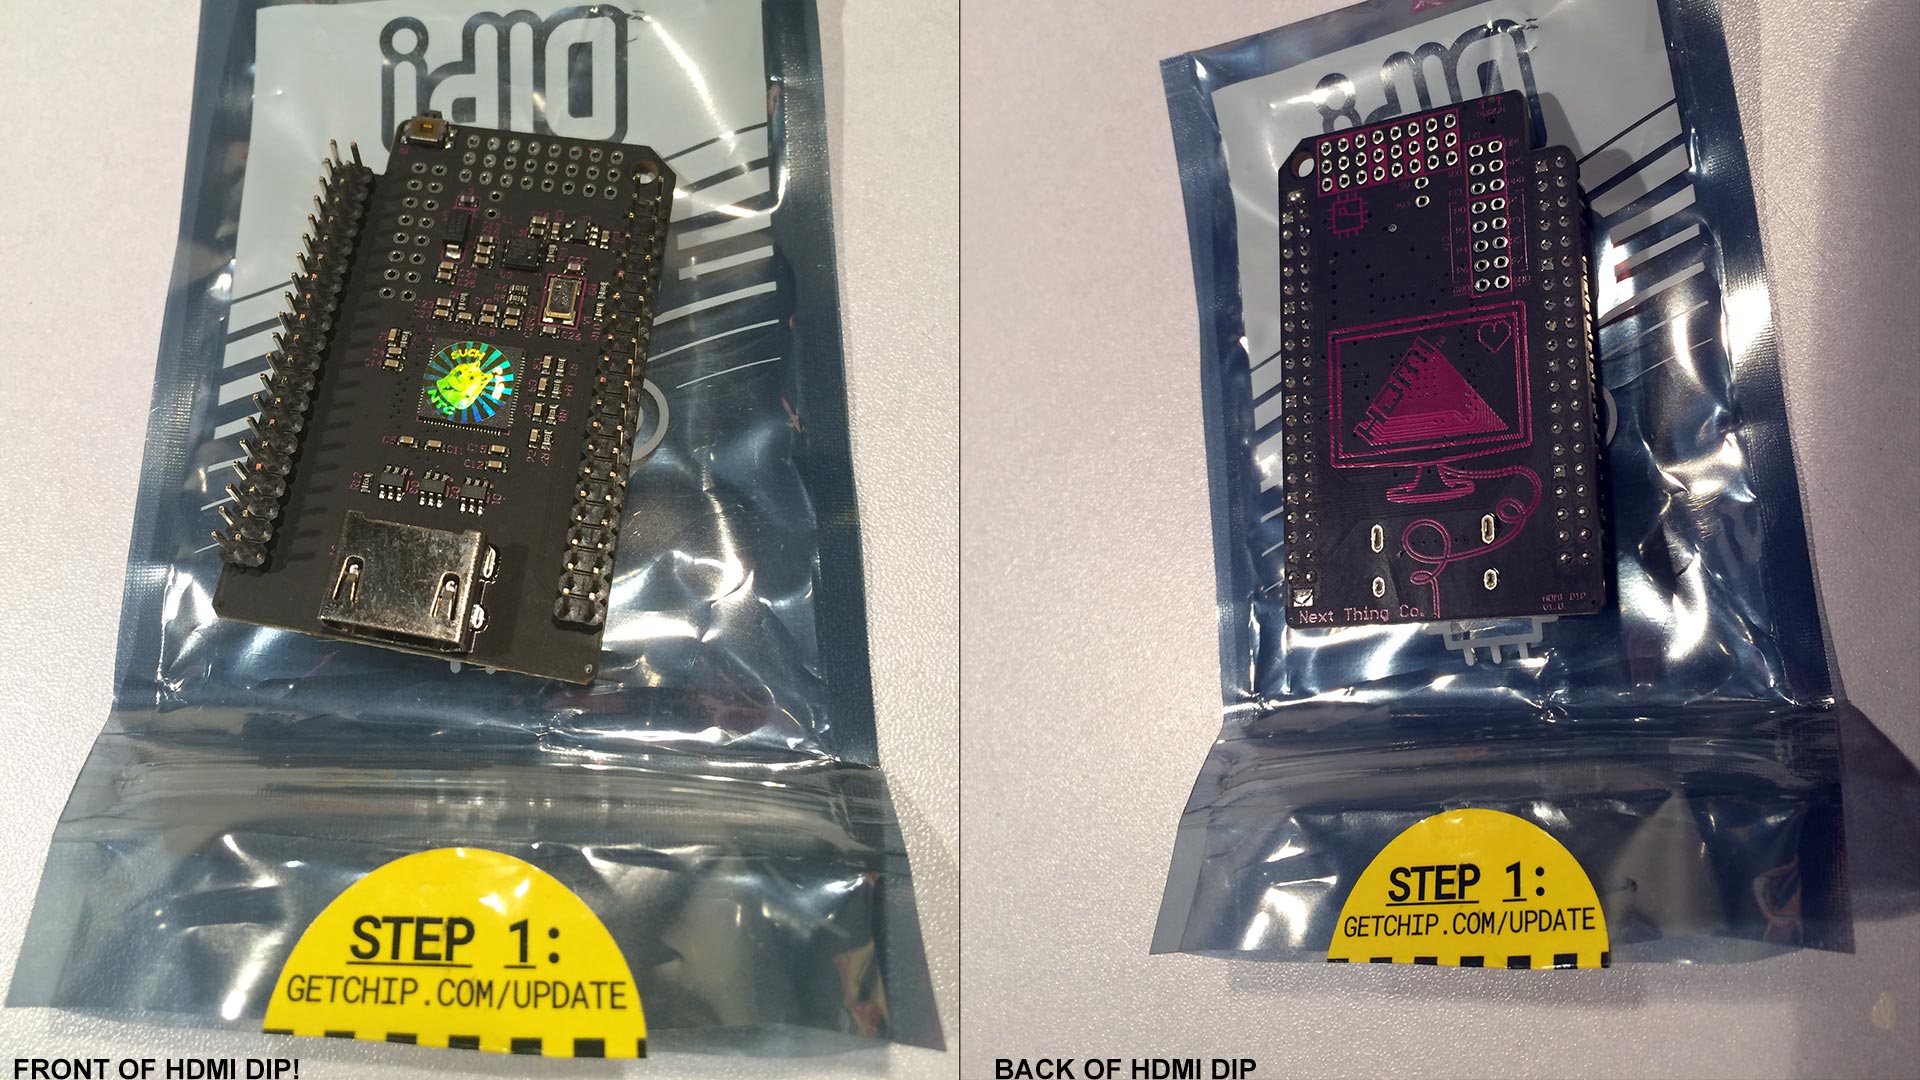 Alright, lets look at the add-on device that costs about as much as two NextThing CHIP units. The HDMI adapter. I am glad that they put the instructions right on the bag that you must download/upgrade your CHIP Unit to version 4.4 or above or else the HDMI adapter will simply not work. And although there's a similar sticker on the NextThing CHIP unit itself the picture I took of the HDMI made it blindingly clear that "Quality Control Doge" Meme is defiantly on the scene with a holographic sticker saying "SUCH PASS NTC". A sense of humor is good!
Flashing the NextThing CHIP.
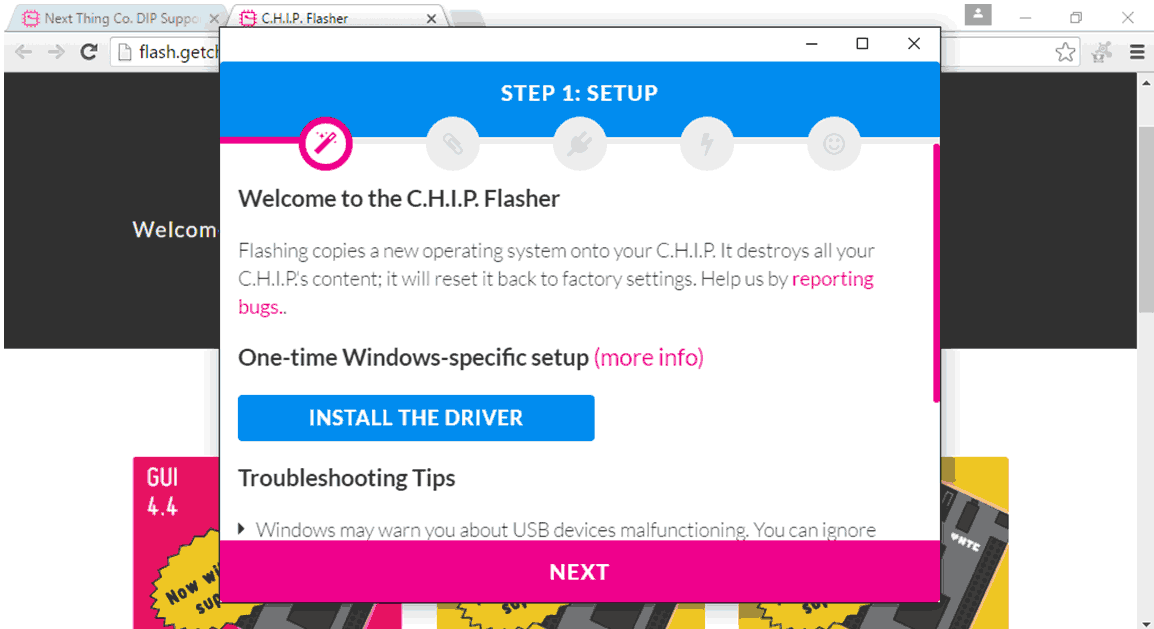
After a while of following their instructions to jumper two pins on the board and flash it. the HDMI does indeed work on it. You have to load Google Chrome onto your laptop or desktop in order to get the flasher working at all. Once you do install Google Chrome it was as easy as following the instruction. We wish there was a non-chrome executable version so we don't have to play these browser games. However, this update procedure is far more superior to the old method of loading Linux on another box just to update your CHIP.
Power problems with the NextThing CHIP.
On both my HDMI as well as my stock CHIP I ran into a serious problem where the unit will start to power up, and the moment it initializes the USB devices (Even when none were plugged in) the Wireless/BlueTooth adapter or worse still the moment I let the unit go into GUI mode with either HDMI or composite. The unit would immediately black out and the power light would vanish. Checking out the NextThing forums this problem is plaguing almost everyone owning one of these units. It's power requirements are something around 230mA to 350mA so a basic cell-phone 1amp charger should do it. However, even after using multiple cell-phone chargers, then using an Apple I-Pad charger, finally a 250watt PC power supply! I was starting to feel like the Raspberry Pi days where I simply cannot get this unit to reliably power on and work!
Not all power supplies are created equal. But we would like to think that something that can power something as hungry as a Raspberry Pi 3 should be able to power the NextThing CHIP but much to my disappointment I couldn't stabilize it.
Adding a lithium battery not for portability reasons but for power regulation.
But then, I thought to myself that if the internal DC-DC circuit that brings voltage from 5vdc down to 3.3vdc which the processor and ram uses is for some reason dropping even for a few nanoseconds could kill itself. Then attaching a battery may be the solution to the problem.
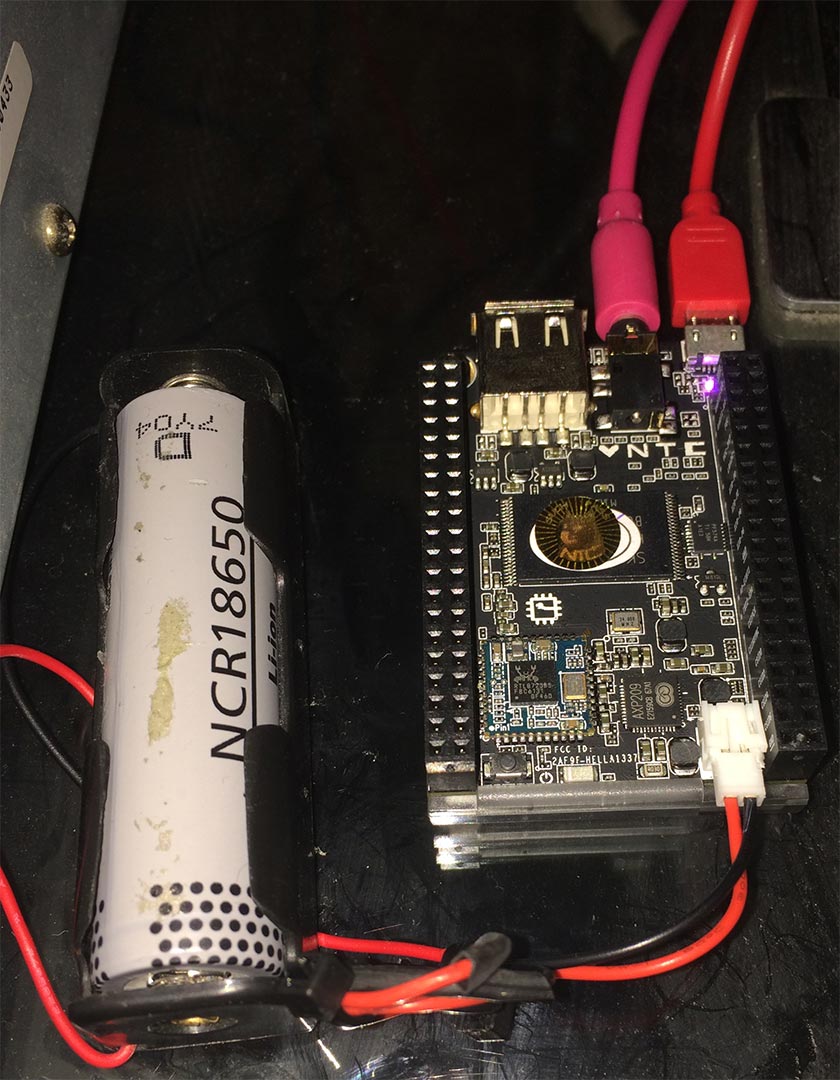 Because I did spend a considerable amount of time playing with Li-Ion batteries it was not hard to scavenge up the parts to get the CHIP working. If you reading about how the connections are inverted versus a PS3 battery. You will have to modify the Molex connector. The end result is what you see here with it powered on happily processing data. Even with a Micro USB cable and a cheapo Amazon Fire 1amp charger, it can keep the CHIP going as well as even charge the battery.
I used an NCR18650 battery which according to my IMax B6AC-v2 Li-Ion battery charger is capable of storing up to 2450mah of power. If the chip ran at average processing power at around 200-260mah then one of these cels can keep the CHIP online for 9 to 10 hours before finally giving out without power.
Edit 09/03/17 - Lessons learned.
Just like my blog about the Raspberry Pi; The quality of your USB cable really is everything! It turns out that many people were having terrible issues such as the wi-fi/bluetooth devices simply disappearing and in my case the unit simply powering itself off. Adding the Lithium battery onto my CHIP almost acts like a buffer in between the power fluctuation which is why the battery mod worked out so well.
About the PS3 battery with the correct Molex adapter.
I must also note something here. It's a little dangerous to hook a Li-Ion battery that you salvage from a laptop and drop it directly into a device like this. Although the CHIPs charger does have a cut-off point that your battery should also have under/over-voltage circuit protection for it as well. Lithium Ions are dangerous devices. Also, you don't need a massive battery like this.
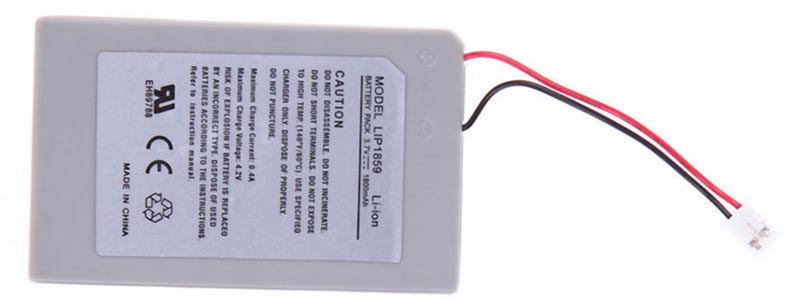
If you get a PS3 controller battery and use an ultra-fine tool like a jewelers screwdriver. you can release the metal tabs end connector and reverse it to make it work with the NextThing CHIP. PS3 batteries are a little ideal as once your done you can simply move the battery to the top of your chip unit to keep it all together as one package. I should also note that the battery doesn't really have to be that strong. About 250mah is fine to keep the CHIP running for a good hour after a power outage.
Wireless mode with NextThing CHIP:
We noticed that there's a problem with the wireless functionality where it would drop our SSH connection after a few minutes of inactivity. This could be a setting within the wireless driver of the CHIP but this is annoying. Looking at our router via DD-WRT revealed that the wireless would go into this low-power mode that could take a very long time to wake up from. We hope that the wireless time-out issues are fixed in a later revision of the CHIP software.
Headless CHIP and all of the software:
For the first test. We decided to run the NextThing CHIP in headless mode. The picture used for the Li-Ion battery is for the headless unit connected to a stereo and followed the instructions for installing an AirPlay daemon onto this CHIP just like the blog about the Raspberry Pi.
Apple AirPlay on NextThing CHIP:
The results of Airplay/Shairplay service are that it works but it was shit. It was dropping out a lot and there was a lot of hissing and popping worse than even the Pi B+. This is really odd because it uses the same sound processor that my Banana Pi has and that one is great. We don't feel like busting out a USB DAC which would be the equivalent size of the CHIP. The ALSA drivers in Linux are kind of shit because you can only pipe one application at a time. What If I wanted AirPlay AND Bluetooth audio? No, you can't! So! I had to install the Pulse Audio Driver for Linux.
Install those Pulse Audio Drivers onto the NextThing Chip.
If you haven't already done so on your CHIP now would be a good time to get your OS up to date.
apt-get update
apt-get upgrade
sudo isn't necessary at this point since the only login is root and believe me, that's something I'm going to change once done here.
To get pulse-audio installed:
apt-get install -y pulseaudio-module-bluetooth pulseaudio-module-zeroconf
Modify a lot of PulseAudio files.
We edit /etc/default/pulseaudio to launch it as a service:
nano /etc/default/pulseaudio
The next two lines may already be in the file, just verify the following:
PULSEAUDIO_SYSTEM_START=1
DISALLOW_MODULE_LOADING=0
ctrl-x to save.
Next we'll be modifying the pulse audio system:
nano /etc/pulse/system.pa
This is where pulse loads whatever modules it needs in order for it to work as an audio overlay.
Find the area which talks about "module-native-protocol" and add the following lines:
load-module module-native-protocol-unix auth-anonymous=1
load-module module-native-protocol-tcp auth-ip-acl=127.0.0.1;192.168.0.0/24 auth-anonymous=1
load-module module-zeroconf-publish
Ctrl-x to save. This will allow anyone to use pulse audio which is what we need for the shairplay protocol to work.
We need to change the sampling rate for better compatibility and quality:
nano /etc/pulse/daemon.conf
find an the area which talks about resampling and change it to look something like this:
resample-method = trivial
default-sample-rate = 48000
Ctrl-X and save again.
Finally, we are going to modify the library our shairport service uses to pipe directly to the Pulse driver.
nano /etc/libao.conf
replace the two lines with the following:
default_driver=pulse
quiet
Ctrl-X to save it.
To make sure it boots up we need to modify the rc.local file.
nano /etc/rc.local
add the following line into your rc.local
sudo /usr/bin/pulseaudio -D --realtime=false --high-priority=false --system --disallow-module-loading=false
Ctrl-X to save it.
For some reason the CHIP does not give you a "pulseaudio" service in /etc/init.d for user interactive mode. Pulse driver in system mode is a possible security risk. We are done with the PulseAudio Driver. Phew! Back to AirPlay
Back to the Airplay / ShairPlay daemon
The last thing we need to do is setup an ID so see our ShairPlay Server .
nano /etc/init.d/shairport
Then edit the following.
NAME=RandomNameHere
[...]
 DAEMON_ARGS="-w $PIDFILE -a $NAME"
[...]
Ctrl-X to save. What we are doing is adding the string for our CHIP name. We are then appending the -a $NAME to the end of Daemon Args. There's no need to set the pulse user to control the shairplay daemon as we are running in system mode.
SAMBA on NextThing Chip:
Getting Samba to work is very straight forward on the NextThing Chip. The default Raspberry Pi wiki illustrates it very well.
apt-get install samba samba-common-bin
Edit the samba.conf file as shown below.
nano /etc/samba/smb.conf
Find the entries below.
workgroup = Windows_WorkGroup_Goes_Here
wins support = yes
Select whatever your workgroup name will be and ensure wins support is enabled for better connectivity.
[chiphome]
   comment= Chip Home
   path=/chip
   browseable=Yes
   writeable=Yes
   only guest=no
   create mask=0777
   directory mask=0777
   public=no
Ctrl-X to save your smb.conf
Some samba related housekeeping.
Before Samba service can be restarted the directory needs to be made and assigned to user 'chip'
mkdir /chip

 chown chip:chip /chipchmod 777 /chip
In case user chip does not exist you can make this user
adduser chip
Now that the user and directory are created the samba username can be linked.
smbpasswd -a chip
If everything is working CHIP will now appear on the windows network neighborhood.
Amule on NextThing Chip:
We wish to show you a program that has not yet been ported to the NextThing Chip Distro-Tree. Not everything will be available right away since NextThing is undergoing the very difficult process of setting up a distro-tree. Very few of the Pi-like companies out there set up their own software distribution like the NextThing CHIP is doing. The good news is if the NextThing Distro-tree is missing something you like you can link the Raspberry Pi Distro-Tree. The Raspberry Pi runs Debian Jessie Linux. And so does CHIP.
Run the following command.
wget https://archive.raspbian.org/raspbian.public.key -O - | sudo apt-key add -
Edit the sources.list file.
nano /etc/apt/sources.list
Add the following lines to the end of your sources.list file.
deb http://archive.raspbian.org/raspbian jessie main contrib non-free rpi
deb-src http://archive.raspbian.org/raspbian jessie main contrib non-free rpi
Ctrl-X to save.
Finally, you can pass the following commands.
 apt-get update
 apt-get upgrade
 apt-get install amule amuled
All libraries for Amule will download from the Raspbian distro-tree to bring the program online.
A word of caution for those attempting to add the Raspbian Distro to your CHIP. Mixing distros is considered a bad idea and shouldn't be done unless left with no other choice.
Final thoughts on CHIP
We will get to the GUI demo of the NextThing CHIP in a later article but headless mode is very promising. We didn't talk a whole lot about the NextThing forums because the forums have nothing wrong with them at this stage of release. Users in the past have been confused on how to load the CHIP during the early releases. However, NextThing appears to be fixing a lot of those problems with the Chrome release of the software loader. Another thing we really like about the NextThing Company as a whole is how visual all of their tutorials appear to the end-user following you through every step. The most basic instructions for updating and loading the NextThing CHIP are up front and on their website. NextThing CHIP's software was not tucked away in some forums like the many Pi-based boards reviewed here.
Now Granted they are using the Allwinner R8M series of chips. Allwinner series chips are similar to that of BananaPi, Pine, and OrangePi. All articles which were talked about in the past so it has to be noted that CHIP shares the same problem with all of these Chinese packaged boards that a lot of the kernel-level software has not been completely developed for this little unit. As a result hardware acceleration and power management are problematic even on version 4.4 of their kernel release.
END OF LINE+++
hi
how did you manage to connect the chip using the ttrs cable ( one of the photos shows that you connect it using it) , because it is ntsc only , you were just lucky or did you modify the config boot file ? and if you modified it can you please help me ?
thanks