

Setting up Transmission on Pi.
Transmission is a torrent P2P file sharing software which is open source and can be run on practically every type of platform environment on the face of the earth. Since torrents can take a long time to download depending on how many seeders there are (people with complete copies of said file) versus peers or leechers (people who are attempting to receive files) it makes sense to keep a device on that only takes a few watts of power versus a giant PC which just eats power throughout the night. My article talks about Transmission on Pi . It can be for any arm based processor really but I have the Raspberry and Banana Pi's and this is a blog entry showing how I setup Transmission on Pi. Are there more complete entries about this software? I bet there is as I am no professional on this software. But I wanted to write this down in case I have to setup another Pi again.
Lets Begin setting up Transmission on Pi:
Update your Pi:
Starting with the basics you will want to 'su' into your Pi for root access. This will prevent you from typing 'sudo' on every command line all of the time. Then proceed with the basics of making sure your Pi is up to date:
apt-get update
apt-get upgrade
Then, you can install Transmission:
apt-get install transmission-daemon
Setup Directory Structure:
Setup some directories for Transmission to work inside of and give the directory ownership over to an account with superuser privileges such as your default 'pi' account. In my case I made a folder on the root of my SD card called "/d0" standing for disk 0 . This is useful to me as I have also pointed my samba services to this folder as well.
mkdir /d0
mkdir /d0/torrentmkdir /d0/torrent/incomplete
mkdir/d0/torrent/complete
chown -R pi:pi /d0
Access rights notes:
Transmission has its own username called "debian-transmission" which for security reasons is in place so torrents don't go all over your Pi and filling up areas it's not supposed to. This account has access to nothing right now. But we are going to at least give it access to the /d0 folder so Transmission can read and write from just this folder on your Pi. As we have already given ownership to the group and account 'pi' we are going to add debian-transmission to that group now.
Configuring Transmission:
Now comes the fun part of configuring transmission. All of that will be done with our favorate text editor 'nano' which is passed with the following command.
sudo nano /etc/transmission-daemon/settings.json
In there you will find a very long configuration file which I will display mine below and go through some of the key parts of it that are important to change.
{
 "alt-speed-down": 500,
 "alt-speed-enabled": false,
 "alt-speed-time-begin": 540,
 "alt-speed-time-day": 127,
 "alt-speed-time-enabled": false,
 "alt-speed-time-end": 1020,
 "alt-speed-up": 10,
 "bind-address-ipv4": "0.0.0.0",
 "bind-address-ipv6": "::",
 "blocklist-enabled": true,
 "blocklist-url": "http://john.bitsurge.net/public/biglist.p2p.gz",
 "cache-size-mb": 4,
 "dht-enabled": true,
 "download-dir": "/d0/torrent/complete",
 "download-limit": 100,
 "download-limit-enabled": 0,
 "download-queue-enabled": true,
 "download-queue-size": 5,
 "encryption": 1,
 "idle-seeding-limit": 30,
 "idle-seeding-limit-enabled": false,
 "incomplete-dir": "/d0/torrent/incomplete",
 "incomplete-dir-enabled": true,
 "lpd-enabled": false,
 "max-peers-global": 200,
 "message-level": 1,
 "peer-congestion-algorithm": "",
 "peer-limit-global": 240,
 "peer-limit-per-torrent": 60,
 "peer-port": 51413,
 "peer-port-random-high": 65535,
 "peer-port-random-low": 49152,
 "peer-port-random-on-start": false,
 "peer-socket-tos": "default",
 "pex-enabled": true,
 "port-forwarding-enabled": false,
 "preallocation": 1,
 "prefetch-enabled": 1,
 "queue-stalled-enabled": true,
 "queue-stalled-minutes": 30,
 "ratio-limit": 2,
 "ratio-limit-enabled": false,
 "rename-partial-files": true,
 "rpc-authentication-required": true,
 "rpc-bind-address": "0.0.0.0",
 "rpc-enabled": true,
 "rpc-password": "{6ecb749368f845dce8fdc0e62b01cdef63257183ULYIwru3",
 "rpc-port": 9091,
 "rpc-url": "/transmission/",
 "rpc-username": "lol-admin",
 "rpc-whitelist": "127.0.0.1,11.1.1.*",
 "rpc-whitelist-enabled": true,
 "scrape-paused-torrents-enabled": true,
 "script-torrent-done-enabled": false,
 "script-torrent-done-filename": "",
 "seed-queue-enabled": false,
 "seed-queue-size": 10,
 "speed-limit-down": 1500,
 "speed-limit-down-enabled": false,
 "speed-limit-up": 10,
 "speed-limit-up-enabled": true,
 "start-added-torrents": true,
 "trash-original-torrent-files": false,
 "umask": 18,
 "upload-limit": 100,
 "upload-limit-enabled": 0,
 "upload-slots-per-torrent": 14,
 "utp-enabled": true
 }
All of the items marked in bold we will be changing from its defaults upon loading transmission onto our Pi. The "Alt-speed*" entries are if you want to slow down your torrents during the day and can be accessed with a small turtle icon when you login to the Transmission web-server. Those can be set within the web interface and we don't have to worry about that.
"blocklist-enabled": true,
"blocklist-url": "http://john.bitsurge.net/public/biglist.p2p.gz",
This entry will be set to false and have a blank URL in place. This is fine if you trust the network you are sharing files on. If you do not, you might want to set this section up.
"download-dir": "/d0/torrent/complete",
This will be set to some folder in the /var section of your drive which is inconvenient. Direct this folder out to someplace that you can use it.
"incomplete-dir": "/d0/torrent/incomplete",
 "incomplete-dir-enabled": true,
This is important to enable and have a different path. If you do not set this up, everything goes into the download-dir folder and you will mix up your completed downloads with your incompleted downloads. No good yo!
"rpc-authentication-required": true,
 "rpc-bind-address": "0.0.0.0",
 "rpc-enabled": true,
 "rpc-password": "{123456789123456789123456789123456789123456789123",
 "rpc-port": 9091,
 "rpc-url": "/transmission/",
 "rpc-username": "lol-admin",
 "rpc-whitelist": "127.0.0.1,192.168.0.*",
 "rpc-whitelist-enabled": true,
The remote protocol connector is the most important part of configuring transmission! RPC enable and authentication will be enabled by default. You will notice the bunches of numbers in the "rpc-password" section. Simply delete that and insert your own password in there as follows.
"rpc-password": "simplepassword",
and when we restart Transmission it will scramble it and allow us to login. It's also a good idea to change the username to something other then "pi" or "transmission" for security reasons
"rpc-username": "lol-admin",
Finally, so you do not get 403 forbidden errors when logging in on another PC within your local network you will want to modify the rpc-whitelist to reflect your local area network settings. You may use wildcards to allow a range to access this. Also, you may disable the whitelist all together if you need to access your Pi outside of your house and you have a domain name linked to it. But for reasons of security we are going to leave that alone and let everything from IP address 192.168.0.1 to 192.168.0.255 have access to Transmission.
"rpc-whitelist": "127.0.0.1,192.168.0.*",
"rpc-whitelist-enabled": true,
Once you are satisfied with all of your settings you may save the settings.json file.
Restart Services for Transmission:
You're going to want to reload the Transmission service as restarting the service would overwrite your settings.json file which we do not want to do!
service transmission-daemon reload
Check Transmission via Web:
Finally, you may go to your Pi's website "http://mypihere:9091" and verify that you can now get in, if you typed in your username and password correctly you should see something like what is displayed below: 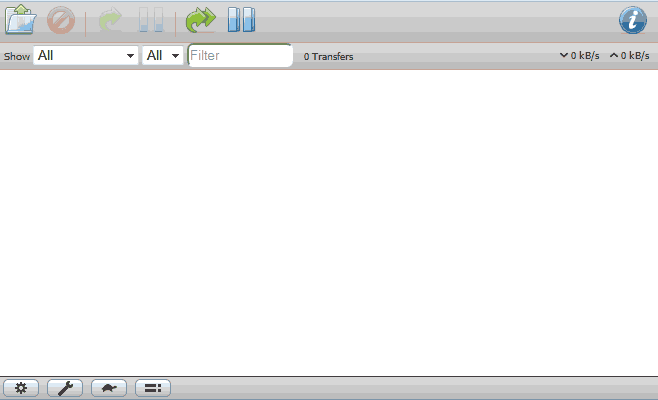
 Special steps dealing with Banana Pi and not finding the webserver after reboot:
The Banana Pi has a gigabit Ethernet chip installed and as such it takes a few seconds longer to initiate a proper handshake and DHCP address retrieval. As such if you attempted to pass a command such as the following.
update-rc.d transmission-daemon defaults
But you would quickly find out that even though the Transmission service is indeed running at start-up it does not connective you and gives you a server not found error. Yet, if you simply restart the service by hand
service transmission-daemon restart
It comes back online! This is because of a known bug where Transmission finds the IP address of eth0 and links its port to that IP. Without an IP on eth0 Transmission has nothing to link to and thus it sits in Limbo. The dirty workaround is you can nano into your /etc/rc.local
nano /etc/rc.local
Then add the following into your rc.local
sleep 5
service transmission-daemon start
sleep 2
 transmission-remote -n pi-userame:pi-password --blocklist-update
and save, this of course will result in a slower start up on the local monitor machine. But in a headless environment it is unnoticeable and the 5 second delay gives the Ethernet card of the Banana Pi enough time to wake up and give a proper connection. Since we're running scripts at startup minus well add one more line to update the block-list as well just to keep things up to date.
Performance of transmission on both Raspberry and Banana Pi:
On my raspberry Pi I was only able to download at around 750-800Kb/s which initially I thought it had a lot to do with the overhead of the processor. On my banana Pi I could download at 1.7Mb/S to 2.0Mbs which is so much better! Perhaps with the Raspberry Pi 2 they have gotten more efficient with their 100mbs connection. But it feels like on my old Raspberry Pi it felt like I was on a internet connection only half of its speed. Thanks for checking out my little article. Hope it helps you as it helped me over the months. END OF LINE+++