
For those who are curious: This is our Sleeper PC!
We're not entirely sure how many people want to see the very PC that is responsible for almost ninety-five percent of the content on this site. However, we noticed there was a thing going around social networks:
Show us your PC!
Now, in contrast to a lot of streamers gaming rigs as well as their battle-station of three to five monitors. Our setup is a little underwhelming but we do feel it's unique in other departments. One of those departments being that we took a giant ass server case. 16.5 inches tall, 20 inches long, 8.5 inches wide. We've had PC's like shuttles in the past and although they were cute. They were impossible to keep cool OR quiet. So screw it! We went in the opposite direction!
Read on if you want to know more.
What is a "Sleeper PC?"
This term came from the automotive world. Where a sleeper car is a car that looks like a stock vehicle but what is under the hood of the car tells a very different story with super-performance parts. A sleeper PC is much the same thing. Something that looks old but underneath the case has some very modern hardware inside.
Every mod has a beginning.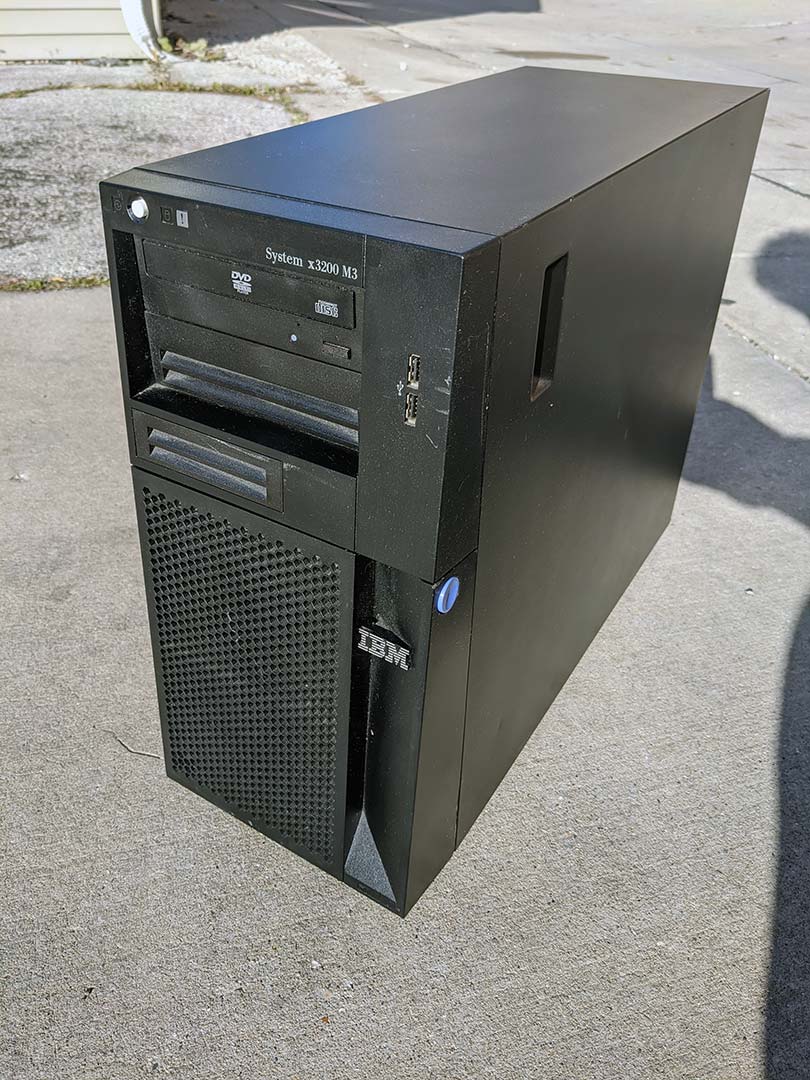
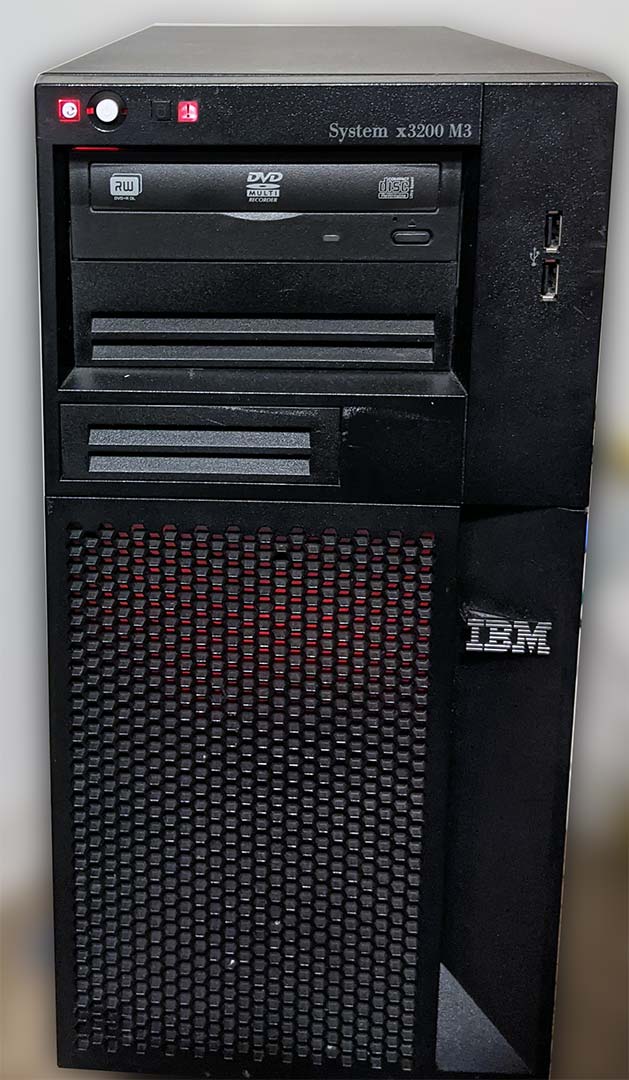
I would like to introduce to you the IBM x3200 M3 Server. A box that depending on its configuration can fetch a few hundred dollars an eBay was scheduled for E-Waste destruction. Now, these types of servers were used for a variety of things. From fileservers, VMboxes, webservers. This particular one was used as a server for a food market which then later got bought out by another organization that had a different IT policy and standard for servers. Thus, the drives were removed to be destroyed and we were asked to drop this off at the local recycler to have the rest of the server destroyed.
Needless to say. We're not good at following orders.
This particular PC had the following Specs.
- 4GB of ram
- I3 3.06Ghz processor with 4Mb RAM.
- Basic 300Watt Power supply.
- DVD-Drive
- NVRAM PCI Card?!?
Yeeeeeah we're not going to do a whole lot with this one.
If there is one thing that caught my eye when we opened this case is
"Wow! Super roomy inside!" -S
With the sides off of the case, we could still stand on it without the case warping. Good steel construction going on with this unit! It's ultra-wide which means that we could actually close the case with my Noctua heat-sink in it. It can easily accept a full-height motherboard. And it appears that most of the screw brackets are standard ATX configuration. So, we took it inside to begin the process of taking everything out of my garbage Chinese aluminum case and making the ultimate sleeper PC.
Disassembly time!
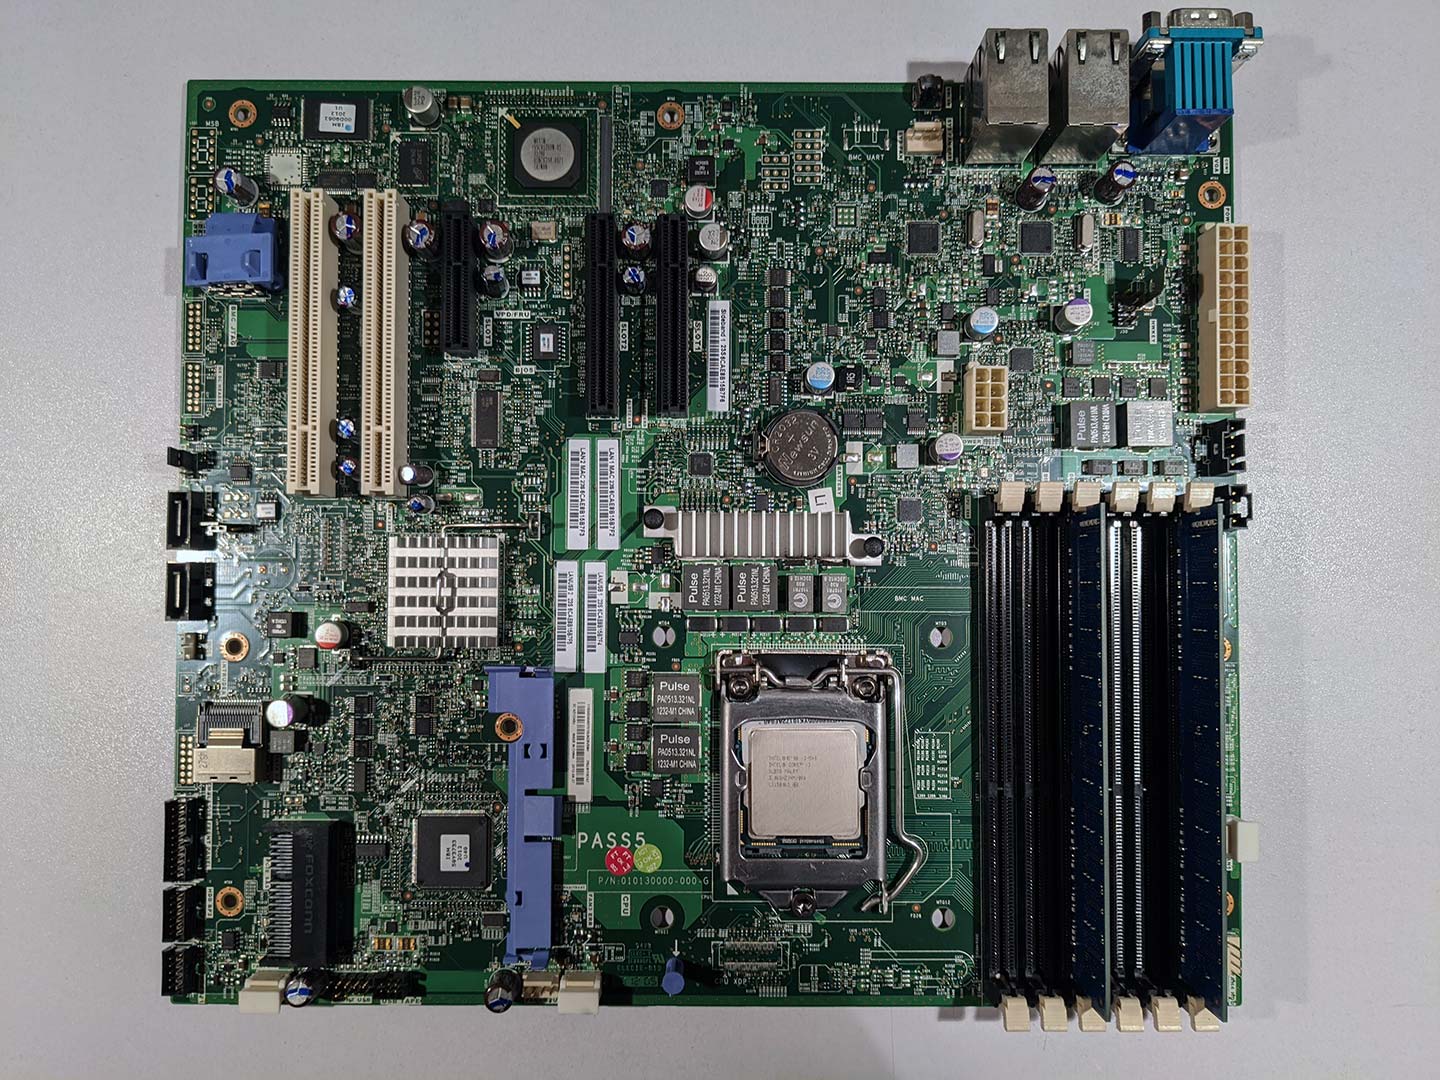
The first order of business is to test the unit in the basement with a fire extinguisher in hand in case it fireballs on power-up. Surprisingly it does fire up and POST. So! We remove the entire motherboard. Now, because it's an IBM server product we knew someone out there wouldn't mind picking up the motherboard and for the most part, we were right. $50 on eBay and it's gone. So right off the bat this thing is making us money and also we don't feel so bad in destroying an IBM server when others are going to put the parts to good use and we are just interested in the case.
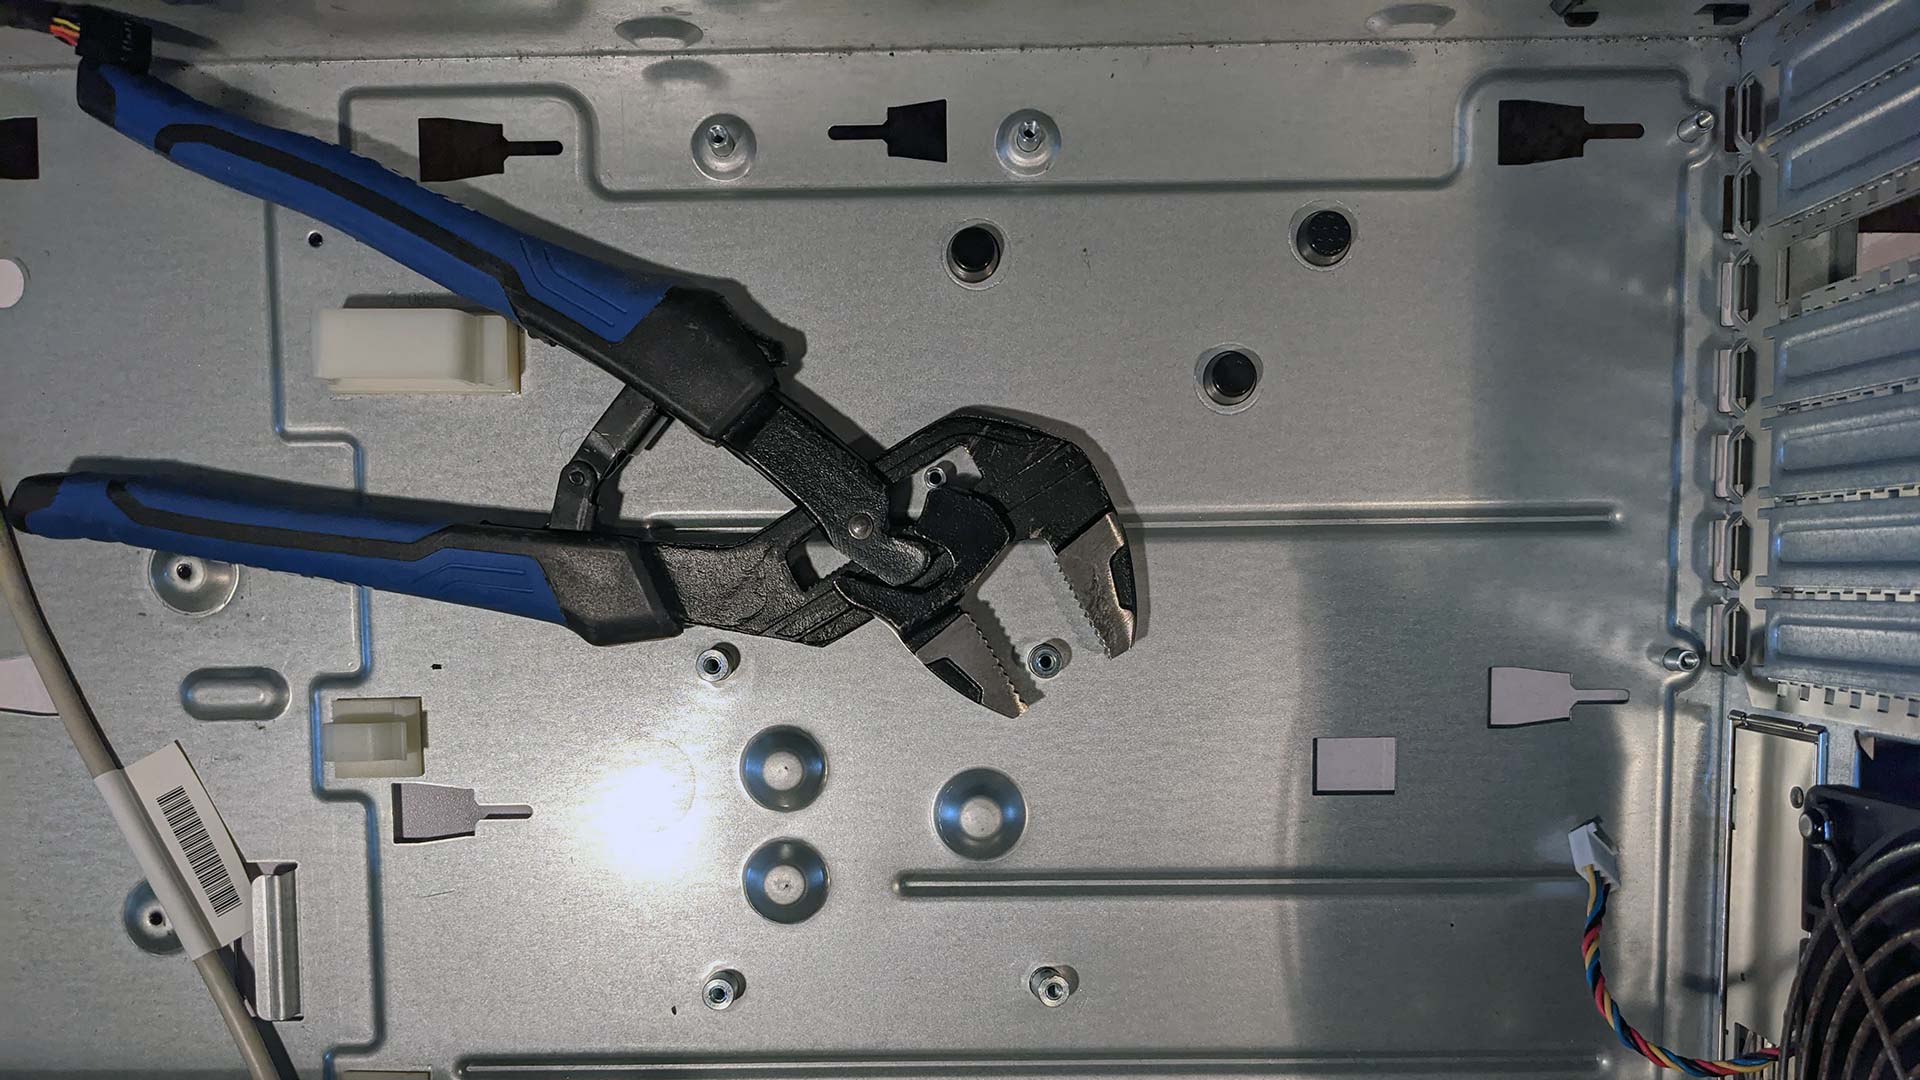
Okay, now that the motherboard is removed we noticed something rather annoying about this case. Now, it would not be a modded case if this DIDN'T happen. But most motherboards would either let the heatsink lockdown to the PCB of the motherboard. Or, most motherboards would have a cross-brace underneath. IBM decided to take it to the next level by using the processor supports riveted down to the bed of this case.
Luckily the rivets are very short and easy to remove by grabbing them with pliers and wiggling back and forth to pop them right out.
As for the parts of the bed that pop-up a little. We will be placing some gaffers tape down just to be on the ultra-safe side that my main-board does not ground out.
OMG! Clean that case!
Now, this may be a common-sense thing. But unlike a brand spanky new PC case that comes out of Shin-Zen China which has that faint smell of electrical fire when you open up the box. You have absolutely no idea what a used dumpster case has gone through. It could be home to rats, cockroaches, mold, etc. You don't want to bring that shit into your home!
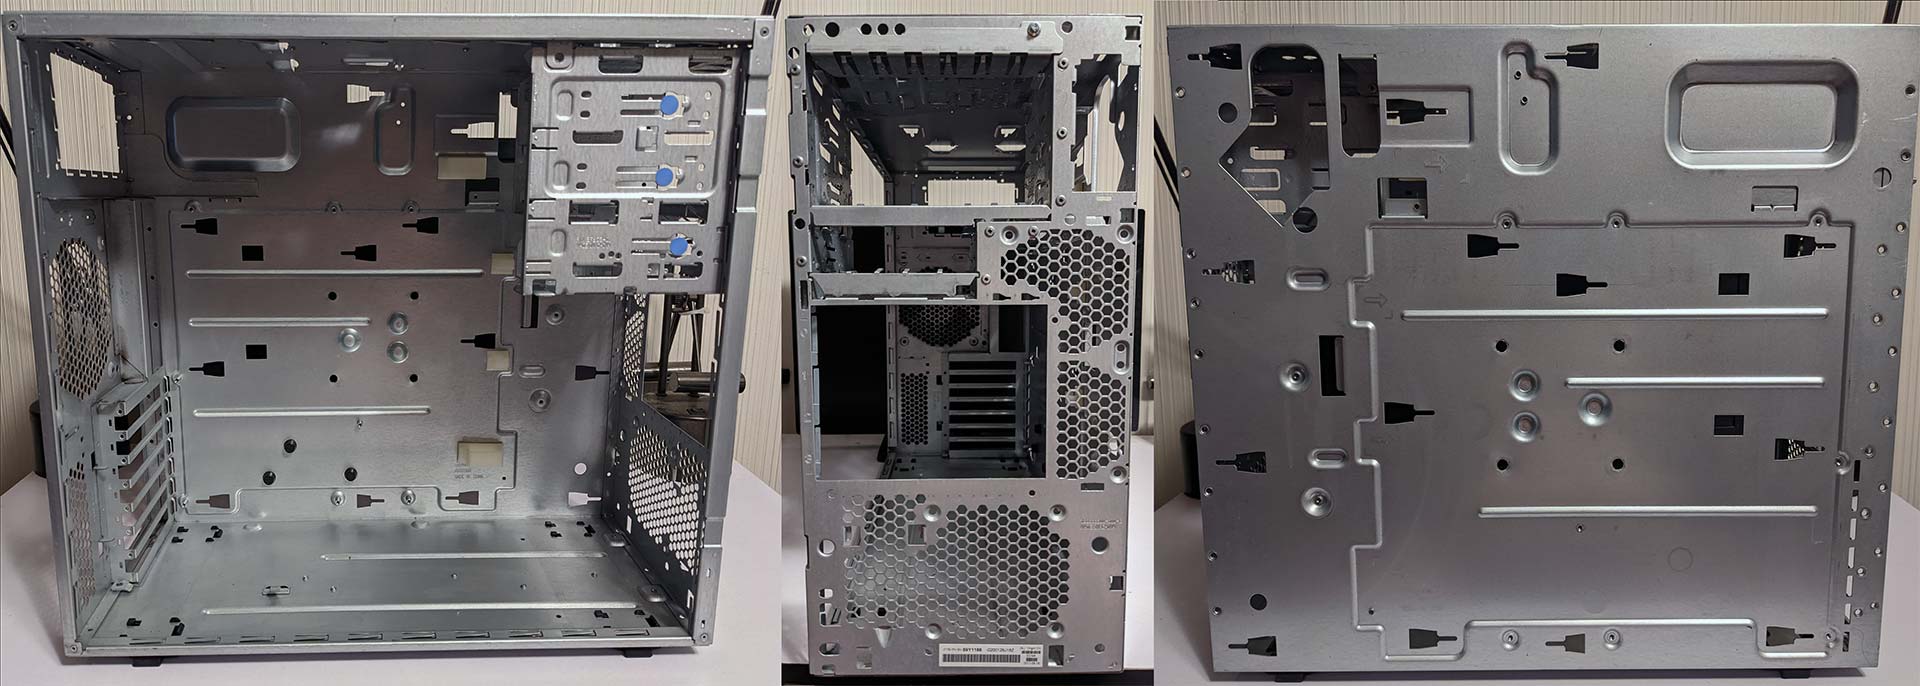
So not only did we strip this case down to bare metal to have everything exposed so we could blast it with a hose and towel dry. But as you could see in the pictures we removed the hard drive bays and the full-height brackets at the bottom. Since we have SSD and NO full-height cards having all of that extra metal inside of a giant waste of space, airflow restrictive, and just made the case 4 pounds heavier. So it's gone!
All of the plastics are also blasted with water too. Every bit of electronics even the switches for power and LED buttons have been removed from this case. The switches and fans (Where applicable) will be hand-cleaned.
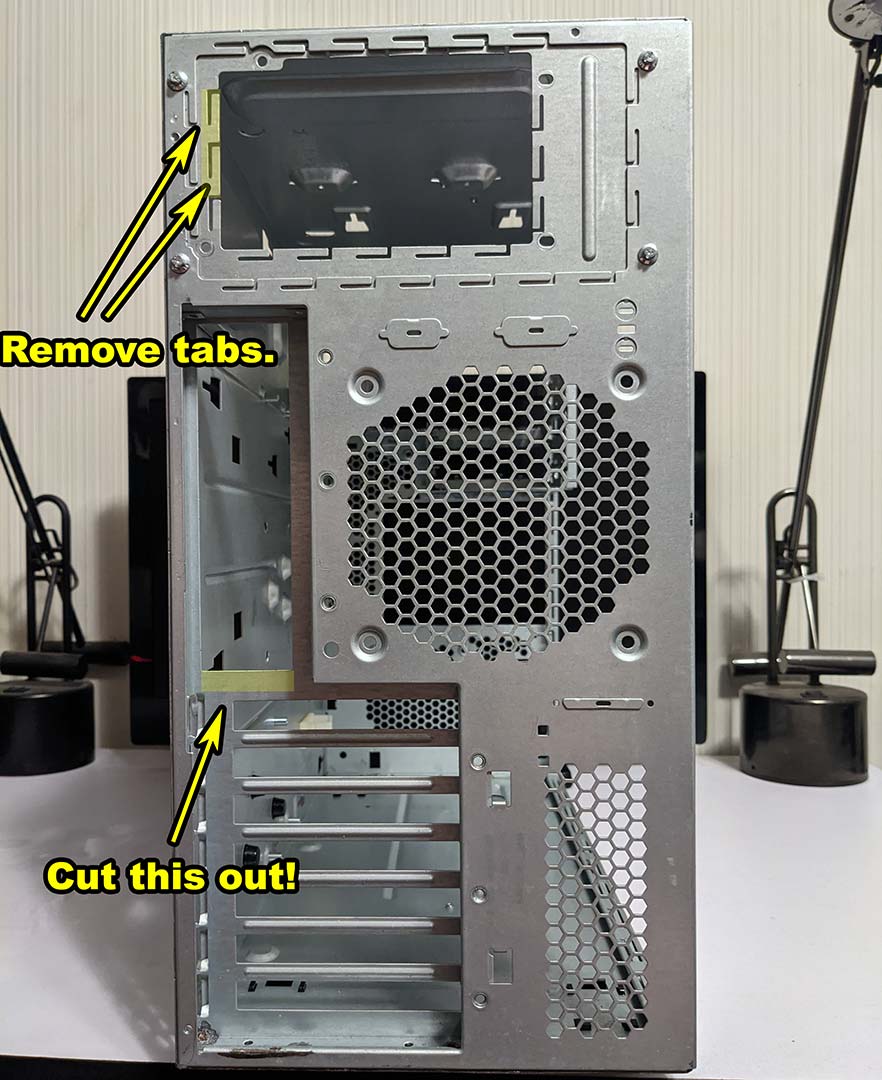
Like with the CPU bolts. Some modifications to the case will be necessary in order for us to fit a standard motherboard. IBM build this case for IBM products and not for anyone elses products. The first thing we have to do is remove the tabs around the power supply. You will see why in the later pictures. Now the little "L" brackets can be easily removed with just some pliers without too much of a concern.
The really annoying thing that IBM did is they made a nonstandard motherboard back-plate. Meaning, if we mount our motherboard without modification the audio-ports would slam into the case and thus we could not bolt down the unit. To fix this we had to bust out a rotary tool with a carbide bit to make a crude square so the audio ports do not et blocked.
Installation time.
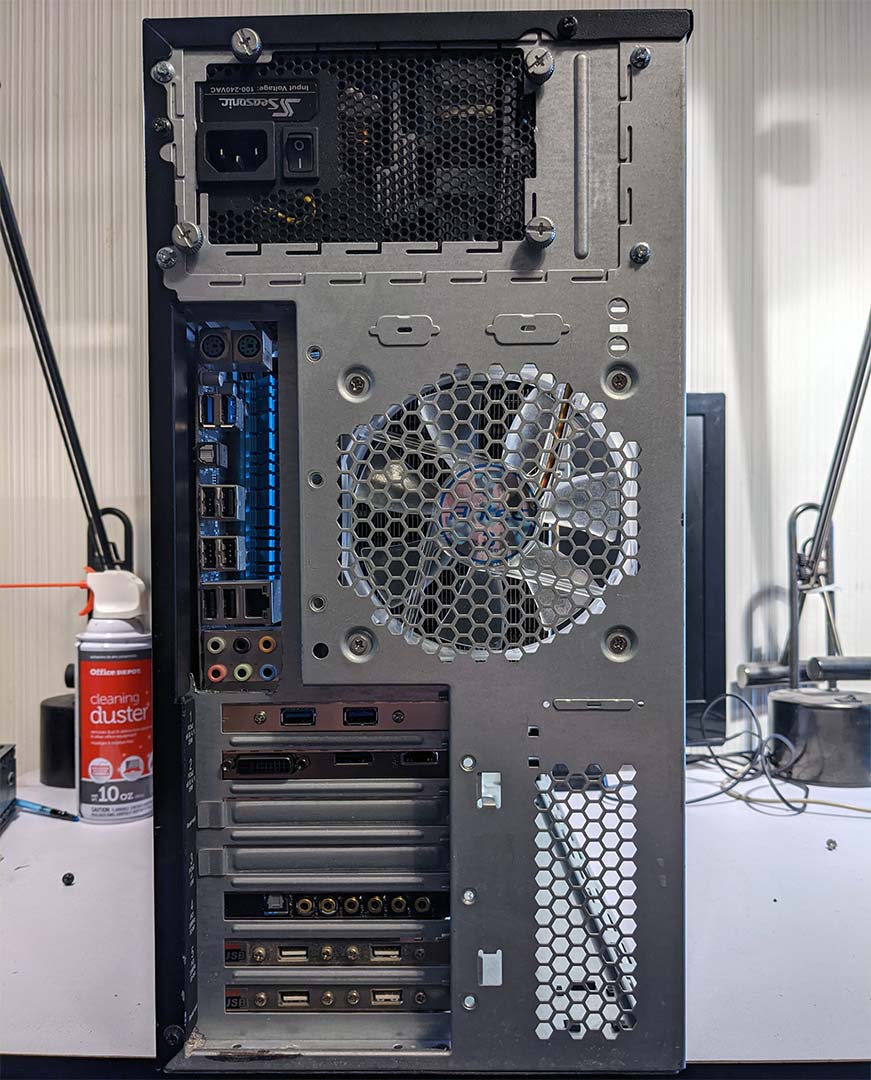
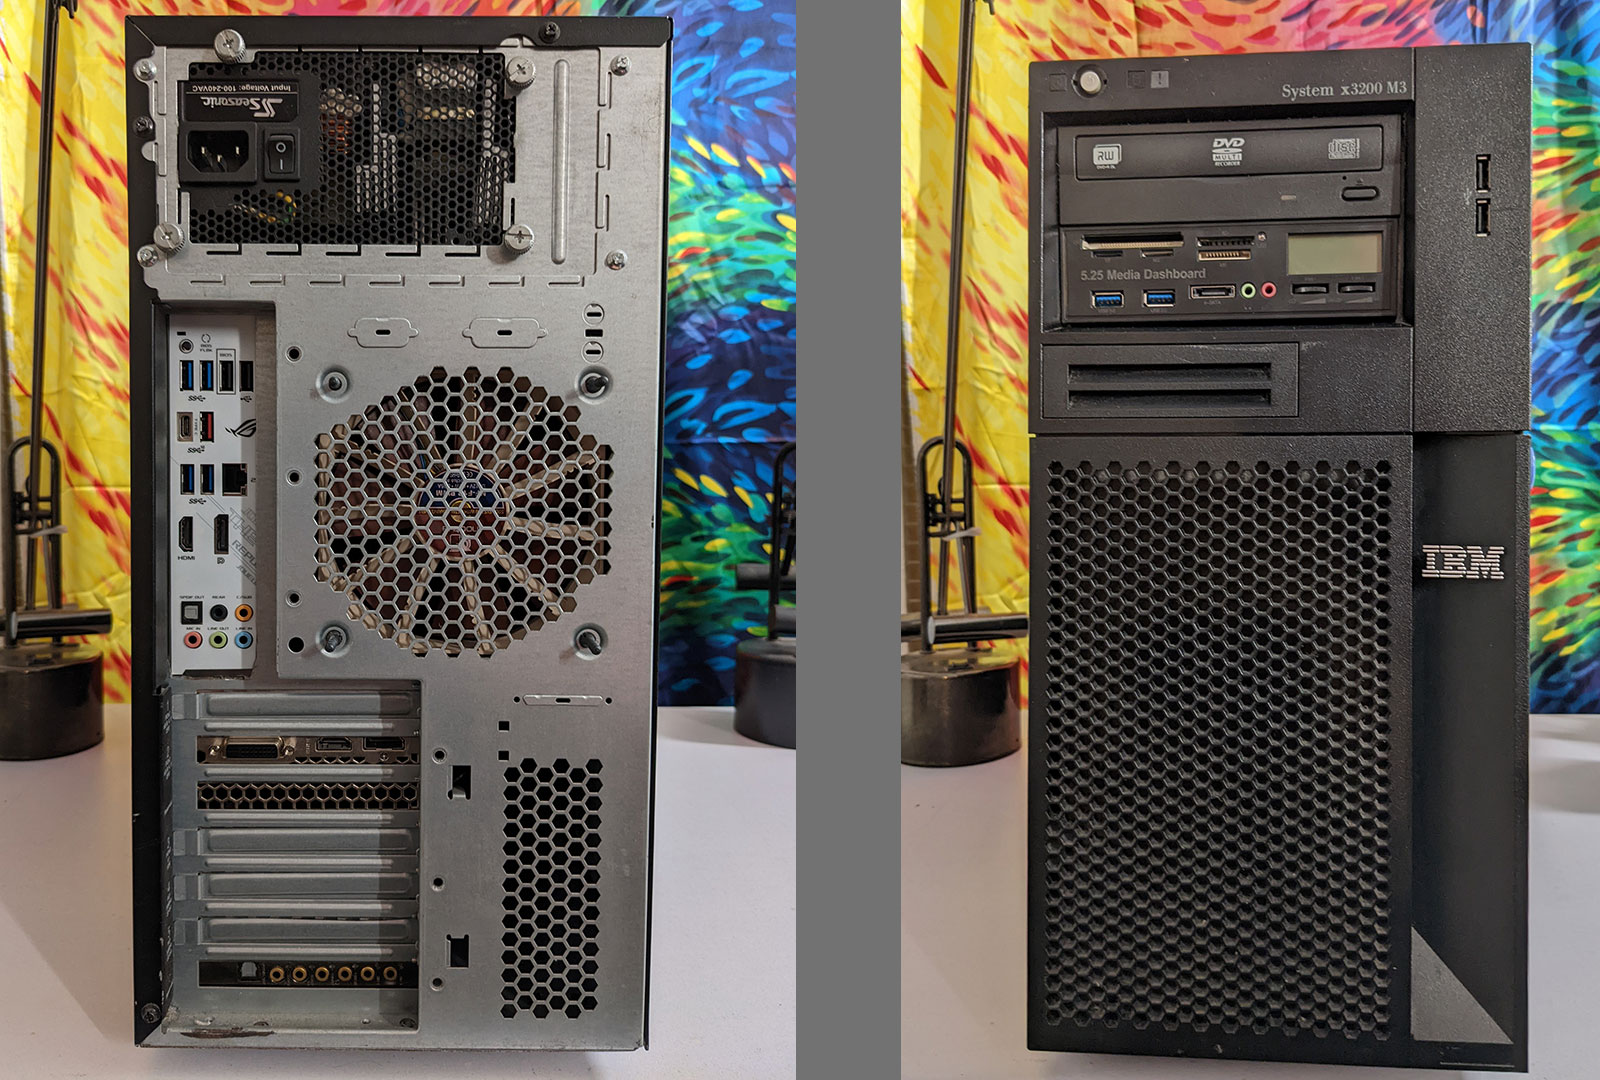
You can start to see what I mean when I had to cut out those sections of the case in order for things to fit. My SeaSonic power supply had the plug right on the edge and thus needs that area there the "L" Brackets are at. And as for the audio ports. Even though it was not the cleanest rotary tool job it works which is all that matters.
As for that Antec fan. Might replace that in the future with a Noctua. But for now, in its low setting, we can't really hear the thing.
And yes, USB ports are important to me.
OMG S!!! You put your Seasonic PSU upside down! What a n00b!!

A SeaSonic power supply is one of the few power supply manufacturers that make a "Fanless" unit. Essentially for those looking for quiet (Such as us) you pay a premium to have a power supply so efficient that it can survive on passive cooling alone. Now, the warnings all say that you're supposed to mount that power supply right-side up. This is under the assumption that PC case design has the power supply at the bottom of the case versus the old standard of having the power supply at the top. The logic for the power supply being at the time is to draw the warm air away from the CPU and push it through the power supply and out of the case. Allowing cold air coming from the front of the unit.
If we were to mount the SeaSonic right-side-up in this IBM case. That would be hundreds of times worse! Because we've cut off all circulation! To have it upside down at least offers a chance for the PSU to still cool passively so long as there is air-movement though-out the case. Now, we were super cautious about this at first by powering it on and taking temperature measurements. However, even upside down the SeaSonic is room temperature. We must've gotten the airflow just right within the case.
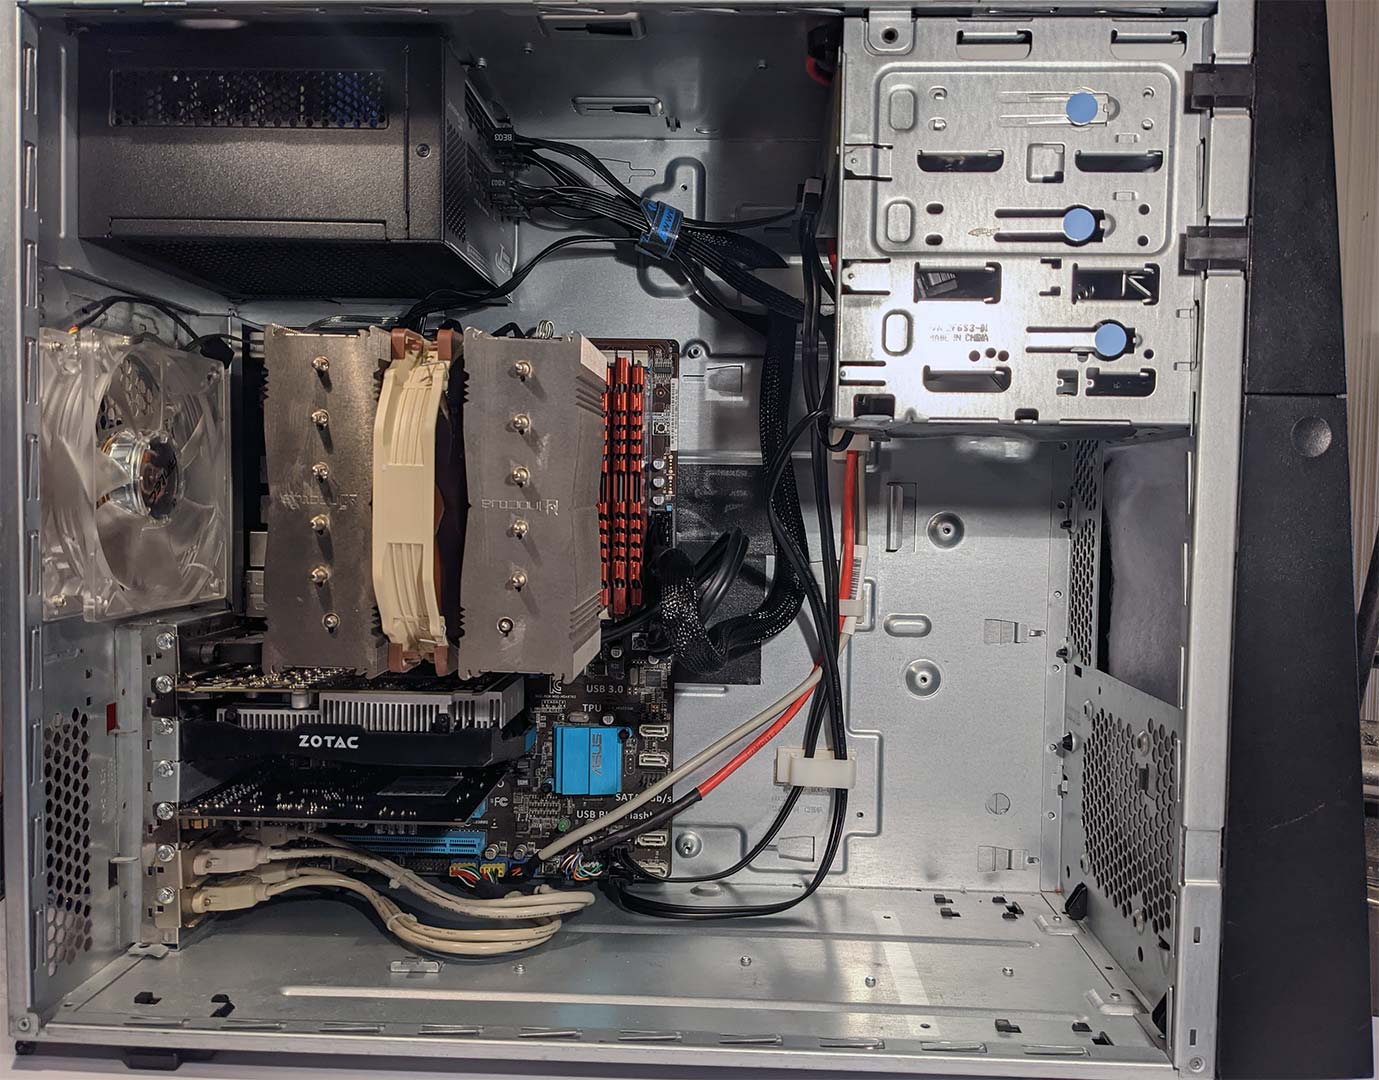
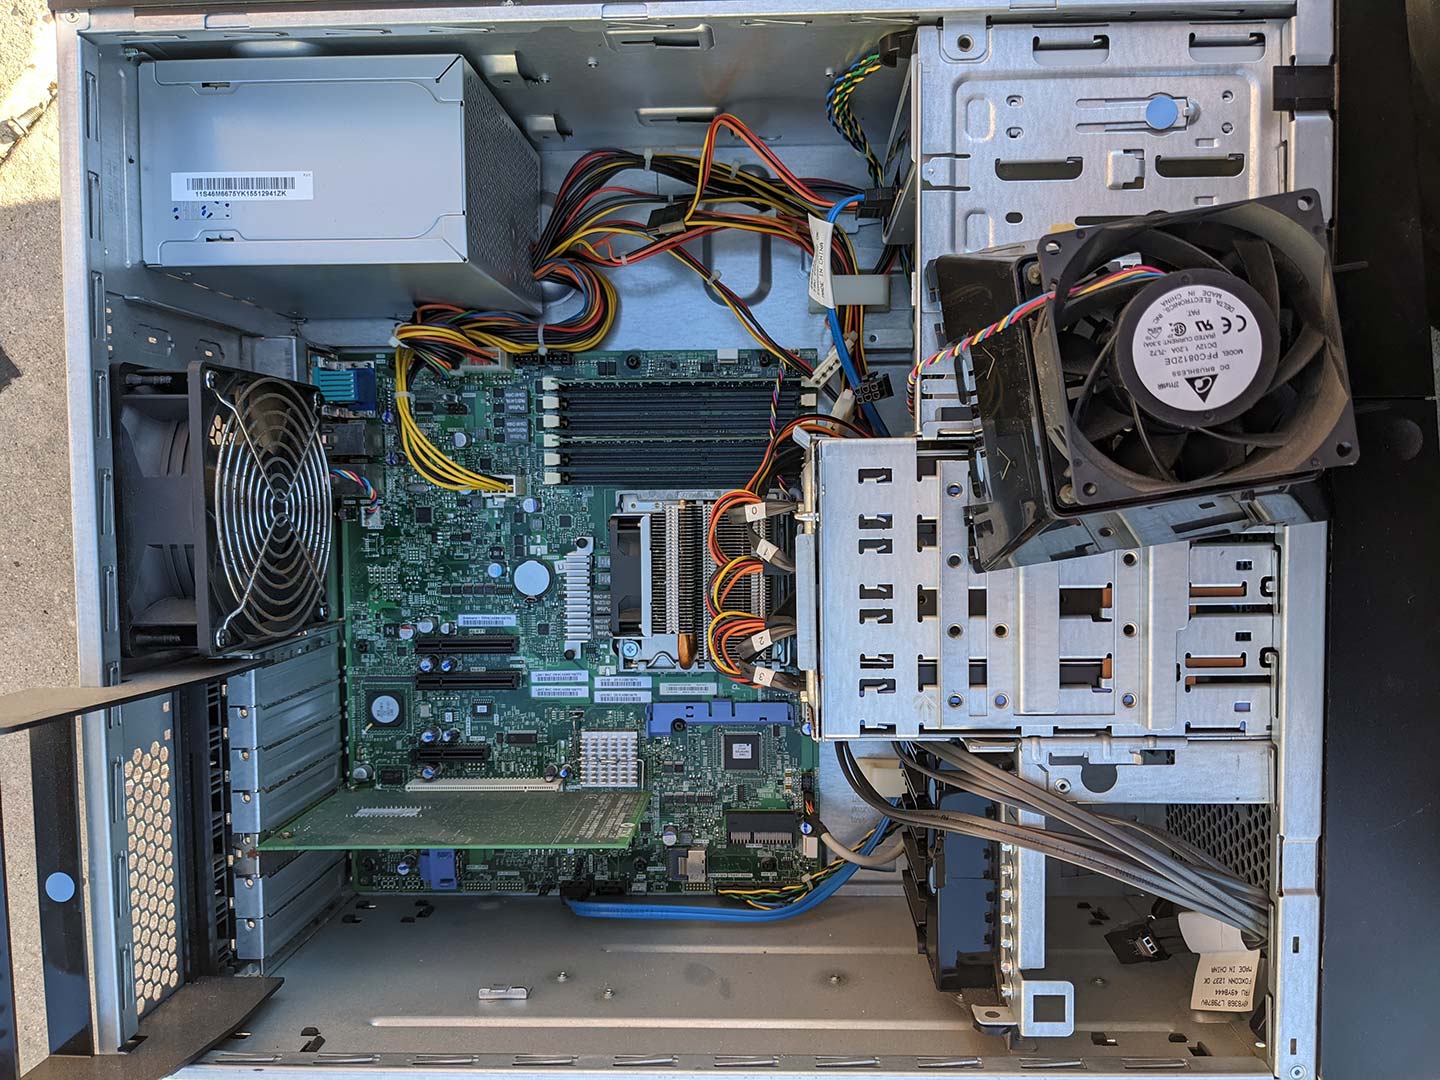
This may look like some kind of bizarre optical illusion with having a stupid-huge heat-sink and stupid huge case. But that is a full-size motherboard in there! We still have to do some more tidying up with the cable management but we're seriously liking how this is going so far! You can even notice in the picture that we removed the front of the case and put in some air-conditioner filtration material so that whatever air it pulls into the case (as all of the fans are exhaust) will at least reduce the amount of dust that gets sucked inside. I will probably have to make a mini-filter for the air-flow area above the PCI cards too.
We replaced the DVD drive with a DVD-RW drive. Drive bays are almost useless in their era of computing with M.2 and SSD drives but to us they are still good for storing all of the extra cables we did not use on my Seasonic power supply.
PC Specs:
We suppose this would be a good time to explain everything that is in my case.
- ASUS MSA97 R2.0 Motherboard
- AMD FX-8350 Eight-Core Processor @ 4.00Ghz
- 4x - G.SKILL Ripjaws X Series 4GB 240-Pin DDR3 SDRAM DDR3 1600 (16GB Total)
- Samsung 500GB SSD drive.
- LG DVD-RW drive
- Noctua NH-D15S 140mm Heatsink and CPU Cooler
- Zotac 1050Ti 6gb DDR5 graphics card.
- Creative Audigy 5rs
Most of the components in this system are just about 8 years old. But I can still play GTA5 @ 50-60FPS when we do want to play games. We also have plenty of cores where we can stream without it affecting our gaming performance we're good there. Otherwise, it's perfectly fine for all of the video editing and blogging that we do here. The ever-climbing expansion of Moore's law kind of flattened out around the mid-2000s. We partially blame the overall lack of innovation to demand better power. In the future when we do get a better motherboard I know that the Noctua can easily transfer over to a Ryzen board of my choosing. If I magically get a thread-ripper then we probably get a different Noctua!
But does it power up?!?!?!?!
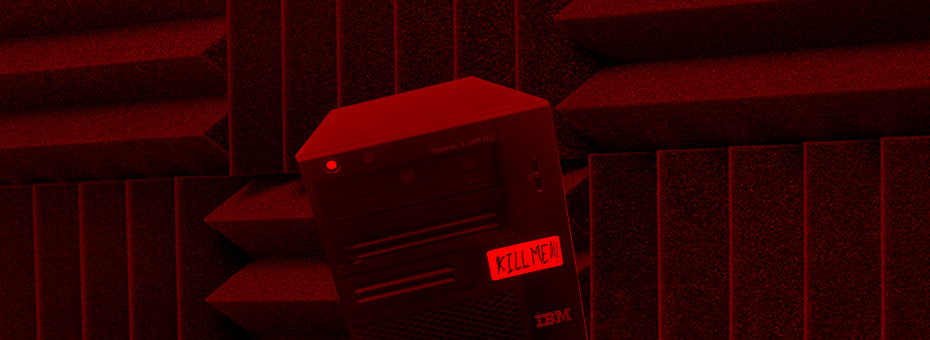
You're damn right it powers up! We also took the time to replace the LEDs at the top which had boring-ass green and orange LEDs with pure red in a quasi salute to Lenovo/AS400's where all of the status lights were red. We decided to hook the hard drive light up to the "!" as it was brighter. Finally, that extra red coming out through the air-conditioner filters is not an illusion. We installed a 160mm fan with LEDs in the front of the case so that air can be drawn into the case.
TO-DO
There is probably one last thing we will order for this case. Outside of new motherboard/CPU/ram. C'mon guys! It still works!
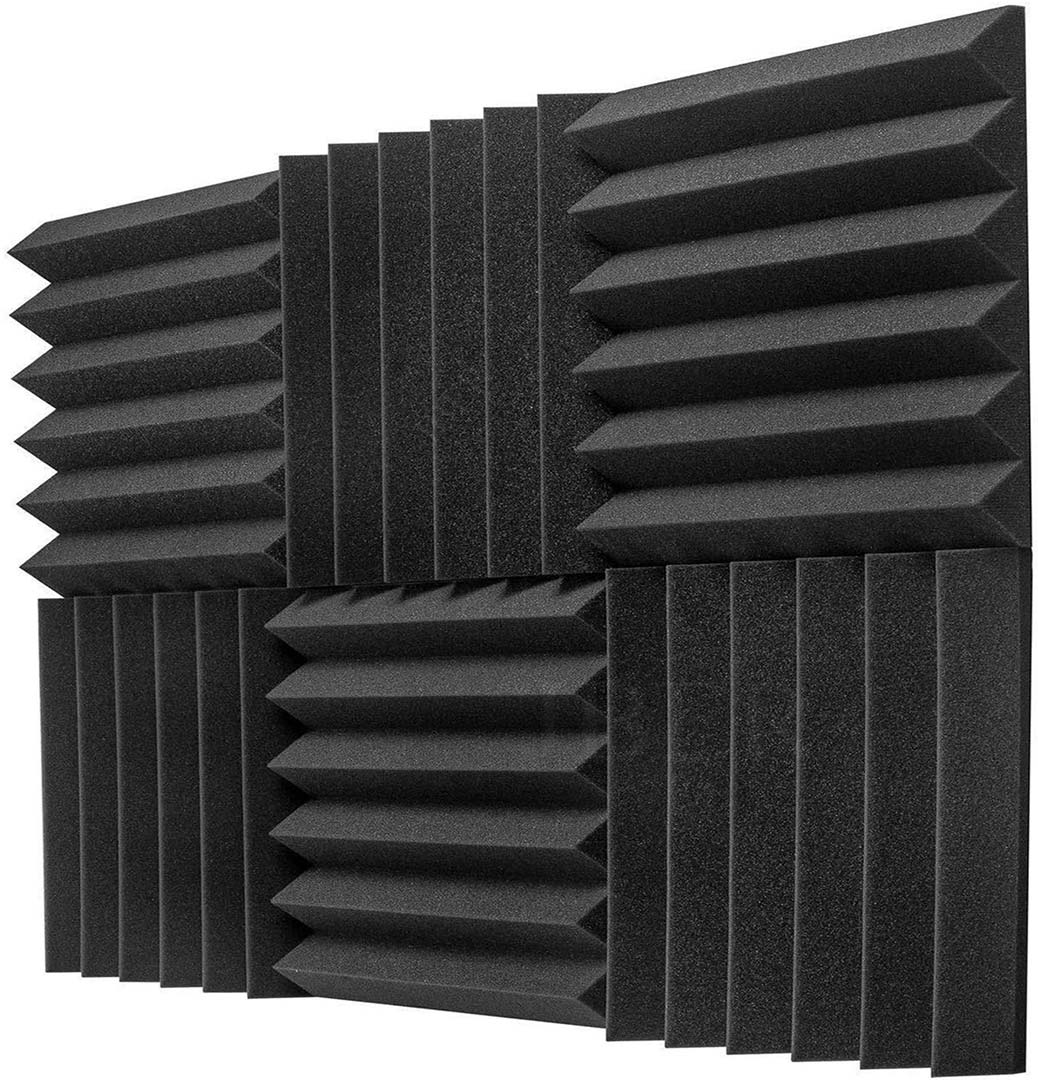
Soundproofing foam on the inside of the case - Because despite the fan motors being quiet. There's this low-pitched whistling sound that happens when we close our PC case. and as awesome as it would be to have every component of his system fan-less we are ultimately faced with a reality that we have to deal with fans to keep everything cool. Normally, sound-proofing foam is a no-go because cases are small and the foam would act as insulation making the case much warmer. However, as you could see. going big will pay off for us because i could line the side-cover, the bottom, and some of the drive-bays with foam to reduce the amount of sound that bounces around inside of this case.
Tap into your inner pyro.
Oh yes, If you are going to do this to your case. Be sure it's fire-proof. That is absolutely crucial if you are going to play with sound-proofing foam anywhere near electronics!
In fact, take one of the squares out yourself and set it on fire. If it extinguishes after lighting a corner on fire then it's good. If the entire square burns then your vendor lied to you and do not install that foam into your PC! Don't breathe in any of the fumes when lighting it on fire. Oh, and go outside in a parking lot or something. Don't set buildings/houses/cars on fire when you do this. We're also not responsible if you set yourself on fire.
Final thoughts:
We're not sure if we'll ever buy another PC case again. Even if this one gets trashed we'll simply find another server or something that is already used and mod/hack/spray-paint up to taste. IBM as a hardware company is long gone. The Point-of-Sale industry going off to Toshiba and the rest of the industry going off to Lenovo makes having an IBM case almost retro in a sense. As a company, IBM put a lot of thought into how their servers were designed as we could at least appreciate that when working on their case which we later found out was contracted by Foxconn to make.
Perhaps it's even more amazing that we're still in the standards of ATX computer cases for almost 20+ years.
Before you shop for that shiny new gamer case. Ask yourself if you see yourself with that computer 10-15-30 years from now? Will all of the acrylics shatter? Tempered glass crack and spider? All of the tin turn to rust? When all of it rusts and shatters will you add barb wire to your case for that Mad-Max industrial feel as it hits year 30? Go out and claim your own case. Make it yours and unique. Even if the ATX standard changes just add some more bolts and screws to secure the next board in its place and keep going!
Update 07/15/2022:
We have since upgraded the motherboard again! This time, adding a ridiculous GPU heat-sink to actually utilize all of that space we have inside of our case. Click here if you wish to see what happens next.
That's all server has to say.
+++END OF LINE
Ello, I've got an old Lenovo ThinkServer TS100 (IBM System X3200 M2 with a new logo) and I have been wanting to do something similar to this, Just curious, Was the front panel on the M3 proprietary as well? Just curious.
The front panel (i.e. the LEDs, power button) was indeed proprietary however not all that impossible to re-wire. Originally I snapped the straight line connector into two-port connectors. sanded the sides so it could fit nicely into a generic board. Eventually I found a 9-10pin USB header connector from a dead PC case, spliced the wires together (solder and heat-shrink) and it makes connecting to my ASUS motherboard header so much nicer.
On my X3200, removing the front panel assembly was actually remarkably easy as it came on this blue plastic tray that you simply had to press and pull back to remove. From there, I replaced the green and orange LEDs with red ones.
As for the USB header in the front. That one was a little weird. As the first USB port is wired correctly the second one is not for a generic 9-10 pin header. But I got those working as well. So not only do i have the 5.25 bay to assist with USB 3.0. but the 2.0 naturally built into the case work too.
Hey there! I'm trying to do a similar thing with a similar case, and before I pull the trigger on the case, I'd like to ask: do ATX and BTX motherboards have similar screw spots? I'm either iliterate and missed it or there's no parts that mention how did you get the motherboard secured in there (with that gorgeous big fat tower cooler no less).
(I'd also love to talk old hardware, say hello to @fauxpasz on twitter sometimes?)
Thanks a lot! Server protect you!
Hello Faux and thanks for checking out this blog.
To answer the question about BTX/ATX. screw hole positioning it different in respects that positioning of almost mirrored. but not quite. Thus, it would hard if not impossible to install a BTX board into a IBM case like what we did. It would be ATX based .
That being said. MOST of the posts actually lined up with an ATX motherboard perfectly. The only thing I did add later on was a plastic stand closest to the proocessor. Because I had to use pliers to rip out the socket posts in that area . There was really nothing to screw into the lower-right portion of the motherboard.
This didn't really create any massive stress on the board as we were able to secure it in the corners as well as the left-hand of the board (where the PCI-display and audio cards went in)
Again, thank you very much for checking out this blog! and server protect you!
- S
Hey I did the same thing with my x3200 that I had laying around. It's an awesome case.
Out of curiosity, did you ever get to make the front USB ports work with your mobo? I tried but the connector has a pin on the wrong side and i'm working on the pinout to see if I can make it work.
Cheers.
I did! But I found out they broke really easily! Lol!
I had to take out that circuit and re-do the male headers and then re-assemble.
I Think i remember something with the USB connector and how the ground pin header was on an odd pin instead of even. I have another X3200 i'll be converting (streaming/Digitizing/Render box) so i'll pay closer attention and see if i have to change it on the next iteration.
Same thing here. I put an MSI Ryzen5 board in mine. I'm still using the 4 drive bays (using up various HDDs around the house), and booting off a NVMe stick. I'm waiting (and waiting) for the media bay for the floppy drive bay (had to track one down that has headphone/microphone ports as well). The USB2 ports on the front are still functional, and for USB3 I have a powered hub on my desktop.
If course, I used a label printer to make a new nameplate with the mainboard's model number (as close of a font to the "System x3200" text as I could find), pulled off the IBM badge and stuck the MSI sticker there. Then the Ryzen and Radeon stickers are on the bottom corner where a factory-built machine would have them.
Nice! It's good to hear that people are re-using the IBM cases out there. Our IBM case has been upgraded as well to a Ryzen. And still digging how much room there is to work inside.
Thanks for checking out this blog!
- S
This pc is beautiful, i tend to want IBM cases too, i can't afford to ship them to where i live though. Cool build, if i may suggest, you need to add some of those plastic assemblies that slide over the heatsink to optimize airflow through the back so that the thermal zone of the vrm and chipset along with the graphic accelerator card will be a seperate thermal area, you can get massive gains in cooling performance by simply taping off sections of the front that are unused like under the optical drive bay as else the pc might spit out hot air through the front vents, especially when silent and cooling is suboptimal. My own pc sounds like a fighter plane to be honest but then i only use it for gaming twice a week. I cut the pwm cords :P.
Hello there!
Just want to say thanks for checking out my blog and for the comment! Super appreciated! A PVC Cowl vent to control the flow of cold versus heat kind of like what IBM originally did would probably be my next step past the sound proofing foam. I'll have to look into a way to do it nicely.
Thanks again!