
Basic boi time in Second Life - from prims to mesh. How to put your art into SL.
It's been a while since we touched the "Metaverse" category within our blog, and we figure to add a tutorial on how to do something that seems mundane at first. This is adding a texture to an object to show off your art in Second Life. But we're going to go at it in the most convoluted way possible. Why do you ask? In part, this is why we learned how to use the 3d software "Blender". By taking very simple shapes and exporting them into something Second Life can use.
I suppose in some respects. These same principles we're about to do could be applied to other engines as well. On top of this. We wanted to start with something that *hopefully* will not make people's heads explode!
Read on if you want to know more.
In the beginning.
We'll start with assembly coding for the 6502 microprocessor and-..
Whoa! Way too far back.
Starting with Second Life.
If we were to describe possibly the best feature, which some would describe as both a blessing and a curse. Is the ability to make "Prims". What exactly are prims?
Prims are a series of 3d shapes that Second Life can easily store in a mathematical fashion. In respect, a lot of your 3d video games like Half-Life, Quake, and Doom, just to name a few, used primitive building for designing maps. It was functional in that a designer could place a series of shapes in a certain formation, like buildings, roads, etc. Texture those roads. And save it all without having to jump in and out of a 3d party software (short of Photoshop or GIMP for texturing.)
It's simple to store. Just like the games of old. When you created a "DeathMatch" or "Capture the Flag" map and saved it. Depending on your 3d engine, it took that simple geometry and allowed it to 'bake' false lighting, and if your prims were configured correctly, it will then save a 'hull' of your geometry into the 3d engine for it to better optimize and understand.
The same goes for Second Life. When building a Metaverse engine in 2008, Blender was nowhere near mature in the 3d rendering war. You had Maya, 3dsMAX, Lightwave, and Cinema4D. And all of them wanted to be declared the 'standard' and attain that position that Adobe has carved out for themselves (and have exploited. Because Adobe has taken on the slogan of "Fuck the Artist" with their introduction to AI and costly monthly subscriptions).
So, Second Life introduced a way for people to 'build' inside the metaverse without the requirement of external software. Although we have not completely reviewed Facebook Meta, we know for a fact this does not exist in VR-Chat nor Tower Unite (Could be wrong on this one, we've seen some weird condo builds there). But in 2008 this concept was kinda remarkable! And from the Linden Labs administrative point of view, this was a 'safe' way for users to interact with their software.
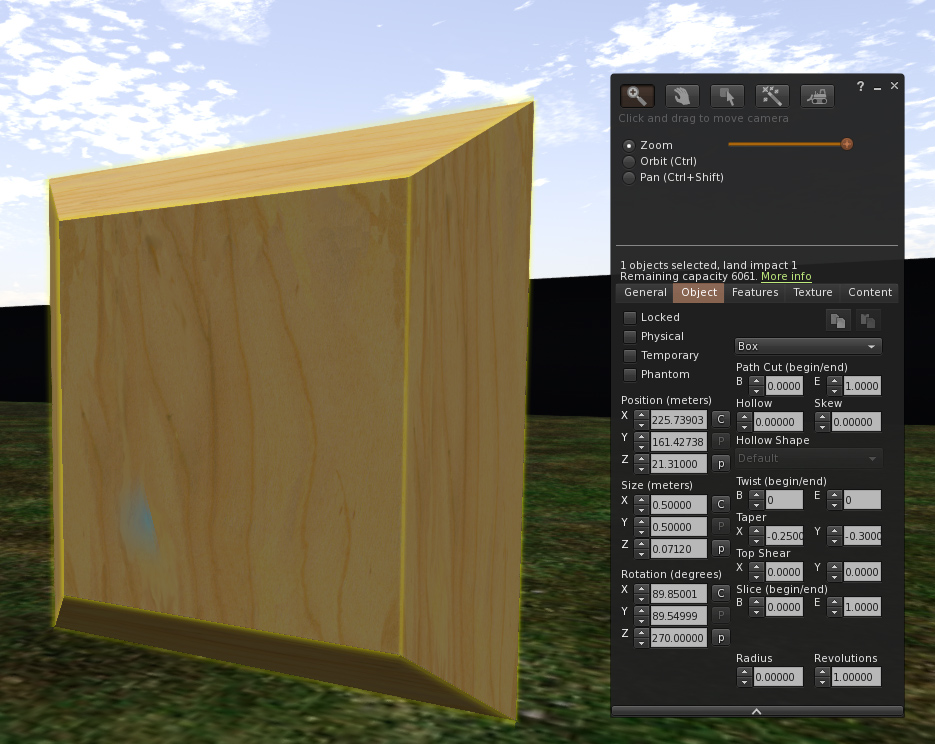
Now, we could take that square. Go into the 'Object' tab to taper one side by -0.25. Ctrl-Shift mouse-drag on the blue boxes to stretch the Z-axis of my box. Then Control+Mouse-Drag on the Y Rotation and you get what we have pictured above.
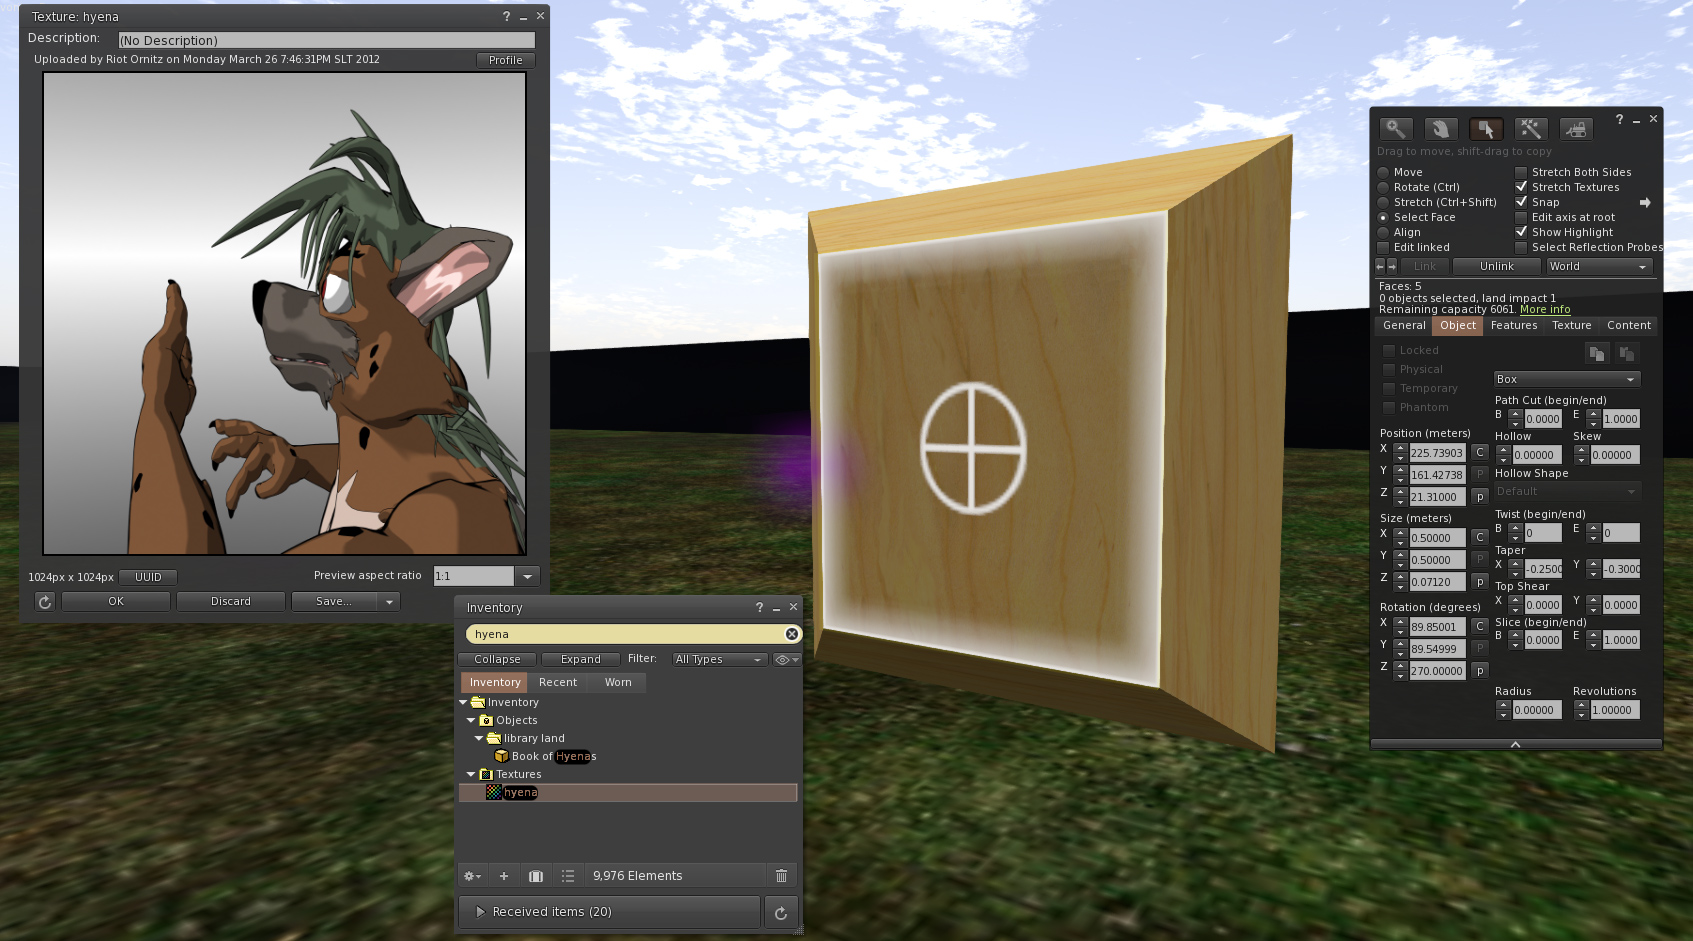
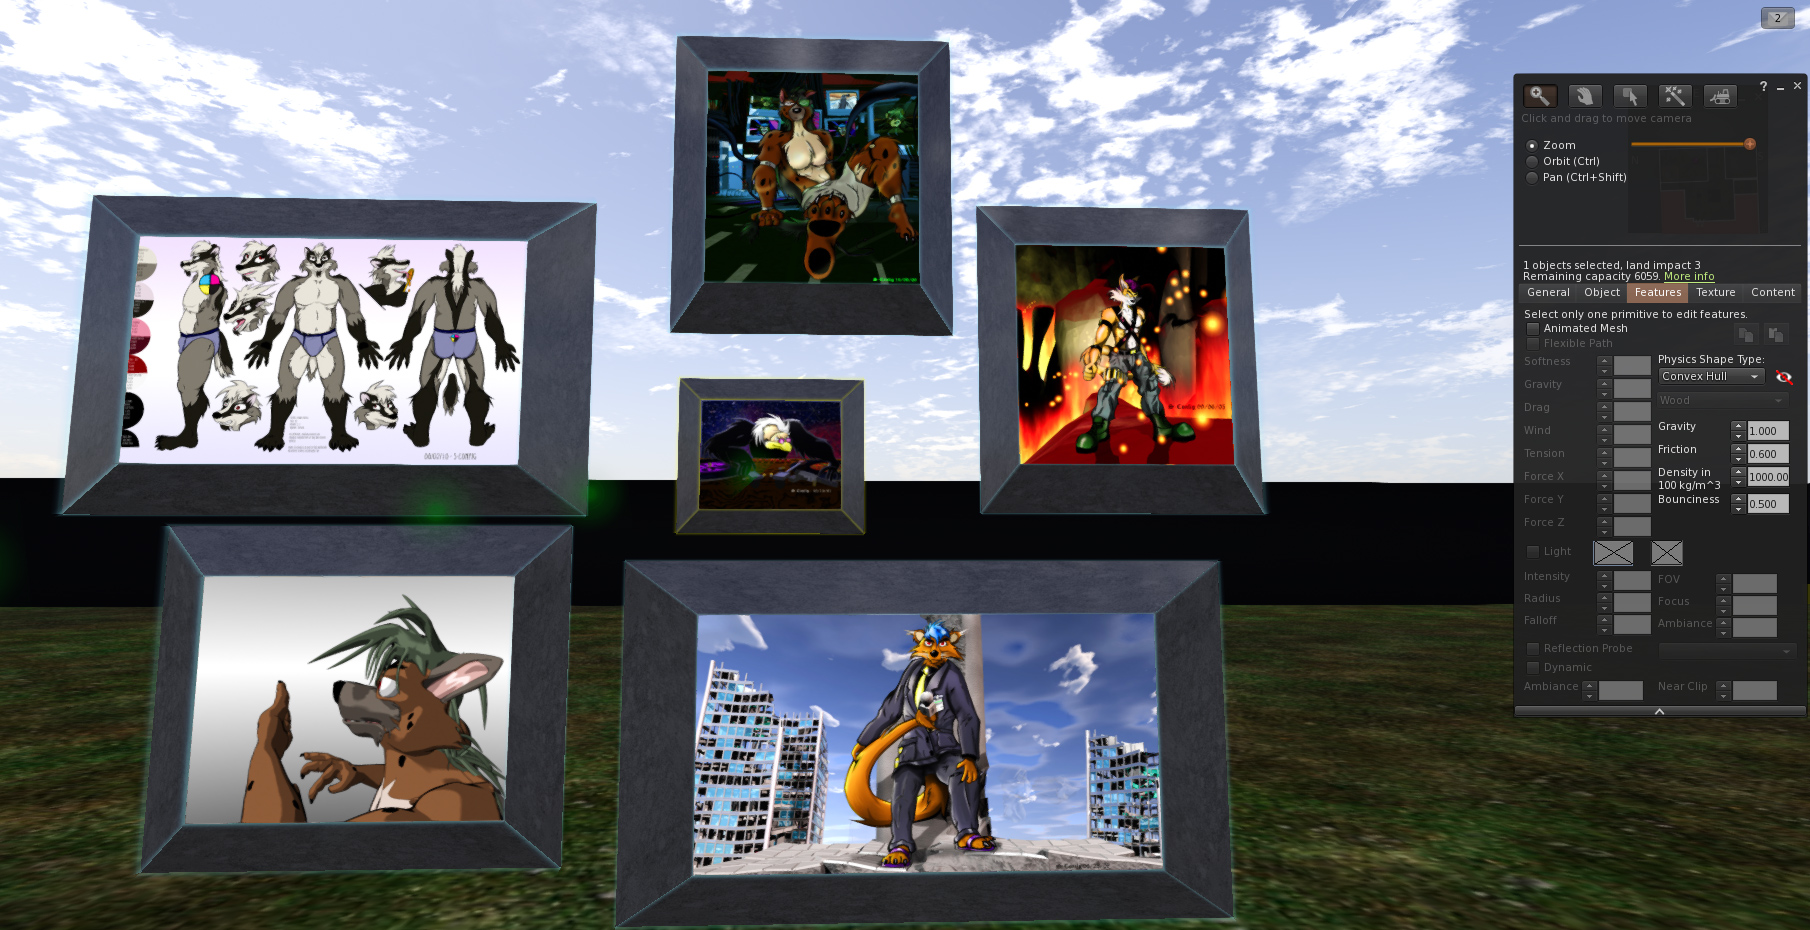
Now, we don't want to apply the texture onto ALL faces of the prim. That would look a little fucked up having the image where the frame sides are. Instead! In our object editing tab, while the Prim is highlighted, We will choose Select Face and then click on the face we want to modify. Now, if we open up our inventory, we could apply a photo that we took in SL. OR! We could apply a texture from an external program and upload that to Second Life (For a nominal price of 10 lindens if you have a basic account, Or NOTHING if you are on Open Simulator)
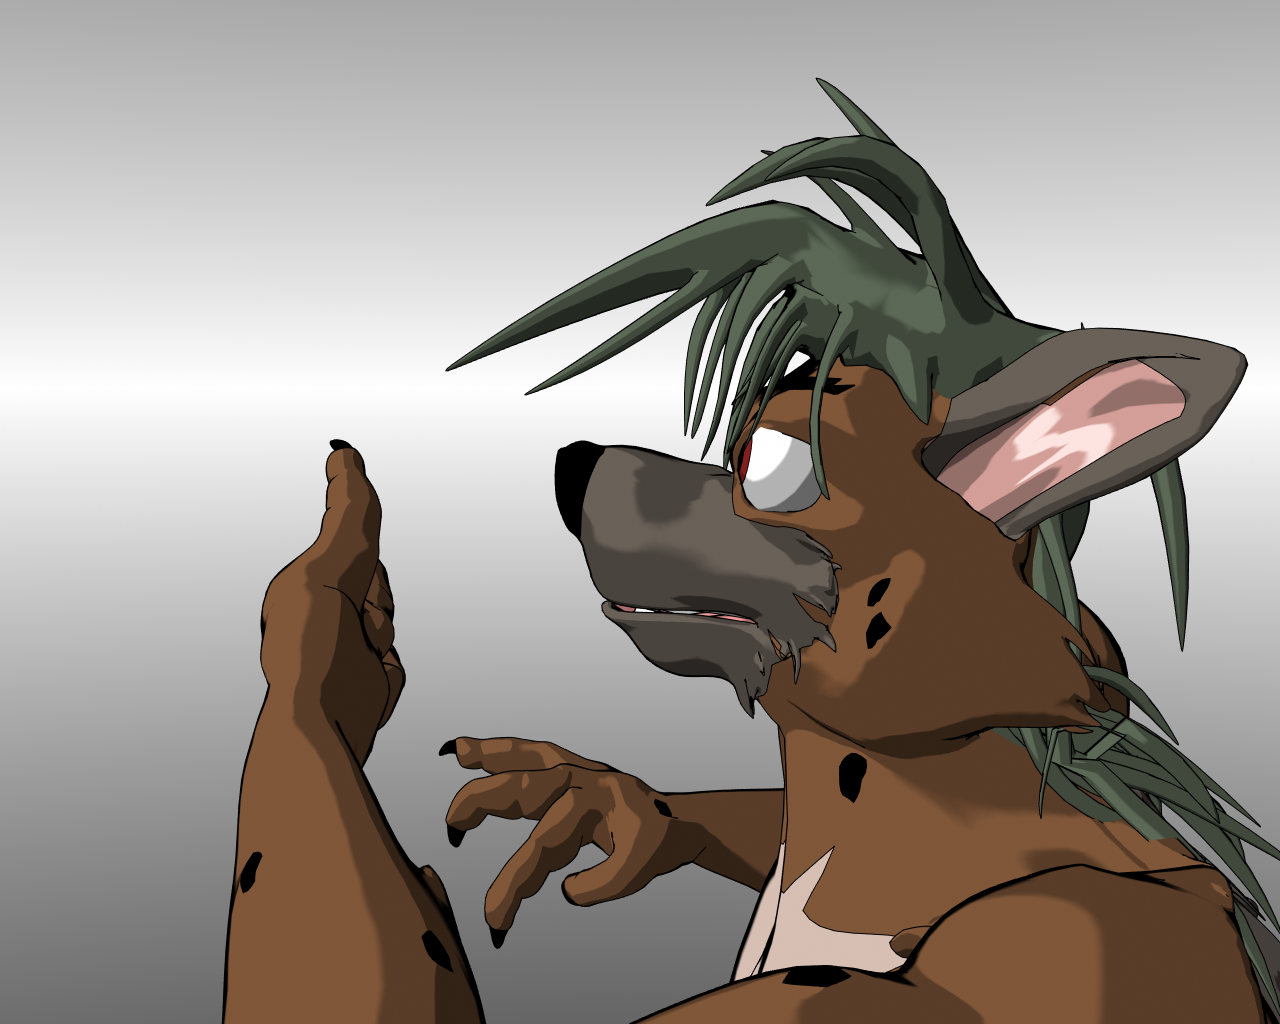
A little bit of a technical note about uploading. Maximum resolution is 1024x1024 or a 1:1 scale because of the nature of applying 'textures'. The original piece was done in Lightwave 6.x, which at the time we had a PC with 1280x1024. So, instead of letting Second Life get weird with the image. In Photoshop for example we went into Image > Image Size and sized it ourselves to 1024x1024, saving it as a TGA file, which is a lossless raster format that Second Life happily accepts.
Do you -really- need to go 1024x1024? Some people would argue that if the size of your painting in the metaverse is small, such as 0.2 meters square. Just save as 512x512 and save everyone some GPU ram/frames. Which hey! We would agree if we were still rocking 2008 hardware. But since we have video cards that now have GIGS on ram on the GPU alone. We're probably just fine.
If for some reason you are modifying textures in a game that disallows changing geometry, then the approach we would've taken is "Pillar boxing" my picture by adding black above and below so it's 1280x1280, then reducing the size.
Okay, with a simple mouse-drag of the texture onto the side of the prim we have exactly what we want.. Kinda!
- It's too dark! (Due to the prim being affected by the environment of Second Life)
- It's still 1:1 !!
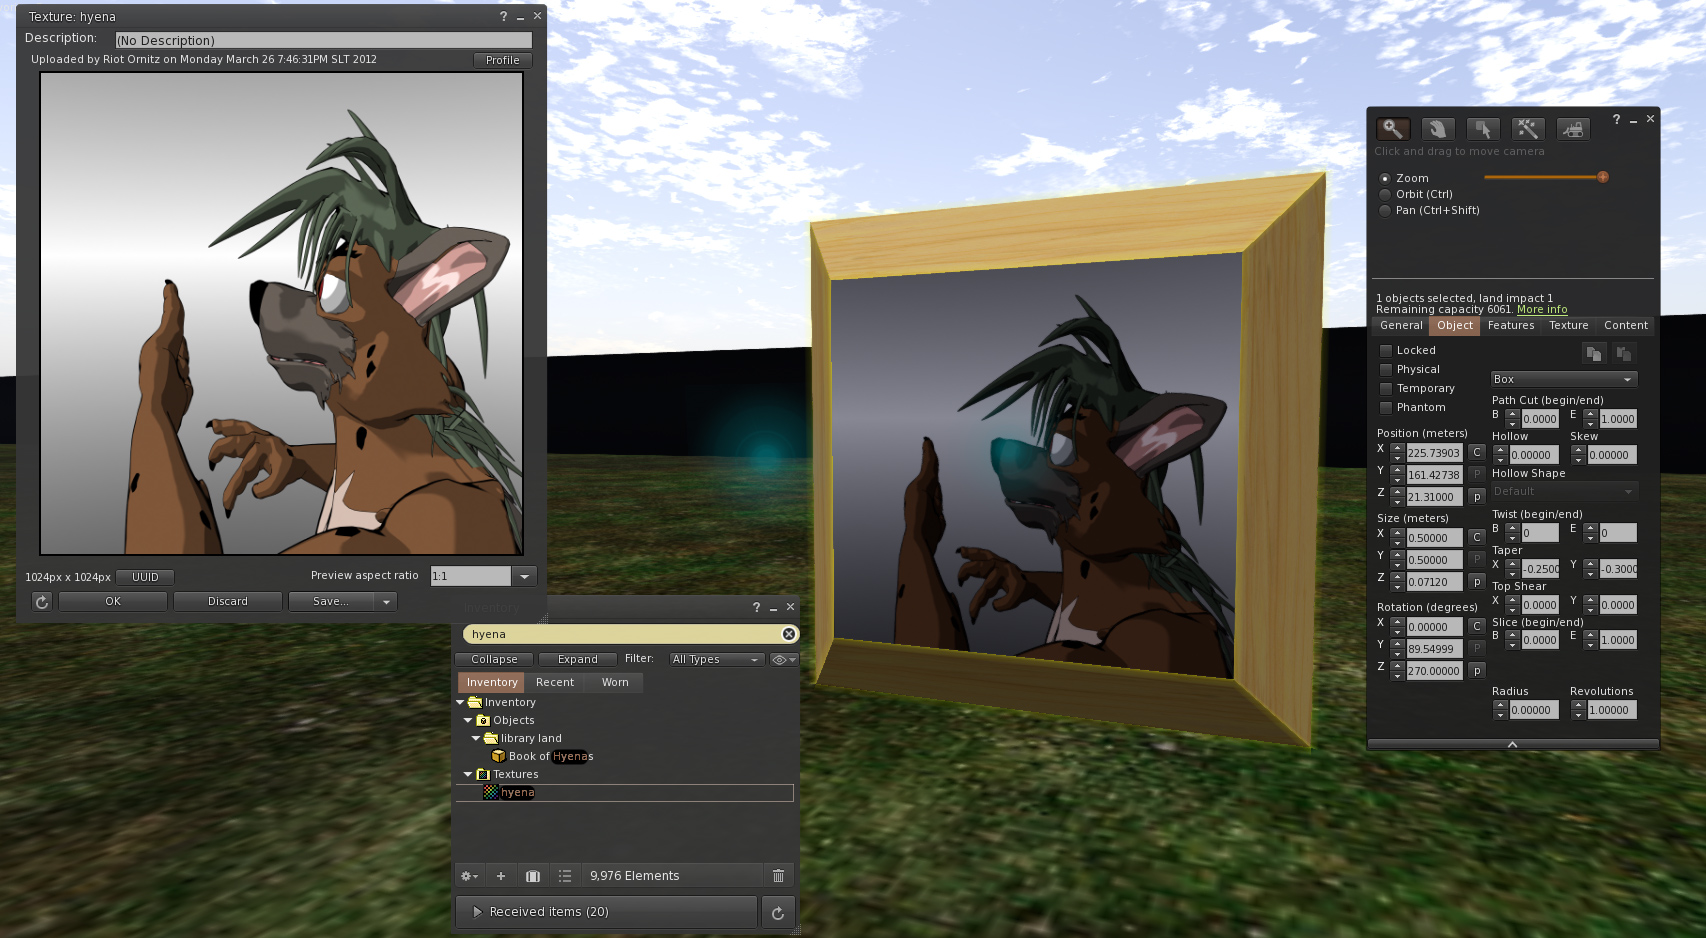
The 1:1 Ratio is easy to fix by staying in the object tab and resizing X (in our case) to 0.60 instead of 0.50. Or just Ctrl-Shift plug Mouse-Drag to whatever distortion you want.
Done!
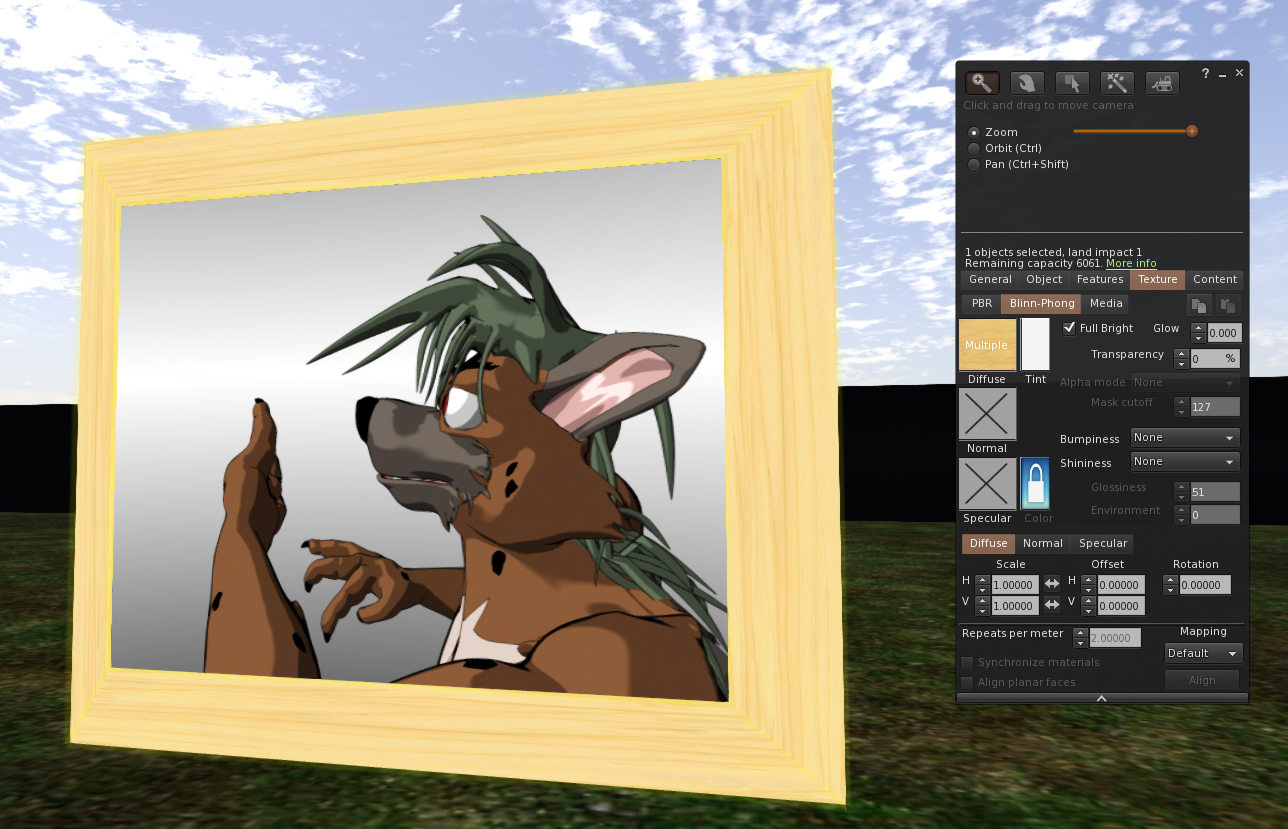
The lighting issue. Easiest way of tacking this if you want to show off your art without SL environments fucking with you is to go into your Texture tab and under Blinn-Phong check the box to make it full-bright.
Quick note: Blinn-Phong is Second Lifes older texturing system, dating back to when it first opened,d and PBR is a newer style of texturing that 3d artists are more familiar with, allowing better shaders.
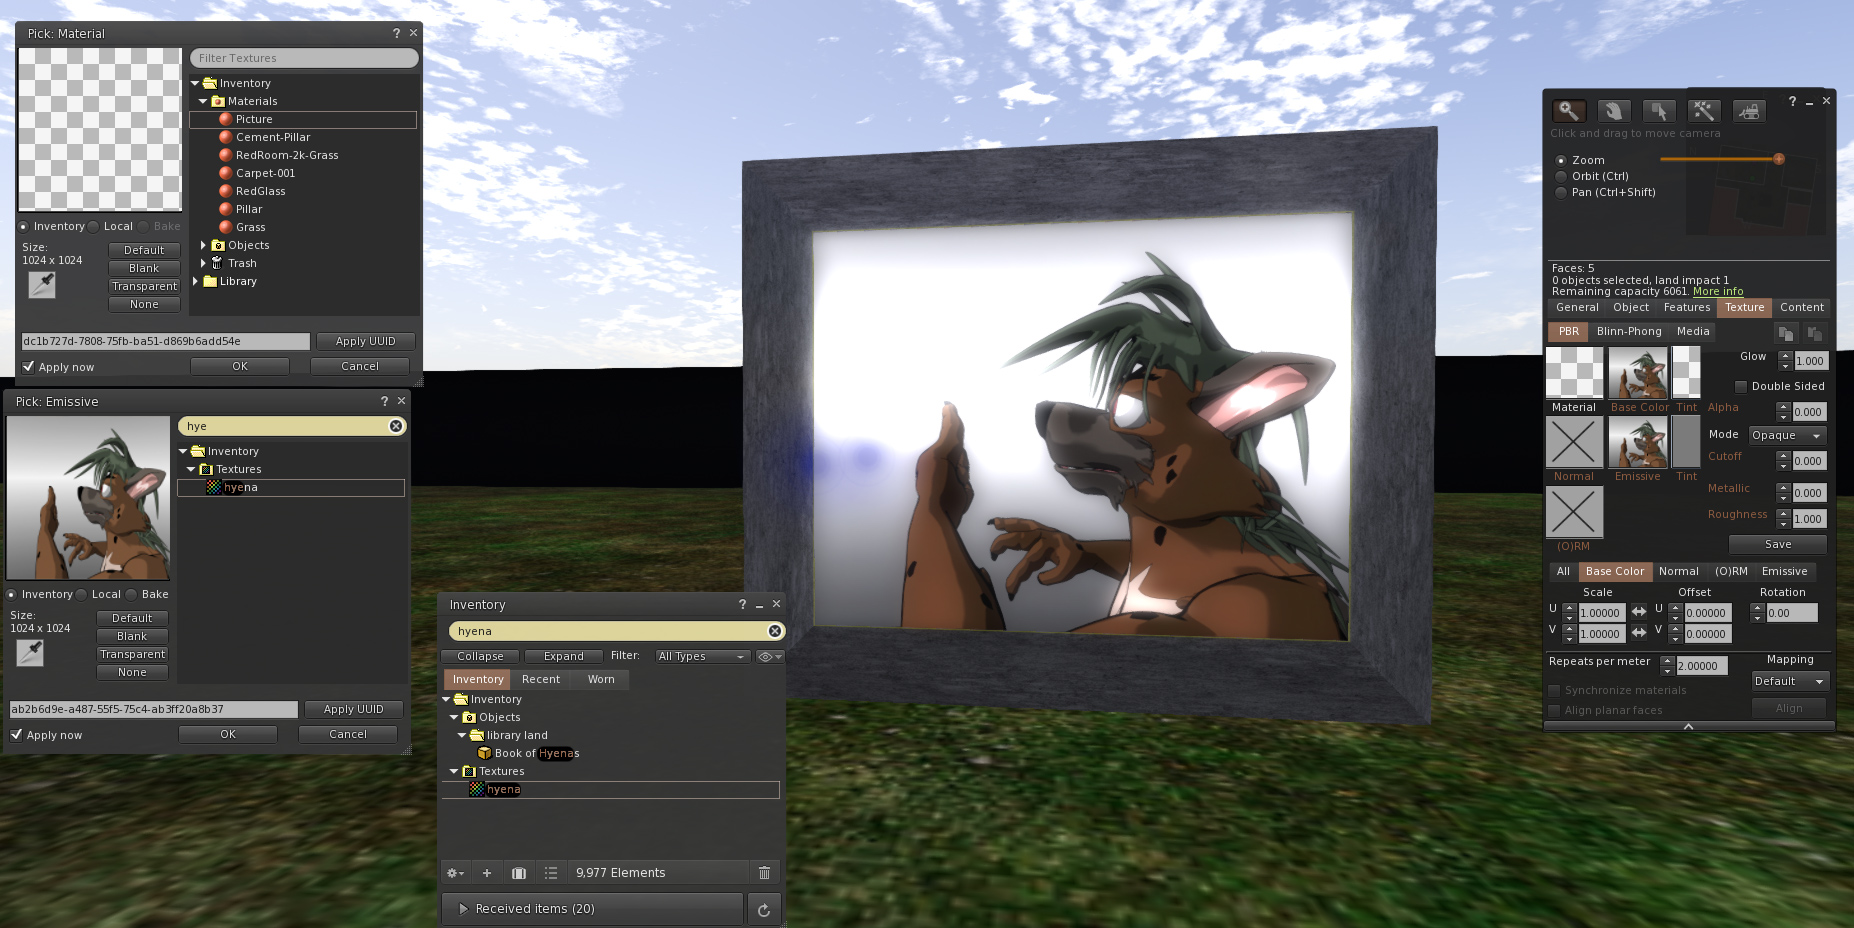
Although out of the scope of this tutorial, for those people looking for how to make "Full-Bright" on the Surface material within PBR because the button does not exist (Obvious reasons. PBR is how surfaces interact with the environment, and Full-Bright is counterintuitive in the eyes of a 3d artist). Post the same texture to Emissive and increase the tint RGB values to 128,128,128. This will give you a very close representation of Blinn-Phong's "Full-Bright" mode, day or night, without the bloom destroying your picture.
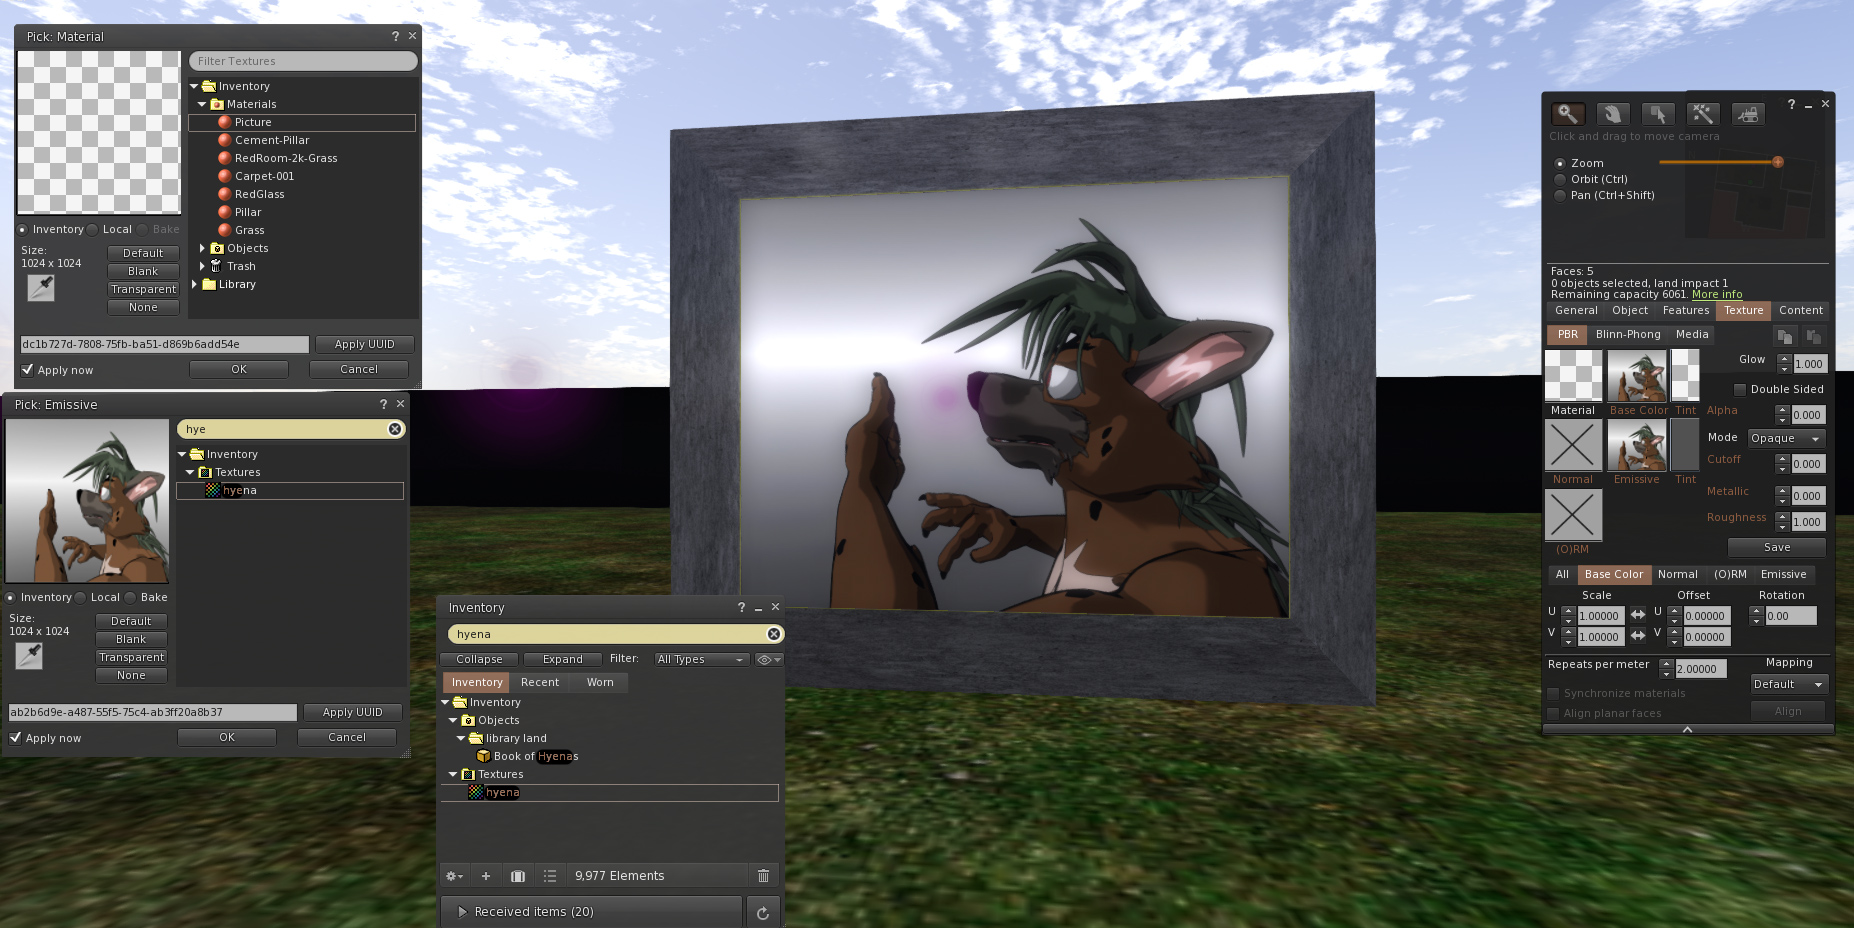
You'll have to adjust the Emissive tint to taste. In the picture before 128,128,128 was WAY too high. Had to drop it to 85,85.85 and even then some of my flat colors dimmed a little, balancing out the white gradient. So if you wish to show pictures in their Absolute form, it may be best to stay away from PBR mode all together!
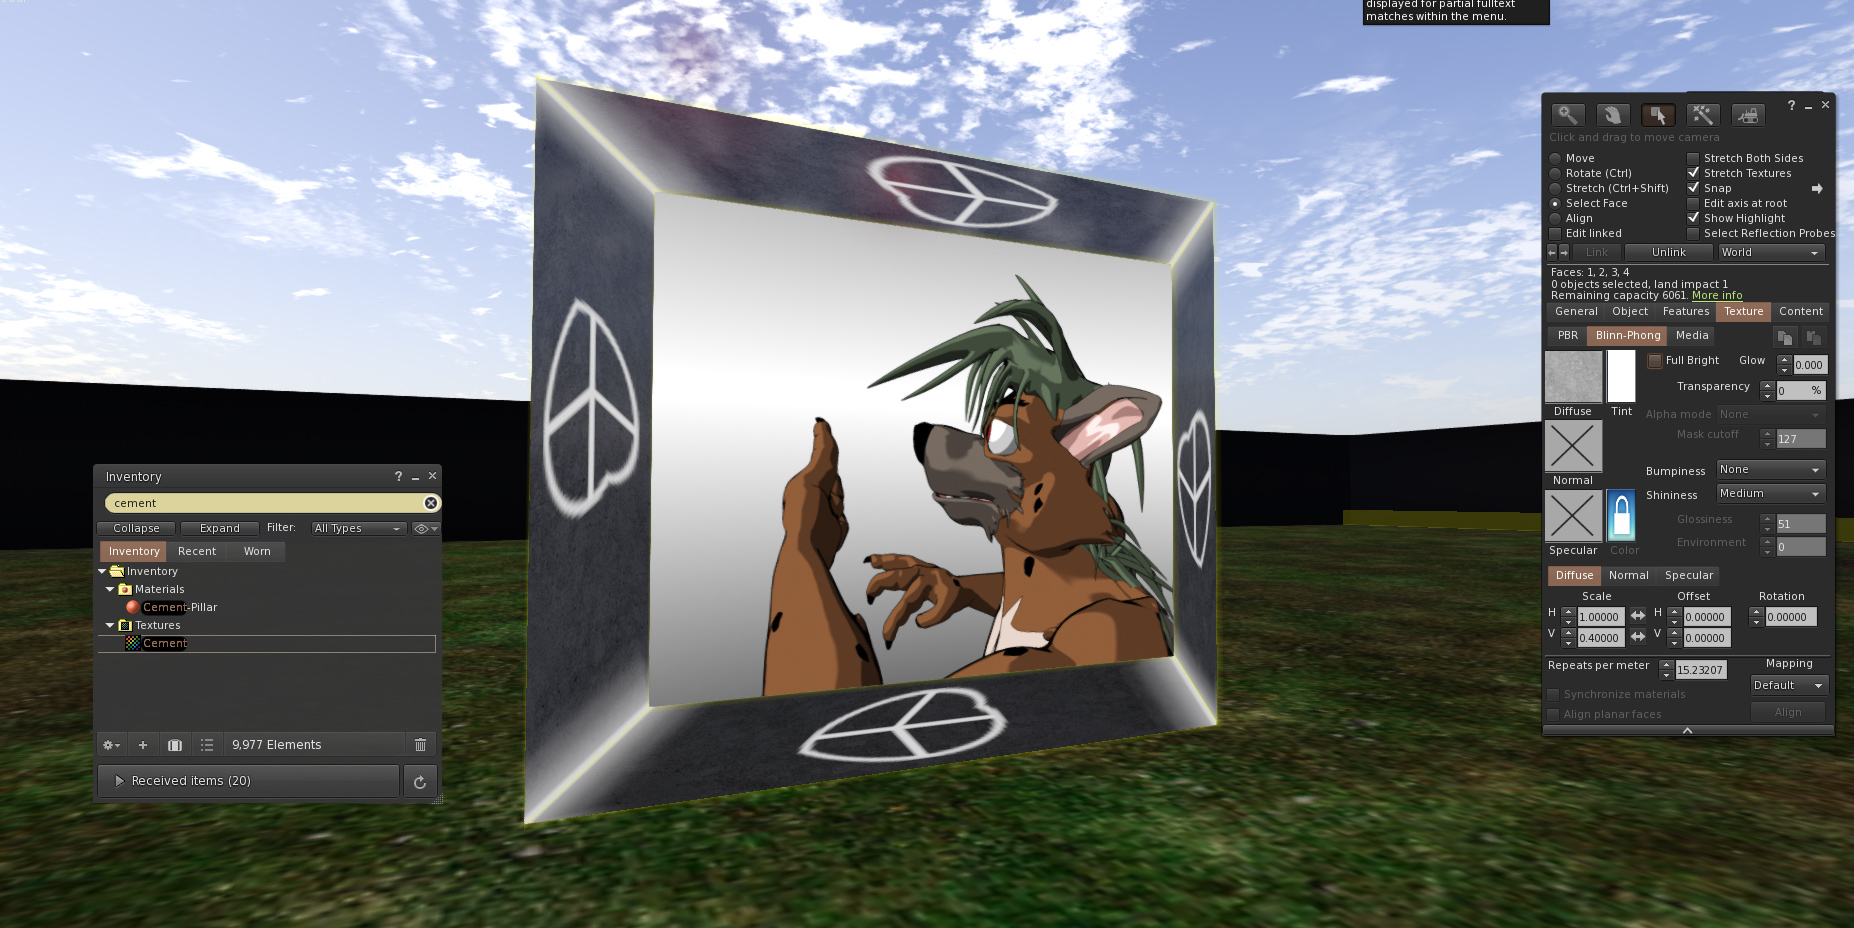
Alright, now that we've deviated enough into PBR territory. Getting back to the basics, we can continue to select faces and add repeating textures to all aspects of the frame. And be sure to turn OFF full-bright on the frame. We're trying to draw attention to the picture. Not to the Prim.
Now, some of you may be thinking along the lines of this:
HAH! Fuck you S! I don't NEED to learn blender! What you just showed me is all I need to decorate my house! I'm now going to post a warehouse of GPT generated care-bears with dicks coming out of their chest!
Which, for starters. Fuck your GPT generated ANYTHING! It's not that hard to draw care bears and not that hard to draw a dick. I'm setting environmentalism aside because even if you draw on paper, it's still better than using a nuclear facility to compute something based on the works of others.
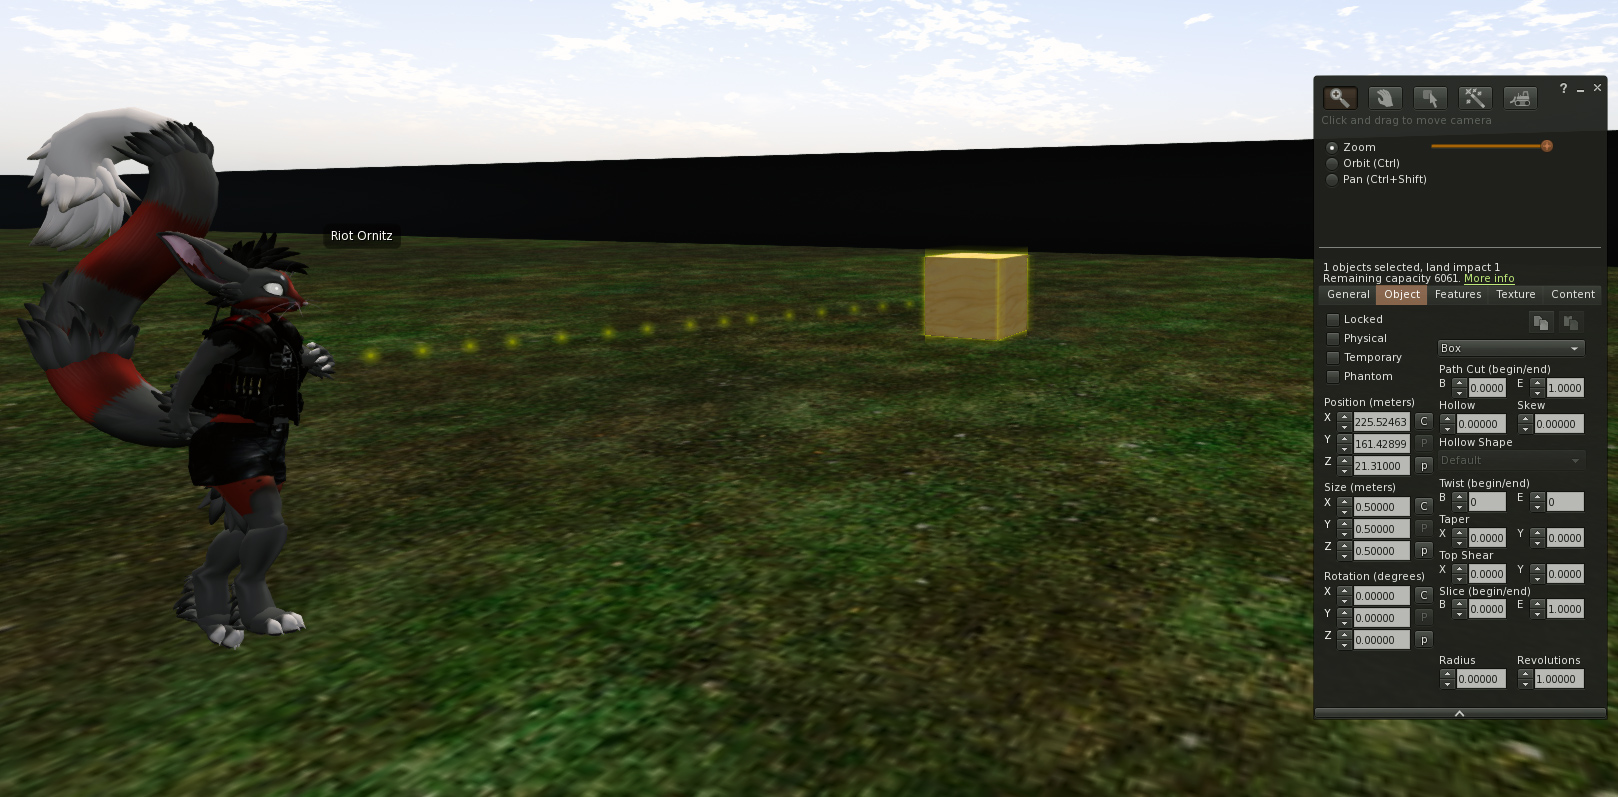
Moving past that point, there is a bit of a technical concern in the Metaverse environment of Second Life. Objects that you place onto land have 'weight' that only a certain allowance of Prims can be placed within a certain space.
Prim usage is what maintains a sense of sanity within SL. Where in a user cannot bring in millions of cubes and not only crash the sim. But crashes anyone attempting to log in to said environment. Creating these black holes within the metaverse. It also requires resources to transfer the assets from one region to another.
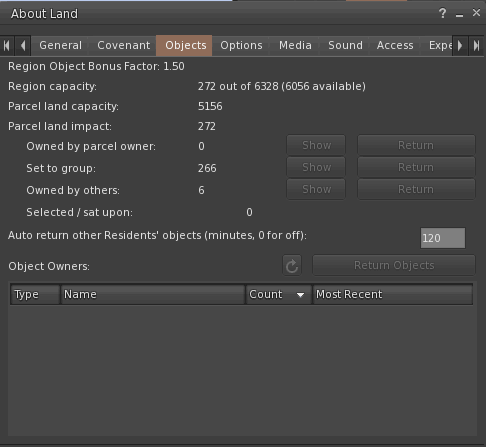
In the area we're building for this tutorial, which is a low-traffic sandbox. 272 out of 6328 prims are in use. 6 of those are ours.
When you purchase land in Second Life, or get 'free' land with a premium Second Life account. Or just RENT land from some dude in SL. Your region capacity will be far less, unless you decide to purchase a quarter of a sim (note: an entire sim is approximately 4 city blocks and costs hundreds of REAL dollars to rent from Linden Labs.)
Now, if you own a Sim. Or you're on Open Simulator, where YOU are the server owner of the Sim. And you do not give a shit about prim-counts. Then I guess this is where you can stop reading this tutorial. You're done! Thanks for coming by.
Also S, I could just shift-click all of my prims and "Link" them together and instantly save 50 percent off my prim count! Done! Didn't need your help with Blender at all!
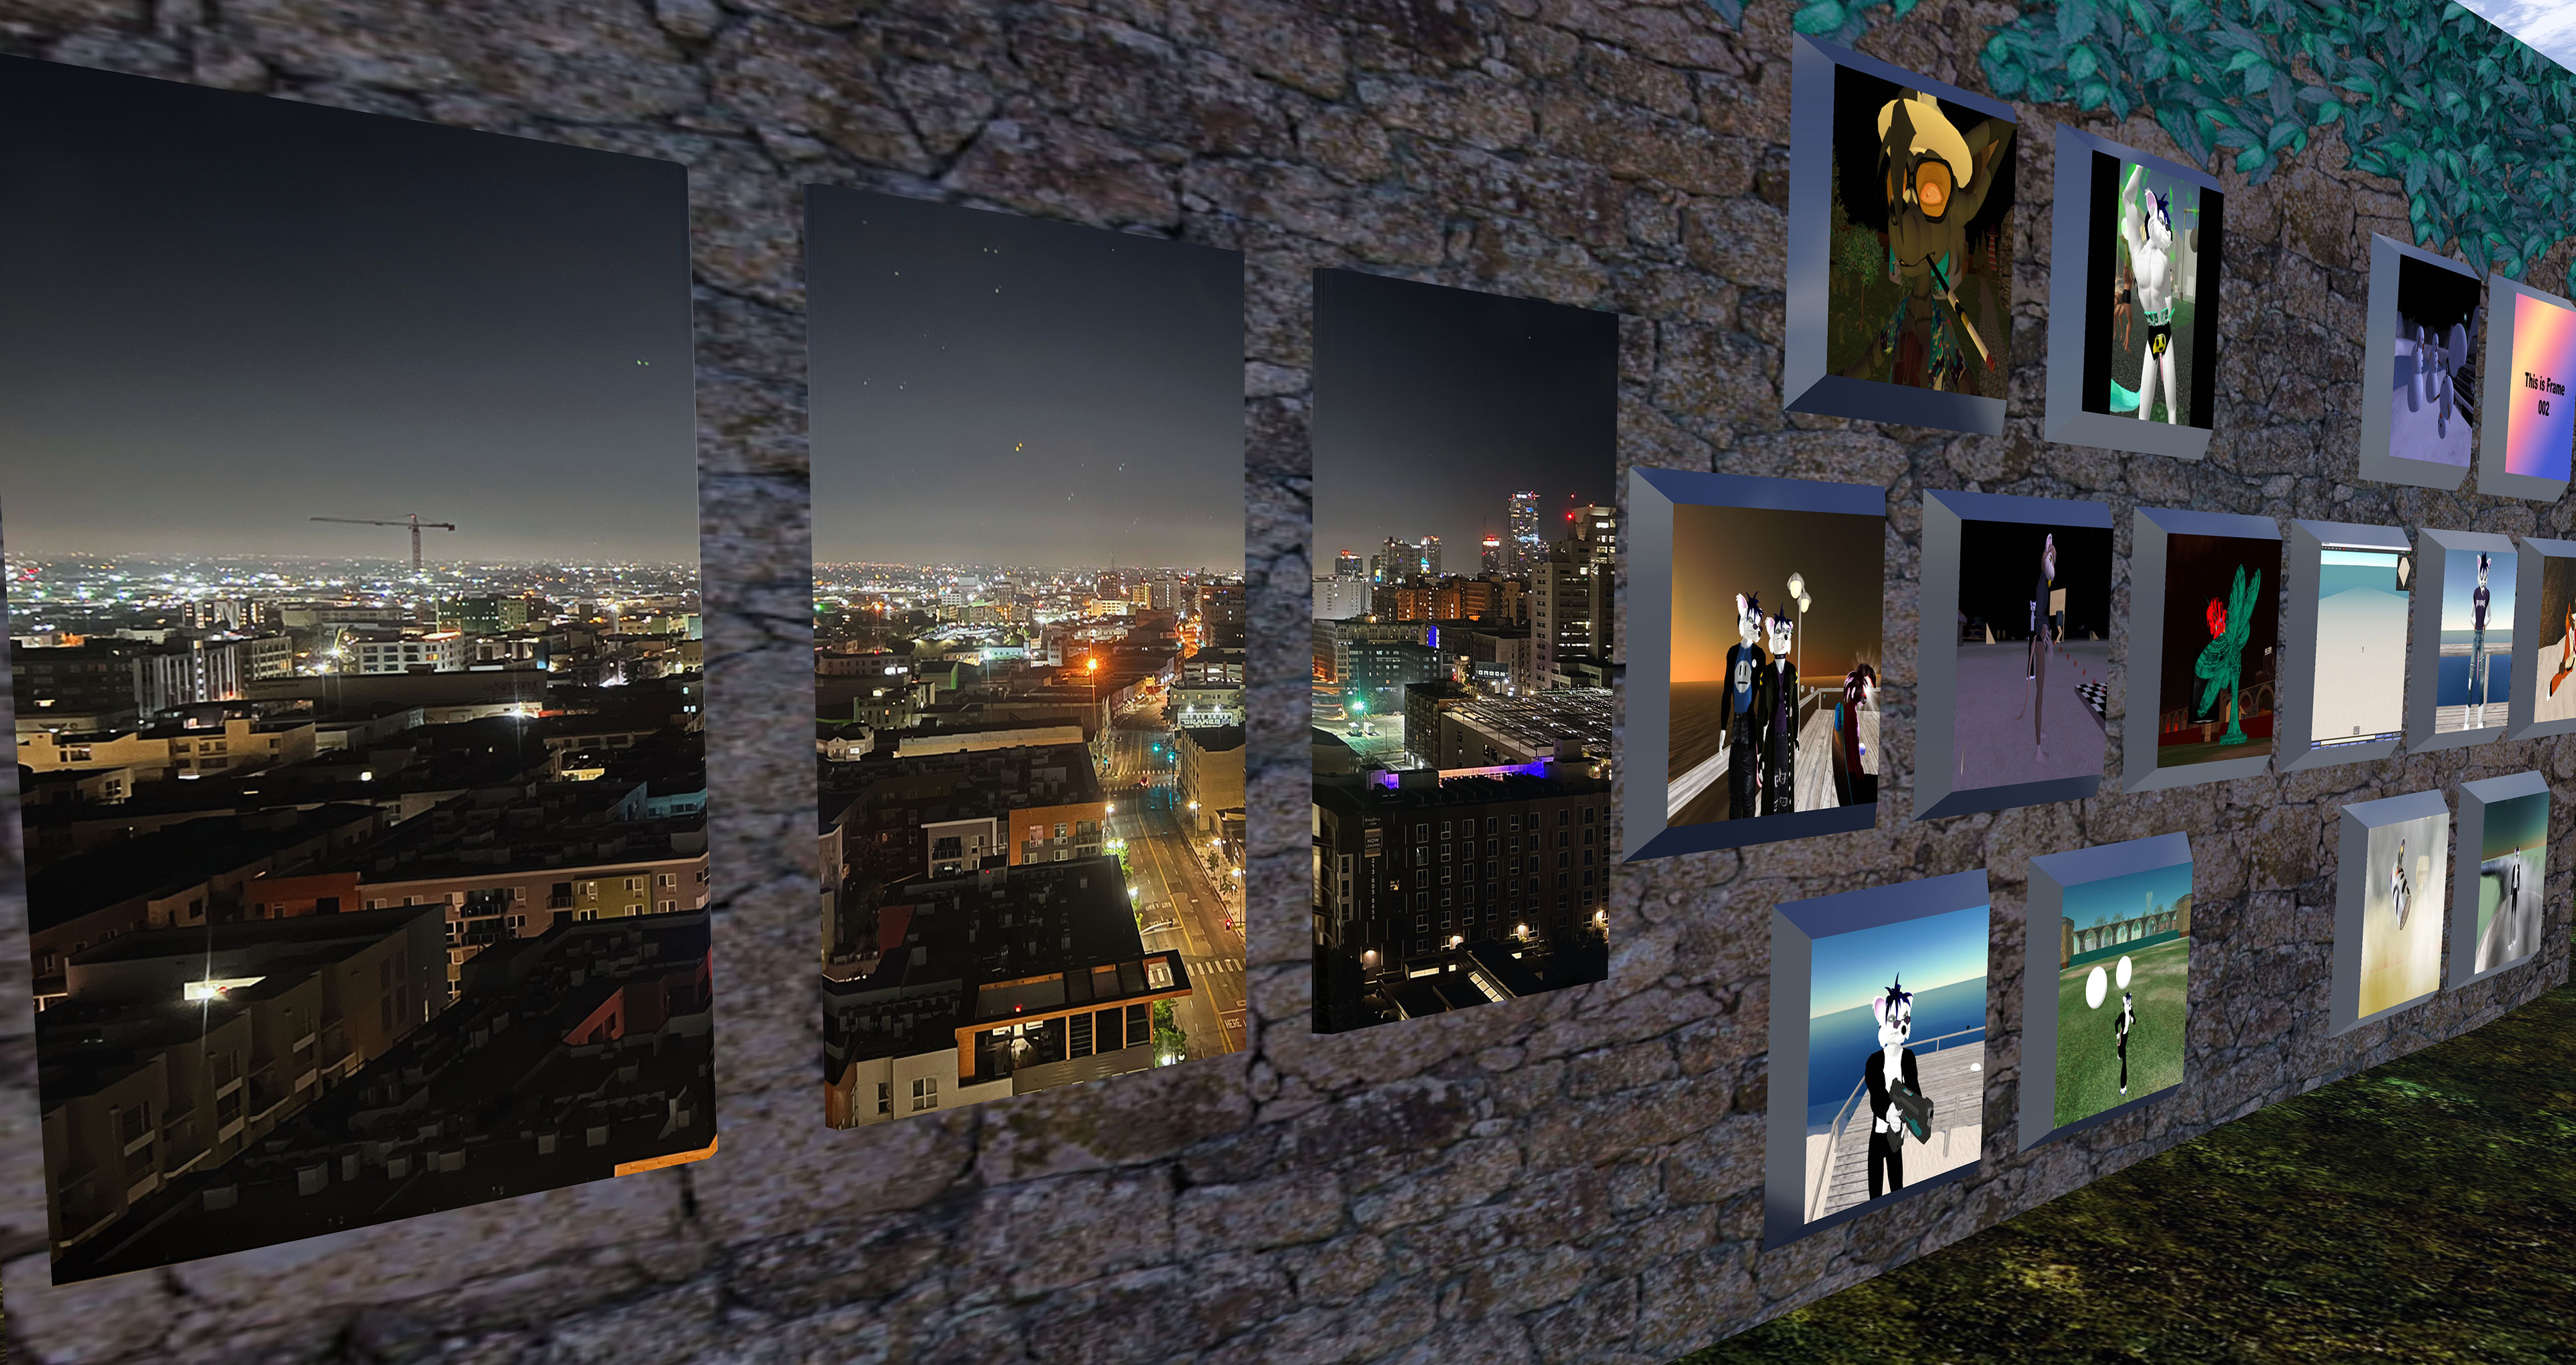
About linking: Sometimes Second Life would be (sometimes) even generous enough to link it down to just 1 prim if you turn off physics on everything! But what if we told you that with Mesh, we can get everything you see in that screen, PLUS one more picture, and be optimized down to 0.6 prims? Which, if you link two meshes at 0.6, it's 1.2 prims that Second Life rounds downward to just 1 prim for 14 pictures? Having that many pictures on an entire wall not only looks impressive. But if your entire region that you own has a 100 prim limit after you placed your house down. Every fucking prim counts!
We could've also gone on the rant that mesh is more optimized than Prim because every prim used to be 1024 vertices in size. Apparently newer versions of the Second Life viewer fixed that issue with better Level of Detail "A.K.A. LoD" control.
About Blender.
While the rest of the world is going into a state of enshittification if there's one thing that being in 2025 is great for, is access to legitimately GOOD open source applications. Blender is one of those applications. And because Second Life Client is available for Linux, Mac, and Windows. Well, so is Blender!
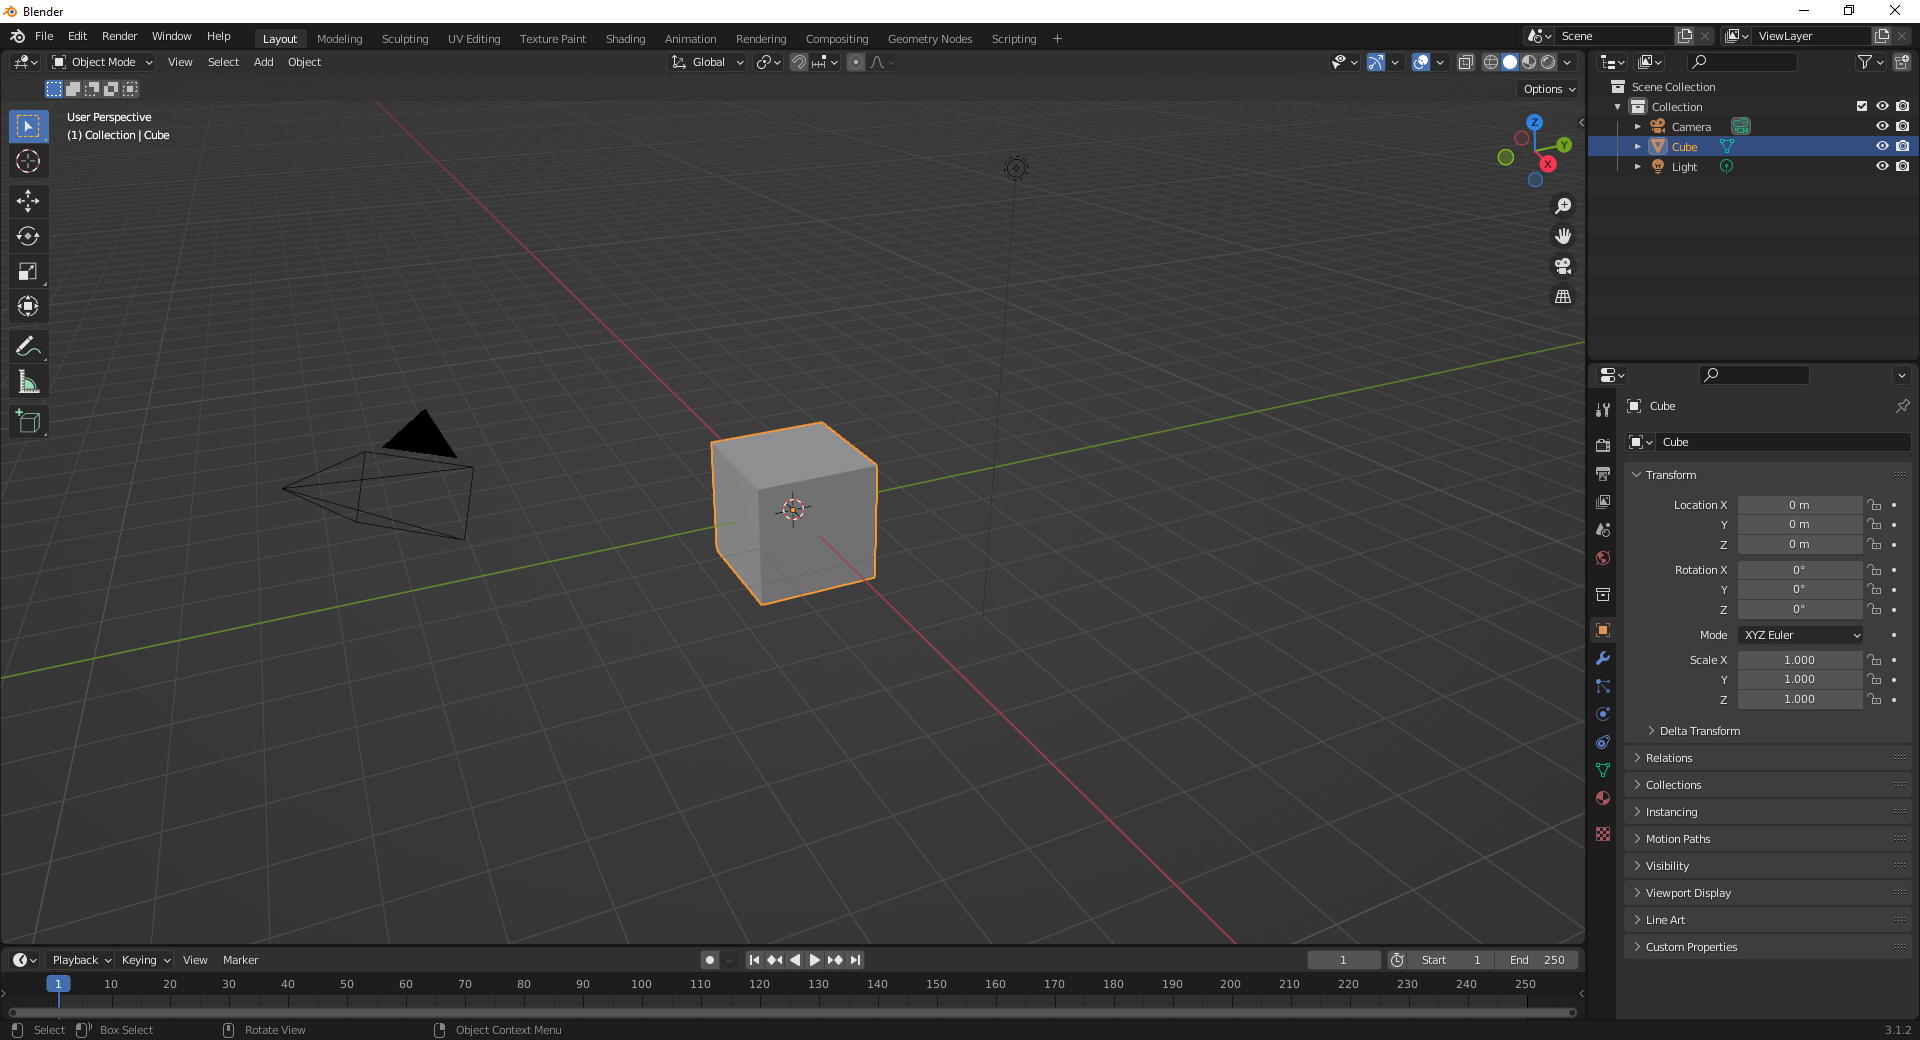
When you first load up the "Basic" environment, you'll be greeted with a screen similar to above. To a brand-new user of Blender. This looks terrifying! There's so many buttons and menus fucking everywhere!
Well, let's break it down a little bit. The very top menu where it says Layout, modeling, sculpting, etc? Consider those 'steps' in the rendering process. And for this tutorial, we'll be in Layout just long enough to delete the light and camera because we don't need those for Second Life. Click on "modeling" so you can get rid of that animation bar on the lower half of the screen.
By default, Blender is in "Object" mode. Meaning that when you load up the layout, it comes with "Cube" but you can ask for other things from Blender, such as a "Plane" or a 2-dimensional square. a sphere, and so on.
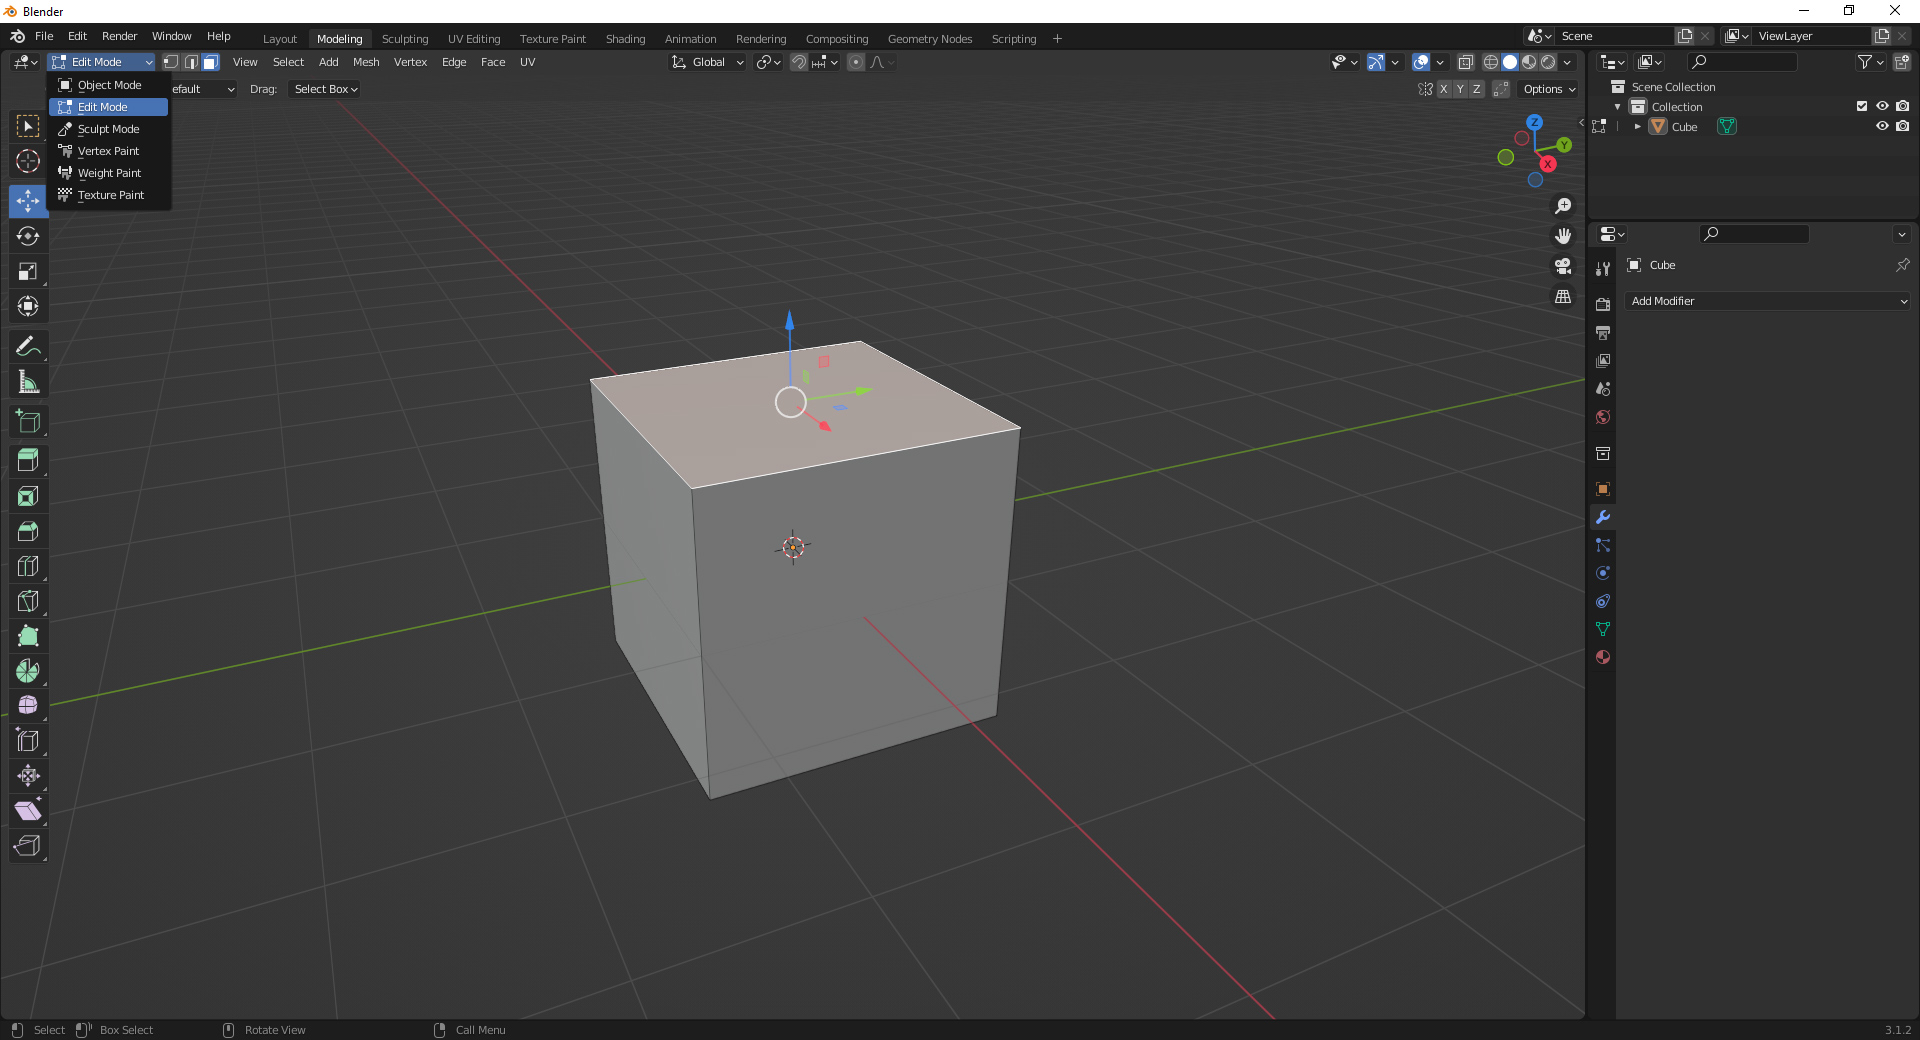
The default cube will be perfectly fine for us. So with the camera and light deleted on the upper-right "Scene" panel. We can click on the drop-down for Object Mode and go right into edit-mode to actually edit that cube that's on our screen.
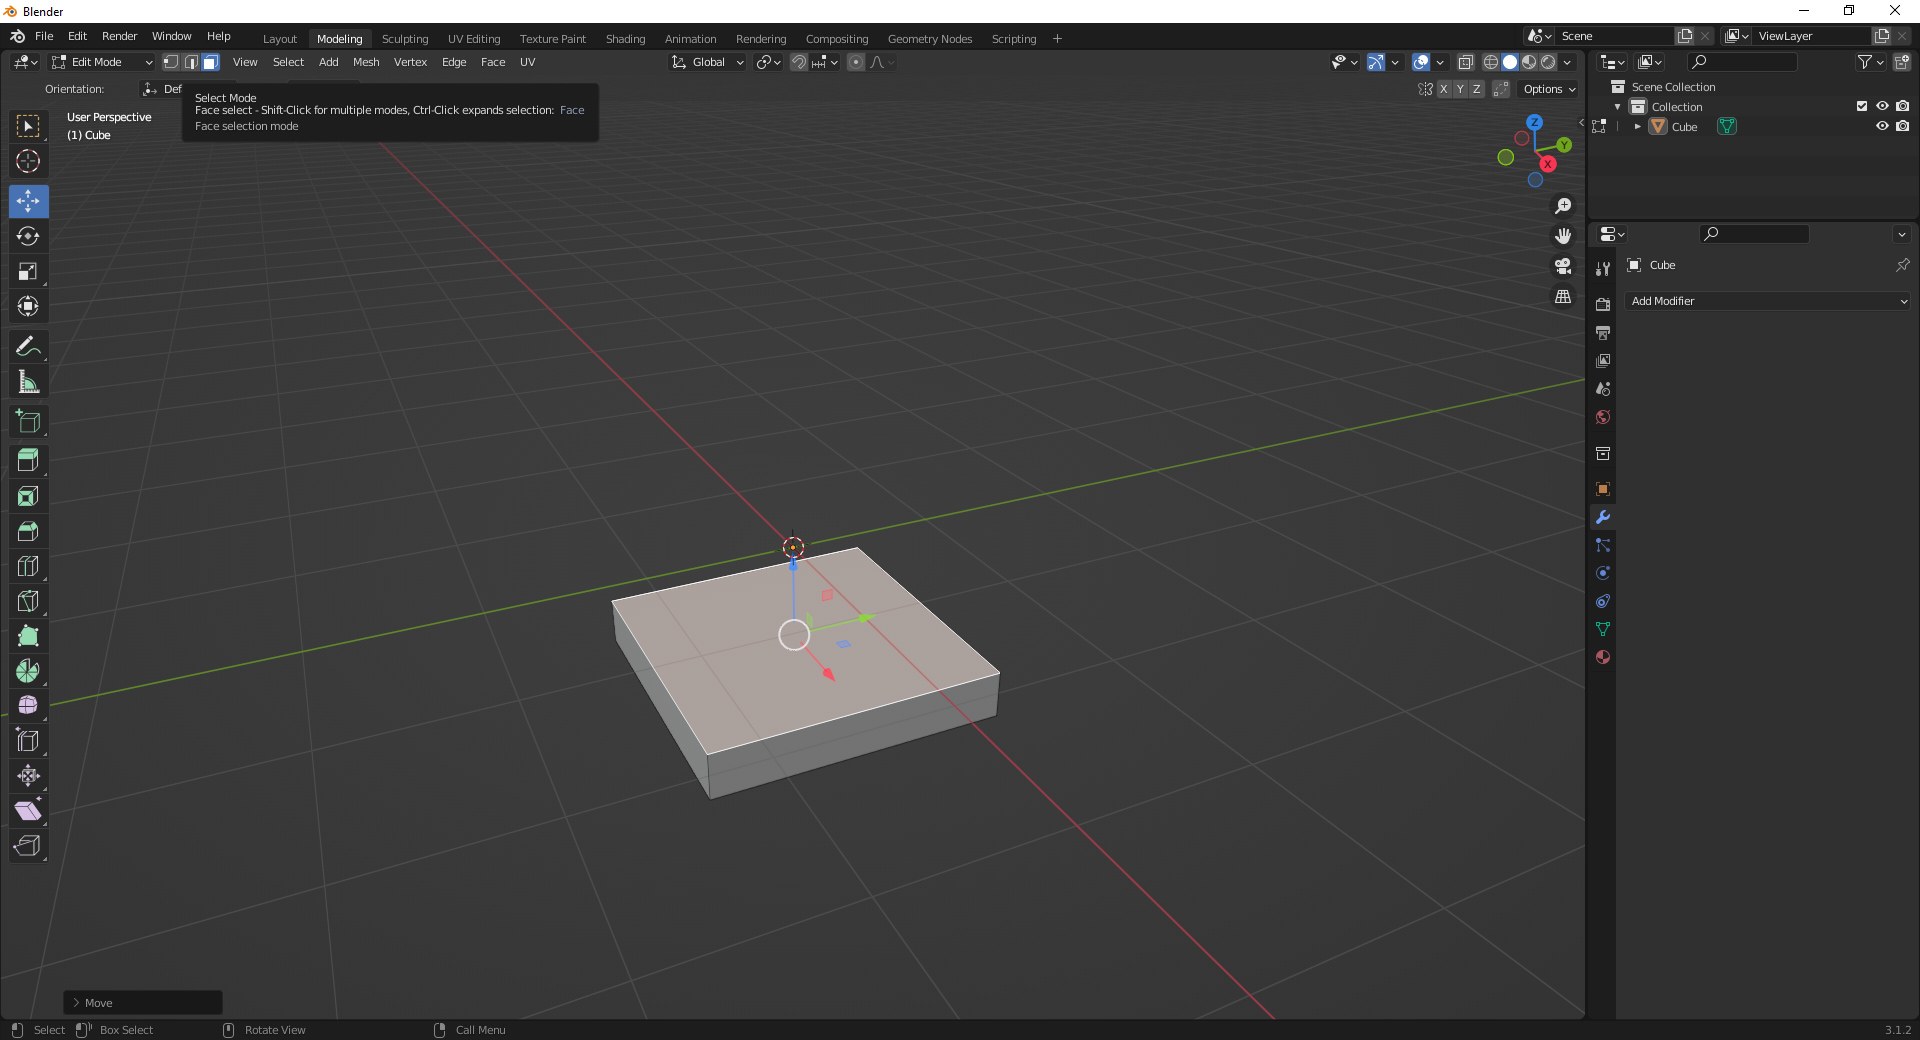
By default, everything on the object is highlighted. We just want to select a face. Which three buttons near the upper left of the screen allow us to select the 'point' of an object. The line or 'verticy' of an object. Finally, the 'face' of an object. Just like in Second Life, you can hold the Shift key in Blender to select multiple faces.
Next, on the right-hand icon panel, we'll select the 'move' button, and another familiar SL group of icons appears, asking what direction you wish to move this face. Dragging that Z-axis down gives us our flat rectangle.
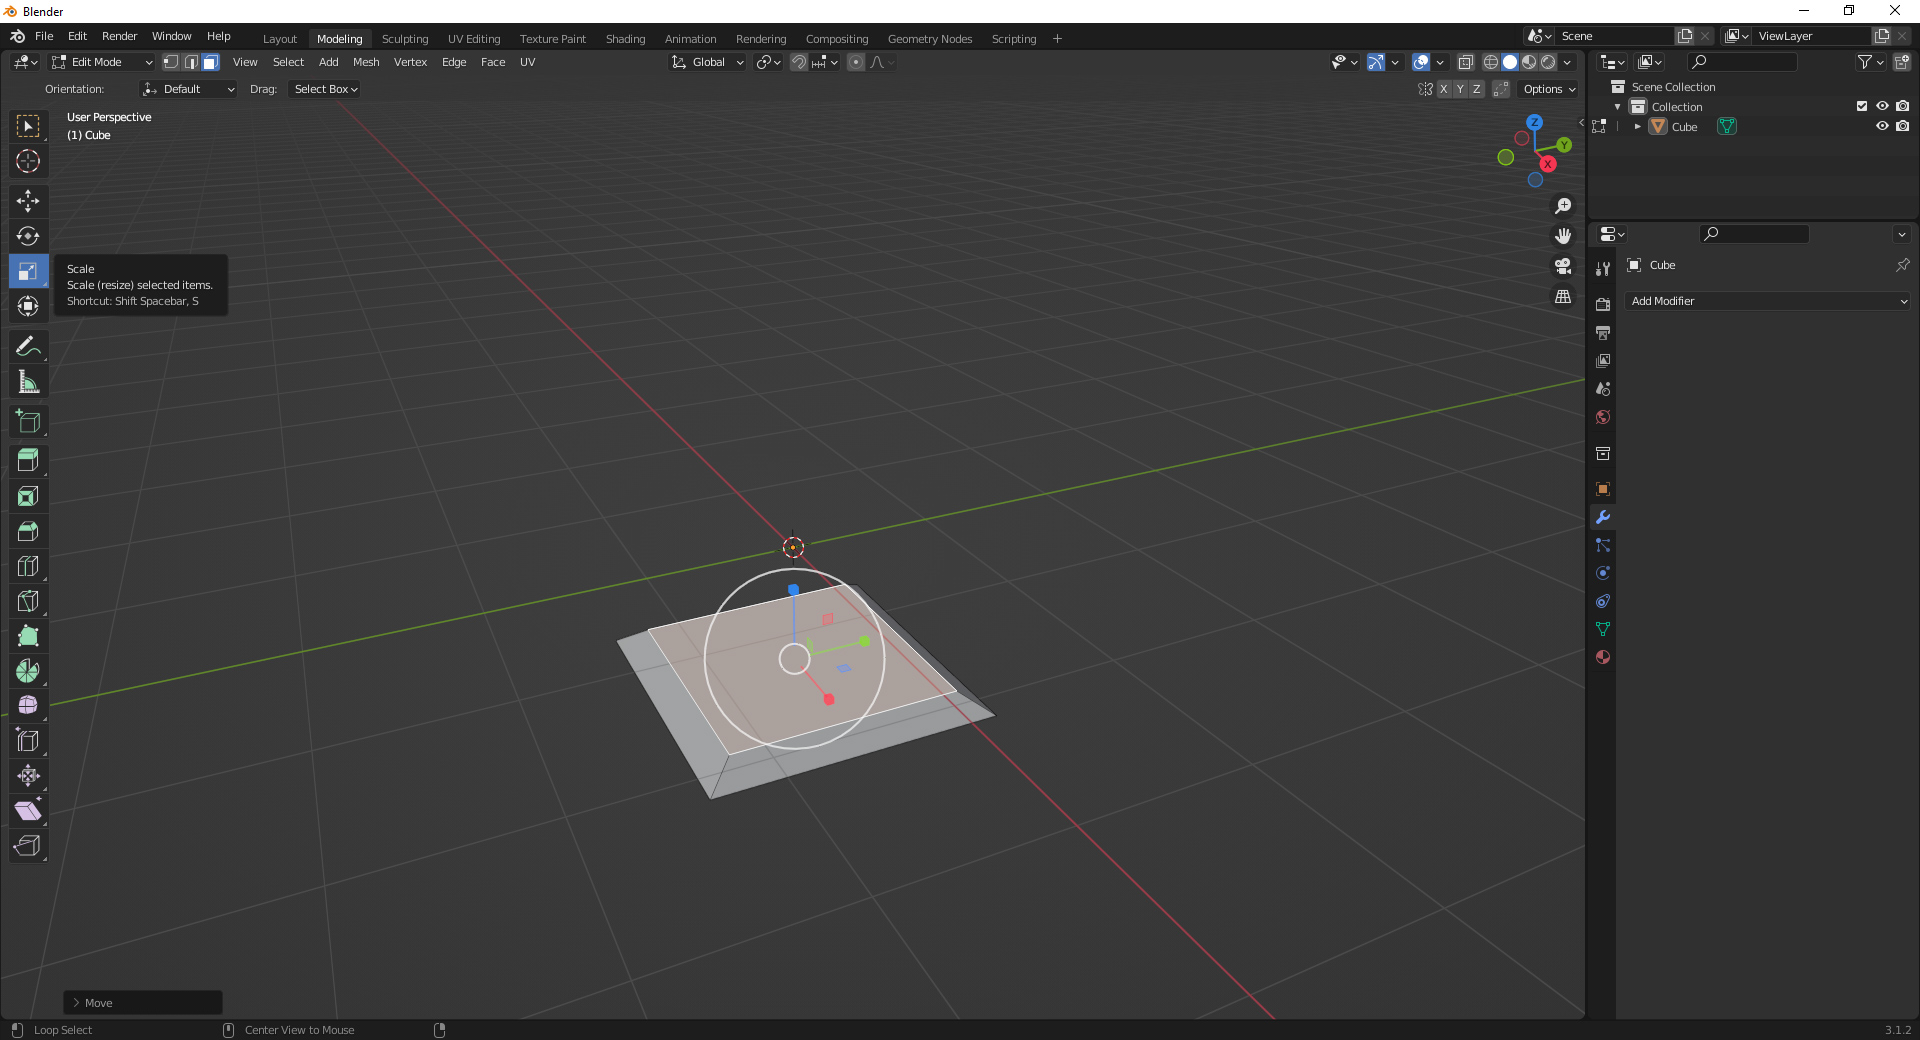
With that same face selected, we can 'Scale" to 0.8 of the size, just like what we did in SL. And guess what? Our modeling for a 1:1 image is complete. Congrats.
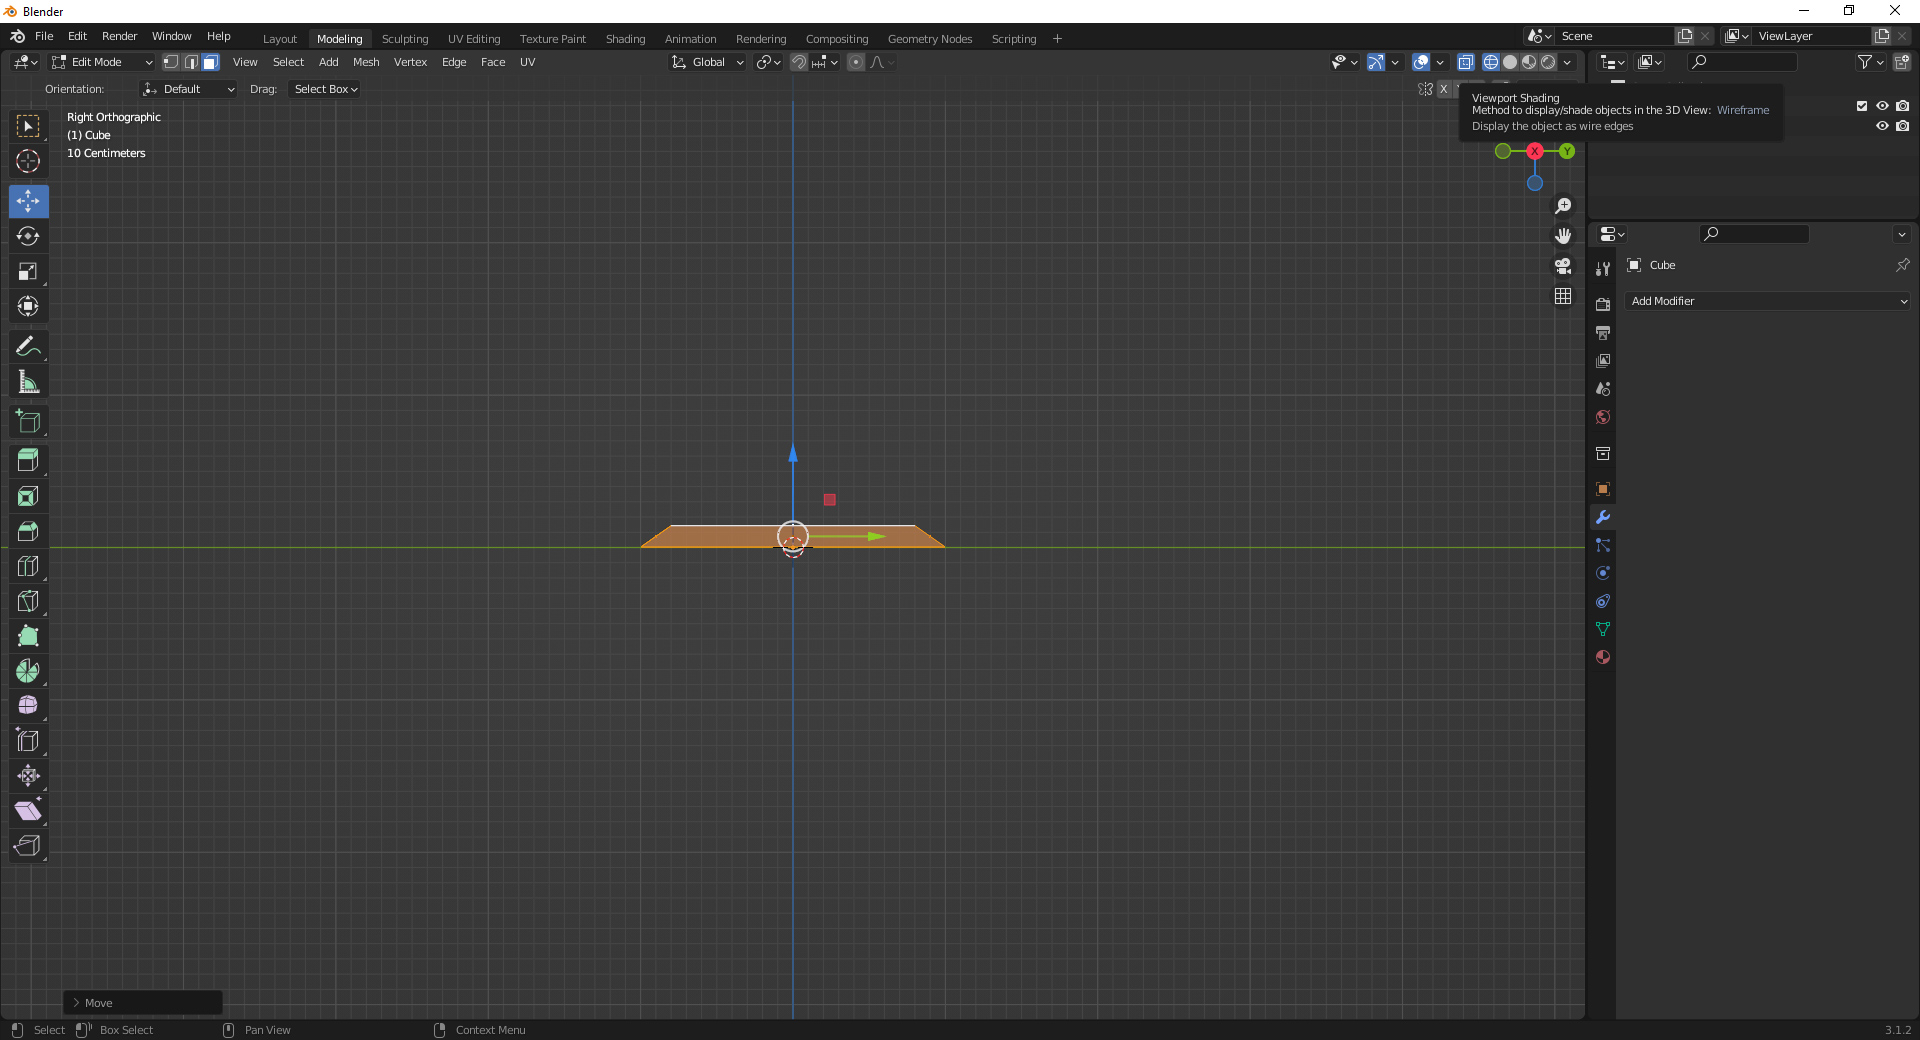
Another thing we like to do is adjust our viewport from solid to wireframe mode. This will give you the ability to select the entire object as well as to troubleshoot by selecting verts that may be inverted or hidden. There are also viewing presets near the upper right that allow you to go into 2-dimensional mode temporarily, which helps with alignment. I just clicked on the pink "X" axis, and it took me into facing "Y" 2d mode for us to align our selected mesh object and bring it back to the center with the move icon.
Defining your "Material"
After a while of playing with the mesh, eventually you're going to want to define materials. In secondlife these are the 'faces' of your prim. You can have up to eight materials during the upload of a single object, which is the real meat of making art frames. If you try to assign more than eight materials to a mesh in Blender and attempt to upload it. It may crash hard FireStorm clients and/or produce an error that the shape is invalid to upload.
By default, any prim that you start with will have its UV map and its own "Material." We're going to press the plus sign on the far right window to make ANOTHER material.
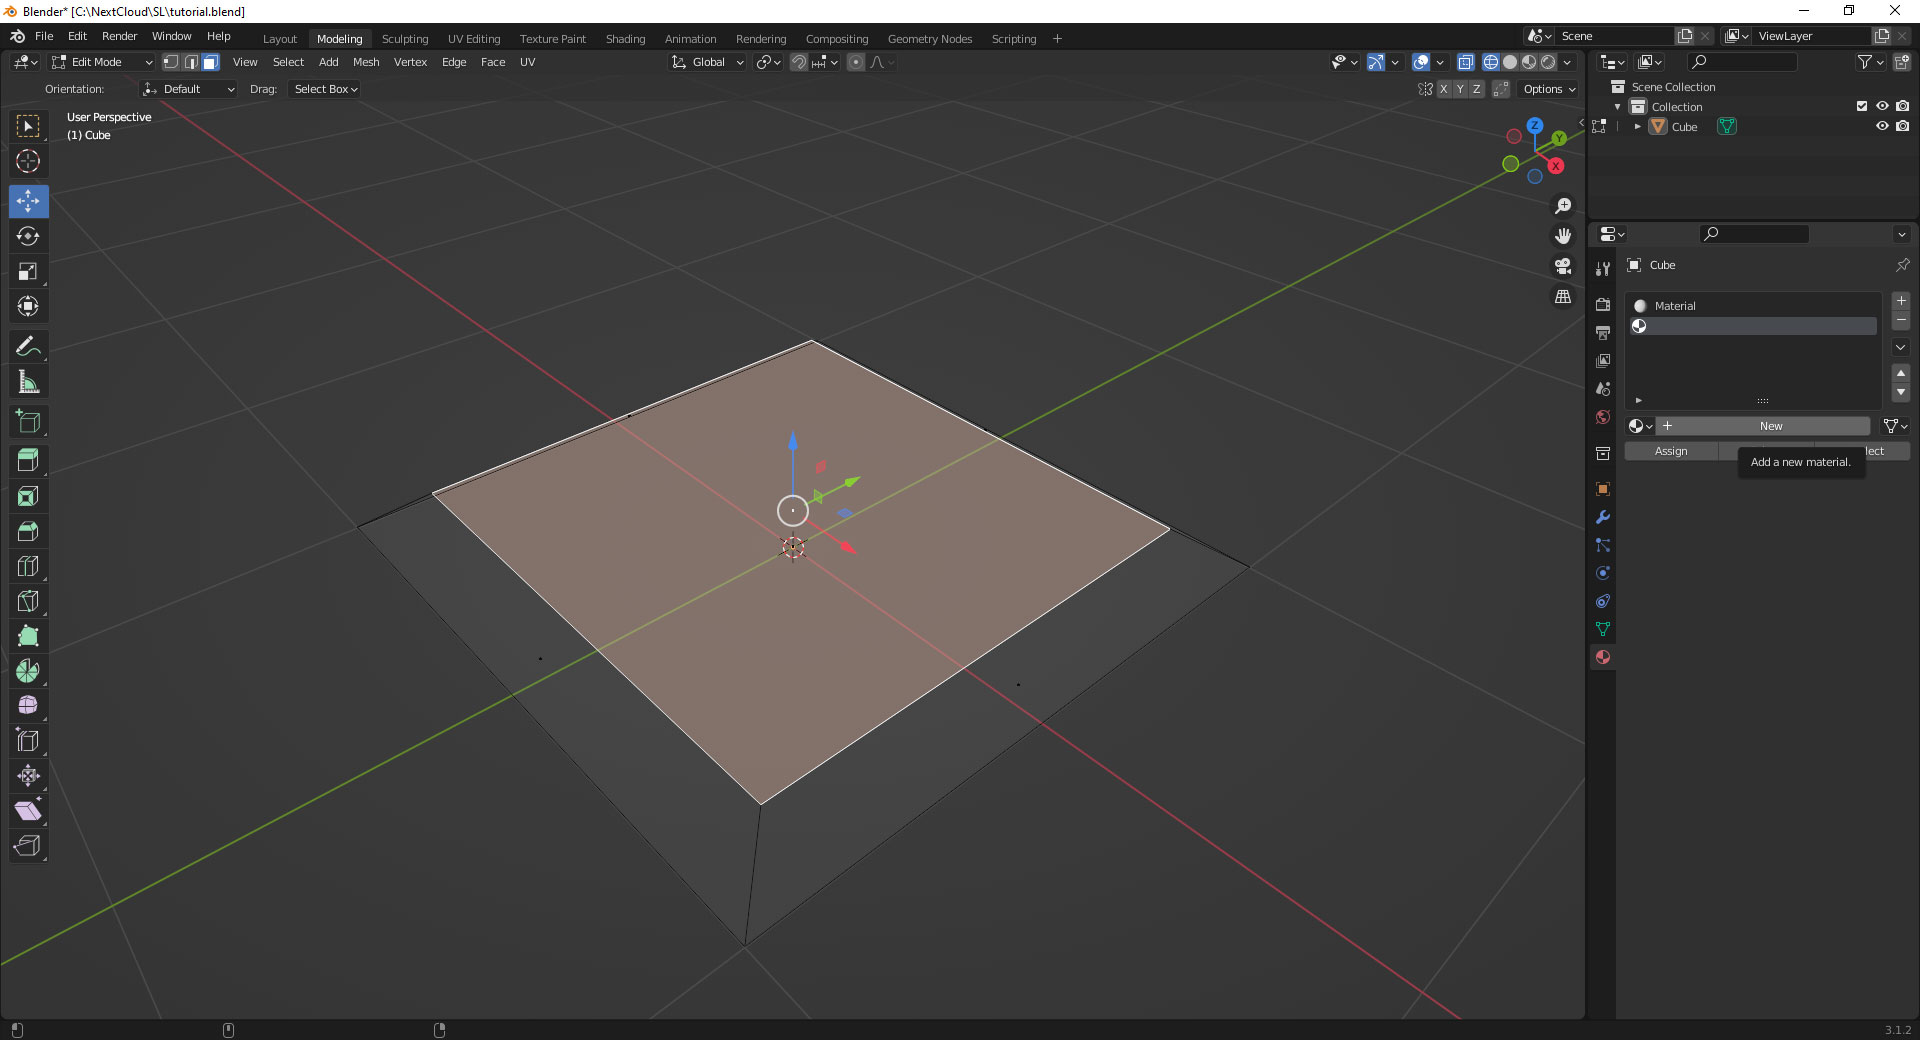
Hover your mouse over that new button to confirm you want to add another material to the list.

This is where we tend to name our materials so we know what goes where.
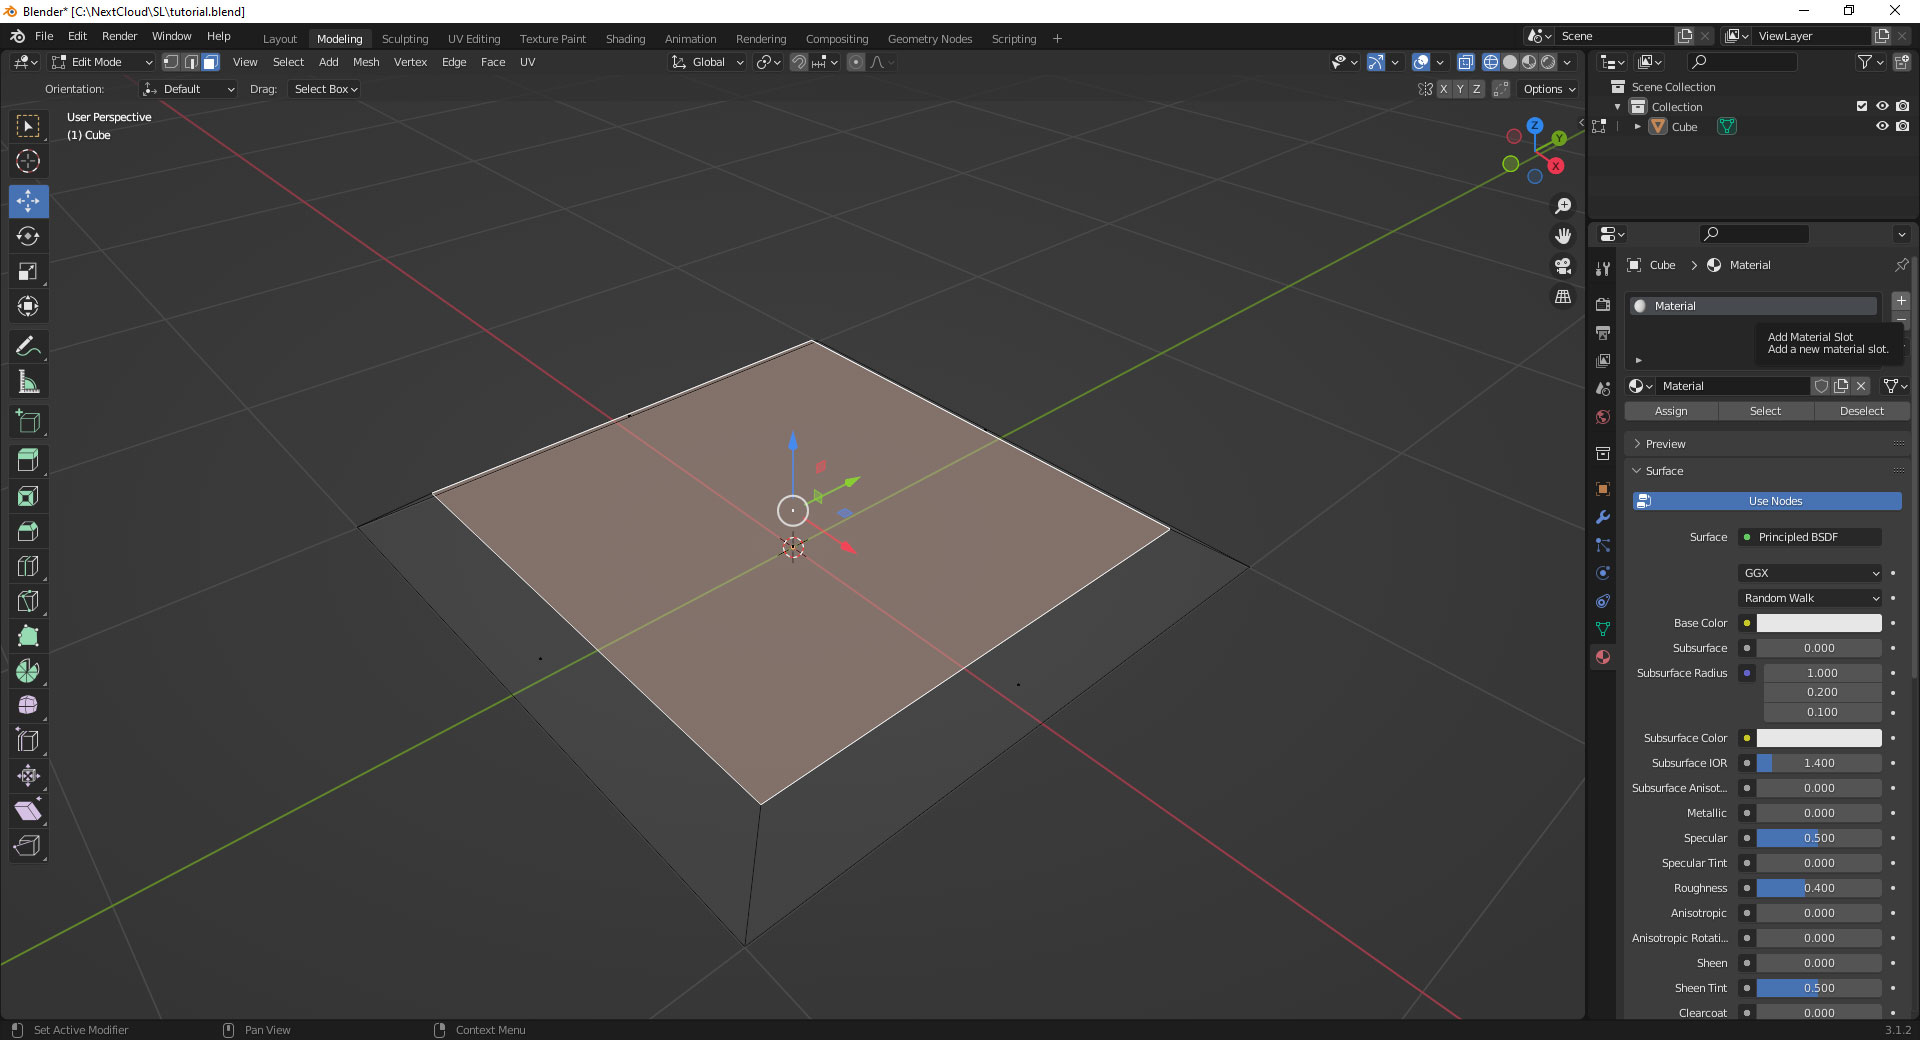
Now, you'll notice there are a bunch of other options after you've created your material. And we're sure that if you choose a color like say red or 255,0,0 that nothing changes in the preview. This is because we're still in wireframe mode.
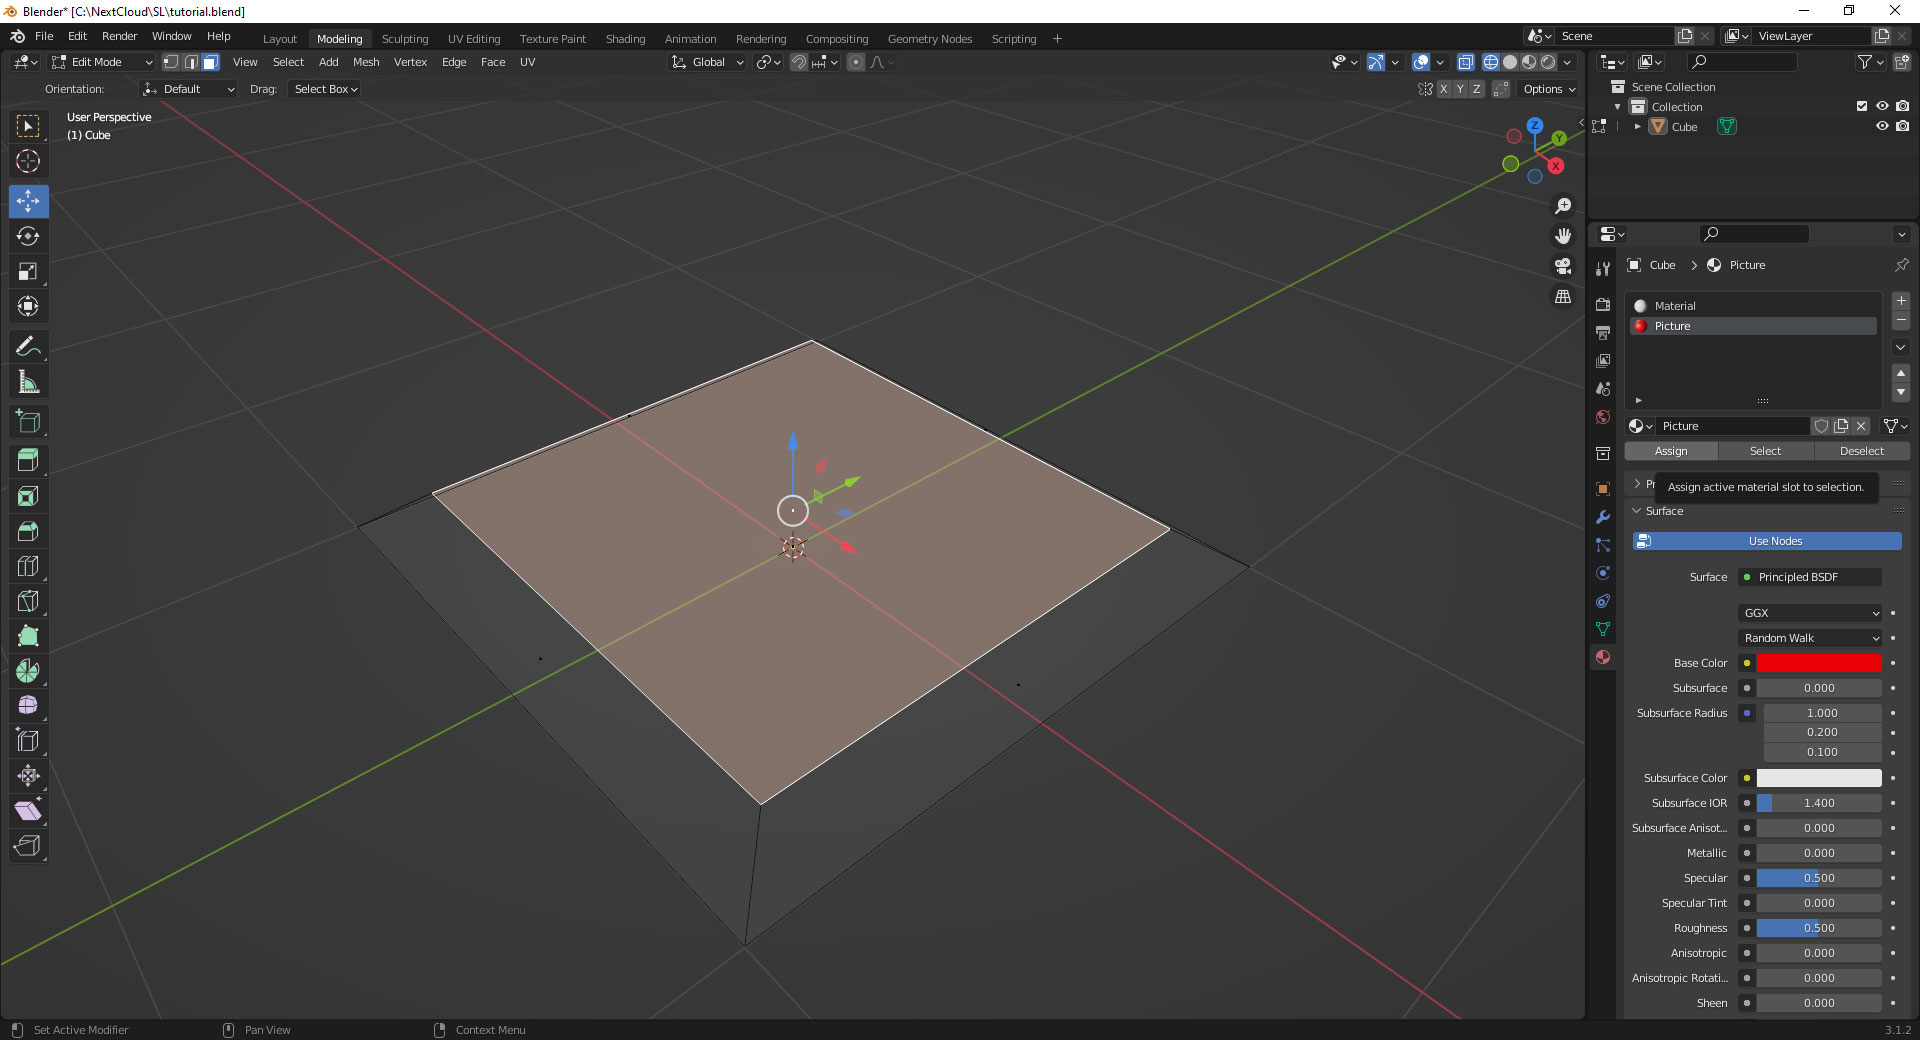
The first thing we have to do is, with that face on our object selected,d we have to assign our "picture" material to the selected faces.
But it still does not show in our preview.
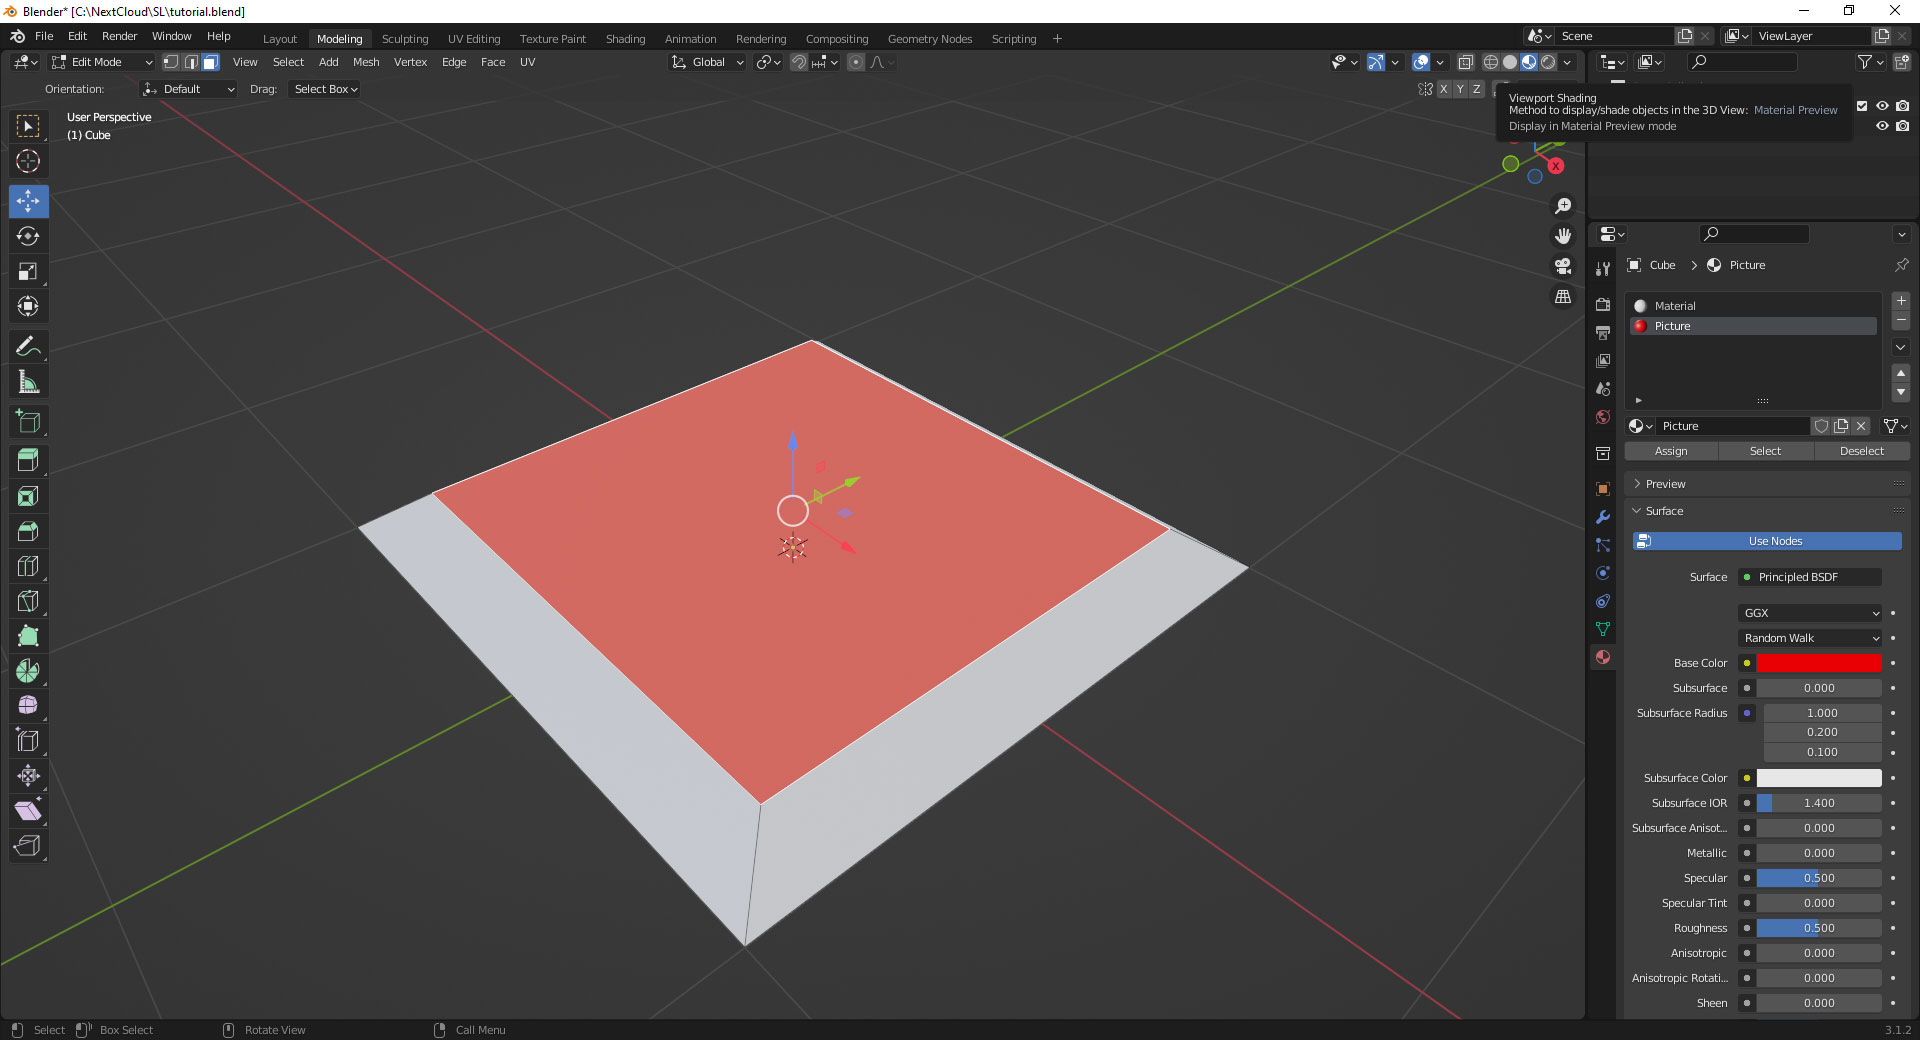
Earlier, we set our viewport to Wireframe in the upper right-hand corner for us to easily manipulate and change our object mesh. In wireframe mode, it does not care about textures. So, to see the changes we've made so far, we have to either be in Material Preview or in Rendered modes to see the changes happening to the surface we assigned a material. Now, Second Life would honor this color during importation. In our case, we want this 'Picture' material to show our art.

Next to the yellow dot on Base Color, we can select more than just color. In our case, we will by selecting an Image Texture.
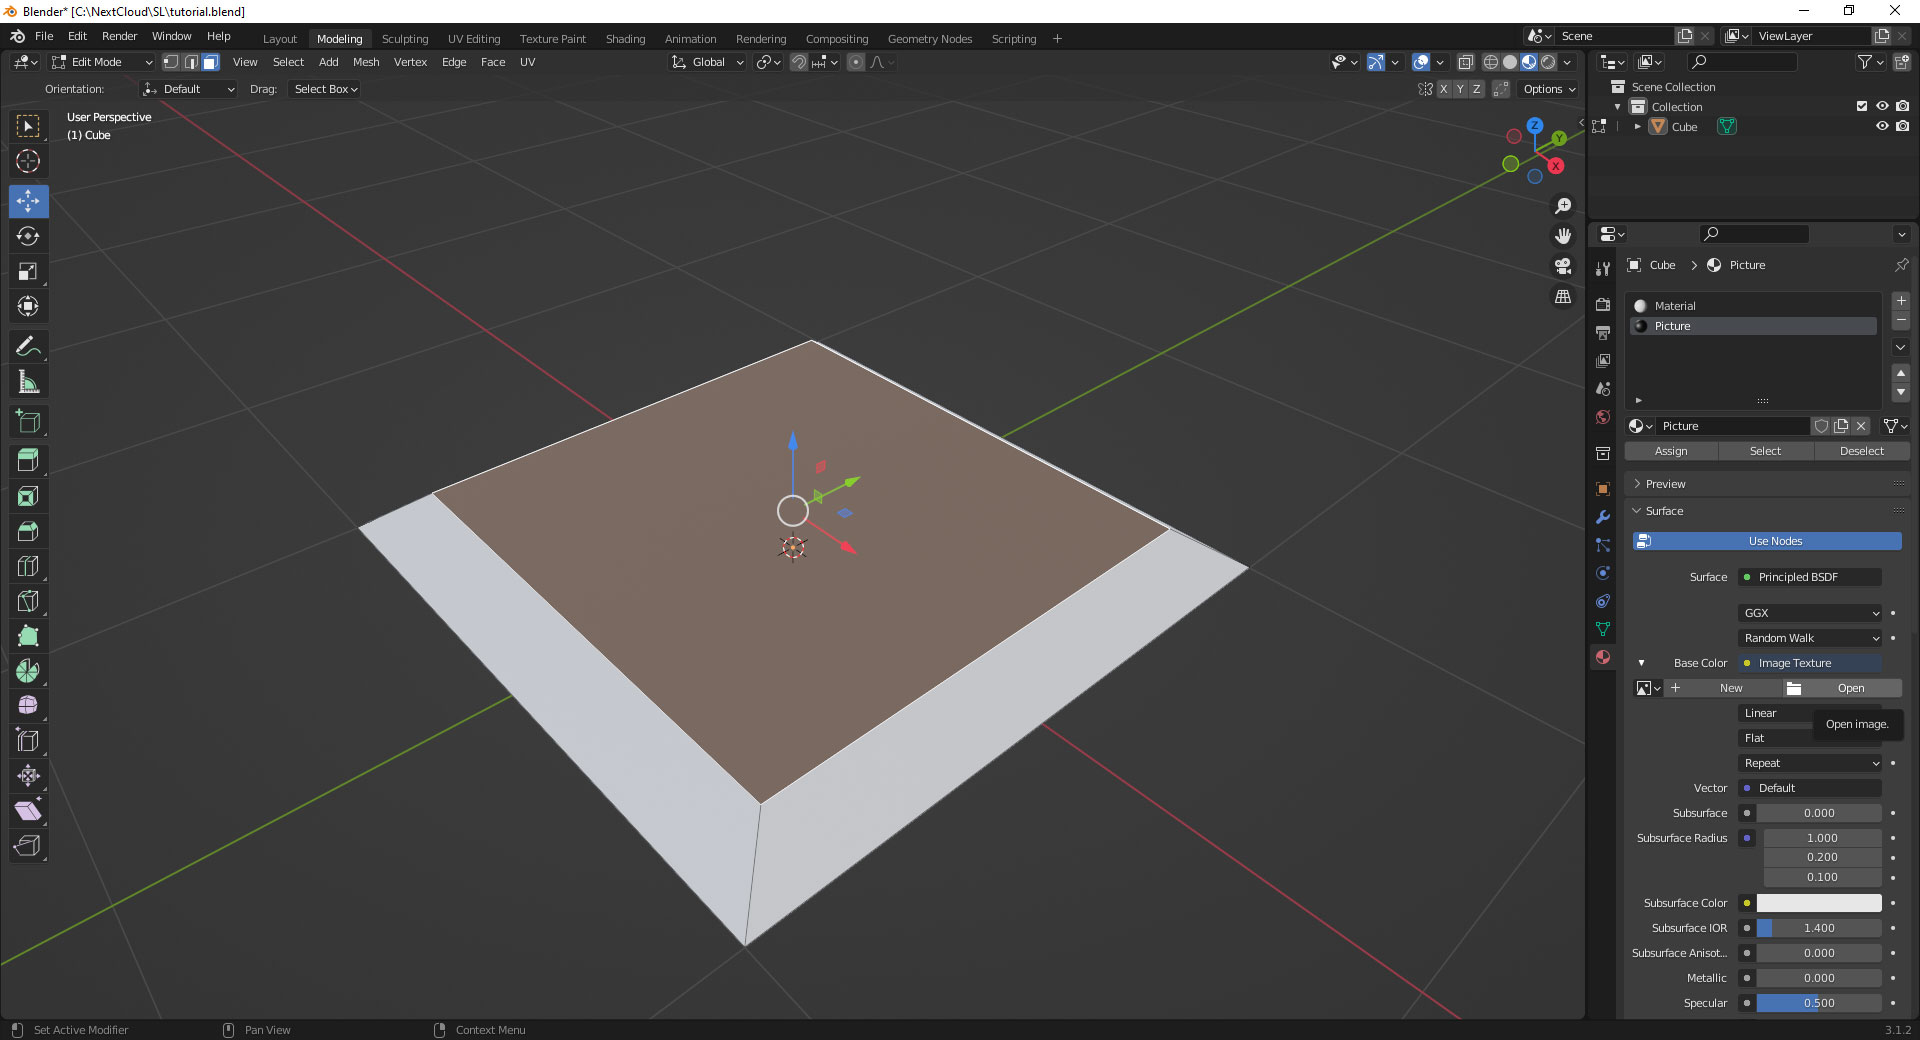
This now gives us the possibility to open a raster image and apply it to our material.
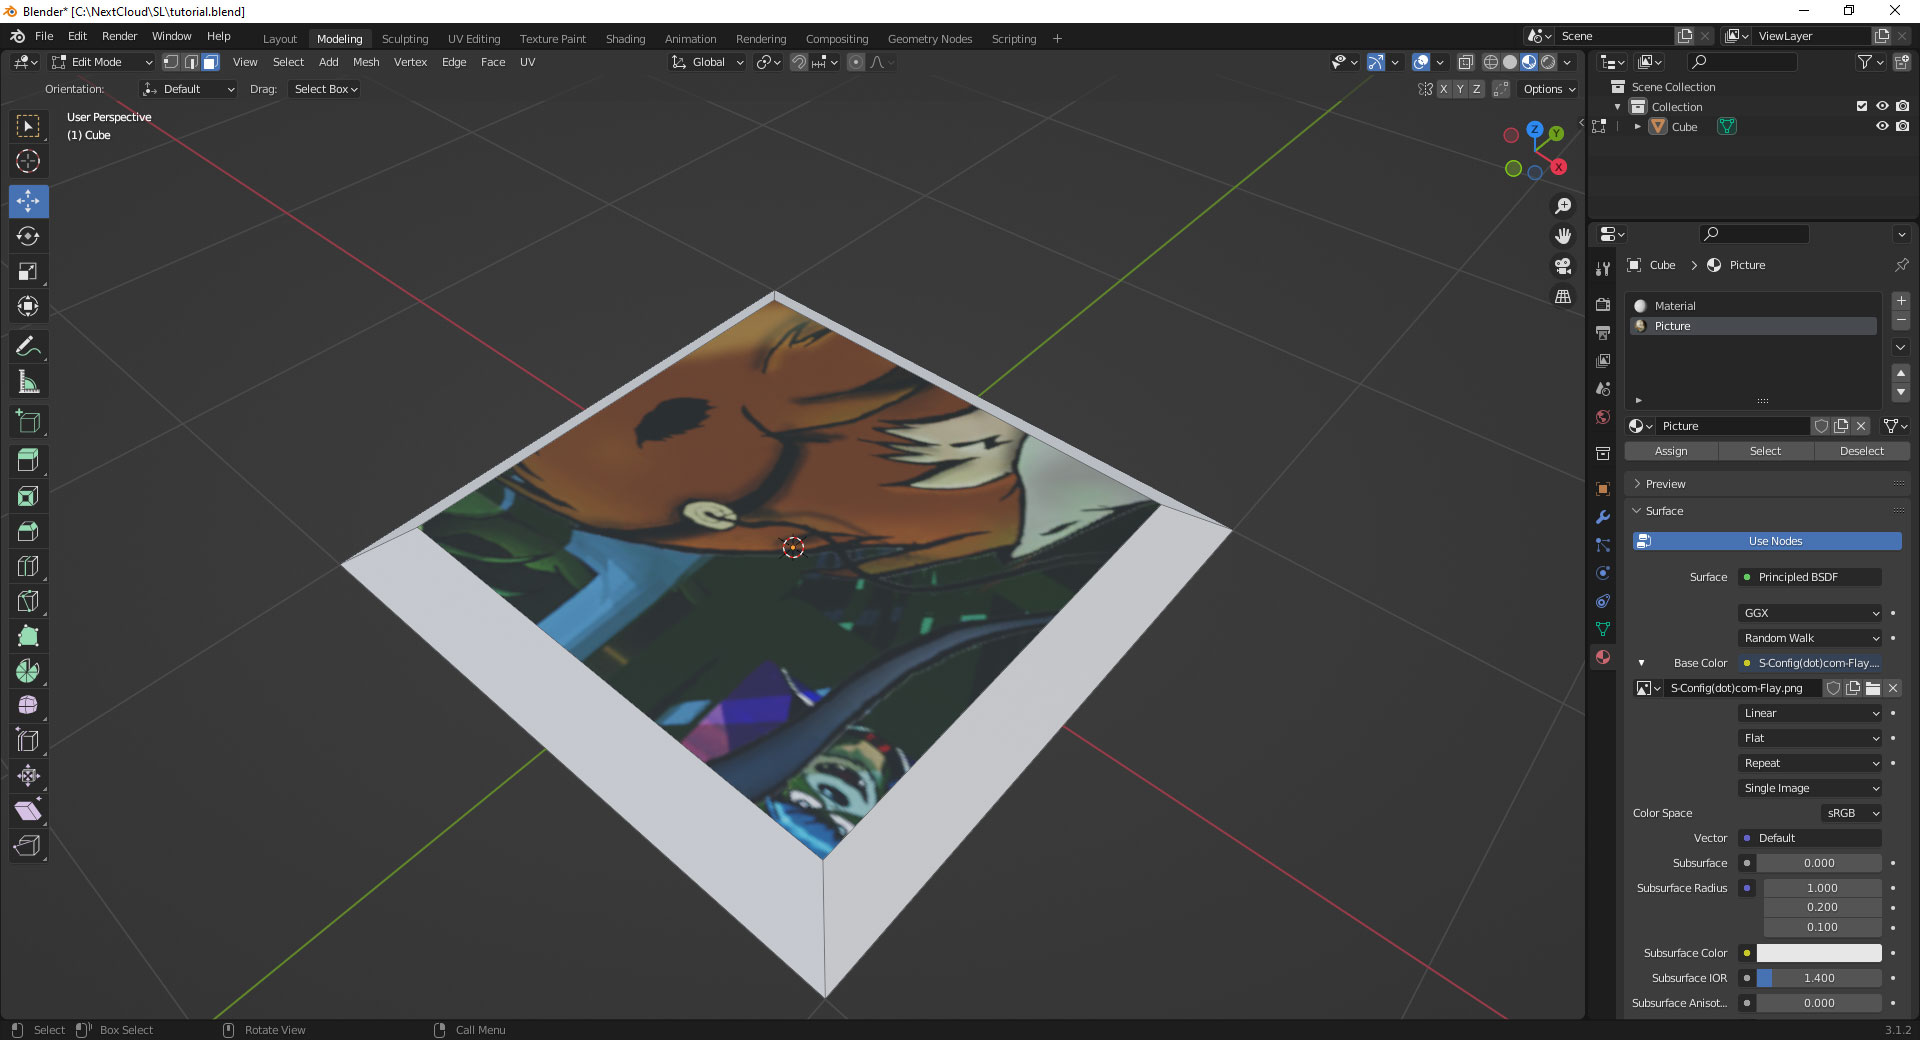
Okay, we managed to open up our artwork that we changed to 1024x1024 to accommodate Second Life, but something is wrong. We're only getting one piece of our artwork. Now, if you build a mesh from scratch instead of using one of the predefined shapes in Blender, you may not get anything at all! To control this Material, we have to go to the UV Editing tab on the very top, which will split our screen in two. The right will represent the 2d space of the raster, and the left will represent the 3d space of our object.
Also note, this may put your editing back into Wireframe mode, so you may have to switch again to Material Preview to see what is happening.
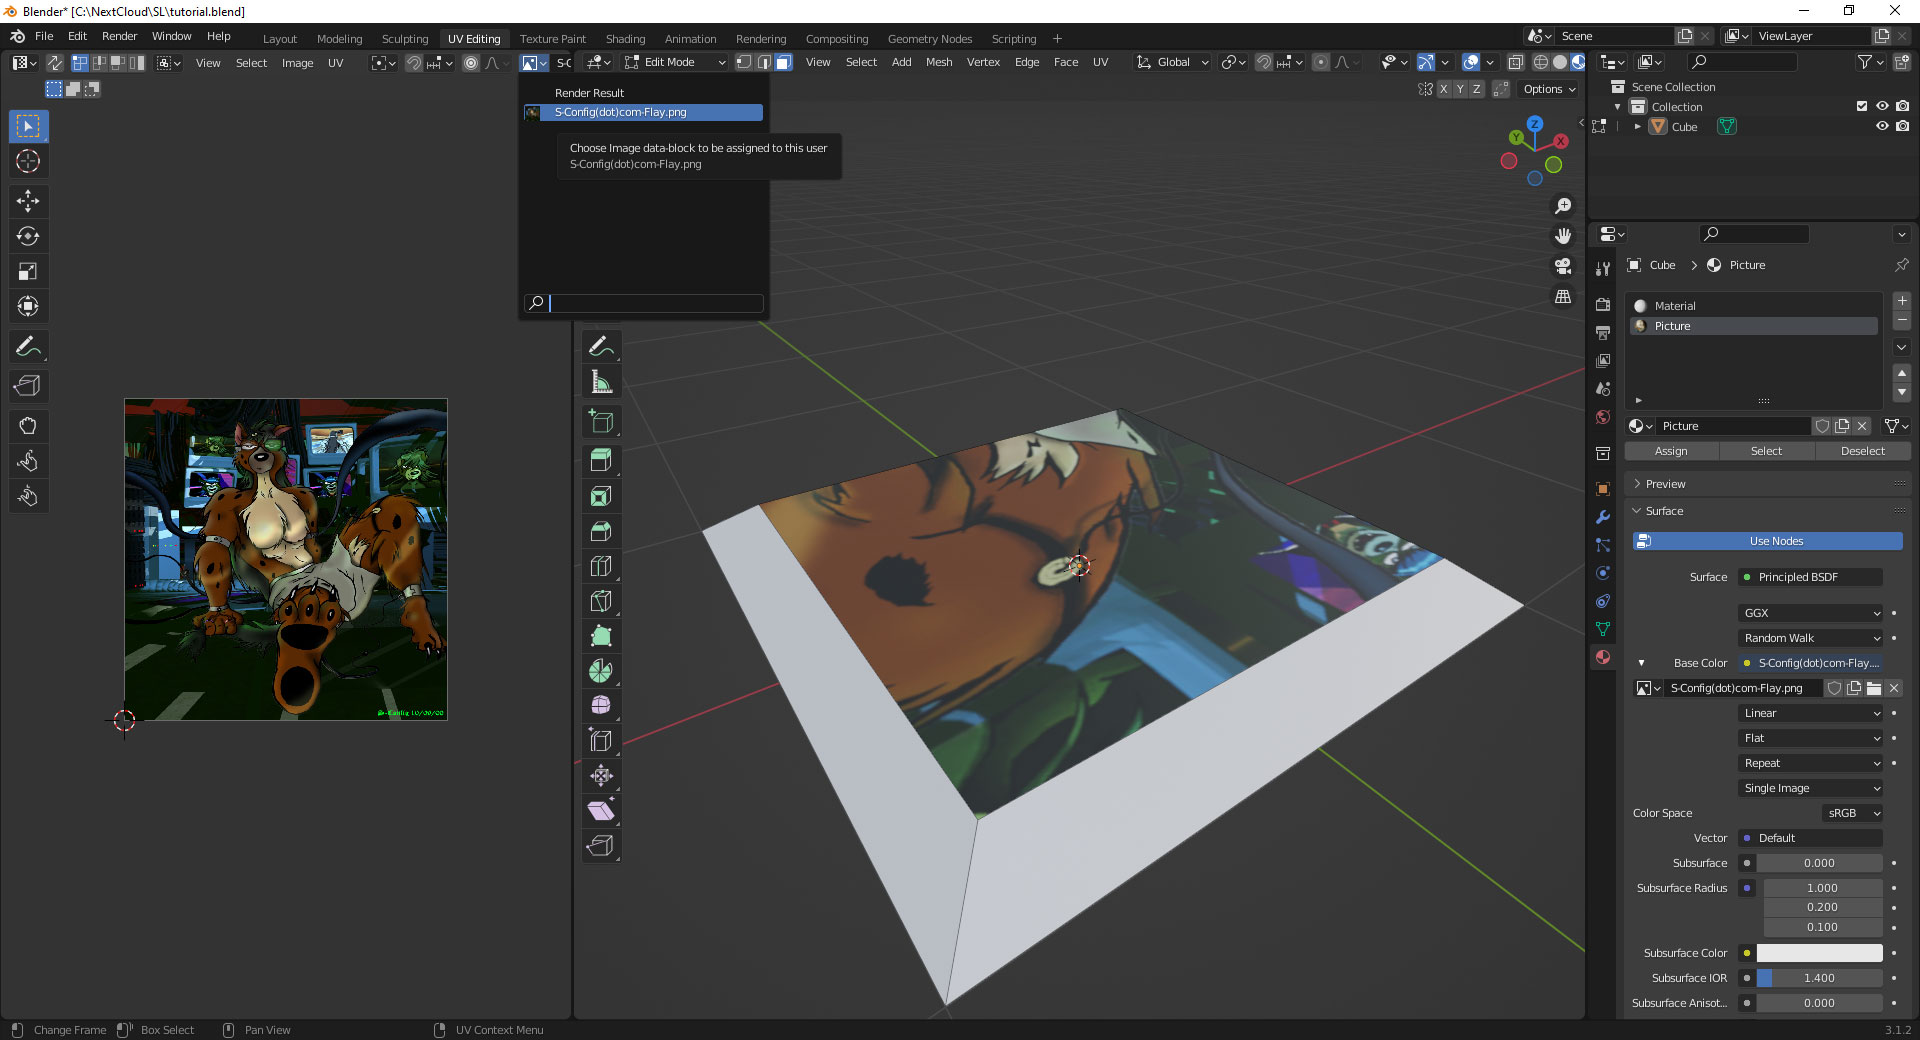
To see your 2d raster in the UV menu you my wish to select the scene icon near to the top of the UV Editor and Load the same picture that you assigned as a raster-image for your material.
Now. Blender doesn't tell you much until you start selecting the faces of your object.
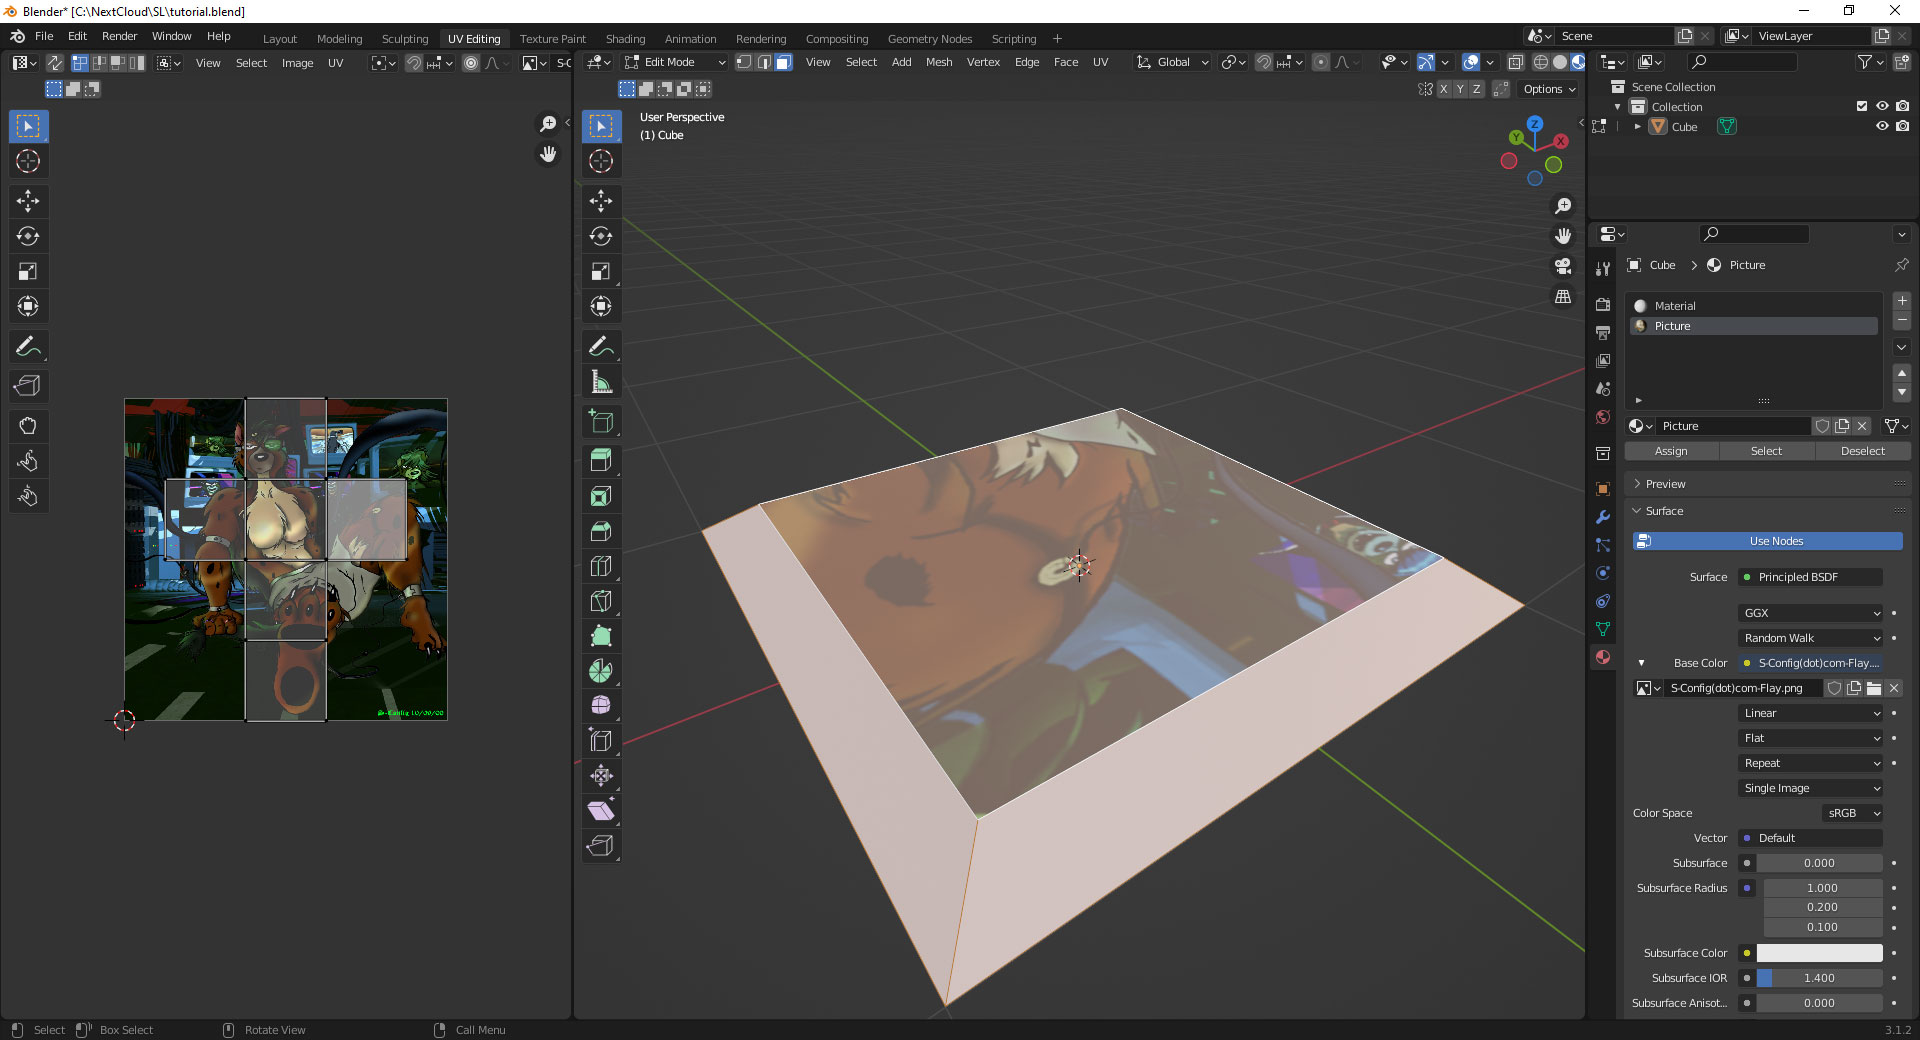 If you go to your object modeling window. While the edit mode is still active, press Select and All. It becomes clear as to why the image is fucking up! It's because the default cube object that we selected and started to modify ALREADY had a UV map applied. And the square we applied the "Picture" material to is only focused on a piece of our art. Not the entire thing.
There are a few ways of handling this:
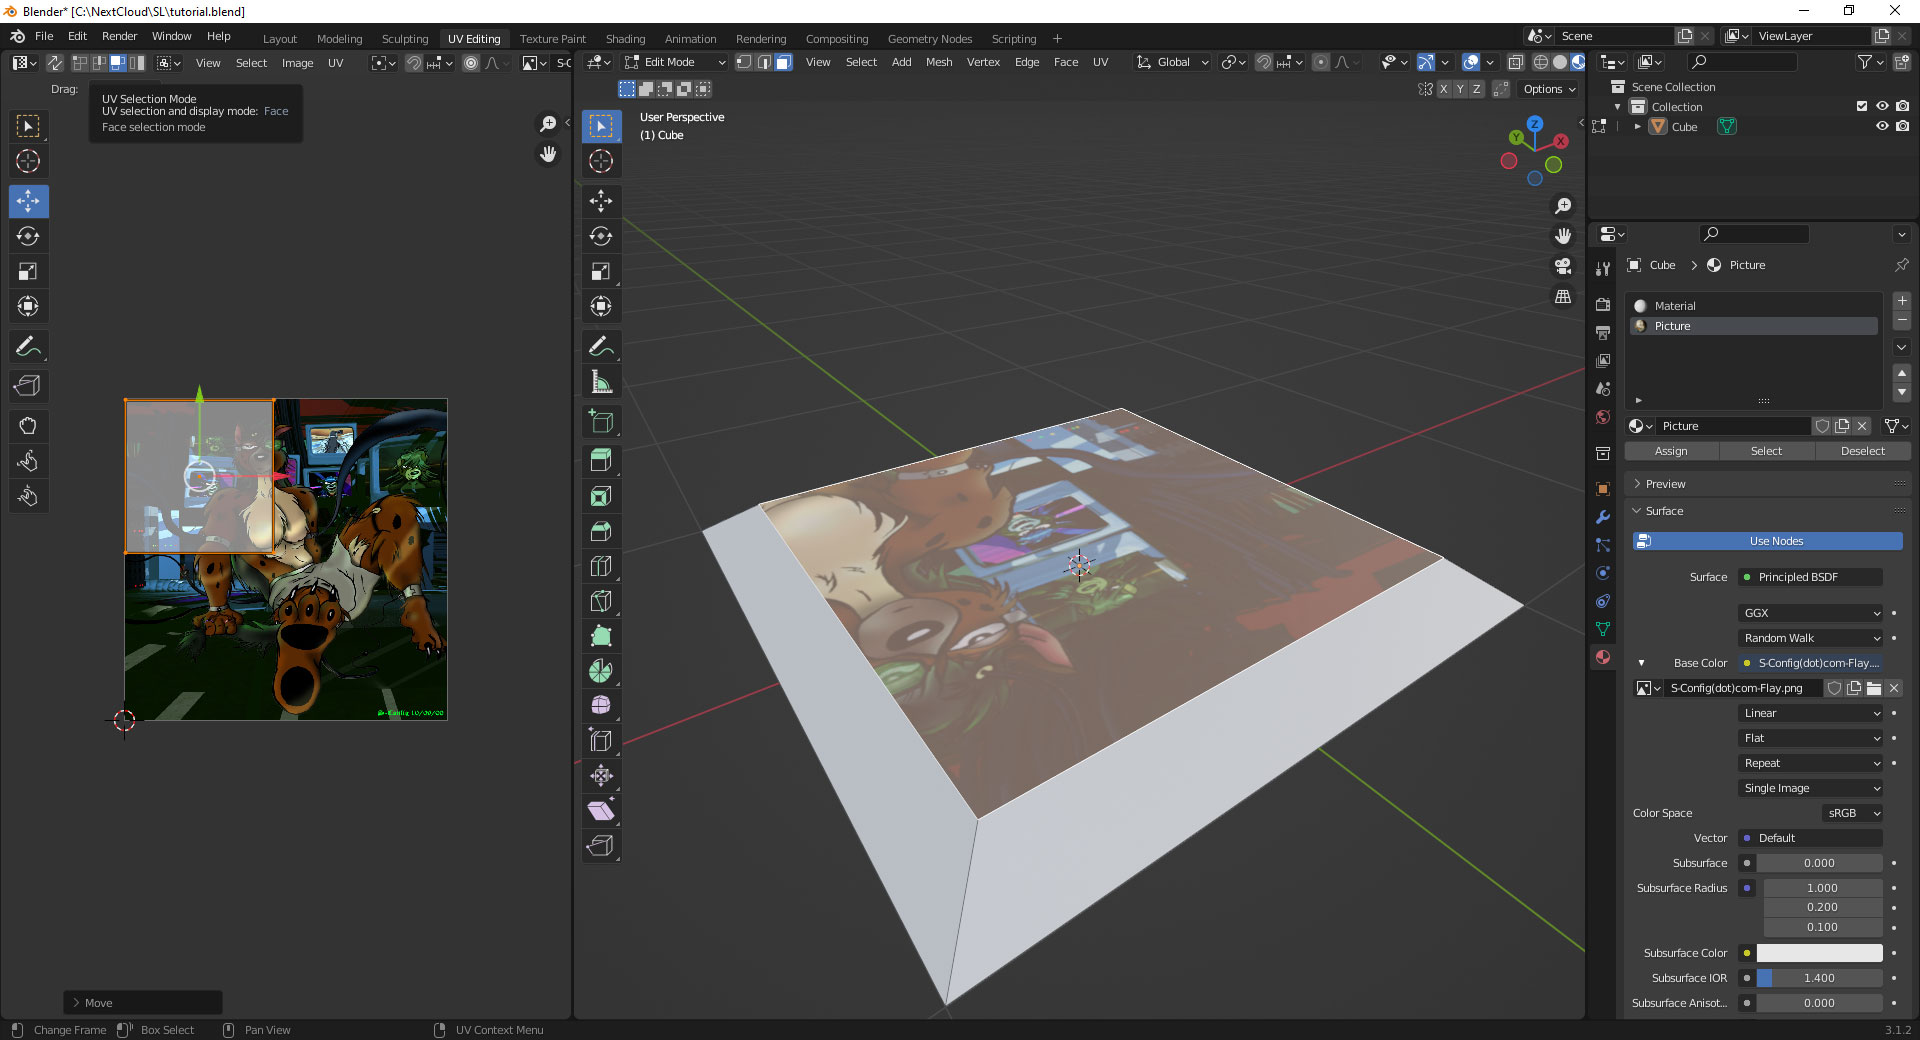
You could select the face in object edit mode.. Then, over to the UV Editing side, change your selection to move a UV Face instead of a node. And from there, you can move the face. Resize the face. etc.
This has interesting possibilities because if your Raster is set up with 2x2 512px artwork files, then you could potentially have the 7 Materials hold up to 28 art pieces! On one Prim in SL!
However, for people rocking 4k monitors, or if your artwork will be bigger than 1m in SL. You might want to simply use the entire UV.
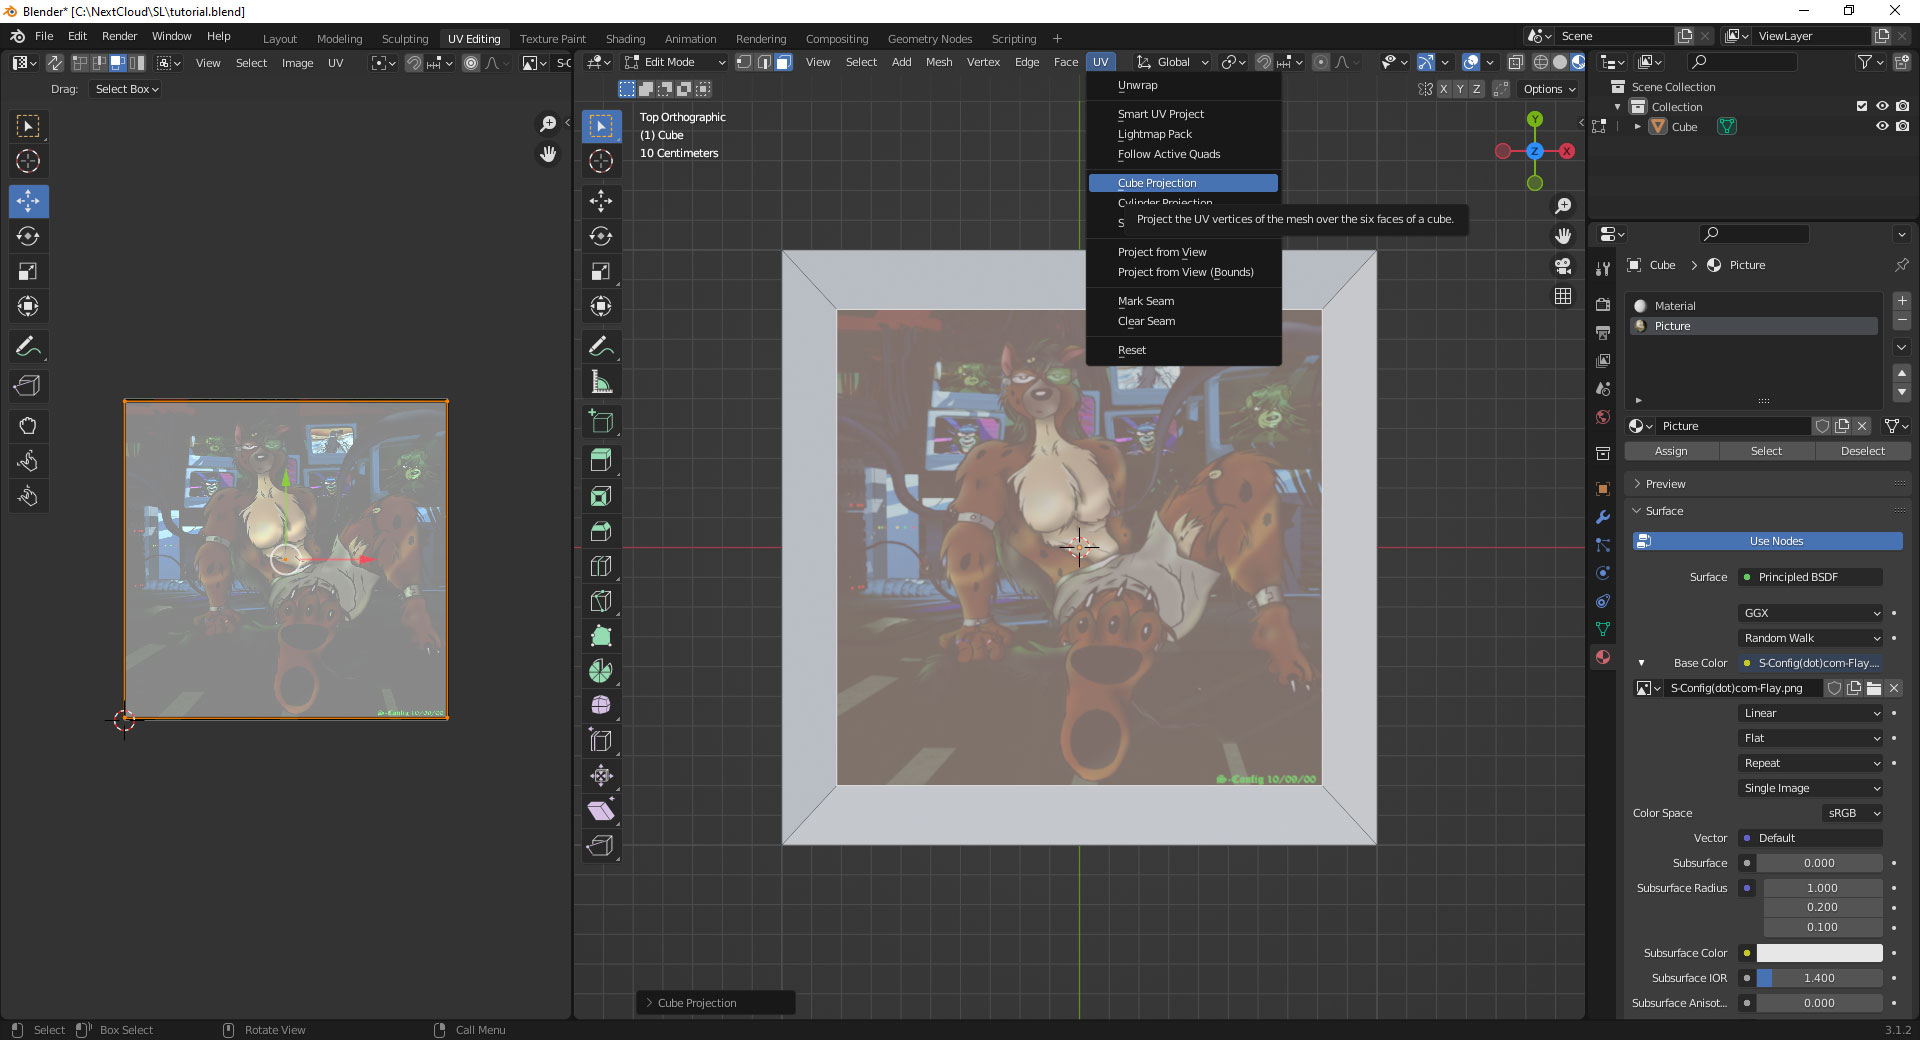 As pictures are very simple UVs to map, while the face of the Material known as "Picture" is still selected, we can go back to the object edit screen. Click on UV, and finally, Cube Projection, and the UV will bring in the entire picture we resized in Photoshop.
What about the frame?!?!
A little more clicking. But absolutely.
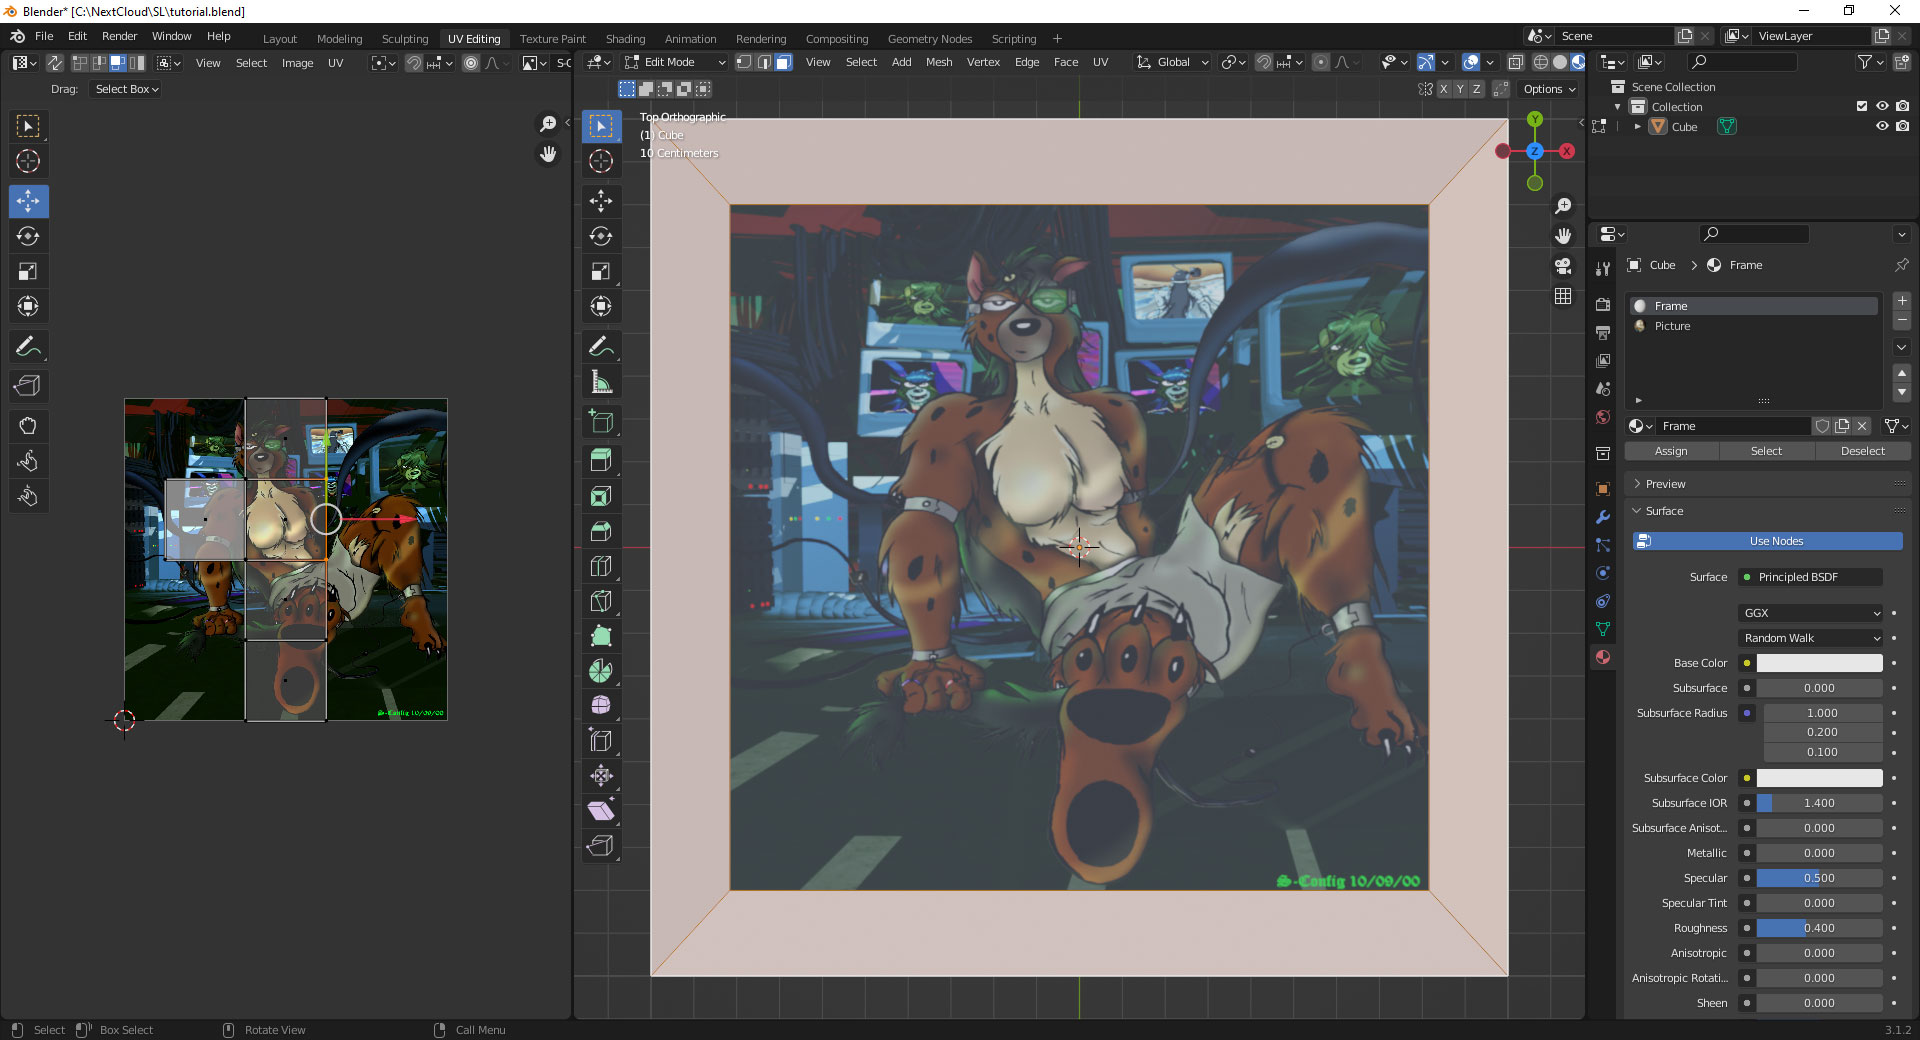
We simply click on all of the faces of the OUTSIDE of the picture. Since the Frame is on the default "Material", why don't we change the name of that material to "Frame"? Don't forget to rotate around and capture the BACK of the picture too. We want it all!

We just applied a repeating cement texture, and you could side the sides are all distorted because the sides of our cube are not squares. They're rectangular and thus distorted. On top of this. We're not taking full advantage of our UV map, as you can see on the left-hand side.
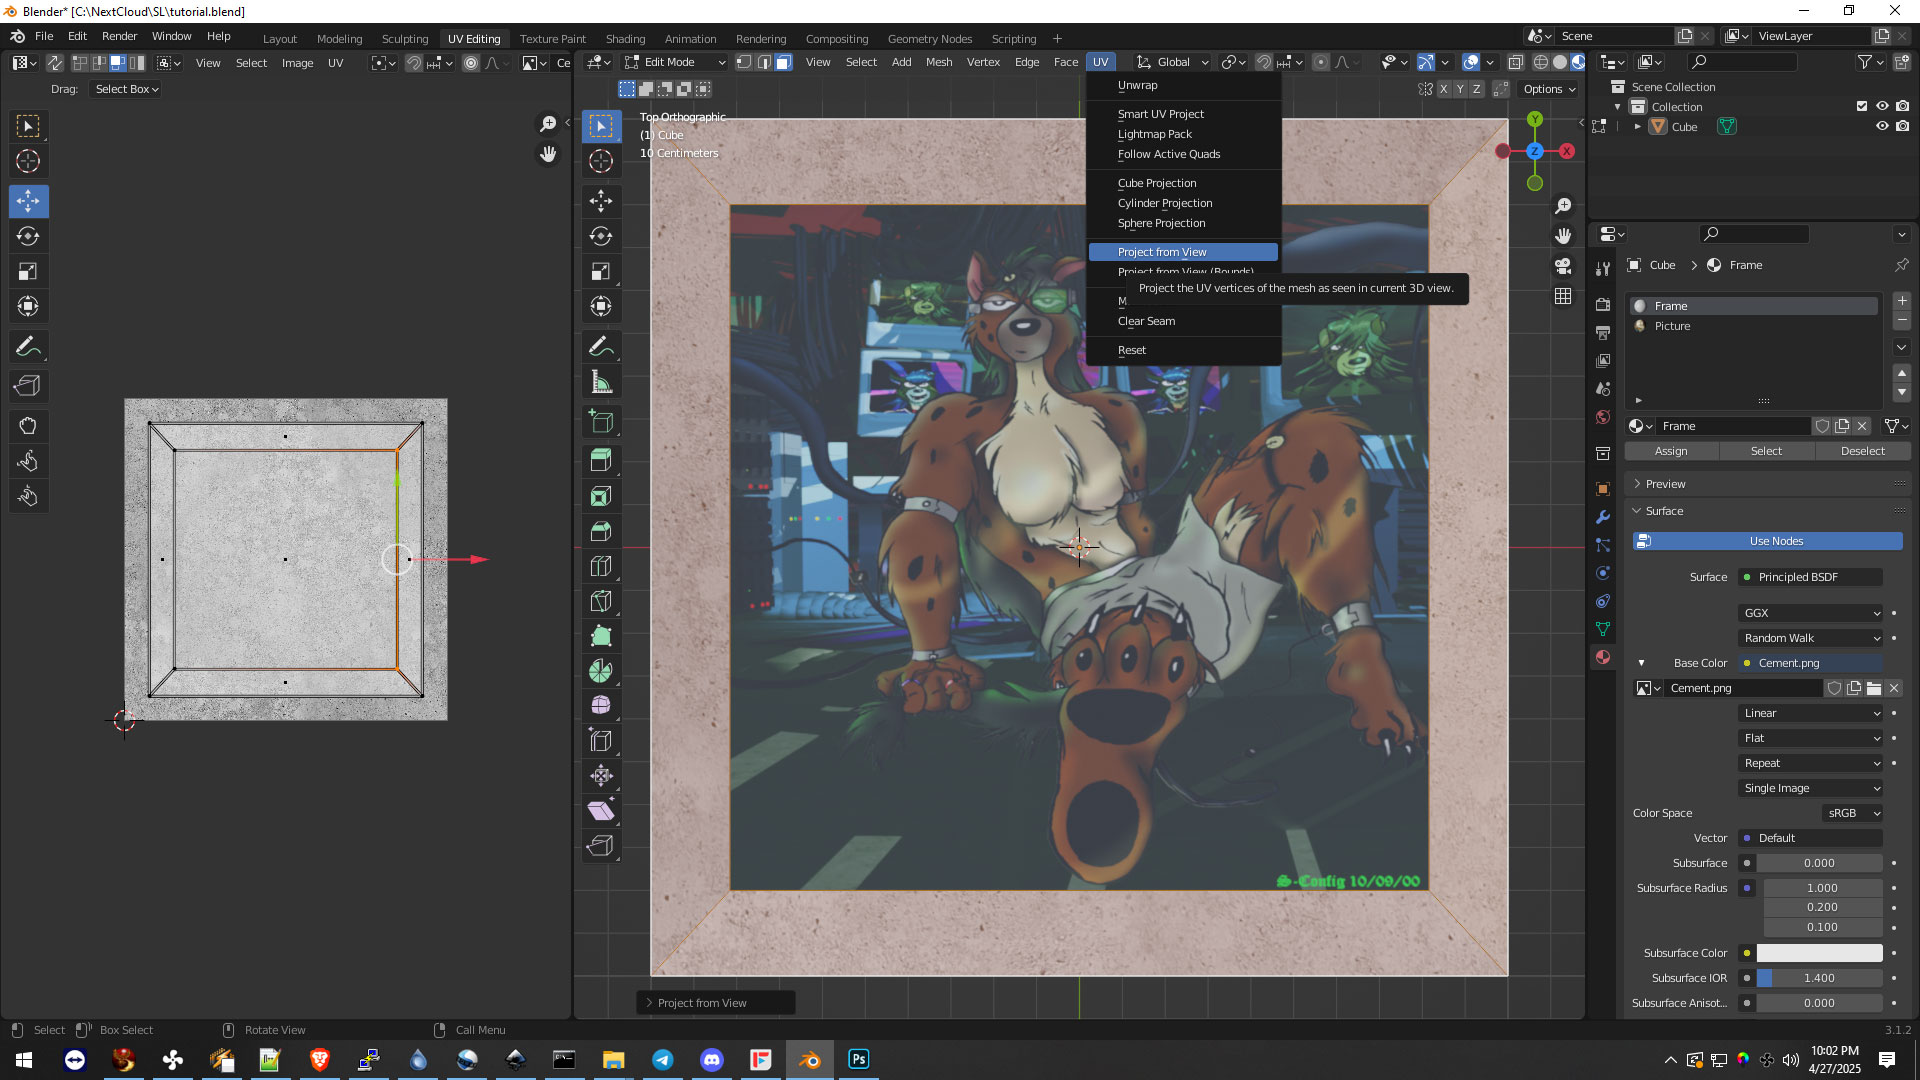
This time around, we didn't use Cube Mapping. We used projection mapping. which means it takes the angle of whatever you are viewing at and places that into 2d space. Now, we will have to go in and resize our cube in UV space. But this type of mapping is a little controversial in that the back of this frame shares the same UV textures as the front of this frame.
Now, the odds of anyone seeing the BACK of the frame will be next to impossible. However, you could also resize the back of the frame to fill in the empty hole where the picture is. This way. Every part of the UV is mapped to its independent part of the texture.
Or if you're like me and don't care because no one will see the back of the frame. You leave it as is. Taking advantage of the texture, and if you wanted to repeat it in SL, it will do so seamlessly..
Checking Size:
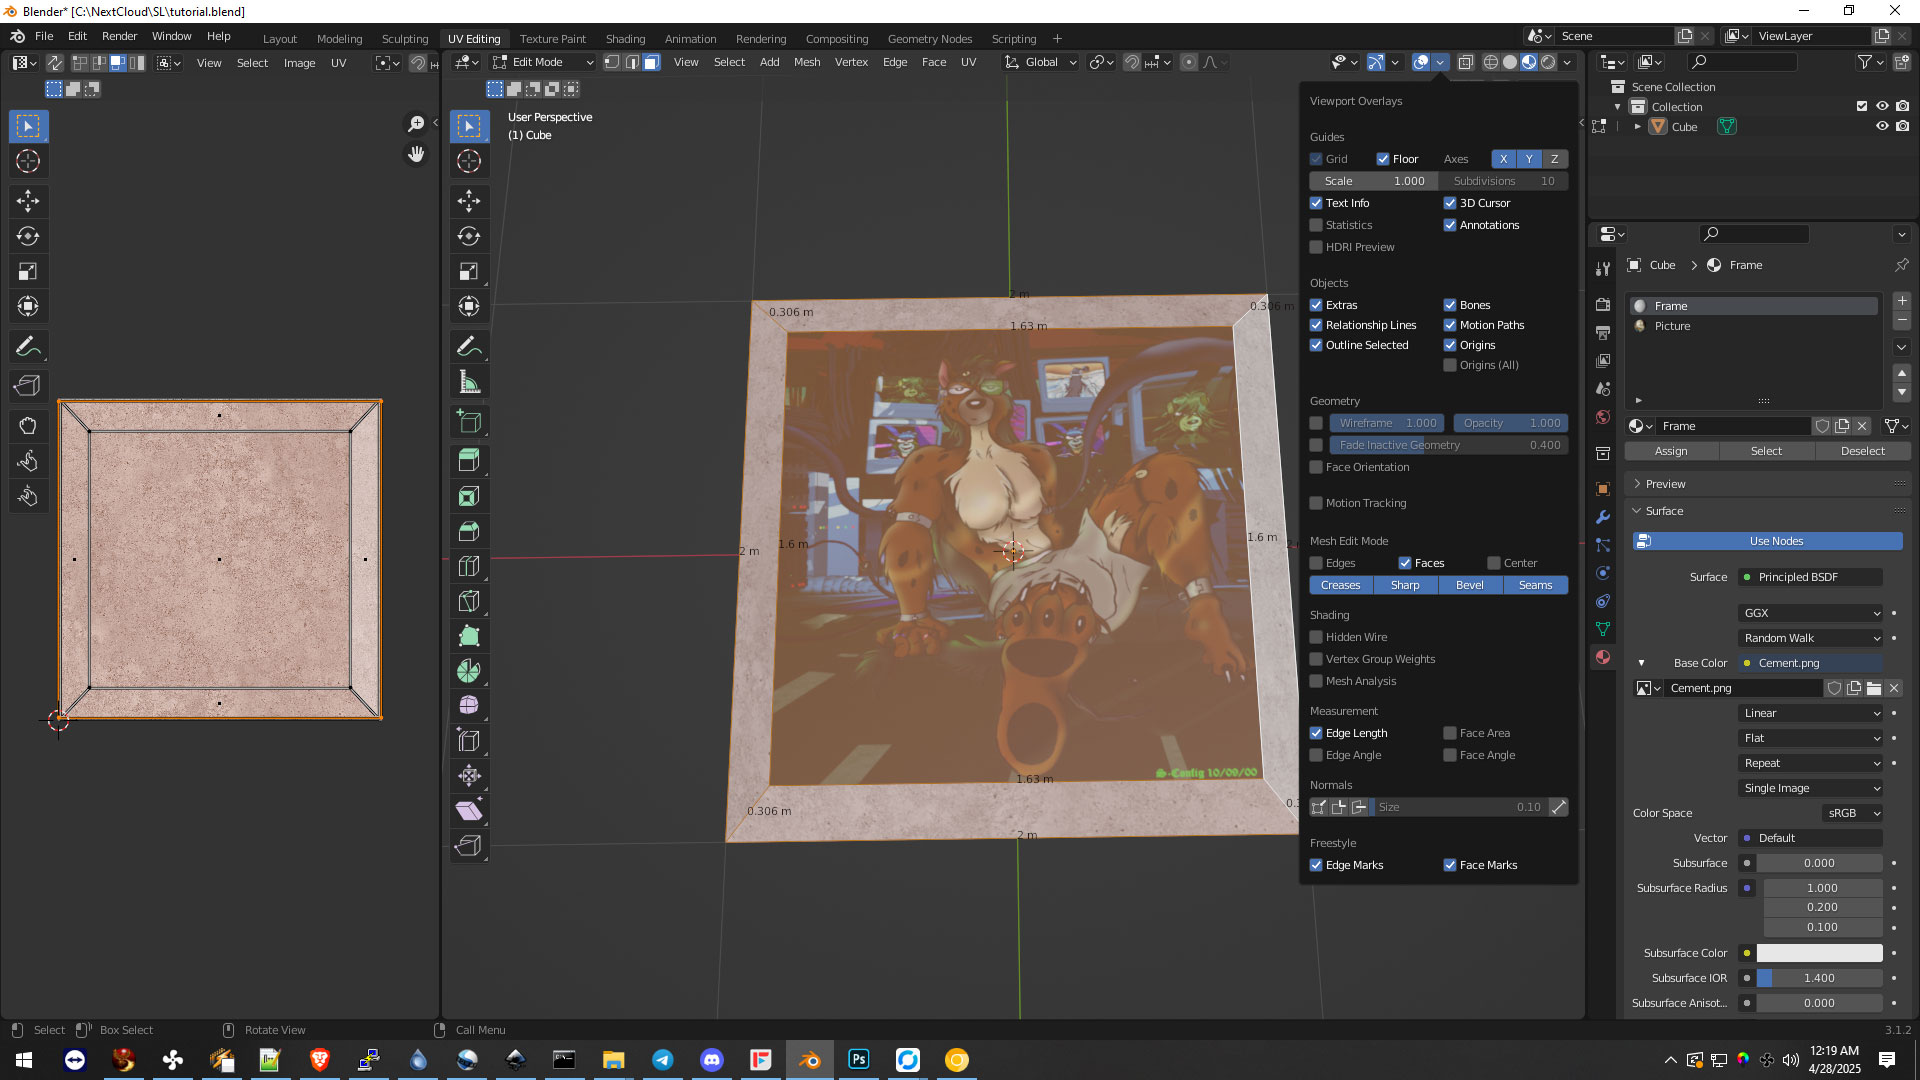
Before we go any further, it may be a good thing to point out that if you go into your viewport and check the Edge Length of your model, you will get an estimate on the approximate size of your model. This is generally a good idea to do as you don't want to export something massive where it screws up your calculation. As far as measuring in Second Life. We find it best to just use a cube and look at the size values as meters for the overall size of your project.
Replication.
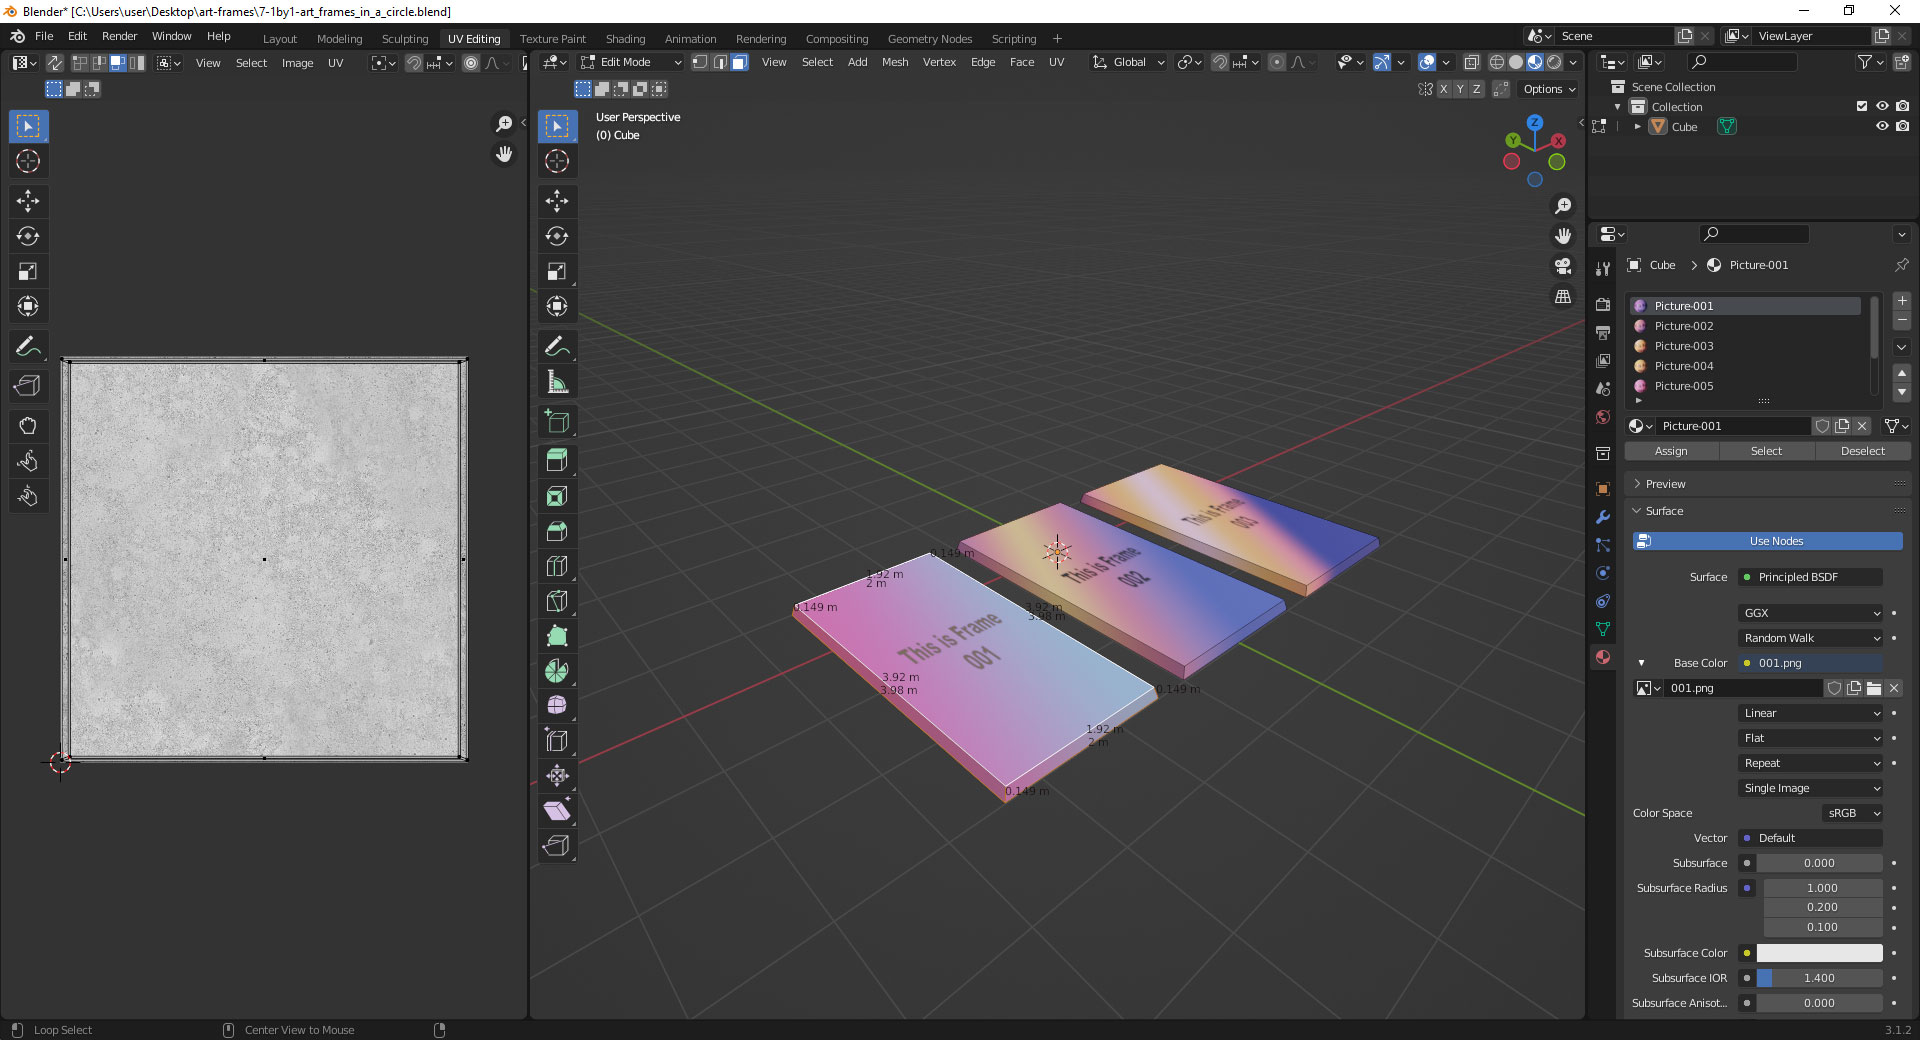
Now that your frame with your picture is done, it's time to make more. Since the frame took one Material, each picture takes a material. We could technically have 7 different paintings.
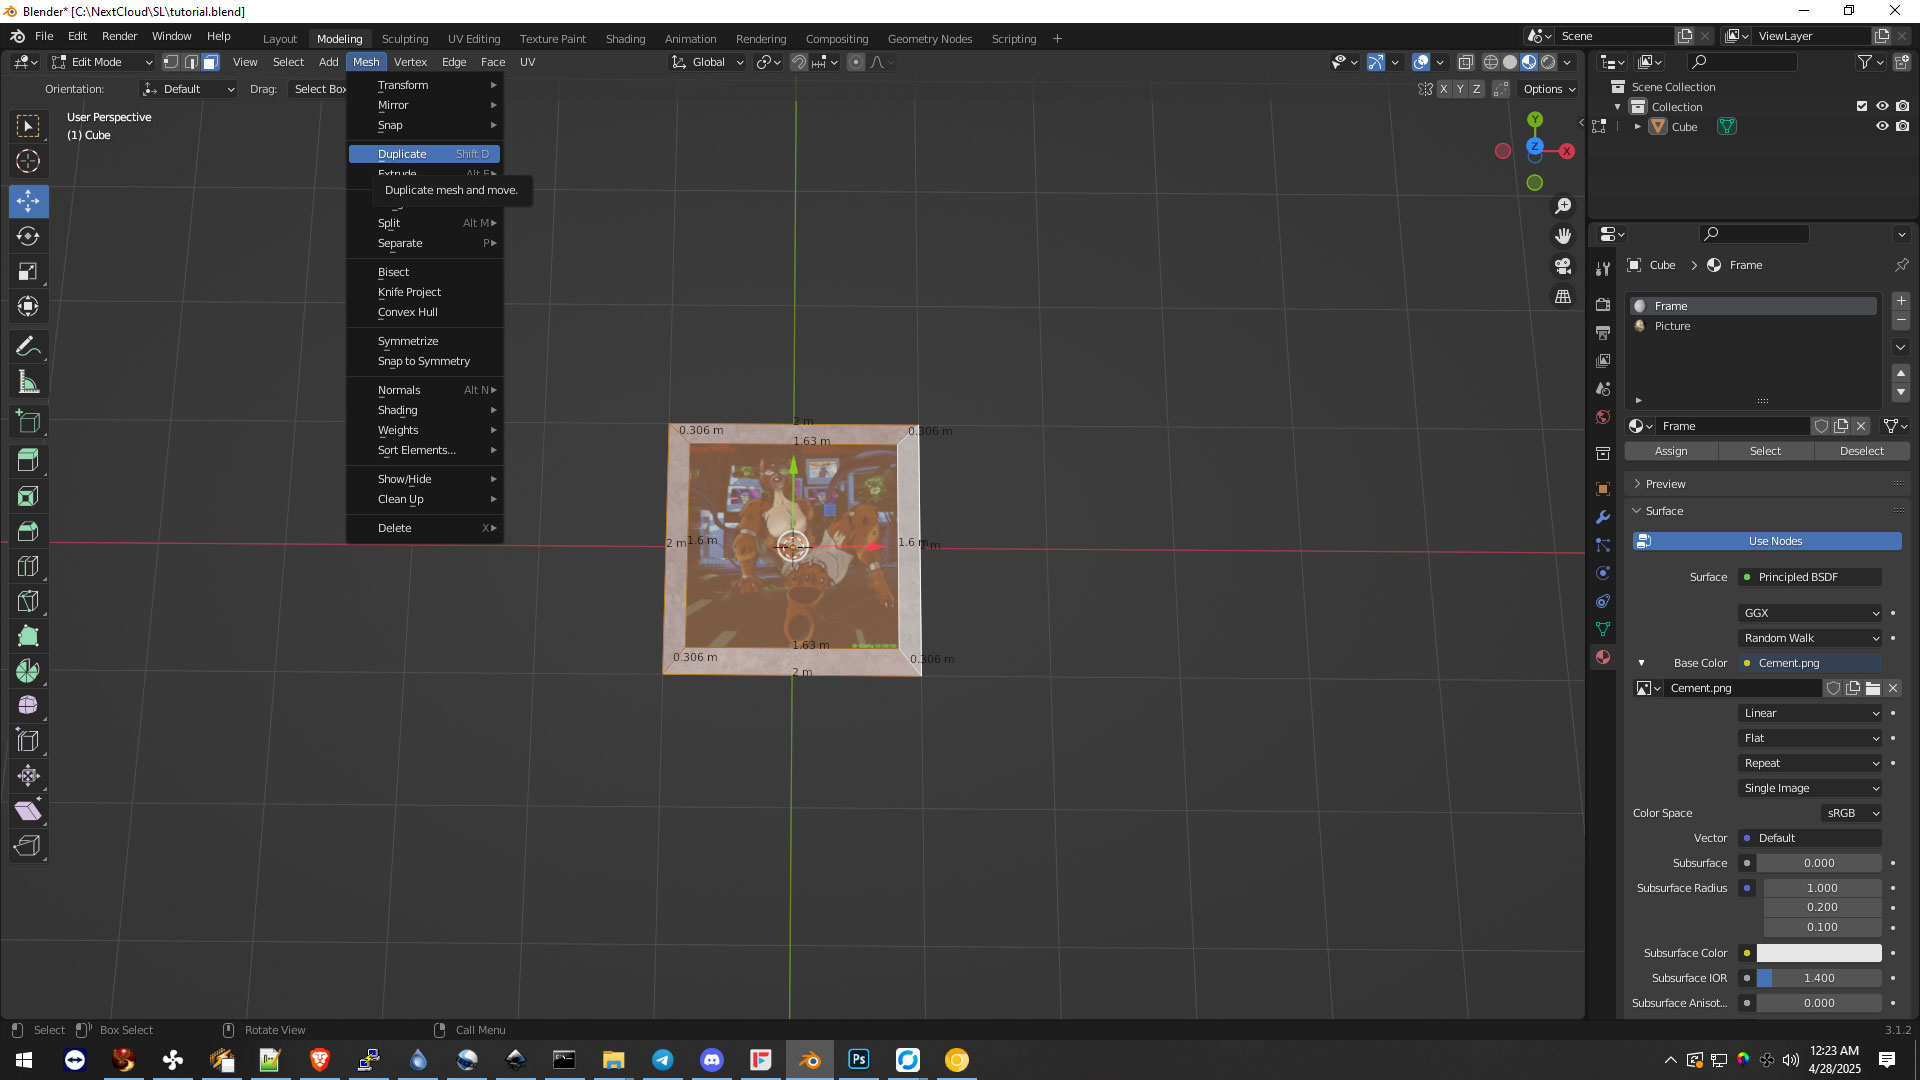
Instead of duplicating the object, which creates a horrid mess, such as merging the objects back together, as well as all of the materials. We're going to simply click Mesh and then Duplicate to duplicate the mesh instead of the object.
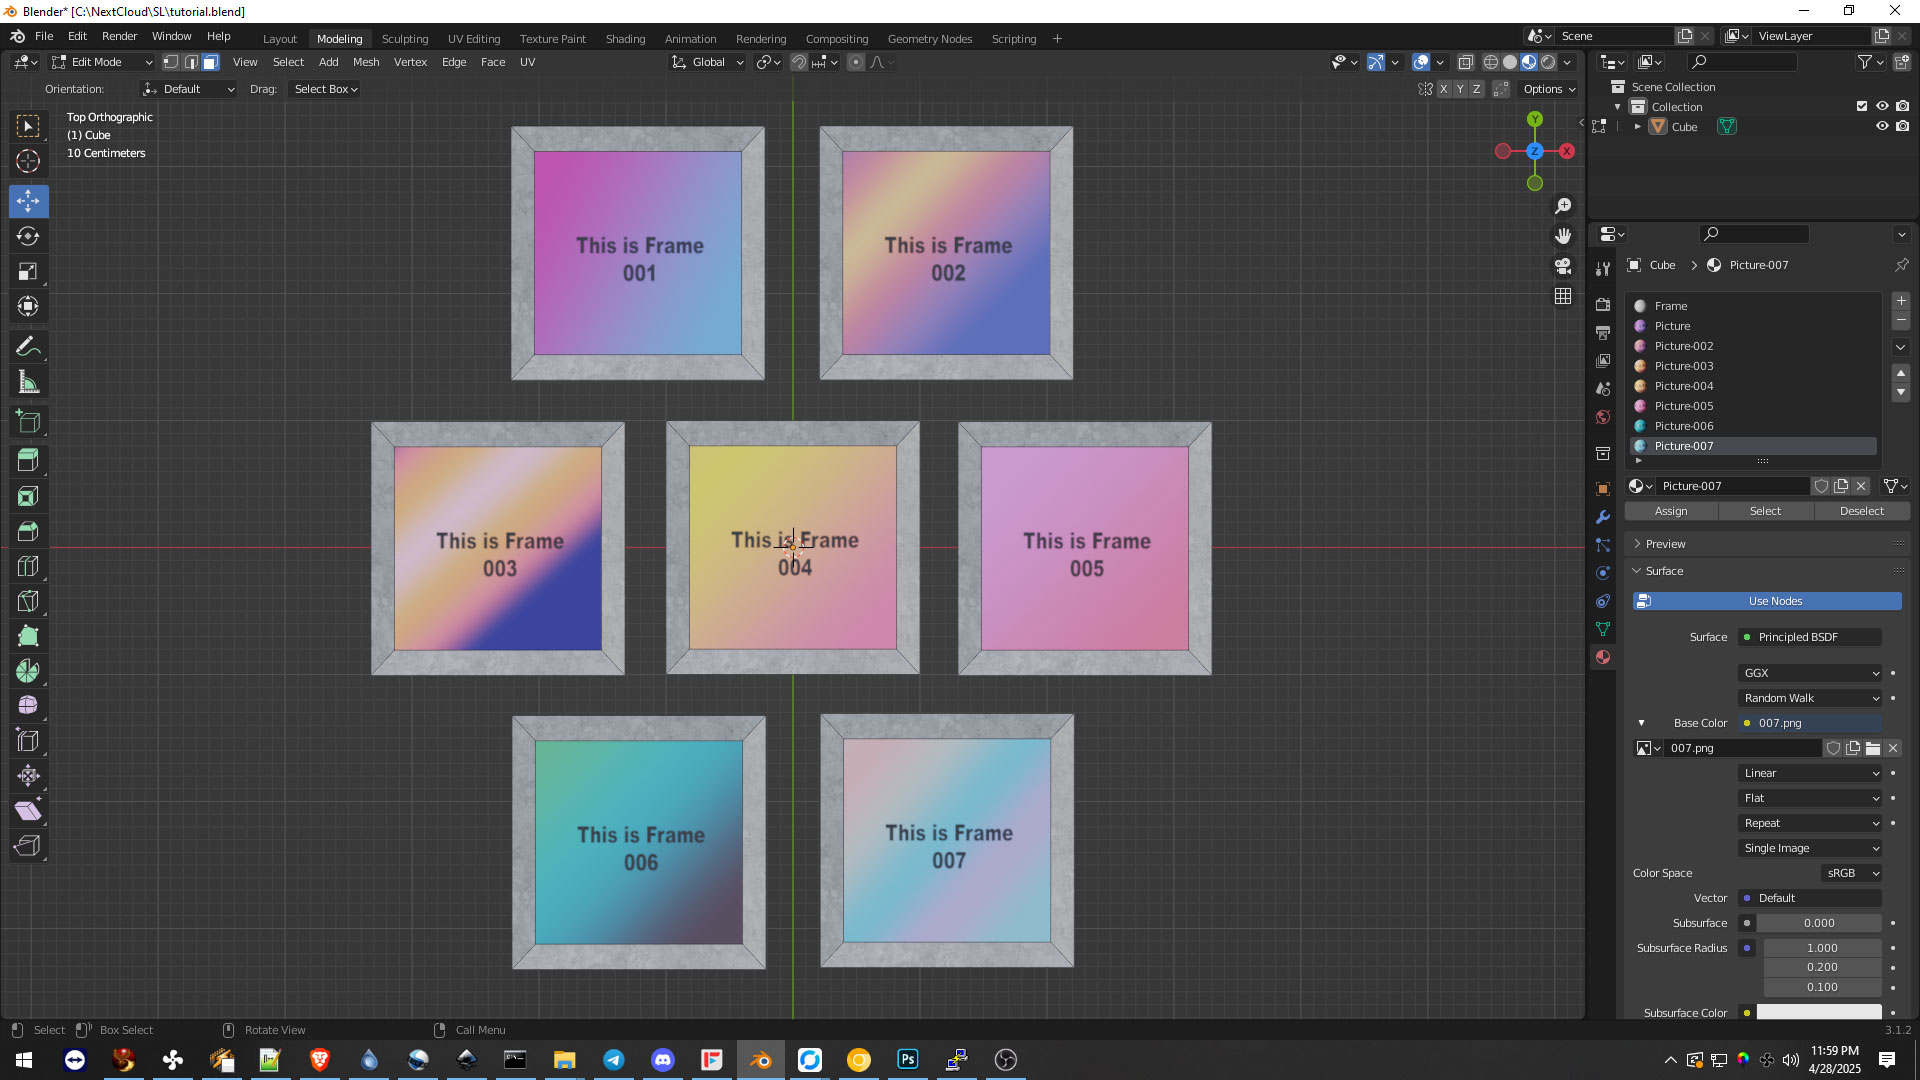
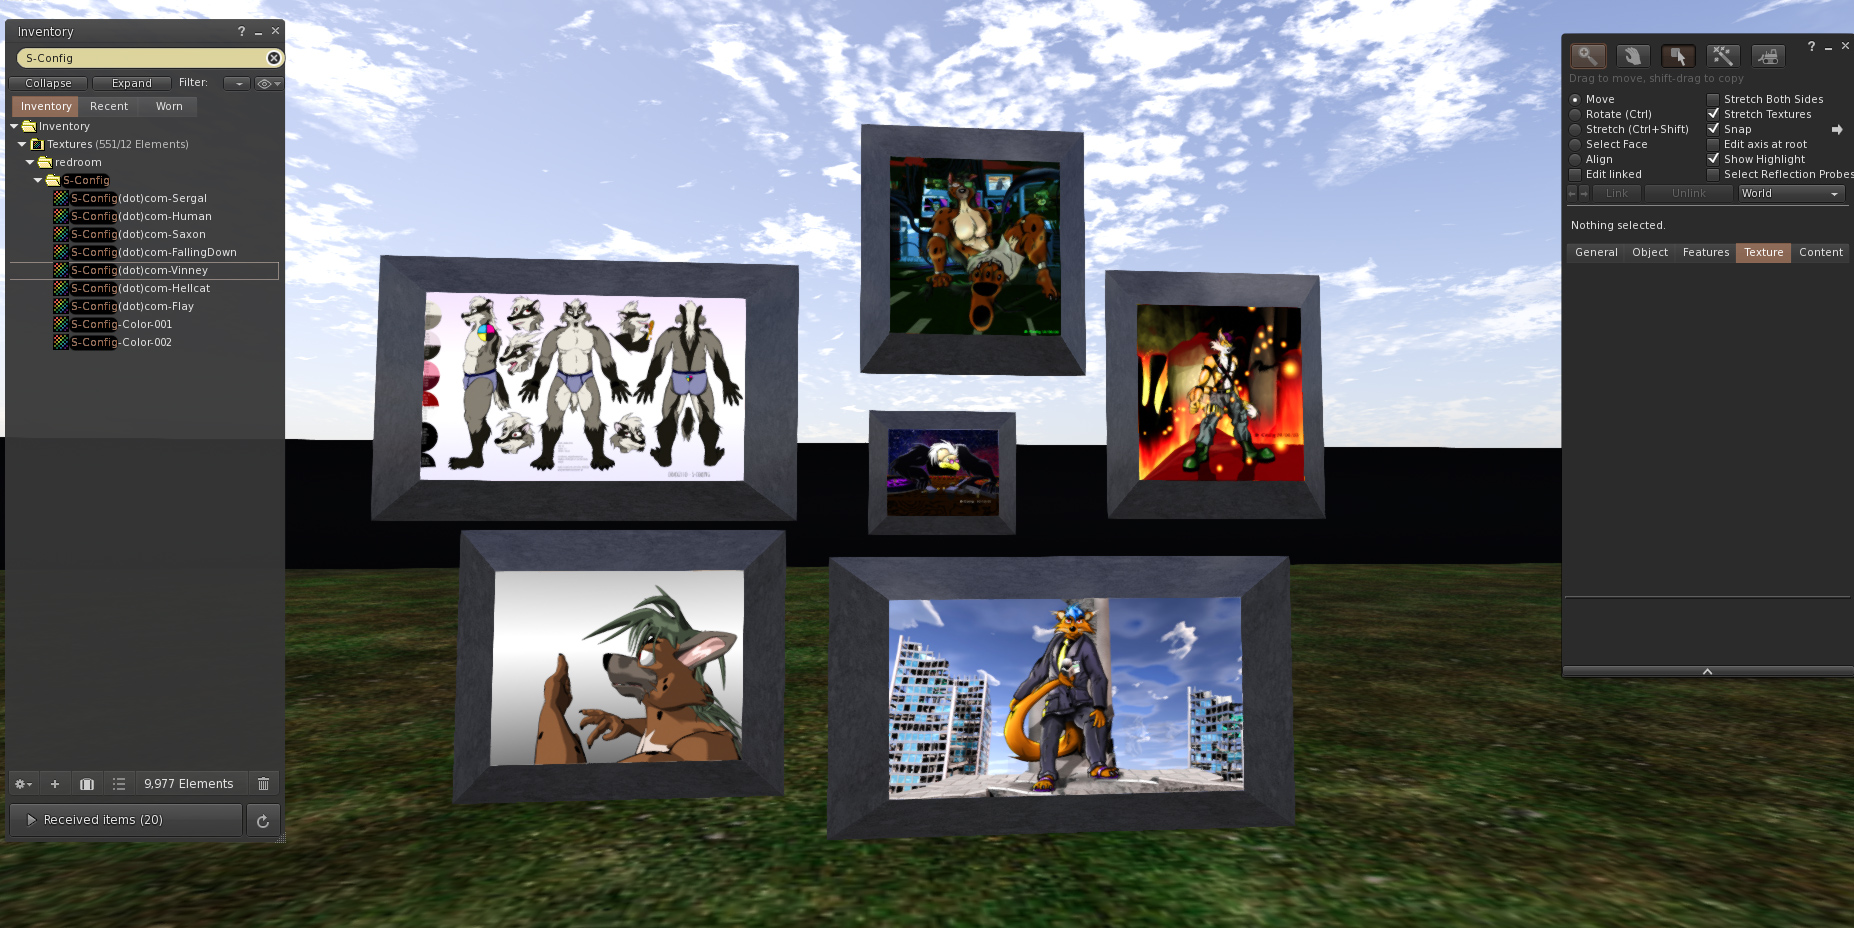
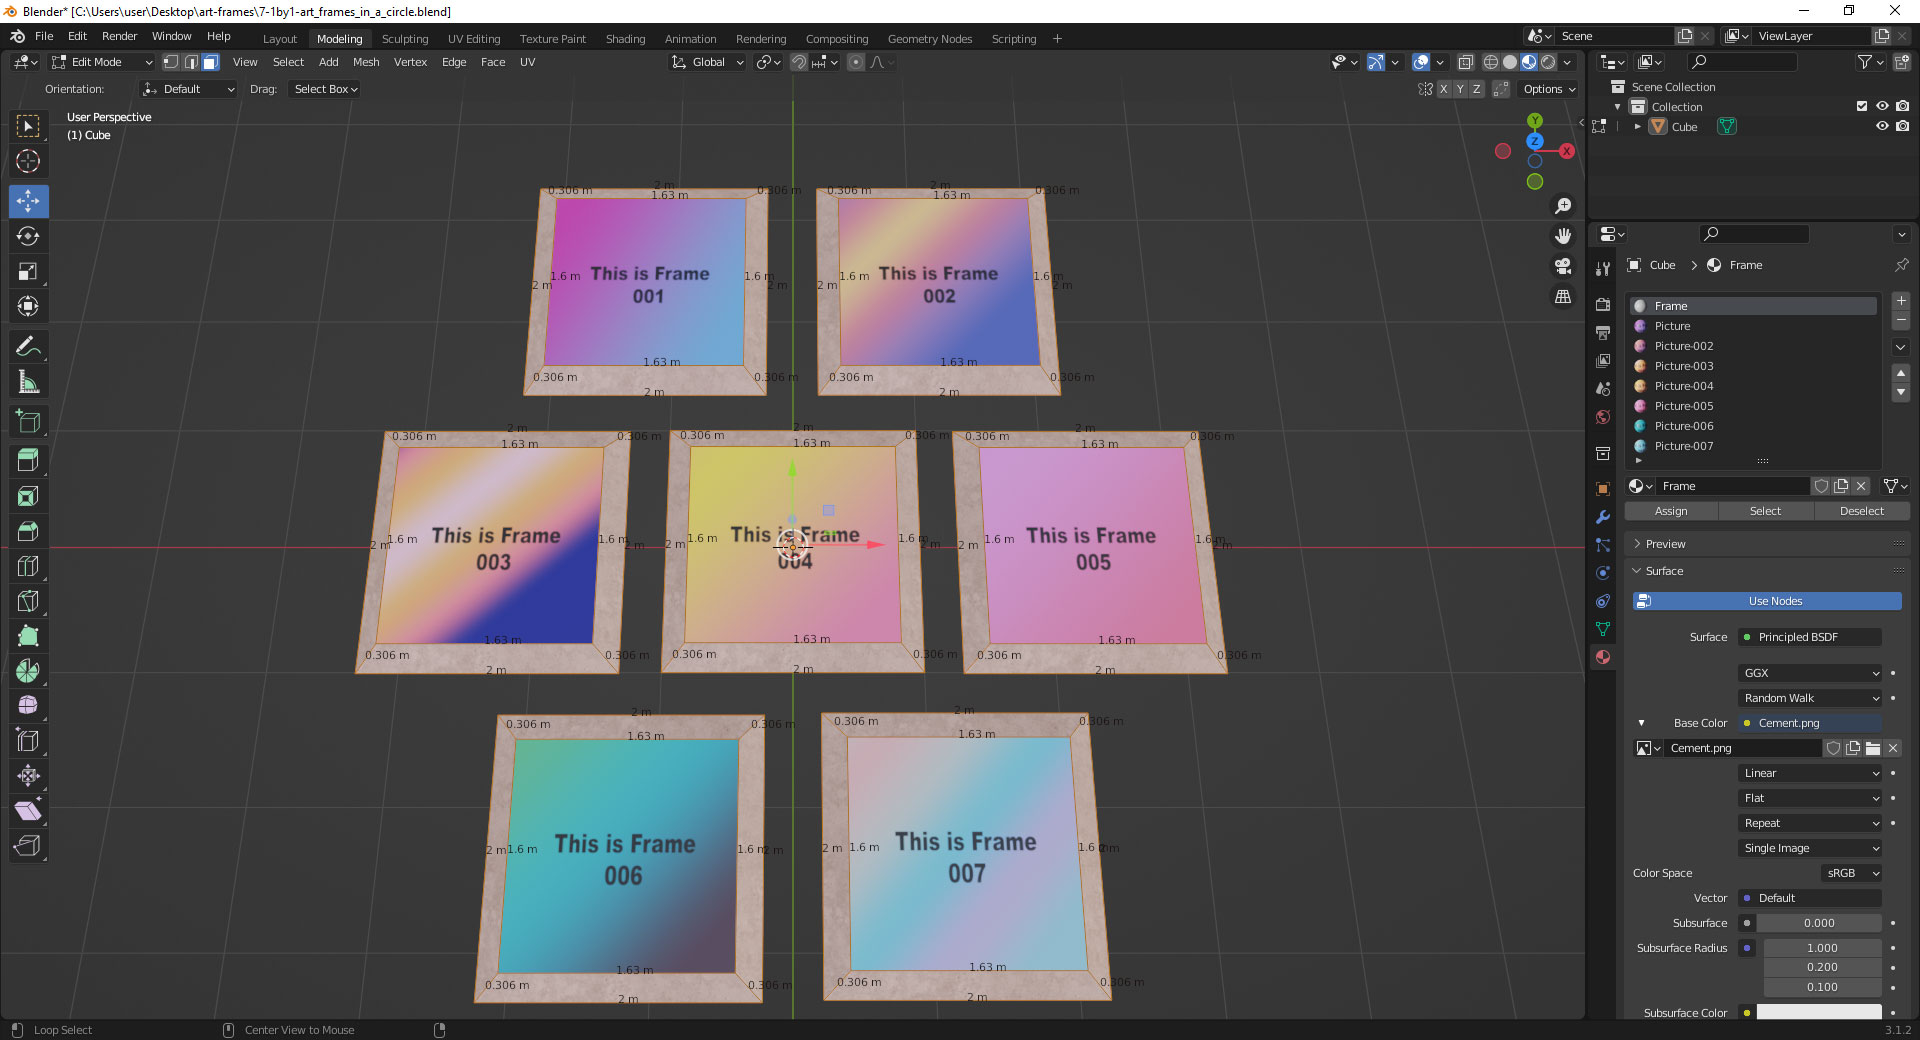
Because we're replicating the mesh that we have assigned the UV, there was no need to redo any of the squares. The only thing we would have to do is repeat the steps of making materials and loading files. In the example above, I'm using 7 separate PNG files at 1024x1024 plus one repeating cement texture for the framing.
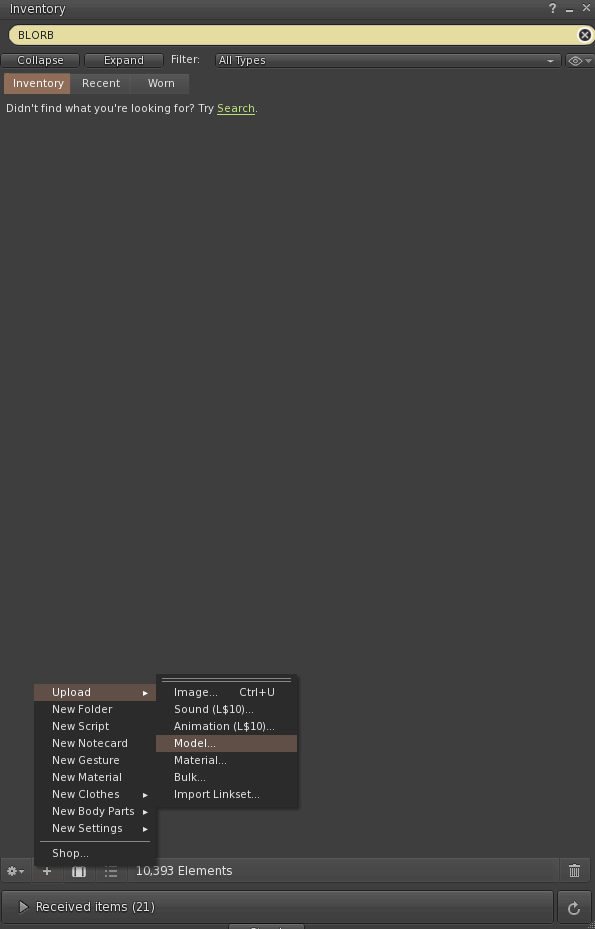
At this stage, you COULD file, export, Collada (Default) .dae, which is exactly what Second Life Mesh will use. Then, jump over to your Second Life client, and from your inventory men,u you can import a model into Second Life.
Now, when you first bring in your brand new Mesh into SL. At first, everything looks great. and the "High Resolution" is selected.. There is even some creators in SL take the "Fuck it" attitude and let Second Life sort of their mess by Auto-adjusting the LoD or (Level of Detail).

That's a terrible idea.
Generally, if you leave it up to SecondLife to optimize, it has no idea what the priority vector to optimize. Meaning, at Medium detail, which is anywhere from 15-20 meters away, you'll see the object smash into some horror.
Now, as you can see in the settings. We could allow the importer to generate a new mesh. Or! We could take control of ourselves. If you take control of yourself and you don't try to reduce your polys, you ruin whatever efficiency that is gained from making everything in Mesh.
Now, because the shapes are relatively simple. We're going to clone the same high-vertex shape to the medium category. If you had thousands of vertices, THEN you might want to optimize to just a few hundred on the Medium setting. However, since all 7 frames are under 100. Leaving the exact detail on medium is just fine.
Moving onward to the Low setting.
For the Low setting. We're going to click on the 'frame' material and press select to highlight any object that uses that cement frame. Then, delete all of the faces.
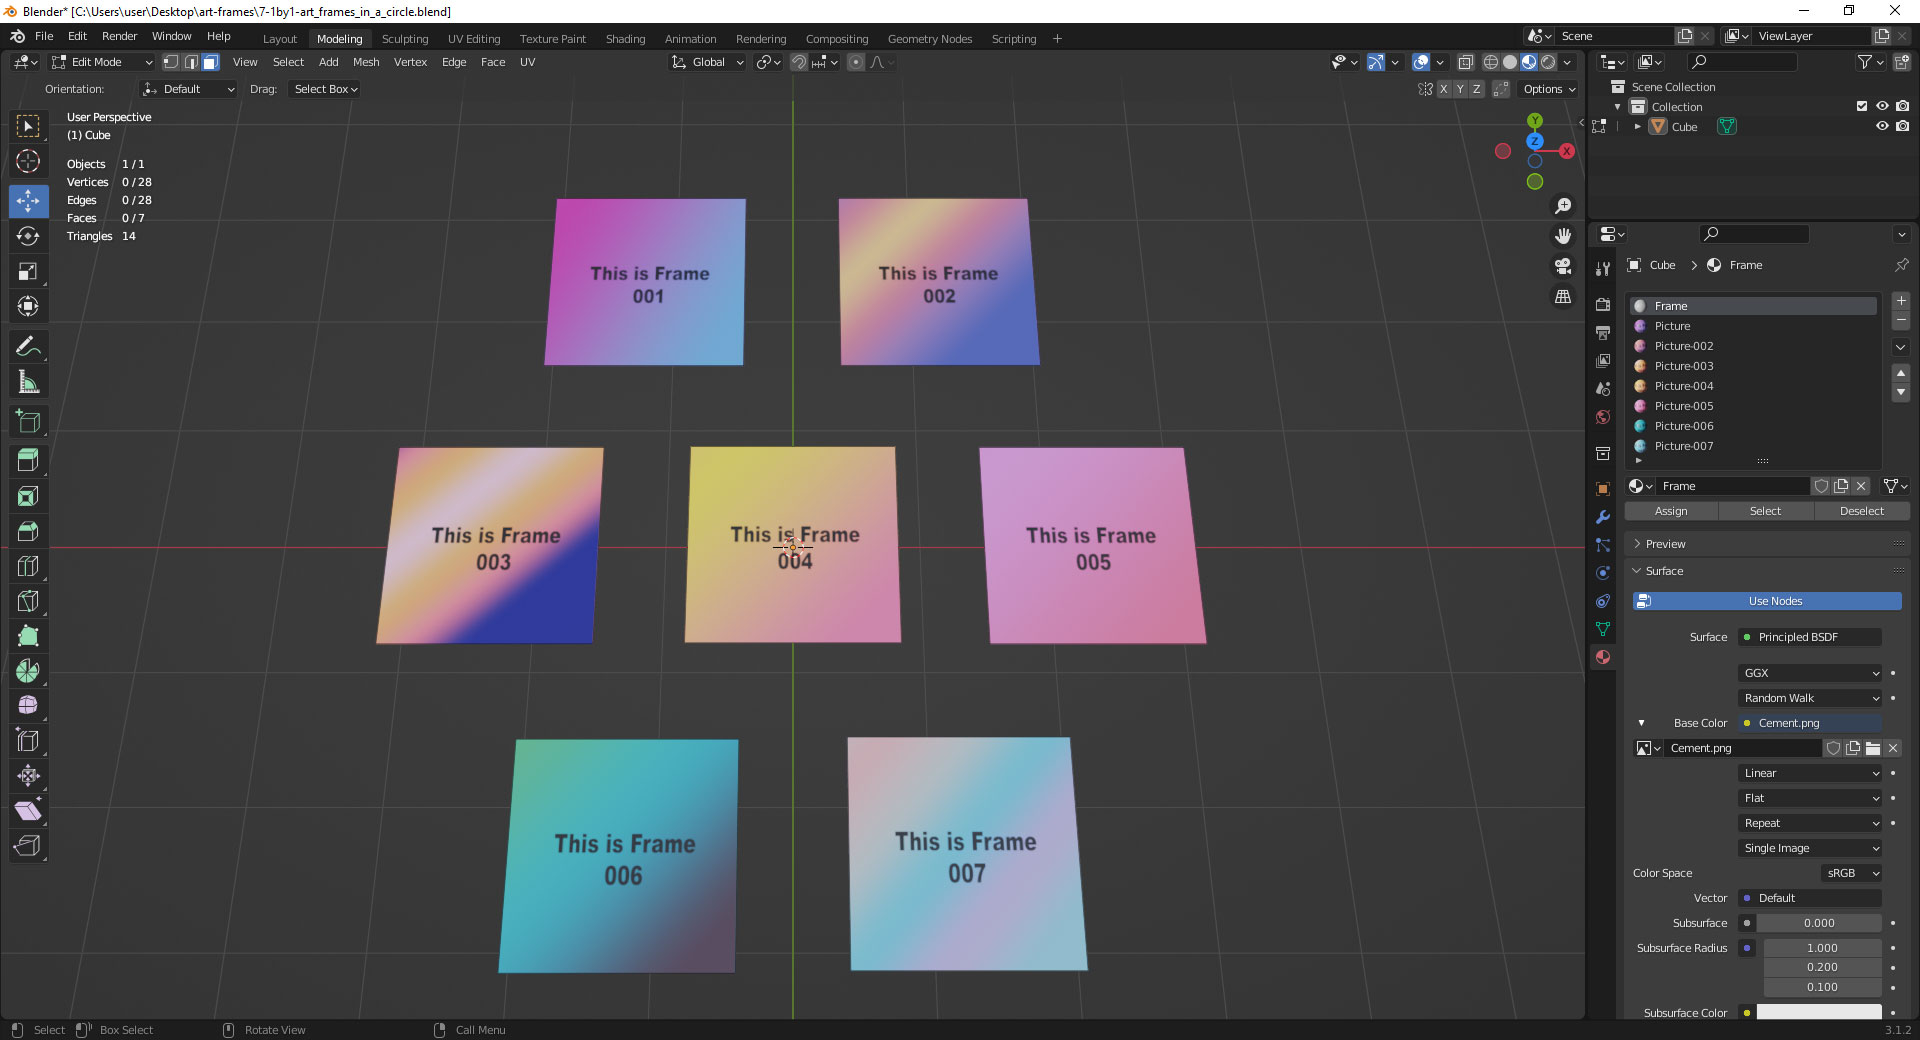
In the Overlays button near the upper right-hand of the editing screen. We could turn on statistics and see that we're already optimizing far better than what Second Life could do in automatic Mode. Exporting this one as our "Low" polygon mesh model, which is generally good for up to 60 meters away.
Sidenote: Sometimes Second Life will pull some bizarre and explainable shit when reducing polys of multiple surfaces where it decies to 'cling' onto the first surface no matter what. In that, even I'd select just one face of the cement frame that is facing away from the viewer to satisfy Second Life's need to hold onto the root surface at all costs. I'd consider this a bug during model importation.
Also, some people may not want the frames at all. In which case? THIS would be your starting point for a high-poly .dae file. You could even take the frame itself and UV wrap it with the texture giving it that wrapped canvas effect too. That's the neat thing about making your own meshes for Second Life: you are in complete control.
Beyond 60 meters, objects tend to look like dots, and SL is very tight on what it allows itself to display from a distance.
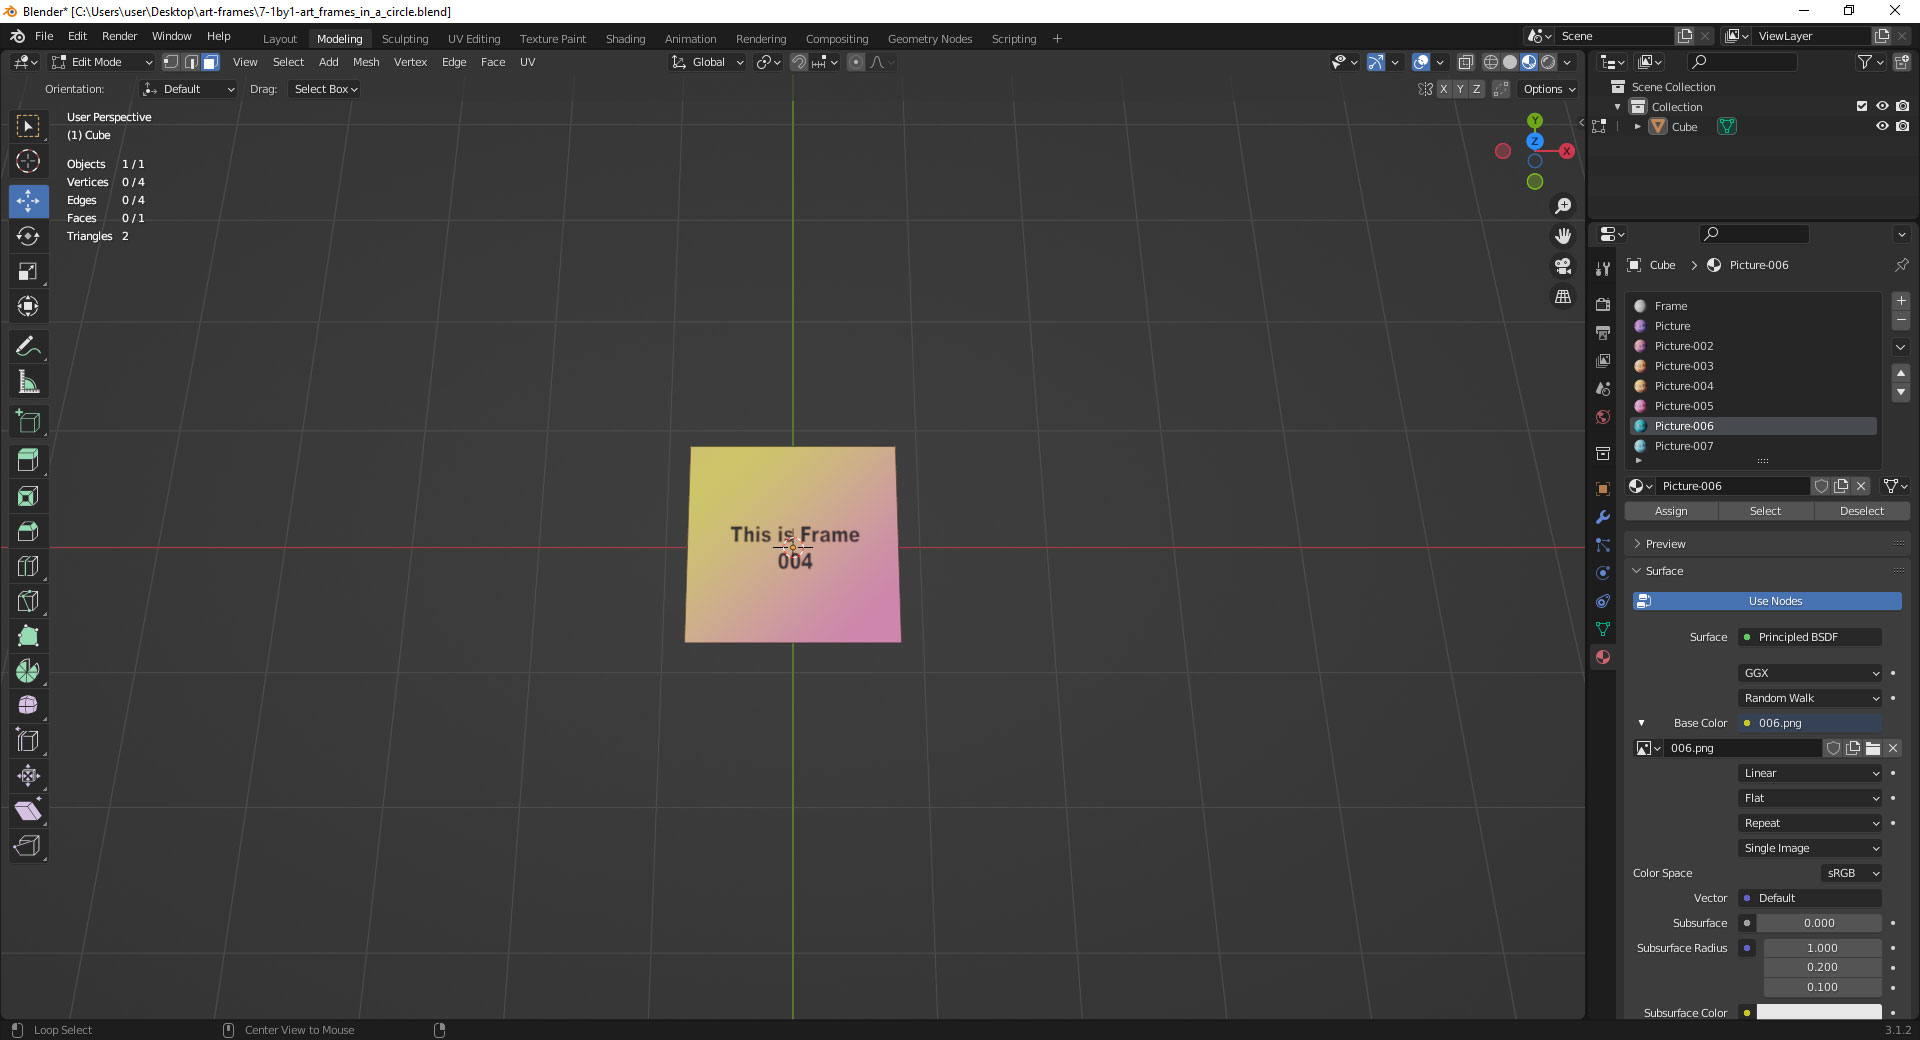 At the 60+ meter and over viewport, things are practically a dot. So even though there's a good chance that focusing on your most important picture may blow up this picture to the size of your gallery, it won't matter! Having something as simple as a 2-face is enough. This will be considered our 'Very-Low' level of detail.
Now that we've exported the following:
- model-high.dae
- model-low.dae
- model-v-low.dae
We are now ready to import these into Second Life.
We would have a "model-med.dae" if this was a complex model such as furniture or anything that required a lot of detail and medium would use the art of selecting your 1000+ polygon then selecting Mesh > Clean Up > Decimate geometry to attempt to reduce the amount of polys used without destroying your UV map. But that simply was not required in this case.
Final upload:
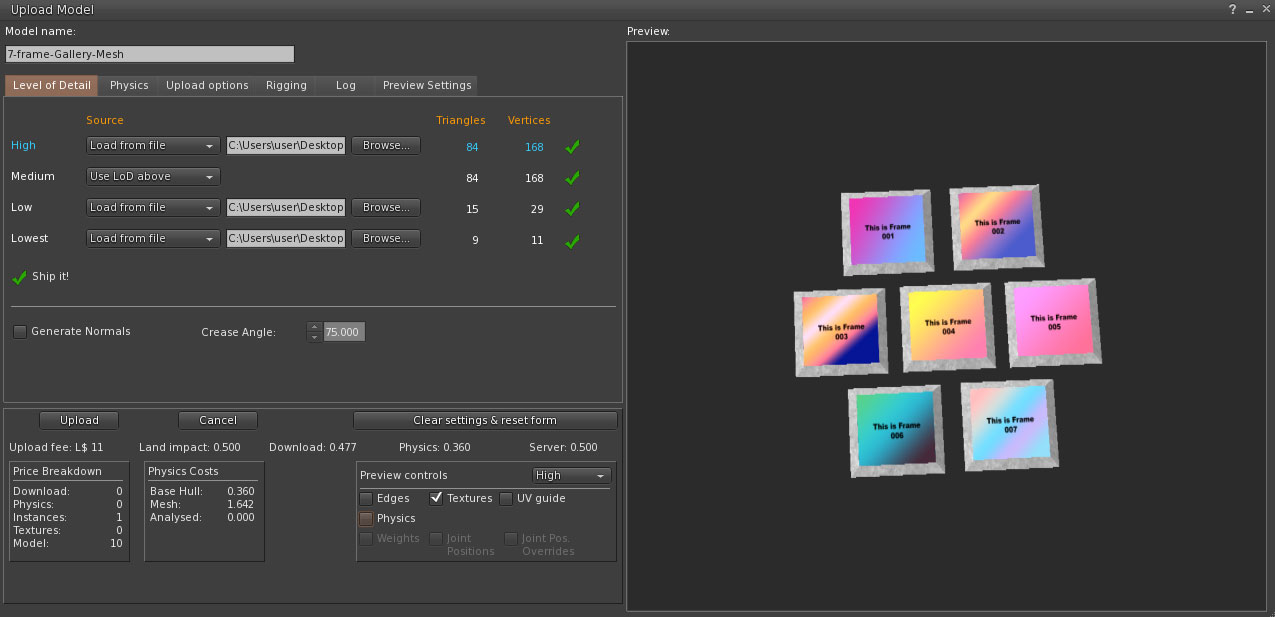
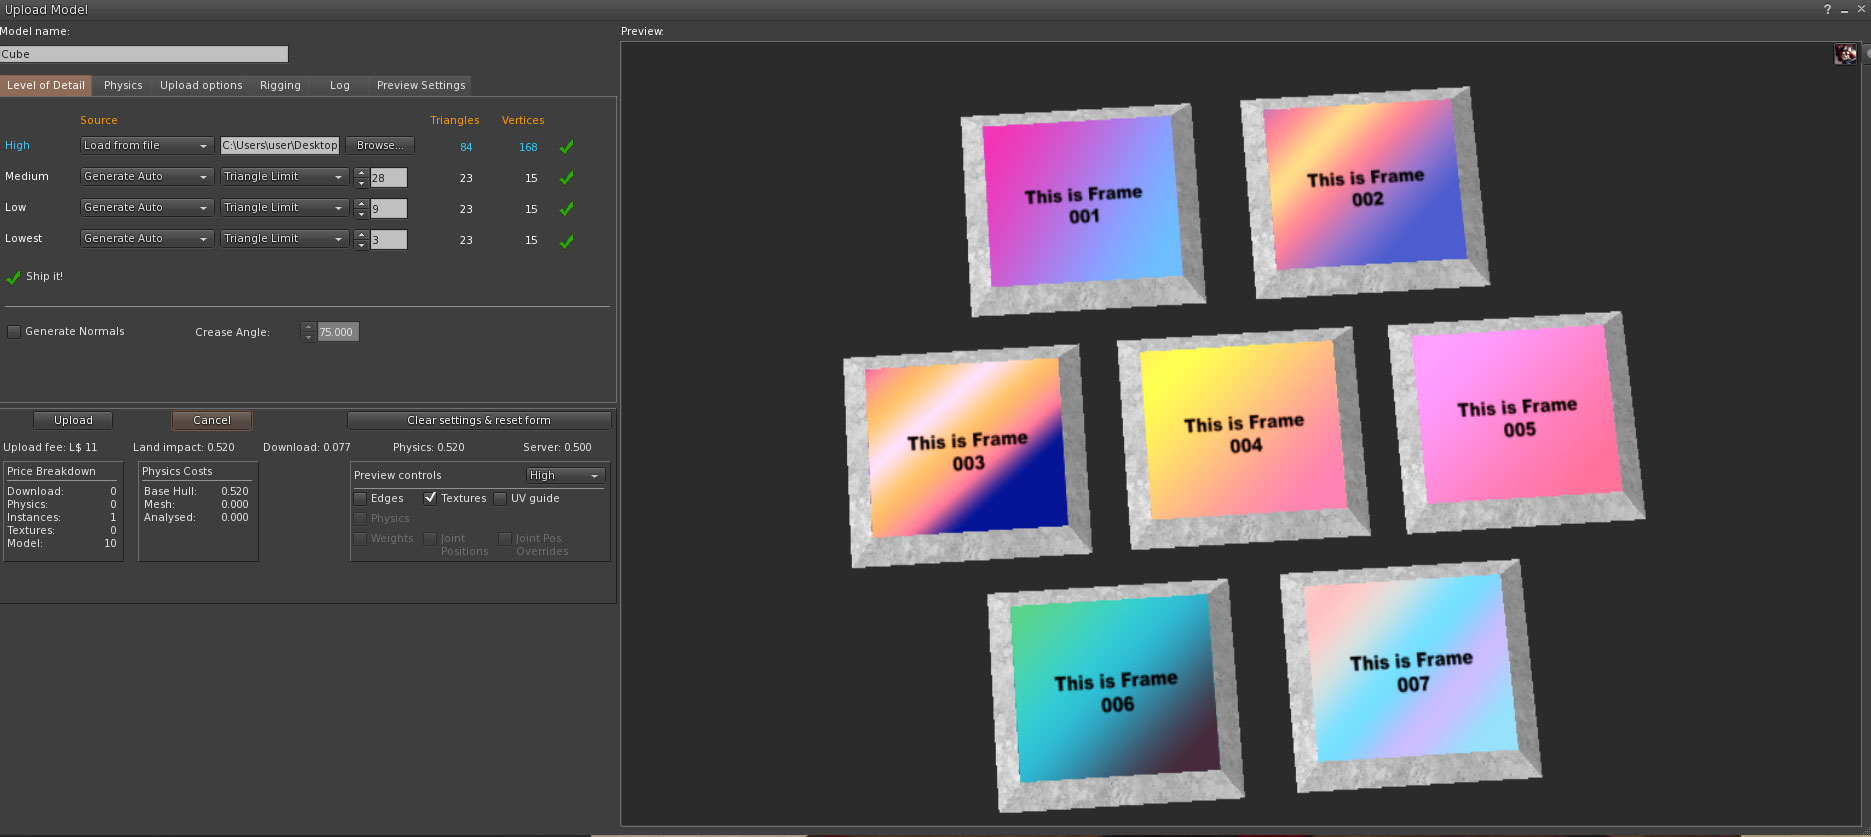
If we did everything correctly, you should see a model upload go down like this (especially with the texture icon selected) . Where the upload button would be in this screenshot would be the "Calculate Weights and Fees" in which you can look at the Land Impact, Download, Physics, and Server. Despite using a high LoD object in the Medium distance category. It's still giving us to the lowest possible score to upload a mesh right into SecondLife which is fucking amazing.
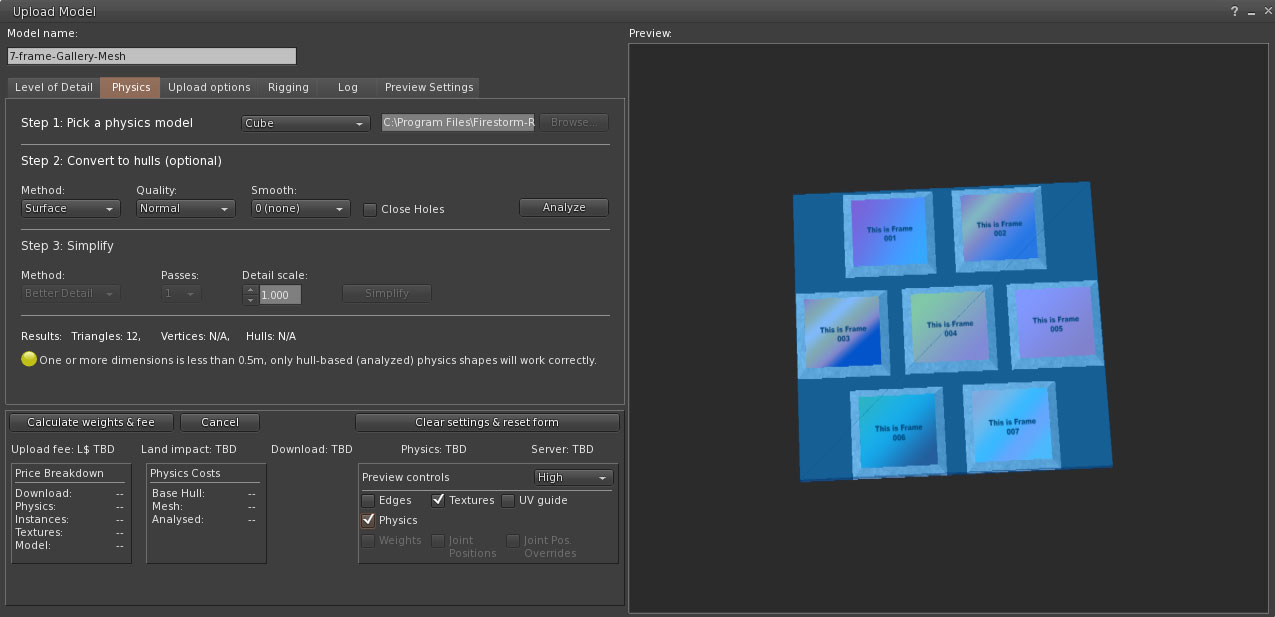
This step is optional, but it's a really good habit to get into, which is checking your Mesh's physics before upload. Now, because this is going to be a gallery in 'phantom' mode, meaning we'll be disabling the physics, as it's just aesthetics for interior home design. But if you are making a structural Mesh for a building, you may also want to create a DAE file for the physics using the lowest amount of polys possible so that the blue matches your mesh.
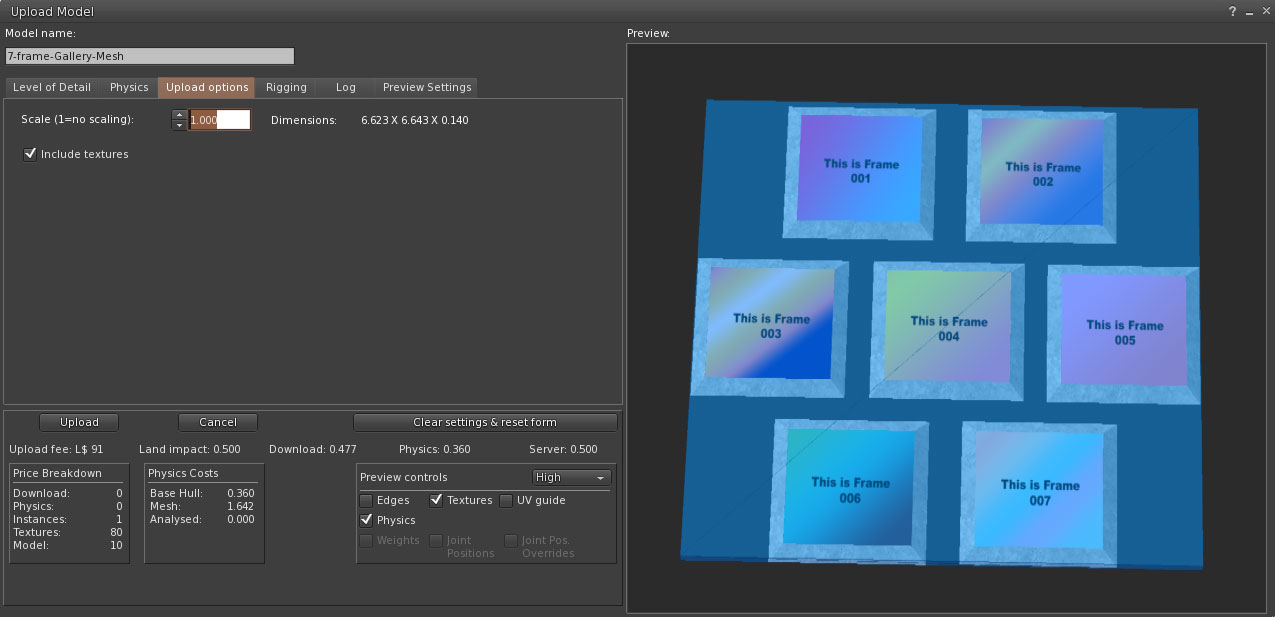
The very last thing we like to check on is the upload options tab. This is kind of important for those who don't check their model size in Blender because in the wonderful world of Second Life, the bigger the mesh, the more it may cost in terms of needless Land Impact and/or Physics. Also, by checking the textures button, it will upload all of the textures you used in Blender for your model. If you have a premium Second Life account, you can upload textures all day. But for plebs such as ourselves. It may be better to skip the upload of these placeholders and instead use actual art.
Perhaps 6-meter-sized galleries might be okay if we had a mansion. But for most houses in Second Life, 50 percent of the size would be totally fine. But even at this size, we're getting the best efficiency we can out of Second Life. So, we'll leave it for now
MY FRAMES ARE... TOO BIG!!!
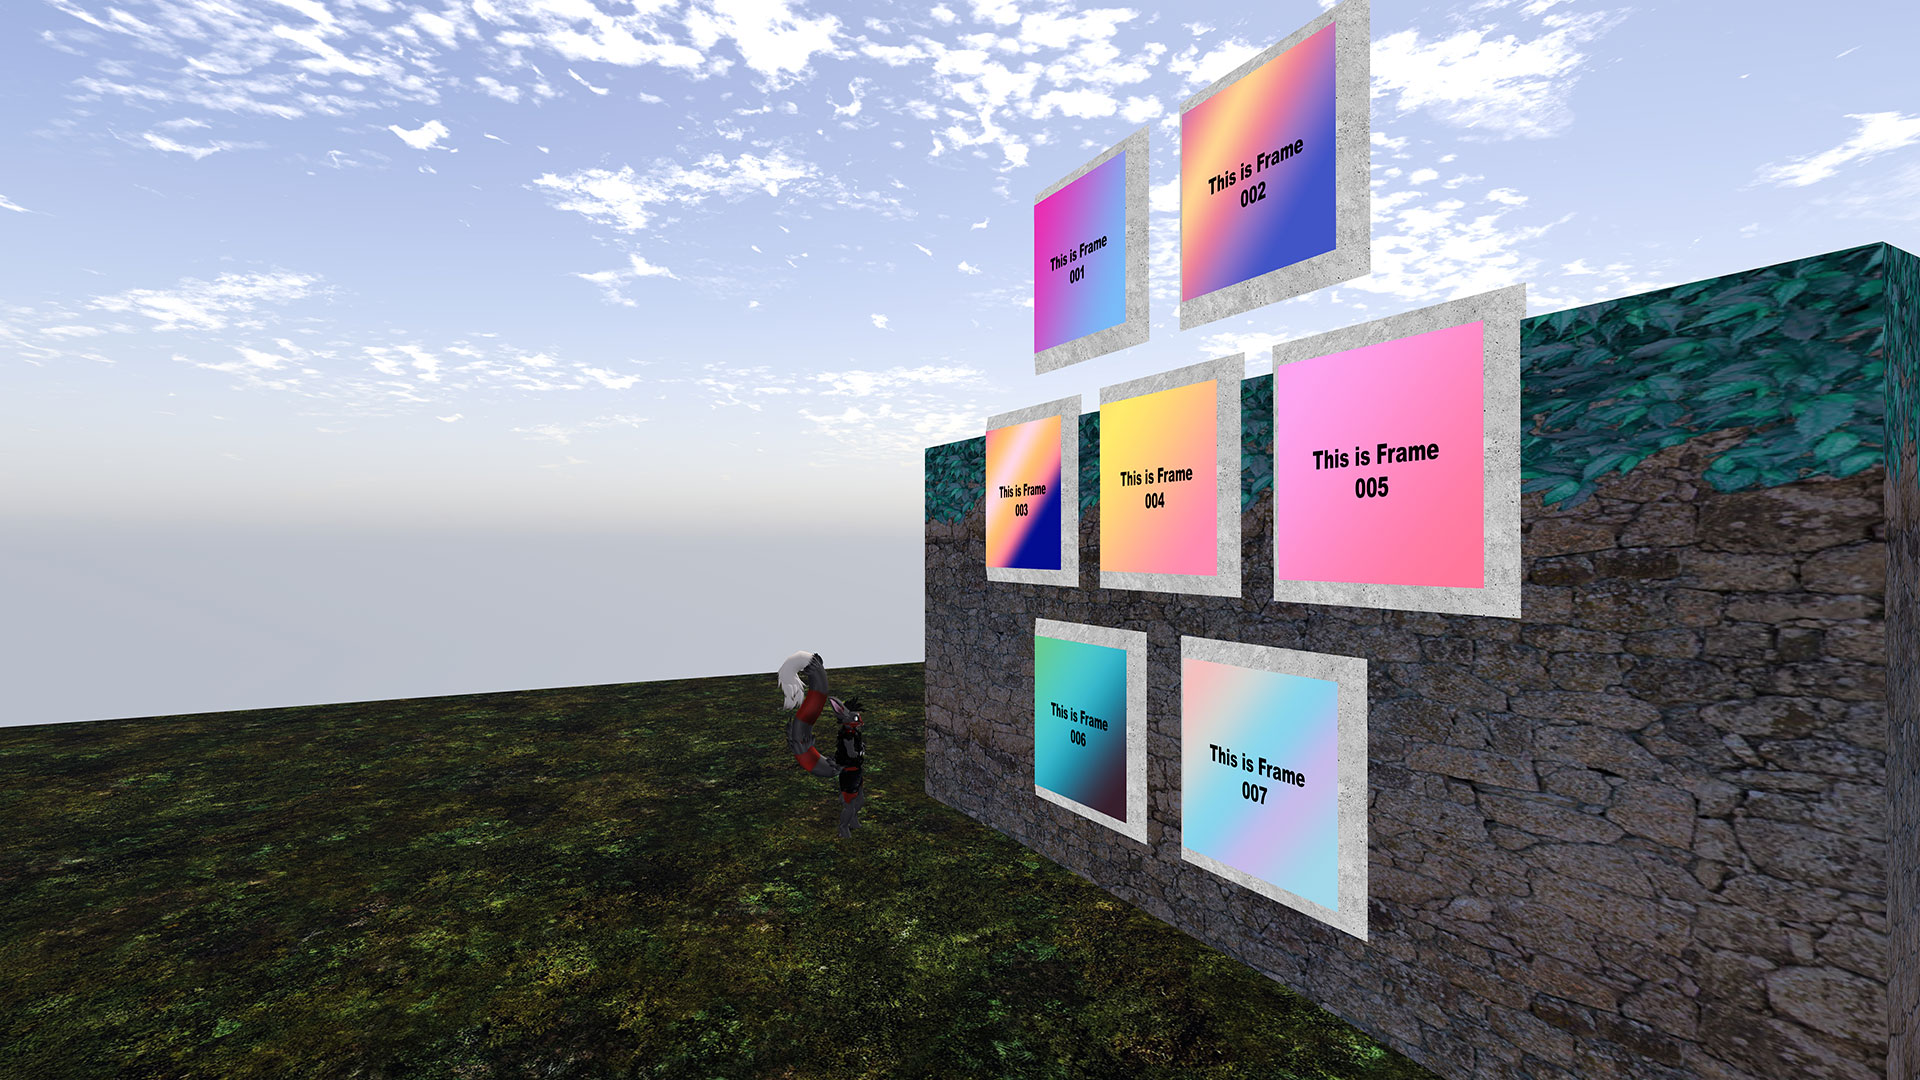
We decided to upload this anyway despite our initial warnings of the gallery being 6 meters wide! Again, if you had a mansion in SL, perhaps this is your intention. But the wall I'm attaching this to is approximately 10 meters, which is the average size of a floor for a building in Second Life.
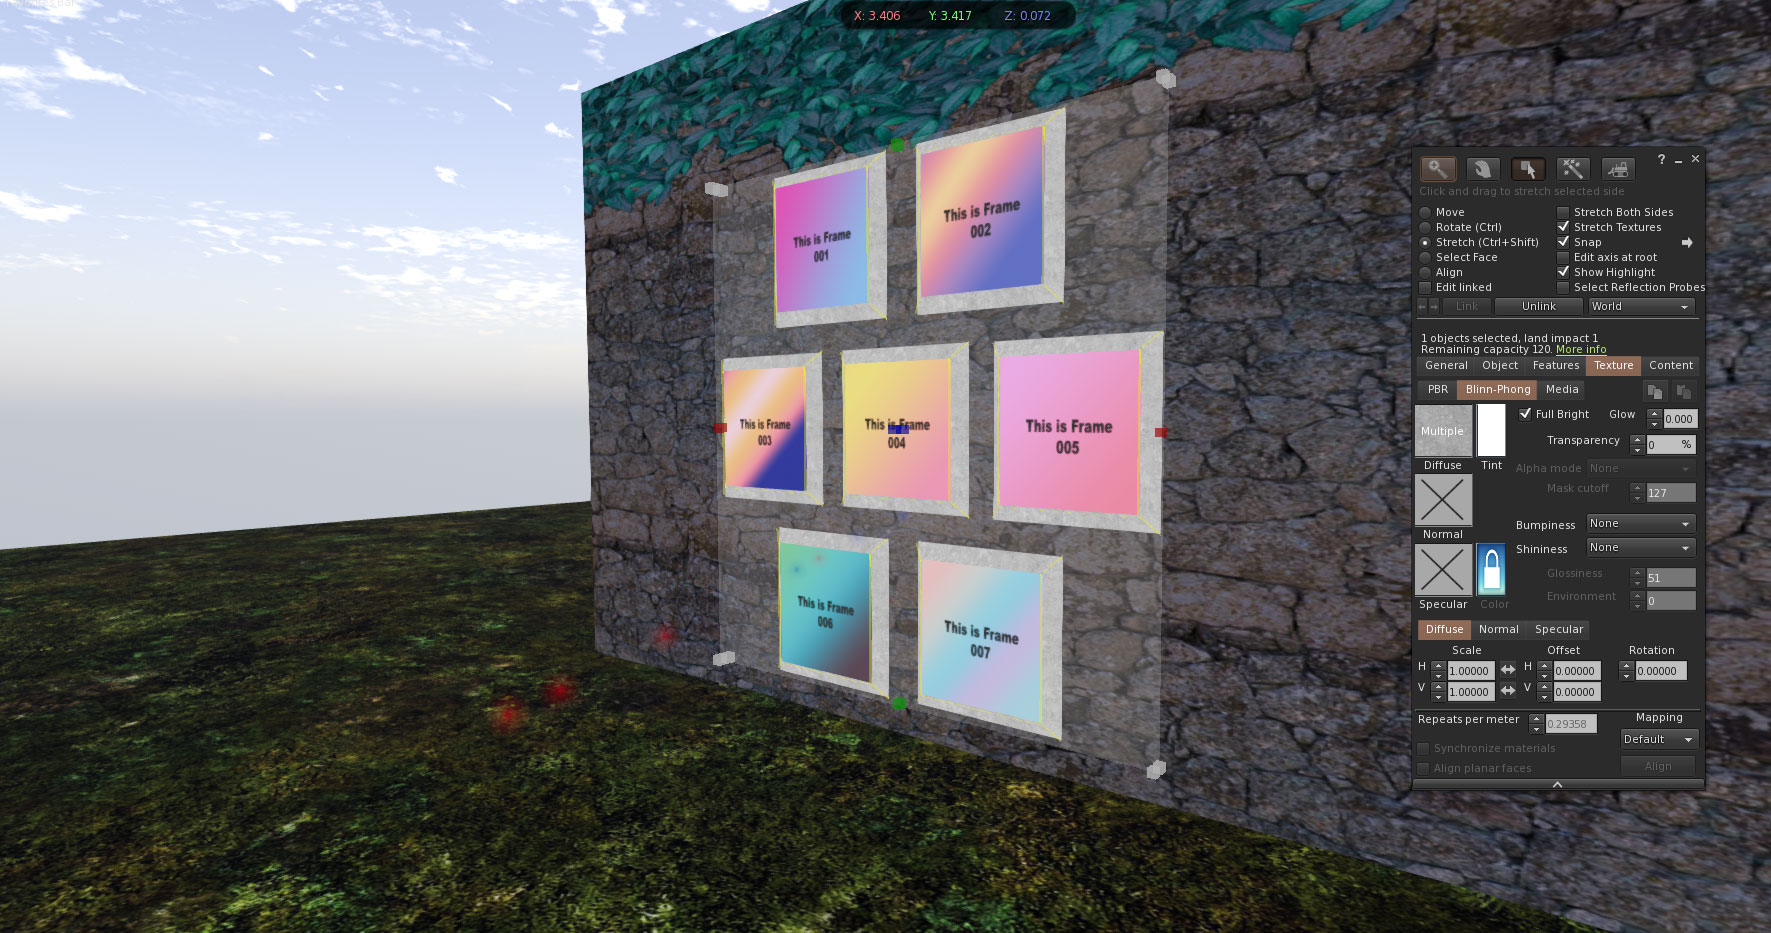
So, instead of circling back to Blender and building new DAE files for the correct size. With the magic of Second Life's Prime editor, we can resize this gallery to our wall using the prim interface, which treats the entire mesh as a solid object. The general rule of thumb when it comes to altering mesh objects in Second Life is that it's okay to go smaller. It's when you go bigger that sometimes the mesh-to-prim calculation goes ballistic.
14 pictures, 1 prim.
If you ever clicked on the green "more info" button in your prim build editor, you'll note that the size of our Mesh is 0.5 prims. We can use this to our advantage.
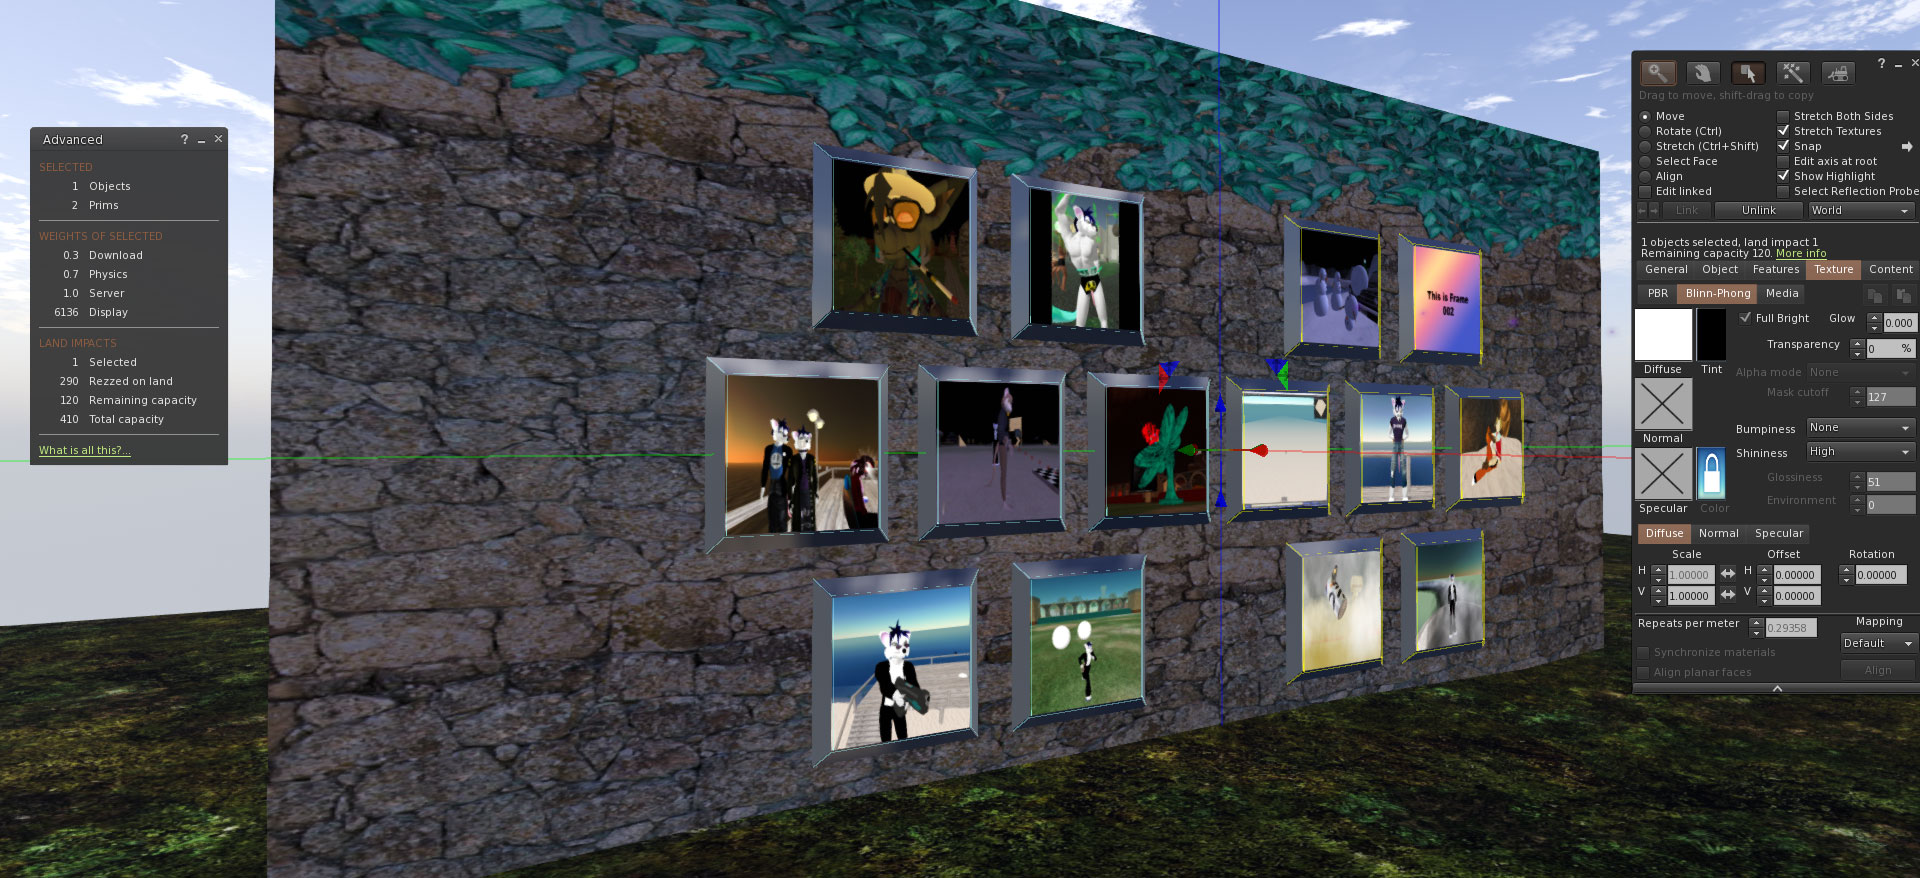
Here's an example of the potential with Mesh items within SL. I copied the 7-frame gallery and linked the two together, giving me 14 pictures which each of which can have its one 1024x1024 texture in. When pulling up the "More Info" statistics that even though it's technically still 2-prims. Land Impact is only one. Thus, if you have a very low-prim rental. Say you're renting a place for 100L/week and it only has a 50 Land Prim limit. You can easily decorate a wall of your house with just one prim!
Other questions.
S, this is great if I have 1:1 pictures as you're showing because those screenshots are from a time in SL where monitors were 1280x1024, but what about now where everything is wide screen format? How to I accomidate pictures that are wider?

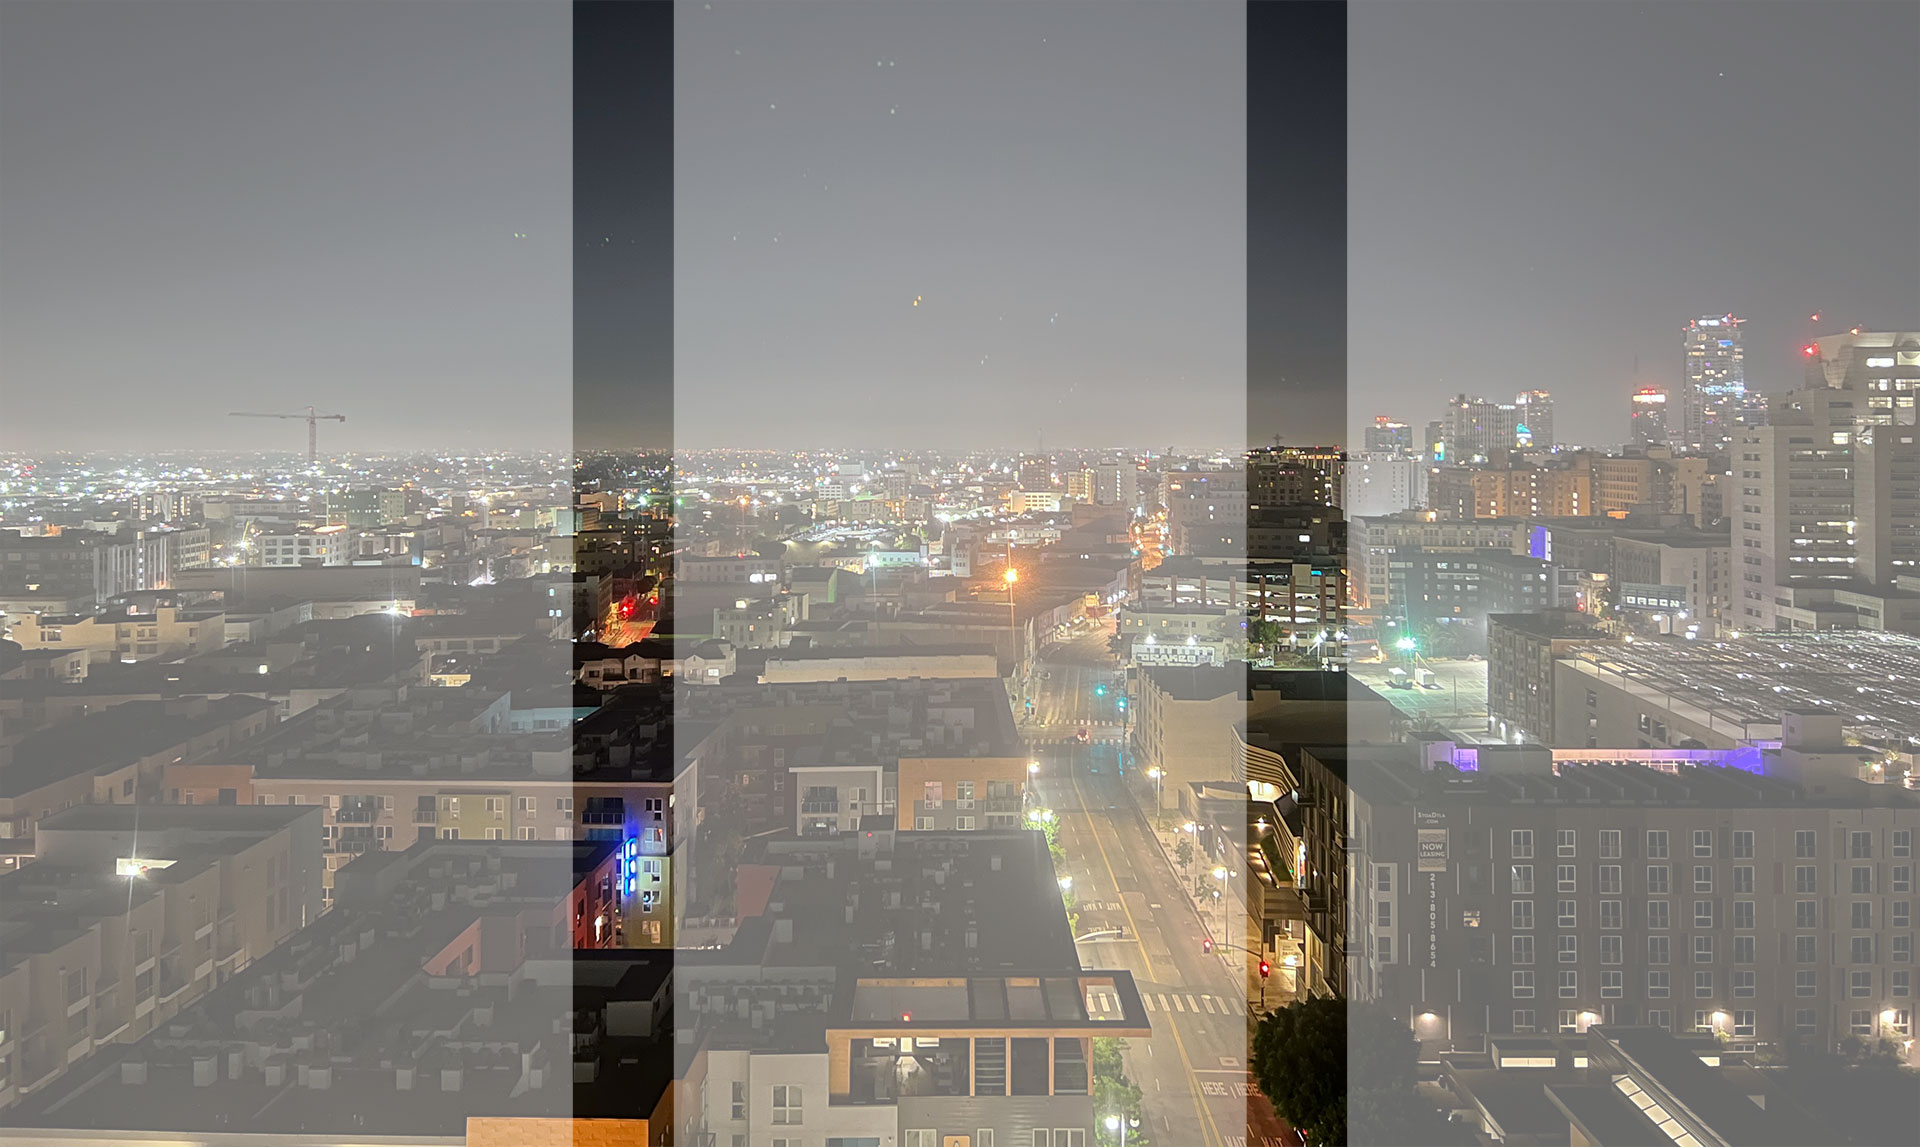
Suppose you want to emulate the pretentious office frame scene of some cityscape scene broken into 3 pictures because fuck spending money on one giant painting it's more 'artisenal' to break it into smaller ones that give the illusion of a big painting. We'll temporarily switch ourselves into wireframe mode because we'll be doing some Vertex selection of points to move.
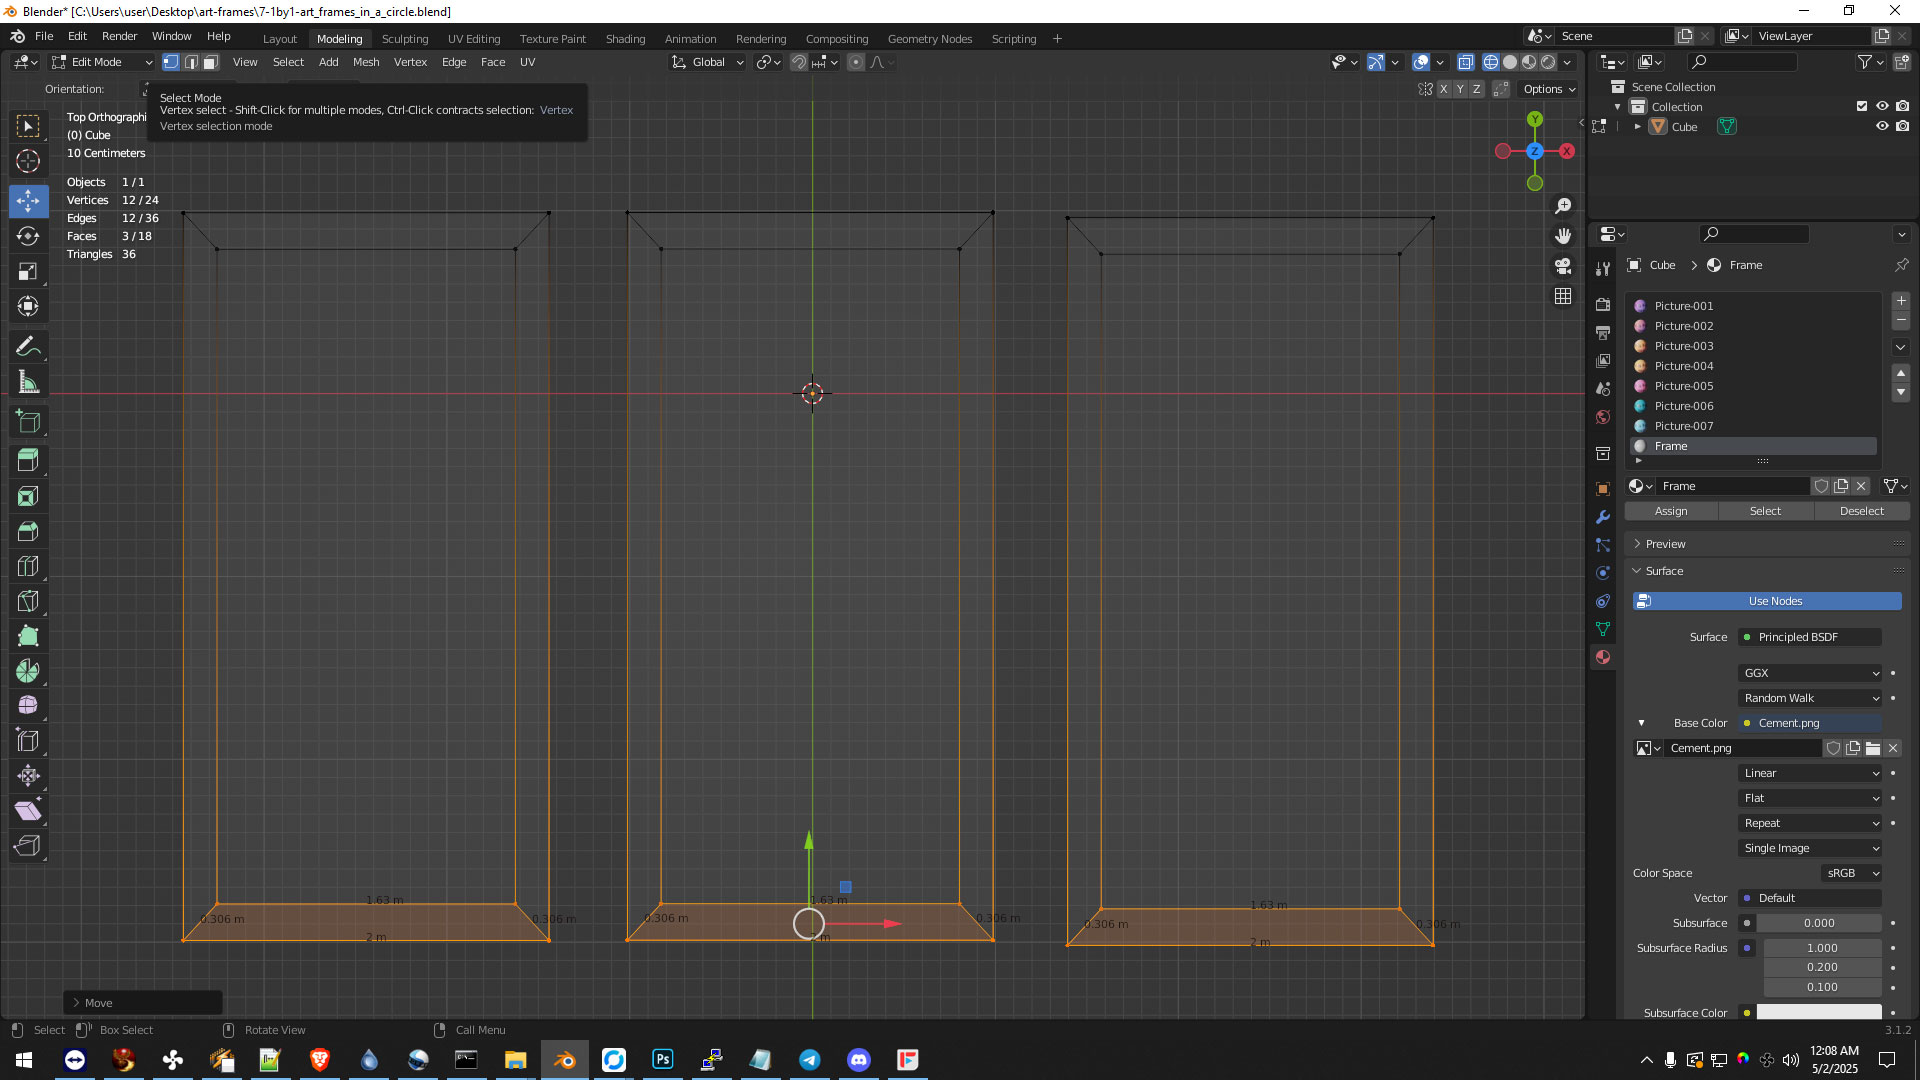
By clicking on the vertex selection instead of the face selection in object edit mode. We can drag that frame down more. Now, this may stretch the UVs of the frame itself. If you want to be a perfectionist, you could RE-UV-Map the outside frame to accommodate. But for us. We're more concerned about the pictures.
Now, to really get that metrosexual apartment/office look of wanting to own expensive art but not wanting to pay 100s to get it framed properly. We select not only the texture but also the sides of the frames and assign that to the Picture-xxx material. Then, we re-UV map Picture-xxx using projection.. In the UV map edit the projection map may come in tiny, which is okay. We can simply resize the UV to cover the entire 1024x1024 pixel area. Done!
Of course, at this stage, if you're comfortable with Blender where you want to sub-divide and smooth this to round out the corners more. go nuts. Just as long as you follow the rules of LOD and make sure the polys go down with every level of detail.
Once done, you can go through all the fun of exporting LOD and uploading the Mesh to Second Life.

Something we want to point out during the upload process in Second Life is that the sides of your frame are sharing the same surface as your art You could Generate Normals to add a bit of shading effect to the object to give the illusion that the sides are smoothed a little. We didn't do it before because none of the vertices were really sharing the same surface.
Make a texture.
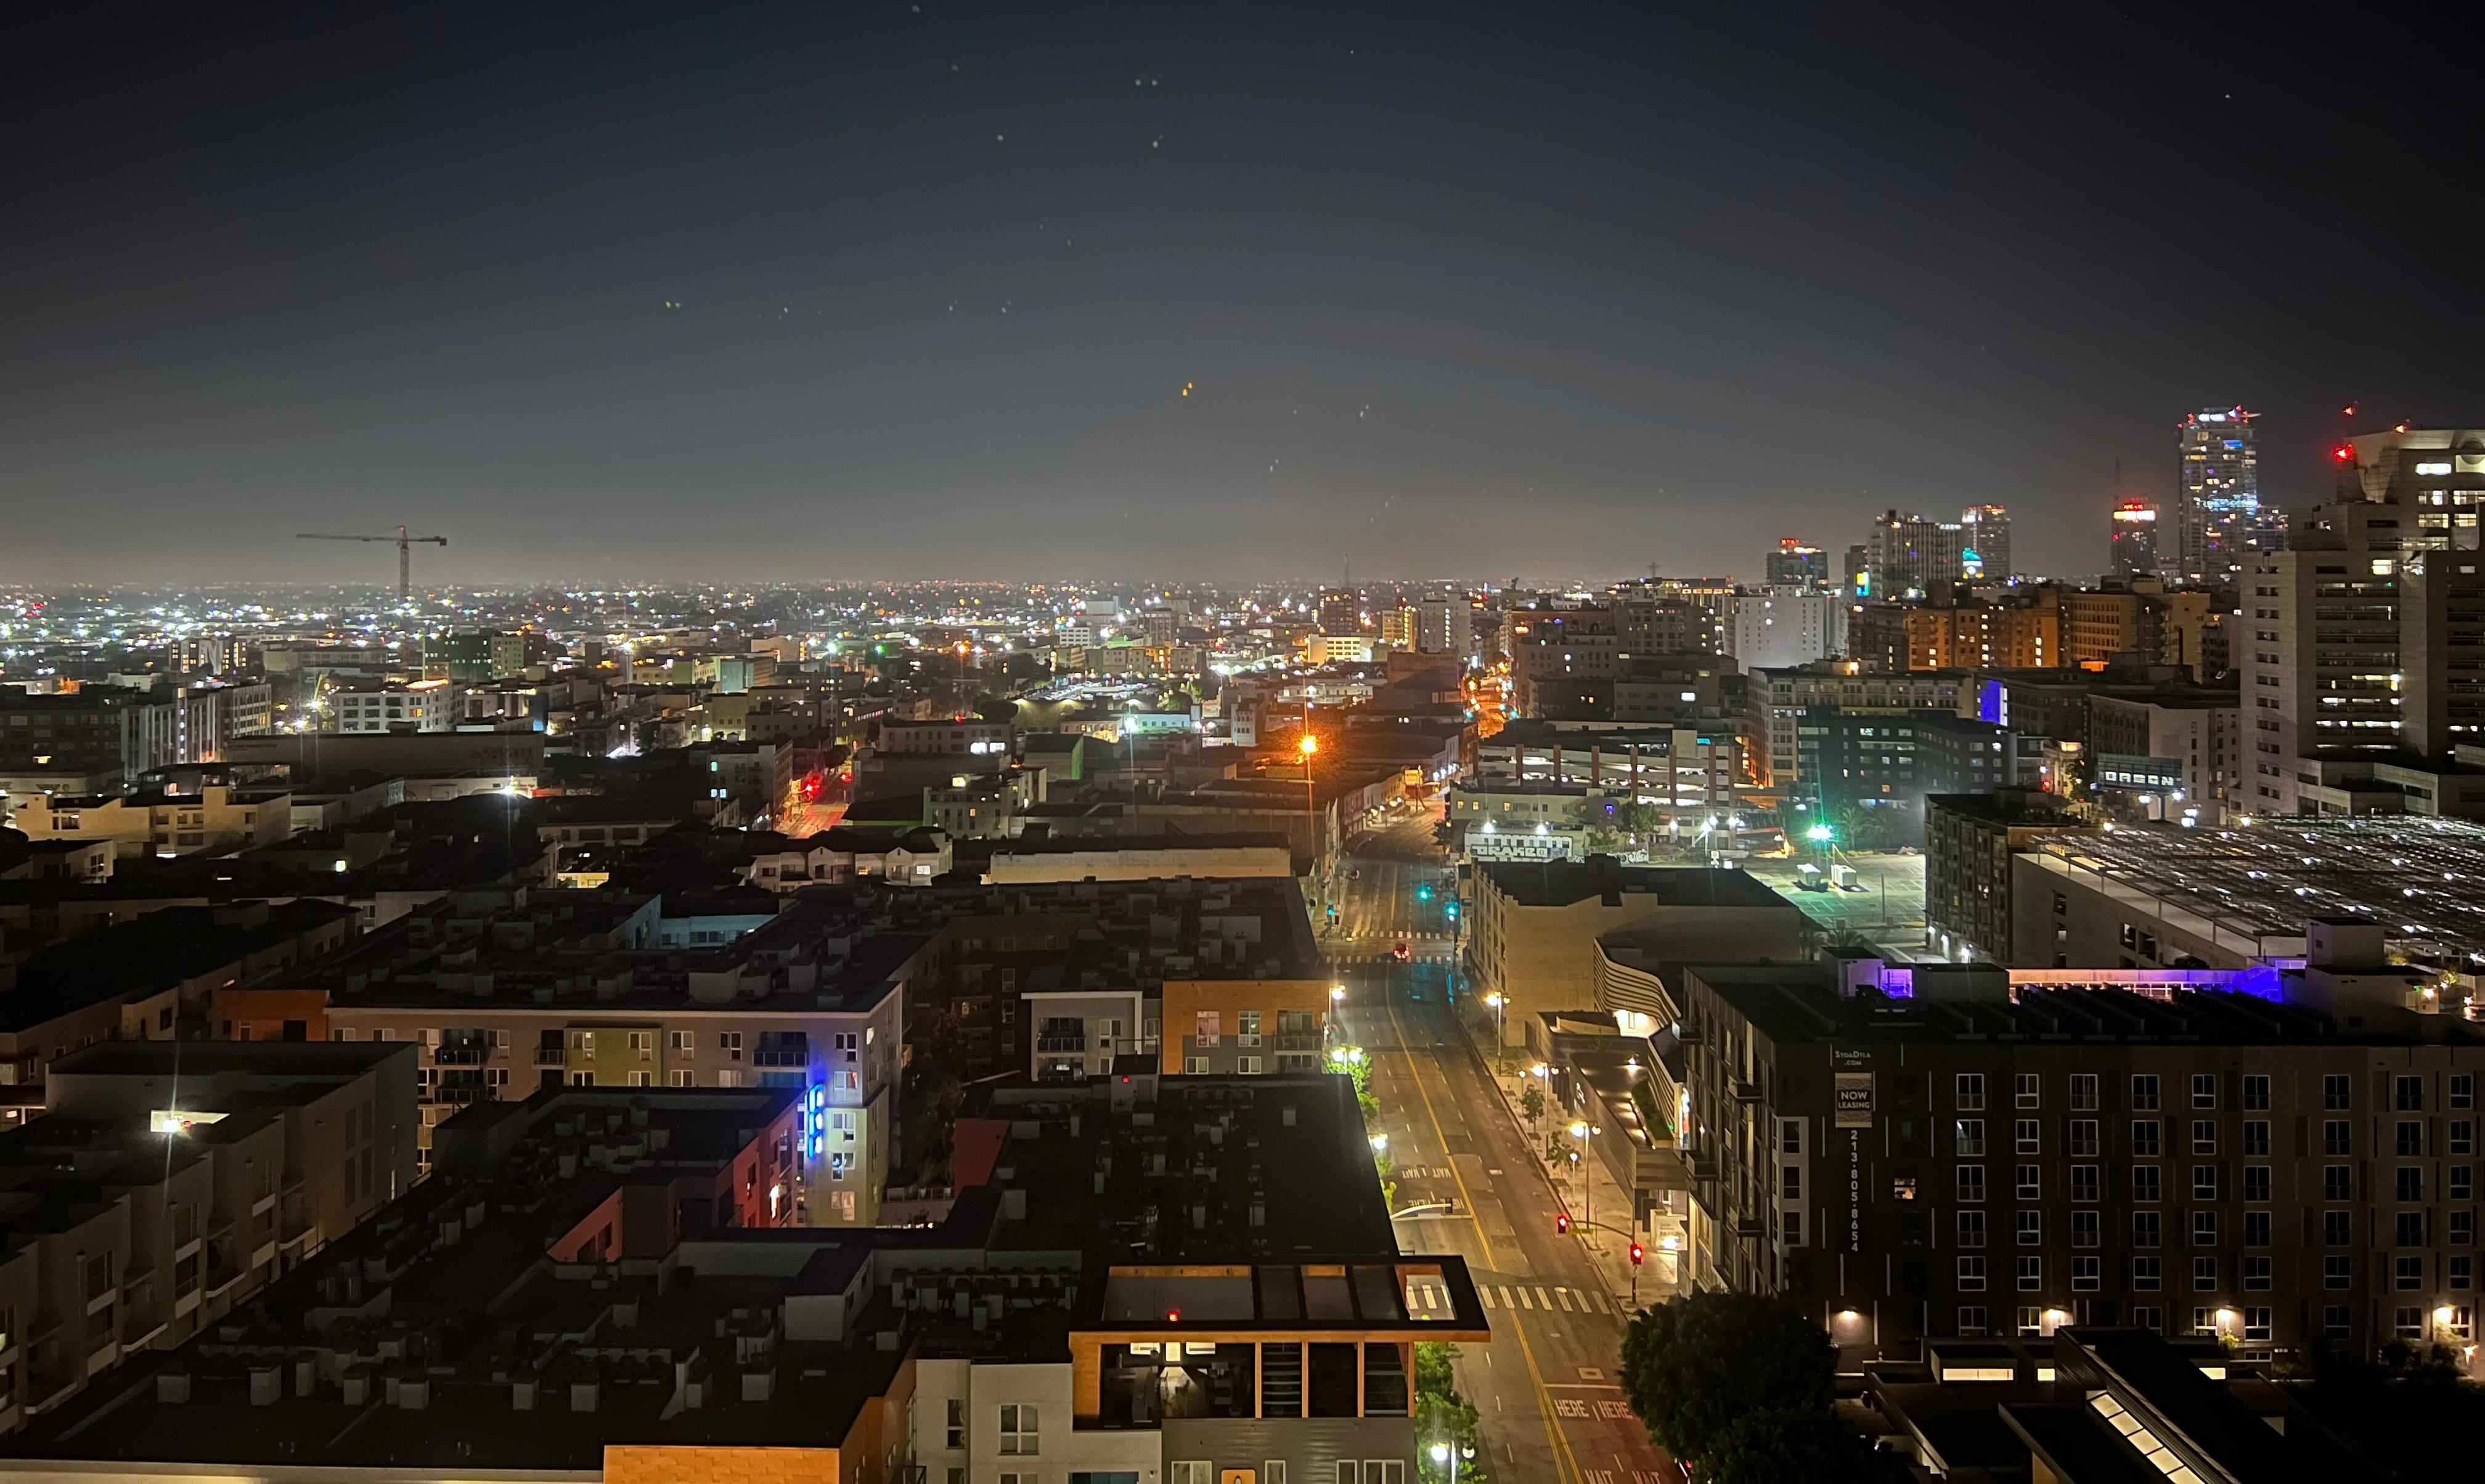
Instead of downloading something from the internet, wherein I would be entrapped into paying hundreds of dollars in licensing fees to a professional photographer. Here's my shot of the Los Angeles Skyline. No, this is not the picture from our apartment. We don't have that kind of cash to be living in some high-rise apartment in California. This was taken at the DoubleTree at 2 in the morning as we were washing the tear-gas out of my eyes, thinking we could just get something to eat at the 7-11 across the street. What the fuck were we thinking right? Fuck we guess we did pay for this shot in a way. Covid was a wild ass time. But hey, we could at least use this picture as an example of how to make canvas wall art.
You can use this picture for whatever. Don't give a shit.
Alright, just like our Mesh. We're going to zone off the picture and even factor in the spaces that are dead so that everything lines up in whatever raster paint software you wish to use. GIMP, Kirta, or if you're stupid rich and like being told to go fuck yourself by some cooperation then please use Adobe Photoshop. Or you were a lucky bastard that kept your CS copy from school, then great. I selected along the white highlighted areas. Paste into a new artboard and force-resize each section to 1024x1024 so it's easy to upload to Second Life.
Final thoughts.
Some people are going to blast the fuck out for being so wasteful about texture GPU ram. When playing Second Life on a 4k monitor, if you look at the frames of LA versus the wall texture. Both of those have been resized, and both are indeed at 1024x1024. You can start to see that level of grain you otherwise wouldn't see back when Second Life was brought out in 2008. Times have changed, and technology is getting better. Even though we feel that Linden Labs has not done enough to keep up with the times. At least from the perspective of a 3d designer, at last, Linden Labs gives you that level of control.
We've also tested these textures on our T620 client, where graphic memory was laughable at 1 GB. Sometimes it would render at 512x512px, sometimes it would render at the full rate. So in many respects, clients like FireStorm do a good enough job in handling what the computer can and cannot handle.
I'd like to close out this blog by thanking everyone for reading this long into this. If you want to see more articles like this one about Blender and the Metaverse, leave a comment below. If there's enough interest, we can even attach a blender video to go step-by-step throughout the process without getting destroyed by ad-revenue bots.
A place in Second Life.
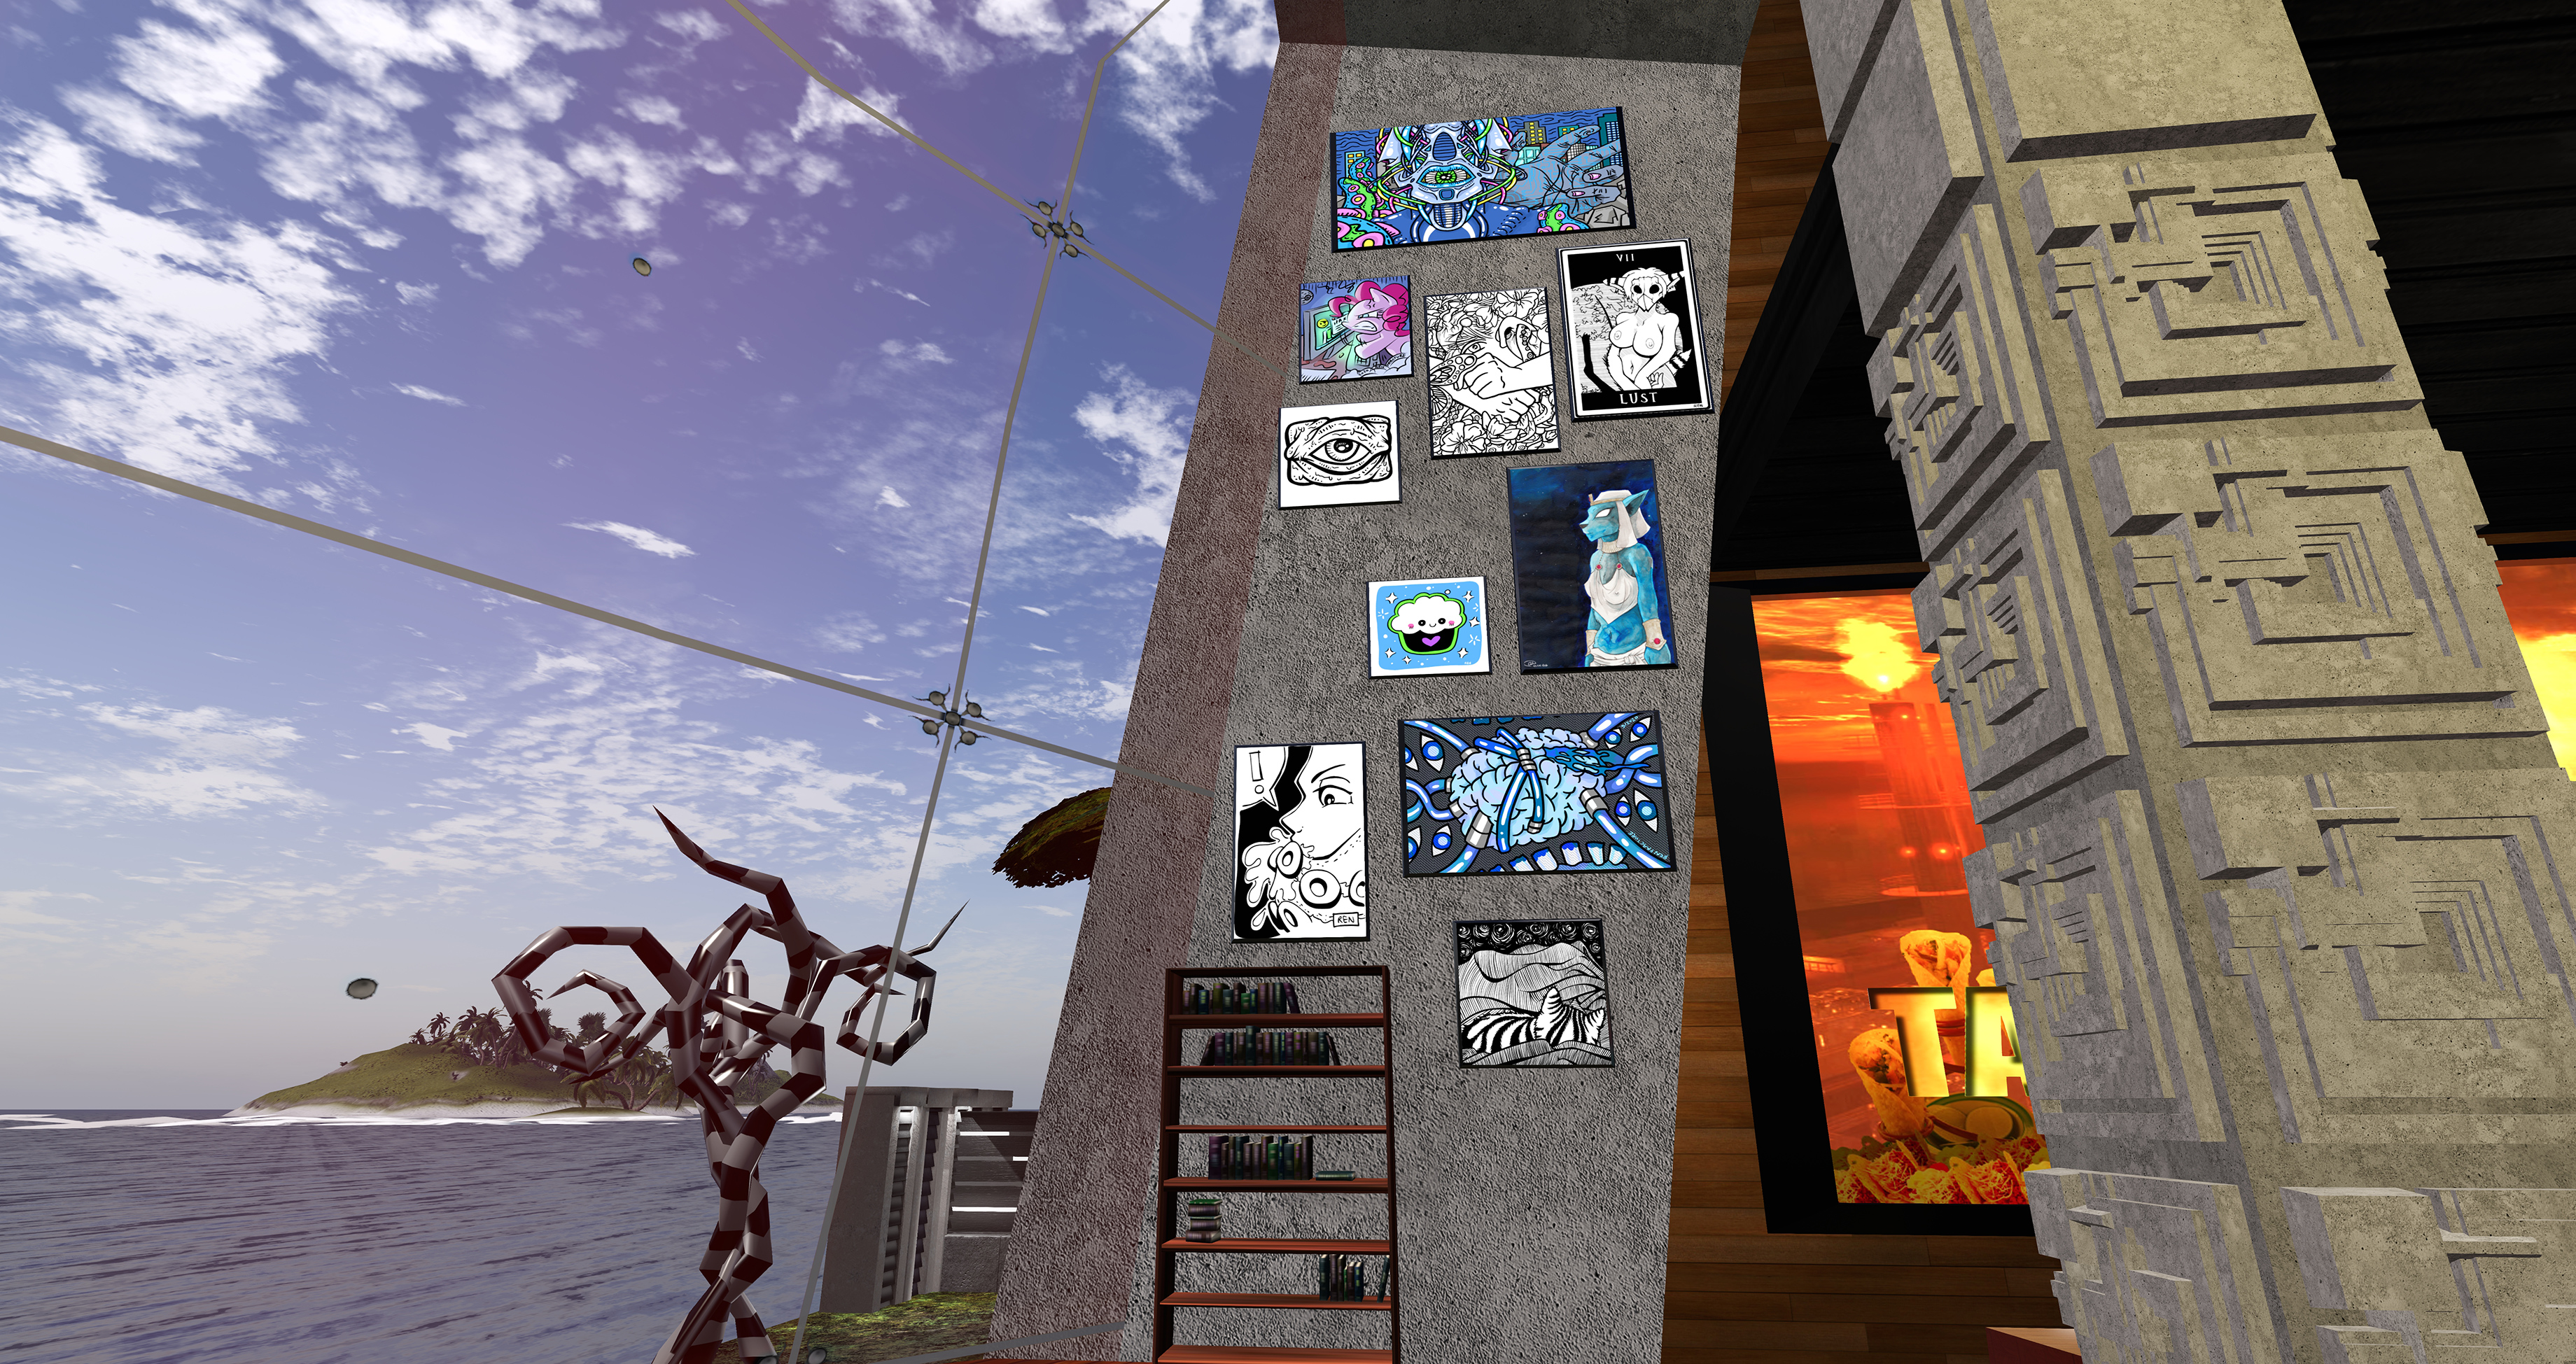
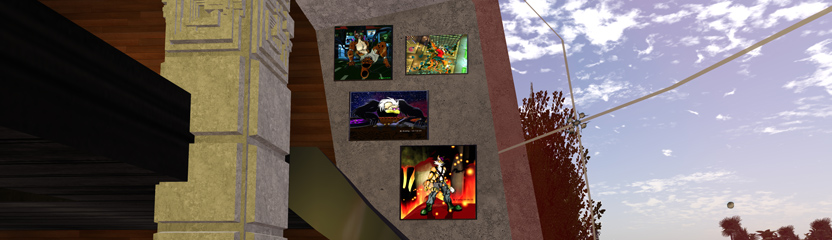
I guess this would be considered self-doxing if it weren't virtual. But if you want to check out how we deploy frames. Such as (with permission, mind you), how we display the art of StrangeDefinition within our place, as pictured above. If you want your art frames and shown inside a virtual space, where traffic might get up to 30 per month if we're lucky. Either leave a comment below or contact us. We'll see about getting your art here.
If you already have secondlife open. allow us to give you a SLURL to visit:
http://maps.secondlife.com/secondlife/Paw%20Springs/233/200/21 - to view the location within the Metaverse map. Paw Springs is the island sim where our house resides within the dimension of Second Life.
or!
secondlife://PAW%20SPRINGS/233/200/21 - Which, if you have already installed Second Life, the link should then be processed by your client. You will be taken to "House of Riot"
We thank you very much for visiting and until next time.
Server protect you.
END OF LINE+++
yo