
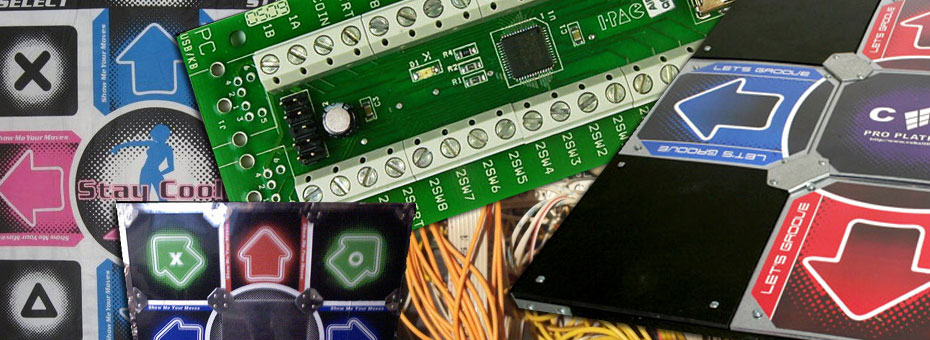
Stepmania + Pads + I-PAC = solid response times!
StepMania love coming at you! This is a quasi blog and guide on how we got our dance pads to work well with StepMania thanks to the I-PAC. Just keep in mind that my solution is not the cheapest in the world. We were going for a solid solution when I moved my pads from PC to PC.
Let's Begin!
Hardware.
Let us take a tour of all of the different hardware we used and the experiences that have occurred with it.
The SoftPad:
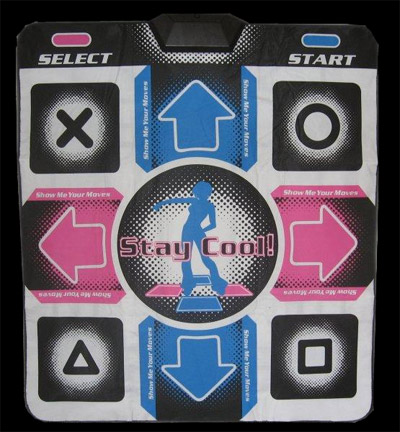
For a long-time, we got into Dance Dance Revolution and eventually Stepmania. We are not any good. The best attainable grades were B's and A's on heavy's when I was doing it non-stop for months at a time. An upgrade was necessary and we didn't want MadCatz soft-mat or the ultra-crappy OEM dance mats. People were getting injured on these mats because the mat flew out from under you during a song twisting your ankle if you didn't tape it down! Ouch!
The Chinese hard pad:
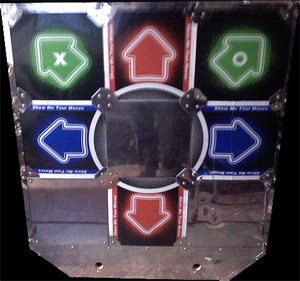
We first bought some Chinese hard mats. BIG MISTAKE!! Pissing $150 (Plus $75 shipping and handling for how awkward they are to ship) away they were made with 1/8ths inch thick plywood with another 1/8ths-inch thick ply for the pads. And a guy like myself around 280 lbs found these pads too flimsy. If you scroll down most of these eBay sellers; There will be a disclaimer on them where it said:
These mats can hold up to 250lbs of pressure!
- China hard-mat eBay seller.
Turns out that a 70lbs child can max out the pad as it's your weight times three would be the pressure of the pad. Needless to say, these pads only took a total of a few months of abuse and i had to open them repetitively because the aluminum tape was sticking to the sensor PCB. It was a giant waste of money and time.
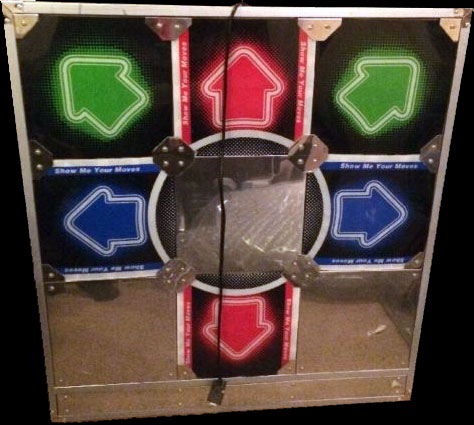
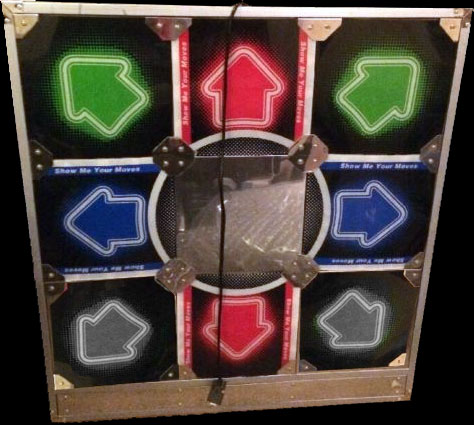
A legitimate hard pad:
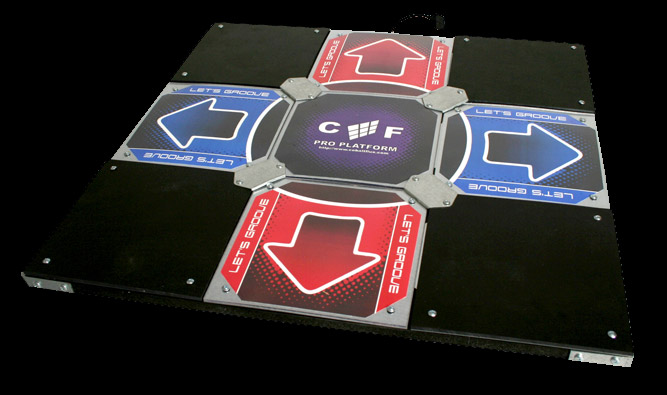
Moving onward to the Cobalt Flux for $300 per pad with the arcade riser kit as shown in the picture. It was a godsend! The only thing that would be better than this would be the actual Arcade Pads ripped right off of a machine. Arcade parts do go on sale but every time they are listed they can cost up to $700 per pad (so if I wanted doubles. I minus well buy the whole damn arcade machine!). With giant holes burned into our pockets at the point of the game, it simply was not worth it. And these things still work to this day (my pads acrylic is all scuffed to hell! but otherwise perfect!)
The Chinese PlayStation 2 to USB adapter:
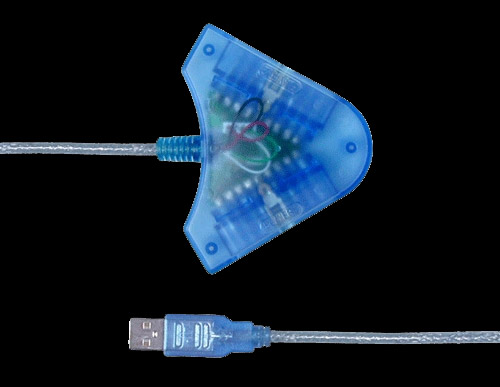
Getting bored withPS2 DDR it was time to hook the Cobalt flux Pads up to my PC. From the soft-mat days, we had this adapter. It's a PlayStation to PC adapter that China makes for anywhere from $5-$15 dollars. We first tested this adapter by hooking PlayStation controllers to there were no perceivable problems. However, the weird thing that was encountered depending on the USB chip-set is latency. On some chip-sets latency is virtually non-existent. On others, however (mostly laptops) there was a quarter-second lag. With the quarter-second lag it's enough to mess up just about any score in StepMania and as a result, was not a consistent solution for game-play. Well! Mark this as strike two from china! Let us find the fastest converter in the world for my cobalt flux pads. going through some MAME forums I found this bad boy.
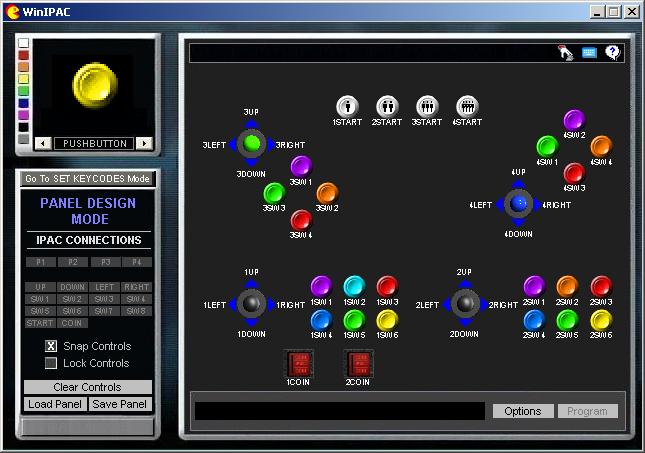
Enter the I-Pac ve controller:
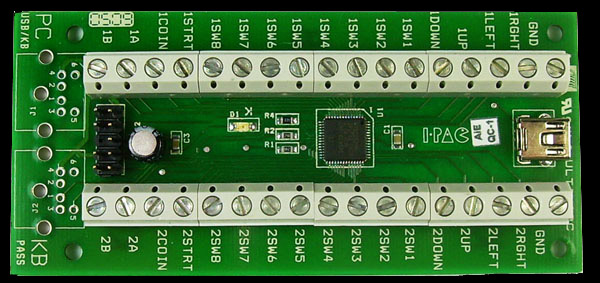
Enter the I-PAC controller (Website here). The I-PAC is more than acceptable for the feeling of the hard-core gamer. Even though it emulates a keyboard via USB it has an interrupt per key instead of sharing or 'ghosting' the interrupts. This means you can hold all 32 keys down at the same time and they would register at the exact time as just pressing down one. My Cobalt Flux just has pin-outs with a common ground. Thus, I can bypass the OEM Cobalt Flux PlayStation controller brick and pipe all of the wiring right into this unit.
The image pictured above is actually the I-PAC VE controller which is cheaper and had free shipping at the time I got it (around $32 US) and the only thing that separated this from the regular I-PAC is this one only had USB and this one resets it's configuration to a default MAME mapping every-time you power it off (no problem I can re-configure the mapping in StepMania) So outside of lack of non-volatile memory according to Ultimarc the programming is incidental between the I-PAC and I-PAC VE. I-PAC states that the VE series is exactly like their original series in every way except for the non-volatile ram. Really? We re-added the PS2 keyboard connectors and it would work? The answer is YES! If you re-solder some PS2 keyboard connectors onto your I-PAC VE it works (Note: I only had one PC where it wouldn't power itself on with the PS2 mod. 8 other PC's I tried it with worked flawlessly)
Enclosure used for my new dance pad controller:
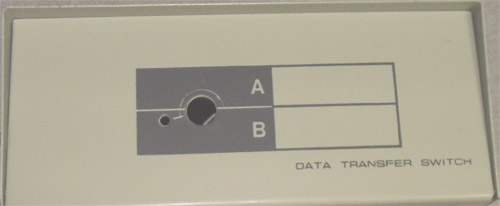
The next order of business is an enclosure to put everything together. It so happens in our inventory there is an ancient KVM switch that was purely mechanical. These types of KVM switches were stupidly dangerous! In respect that switching with a mechanical switch could blow up video cards and keyboards, which is why I never used the thing! So if I ripped it apart I wouldn't feel overly bad about it. 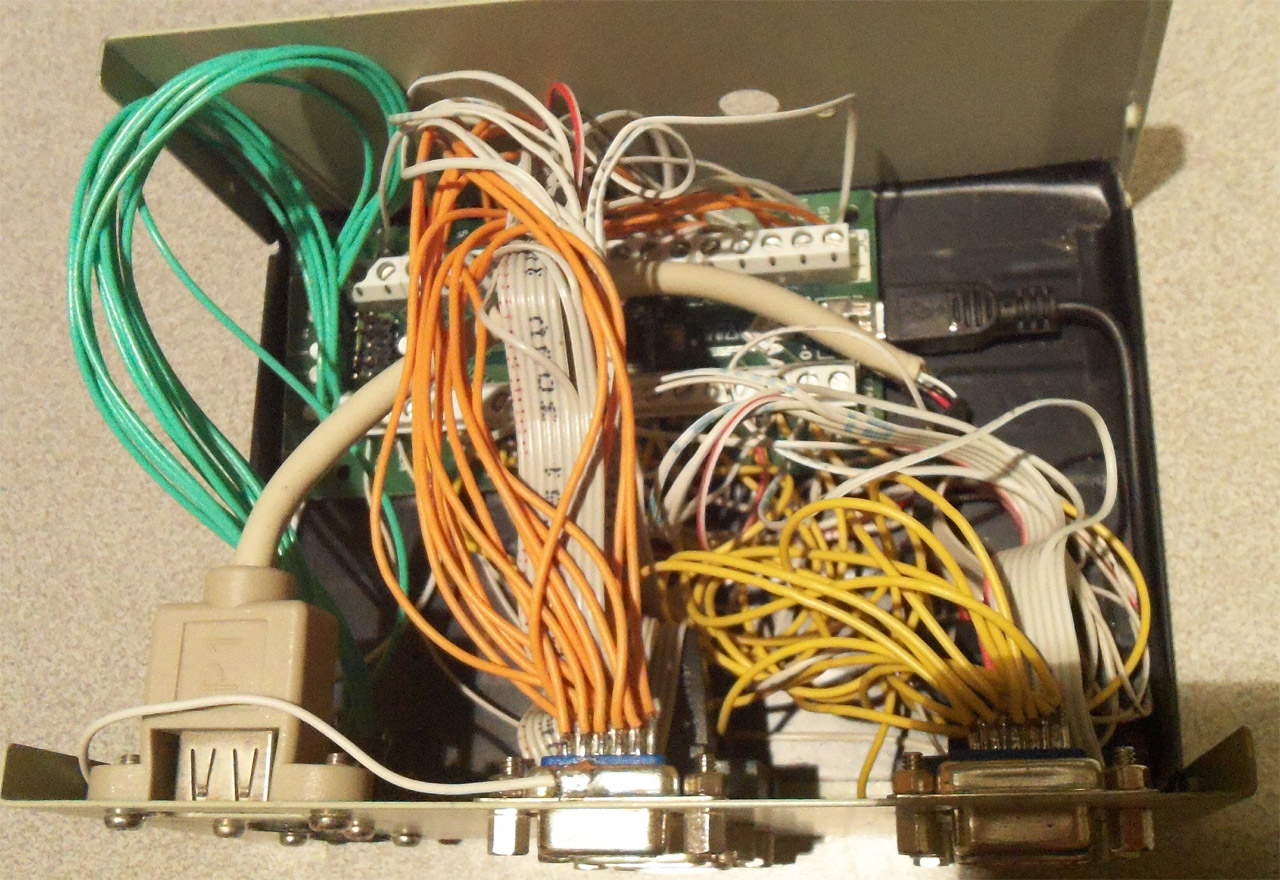
It's wiring time!
After about an hour of stripping wire and plugging everything in. We now Have my I-PAC VE controller inside of this KVM switch. The whole bottom is lined with electrical tape so that the I-PAC cannot ground out and then added some Velcro tape to the base and the board so the I-PAC wouldn't move around at all. As you can see, the green wires are soldered right onto the I-PAC VE board (Just to let you know this will totally void your warranty with Ultimarc!) where's the Orange (Player 1 PAD) and Yellow (Player 2 PAD) are plugged into the sockets onto the I-PAC itself. Now you'll probably notice a few more connectors going on here.
4 DB9 Male connectors were added. Why you may ask? Well, out of the sake of it being multi-functional I decided to mod this into almost a 4-player C=64 joystick adapter (Which is useful for Amiga Emulation when playing DynaBlasters). and made the holes that used to be for keyboards only with a Dremmel. The DB-9 connectors also serve as a selection box in the event I want to set one up. Instead, it pressing those tiny buttons on the Cobalt Flux you can simply hit a plunger.
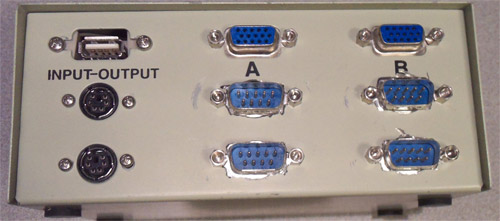
It receives its data and power from the USB connector in the upper left (using a male to male A connector just to be obnoxious ) OR I can hook up via the PS/2 connectors and get data and power that way. Where it's marked "A" is the player 1 port for DDR. Below it would be DB9 Player 1 and 2 Where it's marked "B" is the player 2 port for the DDR. Below would be DB9 Player 3 and 4 I found this configuration gives maximum usage out of the hardware as well as makes it easy to make MAME joysticks in the future. People were concerned if the length of the DB-15 connector would be a problem with the I-PAC. Actually, the signal strength is -really- good even routing around a dance pad which on top of the 6 foot of VGA cable there are another 6-10 feet of wire inside.
Here is the pin-out system used in this setup in case anyone wants to replicate it. All of the DB15 connectors are Part "A" and the DB9s are either Port "1" or "2"
I-Pac wiring pin-outs on the back of my enclosure:
| Input | Preset Key | DB15 - DDR | DB9 - C64 |
|---|---|---|---|
| 1B | Enter | N/C | 2 Pin5 |
| 1A | P | N/C | 2 Pin9 |
| 1Coin | 5 | A Pin12 | 2 Pin7 |
| 1Start | 1 | A Pin11 | 1 Pin7 |
| 1SW8 | V | A Pin15 | 2 Pin6 |
| 1SW7 | C | A Pin14 | 2 Pin2 |
| 1SW6 | X | A Pin7 | 2 Pin1 |
| 1SW5 | Z | A Pin6 | 2 Pin3 |
| 1SW4 | L-Shift | A Pin13 | 2 Pin4 |
| 1SW3 | Space | A Pin8 | 1 Pin5 |
| 1SW2 | L-Alt | A Pin9 | 1 Pin9 |
| 1SW1 | L-Ctrl | A Pin10 | 1 Pin6 |
| 1Down | D Arrow | A Pin3 | 1 Pin2 |
| 1Up | U Arrow | A Pin2 | 1 Pin1 |
| 1Left | L Arrow | A Pin4 | 1 Pin3 |
| 1Right | R Arrow | A Pin5 | 1 Pin4 |
| GND | GND | A Pin1 | 1&2 Pin8 |
For The other column it's pretty much a mirror of the first, DB15 is port "B" and DB9 connectors are ports "3" and "4"
| Input | Preset Key | DB15-DDR | DB9-C64 |
|---|---|---|---|
| 2B | Enter | N/C | 4 Pin5 |
| 2A | P | N/C | 4 Pin9 |
| 2Coin | 5 | B Pin12 | 4 Pin7 |
| 2Start | 1 | B Pin11 | 3 Pin7 |
| 2SW8 | V | B Pin15 | 4 Pin6 |
| 2SW7 | C | B Pin14 | 4 Pin2 |
| 2SW6 | X | B Pin7 | 4 Pin1 |
| 2SW5 | Z | B Pin6 | 4 Pin3 |
| 2SW4 | L-Shift | B Pin13 | 4 Pin4 |
| 2SW3 | Space | B Pin8 | 3 Pin5 |
| 2SW2 | L-Alt | B Pin9 | 3 Pin9 |
| 2SW1 | L-Ctrl | B Pin10 | 3 Pin6 |
| 2Down | D Arrow | B Pin3 | 3 Pin2 |
| 2Up | U Arrow | B Pin2 | 3 Pin1 |
| 2Left | L Arrow | B Pin4 | 3 Pin3 |
| 2Right | R Arrow | B Pin5 | 3 Pin4 |
| GND | GND | B Pin1 | 3&4 Pin8 |
DB9 Connector for C=64/Amiga/Atari joysticks:
Explanation of the way I wired DB9
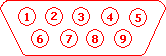 This is the pinouts for a DB9 Facing you.
| Pin Number | Action |
|---|---|
| 1 | Forward |
| 2 | Back |
| 3 | Left |
| 4 | Right |
| 5 | Button3 / Pot-Y |
| 6 | Button1 |
| 7 | 5vdc |
| 8 | GND |
| 9 | Button 2 / Pot-X |
It is noted that Pin 7 is usually +5v power, and thus you shouldn't wire a MAME or DDR pads to ever go to Pin7 Just in case you DO hook it up to a retro PC. The only reason why I hook to Pin7 is to get an extra button out of it for my 4 player setup for (start, select) buttons. However, If I wanted to hook up a retro joystick such as an atari or an amiga joystick, pin7 is harmless. Also, Sega Genesis joysticks will have limited usage of its buttons because they used a shift register circuitry to sort of 'MUX' more buttons down one line.
Cobalt Flux DB15 pin-out:
 DB15 female connector used on the Cobalt Flux
| Pin Number | Action | PS2 Action |
|---|---|---|
| 15 | N/C | Right Rear Button2 |
| 14 | N/C | Left Rear Button 2 |
| 13 | N/C | Right Rear Button 1 |
| 12 | Select | Select |
| 11 | Start | Start |
| 10 | Center | L-Analog Stick |
| 09 | Down-Right | Square Button |
| 08 | Down-Left | Triangle Button |
| 07 | Up-Right | Circle Button |
| 06 | Up-Left | X Button |
| 05 | Right | D-Pad Right |
| 04 | Left | D-Pad Left |
| 03 | Down | D-Pad Down |
| 02 | Up | D-Pad Up |
| 01 | GND | GND |
In this wiring I added pins 13-15 to the wiring system, Allowing us to hook up MAME style joysticks if we so desire for fighting arcade games or whatever else I want. Also, Note that R-Analog and L-Analog only reflect the buttons when you push down on the analog stick. the I-PAC controller is not capable of reading analog signals.
Also when using this setup you will need some FULL VGA cables with all of the pins going from one side to the other. if the cable looks thin then chances are all of the ground pins are wired together in a VGA analog setup which case that will not work! To test this always perform a continuity check with your voltmeter.
6-Button China HardPad DB15 pin-out:
 The exact name that china originally sold these under is "tournament hard pad dance" Since we had one of these in our possession at one point we did find the old pin-out paperwork for those who still have one of these in an operational state.
| Pin Number | Action |
|---|---|
| 15 | Up left |
| 14 | Up Right |
| 13 | N/C |
| 12 | N/C |
| 11 | N/C |
| 10 | Right |
| 9 | Left |
| 8 | Down |
| 7 | Up |
| 6 | N/C |
| 5 | Ground |
| 4 | N/C |
| 3 | N/C |
| 2 | N/C |
| 1 | N/C |
8-Button China HardPad DB15 Pinout.
 This pad was a little rare to find as there wasn't much use for an 8-button DDR hard pad. Since there was no center button you couldn't even activate the center button for Pump-It-Up like the Cobalt flux pads could.
| Pin Number | Action |
|---|---|
| 15 | Ground |
| 14 | Up |
| 13 | Down |
| 12 | Left |
| 11 | Right |
| 10 | N/C |
| 9 | Down-Left |
| 8 | N/C |
| 7 | N/C |
| 6 | N/C |
| 5 | Down-Right |
| 4 | Up-Right |
| 3 | Ground |
| 2 | Up-Left |
| 1 | N/C |
Note: Ground appears twice because for reasons beyond explanation pins 2 and 4 go to ground pin 3 and everything else goes to ground pin 15.
Update 3/12/2013
We just got some e-mails about the design of the Cobalt Flux and how there were actually two versions of my pad that were released. Version 1 Cobalt Flux pads supported a DB9 connector going to the controller and apparently only had 6 buttons (up, down, left, right,upper-left-corner, upper-right-corner) we, unfortunately, do not have any info on how the DB9 connectors are set up on the Version 1 model of the Cobalt Flux pads. It most certainly does not follow the design mentioned in my document and the ground pin may be on pin 1 rather than pin 8 like how it is on Atari/C=64/Amiga joystick configurations.
Reading through a lot of old DDR forums it appears a lot of the first generation Cobalt Flux V1 control boxes had a tendency of failing. Although the pad itself is perfectly fine either the wiring harness or control box simply stopped working on their Playstation 2. Since I do not know the pin-outs my best suggestion is to grab a voltmeter and find the ground pin (If it is anything like the version 2 Cobalt Flux ground pin will be pin 1) map out your buttons and arrows and simply adjust your DB9 connectors accordingly to a new control box such as an I-PAC series controller. If anyone has the pin-outs for the generation 1 cobalt flux pads which have a DB9 connector on them please contact me or reply to this blog and we'll be sure to put it up for everyone to see.
Final thoughts.
I can't complain really! My StepMania now runs flawlessly with response times (Just wish I could say that about my dancing skill!) On a side note, we are able to test out all of my C=64 joysticks which we actually found out some of the copper wirings had failed on a lot of my 15+-year-old sticks which I was able to see using the I-PAC diagnostics tool. The I-PAC controller is pricey. And with adapters for game consoles, it can make it even more pricey (Almost $100 for just controller action). To us, the I-PAC is well worth it because if it's solder-less connectors and rock-solid diagnostics software. You could even spend a little more money to get past the 'I-PAC-ve' series and pre-program your keystrokes so you don't have to reconfigure your keyboard commands in StepMania. WE do hope you have fun keeping alive your old gear and until then. END OF LINE+++
Hello there! I simply would like to give you a big thumbs up for your excellent info you have got here on this post. I will be coming back to your site for more soon.
What a tremendous research!
Now I am working on it with DDR USB mat and Raspberry pi Stepmania.
I have two kinds of mats. One of them is the same as yours the cheap one and the other is pump mat.
Firstly, I have to connect the lines from the mat to the joystick encoder.
Could you give me an advice, please?
kind regards,
Clara
When it comes to all of the different hardpads and even softpads out there. the key is finding out what is your ground/common pin.. it will be something that all of your buttons on your DDR mat will share.. and with the mat unplugged from your computer using a multi-meter.. If you take apart two of the pads on your hard-mat and you get positive continuity between one side of your pad. That is Ground/Common. Then, you find that pin that all of your pads share..
As for soft-pads. it's a little more difficult as many of them are stitched together resulting in only being able to access the PCB board area.. But it's still possible to find ground/common with that multi-meter and from there re-wire your pads.
Good luck on the Raspberry Pi Stepmania build. the last we checked that repo it's playable but there was some sound issues.
I just got some arcade ddr pads. I'm going to give it a go at hooking them up to a pc. Wish me luck.
That's awesome what you did there.
I am just wondering where you got the KVM switch. I haven't been able to find a 2-computer KVM switch like that anywhere that supports VGA AND PS/2!
Lol! Thanks!
I found it at some swap meet a long time ago for a few bucks. They also pop up Ebay from time to time for around 5-8 bucks which is a lot better then paying for all of the DB15 and PS/2 connectors individually. Just do a search for "4 port kvm switch ps/2". Since the beige ones are old (mid 90's) it may take a while for someone to put one up there.